

|
RDL Homepage |
Table of Contents |
Document Information |
Download Instructions |
15. The squad leader and assault fire team move to the entrance of the next room to be cleared and position themselves on either side of the entrance. The squad enters and clears all subsequent rooms by repeating the actions discussed in paragraphs 8 through 12.
16. The squad leader directs the team to continue and clear the next room. The squad leader rotates fire teams as necessary to keep the soldiers alert, to equitably distribute the dangerous duties, and to continue the momentum of the attack.
17. The squad leader follows the fire team that is clearing to ensure that cleared rooms are properly marked in accordance with the platoon SOP.
18. The squad leader assesses the situation to determine if he can continue clearing the building. He reports the situation to the platoon leader. The platoon follows the success of the entry into the building.
19. The squad consolidates its position in the building and then reorganizes as necessary. Leaders redistribute ammunition.
| NOTE: | Normally the platoons will suppress enemy in buildings with the BFVs. |
20. The platoon leader moves into the building with the trail fire team of the squad that entered the building and directs the squad to continue to clear the building or calls for the other squad to move into the building and begin clearing rooms systematically. The platoon clears the building by repeating the actions discussed in paragraphs 8 through 12 to clear all subsequent rooms.
21. The platoon leader rotates squads as necessary to keep his men fresh and to maintain the momentum of the action.
22. The base-of-fire element:
a. Repositions, if necessary, to continue to isolate and suppress the building from the outside.
b. Ensures that all friendly forces enter the building only through the designated entry point.
23. The platoon sergeant calls forward ammunition resupply and organizes teams to move it forward into the building.
24. The platoon leader reports to the company commander that his platoon has cleared the building or that he is no longer able to continue clearing.
BATTLE DRILL 6. ENTER/CLEAR A TRENCH (PLATOON)
SITUATION: The platoon is attacking as part of a larger force and identifies enemy in a trench line. The platoon deploys and establishes a base of fire. The platoon leader determines that he has sufficient combat power to maneuver and assault the trench line.
REQUIRED ACTIONS: (Figures 3-12, 3-13, and 3-14.)
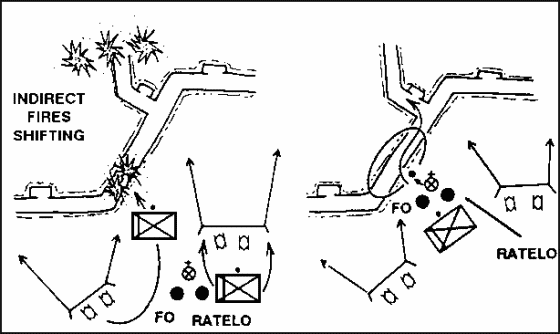
Figure 3-12. Clear a Trench Line (platoon).
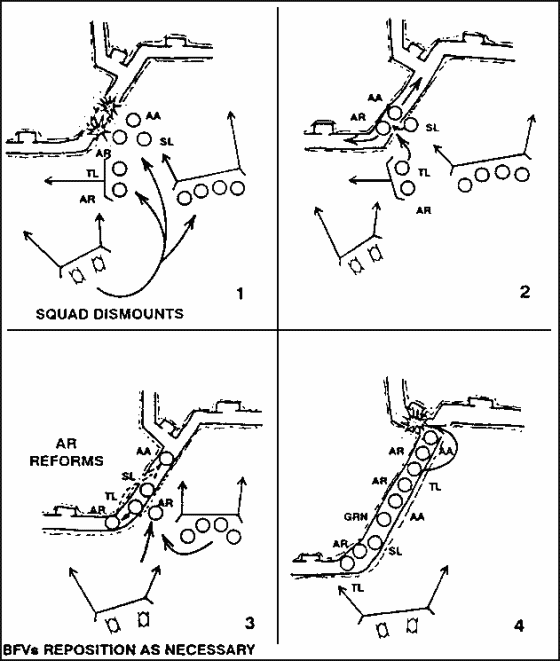
Figure 3-13. Enter a Trench Line (squad).
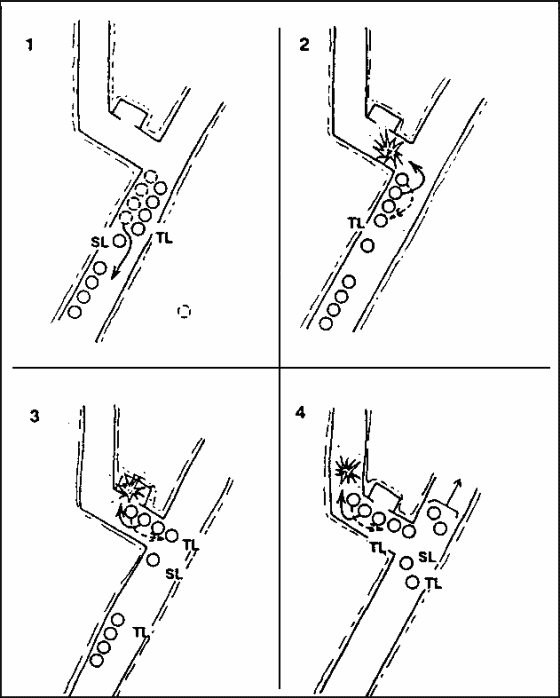
Figure 3-14. Clear a Trench Line (squad).
1. The platoon leader directs one squad to enter the trench and secure a foothold.
2. The platoon leader designates the entry point of the trench line and the direction of movement once the platoon begins clearing.
3. The platoon sergeant positions BFVs to suppress the trench and isolate the entry point.
4. The assaulting squad executes actions to enter the trench and establish a foothold. The squad leader directs one fire team to assault and one fire team to support by fire initially, then follow and support the assaulting fire team. He designates the entry point of the trench line.
a. The squad leader and the assault fire team move to the last covered and concealed position short of the entry point.
(1) The squad leader marks the entry point.
(2) The base-of-fire element (BFVs and one squad) shifts direct fires away from the entry point and continues to suppress adjacent enemy positions or isolate the trench as required.
(3) The assault fire team leader and the automatic rifleman remain in a position short of the trench to add suppressive fires for the initial entry.
(4) The squad leader takes the two remaining soldiers of the assault fire team (antiarmor specialist and automatic rifleman) and continues toward the entry point. They move in rushes or by crawling.
(5) The squad leader positions himself where he can best control his teams.
b. The first two soldiers (antiarmor specialist and automatic rifleman) of the assault fire team move to the edge of the trench; parallel to the trench and on their backs; on the squad leader's command, cook-off grenades (two seconds maximum), shout FRAG OUT, and throw the grenades into the trench.
(1) After ensuring that both grenades detonate, the soldiers roll into the trench, landing on their feet, and back-to-back. They fire their weapons down the trench in opposite directions. Immediately, both soldiers move in opposite directions down the trench, continuing to fire three-round bursts. Each soldier continues until he reaches the first corner or intersection. Both soldiers halt and take up positions to block any enemy movement toward the entry point.
(2) At the same time, the squad leader rolls into the trench and secures the entry point.
(3) Upon detonation of the grenades, the assault fire team leader and the automatic rifleman immediately move to the entry point and enter the trench. The squad leader directs them to one of the secured corners or intersections to relieve the antiarmor specialist or automatic rifleman who then rejoins his buddy team at the opposite end of the foothold.
c. The squad leader remains at the entry point and marks it.
d. The squad leader reports to the platoon leader that he has entered the trench and secured a foothold. The platoon follows the success of the seizure of the foothold with the remainder of the platoon as part of the platoon actions to clear a trench line.
e. The squad reorganizes as necessary. Leaders redistribute ammunition.
5. The platoon leader directs the squad that is a part of the base-of-fire element to move into the trench and begin clearing it in the direction of movement from the foothold.
6. The base-of-fire element repositions as necessary to continue suppressive fires.
7. The platoon leader moves into the trench with the assaulting squad.
8. The assaulting squad passes the squad that has secured the foothold and executes actions to take the lead and clear the trench.
a. The squad leader designates a lead fire team and a trail fire team.
b. The lead fire team and the squad leader move to the forward-most secure corner or intersection. The squad leader tells the team securing that corner or intersection that his squad is ready to continue clearing the trench. The trail fire team follows maintaining visual contact with the last soldier of the lead team.
| NOTE: | Throughout this technique, the team leader positions himself at the rear of the fire team to have direct control (physically, if necessary) of his soldiers. Other soldiers in the fire team rotate the lead. Soldiers rotate the lead to change magazines and prepare grenades. Rotating the lead provides constant suppressive fires down the trench and maintains the momentum of the attack as the squad clears the trench. |
c. The lead fire team passes the element securing the foothold.
(1) The lead soldier of the fire team moves abreast of the soldier securing the corner or intersection, taps him, and announces TAKING THE LEAD.
(2) The soldier securing the corner or intersection acknowledges that he is handing over the lead by shouting OKAY. He allows the fire team to pass him.
d. The lead fire team starts clearing in the direction of movement. They arrive at a corner or intersection.
(1) Allowing for cook-off (two seconds maximum) and shouting FRAG OUT, the second soldier prepares and throws a grenade around the corner.
(2) Upon detonation of the grenade, the lead soldier moves around the corner firing three-round bursts and advancing as he fires. The entire fire team follows him to the next corner or intersection.
e. The squad leader:
(1) Follows immediately behind the lead team.
(2) Ensures that the trailing fire team moves up and is ready to pass the lead at his direction.
(3) Rotates fire teams as necessary to keep his soldiers alert and to maintain the momentum of the attack.
(4) Requests indirect fires, if necessary, through the platoon leader. (The squad leader also directs the employment of the M203 to provide immediate suppression against positions along the trench line.)
DANGER THE FIRE TEAMS MUST MAINTAIN SUFFICIENT INTERVALS TO PREVENT THEM FROM BEING ENGAGED BY THE SAME ENEMY FIRES. |
f. At each corner or intersection, the lead fire team performs the same actions described above (paragraph d).
g. If the lead soldier finds that he is nearly out of ammunition before reaching a corner or intersection, he announces AMMO.
(1) Immediately, the lead soldier stops and moves against one side of the trench, ready to let the rest of the team pass. He continues to aim his weapon down the trench in the direction of movement.
(2) The next soldier ensures that he has a full magazine, moves up abreast of the lead soldier, taps him and announces TAKING THE LEAD.
(3) The lead soldier acknowledges that he is handing over the lead by shouting OKAY, positions rotate, and the squad continues forward.
h. The trailing fire team secures intersections and marks the route within the trench as the squad moves forward. The trailing fire team leader ensures that follow-on squads relieve his buddy teams to maintain security.
i. The squad leader reports the progress of the clearing operation. (The base-of-fire element must be able to identify the location of the lead fire team in the trench at all times.)
9. The platoon leader rotates squads to keep soldiers alert and to maintain the momentum of the assault.
10. The platoon sergeant calls forward ammunition resupply and organizes teams to move it forward into the trench.
11. The base-of-fire element ensures that all friendly forces move into the trench ONLY through the designated entry point. (All movement must be made in the trench to avoid fratricide.)
12. The platoon leader reports to the company commander that the trench line is secured, or that he is no longer able to continue clearing.
BATTLE DRILL 7. KNOCK OUT BUNKERS (PLATOON)
SITUATION: The platoon receives fire from enemy in bunkers while moving (mounted or dismounted) as a part of a larger force and dismounted element is required to clear the bunkers.
REQUIRED ACTIONS: (Figures 3-15 and 3-16.)
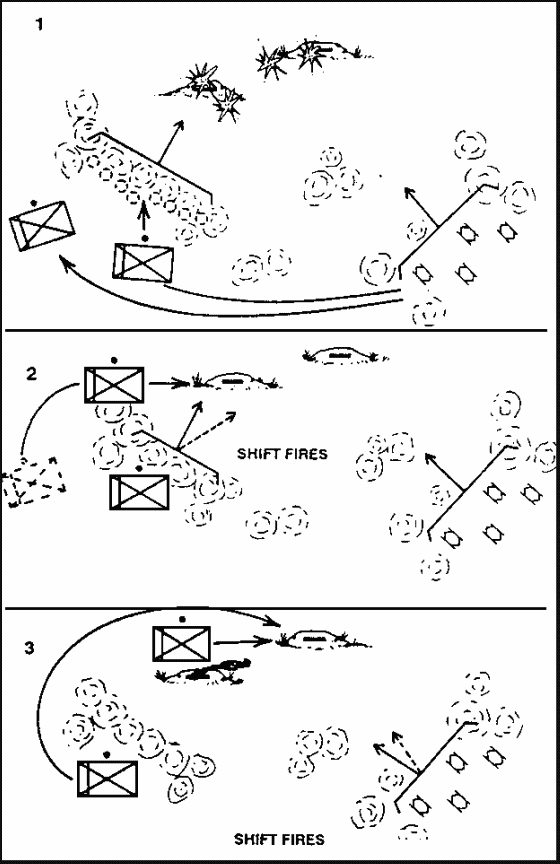
Figure 3-15. Knock out Bunkers (platoon).

Figure 3-16. Knock out Bunkers (squad).
1. The section or squad in contact reacts to contact.
2. The platoon gains suppressive fires.
a. The section or squad in contact establishes a base of fire.
b. If mounted, the squad dismounts, establishes local security, and adds its suppressive fires against the enemy. The platoon leader, his RATELO, and platoon FO, dismount and if not the lead section, move forward with the other squad leader and link up with the squad leader of the lead squad. If dismounted, the platoon leader, his RATELO, platoon FO, and the squad leader of the other squad move forward to link up with the lead squad leader.
c. The platoon sergeant repositions the mounted element, if necessary, to provide additional observation and base of fire.
d. The base-of-fire element (the BFVs and the squad in contact):
(1) Destroys or suppresses enemy crew-served weapons first.
(2) Obscures the enemy position with smoke (M203).
(3) Sustains suppressive fires.
e. The platoon FO calls for and adjusts indirect fires as directed by the platoon leader.
3. The platoon leader determines that he can maneuver by identifying:
a. The enemy bunkers, other supporting positions, and any obstacles.
b. The size of the enemy force engaging the platoon. (The number of enemy automatic weapons, the presence of any vehicles, and the employment of indirect fires are indicators of enemy strength.)
c. A vulnerable flank of at least one bunker.
d. A covered and concealed flanking route to the flank of the bunker.
4. The platoon leader determines which bunker is to be assaulted first and directs the squad not in contact to knock it out.
a. The platoon FO shifts indirect fires to isolate enemy positions.
b. On the platoon leader's signal, the base-of-fire element lifts fires or shifts fires to the opposite side of the bunker from which the squad is assaulting.
5. The assaulting squad, with the platoon leader and his RATELO, move along the covered and concealed route and take action to knock out the bunker.
a. The squad leader moves with the assaulting fire team along the covered and concealed route to the flank of the bunker.
(1) The assaulting fire team approaches the bunker from its blind side and does not mask the fires of the base-of-fire element.
(2) Soldiers constantly watch for other bunkers or enemy positions in support of it.
b. Upon reaching the last covered and concealed position:
(1) The fire team leader and the automatic rifleman remain in place and add their fires to suppressing the bunker (includes the use of LAW or AT4s).
(2) The squad leader positions himself where he can best control his teams. On the squad leader's signal, the base-of- fire element lifts fires or shifts fires to the opposite side of the bunker from the assaulting fire team's approach.
(3) The squad leader continues forward with the automatic rifleman and antiarmor specialist to the blind side of the bunker. One soldier takes up a covered position near the exit, while one soldier cooks off (two seconds maximum) a grenade, shouts FRAG OUT, and throws it through an aperture.
(4) After the grenade detonates, the soldier covering the exit enters the bunker, firing short bursts, to destroy the enemy. The soldier who throws the grenade should not be the first one to clear the bunker.
c. The squad leader inspects the bunker to ensure that it has been destroyed. He reports, reorganizes as needed, and continues the mission. The platoon follows the success of the attack against the bunker and continues the attack of other bunkers.
6. The platoon leader repositions the base-of-fire element as necessary to continue to isolate and suppress the remaining bunkers and to maintain suppressive fires.
7. The platoon leader either redesignates the squad that is part of the base-of-fire to move up and knock out the next bunker, or he directs the assaulting squad to continue and knock out the next bunker.
| NOTE: | The platoon leader must consider the condition of his assaulting squad (ammunition and exhaustion) and rotate squads as necessary. |
8. The assaulting squad takes action to knock out the next bunker (see paragraph 5).
9. The platoon leader reports, reorganizes as necessary, and continues the mission. The company follows up the success of the platoon attack and continues to assault enemy positions.
BATTLE DRILL 8. CONDUCT INITIAL BREACH OF A MINED WIRE OBSTACLE (PLATOON)
SITUATION: The platoon is operating as part of a larger force (mounted or dismounted). The lead section or squad identifies a wire obstacle, reinforced with mines, that cannot be bypassed. The enemy begins to engage the platoon from positions on the far side of the obstacle.
REQUIRED ACTIONS: (Figure 3-17.)
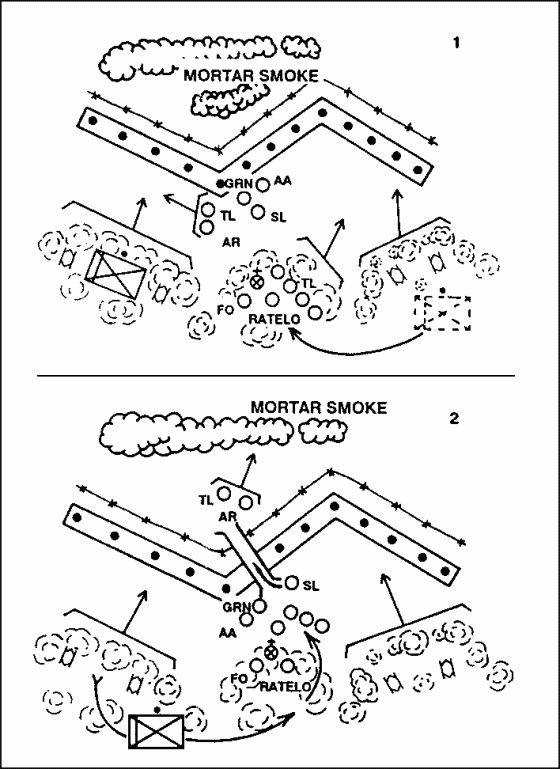
Figure 3-17. Conduct Initial Breach of a Mined Wire Obstacle (platoon).
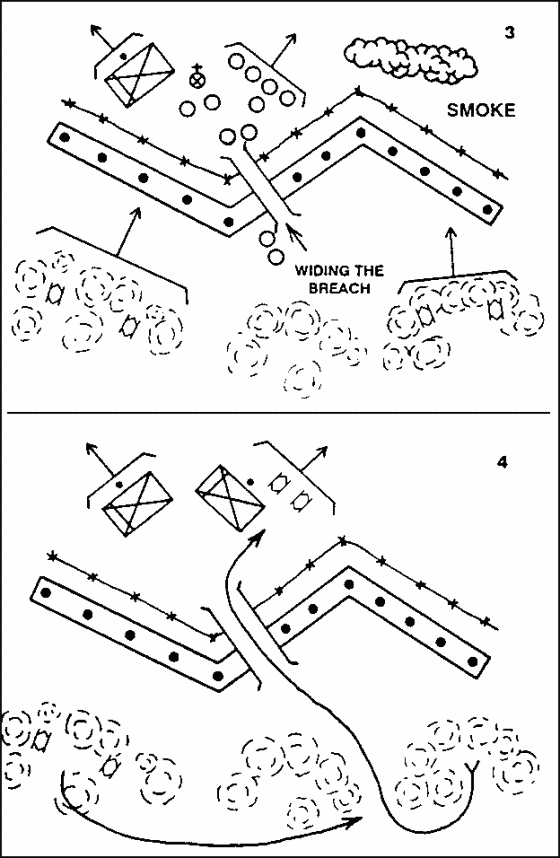
Figure 3-17. Conduct Initial Breach of a Mined Wire Obstacle (platoon) (continued).
1. The section/squad in contact reacts to contact.
2. The platoon gains suppressive fires. The section/squad in contact establishes a base-of-fire position. The platoon leader, his RATELO, platoon FO, and the squad leader of the other squad move forward to link up with the squad leader of the squad in contact.
3. The platoon sergeant repositions the BFVs, if necessary, to provide additional observation and supporting fires.
4. The platoon leader determines that he can maneuver by identifying:
a. The obstacle and enemy positions covering it by fire.
b. The size of the enemy force engaging the section or squad. (The number of enemy automatic weapons, the presence of any vehicles, and the employment of indirect fires are indicators of enemy strength.)
c. A breach point.
d. A covered and concealed route to the breach point.
5. The platoon leader directs the BFVs and the lead squad to support the movement of the other squad to the breach point. He indicates the enemy positions to be suppressed, and the route that the rest of the platoon will take to the breach point. He also gives instructions for lifting and shifting fires.
6. On the platoon leader's signal, the base-of-fire element:
a. Destroys or suppresses enemy crew-served weapons.
b. Obscures the enemy position with smoke (M203).
c. Sustains suppressive fires at the lowest level possible.
7. The platoon leader then directs the squad leader to designate the breach point and lead the breach squad along the covered and concealed route to the breach point.
8. The platoon FO calls for and adjusts indirect fires as directed by the platoon leader.
9. The breach squad executes actions to breach the obstacle (footpath).
a. The squad leader directs one fire team to support the movement of the other fire team to the breach point.
b. The squad leader identifies the breach point.
c. The base-of-fire element continues to provide suppressive fires and isolates the breach point.
d. The breaching fire team, with the squad leader, moves to the breach point using the covered and concealed route.
(1) The squad leader and breaching fire team leader employ smoke grenades to obscure the breach point. The platoon base-of- fire element shifts direct fires away from the breach point and continues to suppress key enemy positions. The platoon FO lifts indirect fires or shifts them beyond the obstacle.
(2) The breaching fire team leader positions himself and the automatic rifleman on one flank of the breach point to provide close-in security.
(3) Under the direction of the squad leader, the antiarmor specialist and automatic rifleman of the breaching fire team probe for mines, and cut the wire obstacle, marking their path as they proceed.
(4) Once the obstacle has been breached, the breaching fire team leader and the automatic rifleman move to the far side of the obstacle and take up covered and concealed positions. They signal to the squad leader when they are in position and ready to support.
e. The squad leader signals the base-of-fire team leader to move his fire team up and through the breach. He then moves through the obstacle and joins the breaching fire team leader and the automatic rifleman, leaving the antiarmor specialist and automatic rifleman on the near side of the breach to guide the rest of the squad (and platoon) through.
f. Using the same covered and concealed route as the breaching fire team, the base-of-fire team moves through the breach and takes up covered and concealed positions on the far side.
10. The breach squad leader reports the situation to the platoon leader and posts guides at the breach point.
11. The platoon leader redesignates the base-of-fire squad as the assault squad once the breach has been made. (Normally, it follows the covered and concealed route of the breach squad.)
12. The platoon leader then leads the assault squad along the covered and concealed route through the breach in the obstacle and positions it on the far side to support the movement of the remainder of the platoon or assaults the enemy position covering the obstacle.
13. The breaching squad continues to widen the breach to allow vehicles to pass through.
14. The platoon leader reports the situation to the company commander and directs his breaching squad to move up and through the obstacle. The platoon leader leaves guides to guide the company through the breach point.
15. The platoon sergeant brings the mounted element forward and through the breach on the platoon leader's command.
16. The company follows up the success of the platoon as it conducts the breach and continues the assault against the enemy positions.
A crew drill is a collective action that the crew of a weapon or piece of equipment must perform to successfully use the weapon or equipment in combat or to preserve life. This action is a trained response to a given stimulus such as a simple leader's order or the status of the weapon or equipment. It requires minimal leader orders to accomplish and is standard throughout the Army.
CREW DRILL 1. BAIL OUT (CREW/FIRE TEAM)
SITUATION: The BFV, with a fire team mounted, has received hostile fire requiring the crew and fire team to evacuate the vehicle.
REQUIRED ACTIONS:
1. Bailout procedures for the BFV crew.
a. Bradley commander:
(1) Alerts soldiers by the intercommunications system or by voice command if the intercommunications system does not work. Commands BAIL OUT.
| NOTE: | As soldiers bail out, they should use the BFV for cover from enemy fires. |
(2) Turns the turret power switch to OFF.
(3) Evacuates the vehicle through the BC's hatch.
b. Gunner: Evacuates the vehicle through the hatch.
c. Driver:
(1) Stops the vehicle.
(2) Shuts down the vehicle by pulling out the fuel control handle.
(3) Lowers the ramp.
(4) Disconnects the CVC helmet and unfastens the seat belt.
(5) Secures his weapon.
(6) Turns the master-power switch to OFF.
(7) Evacuates the vehicle through the driver's hatch, if possible. If the driver cannot evacuate through the driver's hatch, he exits through the ramp door.
2. Bailout procedures for the troop compartment and fire team members.
a. Squad leader or fire team leader:
(1) Announces BAIL OUT.
(2) Pulls the quick disconnect to release the CVC helmet or headsets.
(3) Disconnects the seat belt.
(4) Secures his weapon.
(5) Evacuates the vehicle through the ramp or ramp door.
b. Fire team members:
(1) Disconnect the seat belts.
(2) Secure their weapons.
(3) Evacuate the vehicle through the ramp door or the cargo hatch. The fire team member in the No. 4 seat attempts to evacuate through the driver's hatch.
3. Senior man accounts for soldiers and equipment.
CREW DRILL 2. EVACUATE INJURED PERSONNEL FROM A BFV
SITUATION: A crew member or fire team member has been injured.
REQUIRED ACTIONS:
Evacuate BC or Gunner
Evacuation of gunner through the hatch. (If BC is the casualty, the gunner will perform the same actions.)
1. Bradley Commander: Commands EVACUATE THE GUNNER.
2. Driver: Moves to the nearest covered position and halts the vehicle.
3. Bradley Commander:
a. Attempts to rotate the turret to the 6400-mil position.
b. Engages the turret travel lock.
c. Sets the turret drive system switch to OFF.
5. Bradley Commander: Places the gunner in position for removal from the vehicle. Adjusts the seat to the raised position, being careful not to cause further injury. Unfastens the seat belt.
6. Fire Team Members:
a. Place a pistol belt around the gunner's chest and slowly pull the gunner out. Move the gunner to the front edge of the vehicle.
| NOTE: | If the gunner and BC are wearing lightweight jumpsuits, grasp the straps on the back of the suit and pull the gunner or BC out of the vehicle. |
b. Lower the gunner or BC from the vehicle to the two fire team members on the ground.
c. Place the gunner or BC on the ground and administer first aid. If the gunner cannot be evacuated through the hatches, evacuate through the turret shield door.
7. Bradley Commander: Commands EVACUATE THE GUNNER.
8. Driver: Moves to the nearest covered position and halts the vehicle.
9. Bradley Commander:
a. Rotates the turret to the 6400-mil position.
b. Engages the turret travel lock.
c. Sets the turret drive system switch to OFF.
d. Places the gunner in position for removal from the vehicle, without causing further injury.
10. No. 4 Fire Team Member:
a. Opens the turret shield door, grasps the gunner under the armpits, and pulls him out of the turret.
b. Carries the gunner to a flat surface and administers first aid.
Evacuate Driver
11. Bradley Commander: Commands EVACUATE THE DRIVER.
| NOTE: | If the driver is unable to halt the vehicle, a fire team member must move forward, behind the driver's seat, and pull the fuel shutoff handle to stop the engine. |
12. Gunner:
a. Ensures the turret exposes the driver's hatch.
b. Engages the turret travel lock.
c. Sets the turret drive system switch to the OFF position.
13. Bradley Commander:
a. Exits the vehicle.
b. Releases the trim vane.
| NOTE: | The M2A2 BFV does not have a trim vane attached to the vehicle's front slope. The BC must determine the urgency to evacuate the driver and treat the driver's wounds before deciding to install the work platform. |
14. Fire Team Members:
a. Move forward behind the driver and lowers the backrest of the driver's seat, using the backrest release handle on the right side just beneath the backrest, lowers the driver's seat backrest.
b. Assist the BC in removing the driver from the vehicle.
15. Bradley Commander:
a. Opens the driver's hatch.
| NOTES: | 1. | If the driver's hatch is damaged and will not open, the fire team member pulls the driver back into the troop compartment. |
| 2. | The BC's duties can be performed by the gunner. |
b. Disconnects the CVC helmet and the safety belt.
c. Crosses the driver's arms over his chest. (If this is not possible, wraps a belt around the driver's chest to raise him.)
d. Pulls the driver out of the vehicle and hands him to the fire team member on the ground.
16. Fire Team Members:
a. Assist the BC in pulling the driver from the vehicle.
b. Two fire team members dismount to the left front of the vehicle to assist by taking the driver from the BC. They lay him on the ground and administer first aid.
c. One fire team member remains in the vehicle and assists in the removal of the driver by untangling his legs as necessary.
Evacuate Fire Team Member
17. Fire Team Leader: Informs the BC that a fire team member is injured.
18. Bradley Commander: Commands EVACUATE FIRE TEAM MEMBER.
19. Driver: Moves to the nearest covered position, halts the vehicle, and lowers the ramp.
NOTE: |
Depending on which fire team member is injured, the fire team leader designates which member will assist in evacuating the casualty. If the fire team leader is injured, then the next senior man in the fire team takes charge. |
20. Fire Team Members: Two fire team members remove the injured member, lay him on the ground, and perform first aid, as needed.
CREW DRILL 3. EXTINGUISH A FIRE (CREW)
SITUATION: Upon automatic or manual discharge of the fire suppression system. The BFV crew and fire team are mounted. The BC alerts personnel of a fire.
REQUIRED ACTIONS:
1. Extinguish a fire in the engine compartment.
a. Bradley Commander:
(1) Alerts the soldiers of an engine compartment fire by the intercommunications system or by voice command if the intercommunications system does not work. Commands, FIRE, ENGINE COMPARTMENT. Rotates the turret to 6400 mils.
FAILURE TO PLACE THE TURRET AT 6400 MILS MAY PREVENT THE CARGO HATCH FROM FULLY OPENING. IF THE RAMP OR RAMP ACCESS DOOR FAILS, SOLDIERS COULD BE TRAPPED INSIDE THE TROOP COMPARTMENT. |
(2) Turns the turret power switch to OFF.
b. Driver:
(1) Stops the vehicle.
(2) Shuts down the engine by pulling out the fuel control handle.
(3) Discharges the Halon bottle by rotating the release valve inside the driver's compartment if it has not been automatically discharged.
(4) Lowers the ramp (TM 9-2350-252-10-1 or TM 9-2350-284-10-1).
(5) Turns the master power switch to OFF.
(6) Disconnects the CVC helmet and unfastens the seat belt.
(7) Secures his weapon.
(8) Evacuates the vehicle through the driver's hatch, if possible. If the driver is unable to evacuate through the driver's hatch, he exits through the ramp.
c. Fire Team Members:
(1) Disconnect the seat belts.
(2) Squad leader or fire team leader pulls the quick disconnect to release the CVC helmets or headsets.
(3) Secure their weapons.
(4) The fire team members in the No. 5 and 9 seats secure the rear portable fire extinguishers.
(5) Evacuates the vehicle through the ramp.
d. Bradley Commander: Evacuates the vehicle through the BC's hatch.
e. Gunner: Evacuates the vehicle through the gunner's hatch.
| NOTE: | If the fire is not extinguished, the portable fire extinguishers must be used. |
2. Extinguish a fire in the troop compartment.
a. Squad Leader or Fire Team Leader: Alerts the BC of a troop compartment fire by intercommunications system or by voice command if the intercommunications system does not work. Announces "FIRE, TROOP COMPARTMENT."
b. Bradley Commander: Turns the turret power to OFF, and evacuates the vehicle through the BC's hatch.
c. Gunner: Evacuates the vehicle through the gunner's hatch.
d. Driver:
(1) Stops the engine.
(2) Shuts down the vehicle and pulls out the fuel control handle.
(3) Lowers the ramp.
(4) Turns the master power switch to OFF.
(5) Pulls the quick disconnect to release the CVC helmet and seat belt.
(6) Unfastens his seat belt.
(7) Secures his weapon.
(8) Evacuates the vehicle through the driver's hatch.
e. Fire Team Members:
(1) Unfasten the seat belts.
(2) The squad or fire team leader pulls the quick disconnect to release the CVC helmets and headsets.
(3) Secures their weapons.
(4) The fire team members in the No. 5 and 9 seats secure the portable fire extinguishers.
(5) Evacuate the vehicle through the ramp.
(6) The fire team member in the No. 9 seat pulls the handle to activate the troop-area fire extinguishers from the outside.
| NOTE: | If the fire is not extinguished, the portable fire extinguishers are used. |
CREW DRILL 4. DISMOUNT THE VEHICLE (PLATOON/SQUAD)
SITUATION: The platoon/squad is mounted and must dismount. The platoon leader orders the platoon/section to prepare to dismount.
REQUIRED ACTIONS: (Figure 3-18.)
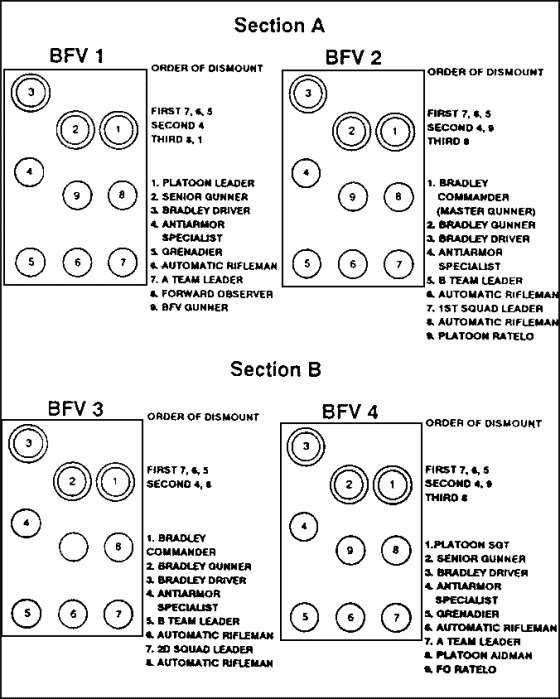
Figure 3-18. BFV Order of Dismount.
1. The platoon leader selects the dismount point.
2. The platoon leader orders personnel to dismount.
a. Gives the warning PREPARE TO DISMOUNT.
b. Designates dismounted platoon's weapons composition; for example, "No Dragons" or "Heavy on AT4s."
c. Gives dismount instructions for each vehicle; for example, "Right" (left), distance "Fifty meters," and any identifying terrain feature "Backside of hill."
3. Squad/team leader(s) monitors commands and dismount. He then alerts the soldiers in the troop compartment.
4. The drivers move the vehicles to the designated dismount point and orient the front of the vehicle toward the enemy.
5. The gunners orient the turret to provide overwatching support and supporting fire, if necessary.
6. The platoon leader gives the command DISMOUNT.
7. Fire team members take the M231 FPWs out of the ramp and secure them in the vehicle.
8. The drivers stop the vehicle and lower the ramp or the BC orders the ramp access door opened.
9. The fire team member's dismount in the specified order and then move to covered and concealed positions (about 5 meters apart). The fire team then links up with the squads and continues with the rest of the mission. The squad leader establishes contact with the platoon leader.
10. The mounted element occupies covered positions and overwatches the dismounted element with the appropriate weapon.
11. Platoon/squad leader reports to higher headquarters.
12. All squad members search for enemy positions and respond to orders.
13. Squad and fire team leaders position or reposition squad members (if needed).
14. Section leaders reposition the vehicles, as required.
CREW DRILL 5. MOUNT THE VEHICLE (PLATOON/SECTION)
SITUATION: The squads are dismounted and must remount the vehicle. The platoon/squad leader orders the platoon to mount their vehicles.
REQUIRED ACTIONS: (Figure 3-19.)
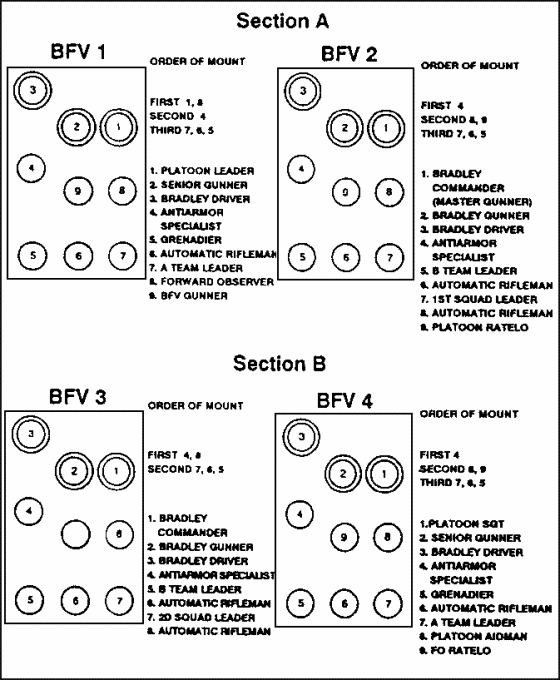
Figure 3-19. BFV Order of Mount.
1. The platoon/squad leader(s) gives the order or signal to the squads to mount their BFVs, and designates a mount point.
2. Both elements (mounted and dismounted) move to the mount point using covered and concealed routes.
3. The vehicle crew, using the appropriate weapons, overwatches primary enemy avenues of approach and provides supporting fire and smoke, if necessary.
The BC orders the driver to lower the ramp, or the fire team to enter through the ramp access door.
4. The platoon/squad leader orders MOUNT. (The order to mount may come with clarifying instructions; for example, "1st Squad, provide a base of fire until 2d Squad is mounted.")
5. Each squad/team mounts in the order specified. The squad leader designates which fire team mounts first; for example, Team A mount first, Team B provide overwatching fires.
6. Soldiers remount the vehicle in reverse sequence of dismount.
7. The platoon leader/BC prepares for mounted operations.
a. Each team leader accounts for all personnel and equipment in the BFV, and reports to the BC. Announces, ALL UP.
b. The platoon leader designates a direction of movement, formation, and movement technique from the mount point.
c. The platoon leader establishes visual or radio contact with the other BCs.
d. The team leader ensures the dismounted weapons are on SAFE once the soldiers have mounted.
e. The BC orders the driver to raise the ramp or the fire team to close the ramp access door. The fire team members in the No. 5 and 6 seats install their FPWs.
8. The platoon leader reports to the company commander.
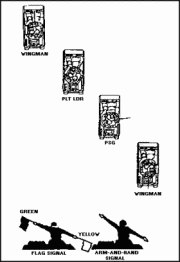
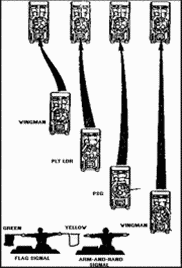
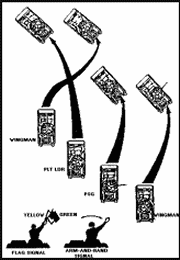
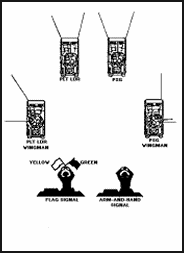
CREW DRILL 6. CHANGE FORMATION mounted) (PLATOON)
SITUATION: The platoon is moving and must change formation. The platoon leader gives arm-and-hand signal, flag signal, or radio for change of formation.
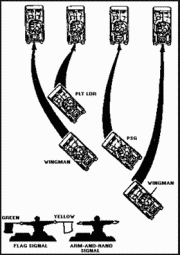
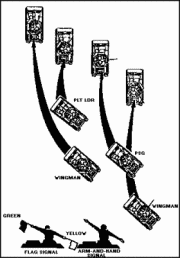
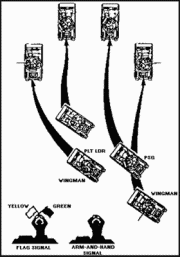
REQUIRED ACTIONS: (Figures 3-20 through 3-35.)
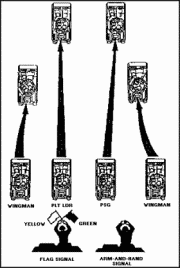
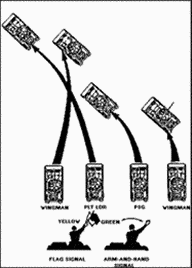
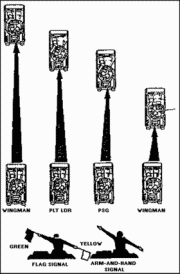
1. The platoon leader directs the formation change by giving the standard arm-and-hand signals, flag signals, or by radio.
2. The BCs relay arm-and-hand or flag signals.
3. The BCs direct drivers into position in the new formation. The driver maintains the position in the formation based on the platoon leader and wingmen.
4. The BCs traverse the main weapons toward likely enemy positions or assigned sectors and instruct the gunners to scan for targets in their sectors. The BCs give the gunners the limits of their sectors using the turret position indicator (for example, scan from 12 to 2).
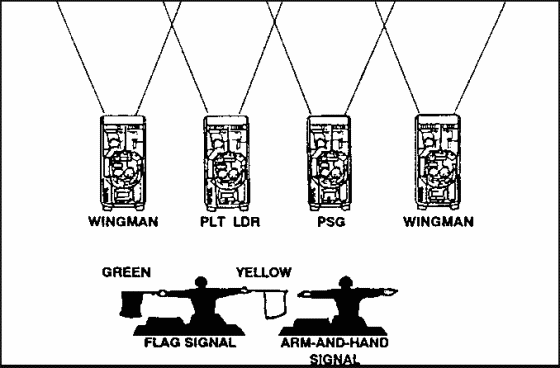
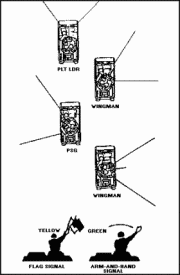
Figure 3-20. Line Formation.
|
|
|
|
|
|
|
|
|
|
|

|
|
|
|
|
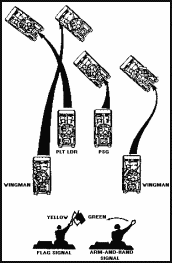
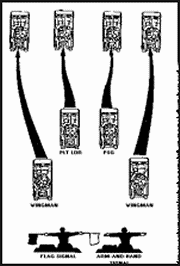
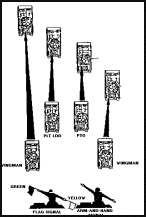
Figure 3-35. Wedge to Echelon Formation.
GO TO:
Table of Contents