|
RDL Homepage |
Table of Contents |
Document Information |
Download Instructions |
LESSON 3
BATTLE DRILLS AND CREW DRILLS
OVERVIEW
Lesson Description:
This lesson requires you to learn the definition, format, and content of infantry platoon and squad battle and crew drills.
Terminal Learning Objective:
ACTION: |
Define, list, and explain procedures followed in the infantry platoon/squad battle and crew drills. |
|
|
CONDITION: |
Given the information contained in this lesson. |
|
|
STANDARD: |
You must attain a score of 70 percent, or more, on the subcourse examination. |
|
|
REFERENCE: |
Mechanized infantry battle and crew drills describe how platoons and squads apply immediate action and fire and maneuver to commonly encountered situations and equipment malfunctions. They require leaders to make decisions rapidly and to issue brief oral orders quickly. A platoon's ability to accomplish its mission often depends on soldiers, leaders, and squads and sections executing key actions quickly. All soldiers and their leaders must know their immediate reaction to enemy contact and equipment malfunction as well as follow-up actions. Drills are limited to situations requiring instantaneous response; therefore, soldiers must execute drills instinctively. This results from continual practice. Drills provide platoons with standard procedures essential for building strength and aggressiveness. They identify key actions that leaders and soldiers must perform quickly. They provide for a smooth transition from one activity to another; for example, from movement to offensive action to defensive action. They provide standardized actions that link soldier and collective tasks at platoon level and below. (Soldiers perform individual tasks to CTT or SDT standard.) They must be understood by each individual and leader, and continually practiced by the platoon.
Where applicable, drills are cross- referenced with material in other lessons, other drills, or both. Battle drills are in Part A and crew drills are in Part B. (See ARTEP 7-7J-DRILL for the tasks, conditions, and standards for drill training.)
A battle drill is a collective action executed by platoon or smaller element without applying a deliberate decision-making process. The action is vital to success in combat or critical to preserving life. The drill is initiated on a cue, such as an enemy action or simple leader's order, and is a trained response to the given stimulus. It requires minimal leader orders to accomplish and is standard throughout like units.
BATTLE DRILL 1. PLATOON ATTACK (DISMOUNTED)
SITUATION: The platoon is moving as part of a larger force conducting a movement to contact or a hasty or deliberate attack.
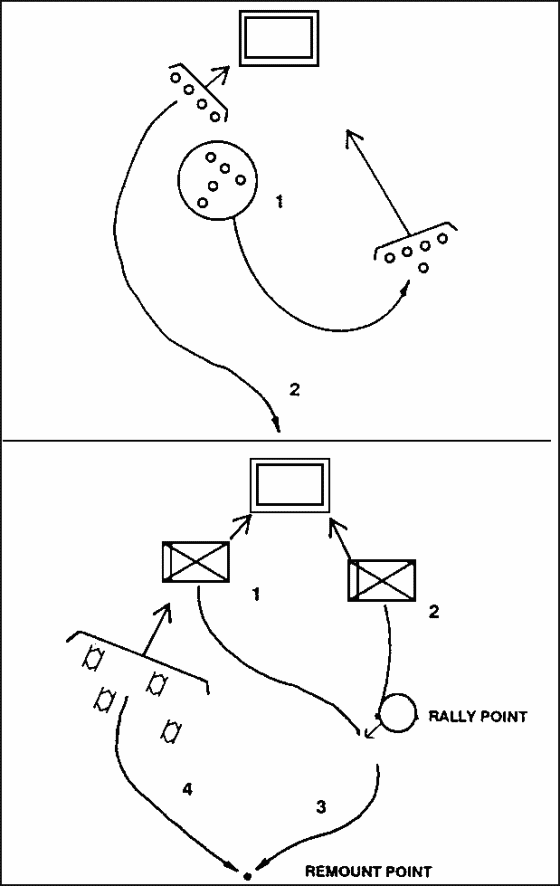
REQUIRED ACTIONS: (Figure 3-1.)
Figure 3-1. Platoon Attack (dismounted).
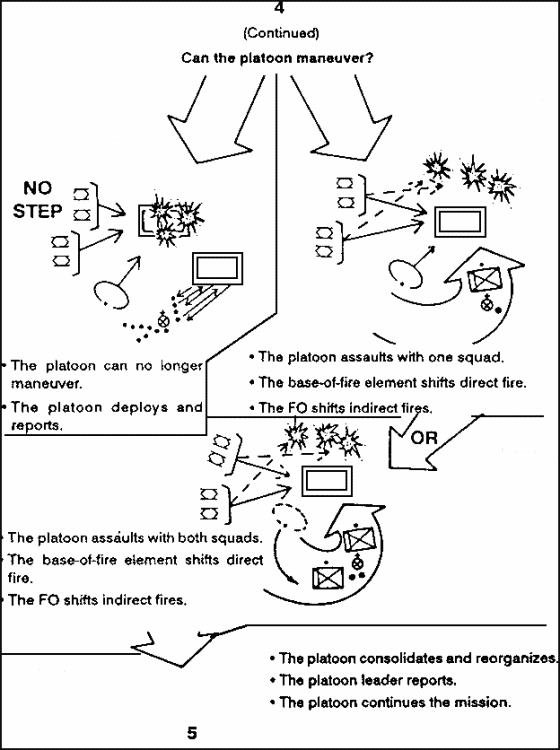
Figure 3-1. Platoon Attack (dismounted) (continued).
STEP 1. Action on Enemy Contact.
a. The platoon initiates contact. The platoon leader directs when and how his base-of-fire element initiates contact with the enemy to establish a base of fire. This element must be in position and briefed before it initiates contact. If the platoon has not been detected, STEPs 1 and 2 consist of positioning the base-of-fire element and identifying the enemy's positions.
b. The enemy initiates contact. If the enemy initiates contact, the platoon takes the following actions:
(1) The squad in contact reacts to contact (Battle Drill 2). It attempts to achieve suppressive fires with one fire team, then maneuvers the other team to attack the enemy in the flank.
(2) The platoon leader, his RATELO, the platoon FO, and the squad leader of the other squad move forward to link up with the squad leader of the squad in contact.
(3) The platoon sergeant repositions the BFVs as necessary to provide observation and supporting fires against the enemy.
(4) The platoon leader reports contact and assesses the situation. He follows the success of the squad's flank attack by leading the trail squad along the covered and concealed route taken by the assaulting fire team of the squad in contact.
(5) If the squad in contact cannot achieve suppressive fire, the squad leader reports to the platoon leader.
(a) The squad in contact establishes a base of fire. The squad leader deploys his squad to provide effective, sustained fires on the enemy position. The squad leader reports his final position to the platoon leader.
(b) The remaining squad (not in contact) takes up covered and concealed positions in place and observes to the flanks and rear of the platoon.
(c) The platoon leader moves forward with his RATELO, the platoon FO, and the other squad leader.
STEP 2. Locate the Enemy.
a. The squad leader of the squad in contact reports the enemy size and location, and any other information to the platoon leader. The platoon leader completes the squad leader's assessment of the situation.
b. The squad continues to engage the enemy's position.
c. The platoon leader directs the platoon sergeant to reposition the BFVs as necessary to observe and provide supporting fires against the enemy.
STEP 3. Suppress the Enemy.
a. The platoon leader determines if the BFVs and squad in contact can gain suppressive fire against the enemy, based on the volume and accuracy of the enemy fire and the ability of the BFVs to suppress the enemy.
(1) If YES, he directs the BFVs and the squad in contact to continue suppressing the enemy.
(a) The BFVs and the squad in contact destroys or suppresses enemy weapons that are firing most effectively against them, including vehicles and crew-served weapons.
(b) In addition, the squad in contact places screening smoke (M203) to prevent the enemy from seeing the maneuver element.
(2) If NO, the platoon leader deploys the other squad to suppress the enemy position.
(3) The squad not in contact provides suppressive fires from its overwatch position or repositions to observe and provide suppressive fires against the enemy.
b. The platoon leader again determines if the platoon can gain suppressive fires against the enemy.
(1) If YES, he continues to suppress the enemy with the two squads and the BFVs. The platoon FO calls for and adjusts fires based on the platoon leader's directions. (The platoon leader does not wait for indirect fires before continuing with his actions.)
(2) If still NO, the platoon leader reports the situation to the company commander. Normally, the platoon will become the base-of-fire element for the company. The platoon continues to suppress or fix the enemy with direct and indirect fire, and responds to orders from the company commander.
STEP 4. Attack.
If the BFVs and the squad in contact can suppress the enemy, the platoon leader determines if the remaining squad not in contact can maneuver. He makes the following assessment.
- Location of enemy positions and obstacles.
- Size of enemy force. (The number of enemy automatic weapons, the presence of any vehicles, and the use of indirect fires are indicators of enemy strength.)
- Vulnerable flank.
- Covered and concealed flanking route to the enemy position.
a. If YES, the platoon leader maneuvers the squad not in contact into the assault:
(1) Once the platoon leader has ensured that the base-of- fire element is in position and providing suppressive fires, he leads or directs the assaulting squad, by the flanking route, to the enemy position.
(2) Once in position, the platoon leader gives the prearranged signal for the base-of-fire element to lift or shift direct fires to the opposite flank of the enemy position. (The assault squad MUST pick up and maintain effective fires throughout the assault. Hand over of responsibility for direct fires from the base-of-fire element to the assault element is critical to prevent fratricide.)
(3) The platoon FO shifts indirect fires to isolate the enemy position.
(4) The assaulting squad fights through enemy positions using fire and maneuver. The platoon leader controls the movement of his squad. He assigns specific objectives for each team and designates the main effort or base maneuver team. (The base-of-fire element must be able to identify the near flank of the assaulting squad.)
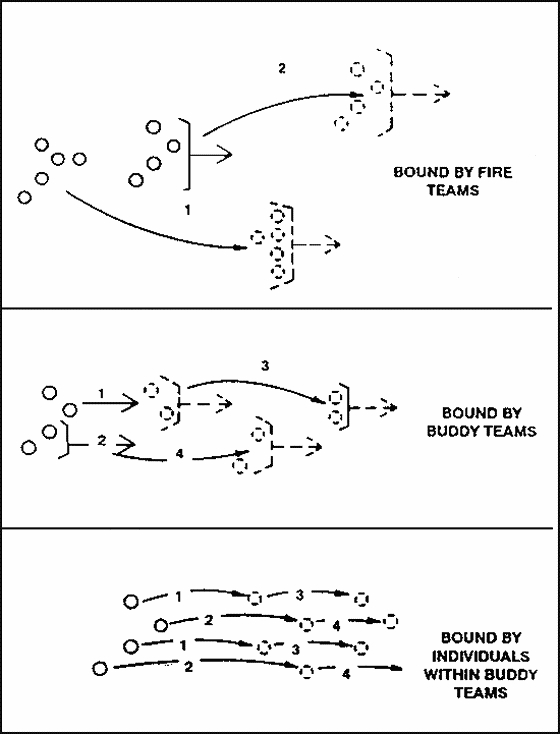
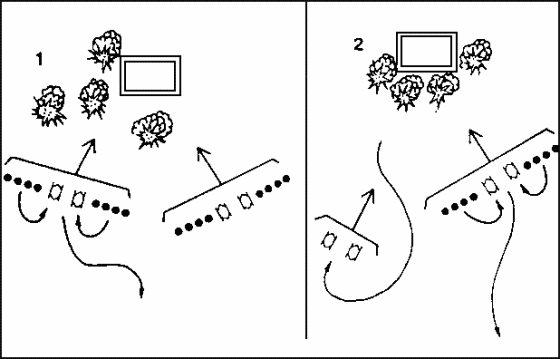
(5) In the assault, the squad leader determines the way in which he will move the teams of his squad based on the volume and accuracy of enemy fire against his squad and the amount of cover afforded by the terrain. (Figure 3-2.) In all cases, each soldier uses individual movement techniques as appropriate.
Figure 3-2. Squad and Fire Team Fire and Movement in the Assault.
(a) The squad leader designates one fire team to support the movement of the other team.
(b) The squad leader designates a distance or direction for the team to move. He accompanies one of the fire teams. (See Figure 3-2.)
(c) Soldiers must maintain contact with team members and leaders.
(d) Buddy teams time their firing and reloading in order to sustain their rate of fire. Teams are:
- Fire Team A, Buddy Teams: Team leader and automatic rifleman, grenadier (M203) and antiarmor specialist.
- Fire Team B, Buddy Teams: Team leader and automatic rifleman, automatic rifleman and antiarmor specialist.
(e) The moving fire team proceeds to the next covered position. Teams use the wedge formation when assaulting. Soldiers move in rushes or by crawling.
(f) The squad leader directs the next team to move.
(g) If necessary, the team leader directs soldiers to bound forward as individuals within buddy teams. Soldiers coordinate their movement and fires with their buddies. They maintain contact with their team leader.
(h) Soldiers fire from covered positions. They select the next covered position before moving. They either rush forward (no more than 5 seconds), or use high or low crawl techniques based on terrain and enemy fires.
b. If NO, or the assaulting squad cannot continue to move, the platoon leader deploys the squads to suppress the enemy and reports to the company commander. The platoon continues suppressing enemy positions and responds to the orders of the company commander.
STEP 5. Consolidate and Reorganize.
a. Consolidate. Once the platoon has seized the enemy position, the platoon leader establishes local security. (The platoon must prepare to defeat an enemy counterattack. The platoon is most vulnerable at the conclusion of the assault.)
(1) The platoon leader signals for the base-of-fire element to move up into designated positions.
(2) The platoon leader assigns sectors of fire for each BFV and squad.
(3) The platoon leader positions BFVs and key weapons to cover the most dangerous avenue of approach.
(4) Soldiers take up hasty defensive positions.
(5) The platoon leader and his FO develop an initial fire support plan.
(6) The squads place out OPs to warn of enemy counterattacks.
b. Reorganize.
(1) The platoon performs the following tasks (only after it completes consolidation on the objective):
(a) Reestablish the chain of command.
(b) Treat casualties and evacuate wounded.
(c) Man crew-served weapons first.
(d) Redistribute and resupply ammunition.
(e) Redistribute critical equipment (radios, NBC, NVDs).
(f) Coordinate for ammunition and resupply (platoon sergeant).
(g) Search, silence, segregate, safeguard, and speed EPWs to collection points.
(h) Collect and report enemy information and materiel.
(i) Fill vacancies in key positions.
(2) Squad and section leaders provide ammunition, casualty, and equipment (ACE) reports to the platoon sergeant. (Bradley commanders additionally provide fuel status.)
(3) The platoon sergeant consolidates ACE reports, reviews them with the platoon leader, and gives them to the first sergeant (or XO).
(4) The platoon continues the mission after receiving guidance from the company commander. The company follows the success of the platoon's flanking attack.
BATTLE DRILL 1A. PLATOON ATTACK (MOUNTED)
SITUATION: The platoon is moving as part of a larger force conducting a movement to contact or a hasty attack.
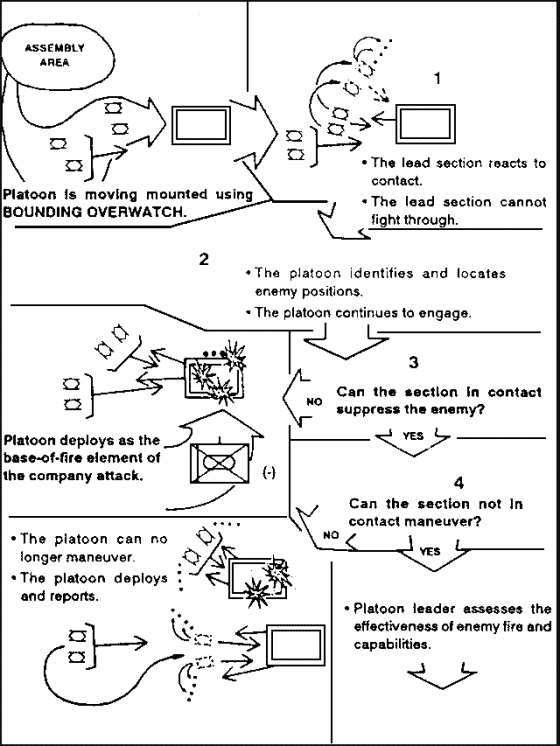
REQUIRED ACTIONS: (Figure 3-3):
Figure 3-3. Platoon Attack (mounted).
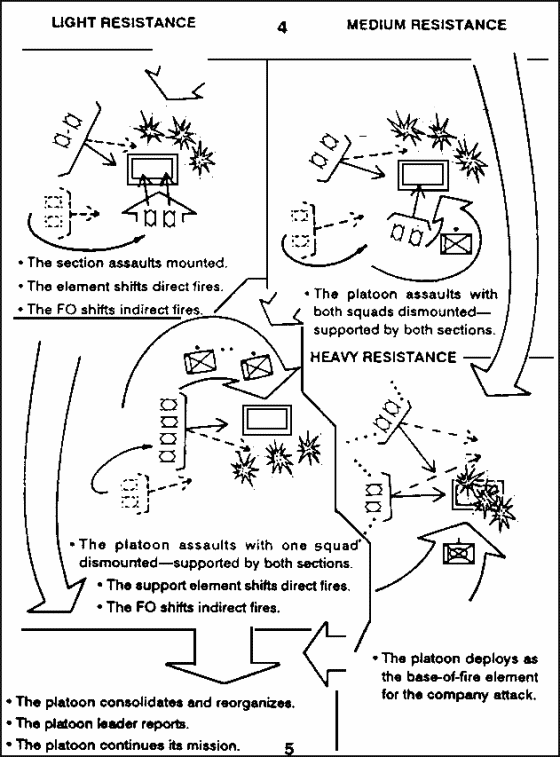
Figure 3-3. Platoon Attack (mounted) (continued).
STEP 1. Action on Enemy Contact.
a. The platoon initiates contact: The platoon leader directs when and how his base-of-fire element initiates contact with the enemy to establish a base of fire. This element must be briefed before it initiates contact. If the platoon has not been detected, the platoon performs Steps 1 and 2, which consist of positioning the supporting element and identifying the enemy's position.
b. The enemy initiates contact: The section in contact reacts to contact ( Battle Drill 2A). The section in contact returns fire on the move and moves to covered and concealed positions. The squad dismounts to provide local security or add to the suppressive fires against the enemy.
c. The section not in contact takes up covered and concealed positions and orients its weapons on the enemy.
d. The platoon leader reports contact and assesses the situation.
STEP 2. Locate the Enemy.
a. The section leader of the section in contact (normally the platoon leader or the platoon sergeant) reports the enemy size and location, and any other information. The platoon leader completes the section leader's assessment of the situation.
b. The section in contact continues to engage the enemy's position.
STEP 3. Suppress the Enemy.
a. The platoon leader determines if the section in contact can suppress the enemy based on the volume and accuracy of the enemy fire.
b. If YES, he directs the section and squad to continue suppressing the enemy.
(1) The BFVs destroy or suppress enemy weapons that are firing most effectively against them, including vehicles and crew-served weapons.
(2) The platoon leader or FO calls for and adjusts indirect fires (including smoke) to suppress and isolate the enemy position.
c. If NO, he deploys the other section to suppress the enemy position.
(1) The section not in contact provides supporting fires from its overwatch position.
(2) The section not in contact repositions to observe and provide supporting fires against the enemy.
(3) The squad dismounts to provide local security or add suppressive fires against the enemy.
d. The platoon leader again determines if the platoon can gain suppressive fire over the enemy.
e. If YES, he continues to suppress the enemy with the BFVs.
f. The platoon FO calls for and adjusts fires based on the platoon leader's directions. (The platoon leader does not wait for indirect fires before continuing with his actions.)
g. If still NO, the platoon leader reports the situation to the company commander. Normally the platoon will become the base-of-fire element for the company. The platoon continues to suppress or fix the enemy with direct and indirect fire, and responds to orders from the company commander.
STEP 4. Attack.
a. If the section in contact can suppress the enemy, the platoon leader determines if the section not in contact can maneuver. He makes the following assessment:
(1) Location of enemy position(s) and obstacles.
(2) Size of enemy force engaging the section. (The number of enemy automatic weapons, vehicles, and employment of indirect fires.) (The platoon leader must assess the type of enemy resistance.)
(a) Light resistance is resistance from an enemy squad-sized element or smaller that is not producing friendly casualties. The enemy force is equipped with or without an armored vehicle, in a hasty fighting position with no obstacles, and primarily using hand-held antiarmor weapons.
(b) Medium resistance is resistance from an enemy squad- to platoon-sized element that is producing light friendly casualties. The enemy defense is organized around the best defensible terrain with combined arms assets integrated.
(c) Heavy resistance fire is resistance from an enemy platoon-sized element or larger that is producing heavy friendly casualties. The enemy is defending a strongpoint with combined arms assets.
(3) Vulnerable flank.
(4) Covered and concealed flanking route to the enemy position.
b. If YES, the platoon leader maneuvers the section not in ontact into the assault.
(1) Once the platoon leader has ensured that the base-of-fire section is in position and providing supporting fires, he leads or directs the assaulting section by the flanking route onto the enemy position.
(2) Once in position, the section leader gives the prearranged signal for the base-of-fire section to lift or shift direct fires to the opposite flank of the enemy position. The assaulting section MUST pick up and maintain suppressive fire throughout the assault. Hand over of responsibility for direct fires from the base-of-fire section to the assaulting section is critical to prevent fratricide from occurring.
(3) The platoon leader ensures that indirect fires are shifted to isolate the enemy position.
(4) The assaulting section fights through enemy positions to the far side. Then the squad dismounts to clear and secure the position using fire and maneuver.
(a) The squad leader determines the way in which he will move the elements of his squad based on the volume and accuracy of enemy fire against his squad and the amount of cover afforded by terrain. In all cases, each soldier uses individual movement techniques as appropriate.
(b) The squad leader designates one fire team to support the movement of the other fire team.
(c) The squad leader designates a distance or direction for the team to move. He accompanies one of the fire teams.
(d) Soldiers maintain contact with team members and leaders.
(e) Buddy teams time their firing and reloading in order to sustain their rate of fire.
(f) The moving fire team proceeds to the next position.
(g) Soldiers move in rushes or by crawling. (Normally, soldiers place weapons on SAFE before moving. However, they may elect to fire as they rush.)
(h) The squad leader directs the next team to move.
(i) If necessary, the team leader directs soldiers to bound forward as individuals within buddy teams. Soldiers coordinate their movement and fires with each other within the buddy team. They maintain contact with their team leader.
(j) Soldiers fire from covered positions. They select the next covered position before moving. They either rush forward (no more than 5 seconds), or use high or low crawl techniques based on terrain and enemy fires.
(k) Fire team leaders maintain contact with the squad leader and pass signals to team members.
(5) The BFVs of the assaulting section continue to engage and destroy enemy vehicles and any soldiers attempting to withdraw or reinforce. (The base-of-fire section must be able to identify the near flank of the assaulting section and its squad.)
c. If NO, or the assaulting section cannot continue to move, the platoon leader deploys the sections to suppress the enemy and reports to the company commander. The platoon continues suppressing enemy positions and responds to the orders of the company commander.
STEP 5. Consolidate and Reorganize.
a. The platoon consolidates once it has seized the enemy position and the platoon leader has established local security. (The platoon must prepare to defeat any enemy counterattack. At the conclusion of the assault, the platoon is most vulnerable.)
(1) The platoon leader signals for the base-of-fire section to move up into a designated position.
(2) The platoon leader assigns sectors of fire for each BFV and squad.
(3) The platoon leader positions BFVs and key weapons to cover the most dangerous avenues of approach.
(4) Soldiers take up hasty defensive positions.
(5) The platoon leader and his FO develop an initial fire support plan.
(6) The squads place out OPs to warn of enemy counterattacks.
b. The platoon reorganizes to perform the following tasks (only after it has completed consolidation on the objective).
(1) Reestablish the chain of command.
(2) Treat casualties and evacuate wounded.
(3) Man crew-served weapons first.
(4) Redistribute and resupply ammunition.
(5) Redistribute critical equipment (radios, NBC, NVDs).
(6) Coordinate for resupply (platoon sergeant).
(7) Search, silence, segregate, safeguard, and speed EPWs to collection points.
(8) Collect and report enemy information and materiel.
c. Squad or section leaders provide ammunition, casualty, and equipment (ACE) reports to the platoon sergeant). (Bradley commanders additionally provide fuel status.)
d. The platoon sergeant consolidates the ACE reports, reviews his ACE report with the platoon leader, and passes it to the first sergeant (or XO).
e. The platoon continues the mission after receiving guidance from the company commander. The company follows the success of the section's flanking attack.
BATTLE DRILL 2. REACT TO CONTACT (PLATOON OR SOUAD)(DISMOUNTED)
SITUATION: The platoon or squad (dismounted element) receives fires from enemy individual or crew-served weapons. The dismounted element is operating within the supporting range of the BFVs.
REQUIRED ACTIONS: (Figure 3-4.)
Figure 3-4. React to Contact (dismounted).
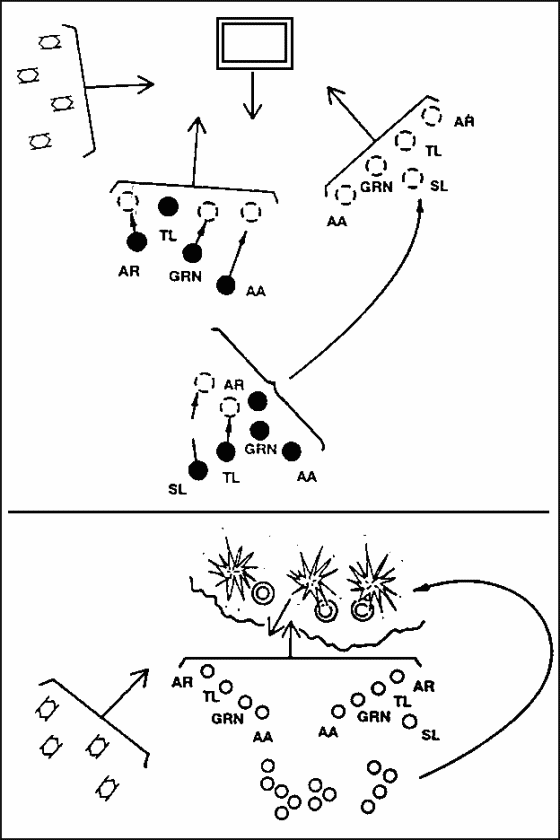
Figure 3-4. React to Contact (dismounted) (continued).
1. Soldiers immediately assume the nearest covered positions and return fire in the direction of contact.
2. Squad or team leaders locate and engage known or suspected enemy positions with well-aimed fire and pass information to the squad or platoon leader. The platoon leader reports contact to the company commander.
3. Fire team leaders control fire using standard fire commands (initial and supplemental) containing the elements of alert, direction, description of target, range, method of fire (manipulation and rate of fire), and command to commence firing.
4. Soldiers maintain contact (visual or oral) with the soldiers on their left and right.
5. Soldiers maintain contact with their team leaders and report the location of enemy positions.
6. Leaders (visually or orally) check the status of their personnel.
7. The squad or team leaders maintain visual contact with the platoon or squad leader.
8. The team leader leads his team by example: "Follow me; do as I do."
9. Leaders relay all commands and signals from the platoon chain of command.
10. The platoon sergeant positions the BFVs as necessary to observe and to provide supporting fires.
| NOTE: | Once the platoon has executed the React to Contact drill, the platoon leader makes a quick assessment of the situation (for example, enemy size, location). He decides on a course of action (Battle Drill 1, Platoon Attack (Dismounted) or Battle Drill 3, Break Contact (Dismounted)). The platoon leader reports the situation to the company commander. |
BATTLE DRILL 2A. REACT TO CONTACT (SECTION OR PLATOON) (MOUNTED)
SITUATION: While mounted, the platoon receives fires from enemy individual or crew-served weapons (including light antiarmor weapons).
REQUIRED ACTION: (Figure 3-5.)
Figure 3-5. React to Contact (mounted).
1. Vehicles of the section in contact immediately return fire in the direction of contact while moving out of the beaten zone. The section leader of the section in contact (if not the platoon leader) reports contact to the platoon leader.
2. All vehicles move to the nearest covered and concealed positions.
3. Upon reaching the covered and concealed position, the section in contact continues to engage the enemy with well-aimed fire using precision or battlesight fire command. The squad dismounts to provide local security and or add its suppressive fires against the enemy position.
4. Vehicles of the section not in contact orient their weapons in the direction of the enemy.
5. The platoon leader or platoon sergeant reports contact to the company commander.
| NOTE: | Once the platoon has executed the React to Contact drill, the platoon leader makes a quick assessment of the situation (for example, enemy size, location). He decides on a course of action (Battle Drill 1, Platoon Attack (Dismounted); Battle Drill 1A, Platoon Attack (Mounted)). The Platoon leader may elect to bypass, if permitted by the company commander. The platoon leader reports the situation to the company commander. |
6. Bradley commanders maintain contact with each other (wingman concept).
7. Bradley commanders maintain contact with the platoon leader.
8. Bradley commanders relay all commands to mounted infantry teams.
BATTLE DRILL 3. BREAK CONTACT (PLATOON OR SOUAD) (DISMOUNTED)
SITUATION: The platoon or squad (dismounted element) is under enemy fire and must break contact. The dismounted element is operating within supporting range of the BFVs.
REQUIRED ACTIONS: (Figure 3-6.)
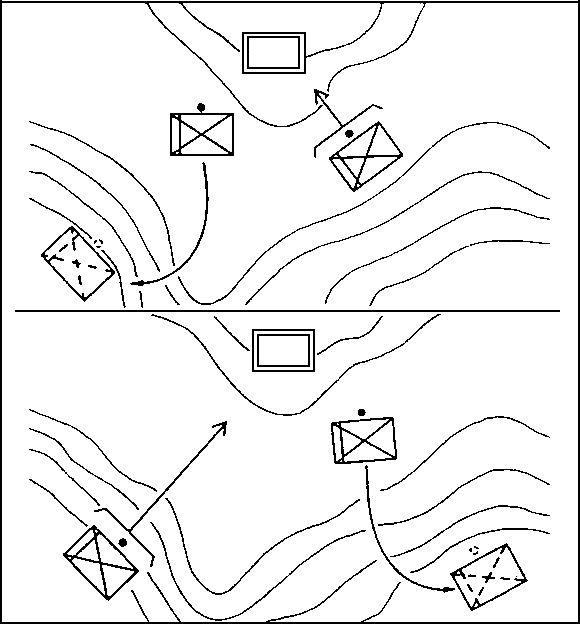
Figure 3-6. Break Contact (dismounted).
Figure 3-6. Break Contact (dismounted) (continued).
1. The platoon leader gives the order to break contact.
2. The platoon leader directs the BFVs to support the disengagement of the dismounted element. (If the BFVs cannot support the disengagement of the dismounted element, the platoon leader directs one squad or fire team to suppress by fire to support the disengagement of the remainder of the element.
3. The platoon or squad leader orders a distance and direction, a terrain feature, or the last objective rally point for the movement of the first squad or fire team.
4. The base of fire (BFVs or squad or fire team) increases the rate of fire to suppress the enemy.
5. The maneuver element moves to assume the overwatch position. The maneuver element uses fragmentation, concussion, and smoke grenades to mask its movement.
6. The maneuver element takes up the designated position and engages the enemy position.
7. The platoon leader directs the initial base-of-fire element (BFVs or squad or fire team) to move to its next location. (Based on the terrain and the volume and accuracy of the enemy's fire, the maneuver squad or fire team may need to use fire and movement techniques.)
8. The platoon or squad continues to bound away from the enemy until (the platoon or squad must continue to suppress the enemy as it breaks contact):
- It breaks all contact.
- It passes through a higher level base-of-fire position.
- Its squads or fire teams are in the assigned position to conduct the next mission.
9. In the absence of a leader's instructions, the platoon or squad moves to the last designated rally point.
10. The platoon leader directs the BFVs to move to a rally point and link up with the dismounted element.
11. Section or squad leaders account for soldiers, report, reorganize as necessary and continue the mission.
12. The platoon leader reports the situation to the company commander.
BATTLE DRILL 3A. BREAK CONTACT (SECTION OR PLATOON) (MOUNTED)
SITUATION: The platoon is mounted (except for security elements). It is under enemy fire and must break contact.
REQUIRED ACTIONS: (Figure 3-7.)
Figure 3-7. Break Contact (mounted).
1. The platoon leader gives the order to break contact.
2. The platoon leader directs one section to be the base-of-fire element to support the disengagement of the other section.
3. The platoon leader orders a distance and direction, a terrain feature, or last objective rally point for the moving section.
4. The base-of-fire section continues to engage the enemy. It attempts to gain suppressive fire long enough to support the bound of the moving element. (The platoon uses all available direct and indirect fires, including smoke to assist in disengaging.) The section leader controls fires using standard fire commands containing the alert, direction, description of target, range, method of fire, and command to commence firing.
5. The moving section's security element remounts.
6. The moving section continues to fire while moving to an overwatch position and continues to provide suppressive fires. Firing port weapons are manned and ready to fire.
7. The platoon leader directs the supporting section to move to its next location.
8. The platoon continues to bound away from the enemy until (the platoon must continue to suppress the enemy as it breaks contact):
a. It breaks all contact.
b. It passes through a higher level base-of-fire position.
c. Its sections are in the assigned position to conduct the next mission.
9. In the absence of a leader's instructions, the platoon moves to the last designated rally point.
10. Section or squad leaders account for soldiers, report, reorganize as necessary, and continue the mission.
11. The platoon leader reports the situation to the company commander.
BATTLE DRILL 4. REACT TO AMBUSH (PLATOON OR SOUAD) (DISMOUNTED)
SITUATION: If the platoon or squad (dismounted element), enters a kill zone, and the enemy initiates an ambush with a casualty- producing device and a high volume of fire, the squad or platoon takes the following actions.
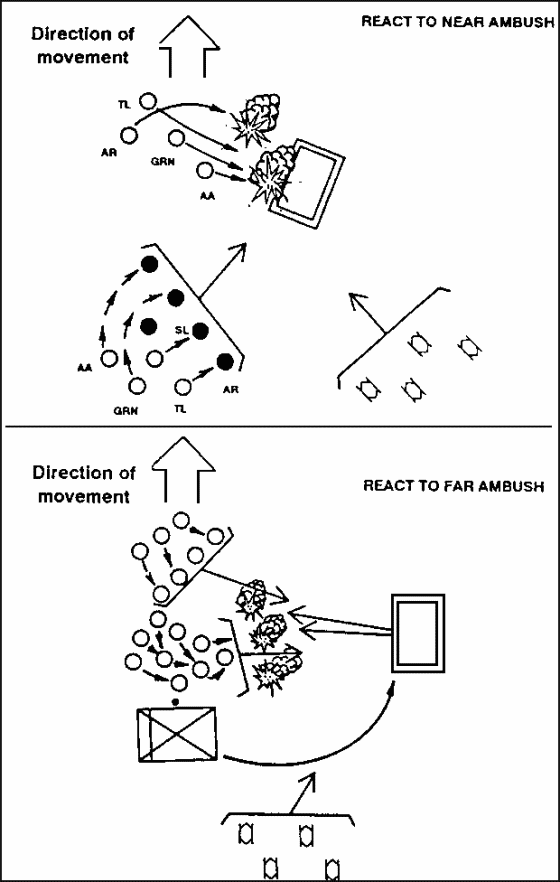
REQUIRED ACTIONS: (Figure 3-8.)
Figure 3-8. React to Ambush (dismounted).
1. In a near ambush (within hand-grenade range), soldiers receiving fire immediately return fire; take up covered or assume prone positions; throw fragmentation, concussion, and smoke grenades.
a. Immediately after the grenades detonate, soldiers in the kill zone assault through the ambush using fire and movement.
b. BFVs and soldiers not in the kill zone immediately:
- Identify enemy positions.
- Initiate immediate suppressive fires against the enemy.
- Shift fires as the soldiers in the kill zone assault through the ambush.
2. In a far ambush (beyond hand-grenade range), soldiers receiving fire immediately return fire, take up covered positions, and suppress the enemy by:
- Destroying or suppressing enemy crew-served weapons.
- Obscuring the enemy position with smoke (M203).
- Sustaining suppressive fires.
a. Soldiers (squads or teams) not receiving fires move by a covered and concealed route to a vulnerable flank of the enemy position and assault using fire and movement techniques.
b. BFVs and soldiers in the kill zone continue suppressive fires and shift fires as the assaulting squad or team fights through the enemy position.
c. The platoon leader directs the vehicles to move to positions where they can place effective fires on the enemy or the platoon leader conducts a flank attack, if he determines that there are no antitank weapons in the ambush.
3. The platoon FO calls for and adjusts indirect fires as directed by the platoon leader. On order, he lifts fires or shifts them to isolate the enemy position or to attack them with indirect fires as they retreat.
4. The platoon or squad leader reports, reorganizes as necessary, and continues the mission.
BATTLE DRILL 4A. REACT TO AMBUSH (PLATOON) (MOUNTED)
SITUATION: If the platoon is mounted, enters a kill zone, and the enemy initiates an ambush with a light antiarmor weapon and a high volume of fire, the platoon takes the following actions.
REQUIRED ACTIONS: (Figure 3-9.)
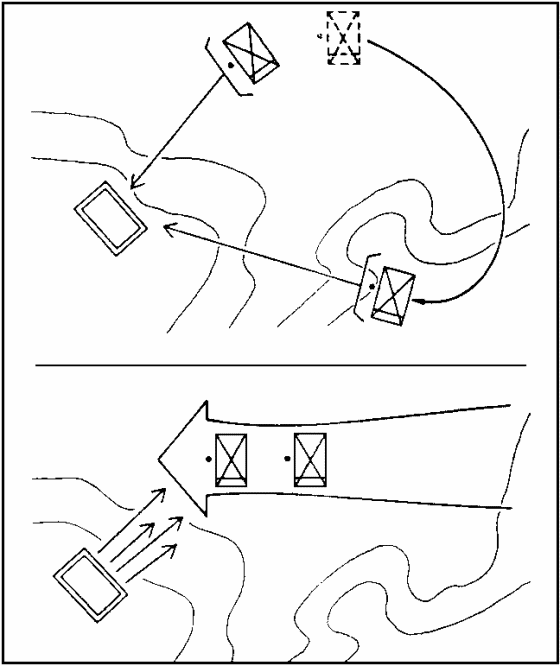
Figure 3-9. React to Ambush (mounted).
1. Vehicles in the section in the kill zone immediately return fire, while moving out of the kill zone or moving to covered positions within the kill zone and continue to fire on the ambush position with the highest possible volume of fire.
2. Soldiers in disabled vehicles in the kill zone dismount immediately, assume covered and concealed positions, and add their suppressive fires against the enemy.
3. The section in the kill zone gains suppressive fire, and:
a. Destroys or suppresses enemy weapons firing most effectively against the section.
b. Obscures the enemy position with smoke.
c. Sustains suppressive fires.
d. The section not in the kill zone moves by a covered and concealed route to a vulnerable flank of the enemy position and - assaults across the enemy position mounted. (Battle Drill 1 or 1A.)
e. BFVs and soldiers in the kill zone continue suppressive fires and shift fires as the assaulting section fights through the enemy position.
4. The platoon leader calls for and adjusts indirect fires as directed by the platoon leader. On order, he lifts fires or shifts them to isolate the enemy position, or to attack them with indirect fires as they retreat.
5. The platoon leader reports, reorganizes as necessary, and continues the mission. (If the platoon cannot continue the assault, it breaks contact. See Battle Drill 3A, Break Contact [Mounted].)
BATTLE DRILL 5. ENTER BUILDING/CLEAR ROOM/BUILDING (PLATOON)
SITUATION: Operating as part of a larger force, the platoon is moving (mounted or dismounted) and is operating within supporting range of the BFVs when it receives fire from the enemy in a building.
| NOTE: | The discussion that follows assumes that the infantry squad is supported only by the platoon's organic weapons. The preferred method of entering a building is to use a tank main gun round, direct-fire artillery round, or TOW, Dragon, or Hellfire missile to clear the first room. Additionally, some MOUT situations may require precise application of firepower. This is true of a MOUT environment where the enemy is mixed with noncombatants. The presence of civilians can restrict the use of fires and reduce the combat power available to a platoon leader. His platoon may have to operate in "no fire" areas. Rules of engagement (ROE) can prohibit the use of certain weapons until a specific hostile action takes place. The use of hand grenades and suppressive fire to enter rooms may be prohibited to preclude noncombatant casualties and collateral damage. All leaders must be aware of the ROE. They must include the precise use of weapons in their planning for MOUT missions. This includes how the platoon will employ its organic weapons including snipers and other weapon systems it may have in support; for example, AC 130 or AH 64 aircraft. They must coordinate the use of marking systems to prevent casualties due to friendly fire. FM 90-10 and FM 90-10-1 provide additional techniques for platoons and squads in MOUT. |
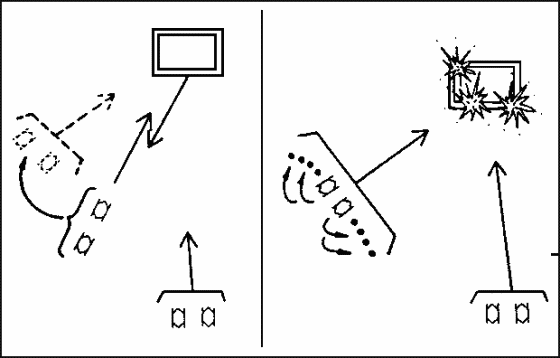
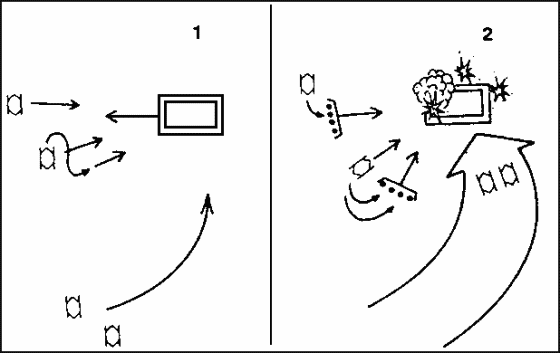
REQUIRED ACTIONS: (Figures 3-10 and 3-11.)
Figure 3-10. Enter and Clear a Building (platoon).
Figure 3-11. Enter a Building and Clear a Room (squad).
1. The section or squad in contact reacts to contact.
2. The platoon gains suppressive fires.
a. The section or squad in contact establishes a base-of-fire position. If mounted, the squad dismounts, establishes local security, and adds its suppressive fires against the enemy. If dismounted, the platoon leader, his RATELO, platoon FO, and the other squad leader move forward to link up with the squad leader of the squad in contact.
b. The platoon sergeant repositions the BFVs, if necessary, to provide additional observation and supporting fires against the enemy.
3. The platoon leader determines that he can maneuver by identifying:
a. The building and any obstacles.
b. The size of the enemy force engaging the platoon.
c. An entry point. (Assaulting squad should enter the building at the highest level possible.)
d. A covered and concealed route to the entry point.
4. The base-of-fire element (the BFVs and squad in contact):
a. Destroys or suppresses enemy weapons that are firing the most effectively against the squad.
b. Obscures the enemy position with smoke (M203).
c. Sustains suppressive fires.
5. The platoon leader designates the entry point of the building and directs one squad to enter the building and secure a foothold.
6. The squad leader directs the fire team in contact to support the entry of the other fire team into the building.
7. If necessary, the base-of-fire team repositions to isolate the building as well as continue suppressive fires. (Normally, the platoon has added its supporting fires against the enemy.)
8. The squad leader designates the entry point of the building. The platoon and squad shift direct fires and continue to suppress the enemy in adjacent positions and to isolate the building. The platoon FO lifts indirect fires or shifts them beyond the building.
9. The squad leader and the assaulting fire team approach the building and position themselves at either side of the entrance. (Soldiers should avoid entering buildings through doors and windows, because they will normally be covered by enemy weapons inside the building.)
|
COOK-OFF TRAINING WITH LIVE FRAGMENTATION HAND GRENADES IS PROHIBITED. |
10. Allowing cook-off time (two seconds maximum), and shouting FRAG OUT, the lead soldier of the assaulting fire team prepares and throws a grenade into the building.
IF WALLS AND FLOORS ARE THIN, THEY DO NOT PROVIDE PROTECTION FROM HAND GRENADE FRAGMENTS. |
11. After the explosion, the next soldier enters the building and positions himself to the right (left) of the entrance, up against the wall, engages all identified or likely enemy positions with rapid, short bursts of automatic fire, and scans the room. The rest of the team provides immediate security outside the building.
a. The size and shape of the room may cause the soldier entering the room to move to the left or right. The first soldier in the room decides where the next man should position himself and gives the command NEXT MAN IN, LEFT (or RIGHT). The next man shouts COMING IN, LEFT (RIGHT), enters the building, positions himself to the left of the entrance, up against the wall, and scans the room. Once in position, he shouts NEXT MAN IN (RIGHT or LEFT).
b. Depending on the enemy's situation, the size of the entry and the training of the squad, two soldiers can enter the room simultaneously after the grenade detonates. The soldier from the right side of the entry enters, fires from left to right, and moves to right with his back to the wall. At the same time, the soldier on the left enters from the left, fires from right to left, and moves to the left with his back to the wall. One soldier goes high, the other low, to prevent firing at one another. This method puts more firepower in the room more quickly, but is more difficult and requires more practice. When both soldiers are in position, the senior soldier gives the command NEXT MAN IN (RIGHT or LEFT).
12. The assaulting fire team leader shouts COMING IN (RIGHT or LEFT), enters the building initially moving left or right and against the wall, and positions himself where he can control the actions of his team. He does not block the entrance way. He makes a quick assessment of the size and shape of the room, and begins to clear the room. He determines if the remaining man in his team is required to assist in clearing the room.
a. If the team leader decides to bring the last man in, he shouts NEXT MAN IN LEFT (or RIGHT). The last man in the fire team shouts COMING IN LEFT (or RIGHT), enters the building, and begins to clear through the room.
b. If the team leader decides not to bring the last man in, he shouts NEXT MAN, STAND FAST. The last man remains outside the building and provides security from there. The team leader then directs the soldier on the right of the entrance to begin clearing. The team leader reports to the squad leader and then assumes the duties of the soldier on the right of the entrance to provide support.
DANGER WHILE CLEARING ROOMS, SOLDIERS MUST BE ALERT FOR TRIP WIRES AND BOOBY TRAPS. THEY SHOULD NOT EXPOSE THEMSELVES THROUGH OPEN WINDOWS OR DOORS. |
13. Once the room is cleared, the team leader signals to the squad leader that the room is cleared.
14. The squad leader enters the building and marks the entry point in accordance with the platoon SOP. The squad leader determines whether or not his squad can continue to clear rooms and still maintain suppressive fires outside the building. Normally, it takes a platoon to clear a building.
GO TO:
Table of Contents


