

|
RDL Homepage |
Table of Contents |
Document Information |
Download Instructions |
CREW DRILL 7. SECURE AT THE HALT (PLATOON)
SITUATION: The platoon is moving and must halt.
REQUIRED ACTIONS: (Figures 3-36 through 3-39.)
1. The platoon leader gives the arm-and-hand signals for herringbone or coil formation.
2. The platoon halts in the herringbone or coil formation.
3. Each BC ensures his vehicle is correctly positioned, using cover and concealment.
4. The gunner orients his turret and raises the TOW launcher and observes his sector of fire.
5. The platoon leader orders the squads to dismount and provide local security. (Dismount IAW with the task, Dismount the Vehicle.)
6. The fire team occupies a hasty fighting position as designated by the team leader in the vicinity of their respective BFV. The squad leader contacts the team leader and adjusts security positions as necessary.
7. Soldiers continue to observe designated sectors.
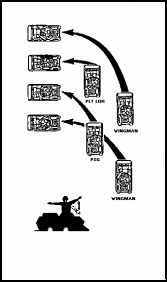
Figure 3-36. Wedge to Coil Formation. |
Figure 3-37. Wedge to Herringbone Formation. |
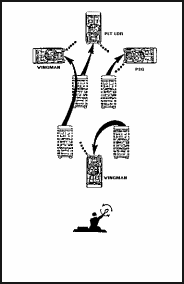
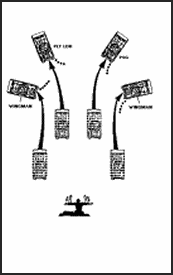
Figure 3-38. Column to Coil Formation. |
Figure 3-39. Column to Herringbone Formation. |
CREW DRILL 8. EXECUTE ACTION RIGHT OR LEFT (PLATOON)
SITUATION: The platoon is moving and must execute action right or left.
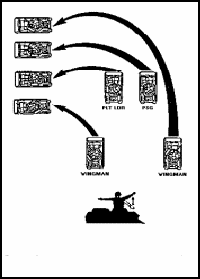
REQUIRED ACTIONS: (Figures 3-40 through 3-45.)
1. The platoon leader signals action right or left using arm-and-hand, flags, or radio.
2. The drivers immediately execute a turn in the direction indicated while moving into a line formation.
- The platoon sergeant orients his vehicle on the platoon leader's vehicle.
- Wingmen orient their BFVs on the section leader's vehicles.
3. The platoon leader orders the BCs to seek covered positions for their vehicles or have them continue to move in the direction indicated.
4. The BCs orient the main weapons toward the enemy, and the BCs and gunners search for targets.
|
|
Figure 3-41. Action Right From a Wedge. |
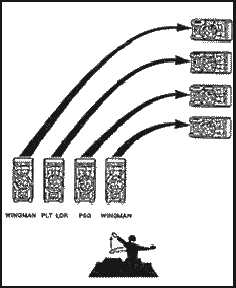
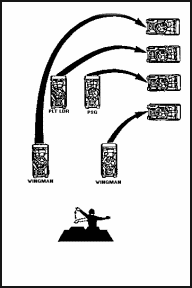
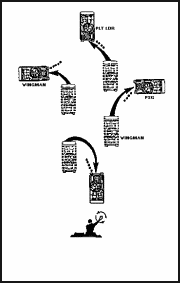
Figure 3-42. Action Right From a Column. |
Figure 3-43. Action Left From a Line. |

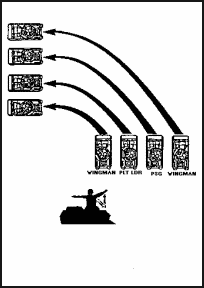
Figure 3-44. Action Left From a Wedge. |
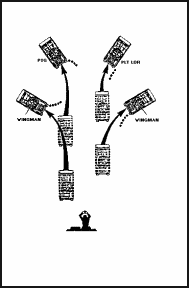
Figure 3-45. Action Left From a Column. |
5. The platoon leader determines if it is necessary to dismount the infantry.
6. The platoon leader reports the situation to the company commander, if necessary.
CREW DRILL 9. LOAD THE 25-MM AMMUNITION READY BOX (HE or AP)
SITUATION: During initial loading or when the low ammunition light comes on. Given a BFV with the ramp up, master power is ON, with 300 rounds of 25-mm ammunition in 30-round boxes stored in accordance with the load plan (25-mm HE or AP).
DANGER HANDLE AMMUNITION WITH CARE. DO NOT BUMP PRIMERS AGAINST ANY HARD SURFACE. IF A CARTRIDGE EXPLODES, SOLDIERS COULD BE KILLED OR HURT. |
REQUIRED ACTIONS:
Load the 25-mm HE Ammunition
1. Gunner: Moves the turret to HE load (2150 mils), announces when he has set the turret travel lock.
DANGER BC MUST TURN OFF THE TURRET DRIVE SYSTEM BEFORE THE TURRET SHIELD DOOR IS OPENED. SOLDIERS COULD BE KILLED OR HURT. |
2. Bradley Commander:
a. Instructs the driver to lower the ramp. BC announces, UPLOAD HE READY BOX.
b. Sets the turret drive switch to the OFF position.
| NOTE: | In the absence of a fire team member, the BC performs the following duties. |
3. Fire Team Member: The fire team member sitting in the No. 9 seat performs the duties of the loader.
a. Opens the turret shield door.
b. Opens and removes the door from the HE ammunition can.
c. Stows squad seats and removes the floor plates.
d. Prepares the HE ammunition for loading.
CAUTION ROUNDS NOT ALIGNED PROPERLY CAN CAUSE JAMMING IN THE 25-MM AMMUNITION CAN AND CHUTES. ROUNDS MUST BE ALIGNED AT THE TIPS. SEVERE DAMAGE TO THE FEEDING SYSTEM COULD RESULT IF THE AMMUNITION IS NOT ALIGNED. |
(1) Unstows the HE ammunition.
(2) Conducts a quick visual inspection to ensure it is serviceable, clean, and aligned.
CAUTION LINKS MAY BE DAMAGED IF ROUNDS ARE NOT REMOVED CORRECTLY. IF A ROUND DOES NOT RELEASE FROM A LINK, STOP PULLING ON THE ROUND. TO FREE A ROUND FROM A LINK, TWIST AND PULL UP ON THE ROUND AT THE SAME TIME. BENT LINKS CAN JAM THE FEEDER. |
(3) If loading an empty can, joins 15-round ammunition belts and loads 30 rounds at a time until there are 230 rounds loaded into the HE ammunition-ready can.
|
CAUTION THE END OF THE AMMUNITION BELT WITH THE DOUBLE LINKS ALWAYS GOES IN THE AMMUNITION CAN FIRST. THE END OF THE AMMUNITION BELT WITH THE EMPTY SINGLE LINK GOES IN LAST. IF THE AMMUNITION IS NOT LOADED CORRECTLY, AMMUNITION WILL BIND IN THE CHUTES AND DAMAGE THE EQUIPMENT. |
| NOTE: | An ammunition belt must be loaded with the links on the top and the rounds pointed to the right of the vehicle. Count the rounds as they are loaded. |
(4) If reloading, checks to see how many rounds are remaining in the ammunition can. There must be a single empty link at the end of the ammunition belt.
e. Loads the first 44 rounds in the ammunition can.
f. Turns the ammunition belt over so that the links are on the top. Rounds should point to the right of the vehicle.
g. Counts the 5th and l9th rounds. Feeds the ammunition belt with the double links first into the ammunition can. Hangs the first five rounds on the loading rail. Hangs the l9th round on the loading rail.
h. Counts the next 25 rounds. Hangs both the 24th and 25th rounds on the loading rail.
4. Gunner: Releases the upper roller to the rear of the ammunition can.
a. Forwards the rounds with the 14-mm ratchet wrench.
b. Locks the upper roller.
5. Fire Team Member: Loads the remainder of the rounds in the ammunition can. Hangs every 24th and 25th round.
6. Gunner: Lifts the ammunition belt loops over the baffles.
7. Fire Team Member: Installs and closes the HE ammunition can door.
a. Ensures the HE-AP selector switch is set to HE.
b. Closes the turret shield door, and taps on the shield door and announces, "HE uploaded."
c. Stows empty ammunition boxes.
d. Replaces floor plates and unstows seats.
Load the 25-mm AP Ammunition
8. Gunner: Moves the turret to AP load (4350 mils). Announces when he has set the turret travel lock.
DANGER BC MUST TURN OFF THE TURRET DRIVE SYSTEM BEFORE THE TURRET SHIELD DOOR IS OPENED. SOLDIERS COULD BE KILLED OR HURT. |
9. Bradley Commander:
a. Instructs the driver to lower the ramp. Announces, UPLOAD AP READY BOX.
b. Sets the turret drive switch to the OFF position.
| NOTE: | In the absence of a fire team member, the BC performs the following duties. |
10. Fire Team Member: The fire team member sitting in the No. 9 seat performs the duties of the loader.
a. Opens the turret shield door.
b. Opens and removes the door from the AP ammunition can.
c. Stows squad seats and removes the floor plates.
d. Prepares the AP ammunition for loading.
CAUTION ROUNDS NOT ALIGNED PROPERLY CAN CAUSE JAMMING IN THE 25-MM AMMUNITION CAN AND CHUTES. ROUNDS MUST BE ALIGNED AT THE TIPS. SEVERE DAMAGE TO THE FEEDING SYSTEM COULD RESULT IF THE AMMUNITION IS NOT ALIGNED. |
(1) Unstows the AP ammunition.
(2) Conducts a quick visual inspection to ensure it is serviceable, clean, and aligned.
CAUTION LINKS MAY BE DAMAGED IF ROUNDS ARE NOT REMOVED CORRECTLY. IF A ROUND DOES NOT RELEASE FROM A LINK, STOP PULLING ON THE ROUND. TO FREE A ROUND FROM A LINK, TWIST AND PULL UP ON THE ROUND AT THE SAME TIME.BENT LINKS CAN JAM THE FEEDER. BELT WITH THE EMPTY SINGLE LINK GOES IN LAST. IF THE AMMUNITION IS NOT LOADED CORRECTLY, AMMUNITION WILL BIND IN THE CHUTES AND DAMAGE THE EQUIPMENT. |
| NOTE: | An ammunition belt must be loaded with the links on the top and the rounds pointed to the left of the vehicle. Count the rounds as they are loaded. |
(4) If reloading, checks to see how many rounds are remaining in the ammunition can. There must be a single empty link at the end of the ammunition belt.
e. Counts the first 26 rounds. Hangs the first round onto the load rail, then hangs the 25th and 26th rounds onto the loading rail.
f. Lifts the single linked end of the ammunition belt up into the forwarder. Pushes the last round until it is engaged in the sprocket.
11. Gunner: Releases the upper roller to the rear of the ammunition can.
a. Forwards the rounds with the 14-mm ratchet wrench.
b. Locks the upper roller.
12. Fire Team Member:
a. Installs and closes the AP ammunition can door.
b. Ensures the HE-AP selector switch is set to AP.
c. Closes the turret shield door, taps on the shield door, and announces, "AP uploaded."
d. Stows empty ammunition boxes.
e. Replaces floor plates and unstows squad seats.
CREW DRILL 10. ENGAGE TARGETS WITH THE 25-MM AUTOMATIC GUN OR 7.62-MM COAX (CREW)
SITUATION: Upon recognition of a target or on the BC's order. With the ISU, the Bradley crew has identified a target.
REQUIRED ACTIONS:
1. Bradley Commander: Lays the gun for direction by squeezing the palm switch on the commander's handstation and turning the turret in the general direction of the target. The BC issues a battlesight or precision fire command.
2. Gunner:
a. Indexes the announced the range into the ISU.
b. Selects the ammunition/weapon system on the weapon control box in accordance with the BC's fire command.
c. Acquires the target using the ISU on low power.
d. Switches to the HIGH magnification and announces, "Identified."
(1) If the gunner announces "Cannot identify," the BC attempts to identify and gives further instructions.
(2) If the gunner announces "Lost," the BC gives additional target location information.
(3) If the gunner announces "Friendly," the BC gives a new target location or takes the weapon out of action.
(4) If the gunner announces "Cannot engage," the BC designates another target or tells the driver to move the vehicle (for example, "Driver, back, right, stop").
e. Lays the reticle on the center of target visible mass.
3. Bradley Commander: Commands FIRE.
4. Gunner: Announces ON THE WAY, and fires the weapons system.
5. Bradley Commander: Announces CEASE FIRE, upon target destruction to end the engagement.
CREW DRILL 11. RELOAD A TOW LAUNCHER (CREW)
SITUATION: The BFV has fired two TOW missiles and needs to be reloaded. The TOW casings are in the launch tubes. The TOW launcher is raised.
REQUIRED ACTIONS:
1. Bradley Commander: Commands PREPARE TO LOAD MISSILE.
2. Gunner:
a. Traverses the turret to the TOW LOAD position (5950 mils).
b. Moves the ARM-SAFE-RESET switch to RESET then to the SAFE position .
c. Elevates the launcher to 500 mils.
3. Bradley Commander: Moves the turret drive switch to OFF.
4. Gunner: Engages the turret travel lock.
5. Fire Team Member: The fire team member in the No. 5 seat is responsible for reloading the TOW missiles.
| NOTE: | In the absence of the dismounted soldiers, the BC acts as the loader, depending on the unit's SOP. In the absence of the BC, the gunner assumes the responsibilities of the BC. |
a. Unstows the missiles.
b. Checks the humidity indicator(s) on the stowed missile(s). (If the humidity indicators are pink, do not use.)
c. Inspects the containers for damage.
d. Removes the forward handling rings from the nose end of the stowed missiles.
e. Removes the electrical connector covers from the stowed missiles .
f. Checks the nose ends and rear diaphragms.
6. Bradley Commander: Commands LOAD MISSILE.
7. Fire Team Member:
a. Leader announces, UPLOADING TOW.
b. Opens the cargo hatch cover to the TOW LOAD position.
c. Pushes the release button on the side of the locking handle and pulls down.
d. Removes the expended missiles.
e. Ensures the umbilical connectors do not extend down into the TOW launcher.
f. Loads the missiles into the launcher (outside tube first).
g. Holds the missile and pushes the locking handle up until it locks.
h. Closes the cargo hatch.
i. Announces, TOW UPLOADED.
8. Gunner:
a. Turns the turret drive switch to ON and disengages the turret travel lock.
b. Traverses the turret to the target area and arms the system.
CREW DRILL 12. ENGAGE TARGETS WITH THE TOW (CREW)
SITUATION: The Bradley crew has identified a target for the TOW within 3,750 meters.
REQUIRED ACTIONS:
1. Bradley Commander: Commands GUNNER, MISSILE, TANK, and lays the gun for direction to the target.
2. Gunner: Starts searching for the target as the BC lays the gun.
3. Driver: Halts the vehicle in a hull-down position.
4. Gunner: Selects HIGH MAG and uses the ISU to determine if the target is engagable.
5. Driver: Checks the vehicle slope indicator to ensure the vehicle is within the 10-degree slope warning.
6. Gunner: Checks the vehicle slope indicator to ensure the vehicle is within the 10-degree slope warning. Places the launcher's UP-DOWN switch on the TOW control panel to UP.
a. Depresses the gunner's palm switch to raise the launcher.
b. Depresses the TOW button on the TOW control panel.
c. Selects the missile tube one or two on the TOW control panel.
d. Places the arm-safe-reset switch to ARM.
e. Sights the target, announces "Identified," and lays the cross hairs on the center of target visible mass.
(1) If the gunner announces "Cannot identify," the BC attempts to identify and gives further instructions.
(2) If the gunner announces "Lost," the BC gives additional target location information.
(3) If the gunner announces "Friendly," the BC gives the new target description or takes the weapon out of action.
(4) If the gunner announces "Cannot engage," the BC designates another target or tells the driver to move the vehicle (for example, "Driver, back, right, stop").
7. Bradley Commander: On hearing "Identified," commands, FIRE.
8. Gunner: On hearing "Fire," announces ON THE WAY, and fires.
CREW DRILL 13. REMOVE A MISFIRED TOW (CREW)
SITUATION: With all hatches closed, a TOW launcher raised to the firing position, and a misfired TOW. Immediate action has already been performed, or on order from the BC.
REQUIRED ACTIONS:
1. Gunner:
a. Announces TOW MISFIRE, and indicates the missile that did not fire.
b. Moves the arm-safe-reset switch to RESET, then to SAFE.
c. Ensures that stabilization switch is set to ON to keep the weapon pointed downrange while the driver rotates the vehicle.
2. Bradley Commander: Directs the driver to seek a covered or hull-down position.
3. Driver: Pivot steers the vehicle, either left or right, in accordance with the BC's instructions. Turret remains pointed downrange.
4. Bradley Commander:
a. Tells the driver to pivot until the turret is at 1600 or 4800 mils.
b. Engages the turret travel lock.
c. Moves the turret drive system switch and turret power switch to OFF.
5. Fire Team Members:
a. Two fire team members dismount to the rear of the vehicle.
b. One fire team member climbs onto the vehicle from the left side, keeping away from the front and rear of the vehicle.
c. Removes the misfired TOW from the launcher.
d. Hands the misfired missile to the fire team member on the ground.
e. Carries the missile a safe distance away from the vehicle Marks the missile's location.
f. Lays the missile so that the backblast area is least destructive (minimum 200 meters).
g. Puts a clearly visible stake and yellow flag at the misfired TOW location.
6. Bradley Commander: Notifies the chain of command of the existence and location of the misfired TOW.
CREW DRILL 14. LOAD, UNLOAD, AND STOW GRENADES FOR THE M257 SMOKE GRENADE LAUNCHER (CREW)
SITUATION: On order of the BC, the crew loads the eight smoke grenades stowed in the smoke grenade storage bins.
REQUIRED ACTIONS:
1. Gunner: Traverses the turret to the 6400-mil position and sets the turret travel lock.
2. Bradley Commander: Turns the turret drive system switch and the turret power switch to OFF.
3. Driver: Ensures that the master power switch is OFF.
4. Bradley Commander: Commands LOAD SMOKE GRENADES.
5. Bradley Commander or Gunner:
a. Exits the turret from the gunner or BC hatch.
b. Removes expended grenades from the launcher.
c. Checks each launch tube for damage and debris.
d. Lifts the grenades (four) from the stowage bin and inspects the grenades.
e. Loads the launcher by sitting on the stowage bin and straddling the launcher.
f. Loads the grenades, metal end down, from bottom to top. Gently push on the smoke grenade until two clicks are felt, then turns it one-half turn.
g. Assumes the assigned seat in the turret.
6. Bradley Commander: Commands, UNLOAD THE SMOKE GRENADE LAUNCHER.
Turns the turret drive and turret power switches to OFF.
7. Driver: Turns the master power to OFF.
8. BC or Gunner: Sitting on stowage bin, removes the four discharger caps and grenades from top to bottom.
a. Installs the discharger caps on the grenade launcher tubes.
b. Opens the bins to stow the grenades.
c. Stows the grenades metal end down.
d. Closes and latches the smoke grenade stowage bin.
CREW DRILL 15. DESTROY OR ABANDON AN M2 BRADLEY FIGHTING VEHICLE (CREW)
SITUATION: Given an order to destroy or abandon the BFV, 15 one-pound blocks of TNT (or equivalent), equipment to complete an electric or nonelectric firing circuit, or two incendiary grenades, and a vehicle crew and a firing team.
REQUIRED ACTIONS:
1. Destruction by Removal or Destruction of Main Components.
a. Bradley Commander:
- Removes the 7.62-mm coaxial machine gun backplate and destroys it.
- Smashes the radios.
- Secures his protective mask, and individual weapon, gear, and the night vision goggles.
b. Gunner:
- Takes the bolt assembly from the 25-mm automatic gun.
- Smashes the ISU.
- Secures his protective mask, and individual weapon and gear; and evacuates the vehicle.
c. Driver:
- Cuts the coolant lines.
- Cuts the engine oil hose.
- Smashes the AN/VVS-2 night vision viewer.
- Secures his protective mask, individual weapon and gear.
d. Team Members:
- Secures all night vision devices.
- Secures dismounted radio.
- Secures their protective mask, and individual weapons and gear; and evacuates the vehicle.
2. Destruction by Fire.
a. Bradley Commander:
- Traverses the turret to 4100 mils.
- Secures his protective mask and individual weapon.
b. Driver:
- Discharges the Halon bottle in the engine compartment.
- Lowers the ramp; opens the power unit access door.
- Opens the main fuel manual shutoff valve and main fuel drain valve, and cuts the fuel lines.
- Secures his weapon and protective mask, and evacuates the vehicle.
c. Fire Team Members:
- Open the cargo hatch.
- Secure the weapon and protective mask, and evacuates the vehicle.
- Discharge the Halon bottle; removes and empties the portable fire extinguishers.
- Secures two incendiary grenades.
- Places one grenade in the power unit and one in the crew compartment, and evacuates the vehicle.
DANGER TEAM MEMBERS MUST TAKE COVER WITHOUT DELAY, BECAUSE THE FIRE MAY CAUSE AN EARLY EXPLOSION OF AMMUNITION. |
3. Destruction by Antiarmor Fire. The BC:
- Has the team members dismount with protective masks, individual weapons, and light antitank weapons (AT4s).
- Has the antiarmor specialist secure the Dragon or AT4.
- Moves the team past the minimum range of the Dragon (65 meters) and within maximum range of the AT4 (300 meters).
- Directs a volley of fire, aiming at the armament, engine, and drive train components.
DANGER DO NOT FIRE AT EQUIPMENT UNTIL ALL SOLDIERS IN THE AREA ARE A SAFE DISTANCE AWAY. |
4. Destruction by Demolition.
a. Gunner:
- Prepares three l-pound blocks of TNT or the equivalent.
- Places the charges as follows:
- On the receiver of the 7.62-mm coax.
- On the receiver of the 25-mm.
- On the integrated sight unit.
b. Driver:
- Prepares six 2-pound charges using 1-pound blocks of TNT or the equivalent.
- Places the charges as follows:
- One charge on the accessory end of the engine.
- The second and third charges on the engine - one on the left side and the other on the right side.
- The fourth charge between the engine and the cross drive transmission.
- The fifth and sixth charges on the left and right track drive sprockets.
c. Bradley Commander:
- Provides for dual priming to minimize the possibility of a misfire.
- Connects all charges (the charges for the turret and engine compartment) for simultaneous detonation.
- Moves team members (with protective masks and individual weapons) to a covered area.
- Detonates the charge.
| NOTE: | Ammunition and equipment that are not destroyed by the detonation should be removed from the vehicle and destroyed by other methods. |
5. Destruction by Using Natural Surroundings. The team members:
- Remove the major components (backplate from the 7.62-mm coax, the bolt from the 25-mm main gun) and submerge them in water (lakes, ponds, rivers, and so forth). If possible, submerge the vehicle.
- If no body of water is near, widely disperse components (backplate from the 7.62-mm coax, the bolt from the 25-mm main gun), preferably into heavy underbrush.
- Break down the bolt and track assembly before disposing of the parts. The BC or gunner keeps the firing pin assembly.
CREW DRILL 16. PERFORM BEFORE-, DURING-, AND AFTER-COMBAT- OPERATION CHECKS (CREW)
SITUATION: During assembly area procedures, after an engagement, or during consolidation and reorganization.
REQUIRED ACTIONS:
1. Before-Combat-Operation Checks.
| NOTE: | Follow all safety procedures while working in and around the turret, and ensure that no weapons are loaded with ammunition when performing the before-operation checklist. |
a. Squad Leader (personally or through coordination with the team leaders):
- Checks to ensure that all personnel are properly wearing personal protective equipment IAW the unit SOP and commander's guidance (for example, protective mask, protective body armor, helmet, nerve-agent antidote). Ensures that all personnel have hearing protection.
- Ensures that all personnel have their assigned weapons and the prescribed ammunition load.
- Checks to ensure that all weapons are loaded and placed on SAFE (to include firing port weapons).
- Ensures that ammunition and pyrotechnics are properly stowed (for example, grenades, flares, small arms ammunition, smoke, LAWs, Claymores, hand grenades).
- Ensures that all target acquisition devices (for example, NOD, binoculars, AN/PVS-5/7, AN/TAS-5) are properly stowed.
- Ensures that the hand grenades are worn properly.
- Ensures that all dismount equipment is functional (for example, test fires the weapons, conducts a communications check with the AN/PRC-77/68).
- For night operations, ensures that all NVD and other target acquisition equipment (for example, binoculars, AN/PVS-5/6) are mounted and available, and operational and zeroed to the appropriate weapon for night operations.
- Ensures that all personnel have additional equipment required to accomplish the mission IAW with METT-T (for example, minefield marking set, wire cutters, obstacle breach kit).
- Reports the status of the squad to the platoon sergeant.
- Ensures all personnel and vehicles are camouflaged.
b. Gunner or Bradley Commander. Ensures the following before-combat-operation checks are performed:
- Ensures that the weapons systems are on SAFE (electrical and manual).
- Ensures that all vehicle weapons systems are properly installed, and the prescribed ammunition is uploaded and stowed IAW the stowage and strapping diagram, vehicle load plan, and platoon SOP.
- Ensures all turret weapons systems are operational and boresighted. Conducts a prefire checklist in accordance with the standards outlined in FM 23-1.
- Ensures the vehicle communications systems are operational.
- Ensures that the turret PMCS has been conducted IAW TM 9-2350-252-10-2 or TM 9-2350-284-10-2.
- Checks individual equipment and weapons of the driver and gunner.
- Reports the status of the vehicle to the BC or section leader.
| NOTE: | During training, in the event the override system is inoperable and the turret interlock system malfunction, the turret drive system should not be used, until it is repaired or fully operational. |
c. Driver:
- Conducts before-operation-hull PMCS in accordance with TM 9-2350-252-10-1 and TM 9-2350-284-10-1.
- Reports the status of the vehicle to the BC.
d. Platoon Sergeant:
- Consolidates the reports from the squad leaders and BCs, and reports the platoon's status to the platoon leader.
- Checks the aidman for complete aid bag.
- Checks the FIST for individual weapons and equipment; operational mission equipment (for example, laser range finder); operational communications (for example, digital message device and radios); any other mission-essential equipment.
- Other attachments as required.
e. Platoon Leader:
- Checks the special equipment required to execute the mission, and designates where it will be carried.
- Reports the platoon status to the company commander NLT the mission start time.
2. During-Combat-Operation Checks. During-combat-operation checks should be conducted in a secure location during a lull in the battle.
a. Squad Leader or Team Leader:
- Ensures the accountability of all soldiers and equipment.
- Supervises aid to injured soldiers.
- Ensures the weapons are on SAFE.
- Checks ammunition status, gets more ammunition from vehicle if possible, cross levels when necessary, and reports the critical shortages to the platoon sergeant.
- Reports the status of personnel, equipment, and ammunition to the platoon sergeant.
- Ensures dismounted security is established.
b. Bradley Commander or Gunner:
- Places the turret system on electrical SAFE.
- Checks ammunition status for all turret weapon systems, performs reload drills when required, cross levels from other BFVs when necessary, and reports the critical shortages to the section leader or platoon sergeant.
- Verifies the boresight of all weapons systems.
- Checks for damaged equipment.
- Ensures communications (radios and intercommunications) are operable.
- Conducts a visual inspection of the turret.
- Ensures the commander's and gunner's handstations are operable.
- Performs during-operation-turret PMCS in accordance with TM 9-2350-252-10-2 or TM 9-2350-284-10-2.
- Reports the status of the vehicle to the section leader or BC.
- Supervises expedient vehicle repairs, if necessary.
c. Driver:
- Performs during-operation-hull PMCS in accordance with TM 9-2350-252-10-1 or TM 9-2350-284-10-1.
- Conducts a visual inspection of the exterior of the vehicle.
- Checks all bolts and nuts on the road wheels and idle wheels.
- Checks fuel status and oil levels in the engine, transmission, fan tower, final drive ramp motor, road wheels, return roller hub windows, and idler wheels.
- Checks the engine compartment for any visible signs of damage.
- Reports the status to the BC.
d. Platoon Sergeant:
- Reports the status of the platoon to the platoon leader.
- Supervises the evacuation of casualties.
- Reports the location and status of inoperative vehicles and the WIA or KIA to the platoon leader.
- Coordinates for resupply, if required (for example, POL, ammunition).
e. Platoon Leader:
- Reports the status of the platoon to the company commander (if resupply or repairs are necessary to complete the mission, if required by SOP, or if the platoon has suffered combat or maintenance vehicle losses).
3. After-Combat-Operation Checks. After-combat-operation checks are to be forwarded in conjunction with consolidation and reorganization, and the infantry is normally dismounted and provides the local security while the BFV crew perform the necessary checks.
a. Squad Leader or Team Leader:
- Ensures that dismounted security is established.
- Checks for injured soldiers.
- Accounts for all personnel and equipment.
- Checks and ensures that all weapons are on SAFE.
- Reestablishes the chain of command.
- Checks the status of ammunition and supplies.
- Ensures that hasty positions are prepared, ensures that the key weapons are manned, and replaces vehicle crew members, as needed.
- Ensures that soldiers and vehicles are recamouflaged as necessary.
- Reports the status of soldiers, equipment, and ammunition to the platoon sergeant.
b. Bradley Commander or Gunner:
- Places turret system on electrical SAFE.
- Ensures that ammunition resupply is conducted for all weapons on the vehicle.
- Conducts a visual inspection of the turret for damages.
- Checks communications (radios and intercommunications) for damage.
- Performs after-operation-turret PMCS IAW TM 9-2350-252-10-2 or TM 9-2350-284-10-2.
- Confirms zero with a few rounds.
- Reports the status of the vehicle to the section leader or BC.
c. Driver:
- Conducts a visual inspection of the vehicle exterior.
- Performs after-operation-hull PMCS IAW TM 9-2350-252-10-1 or TM 9-2350-284-10-1.
- Checks all bolts and nuts on the road wheels and idle wheels.
- Checks fuel status and oil levels in the engine, transmission, fan tower, final drives, ramp motor and return roller hub windows, road wheels, and idler wheels.
- Checks the engine compartment for any visible signs of damage.
- Reports the status to the BC.
d. Platoon Sergeant:
- Reports vehicle, soldiers, equipment, and ammunition status to the platoon leader and company executive officer or first sergeant IAW the unit SOP.
- Supervises evacuation of wounded soldiers, inoperative equipment, and vehicle.
- Requests replacements and resupply (personnel, equipment, batteries, POL, ammunition) from the first sergeant IAW the unit SOP.
- Supervises the repair of equipment and vehicles within the capability.
e. Platoon Leader:
- Determines and disseminates the lessons learned with the platoon sergeant and squad leaders.
- Reports the platoon status to the company commander.
GO TO:
Table of Contents