

"Black 6, this is Red 6 . . . contact . . . ."
TTP for Maneuver when in Direct Fire Contact with Enemy Forces
by CPT Mike Albertson, CALL NTC Liaison
At an alarming rate, BLUFOR offensive missions at the National Training Center (NTC) come to an agonizing halt when they enter the Red Zone, the observation, indirect and direct fire range of the defending enemy. The inability to effectively maneuver in this Red Zone is the number one trend reversal effort at the NTC. This article focuses on defining some of the specific causes of this trend and offers tactics and techniques that BLUFOR elements can use to improve their ability to successfully maneuver, fight and survive in the Red Zone.
DEFINITIONS:
1. RED ZONE: the enemy's direct fire battle space. A dynamic, physical area that expands or contracts in relation to the ability of the enemy to acquire and engage with direct weapons fire. It is graphically characterized, in a BLUFOR deliberate attack, as the area between the probable line of contact and the limit of advance, within enemy direct fire range.
2. KILL ZONE: an area within the Red Zone, where the enemy creates a fire sack; the place where the enemy ideally wants to destroy and defeat the attacking BLUFOR.
Note: The Kill Zone is within the Red Zone. The enemy tries to gain an unfair advantage on this ground to win the battle.
EXAMPLES:
1. Disrupts BLUFOR attack formations with deadly, preplanned artillery fires.
2. Uses complex obstacles, chemical munitions, scatterable minefields to slow the BLUFOR movement/maneuver.
3. The direct and indirect fire, combined with obstacles, chemicals, and mines, forces the BLUFOR into open terrain, increasing exposure time to direct fire within the Kill Zone.
4. The enemy uses well-prepared fighting positions to make it difficult to be acquired by the BLUFOR. Enemy battle positions are generally "L" shaped, with dismounted infantry, armed with AT5s, securing flanks in rough terrain.
5. The enemy builds deception positions and emplaces dummy minefields.
6. In meeting engagements, enemy units are tasked to find, fix, and destroy using tactical maneuver.
RESULTS:
1. BLUFOR is forced to fight in more than one direction.
2. Enemy interlocking direct fires kill command and control vehicles.
3. BLUFOR attack disintegrates into a piecemeal battle characterized by small unit and individual action; stalled attack facilitates total BLUFOR destruction.
The enemy application of combined arms combat power within the Red Zone most often proves too much for BLUFOR elements to overcome. Units lose TEMPO and commit themselves piecemeal and unsupported into the direct fire battle. Further, a lack of adequate intelligence and the challenges of synchronizing the maneuver of numerous formations and the activities of supporting arms contribute to the mission failures.
The remainder of this article will focus on What to do to win in the Red Zone:
- How to avoid Kill Zones
- How to maneuver to accomplish the given mission.
The tactics and techniques that follow on How to Win in the Red Zone focus on several specific subjects pertinent to the planning, preparation and execution of combat operations, especially close combat in the Red Zone:
- IPB
- MOVEMENT versus MANEUVER
- MASS and MUTUAL SUPPORT
- SUPPRESSION
- SURVEILLANCE TECHNIQUES/TARGET ACQUISITION
- COMBINED ARMS MANEUVER SUPPORT: Artillery, Mortars, Close Air Support
- TEMPO and COMBAT PATIENCE
- USE OF INFANTRY
- EFFECTIVE USE OF TERRAIN
- DEVELOPING THE SITUATION
- BATTLE COMMAND
This article disseminates initial impressions from the National Training Center, based on negative trends, and the resulting trend reversal effort. It addresses actions in contact with enemy forces, or problems associated when units close with the enemy. These initial TTPs will be further refined with a more detailed CALL Newsletter that is being written by the National Training Center. The upcoming Newsletter will also provide Training and Evaluation Outlines, as well as Home Station training strategies. At the conclusion, there are some recommendations about what should be doctrinally incorporated to assist in the Trend Reversal process.
Intelligence
Preparation of the Battlefield (IPB)
PROBLEMS:
1. IPB products produced by BLUFOR elements typically portray doctrinal templates of the standard Motorized Rifle Company (MRC) defense - two Motorized Rifle Platoons (MRP) up and one MRP back.
EXAMPLE: see Diagram No. 1.
2. Situational templates that are produced frequently lack sufficient detail to assist the commanders and staff in visualizing how the enemy will fight at the decisive point on the battlefield.
3. S-2s need to portray, in their vulnerability analysis, how the enemy will look as the BLUFOR enters the Red Zone, and, particularly, within Kill Zones.
RESULT: when S-2s do not do a vulnerability analysis, Task Forces typically place the Support-by-Fire (SBF) position in the enemy fire sack - the very place the enemy plans to achieve mass with direct fire weapon systems.
Techniques: build an integrated situational template with sufficient resolution to focus Bn/TF-level planning.
1.
S-2s must conduct a vulnerability
analysis
to
assist the maneuver commander in exploiting
enemy weaknesses
and
bypassing
enemy strength.
EXAMPLE:
see Diagram
No. 2.
This
shows a defense far more dynamic than the static, doctrinal template. Notice
the range fans for AT8 Songsters
and
the 125-mm tank main guns. The enemy positions vehicles based on METT-T, rather
than the table-top
doctrinal
template alignment. What should be obvious?
There
will be a direct fire fight, in most instances, just to establish the SBF positions.
2. Company/Team commanders must also do their own vulnerability analysis, applying the seven forms of contact (FM 17-15):
- visual
- direct fire
- indirect fire
- obstacles
- CAS/rotary-wing threat
- NBC
- electronic/jamming
- visual
Remember, each form of contact exhibits its own unique ability to break down unit formation integrity, and the ability to achieve speed, mass and momentum.
3. Initially, the SITEMP visualizes how we think the enemy will fight. We have to confirm the SITEMP through our R&S effort, or by developing the situation when in contact. Purpose is to:
Use the following chart to help situationally template and develop range fans:
VEHICLE |
WEAPON |
TYPE | RANGE |
| T-80 | MAIN GUN | 125mm | 2500m |
| MISSILE | AT-8 | 3750m | |
| COAX | 7.62 | 800m | |
| BMP-1 | MAIN GUN | 73mm | 800m |
| MISSILE | AT-3 | 3000m | |
| COAX | 7.62 | 800m | |
| BMP-2 | MAIN GUN | 30mm | 2000m |
| MISSILE | AT-5 | 3750m | |
| COAX | 7.62 | 800m | |
| BRDM | MISSILE | AT-5 | 3750m |
| 2A45 | AT GUN | 125mm | 2000m |
| SA-14 | AD MSL | 4000m | |
| AAA | 23mmX4 | 2500m | |
| IRSAM | SAM | SA-9 | 6000m |
| AVENGER | AD MSL | 6000m | |
| HIND-D | MAIN GUN | 30mm | 1500m |
| ROCKET | 57mm | 3000m | |
| MISSILE | AT-6 | 3750m |
Movement
versus Maneuver
FM 71-1(1988) states that "Maneuver consists of fire and movement." A base of fire element provides suppressive fires that allow moving units to achieve positions of advantage that deliver more lethal fires upon the enemy. Through maneuver, the enemy is eventually killed. It is critical to note that the destruction of the enemy occurs from a position of advantage that was achieved through movement, made possible by fires. The terms base of fire and overwatch are not synonymous. As units conduct movement, the overwatch element observes friendly movement and can respond with immediate suppression of enemy positions engaging the moving element. If the enemy is not visible and does not engage the moving force, the overwatch element does not necessarily fire. On the other hand, when units conduct tactical maneuver, the base of fire always fires to support the moving unit's assault. S.L.A. Marshal, in Men Against Fire, stated that the relationship between fire and movement is so interwoven that "to fire is to move."
PROBLEM:
1. Company/Teams have great difficulty transitioning from movement, where units bound forward supported with an overwatch element, to tactical maneuver, where an active base of fire covers forward progress.
EXAMPLE: Observer/Controllers (OCs) see too many instances of Co/TMs moving in traveling overwatch right into the enemy fire sack, where the Co/TM is destroyed very quickly.
2. Too many units develop schemes of movement, not schemes of maneuver.
EXAMPLE: The OPORD discusses the methods of movement between the assault position and the objective, rather than specifically detailing how the Co/TM plans to achieve its assigned objectives, closing with and destroying the enemy, or holding its assigned area.
3. Too many offensive plans reflect thinking that an attack is an assault to run over the enemy, rather than moving to a position to kill the enemy with fire.
Technique: Develop schemes of maneuver for offensive missions reflecting how the unit intends to methodically and deliberately destroy the enemy.
Look at Diagram No. 3. This shows the relationship between movement, based on the likelihood of contact, and maneuver, when the unit is in contact.
PROBLEM: Many commanders have difficulty designating the proper movement technique and the formation best situationally suited for that technique.
EXAMPLE: The SBF element moves to occupy its SBF position in a traveling formation. The Co/TM moves and occupies the exact GPS grid designated by the graphic control measure on the overlay. This position, as discussed earlier, is within range of enemy direct fire weapons.
RESULT: The SBF element becomes decisively engaged, likely destroyed, or at least rendered ineffective as an SBF element. While establishment of an SBF position is no guarantee of the success of an attack, the destruction of the SBF element before occupation of the position during the initial Red Zone fight will significantly diminish the attack's chances for success.
Techniques:
1. Units must deploy, rapidly and smoothly, transitioning from movement to maneuver when entering the Red Zone.
2. Assume that establishing the SBF position will require an attack into that position, rather than a mere occupation. Artillery must be used to suppress while the Co/TM maneuvers to occupy its position. The Co/TM must maneuver by establishing a Base of Fire, that actively fires on the enemy to allow forward movement of platoons. Platoons then move forward through a series of well-rehearsed Set/Move Drills. We will discuss later how units also establish mass and provide mutual support as they maneuver forward to close with the enemy.
3. The SBF location, on the ground, must be dictated by the actual terrain and situation, not by the precise location of the overlay symbol.
4. Plan to accept the risk associated with advancing into the Red Zone, i..e., becoming decisively engaged and thereby losing some maneuver options.
5. To maximize the ability to maneuver, plan how to achieve and maintain fire superiority - from brigade down to squad level.
Historical precedent says clearly that whoever wins this initial contest for fire superiority will gain immediate initiative to influence subsequent events. Understand also that to maintain fire superiority, suppressive fires may be more important than destructive fires.
". . . the action of opening fire immediately into the area which the enemy is believed to be holding, instead of waiting until several of one's own tanks have been hit, usually decides the issue." -- The Rommel Papers
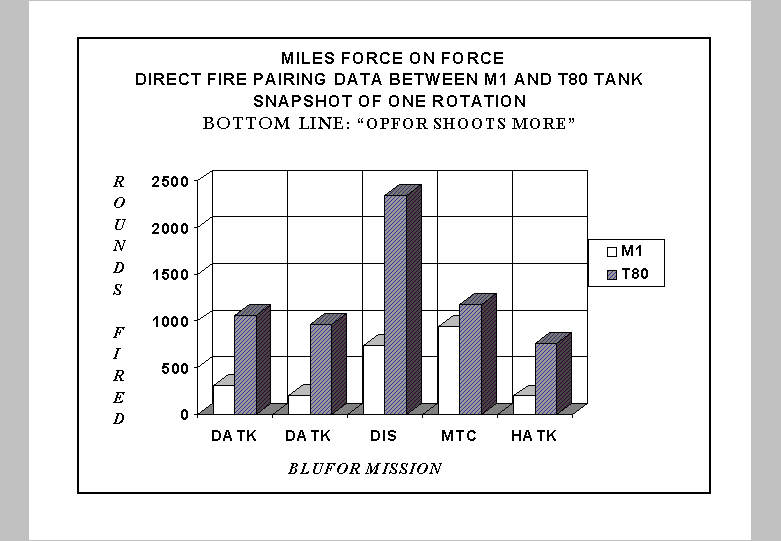
NTC MILES data tends to confirm that achieving fire superiority is still important in producing victory. The Chart below, comparing enemy T-80 tanks with M1A1 tanks during a typical force-on-force rotation, illustrates that enemy tanks fire more rounds.
RESULT: Initiative, specifically the ability to influence the battle, rests with the element that has the other element pinned down and looking for cover. The enemy, for example, consistently achieves and maintains fire superiority, often forcing the BLUFOR to fight in two directions.
When a unit is in contact and enemy direct fire weapons threaten survival, maneuver through fire and movement, is its only salvation. It is this type of maneuver that units must train at Home Station prior to any deployment for combat operations.
Mass
and Mutual Support
Mass is not just bunching up combat vehicles. Rather, units maneuver to mass weapons effects, not systems. Units are successful when they effectively maneuver to outnumber the enemy at a given point - putting the enemy at a disadvantage in each engagement.
All commanders desire tight, agile formations that are capable of responsive mutual support and timely massing of combat power at the decisive point. How units echelon and present themselves into the red zone is another factor critical for success.
PROBLEM: For example, your SOP may call for a distance between vehicles of 100 meters and gaps between company teams from 150 to 200 meters. However, few units can maintain these standards. Dust, confusion, smoke, various levels of driver skills, as well as enemy chemical strikes, artillery, FASCAM, CAS, and EW jamming, all contribute to a gradual, yet constant, elongation of the formation.
RESULT: Unit formations become spread over many kilometers and are incapable of providing mutual support. Rather than massing at the decisive point, units present themselves into the red zone, usually one platoon at a time, as the lead Co/TM attempts to move forward. The attack slows to the speed of the leading element, that is usually unsupported and exposed in the red zone. Often, formations that are initially spread too far for effective control stop and close together very abruptly - in the best direct-fire range of the enemy. The energy of the task force shifts from a violent, aggressive attack to a slow, passive crawl. Very few vehicles actually engage the enemy, and momentum is lost.
Techniques: for fighting in the Red Zone
1. Conceive a series of unfair engagements - unfair to the enemy because we mass more effects than the enemy can handle. Similar to an effective blitz in football where more men rush than can be blocked.
2. Avoid piecemealing into enemy defenses. Develop a time/distance analysis in conjunction with your scheme of maneuver. For example, the TF may elect to adopt an advance guard formation, anticipating early contact with forward enemy CSOPs. Based on the time it would take for the lead Co/TM to either fix or destroy the enemy CSOP, the main body is no farther behind than the time required to close and push into the red zone as a total combined arms team. For example, anticipating a 6-minute fight to destroy forward enemy elements, the TF main body travels 6 minutes behind the advance guard Co/TM. On contact, the TF can then mass effectively and maneuver with deliberation into the red zone. Factor in, during planning, wargaming, and subsequent rehearsal, enemy combat multipliers such as:
- artillery
- CAS, both fixed and rotary
- chemical munitions
- minefields
- obstacles
These multipliers serve to disrupt unit formations and unit integrity. By anticipating the employment of these combat multipliers, units can structure their order of battle, and develop a scheme of maneuver to confidently enter the red zone.
Suppression
PROBLEM: Too many units maneuver without the support of effective, suppressive direct fire in the Red Zone.
RESULT: Too many BLUFOR elements die in the Red Zone, unable to accomplish their mission.
What is suppression? FM 17-12-1, Tank Gunnery, defines suppression as "fires on or about a weapon system to degrade its performance below the level needed to fulfill its mission objectives during the conduct of the fire mission." In other words, to prevent the enemy from shooting and killing us.
Remember the cowboy movies you watched as a kid . . . where the guys pinned down behind the water trough popped up, guns blazing to suppress the bad guys in the shack, while their buddy maneuvered "round back" . . . well, the blazing guns trained on the shack was suppressive fire from an overwatch position. This fire kept the enemy busy . . . kept their heads down . . . allowed successful maneuver so the good guys could assault.
In maneuver warfare, the objective of suppression is exactly the same - effective, suppressive fires allow freedom of maneuver, enabling tankers and infantrymen to occupy better firing positions, from where they can shoot destructive direct fires at the enemy. The enemy will not expose themselves to what they think is deadly fire. Heavy suppressive fires from a base of fire and violent execution are still the best means of conducting the assault and guaranteeing momentum. In addition to suppressing the enemy, a heavy volume of friendly fire will encourage our attacking troops to move forward into the assault. Assaulting soldiers will be inspired by their own force's fire superiority. The enemy's initiative will disappear and the will to resist will diminish.
At first contact: Accuracy is less important than volume.
PROBLEM: Too often commanders state their task and purpose as "suppress in order to destroy," as part of the mission to occupy a support by fire position (SBF) during an attack. This causes tank crews to hesitate - to wait for the perfect Tank Table VIII killing shot.
RESULT: a low volume of suppressive fire that fails to adequately support the assaulting force, allowing the enemy to kill them far more easily.
Techniques: the support force commander must do the combat arithmetic. He must determine how long he can suppress, based on his sustained rate of fire.
1. The commander determines how long the support force can suppress.
2. The commander determines how long the assault/breach force will need suppression to achieve a penetration of enemy defenses, or to maneuver to break through the enemy's FLOT.
3. Do these calculations initially during wargaming; refine during rehearsals; then, cross-talk during execution.
4. Know the respective strengths and weaknesses for each weapon system during suppression, i.e., sustained rate of fire; number of rounds available; effect of different munitions; maximum effective range; probability of hit/kill at various ranges, etc.
EXAMPLE: use Bradleys to suppress enemy positions when the enemy drops down from his firing position. When the enemy moves back up to fire, slam him immediately with M1 fire.
5. EXAMPLE: Task and Purpose: for company team missioned to support the assault force:
"Provide suppressive fires to prevent attrition of the assault or breach force."
6. When the objective is for the assault force to kill the enemy, this objective is best achieved by maneuvering to a position of advantage, then killing the enemy. This maneuvering to an advantageous position is made possible by effective direct fire suppressive fires. There are three possible positive outcomes of suppression:
These positive results of suppression only occur when the fire is sustained and effective, for the duration of the assault/breach.
 Table
of Contents
Table
of Contents
 Mobility/Survivability:
3 Engineer Articles
Mobility/Survivability:
3 Engineer Articles
 "Black
6, this is Red 6 . . . contact . . .", Part 2
"Black
6, this is Red 6 . . . contact . . .", Part 2
|
NEWSLETTER
|
| Join the GlobalSecurity.org mailing list |
|
|
|