

| Chapter Six. Maintenance and Repair |
6-1. Responsibilities. This chapter explains the maintenance and repair of military pipeline systems for which engineer units may be responsible. The commanding headquarters of the constructing and operating units define what repairs are considered minor and major, based on the specific tactical situation. Quartermaster units are responsible for minor repairs and organizational and limited higher-echelon maintenance on a constructed pipeline system. Engineer units are responsible for major repairs when special engineer equipment is required and for organizational maintenance to put the system into operation. See FM 10-20 for details on the maintenance of pipeline systems.
a. Operator Maintenance. The person responsible for the day-to-day care of equipment performs operator maintenance, which is done before and during pipeline operations. Most operator maintenance is preventive maintenance. For example, the operator inspects the pumping equipment for leaks and for signs that the equipment needs adjusting or repairing. He must read the technical manuals for the equipment to be swam his repair responsibilities. The operator performs those actions that are within the limits of his capabilities and duties. He reports defects that he cannot correct to his supervisor. The operator also knows the normal operating characteristics of the equipment. For example, he should be able to tell when the equipment is making more noise than usual and when readings are not within normal operating limits.
b. Organizational Maintenance. The organization responsible for the operation and upkeep of the pipeline and related equipment and facilities performs this type of pipeline maintenance. organizational maintenance--
- Is service and repairs that authorized unit personnel are capable of performing while using the assigned tools, supplies, and test equipment.
- Includes inspecting, adjusting, lubricating, cleaning, making minor repairs, replacing parts in equipment, and servicing. The operator performs the maintenance.
- Includes unit replacement of aboveground joints of pipe, couplings, valves, and fittings; repair of small leaks using overleak clamps; and other repairs not involving construction or special handling equipment.
- Includes repair and maintenance of assemblies using authorized hand tools and small power tools. The equipment does not have to be removed from the area.
c. Support Maintenance. With this type of maintenance, the equipment is removed from the area, repaired, and then returned. Also, support maintenance requires special tools or equipment that the using organization is not authorized to use. Therefore, the using organization cannot perform this maintenance. Support maintenance includes overhauling the pump unit and repairing or reconstructing the pipeline. An example would be laying looped lines to bypass major breaks in the line.
6-2. Safety Precautions. Leaders must be aware of the hazards involved with the construction, operation, and repair of petroleum pipelines and must take measures to prevent accidents. The potential hazards must be identified and reduced before each operation is started. The following paragraphs discuss specific safety precautions pertinent to the construction and repair of pipelines and pumping stations.
a. Fire and Explosion. A constant fire and hazard explosion exists on a pipeline because of the fuels, Construction units must be aware of this during final testing of a newly constructed pipeline and during the repair of an existing pipeline. Units should use an explosimeter to determine how explosive and toxic an area is before entering it. When disconnecting a pipeline to replace damaged pipe or fittings or when a line break occurs, immediately shut down the line and close the closest block valves on each side of the break to capture as much of the fuel as possible before it becomes a fire hazard. Every opening could be a potential fire. Fire-fighting troops should accompany repair crews on major repair assignments. Observe the following precautions while repairing leaks or breaks in military pipelines:
- Keep all vehicles a safe distance from a leak.
- Approach the leak from the windward side.
- Do not approach a leak from a lower level; fuel vapors flow downhill.
- Know how to administer first aid for burns and how to give artificial respiration. Make sure you have adequate first-aid material, including burn ointment and blankets.
- Wear leakproof rubber or synthetic robber boots when standing in fuel.
- Use every precaution to prevent striking sparks when removing and replacing pipe fittings. Use sparkless brass hammers when replacing snap-joint couplings.
- Enforce and observe NO SMOKING rules.
- Never try to weld pipe holes; use clamps.
- Cover an area with petroleum fire-preventing foam even after repairing a leak or break and salvaging the fuel. The area may remain potentially dangerous for several days. Guards should be posted, and they should monitor the area for explosivity, as required.
b. Projectiles. A pipeline under pressure contains a large amount of potential energy. This energy is normally used to move fuel in the pipeline. If pipeline failure occurs, this energy is released suddenly and violently. Pipe sections and fittings can be thrown hundreds of yards. When repairing a coupled pipeline, repressurize and drain it before repairing it. Be very cautious when removing snap-joint couplings.
|
DANGER Avoid working around pressurized pipeline. If you must work in such areas, try to remain shielded by large pieces of equipment or vehicles. |
c. Fuel Inhalation and Skin Contact. Fuels, especially gasoline which contains lead and benzene, are potentiality dangerous to the health of personnel handling them. Inhaled vapors and prolonged skin contact may cause severe irritation. Persistent exposure to leaded gasoline can cause lead poisoning.
|
DANGER An overdose of vapors may cause headaches, dizziness, nausea, unconsciousness, and death. |
a. Temporary Repairs. Repair small leaks in pipe sections and couplings, temporarily, by using clamps. The kind of clamp used depends on the kind of leak. It is not necessary to stop pumping operations while installing clamps. Replace the repaired pipe sections and couplings with new pipe and couplings as soon as possible.
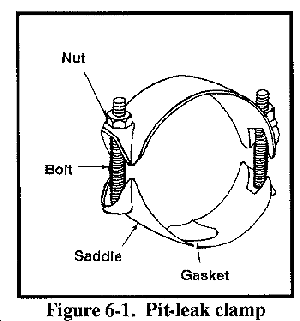
(1) Pit-Leak Clamp. Small-caliber bullets can make holes in a pipeline. Rust can eat holes in the wall of a pipe. These small holes are called pit leaks; use a pit-leak clamp (Figure 6-1) to repair any leaks. If possible, drive small wooden pegs into the holes to stop the leaks until you install a clamp. To mount a pit-leak clamp--
(a) Place the saddle half of the clamp around the pipeline. The gasket should cover the small hole.
(b) Put the bolts in the saddle half of the clamp.
(c) Place the other half of the clamp around the pipeline and over the bolts in the saddle half of the clamp.
(d) Place the nuts on the bolts and tighten the nuts.
(2) Split-Leak Clamp. Flow and surge pressure in a pipeline can cause a section of pipeline to crack or split. Use a split-leak clamp to repair such a split (Figure 2-19). To mount a split-leak clamp--
(a) Cut gasket material large enough to fit the saddle of the split-leak clamp.
(b) Place the saddle half of the clamp around the pipeline. Cover the leak with the gasket and saddle.
(c) Place the clamp stirrups around the pipeline.
(d) Place the nuts on the ends of the stirrups and tighten the nuts.
(3) Overcoupling Leak Clamp. You can stop a leak at a split-ring, groove-type coupling by tightening the bolts on the coupling. Moving the pipe and coupling back and forth and up and down may reseal the gasket and stop the leak. If these actions do not stop the leak, use an overcoupling leak clamp to surround the faulty coupling (Figure 2-20). To install an overcoupling leak clamp--
(a) Take the vent plug out of the top of the overcoupling leak clamp. This allows the pressure and the fuel to escape while putting on the clamp.
(b) Remove the four large side bolts in the overcoupling leak clamp.
(c) Fit the two halves of the clamp and the two-part gaskets over and around the split-ring, groove-type coupling.
(d) Put the four large side bolts back in the clamp and tighten the nuts.
(e) Tighten the smaller packing bolts around each side of the leak clamp to form a seal between the two-part gaskets and the pipe.
(f) Put the vent plug back in the overcoupling leak clamp. Tighten the vent plug.
b. Permanent Repairs. To make permanent repairs on coupled pipelines, break the line and replace the faulty coupling, pipe, or fitting. Before breaking a pipeline, drain its contents and release the pressure. Fuel vapors in the area of the break left in the line and that have collected in low areas could cause a fire, if ignited. To prevent ignition--
- Keep vehicles away from the break.
- Remove anything that could cause a spark.
- Cover any fuel that spills on the ground with fire-retarding foam.
|
WARNING When removing snap-joint couplings on a line under pressure, use extreme caution to avoid personal injury. |
(1) Coupling Replacement. Always make sure that fire-fighting equipment is nearby when replacing a coupling. To replace a faulty coupling--
(a) Stop pumping operations that affect the area you are to repair.
(b) Close the closest gate valve on each side of the area you are to repair.
(c) Drain the line and release the pressure.
(d) Remove the overcoupling leak clamp by removing the four large side bolts if a temporary repair was made. Catch spilled fuel in a container.
(e) Remove the split-ring coupling and gasket. Drain any fuel from the repair section into drums or tank vehicles. (One mile of 6-inch pipeline holds 210 barrels (8,400 gallons) of fuel.)
(f) Inspect the coupling and gasket to determine the cause of the leak. Replace the defected parts.
(g) Reinstall the coupling. You may need come-alongs to drawl the pipe ends together for coupling procedure.
(h) Open the gate valves slowly to put pressure back in the pipeline.
(i) Start pumping.
(j) Remove air from the repaired section by opening the vent valves in the section. If possible, send a scraper through the repaired section to evacuate the air.
(k) Bring the repaired section up to test pressure and check the repaired coupling for leaks.
(2) Pipe Replacement. To repair a section of coupled pipeline, replace the bad section of pipe with a new section. Always make sure that fire-fighting equipment is nearby when replacing a pipe. To replace a pipe--
(a) Stop pumping operations that affect the area you are to repair.
(b) Close the closest gate valve on each side of the area you are to repair.
(c) Drain the line and release the pressure.
(d) Remove the coupling and gasket. Drain any fuel from the repair section into drums or tank vehicles.
(e) Reinstall a new pipe section. Inspect the used gaskets before reinstalling them. You may need come-alongs to draw the pipe ends together for coupling procedures.
(f) Open the gate valves slowly to put pressure back in the pipeline.
(g) Start pumping.
(h) Remove air from the repaired section by opening the vent valves in the section. If possible, send a scraper through the repaired section to evacuate the air.
(i) Bring the repaired section up to test pressure and check the replaced pipe section for leaks.
|
NEWSLETTER
|
| Join the GlobalSecurity.org mailing list |
|
|
|