

MARKSMANSHIP TRAINING
     This chapter is an aid for trainers in preparing and conducting
     marksmanship training for the M249 in the automatic rifle mode.
     Marksmanship training is conducted in three phases--preliminary
     marksmanship; basic marksmanship; and advanced marksmanship,
     which is combat techniques of fire discussed in Chapter 6.
Marksmanship begins with nonfiring individual skill proficiency and concludes with collective proficiency firing during demanding conditions.
5-1. OBJECTIVES
The objectives of M249 marksmanship training are to produce soldiers that
are capable of the following.
-
a. Accurate Initial Burst. Obtaining an accurate initial burst of fire on
the target is essential to good marksmanship. This requires the automatic
rifleman to estimate range to the target, set the sights, and apply the
fundamentals of marksmanship while engaging targets.
b. Adjustment of Fire. The automatic rifleman must observe the strike of the rounds when the initial burst is fired. If not on target, he manipulates the M249 until the rounds do strike the target. He must be proficient in observing the strike of rounds, in observing and using tracers, and in rapidly laying the M249 AR on the target during firing.
c. Speed. Speed is also essential to good marksmanship; it is attained by practice in both dry-fire and live-fire exercises. It is an acquired skill gained through extensive training that combines other skills when delivering fire. Speed should not be stressed to the detriment of accuracy.
5-2. TRAINING PHASES
Marksmanship training for the M249 is progressive in nature. It begins with
nonfiring individual skill proficiency and concludes with collective
proficiency firing during demanding conditions. Soldiers and leaders must
master the fundamentals before attempting individual and collective firings.
More effective and efficient marksmanship occurs if live firing is preceded
with preliminary marksmanship training. Likewise, proficient individual
firing will achieve more proficient collective firing.
-
a. Preliminary Marksmanship. In this phase, the soldier learns and
demonstrates proficiency on individual skills that prepare him for live fire.
This includes mastering mechanical training, the four fundamentals of
marksmanship, sight adjustments, and fire commands. (See Section II .)
b. Basic Marksmanship. In this phase, the soldier applies the fundamentals in live-fire exercises during day, night, and NBC conditions. This includes zeroing, 10-meter firing, field zeroing, and transition firing. (See Section III.)
c. Advanced Marksmanship. In this phase, the soldier is trained on combat techniques of fire and techniques of employment. (See Chapter 6.)
5-3. TRAINING STRATEGY
Training strategy involves the overall concept for integrating resources into
a program to train individual and collective skills that are needed to
perform a wartime mission. The goal of a marksmanship program is to produce
well-trained marksmen who can win and survive on the battlefield.
-
a. Leaders implement training strategies for M249 AR marksmanship
in TRADOC institutions (IET, NCOES, IOBC, and IOAC) and in units. The
overall training strategy is multifaceted and is inclusive of the specific
strategies used in institution and unit programs. Also included are the
supporting strategies that use resources such as publications, ranges,
ammunition, training aids, devices, simulators, and simulations. These
strategies focus on developing critical soldier skills and leader skills that
are required for the intended outcome.
b. The training strategies contain two components: initial training and sustainment training. Both may include individual and collective skills. Initial training is critical because a task that is taught correctly and learned well is retained longer. When an interim of nonuse occurs, well-trained skills are more quickly regained and sustained. The more difficult and complex the task, the harder it is to sustain the skill. Personnel turnover plays a major factor in the decay of collective skills, since the loss of critical team members requires retraining to regain proficiency. If a long period elapses between initial and sustainment training sessions or training doctrine is altered, retraining becomes necessary.
c. The training strategy for M249 marksmanship begins in the institutions and continues in the unit. Figure 5-1, illustrates an example of this overall process, which provides a concept of the flow of unit sustainment training. Combat arms IET provides field units with soldiers who are familiar with standards in basic marksmanship tasks. The soldiers graduating from these courses have been trained to maintain their M249s and to hit a variety of targets. They have learned range determination, target detection, application of marksmanship fundamentals, and other skills needed to engage a target.
d. Additional skills trained in the institution include techniques for employment, classes of fire, and fire commands. These skills must then be reinforced in the unit. Related soldier skills of camouflage, cover and concealment, maneuver, and preparation and selection of a fighting position are addressed in STP 21-24-SMCT, which must be integrated into tactical training.
e. Training continues in units on the basic skills taught in combat arms IET. Additional skills, such as suppressive fire and supporting fire, are trained and then integrated into collective training exercises, which include squad and platoon live-fire exercises. (A unit M249 marksmanship training program is explained in Appendix A.) The strategy for sustaining the basic marksmanship skills taught in combat arms IET involves periodic preliminary marksmanship training, followed by 10-meter, transition firing, and qualification range firing. However, a unit must establish a year-round program to sustain skills. Key elements include training the trainers and refresher training of nonfiring skills.
f. In the unit, individual proficiency and leader proficiency of marksmanship tasks are integrated into collective training that includes squad, section, and platoon drills and STXs. The collective tasks in these exercises, and how they are planned and conducted, are in ARTEP 7-8-MTP and ARTEP 7-8-DRILL. Collective tasks are evaluated to standard and discussed during leader and trainer after-action reviews. Objective evaluations of both individual and unit proficiency provide readiness indicators and future training requirements.
g. A critical step in the Army's overall marksmanship training strategy is to train the trainers and leaders first. Leader courses include limited M249 AR training, but unit publications will help develop officer and NCO proficiency necessary to plan and conduct marksmanship training and to evaluate the effectiveness of their programs. Proponent schools provide training support materials to include field manuals, training aids, devices, simulators, and programs that are doctrinal foundations and guidance for training the force.
h. Once the soldier understands the weapon, knows how to zero, and has demonstrated proficiency at 10-meter and transition ranges, he should be exposed to more difficult ranges and scenarios.
i. IET culminates in the soldier's proficiency assessment, which is conducted on the 10-meter and transition and record fire ranges. Unit training culminates in a collective, live-fire, tactical exercise that provides an overview of unit proficiency and training effectiveness.
Figure 5-1. Unit marksmanship sustainment strategy.
5-4. TRAINING FOR COMBAT CONDITIONS
The trainer must realize that qualification is not an end but a step toward
reaching combat requirements. To reach this goal, the automatic rifleman
not only considers his position and the use of his weapon, but also some of
the following combat conditions as well.
-
a. Most engagements will be within 300 meters; however, the automatic
rifleman must still engage targets out to the maximum range of the M249 AR.
b. Enemy personnel are seldom visible except when assaulting.
c. Most combat fire must be directed at an area where the enemy has been detected or where he is suspected of being but cannot be seen. Area targets consist of objects or outlines of men irregularly spaced along covered and concealed areas (ground folds, hedges, borders of woods).
d. Most combat targets can be detected by smoke, flash, dust, noise, or movement, but they are visible only for a moment.
e. Some combat targets can be engaged by using reference points, predetermined fire, or range card data.
f. The nature of the target and irregularities of terrain and vegetation may require a firer to use a variety of positions to place effective fire on the target. The most stable position for the automatic rifleman is the prone bipod-supported position.
g. Most combat targets have a low contrast outline and are obscured. Therefore, choosing an aiming point in elevation is difficult.
h. Time-stressed fire in combat can be divided into three types: a single, fleeting target that must be engaged quickly; distributed targets that must be engaged within the time they remain available; and a surprise target that must be engaged at once with instinctive, accurate fire.
Once a soldier is proficient in the characteristics and mechanical training of the M249, he is ready to be trained on the four fundamentals of marksmanship. As the automatic rifleman learns the fundamentals, he should be required to manipulate the sights, use his body to shift and lay the sights on the target, and respond to fire commands. Dry-fire exercises are an excellent method for training to proficiency.
5-5. FUNDAMENTALS, MARKSMANSHIP
The four fundamentals for firing the M249 are steady position, aim, breath
control, and trigger control.
-
a. Steady Position. In automatic fire, position is the most important
aspect of marksmanship. If the automatic rifleman has a good zero, aims his
weapon correctly, and properly applies a steady hold in firing a burst of
three rounds, the first round of that burst will hit the target at the point
of aim. However, this is not necessarily true of the second and third rounds.
The first round hits the aiming point the same as when a round is fired
singularly. The recoil from the first and subsequent rounds will
progressively disturb the lay of the weapon with each round of the burst. The
relationship between the point of impact of the first and subsequent rounds
of the burst depends on the stability of the automatic rifleman's position.
His body, directly behind the weapon, serves as the foundation, and his grip
serves as a lock to hold the weapon against the foundation. The better the
body alignment and the steadier the grip, the less dispersed the rounds of a
burst of automatic fire will be.
b. Aim. To aim the M249 AR, the automatic rifleman must align the sights, focus his eye, obtain a correct sight picture, control his breathing, and maintain trigger control.
-
(1) Sight alignment. Align the rear sight aperture (peep sight) with the
sight post of the hooded front sight. Then, align the front sight post in the
center of the rear peep sight. An imaginary horizontal line drawn through
the center of the peep sight should touch the top of the front sight post,
while an imaginary vertical line through the center of the rear peep sight
should bisect the front sight post.
(2) Focus of the eye. A good firing position places the eye directly on line with the center of the rear sight. Focus on the tip of the front sight post. The natural ability of the eye to center objects in a circle and to seek the point of greatest light (center of peep sight) aids in providing correct sight alignment.
(3) Sight picture. A correct sight picture has the target, front sight post, and rear sight aligned. The sight picture consists of sight alignment and placement of the aiming point on the target. Align the tip of the front sight post in the center (Figure 5-2) of the rear peep sight and then align the sights with the target. Align the top of the front sight post on the center base of the target.
c. Breath Control. Two types of breath control are used. When firing single shots, as in zeroing, the automatic rifleman stops breathing after most of the air has been exhaled during the normal breathing cycle. He fires before he feels any discomfort. During automatic fire, ideally, the automatic rifleman exhales and stops his breath when pressing the trigger. He does not have time to take deep breaths between bursts. He must hold his breath before each burst or adapt his breathing by taking quick shallow breaths or taking deeper breaths between several bursts.
d. Trigger Control. Pressing the trigger straight to the rear and releasing it helps control the number of rounds in each burst and prevents disturbing the lay of the weapon. For a three-round burst, the automatic rifleman presses the trigger to the rear, says "Press, release;" and releases the trigger.
Figure 5-2. Sight picture.
5-6. FUNDAMENTALS, FIRING POSITIONS
The bipod-supported prone position and the bipod-supported fighting position
are covered in preliminary marksmanship training.
-
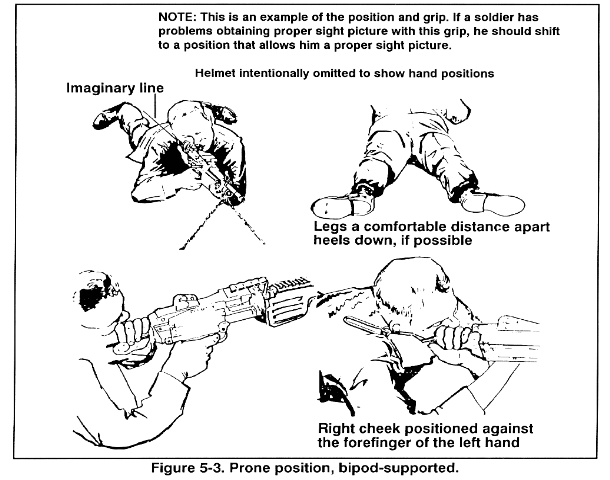
a. Prone Position, Bipod-Supported.
-
(1) Assume a prone position to the rear of the weapon and place the
shoulder rest on your firing shoulder. An imaginary line drawn through the
weapon should bisect the firing shoulder and buttock and continue through
the heel of your foot.
(2) Spread your legs a comfortable distance apart with heels as close to the ground as possible and yet still be comfortable.
(3) Grasp the pistol grip with your firing hand with the fleshy end of the index finger resting lightly on the trigger. Place your nonfiring hand on the small of the stock with your thumb curled underneath. Slide your nonfiring hand forward until your little finger touches the receiver, so your aiming point will always be the same.
(4) Place your cheek against the forefinger of your nonfiring hand to form a stock weld. Try to position your nonfiring hand and cheek at the same spot on the stock each time you fire the weapon. The stock weld should provide for a natural line of sight through the center of the rear sight aperture to the front sight post and to the target. Relax your neck so that your cheek rests on your forefinger naturally.
(5) Apply a firm, steady pressure rearward and down, holding the weapon tightly into the hollow of your shoulder while aiming and firing.
(6) Keep your shoulders level and elbows about an equal distance from the receiver of the weapon (Figure 5-3).
Figure 5-3. Prone position, bipod-supported.
-
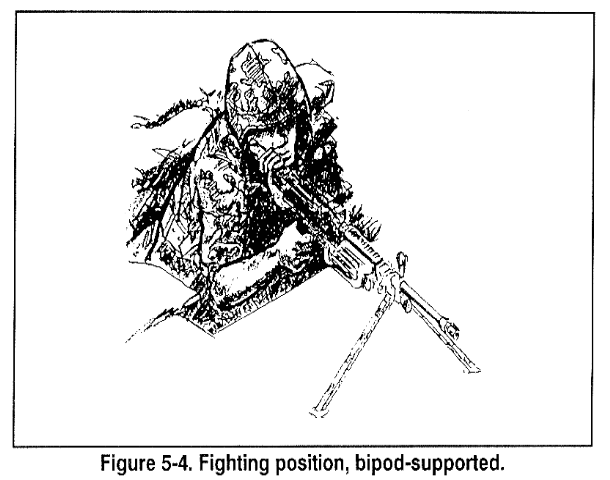
b. Fighting Position (Foxhole), Bipod-Supported.
-
(1) Extend the bipod legs and place the M249 AR in front of the position.
(2) Place your right (firing side foot) foot sideways against the rear of the fighting position and lean forward until your chest is squarely against the forward wall.
(3) Raise the folding shoulder rest and place it on your firing shoulder. Keep your shoulders level or parallel to the ground.
(4) Grasp the pistol grip with your firing hand with the fleshy end of the index finger resting lightly on the trigger. Place your nonfiring hand on the small of the stock with your thumb curled underneath.
(5) Place your cheek against the forefinger of your nonfiring hand to form a stock weld. Try to position your nonfiring hand and cheek at the same spot on the stock each time you fire the weapon. The stock weld should provide for a natural line of sight through the center of the rear sight aperture to the front sight post and to the target. Relax your neck so that your cheek rests on your forefinger naturally.
(6) Apply a firm, steady pressure rearward and down, holding the weapon tight into the hollow of your shoulder while aiming and firing.
(7) Keep your shoulders level and elbows about an equal distance from the receiver of the weapon.
(8) Adjust the bipod legs as needed (Figure 5-4).
Figure 5-4. Fighting position, bipod-supported.
5-7. FUNDAMENTALS, NIGHT FIRING
Although the same four fundamentals of marksmanship are used for night
firing, adjustments must be made to accommodate the night vision devices.
-
a. Steady Position. When firing unassisted, changes in head position and
stock weld are necessary especially when using weapon-target alignment
techniques. Normally, the automatic rifleman positions his head so that he
can align the weapon on the target and look over the sights. In some cases,
the lower part of his jaw makes firm contact with his nonfiring hand on the
stock, with his eyes an inch or so above the sights. The key is to use the
natural pointing ability to align the M249 AR on the target. When using NVDs,
the head position and stock weld must be altered to be able to use the
device. Sometimes height of the NVD may make this impossible. NVDs alter the
M249's weight and center of gravity. The automatic rifleman must compensate
by exerting greater pressure and control with his firing hand on the pistol
grip and his nonfiring hand on the stock.
b. Aim. Various modifications are necessary when aiming the M249 AR at night. When firing unassisted, the automatic rifleman uses off-center vision instead of pinpoint focus. Both eyes are open and focused downrange on the target and not on the sights. Rather than aim using the sights, the automatic rifleman looks over the sights and points the M249 AR where he is looking. The normal tendency is to fire high so the automatic rifleman must improve weapon-target alignment by pointing slightly low to compensate. When using NVDs, the automatic rifleman uses the necessary aiming process to use the device.
c. Breath Control. This fundamental is not affected by night firing conditions; however, wobble is more pronounced when using NVDs, because they magnify the field of view.
d. Trigger Control. There is no change to this fundamental during night firing. The objective is to not disrupt alignment of the weapon with the target.
5-8. FUNDAMENTALS: NUCLEAR, BIOLOGICAL, AND CHEMICAL
The four fundamentals remain valid in an NBC environment, although some
modifications may be needed to accommodate the equipment.
-
a. Steady Position. The bulk of overgarments may require adjustments
to the position for stability and comfort. A consistent stock weld is
difficult to maintain because of the shape of the protective masks. The
automatic rifleman has to hold his head in an awkward position to see through
the sight. If necessary, he may cant the weapon to overcome this; this
relieves the neck muscles and places the eye on line with the center of the
rear sight.
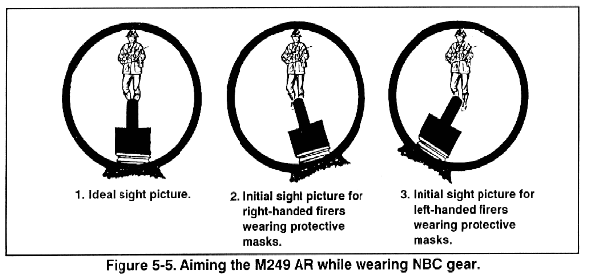
b. Aim. The automatic rifleman may have to rotate (cant) the M249 AR to see through the rear sight aperture. He should rotate only enough to align the sights, and only if necessary. Ballistics cause rounds to impact low in the direction of the cant at long ranges. If canting at targets beyond 175 meters, the automatic rifleman must adjust his point of aim. The best technique is to aim at center base of the target initially and then make adjustments based on the strike of the rounds. Right-handed firers adjust point of aim to the right and high; left-handed firers to the left and high (Figure 5-5).
c. Breath Control. Although breathing is somewhat restricted and more difficult while wearing the protective mask, the impact is negligible. Care must be taken, however, to avoid hyperventilating during burst fire. The amount of oxygen inhaled by taking quick shallow breaths or deeper breaths between bursts is significantly reduced.
d. Trigger Control. Trigger control is affected when the automatic rifleman wears gloves. The effect cannot be accurately predicted for each soldier; therefore, practice and training under these conditions are required.
Figure 5-5. Aiming the M249 AR while wearing NBC gear.
5-9. FUNDAMENTALS, MOVING TARGETS
The fundamentals used to hit moving targets are the same as those needed
to hit stationary targets. However, the procedures to engage moving targets
vary as the angle, speed, and range of the target vary. Targets moving
directly at the automatic rifleman are engaged the same as a stationary
target; there is no change in the application of the fundamentals. But
fast-moving targets at varying ranges and angles do require changes in the
application of steady position and aiming. (For aerial targets engagements,
see Appendix C.)
-
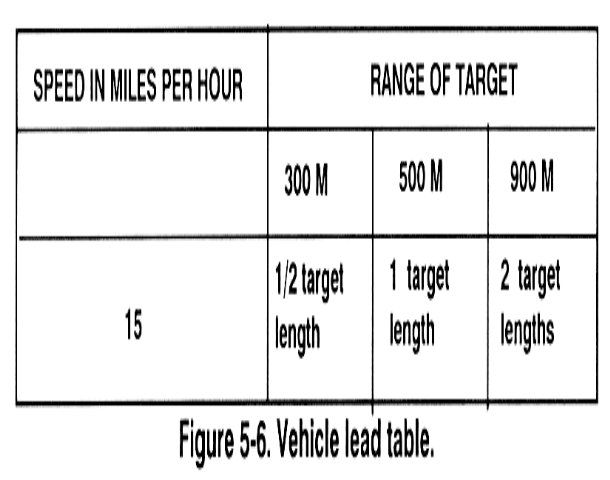
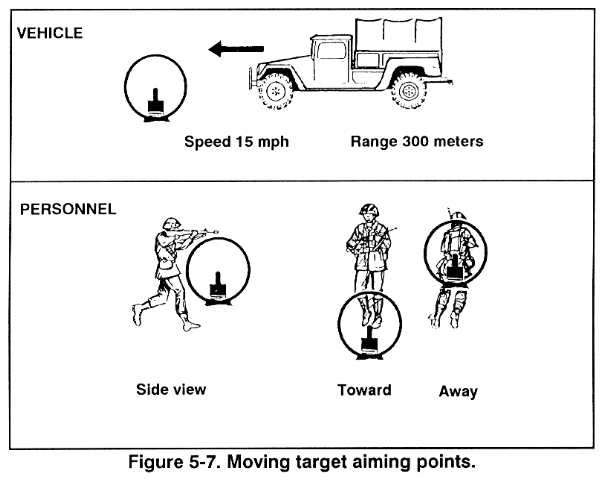
a. Leads. To hit a moving target, the M249 AR must be aimed ahead
of the target a sufficient distance to cause the bullet and target
to arrive at the same time at the same point. This distance is
measured in target lengths. One target length as seen by the automatic
rifleman is one lead. Leads are measured from the center of mass. The simple
lead table in Figure 5-6, gives the amount of lead needed to hit a
moving target moving at right
angles to the automatic rifleman at speed and ranges indicated. The
automatic rifleman makes adjustments as conditions change. If target speed is
7 1/2 mph, the amount of lead is half that shown on the table; at 30 mph,
double that shown. The angle the target moves also changes the lead. If
the target is moving on an oblique angle, only 1/2 the lead is required. For a
target moving directly at the automatic rifleman, the aiming point is below
the center base of the target depending on range and slope of the ground. For
a target moving directly away from an automatic rifleman, the aiming point is
above the center base of the target (Figure 5-7). Too much lead is better
than too little because the target moves into the beaten zone, and
observation of the strike of the rounds is easier in relation to the target.
Figure 5-6. Vehicle lead table.
Figure 5-7. Moving target aiming points.
b. Tracking Techniques. The automatic rifleman aims at a point ahead of the target equal to the estimated number of leads, maintains this lead by tracking the target (manipulates the weapon at the same angular speed as that of the target), and then fires. Tracking puts the automatic rifleman in position for a second burst if the first one misses.
c. Trapping Techniques. The automatic rifleman establishes an aiming point forward of the target and along the target path. He presses the trigger as the target reaches the appropriate point in regard to lead.
d. Bipod Techniques. For targets moving directly away or at the automatic rifleman using a bipod, the same procedures are used. From a prone position, the automatic rifleman may be required to adjust his position quickly depending on range, angle, and speed of the target.
-
(1) Steady position. If appropriate lead cannot be achieved by shifting
your shoulders right or left (traverse) or by moving your elbows closer or
farther apart (search), redistribute your weight to your elbows and toes and
raise your body off the ground. Using your toes, shift your body right or
left in the opposite direction of the target and pivot on your elbows until
you are well ahead of the target. Rapidly assume a steady position, obtain
the sight picture, lead and engage the target. Trapping is the preferred
technique. In order to apply this method, the bipod legs must move freely.
When firing from a fighting position, you must be flexible enough to track
any target in your sector. If lead cannot be achieved, slide the bipod legs
in the appropriate direction (left or right) ahead of the target and continue
as in the prone position. Trapping is still the preferred technique. If the
terrain does not permit sliding the weapon left or right, lift the bipod legs
off the ground and place them where you can aim ahead of the target,
reestablish a steady position, and continue as before.
(2) Aim. You must determine angle, speed, and range quickly; acquire the appropriate lead; and engage the target. Align the front sight post in the proper relationship to lead the target. For targets moving directly away, place the front sight post above center of mass. For targets moving directly at you, align the front sight post below center of mass. For all other targets, align the front sight post with center base of the target with the appropriate lead.
(3) Breath control. There are no changes except that you must hold your breath quickly because of the fleeting nature of moving targets.
(4) Trigger control. There is no change in the application of this fundamental.
5-10. FUNDAMENTALS, TRAVERSE AND SEARCH
Traverse moves the muzzle of the weapon to the left or right to distribute
fire laterally. Search moves it up or down to distribute fire in depth.
-
a. Traverse. To make minor changes in direction, the automatic rifleman
shifts his shoulders to the right or left to select successive aiming points
in the target area. Major changes require him to redistribute his weight to
his elbows and toes and raise his body off the ground. Using his toes, he
shifts his body to the right or left to be in the opposite direction of the
target, and pivots on his elbows until he is once again aligned with the
target. He rapidly assumes a steady position, obtains the proper sight
picture, and engages the target.
b. Search. Searching is moving the muzzle of the weapon up or down to distribute fire in depth. To make changes in elevation, the automatic rifleman moves his elbows closer together to lower the muzzle or farther apart to raise the muzzle. Gross errors in range are corrected by adjusting the range setting with the elevation knob.
5-11. DIRECT LAY
The simplest, quickest, and most effective technique of delivering fire with
the M249 with bipod is to align the sights on the target and properly apply
fire. This technique of fire is called direct lay.
5-12. APPLICATION OF FIRE
The automatic rifleman must aim, fire, and adjust on a certain point of the
target. He always keeps the center of his beaten zone at the center base of
the target for maximum effect from each burst of fire. When this is done,
bullets in the upper half of the cone of fire will run through the target if
it has height, and the bullets in the lower half of the beaten zone will
ricochet into the target.
5-13. ADJUSTMENT OF FIRE
The automatic rifleman initially sets his sights with the range to the
target, lays on the target (sight alignment and sight picture on the center
base of the target), fires a burst, and observes the strike of the rounds or
flight of the tracers. When the initial burst is correct, he continues to
fire until the target is covered. He must regain a good sight picture before
each burst when firing with the bipod.
-
a. Sight Corrections Method. An automatic rifleman must observe and
adjust fire rapidly to be effective. He observes bursts of fire by noting the
strike of the rounds in the target area and the tracers in flight. The
technique to adjust fire depends on time, range, and amount of adjustment.
These factors assist the automatic rifleman in determining whether or not to
make sight corrections or adjust position and point of aim. When the initial
burst is not correctly placed, the automatic rifleman may change the
elevation and windage on the sights and fire another burst on the target.
This method is time-consuming, even for the well-trained soldier.
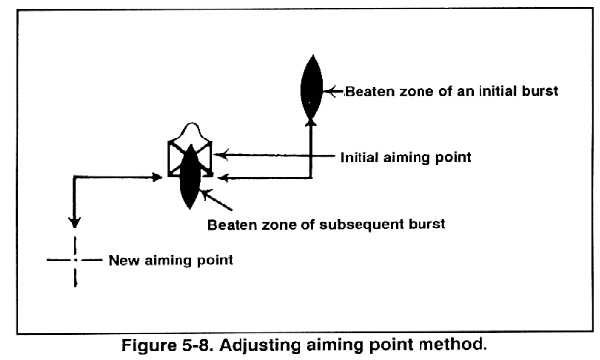
b. Adjusted Aiming Point Method. In this method of fire adjustment, the automatic rifleman uses his sight but does not make sight corrections. This is the quickest method. If the automatic rifleman misses the target with his initial burst, he must rapidly select a new aiming point the same distance from the target as the center of impact of the initial burst, but in the opposite direction. For example, if the strike of the rounds of the initial burst is 20 meters beyond and 10 meters to the right of the target, he rapidly selects an aiming point about 20 meters short and 10 meters to the left of the target, lays on that aiming point, and fires (Figure 5-8). When selecting a new aiming point, he may have to shift his shoulders slightly to the left or right for windage corrections. For elevation changes, he moves his elbows closer together (lowers the impact) or farther apart (raises the impact). For large corrections, he must move his elbows and realign his body to remain directly behind the weapon. He does this by redistributing weight to his elbows and toes and raises his body off the ground. He shifts his body using his toes, to the right or left, pivoting on his elbows until he is on line with the target. Then he assumes a steady position, obtains the sight picture, and engages the target.
Figure 5-8. Adjusting aiming point method.
5-14. EFFECTS OF WIND
The effects of wind vary depending on changes in speed and direction. Wind is
classified by the direction it is blowing in relationship to the firer and
target line. The clock system is used to indicate wind direction and value
(Figure 5-9).
-
a. Clock System. Winds that blow from the left (9 o'clock)
or right (3 o'clock) are called full-value winds, because they have the
most effect on the bullet. Winds that blow at an angle from the front or rear
area are called half-value winds, because they have about one-half the effect
on the bullet as full-value winds. Winds that blow straight into the firer's
face or winds that blow straight into the target are termed no-value winds,
because their effect on the bullet is too small to be a concern. Effects of
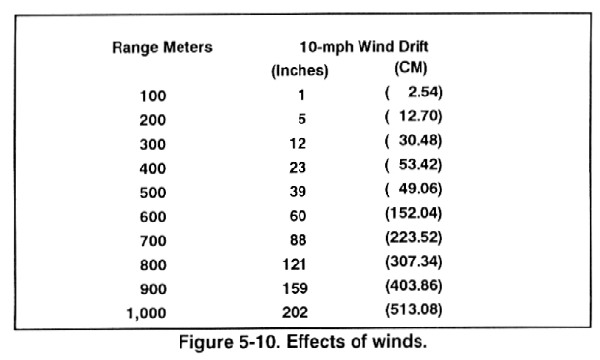
the wind increase as the range increases. Figure 5-10 shows the effects of a
10-mph wind at varying ranges. A 20-mph wind doubles the effect. Winds at
other than right angles have less effect. As indicated in Figure 5-10, wind
has almost no effect up to 300 meters.
Figure 5-9. Clock method.
Figure 5-10. Effects of winds.
b. Wind Measurement. Wind is highly variable and sometimes quite different at the firing position than at the target position. Even though the wind is blowing hard at the firing position, the bullet path could be protected by trees, brush, or terrain. The wind can vary by several miles per hour between the time a measurement is taken and when the bullet is fired. Therefore, training time should not be wasted trying to teach automatic riflemen an exact way to measure wind speed. They should know that even though wind can affect trajectory, it can be overcome by adjusting fire. A wind gauge can be used for precise measurement of wind velocity. When a gauge is not available, velocity is estimated by one of the following methods.
-
(1) Observation method. The following information can assist in
determining wind velocities.
(a) Winds under 3 mph can barely be felt, but the presence of slight wind can be determined by drifting smoke.
(b) Winds of 5 to 8 mph constantly move the leaves of trees.
(c) Winds of 8 to 12 mph raise dust and loose paper.
(d) Winds of 12 to 15 mph cause small trees to sway.
(2) Pointing method. A piece of paper or other light material can be dropped from shoulder height. By pointing directly at the spot where it lands, the angle can be estimated. As shown in Figure 5-11, this angle is also divided by the constant number 4 to determine the approximate wind speed in miles per hour. However, this only indicates conditions at the firing position; they may be different at the target.
Figure 5-11. Pointing method.
5-15. FIRE COMMANDS
The standard fire command is used as a means of control during preliminary,
basic, and advanced marksmanship training. The fire command must be
explained to the automatic rifleman. The elements are given (as appropriate)
before each dry-fire or live-fire exercise. The automatic rifleman takes
action as directed and repeats each element as it is announced. (For a
detailed explanation of fire commands, see Chapter 6.) When using the basic
10-meter range target, the fire command elements are--
-
a. Alert. The alert is given as "Automatic rifleman." Upon hearing the
alert, the automatic rifleman loads his weapon and places the safety on FIRE.
b. Direction. Direction is given as FRONT since the targets appear to the automatic rifleman's front on the basic range.
c. Description. Description is given as PASTER NUMBER (pasters 1 through 8 as appropriate), at which time the automatic rifleman lays his weapon on the announced paster.
d. Range. An elevation of 700 meters on the rear sight assembly is always used on the basic range. This is announced as SEVEN HUNDRED, at which time the automatic rifleman must ensure that his rear sight assembly has the correct elevation setting.
e. Method of Fire. Firing on the basic range is at a point target, so the method of fire is announced as FIXED. The automatic rifleman fires either single rounds or bursts at a rate slower than the sustained rate; therefore, the rate-of-fire element is omitted.
f. Command to Open Fire. This is announced as AT MY COMMAND. When the automatic rifleman is ready, he announces "Up." When all automatic riflemen are ready to fire, the command FIRE is given.
5-16. DRY-FIRE EXERCISES
Dry-fire exercises train the techniques of loading, unloading, immediate
action, fundamentals of marksmanship, and sight manipulation. These exercises
may be conducted using blank or dummy ammunition and should be conducted
using fire commands when appropriate. If the blank firing attachment is
used, safety restrictions for its use must be enforced. While the automatic
rifleman performs the tasks, the coach--
- Checks the sight setting and initial lay.
- Checks the automatic rifleman's position.
- Ensures the automatic rifleman simulates firing before adjusting his position.
- Checks for proper body adjustment.
- Critiques the automatic rifleman at the end of the exercise.
-
a. Loading and Unloading Exercises. The procedures for loading and
unloading are prescribed in Chapter 3 and should be reinforced using
dummy ammunition. This training instills confidence and proficiency in the
operation of the weapon. It also provides training in clearing the weapon.
b. Immediate-Action Exercise. This exercise is conducted using linked dummy rounds and the basic machine gun target (see paragraph 5-18). The instructor should use salvage links to link the dummy rounds together.
-
(1) Load the weapon with dummy ammunition and aim at one of the
aiming pasters on the basic machine gun target.
(2) Being conscious of the sight picture, press the trigger and the bolt goes forward (simulate firing the weapon). If you disturbed the sight picture, check your position and grip, and maintain better control of the weapon.
(3) If you have a stoppage, apply immediate-action procedures and continue to fire.
c. Operational Exercise. The automatic rifleman aims and simulates firing each dummy round at the aiming paster on the basic machine gun target.
-
(1) Observe the sight picture through the feeding, locking, and firing
cycle. This provides feedback on your ability to maintain and hold the sight
picture.
(2) If at the completion of the firing cycle you observe significant movement of the sight picture, your position is not steady enough.
(3) Apply immediate action after firing each shot to extract and eject the dummy cartridge and return the bolt to the cocked position. Return the cocking handle to the forward position.
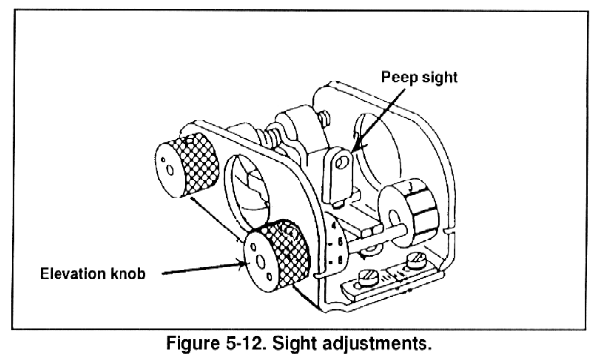
d. Sight Setting and Sight Change Exercises. These exercises are to train the automatic rifleman in the operation and adjustment of the rear sight.
-
(1) For large adjustments in elevation (range), manipulate the rear sight
to different range settings (300 to 1,000 meters). For fine adjustments in
elevation, manipulate the rear peep sight through its maximum range from
bottom (0 clicks in elevation) to the top (9 clicks in elevation).
(2) To make adjustments for windage, traverse the rear sight across the sliding scale.
Figure 5-12. Sight adjustments.
e. Traversing and Searching Exercise. After the automatic rifleman knows the principles of sighting and aiming and can assume a satisfactory firing position, he learns how to make minor and major body changes to obtain an accurate initial lay by using body position changes. He practices shifting the direction of the weapon to successive points by manipulating his body. The basic machine gun target is placed 10 meters from the weapon for this exercise.
-
(1) Make adjustments for large shifts in direction by using the
elbows-and-toes technique described earlier. Make small changes in direction
by adjusting your shoulders.
(2) Make major elevation changes by adjusting the elevation knob. Make minor elevation changes by adjusting your elbows.
(3) Traverse and search the target by sighting on the initial aiming paster (number 5 or 6) and then shifting to each of the other pasters in order (5 through 6 or its reverse).
(4) Upon receiving a fire command, repeat the instructions, set the sights, lay the weapon on the designated paster, assume the correct position, and report UP.
(5) At the command FIRE, simulate firing two single shots, then shift to the next paster and simulate firing until the exercise is complete.
f. Dry-Fire Proficiency (Performance) Examination. An automatic rifleman must demonstrate skill in all the tasks of the dry-fire proficiency examination before he is allowed to progress to 10-meter live firing. This examination emphasizes learning by doing. Proficiency is tested on a pass or fail basis. (The proficiency test is in Appendix B.)
g. Remedial Training. Remedial training must be given to soldiers who fail the performance objectives. Automatic riflemen who have passed the proficiency test may be used to assist in the training of soldiers having difficulty. Following retraining, the soldiers are retested in those tasks.
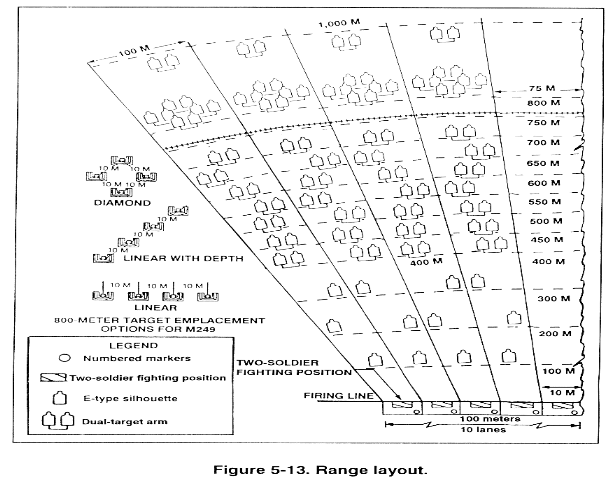
5-17. MULTIPURPOSE MACHINE GUN RANGE LAYOUT
The multipurpose machine gun range is used for conducting the 10-meter
course as well as transition day, night, and integrated NBC firing. The
firing area has 10 lanes. (Detailed setup and target configuration are
described in TC 25-8. The layout is shown in Figure 5-13.)
Personnel required for conducting the 10-meter range as well as the
transition firing are the same, and they should perform the same duties for
each training period. Local policy may dictate personnel requirements. The
following are the minimum required personnel: OIC, NCOIC, safety officer or
NCO, ammunition NCO, tower operator, lane NCOs, trainer and coaches, or IAW
TC 25-8. All personnel must adhere to safety rules in accordance with AR
385-63, local regulations, and Appendix D.
Figure 5-13. Range layout.
5-18. BASIC MACHINE GUN TARGET
The basic machine gun target (FSN 6920-078-5128) is used for the 10-meter
firing exercise (Figure 5-14). The following explanation of the target,
including the size of the aiming pasters and scoring spaces, aids in zeroing
the M249s and facilitates control during the 10-meter firing exercises. The
target consists of four sections lettered A, B, C, and D. Each section has
four point targets numbered l, 2, 3, and 4; and two sets of area targets
numbered 5 through 6 and 7 through 8. Each space is 4 cm wide and 5 cm high.
The black aiming paster within the numbered scoring spaces is 1 cm square.
The target is used to score two automatic riflemen--one uses sections A and
B, and the other automatic rifleman uses sections C and D.
Figure 5-14. Basic machine gun target.
-
a. Point Targets. Point targets on the basic machine gun target are
pasters 1 through 4 of sections A, B, C, and D. Firing at point targets
exposes the automatic rifleman to zeroing techniques and controlled-burst
fire techniques. Targets 1 through 4 can also be used for qualification.
b. Area Targets. Area targets on the basic machine gun target consist of pasters 5 through 6, and 7 through 8 of sections A, B, C, and D. Target group 5 through 6 provides the automatic rifleman with targets in depth and allows him to use a series of aiming points to disburse fire across the target by using body position changes. Target group 7 through 8 provides the automatic rifleman with linear targets with depth. This series of targets uses a series of aiming points to disburse fire across the target and in depth by using body position changes.
c. Grid Square Overlay. This device assists the automatic rifleman in zeroing his weapon at 10 meters, while using the basic machine gun target (Figure 5-15). The grid square overlay is used the same as an M16 25-meter zero target, except the material can be made of plastic or view graph transparency. Each square is equal to 1 cm.
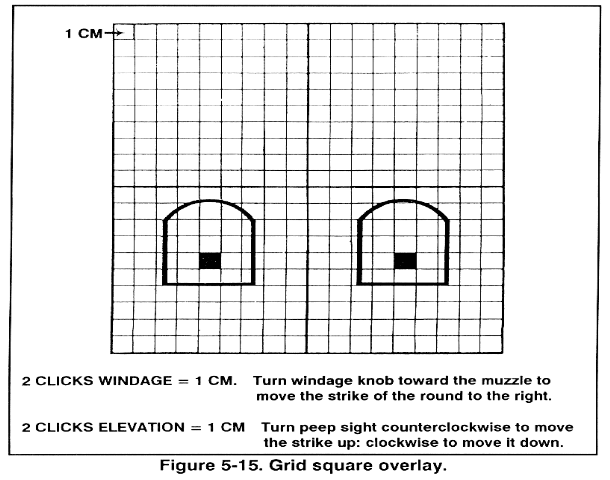
Figure 5-15. Grid square overlay.
-
(1) Set the sights for 10-meter zeroing, then fire a three-round shot
group.
(2) After firing the second three-round shot group (Figure 5-16), place the grid square overlay over the pasters (1 and 2) (Figure 5-17) and count the number of clicks it will take for rounds to impact on the black aiming paster. (Corrections for Figure 5-17 would be turn the windage knob toward the muzzle (clockwise) two clicks.)
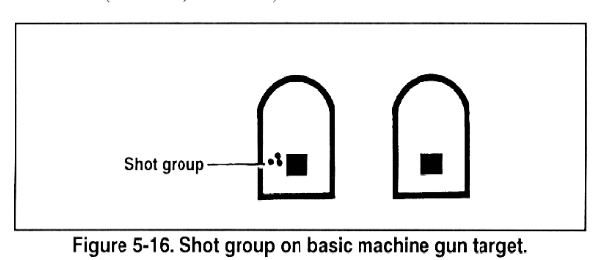
Figure 5-16. Shot group on basic machine gun target.
Figure 5-17. Overlay placed over pasters.
5-19. TARGET ANALYSIS
Targets are analyzed and scored to determine the automatic rifleman's
proficiency and to reinforce the fundamentals of marksmanship. During prone
or fighting position firing with a zeroed weapon, a target is best analyzed
by considering the common errors of M249 marksmanship (Figure 5-18).
Figure 5-18. Common errors of marksmanship.
5-20. 10-METER SCORING PROCEDURES
When scoring the 10-meter target, the trainer scores all scoring spaces (1
through 4, 5 through 6, and 7 through 8). One point is given for each round
impacting within each scoring space. The maximum point value is 3 points
for each scoring space. Rounds touching the line on the paster are considered
a HIT. When firing at 1 through 4 with a belt of 12 rounds, the maximum score
the automatic rifleman can receive is 12 points. When firing at pasters 5
through 6, he engages the five scoring spaces with a 15-round belt. The
maximum score possible is 15 points. When firing at pasters 7 through 8, the
automatic rifleman engages the eight scoring spaces with 24 rounds with a
maximum score of 24 points. Automatic riflemen score their own targets
during practice, but not during record fire. DA Form 7304-R (Scorecard for
M249 AR) is used to record scores (see paragraph 5-30.)
a. The total possible score is 51 points. A minimum of 35 points is required to qualify on the 10-meter course of fire.
b. Soldiers failing to achieve minimum standards must be retrained and retested in a dry-fire mode until proficiency is demonstrated. They do not go on to transition firing. Soldiers should refire the 10-meter portion with close supervision and coaching to ensure that the fundamentals of marksmanship are applied during live fire.
In basic marksmanship, the automatic rifleman applies the fundamentals in live-fire exercises during day, night, and NBC conditions. This includes 10-meter zeroing, 10-meter firing, field zeroing, transition firing, and record firing.
5-21. ZEROING
Zeroing aligns the sights with the barrel so that the point of aim equals the
point of impact. Ten-meter zeroing is for conducting 10-meter fire only and
has no further application. (Zeroing at range or field zeroing is the
automatic rifleman's battlesight zero and must be recorded.)
-
a. 10-Meter Zeroing, Set the Sights (Mechanical Zero). The automatic
rifleman indexes or places the elevation knob on a range of 700 meters. He
centers the rear peep sight by rotating it clockwise (right) as far as it
will go, then rotating counterclockwise (left) 5 clicks or half-turns. He
rotates the windage knob toward the muzzle until the peep sight is completely
to the right, then rotates the windage knob toward the buttstock 12 clicks to
the left. This places the peep sight in the approximate center of the sight.
Each sight may vary as to how many clicks are needed. To check the sight, the
automatic rifleman starts with the sight all the way to the right and, while
counting the clicks, rotates the windage knob until it stops on the left
side. He divides the clicks by two. If it is an uneven number, he rounds it
up. To center the sight, he rotates the windage knob toward the center
(right) while counting the appropriate number of clicks. He adjusts the
sliding scale at the rear of the sight to center the large index line under
the zeroed windage mark
on the sight. Two threads should be showing on the front sight post. If more
or less are showing, the automatic rifleman turns in the weapon for
maintenance.
b. Three-Round Group. The automatic rifleman fires three single rounds loaded individually at the center base of the aiming points on the basic machine gun marksmanship target. He fires the three rounds without making any adjustments to the sights. The shot group must be about a 4-cm circle or smaller to establish the center of the group in relation to the center base of the aiming paster. Establishing a smaller shot group is difficult, because the M249 AR is an open-bolt weapon. Sight alignment is disturbed somewhat as the bolt moves forward during firing.
c. Grid Square Overlay. For a more accurate adjustment, the automatic rifleman moves downrange and places the grid square overlay over pasters 1 and 2. He ensures that he aligns the overlay with the pasters and squares.
-
(1) Count the number of squares it will take to move the shot group to
the aiming paster.
(2) Upon completion, return to the firing line to make corrections to the weapon. Figure 5-19 illustrates a zero group size on which adjustments can be made and a group that is too loose for adjustments. If a group is too loose, check your position and grip.
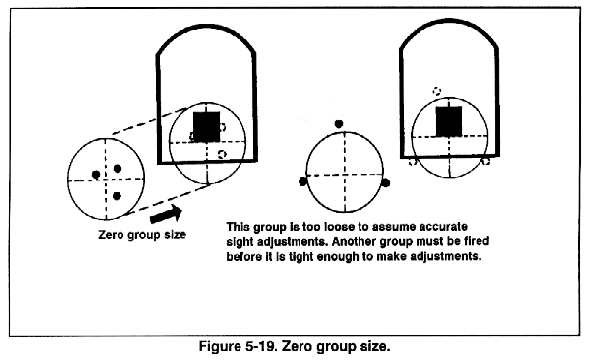
Figure 5-19. Zero group size.
-
d. Windage Correction. If the center of the group is to the left or right
of the black aiming paster, the automatic rifleman must correct for windage.
To do this, he must rotate the windage knob to move the peep sight in the
direction of the desired change (rotate windage knob toward the muzzle
[counterclockwise] to move the strike of the round to the right; rotate the
windage knob toward the buttstock [clockwise] to move the strike of the
round to the left). One click in either direction moves the strike of the
round 1/2 cm at 10 meters.
e. Elevation Correction. Before making elevation adjustments, the range knob must be at its highest setting. If the center of the shot group is above or below the aiming point, the automatic rifleman rotates the peep sight clockwise to lower the strike of the round or rotates the peep sight counterclockwise to raise the strike of the round. One 180-degree turn in either direction moves the strike of the round « cm at 10 meters.
f. Confirmation. The automatic rifleman fires another three-shot group (loaded singly) after making his corrections for windage and elevation. If the center of the group is still off the aiming point, he adjusts further until the group is centered on the point of aim.
g. Recording. There is no reason to record the 10-meter zero, because it applies only to firing at the 10-meter basic machine gun target.
5-22. FIELD ZEROING
Automatic riflemen must know how to zero the M249 AR at distance. He
should select a known distance target between 300 and 700 meters. It is
difficult to determine fully where the center of the beaten zone is in
relation to the target as range increases. Therefore, the 300-meter target on
the transition range is recommended because of the ease of determining
adjustments.
-
a. Set the Sights. The automatic rifleman uses the same
procedures as for 10-meter zeroing are used except that he places the
elevation knob on the range to the target. The recommended range is 300
meters.
b. Fire a Three-Round Burst. The automatic rifleman assumes a good stable position and fires a three-round burst at the center base of the target and notes where the burst strikes.
c. Correct for Windage. If the center of the beaten zone is to the left or right of the target, he corrects for windage. Each click moves the strike of the rounds « mil or 6 inches at 300 meters. He adjusts the windage knob accordingly.
d. Correct for Elevation. If the center of the beaten zone is high or low in relation to the target, he corrects for elevation. Because determining that relationship is difficult, automatic riflemen rely on trial and error to gain sufficient experience in making reliable estimates. He makes corrections in the same manner as 10-meter zeroing.
e. Confirm. After making corrections for windage and elevation, he fires a confirming burst of three rounds. If the target is not hit, he repeats the procedures.
f. Record Zero. Upon confirming the zero, he records it by counting the number of clicks (half-turns) he moved the peep sight for elevation in relation to the initial setting of 5. For example, if he made two half-turns up, he records UP 2. If he made two half-turns down, he records DOWN 2. Adjustments for the windage scale are not recorded; instead, he loosens the windage sliding scale screws and aligns the scale so that the large index line is under the windage mark on the sight. Then, he tightens the screws.
5-23. 10-METER FIRING
The 10-meter firing trains automatic riflemen to apply the fundamentals of
automatic rifle marksmanship in live-fire exercises. It familiarizes the
soldier with the weapon's characteristics, noise, and recoil. It instills in
the soldier confidence in his weapon. Each automatic rifleman learns to zero
his M249 AR, conducts controlled-burst fire at point targets, and uses
traverse and search techniques of fire at area targets. The 10-meter firing
is conducted on a 10-meter range or a multipurpose range using the basic
machine gun target. These exercises are fired with the bipod from both the
prone position and the fighting position. The 10-meter firing exercises are
for practice as well as part of record qualification. All 10-meter firing
exercises are recorded and scored to provide the automatic rifleman an
assessment on his performance. The 10-meter firing is conducted IAW Firing
Table I (Table 5-1). There are seven tasks.
-
a. Task 1, Zero. The automatic rifleman fires single shots to determine
his weapon's zero for 10 meters. This task reinforces the dry-fire experience
and allows the automatic rifleman practice loading, while providing the most
accurate and tight shot group obtainable.
b. Task 2, Controlled-Burst Firing. Using point targets, the automatic rifleman fires three-round bursts. This task exposes automatic riflemen to automatic fire and the action of the weapon and at the same time introduces trigger control.
c. Task 3, NBC Traverse and Search Fire. This task requires the automatic rifleman to make body position changes to engage area targets in depth, to use controlled-burst firing, and to use a series of aiming points to disburse fire across the target, while in protective mask and gloves.
d. Task 4, Traverse and Search Fire. This task requires the automatic rifleman to make position changes to engage area targets with width and depth, to use controlled-burst firing, and to use a series of aiming points to disburse fire across the target.
e. Task 5, Traverse and Search Fire. This task exposes the automatic rifleman to a series of point targets, to controlled-burst fire, and to trigger control during timed conditions.
f. Task 6, NBC Traverse and Search Fire. This task requires the automatic rifleman to engage area targets with width and depth, while making position changes during timed conditions, and while in protective mask and gloves.
g. Task 7, Traverse and Search Fire. This task requires the automatic rifleman to make position changes to engage area targets in depth during timed conditions.
5-24. 10-METER CONDUCT OF FIRE
The automatic riflemen are instructed on the objectives and fundamentals
of firing from the bipod-supported prone and fighting positions, on fire
commands used on the basic range, on the basic machine gun marksmanship
target, and on analyzing and scoring the target. The unit is organized in
firing orders based on range constraints. Each firing order should consist of
an automatic rifleman and a coach. The coach assists the automatic rifleman
during prefire checks and zeroing. He also relays signals to the tower
operator, checks the automatic rifleman's position, and coaches him. During
qualification, a coach is not used. The seven tasks are fired in the
following manner.
-
a. Task 1, Zeroing.
-
(1) The automatic rifleman prepares the rear sight for zeroing and
checks the front sight.
(2) The automatic rifleman assumes a good position.
(3) The tower operator instructs the automatic rifleman to prepare a single round.
(4) The following fire command is given. The automatic rifleman and coach repeat each element of the fire command as it is given.
   AUTOMATIC RIFLEMAN (The automatic rifleman loads and
   moves safety to FIRE)
   FRONT (Focuses on target or target area)
   PASTER ONE (Locates target)
   SEVEN HUNDRED (Adjusts sights and acquires sight picture)
   FIXED, ONE ROUND (Method of fire)
   COMMENCE FIRING (Fires on command of tower operator,
   but when ready)
(5) The automatic rifleman loads one round, obtains the proper sight picture, and gives an UP to the coach.
(6) The coach relays the READY signal to the tower operator.
(7) The tower operator gives the command COMMENCE FIRING.
(8) The automatic rifleman engages paster 1 with three single shots when he is ready.
(9) The automatic rifleman moves downrange to observe, mark, and triangulate the shot group. Sight adjustments using the rear peep sight and windage knob are made at this time if the shot group is tight enough. If not, the automatic rifleman should fire another three rounds to ensure he has mastered the fundamentals before adjusting the sights.
(10) Steps 2 through 8 are repeated, but the automatic rifleman fires at paster 2.
b. Task 2, Controlled-Burst Firing.
-
(1) The tower operator instructs the automatic rifleman to prepare a
6-round belt.
(2) When the fire command is given, the automatic rifleman and coach repeat each element as it is given.
   AUTOMATIC RIFLEMAN
   FRONT
   PASTER THREE
   SEVEN HUNDRED
   FIXED, THREE-ROUND BURSTS
   AT MY COMMAND
(3) The automatic rifleman acquires the proper sight picture and gives an UP to the coach.
(4) The coach relays the READY signal to the tower operator.
(5) The tower operator gives the command to FIRE.
(6) The automatic rifleman fires the first burst of three rounds at paster 3.
(7) Steps 2 through 6 are repeated, but the automatic rifleman fires at paster 4.
c. Task 3, NBC Traverse and Search Fire.
-
(1) The tower operator instructs the automatic rifleman to prepare a
15-round belt.
(2) The tower operator gives the order to mask by stating GAS. Once the soldiers are masked and have their gloves on, he gives the fire command.
(3) When the fire command is given, the automatic rifleman and coach repeat each element as it is given.
   AUTOMATIC RIFLEMAN
   FRONT
   PASTERS FIVE THROUGH SIX
   SEVEN HUNDRED
   TRAVERSE AND SEARCH, THREE-ROUND BURSTS
   AT MY COMMAND
(4) The automatic rifleman acquires the proper sight picture and gives an UP to the coach.
(5) The coach relays the READY signal to the tower operator.
(6) The tower operator gives the command to FIRE.
(7) Using the traverse and search technique, the automatic rifleman engages pasters 5 through 6, firing a three-round burst for each paster. Once complete, the soldiers are given the order ALL CLEAR.
(8) The automatic rifleman restores his mask to the carrier, removes his gloves, and moves downrange to observe and analyze his targets.
d. Task 4, Traverse and Search Fire.
-
(1) The tower operator instructs the automatic rifleman to prepare a
24-round belt.
(2) When the fire command is given, the automatic rifleman and coach repeat each element as it is given.
   AUTOMATIC RIFLEMAN
   FRONT
   PASTERS SEVEN THROUGH EIGHT
   SEVEN HUNDRED
   TRAVERSE AND SEARCH, THREE-ROUND BURSTS
   AT MY COMMAND
(3) The automatic rifleman acquires the proper sight picture and gives an UP to the coach.
(4) The coach relays the READY signal to the tower operator.
(5) The automatic rifleman engages pasters 7 through 8, firing a three-round burst at each paster, using the traverse and search technique.
(6) The automatic rifleman may move downrange to observe and analyze his targets.
e. Task 5, Traverse and Search Fire.
-
(1) The tower operator instructs the automatic rifleman to prepare a
12-round belt.
(2) When the fire command is given, the automatic rifleman and coach repeat each element as it is given.
   AUTOMATIC RIFLEMAN
   FRONT
   PASTERS ONE THROUGH FOUR
   SEVEN HUNDRED
   FIXED, THREE-ROUND BURSTS
   AT MY COMMAND
(3) The automatic rifleman acquires the proper sight picture and gives an UP to the coach.
(4) The coach relays the READY signal to the tower operator.
(5) The tower operator gives the command to FIRE.
(6) The automatic rifleman engages pasters 1 through 4 in 20 seconds, firing a three-round burst at each paster.
(7) The automatic rifleman may move downrange to observe and analyze his targets.
f. Task 6, NBC Traverse and Search Fire.
-
(1) The tower operator instructs the coach to prepare a 24-round belt.
(2) The tower operator gives the order to mask by stating GAS. Once the soldiers are masked and have their gloves on, he gives the fire command.
(3) When the fire command is given, the automatic rifleman and coach repeat each element of as it is given.
   AUTOMATIC RIFLEMAN
   FRONT
   PASTERS SEVEN THROUGH EIGHT
   SEVEN HUNDRED
   TRAVERSE AND SEARCH, THREE-ROUND BURSTS
   AT MY COMMAND
(4) The automatic rifleman acquires the proper sight picture and gives an UP to the coach.
(5) The coach relays the READY signal to the tower operator.
(6) The tower operator gives the command to FIRE.
(7) Using the traverse and search technique, the automatic rifleman engages pasters 7 through 8 in 40 seconds, firing a three-round burst at each paster. Once complete, the soldiers are given the order ALL CLEAR.
(8) The automatic rifleman restores his mask to the carrier, removes his gloves, and moves downrange to observe and analyze his targets.
g. Task 7, Traverse and Search Fire.
-
(1) The tower operator instructs the automatic rifleman and coach to
prepare a 15-round belt.
(2) When the fire command is given, the automatic rifleman and coach repeat each element as it is given.
   AUTOMATIC RIFLEMAN
   FRONT
   PASTERS FIVE THROUGH SIX
   SEVEN HUNDRED
   TRAVERSE AND SEARCH, THREE-ROUND BURSTS
   AT MY COMMAND
(3) The automatic rifleman acquires the proper sight picture and gives an UP to the coach.
(4) The coach relays the READY signal to the tower operator.
(5) Using the traverse and search technique, the automatic rifleman engages pasters 5 through 6 in 40 seconds, firing a three-round burst at each paster.
(6) The automatic rifleman may move downrange to observe and analyze his target, and the coach scores it.
Table 5-1. Firing Table 1.
5-25. 10-METER FIRING, QUALIFICATION
The first phase of qualification consists of firing Tasks 2 through 4 of
Firing Table I for practice, and Tasks 5 through 7 of Firing Table I for
record. Before firing, all soldiers must be familiar with the tasks, the time
allowed, the ammunition allowances, the procedures to follow in the event of
a stoppage, and the penalties imposed.
-
a. Time and Ammunition. Each automatic rifleman completes zeroing
before record firing. Individual fire commands are given for each task.
Task 5 is fired in 20 seconds; Task 6 in 40 seconds; and Task 7 in 40
seconds.
b. Stoppages. If a stoppage occurs, the automatic rifleman must apply immediate action. If the stoppage is reduced, he continues to fire the course.
-
(1) If a stoppage occurs that cannot be reduced by immediate
action, the automatic rifleman raises his hand and awaits assistance.
(2) Once the stoppage is reduced, the automatic rifleman completes firing beginning with the next task.
(3) If a stoppage is caused by an error on the part of the automatic rifleman, additional time is not permitted. The automatic rifleman receives the score he earned before the stoppage occurred.
(4) If it is necessary to replace the M249 AR, the automatic rifleman must zero the new weapon. He may refire the exercise.
(5) Automatic riflemen who cannot fire a task or cannot complete firing in the time allowed (because of malfunctions) can finish the exercise in an "alibi run" after all other automatic riflemen complete firing. They fire only those tasks they failed to engage because of the malfunction.
c. Penalties. Five points are deducted from the score of any automatic rifleman who fails to stop firing at the command or signal to cease fire. If an automatic rifleman fires at the wrong target or exercise, he loses the points for those rounds. An automatic rifleman whose target was fired upon by another automatic rifleman is permitted to refire the exercise.
d. Scoring. Scores are tabulated IAW paragraph 5-20. Automatic riflemen do not score their own targets when firing for qualification. During qualification firing, at least 35 points must be achieved on Firing Table I. DA Form 7304-R is used to record scores (see paragraph 5-30).
e. Position. Based on his METL, the commander selects either the bipod-supported prone position or bipod-supported fighting position for qualification.
5-26. TRANSITION FIRING
Transition firing provides the automatic rifleman the experience necessary to
progress from 10-meter firing to field firing at various types of targets at
longer ranges. The automatic rifleman experiences and learns the
characteristics of fire, field zeroing, and range determination. He uses the
adjusted aiming-point method of fire adjustment. Transition firing is
conducted on a machine gun transition range or the MPRC. These exercises are
fired with the bipod from the prone or fighting position. Transition firing
is fired and scored for practice and
qualification to provide feedback to the automatic rifleman. Firing Table II
consists of eight tasks (Table 5-2).
-
a. Range Facilities. The transition range should consist of several firing
lanes. Each lane should be 10 meters wide at the firing line and 100 meters
wide at a range of 800 meters. Ideally, each lane has a fighting position
with an adjacent prone firing position.
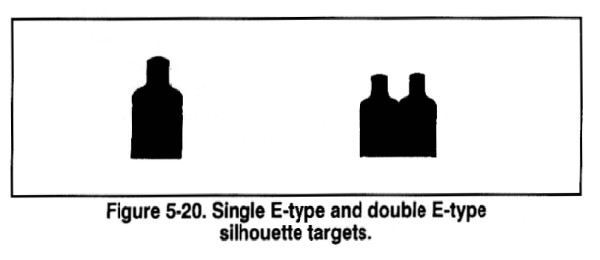
b. Targets. Two target configurations using E-type silhouette targets may be used--single or double. The double represents an enemy automatic weapon, which for the automatic rifleman is a priority target (Figure 5-20). The targets are at various ranges that an automatic rifleman might engage. All targets should be plainly seen from the firing positions. Electrical targets are desirable.
c. Stoppage. The same procedures used in Firing Table I qualification firing are used (page 5-37).
d. Penalties. The same procedures used in Firing Table I qualification firing are used (page 5-37).
e. Scoring. Five points are given for each target hit, whether hit on the first or second burst. The total possible points is 55. The automatic rifleman must hit at least 7 (35 points) targets out of 11 exposures to qualify. DA Form 7304-R is used to record scores (see paragraph 5-30).
f. Position. Based on his METL, the commander selects either the bipod-supported prone position or the bipod-supported fighting position for qualification.
Figure 5-20. Single E-type and double E-type silhouette targets.
5-27. TRANSITION CONDUCT OF FIRE
The unit is organized in firing orders based on range constraints. Each
firing order should consist of an automatic rifleman and a coach. The
coach assists the automatic rifleman during prefire checks and zeroing. He
also relays signals to the tower operator, checks the automatic rifleman's
position, and coaches him except during qualification. The bipod-supported
prone and fighting positions are used. The eight tasks are fired in the
following manner.
-
a. Task 1, Field Zeroing the 300-Meter, Single E-Type Silhouette.
-
(1) The automatic rifleman prepares his rear sight for field zeroing and
checks the front sight post. He sets the range to the zero target on the
elevation knob. The preferred range is 300 meters.
(2) The automatic rifleman assumes a good position.
(3) The tower operator instructs the automatic rifleman to prepare a 12-round belt.
(4) When the fire command is given, the automatic rifleman and coach repeat each element as it is given.
   AUTOMATIC RIFLEMAN
   FRONT
   TARGETS: TROOPS IN THE OPEN
   THREE HUNDRED
   FIXED, THREE-ROUND BURSTS
   COMMENCE FIRING
(5) The automatic rifleman loads one 12-round belt of ammunition, obtains the proper sight picture, and gives an UP to the coach.
(6) The coach relays the READY signal to the tower operator.
(7) The tower operator gives the command COMMENCE FIRING.
(8) The automatic rifleman fires a three-round burst at the target when ready.
(9) The automatic rifleman observes the beaten zone. If the rounds miss the target, he makes adjustments for windage and elevation.
(10) After adjustments have been made, the automatic rifleman repeats steps 8 through 9 with the remaining rounds until rounds are impacting on the target. He records his zero.
b. Task 2, 200-Meter, Single E-Type Silhouette.
-
(1) The tower operator instructs the automatic rifleman to load one
66-round belt.
(2) When the fire command is given, the automatic rifleman and coach repeat each element as it is given. It is only given once for Tasks 2 through 8.
   AUTOMATIC RIFLEMAN
   FRONT
   TARGET: TROOPS IN THE OPEN
   ONE HUNDRED TO FOUR HUNDRED METERS
   FIXED, THREE-ROUND BURSTS
   AT MY COMMAND
(3) The automatic rifleman gives an UP to the coach.
(4) The coach gives the READY signal to the tower operator.
(5) The tower operator gives the command FIRE.
(6) The automatic rifleman scans the sector.
(7) A 200-meter, single E-type target is exposed for 5 seconds.
(8) The automatic rifleman determines the range, places the proper setting on the rear sight, assumes the proper position, obtains the correct sight alignment and sight picture, and fires a three-round burst.
(9) If the automatic rifleman fails to hit the target, he fires another three-round burst using the adjusted aiming point method of fire adjustment.
c. Task 3, 400-Meter, Double E-Type Silhouette.
-
(1) Automatic rifleman continues to scan the sector.
(2) A 400-meter, double E-type target is exposed for 10 seconds.
(3) The automatic rifleman determines the range, places the proper setting on the rear sight, assumes the proper position, obtains the correct sight alignment and sight picture, and fires a three-round burst.
(4) If the automatic rifleman fails to hit the target, he fires another three-round burst using the adjusted aiming point method of fire adjustment.
d. Task 4,100-Meter, Single E-Type Silhouette.
-
(1) The tower operator gives the order to mask by stating GAS. The
automatic rifleman and coach put on their masks and gloves.
(2) The automatic rifleman continues to scan the sector.
(3) A 100-meter, single E-type target is exposed for 10 seconds.
(4) The automatic rifleman determines the range, places the proper setting on the rear sight, assumes the proper position, obtains the correct sight alignment and sight picture, and fires a three-round burst.
(5) If the automatic rifleman fails to hit the target, he fires another three-round burst using the adjusted aiming point method of fire adjustment.
e. Task 5, 300-Meter, Single E-Type Silhouette.
-
(1) The automatic rifleman continues to scan the sector, while in
protective mask and gloves.
(2) A 300-meter, single E-type target is exposed for 15 seconds.
(3) The automatic rifleman determines the range, places the proper setting on the rear sight, assumes the proper position, obtains the correct sight alignment and sight picture, and fires a three-round burst.
(4) If the automatic rifleman fails to hit the target, he fires another three-round burst using the adjusted aiming point method of fire adjustment.
f. Task 6, 100-Meter and 300-Meter, Single E-Type Silhouettes.
-
(1) The automatic rifleman continues to scan the sector, while in
protective mask and gloves.
(2) A 100-meter and a 300-meter, single E-type target are exposed for 20 seconds.
(3) The automatic rifleman determines the range, places the proper setting on the rear sight, assumes the proper position, obtains the correct sight alignment and sight picture, and fires a three-round burst at each target.
(4) If the automatic rifleman fails to hit the target, he fires another three-round burst using the adjusted aiming point method of fire adjustment at each target.
(5) The tower operator gives the order ALL CLEAR. The automatic rifleman and coach restore their masks to their carriers and remove their gloves.
g. Task 7, 200-Meter Single E-Type and 400-Meter Double E-Type Silhouettes.
-
(1) The automatic rifleman continues to scan the sector.
(2) The 200-meter single E-type and the 400-meter double E-type targets are exposed for 20 seconds.
(3) The automatic rifleman determines the range, places the proper setting on the rear sight, assumes the proper position, obtains correct sight alignment and sight picture, and fires a three-round burst at each target.
(4) If the automatic rifleman fails to hit the target, he fires another three-round burst using the adjusted aiming point method of fire adjustment at each target.
h. Task 8, 100- and 200-meter single E-type and 400-Meter Double E-Type Silhouettes.
-
(1) The automatic rifleman continues to scan the sector.
(2) The 100-meter and 200-meter single E-type and 400-meter double E-type targets are exposed for 25 seconds.
(3) The automatic rifleman determines the range, places the proper setting on the rear sight, assumes the proper position, obtains correct sight alignment and sight picture, and fires a three-round burst at each target.
(4) If the automatic rifleman fails to hit the target, he fires another three-round burst using the adjusted aiming point method of fire adjustment at each target.
Table 5-2. Firing Table II.
5-28. TRANSITION FIRING, LIMITED VISIBILITY
Night or limited visibility firing requires the soldier to apply the
fundamentals of automatic rifle marksmanship while using the AN/PVS-4.
This training instills confidence in the automatic rifleman. Each soldier
learns how to engage targets using the AN/PVS-4. He learns to mount the
sight, boresight the weapon at 10 meters, and zero the AN/PVS-4 to the
weapon at 25 meters. Finally, he learns to detect and engage a series of
undetermined targets at various ranges with the AN/PVS-4. Night firing
exercises can be conducted during daylight when the daylight cover is used.
These exercises are for practice and instructional purposes only--not for
qualification. The commander can use this training to assess his unit's
METL. Night firing is conducted on a 10-meter range and the same transition
range or a multipurpose machine gun range used for Firing Table II. There are
no NBC engagements; otherwise, the tasks and conduct of fire in Firing Table
III are the same as in Firing Table II except for range to the target and
number of engagements. Therefore, a conduct of fire is not necessary.
-
a. Time and Ammunition. Firing Table III (page 5-49) outlines ammunition
requirements. There is no time requirement.
b. Stoppage. The same procedures used in Firing Table I, page 5-37.
c. Penalties. No penalties are used.
d. Scoring. No points are used; commanders can use this training for assessment. DA Form 7304-R, provided in the back of this manual, can be used to record the number of hits.
e. Conditions. Firing Table III is for engaging targets out to 400 meters under ideal moonlight or during daylight conditions. If visibility is limited because of a lack of ambient light, commanders may use field-expedient means to identify targets.
f. Targets. Single E-type silhouette targets or double E-type silhouette targets are used.
g. Position. Based on his METL, the commander selects either the bipod-supported prone position or bipod-supported fighting position.
5-29. ZEROING THE AN/PVS-4
Zeroing aligns the AN/PVS-4 to the M249. The sight may be zeroed during
daylight or darkness. (TM 11-5855-213-10.) If done during daylight, the
daylight cover must be used. To obtain a precise zero, it is best done at 300
meters and at night. Once an AN/PVS-4 has been zeroed on an M249 AR,
any soldier who knows how to use the reticle should fire the weapon
effectively. However, there may be some changes in zero when the objective
focus is adjusted to engage targets at various ranges and when the diopter
focus is adjusted for the vision of different firers. A metal target is
excellent for zeroing purposes, because the strike of the round can be easily
observed with an AN/PVS-4. The procedures to zero are as follows.
-
a. Mounting the Bracket and Device. Before zeroing and qualifying with
the AN/PVS-4, the automatic rifleman must mount the bracket and sight
onto his weapon.
When mounting an AN/PVS-4 to the mounting bracket, make sure that the
hole for the screw in the AN/PVS-4 is aligned and flush against the
bracket screw. If not, the screw will strip the threads in the screw
hole of the AN/PVS-4 and prevent use with the M249 AR.
-
(1) Place the mounting bracket on top of the feed cover mechanism
assembly so that the two forked ends are secured around the headless pins.
(2) Remove the screw cover behind the rear sight assembly, and screw the bracket knob in until it is tight.
(3) Position the AN/PVS-4 on top of the bracket so that the mount of the AN/PVS-4 is aligned with the mounting knob of the bracket.
(4) Turn the mounting knob clockwise until the AN/PVS-4 is tight (Figure 5-21).
b. Seating the Device. Once the device is mounted, the automatic rifleman fires a three-round burst to seat the device, checks and tightens the mounting knob, and then fires another three-round burst. He checks the device to ensure it is settled and securely fastened and tightens the mounting knob if necessary. He does not fire at the boresight target during this procedure.
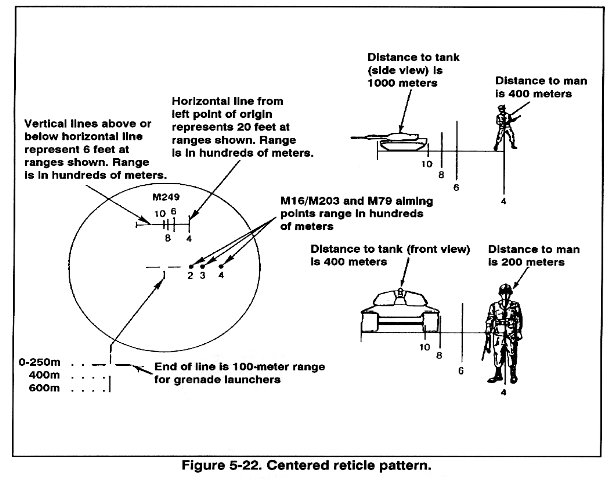
c. Centering the Reticle in the Field of View. The automatic rifleman turns the device on and centers the reticle pattern in the field of view by using the azimuth and elevation actuators. To be accurate, he does this by rotating the elevation and azimuth actuators from one side to the other and from top to bottom, while counting the number of clicks. (The elevation actuator has the down direction marked DN with an arrow. This moves the strike of the round. The azimuth actuator has the right direction marked with RT with an arrow. This also moves the strike of the round. He divides the number of clicks for each by two and moves the elevation and azimuth actuators that number of clicks. This manually centers the reticle in the field of view horizontally and vertically. This enables the automatic rifleman to reach an accurate boresight between the point of aim (reticle) and the center of the bore (Figure 5-22).
Figure 5-21. Mounting the AN/PVS-4.
Figure 5-22. Centered reticle pattern.
-
d. Confirming the Boresight. To do this, the automatic rifleman centers
and affixes a 25-meter (M16A2) zero target to the back of a basic machine
gun paster target. This provides a large, clear surface for identifying the
strike of the round. Then, he emplaces the target 10 meters from the firing
position. The automatic rifleman places the reticle aiming point on the
25-meter zero target aiming point (Figure 5-23) and fires a single round. If
the round impacts anywhere near the aiming point, he fires two more rounds
to establish his group.
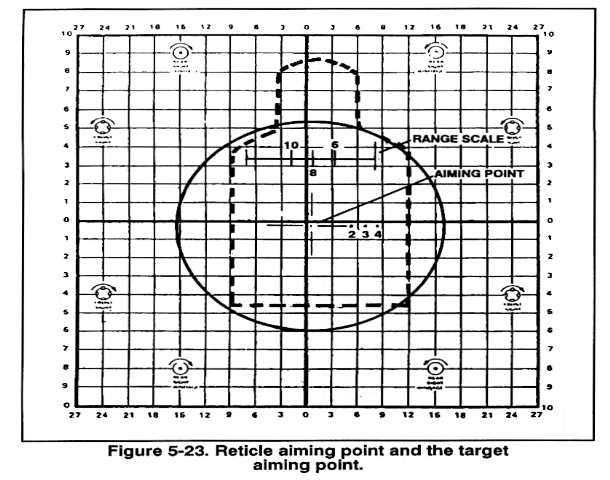
Figure 5-23. Reticle aiming point and the target aiming point.
-
e. 25-Meter Zeroing. After a boresight has been established, the
automatic rifleman moves back to a 25-meter firing position. He affixes
another 25-meter zero target to the back of a 10-meter machine gun
target and fires three rounds.
-
(1) Locate and triangulate the center of the shot group. From the center
of the shot group, adjust the reticle to move the center of the shot group to
a point 8 cm below and 2 cm right of the target aiming point (Figure 5-24).
This location on the 25-meter zero target is 9 squares below (8
cm divided by .9) and 2 squares right (2 cm divided by .9) of the target
aiming point. Make the adjustment using the AN/PVS-4 azimuth and elevation
adjustment actuators. Each square on the 25-meter zero target is .9 cm. Each
click of the actuators moves the strike of the round .25 cm (or .1 inch) at
10 meters.
Therefore, 4 clicks on either the elevation or azimuth actuator moves the
strike of the round one square.
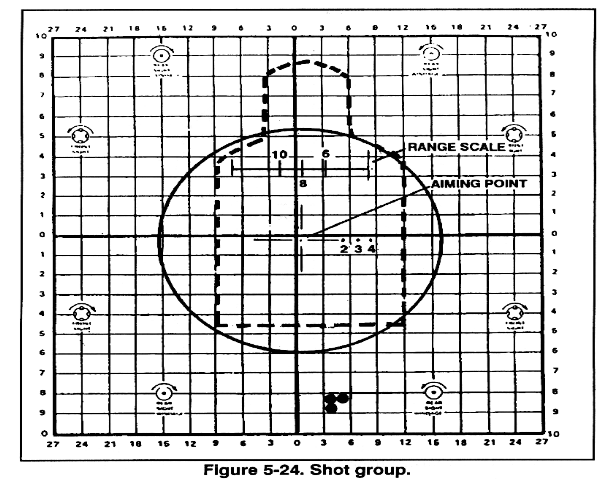
Figure 5-24. Shot group.
-
(2) After making the adjustments, assume a stable position, place the
reticle aiming point on the target aiming point, and fire three more single
rounds. Repeat the process until the rounds impact within the desired
location (9 squares below and 2 squares right).
(3) If you miss the 25-meter zero target with the first round but strike the 10-meter machine gun paster target, make a large adjustment with the elevation and azimuth actuators. Continue this process with three-round groups and adjustments until the rounds strike the desired location.
(4) Once the AN/PVS-4 is mounted and boresighted, fire a three-round burst at the center base of the target and note the strike of the rounds. While maintaining the reticle aiming point on the target, move the reticle aiming point to the strike of the rounds by manipulating the elevation and azimuth actuators.
(5) Acquire a good sight picture on the target with the reticle aiming point once again and fire another three-round burst. Note the strike of the rounds and repeat the process until the rounds impact on target.
Table 5-3. Firing Table III.
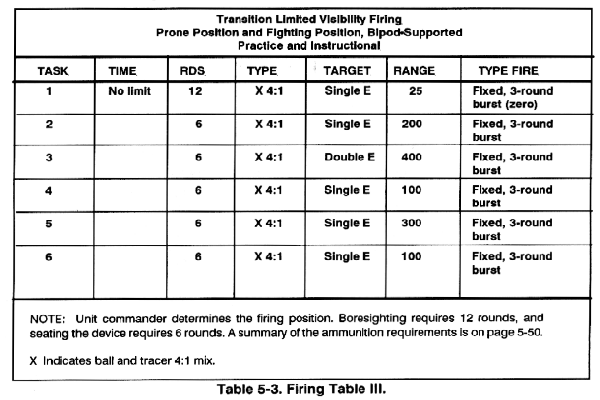
5-30. QUALIFICATION STANDARDS
Qualification with the M249 AR consists of achieving the minimum standards
for 10-meter day and transition day firing tables. One point is allowed for
each round impacting within the scoring space (maximum of 3 for each space)
for Firing Table I. For Firing Table II, 5 points are allowed for each target
hit whether the target is hit on the first or second burst. The maximum
possible score for Firing Table I is 51 points. A minimum of 35 points is
required. The maximum score for Table Firing II is 55 points; at least 35
points must be scored on this table to qualify. The minimum total score is
70; the maximum total score is 106. The overall ratings are as follows:
   EXPERT                                            90-106
   AUTOMATIC RIFLEMAN 1st CLASS                      80-89
   AUTOMATIC RIFLEMAN 2d CLASS                       70-79
   UNQUALIFIED                                       0-69
The trainer uses DA Form 7304-R (Scorecard for M249 AR) for recording the automatic rifleman's performance on the M249 AR qualification range. The instructions for completing the scorecard are on its reverse side. An example of a completed form is in Figure 5-25. A blank locally reproducible form is in the back of this manual. The following is a summary of ammunition required:
               TABLE                    ROUNDS              TYPE

               I Practice                 57                Ball
               I Record                   51                Ball
               II Practice                78                 4:1
               II Record                  66                 4:1
               III Instructional          60                 4:1
               III Practice               36                 4:1
Figure 5-25. Example of completed M249 AR scorecard, front.
Figure 5-25. Example of completed M249 AR scorecard, back; continued.
|
NEWSLETTER
|
| Join the GlobalSecurity.org mailing list |
|
|
|