|
RDL Homepage |
Table of Contents |
Document Information |
Download Instructions |
LESSON 1
PLAN, PREPARE AND CONDUCT A PLATOON DEFENSE USING THE M2 BRADLEY FIGHTING VEHICLE
| Soldier's Manual Tasks | 071-326-4004 | Issue an Oral Operation Order. |
| 071-430-0006 | Conduct a Defense by a Platoon. | |
| 071-430-0017 | Conduct a Defense by an M2 BFV Platoon. | |
| 071-430-0007 | Consolidate a Platoon Following Enemy Contact While in the Defense. | |
| 071-430-0008 | Reorganize a Platoon Following Enemy Contact While in the Defense. |
OVERVIEW
TASK DESCRIPTION: Issue an oral operation order, conduct a defense by a platoon, conduct a defense by an M2 BFV Platoon and consolidate and reorganize a platoon following enemy contact while in the defense.
LEARNING OBJECTIVE:
TASKS: |
Identify how to issue an oral operation order, conduct a defense by a platoon, conduct a defense by an M2 BFV platoon, consolidate a platoon following enemy contact while in the defense, and reorganize a platoon following enemy contact while in the defense. |
CONDITIONS: |
Given the subcourse material for this lesson, a training scenario, the student will complete the practice exercise at the end of the lesson. |
STANDARDS: |
The student will demonstrate his comprehension and knowledge by identifying how to issue an oral operation order, conduct a defense by a platoon, conduct a defense by an M2 BFV platoon, consolidate a platoon following enemy contact while in the defense, and reorganize a platoon following enemy contact while in the defense. |
REFERENCES: |
The material in this lesson was derived from the following publications. FM 7-7J |
INTRODUCTION
The purpose of defensive operations is to repel an enemy attack and destroy the attacker. Defensive operations may also be undertaken to hold critical terrain, to gain time, or to wear down the enemy. Your platoon defends as part of your company or company team and completes tasks assigned to it by the company or company team commander.
The defense may involve fast, frequent movement between battle positions and during counterattacks. Platoons and squads must be able to respond to short-notice changes in mission and must be able to fight immediately from a new battle position. Thus, your platoon must develop and practice SOPs, master applicable drills, and learn to exploit the mobility and firepower of the fighting vehicle.
Platoons defend to hold terrain and destroy the enemy. Their defensive tasks include:
- Destroying enemy BMPs, BTRs, and other lightly armored vehicles with the 25-mm gun and with Dragons light antitank weapons, (LAWs), and grenade launchers.
- Destroying enemy tanks with the BFV-mounted, tube-launched, optically-tracked, wire-guided (TOW) missile and with Dragons and LAWs.
- Suppressing enemy antitank fires with the 25-mm gun, grenade launchers, 7.62-mm coaxial machine gun, squad automatic weapons (SAWs), and rifles.
- Repelling dismounted enemy attacks with the BFV and dismounted infantry.
- Locating the enemy and providing security by manning observation posts and conducting patrols and ambushes.
- Building obstacles to slow, stop, or canalize the enemy and providing security for obstacles.
- Conducting platoon-size counterattacks, or as part of larger force, to regain a portion of their position that has been overrun.
As stated, the immediate purpose of any defense is to defeat the attack. Other purposes, while important, are not the primary focus of the defense.
Defense is used to gain time for reinforcements to arrive or to economize forces in one sector while concentrating forces for attack in another. In either case, a defense or a delay may achieve these purposes.
In other cases, portions of a force may be required to retain key or decisive terrain or essential strategic, operational, or tactical objectives. Even in offensive operations, air assault, airborne, or amphibious forces may need to defend deep objectives until a larger force can link up with them. Whatever its larger purpose, the immediate challenge of any defensive operations is to recapture the initiative and thus create the opportunity to shift to the offensive. All activities of the defense must contribute to that aim.
PART A - PREPARE AND ISSUE AN ORAL OPERATION ORDER (OPORD)
1. General.
You are responsible for keeping your men informed through your squad leaders. A primary way of doing so is through the platoon order. Your platoon order is based on the operation order given by the company commander. It must be altered to delete information that does not concern the platoon and to add sufficient detail to allow proper planning by your squad leaders.
As part of your troop leading procedure you must develop a clear and concise oral platoon order and issue it to your squad leaders. In issuing the order, you must make sure the squad leaders understand their mission and the specific coordinating instructions that apply. The order must contain the following items, properly placed in the five-paragraph format:
- The mission of the company.
- The mission of the platoon.
- The mission of each squad, to include specific areas of responsibility and provisions for security.
- Locations for machine guns and antitank weapons.
- The order and route march to the defensive area.
- Critical signal instructions.
- Locations of platoon and company command posts (CPs).
2. Operation Order.
The company commander issues an OPORD to his subordinate leaders in order to explain how the mission is to be conducted. The OPORD is issued using a five-paragraph format. This format helps the commander organize his thoughts and insures that nothing is overlooked. It also helps his subordinate leaders understand and follow the order.
When your platoon's mission is to defend, the company commander's OPORD explains his plan for the defense. From the order, you learn:
- The most likely and most dangerous enemy avenue of approach and expected enemy course of action.
- The platoon's mission.
- The company team and battalion task force commander's concept, or commander's intent, of how the defense will be fought.
- The position of the platoon in the company or company team defense.
- The platoon's sector of fire or engagement area.
- The fire support that is available.
- The on-order missions for the platoon.
- The evacuation or destruction procedures for damaged vehicles.
- The evacuation procedures for friendly casualties.
- The place where prisoners of war are to be taken.
- The availability of ammunition, mines, barrier materials and other supplies.
- The special signals that are to be used.
On receipt of a company operation order, you begin your troop leading procedures. You begin with an analysis of the mission, enemy, terrain, troops, and time available (METT-T).
Often you will have to issue simple fragmentary orders and rely heavily on standing operating procedures (SOPs) because the tactical situation requires immediate action. During occupation of a battle position, the platoon and squads should use the applicable drills to reduce time and possible confusion. Regardless of the time available, you should do as many of the troop leading procedures as possible.
When you have completed your analysis, made your reconnaissance, and developed your plan, you then complete your order. The order should follow the standard five-paragraph operation order format and be issued orally. Where possible, SOPs should be referred to in the order. This helps to shorten the order. The order must explain what is to be done, how, when, and by whom. The squad leaders then give orders to their squads.
The OPORD must contain the information and instructions needed to complete a specific mission. The amount of detail included in the order depends on the information received and the time available to prepare the order (and prepare for the operation).
The OPORD must be given in easily understood words. For example, it may be preferable to say, "Here's how we are going to get the job done," rather than "Execution."
Following is an example of how the OPORD should be organized to ensure that the squad members are told everything they need to know to perform the mission. The purpose of this format is to help prepare the order. It is to be used as a checklist or guide.
SQUAD OPERATION ORDER
TASK ORGANIZATION: Indicates the squad tactical organization for combat.
1. SITUATION (paragraph 1). This paragraph provides an overview of the general situation.
a. Enemy Forces (subparagraph 1a):
(1) Composition, disposition, location, movement, morale, strength, status of supply, and so forth.
(2) Types of vehicles, weapons, special training, nuclear, biological and chemical (NBC), and so forth.
(3) Most probable course of action. Attack, defend, or delay.
b. Friendly Forces (subparagraph 1b): This subparagraph contains the word-for-word mission statements of other units, listed in the following sequence:
(1) Higher headquarters--The platoon mission.
(2) Adjacent units--Left, right, front and rear unit missions, in that order.
(3) Support or reinforcing units--For example, the mission of an engineer unit or ground surveillance radar (GSR) team.
c. Attachments and Detachments: List units attached to or detached from the platoon and squad and note the time that each change occurred.
2. MISSION (Paragraph 2). The mission is a clear, concise statement of the issuing unit's purpose and task(s) to be accomplished. The mission statement is derived from an analysis of both the company and platoon missions; stated, implied, and mission-essential tasks; limitation and constraints; the WHO, WHAT, WHEN, WHERE, and WHY of the operation. All of the mission-essential tasks to be accomplished are normally addressed in chronological sequence in the mission statement. These are tasks that the commander has determined to be critical to the success of the operation. The mission is always stated in full. It must stand alone without reference to any other documents except a map. In addressing the "WHERE" of the operation, the mission statement always lists the terrain feature (for example, "HILL 302" or "Road Junction") and grid coordinates. The terms "OBJECTIVE" and "Battle Position" may be related to terrain features or to grid coordinates.
3. EXECUTION (paragraph 3). This paragraph contains the "How to" information needed for mission accomplishment. It consists of three elements: Concept of the operation, subordinate unit subparagraphs, and coordinating instructions.
a. Concept of the Operation (subparagraph 3a):
(1) Scheme of maneuver. This is the leader's mental picture of the execution of an operation order from start to finish. It provides the soldiers with their leader's intent so that the mission may be done in the time available and in the absence of further instructions. The scheme of maneuver describes the use of maneuver elements (formation, order of march, route, actions on the objective and so on). It states all the objectives, sectors, or battle positions for the maneuver elements. Designation of a reserve is also included in this part of the concept for any type of mission.
(2) Fires (plan fire support). This complements and supports the scheme of maneuver. It includes the priority of fire, priority targets, final protective fires (FPFs), preparatory fires (to include the start time and the duration of each of these fires). It also includes any special fires such as nuclear, chemical, smoke operations, or close air support fires. Only indirect fires are addressed in this part of the concept.
(3) Obstacles, mines, and fortifications. These MAY be included in the concept for offensive operations; they MUST be included for defensive operations. This part includes a brief statement of the leader's intent or the basic thrust of the maneuver. It also includes the order for obstacle work. The types of operations (mobility, countermobility, and survivability) may also be stated.
(4) Intelligence and electronic warfare. These may be addressed in the concept. A brief discussion of intelligence collection and electronic warfare priorities may be added. The squad leader may direct any attached surveillance assets to rank their efforts that are directly related to the success of the operation.
b. Subordinate Unit Instructions (subparagraph 3b and subsequent lettered subparagraphs): These give the specific task to be done by each subordinate or subordinate element of the unit. Instructions given in the concept of operation may be repeated. All subordinate units must be listed. If no further instructions are to be issued, state "None."
c. Coordinating Instructions (last subparagraph of paragraph 3): These contain the details of coordination and control which apply to two or more elements of the squad (except for Signal, which is addressed in paragraph 5b). Where there are no coordinating instructions, the word "None" appears. Typical items included in coordinating instructions are--
(1) Reports to be made other than SOP.
(2) NBC troop safety instructions and operational exposure guidance (OEG).
(3) Mission-oriented protective posture (MOPP) levels (if not the same as SOP).
(4) Air defense standards.
(5) Consolidation and reorganization instructions.
(6) The priority intelligence requirements (PIR), if not stated in an intelligence annex.
(7) Coordination of passage of lines.
(8) Effective date-time group (DTG) of attachments and detachments (if not listed in TASK ORG or paragraph 1c).
(9) Effective DTG or the conditions in which the operation plan (OPLAN) goes into effect when the order or plan does not go into effect when it is received.
(10) Reference to annexes that are included in the OPORD/OPLAN but that are not mentioned in the body of the OPORD/OPLAN.
(11) Actions on the objective.
4. SERVICE SUPPORT (paragraph 4). This paragraph contains combat service support (CSS) instructions and information relating to the operation. There is no doctrinal format for paragraph 4; however, the administrative/logistics order format is recommended as follows: (NOTE: Reference may be made to the unit SOP, if appropriate; items not required are omitted.)
a. Materiel and Service. Status of all classes of supply, transportation, services, and maintenance.
b. Medical Evacuation and Hospitalization.
c. Personnel. Unit strengths, replacements, maintenance of morale, discipline, law and order, and headquarters management.
d. Civil-Military Cooperation. Limitations or restrictions concerning the local area and the use of PSYOPs.
e. Miscellaneous. Prisoner of war (EPW) procedures.
f. Combat Service Support Facilities. The locations and proposed locations of CSS facilities (combat or field trains) may be given; this may not be needed if they are shown on an overlay.
5. COMMAND and SIGNAL (Paragraph 5). This paragraph contains instructions and information that relates to command and to the functions of communications - electronics (CE). Two subparagraphs entitled "command" and "signal", in that order, will be included, as follows:
a. Command (subparagraph 5a). This includes at least, the initial location of the commander (to simplify messenger operations). It may give the command post locations (this is required if the CP locations are not shown on an overlay) and it may give the CP axis of displacement. The chain of command may be noted if it differs from the SOP.
b. Signal (subparagraph 5b). This lists the signal operating instructions (SOI) index by specific number in effect for the operation. It also lists any changes scheduled during the operation. It may also list alternate or emergency signals (pyrotechnics) and any signal restrictions such as "radio listening silence." Detailed signal instructions normally are included in a CE annex.
If there is time after issuance of the order, the soldiers may be asked about the order to ensure that they understand it.
2. Summary
This concludes the discussion on preparing and issuing an oral OPORD. During this portion of the subcourse we discussed your responsibility to issue the order, the format, and elements. We also discussed the importance of developing a clear and concise oral OPORD order that covers the situation, mission, execution, service support, and command and signal instructions. Specific guidance of what each of these elements must contain was discussed. We will now move to the next part which is designating primary, alternate, and supplementary positions for key weapons in the defense.
PART B - CONDUCT A DEFENSE BY A PLATOON
1. General.
As a platoon leader, you must prepare your platoon to defend as part of a larger force. Once you have been assigned your platoon's sector of responsibility, you must designate primary, alternate, and supplementary positions for your antiarmor weapons and squad automatic weapons (SAWs). You and your subordinate leaders must ensure that the positions:
- Cover the most likely armor avenues of approach into the platoon area with medium antitank weapons (MAWs), and heavy antitank weapons (HAWs), from the primary positions.
- Cover the most likely dismounted avenues of approach into the platoon area with M249 SAWs, from the primary positions, with emphasis on protection for the antiarmor positions.
- Provide coverage of the same sectors of fire from alternate positions.
- Provide coverage of armor and dismounted avenues of approach into the platoon area, from supplementary positions, that cannot be covered from the primary or alternate positions. This coverage includes approaches into the flanks or rear of the platoon area.
- Take maximum advantage of all available natural cover and concealment and weapons' capabilities.
2. Key Weapons Locations.
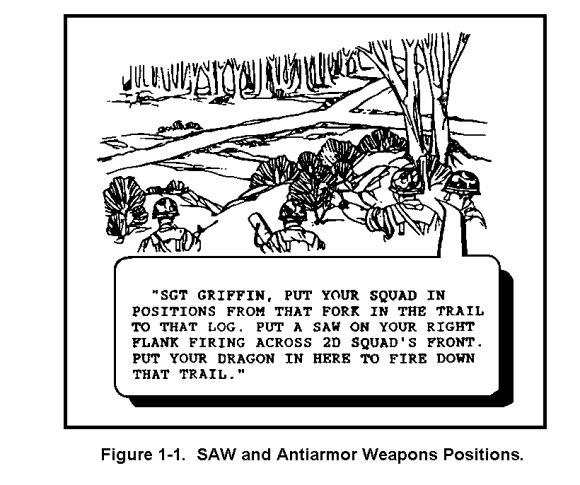
You normally select the location for your SAWs, Dragons, and any attached crew-served weapons. The success of the platoon's mission depends greatly on the proper positioning of those weapons to obtain their maximum sustained firepower. You must make use of all available cover and concealment to provide those weapons with maximum protection from enemy observation and fire. The enemy will concentrate his efforts on finding and destroying crew-served weapons because of their tremendous volume of destructive firepower. Primary, alternate, and supplementary positions which are described below, must be selected for your entire platoon, but positions for your SAWs and antiarmor weapons are most critical (Figure 1-1).
Primary Position. This is the position within the platoon sector from which the crew-served weapon can best perform its mission (Figure 1-2).
Alternate Position. An alternate position is a position to be occupied when the primary position can no longer be manned and from which the same sector of fire can be covered. (Figure 1-2).
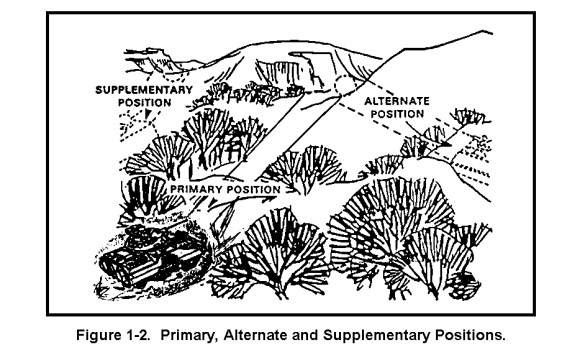
Supplementary Position. This is a position that provides the best location for the accomplishment of a task that cannot be accomplished from the primary or alternate positions, such as providing mutual support to adjacent platoons or defending against an attack from a different direction (Figure 1-2).
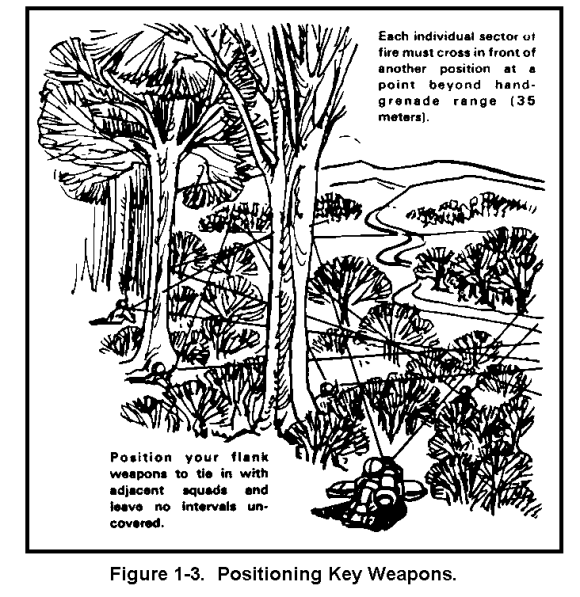
Position your key weapons where they have both cover and concealment, and good fields of fire. Strive to put them where their fires will be overlapping, integrated, and mutually supporting. Position them so that their fire will be heavier on the avenues of approach that the enemy will most likely use. The weapons placed on the flanks of your position must be tied in with the adjacent unit fires to prevent gaps (Figure 1-3).
Cover. Even when natural cover is available, it usually must be complemented by properly prepared positions. As cover is sometimes sparse, you must be skillful in selecting positions so that all natural cover is used to the maximum extent. When no natural cover exists, positions that are well prepared will protect your men and weapons from enemy fire.
Concealment. The enemy's greatest effort will be toward locating the weapons that hold up his attack. Therefore, clever use of terrain and camouflage is mandatory to deceive the enemy. The best foliage for concealment is alive and natural. Even at night, dead foliage can be detected by electronic sensors.
3. Squad Automatic Weapons.
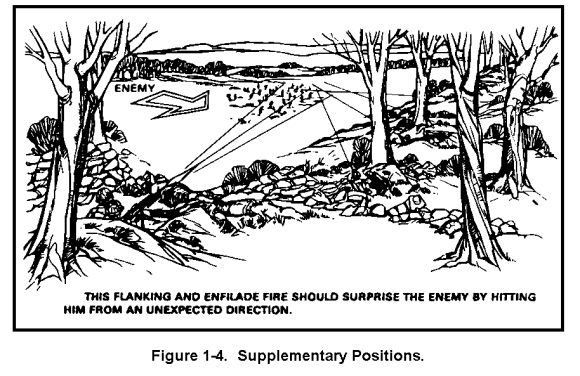
SAWs are the platoon's key weapons for defense against a dismounted infantry assault and for suppressing unprotected enemy direct fire weapons. Position your SAWs laterally across the front so you can have overlapping, mutually supporting bands of fire and, where the terrain allows, final protective fires (FPF). SAW fire is most effective when it hits the long axis of the enemy assault formation with the long axis of its beaten zone. When you can, position SAWs in pairs to fire final protective lines (FPL) parallel to one another. Each SAW should be assigned:
- A primary and a secondary sector of fire.
- An FPL or a principal direction of fire (PDF).
- At least one alternate position.
- Supplementary positions that give depth to the defense, provide mutual support to adjacent platoons, and/or meet an attack from a different direction (Figure 1-4).
4. Dragons.
Medium antitank weapons are key to the platoon's defense against a tank threat. You should consider the following when employing these weapons:
- Dispose them laterally and in depth to cover a designated armor kill zone. That keeps them from being hit by enemy fire directed at a single point or area.
- Position them to deliver surprise fire. Do so by using the terrain to get maximum use of cover, concealment, and fields of fire to hit the enemy from an unexpected direction (flank or rear).
- Keep central control of them. Enemy fire may cause antiarmor weapons to move to alternate positions or to supplementary positions to meet an attack from another direction. Coordinate their fire to provide a timely massing of fire at the critical point. When Dragon positions are selected, consider that:
- The missile must be at least 33 centimeters (13 inches) above the ground.
- Obstacles that could detonate the missile, snag its fins or wire, or interfere with its guidance must be cleared. DO NOT FIRE ACROSS POWER LINES.
- The cover and concealment hiding one of these weapons must also hide its launch signature from the front. A rise in the ground that covers and conceals both the weapon and its signature is best.
- Minimum range for the Dragon is 65 meters.
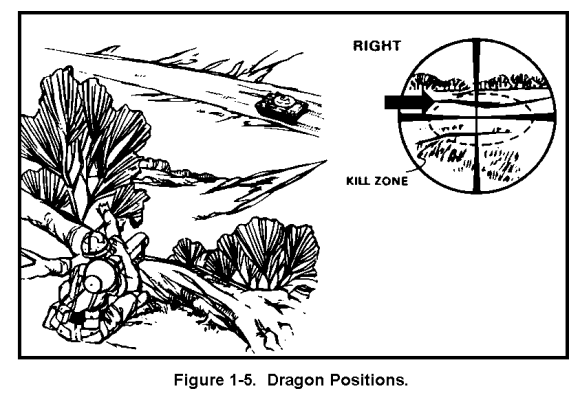
- Position the Dragon so targets will not move behind obstacles before the missile strikes. This is important because, when a vehicle is engaged from the flank, it may move a few hundred meters before the missile strikes it. If you can see no obstacles in your field of view through the sight, then it is clear to launch a missile within that area to a target moving at right angles to your line of sight (Figure 1-5).
5. Summary
This concludes the discussion on designating positions for your platoon's key weapons. We discussed the importance of selecting primary, alternate and supplementary positions for your antiarmor weapons and SAWs, having good cover and concealment, FPLs and PDFs for SAWs and positions for Dragons. We will now move to preparing defensive positions for an M2 Bradley platoon.
PART C - CONDUCT A DEFENSE BY AN M2 BFV PLATOON
1. General.
You and your squad leaders must closely supervise the preparation of defensive positions. You must use cover and concealment, and position key weapons to cover all avenues of approach into the platoon sector.
2. Positioning the M2 Bradley.
The firepower and long-range accuracy of the 25-mm automatic gun and TOW are among the platoon's greatest assets. Therefore, you first consider where to position the BFVs, and then build the platoon defense around them.
Position the BFVs where they can provide:
- Cover, especially to the front.
- Concealment from ground and air observation.
- Good fields of fire into the most likely avenues of enemy approach.
- Mutual support between positions.
- Covered routes of withdrawal.
Employ the BFV's in hull-down, turret-down, or hide positions. Since the BFV is large, cover is often more important than camouflage. There are three main ways to conceal the vehicle: turret-down position, hull-down position, and hide position.
Turret-Down Position. In this position most of the BFV is hidden from enemy ground observation by the terrain to the vehicle's front. Only the top of the turret is exposed so that the Bradley commander and gunner can observe the battlefield. The BFV must be moved from a turret-down position before its weapons can be used effectively. (Figure 1-6).

Hull-Down Position. The most common position, the hull-down position, uses the terrain to protect the hull. This type of position allows the Bradley commander and gunner to observe the battlefield and use the turret weapons. (Figure 1-7).
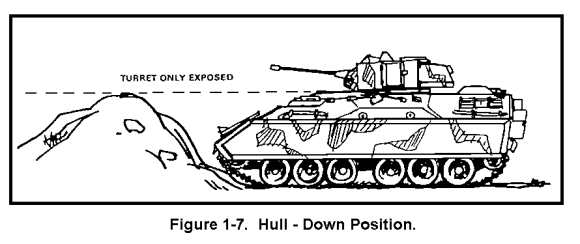
Hull-down positions are often found behind undulations, ridges, slopes, road and railroad embankments, and walls. The Bradley commander may choose to back into a hull-down position. This allows for rapid movement out of the position.
Hide Position. This type of position is used when likely firing positions have little or no cover and concealment. The vehicles are placed to the rear of their designated firing positions in a woodline, behind buildings or in a depression. (Figure 1-8).
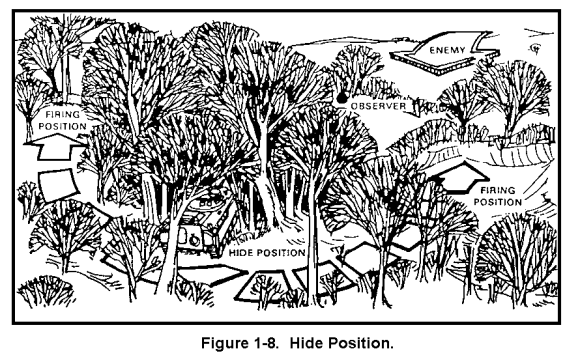
When hide positions are used, the rifle teams should be forward to observe likely engagement areas. They should have a signal to alert the fighting vehicle crews to likely targets and a signal to call the vehicles forward at the appropriate time. These signals can be arm-and-hand, wire, or radio.
No matter what type of firing position is used, the vehicles should have more than one position. Once the BFV engages the enemy, it will attract return fire. By having other firing positions, a BFV can destroy a target, back down into cover, and move to another position. While this is being done, the other BFVs and the dismount element can be firing to divert the enemy's attention.
2. Distance Between Dismount Teams and Squads.
The distance between dismount teams will be determined by the mission, enemy, terrain and weather, and troops and time available.
You can increase distances between squads by positioning each squad with its dismount team deployed and collocated with its fighting vehicle team (Figure 1-9). Still, each squad should be within mutual supporting range of at least one other squad.
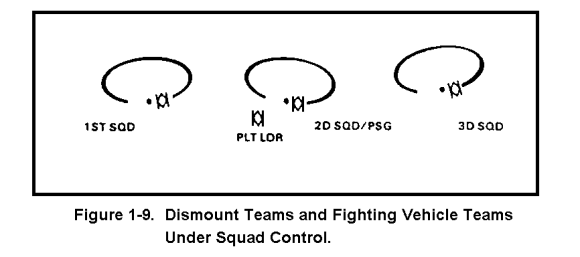
When the dismount element and fighting vehicle element are separated, you must position the two elements to support each other. The maximum front of a platoon dismount element, separated from the fighting vehicle element, can be assigned under ideal conditions--good terrain, full strength, good fields of fire, etc, is shown in Figure 1-10.
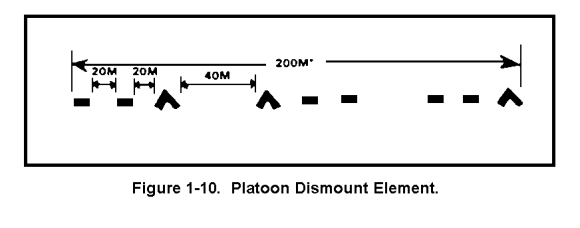
Where possible, have the dismount element's fires reinforce and protect the fighting vehicle element. Dismounted infantry should not allow enemy observation much beyond effective small arms/LAW range (about 200 meters). Plan artillery and mortar fire with first priority going to support the dismount element.
When preparing the dismount element position, you must explain to the dismount team leaders how the fighting vehicle teams are to be used. Then assign each dismount team leader a sector and tell him where to position his SAWs and Dragon, and assign sectors of fire for each. Ensure that key weapons are mutually supporting and there are no gaps in the element's sector. Overlapping sectors of observation and fire between weapons, fighting positions, and teams provide mutual support within the element's sector. This fire must be sufficient to keep the enemy from penetrating the position or isolating any part of the dismount element.
As discussed earlier, make use of all available cover and concealment to provide maximum protection from enemy observation and fire. Select primary, alternate, and supplementary positions for the entire platoon, but the SAWs and antiarmor weapons are most critical. As you recall, the platoon positions you must designate are:
- Primary Position. This is the position within your platoon's sector from which the crew-served weapon can best perform its mission.
- Alternate Position. This position is to be occupied when the primary position can no longer be manned and a location from which the primary position's sector of fire can be covered.
- Supplementary Position. This position provides the best location for the accomplishment of a task that cannot be accomplished from the primary or alternate positions, such as providing mutual support to an adjacent platoon or defending against an attack from a different direction.
3. Squad Automatic Weapons and Dragons.
Position your dismount element's key weapons as outlined in Part B of this lesson.
4. Obstacles.
Enemy approaches into the position should be covered with mines. Use Claymores and other antipersonnel mines to cover any deadspace that cannot be hit with grenade launchers and to supplement the dismount team's fire.
Use antitank mines for close-in protection against mounted assaults. It is best to place antitank mines on likely tank routes where they can be covered by LAW fire. At least one mine should be emplaced for each two-man position; more can be used, depending on the vulnerability of the dismount team to armored attack. You should conceal mines so that they will not be detected. They must also be recorded on DA Form 1355-1-R, Hasty Protective Minefield Record (1 Jun 75).
5. Summary.
This concludes the discussions on preparing a defensive position for an M2 Bradley platoon. We discussed positioning the BFV and then building your defense around them; turret-down, hull-down, and hide positions; positioning the dismount and fighting vehicle teams; selecting primary, alternate and supplementary positions; and use of mines. Next we will cover the employment of the Bradley on battle positions, and conduct of the defense by an M2 Bradley platoon.
6. Employment of the M2 Bradley on Battle Positions.
When your M2 Bradley platoon is operating as part of a company/company team conducting a defensive operation, the company defense OPORD will provide you:
- The commander's concept of how the defense will be fought.
- How the platoon is to deploy and its role in the company/company team defense.
- The platoon sector of fire or engagement area.
- The fighting vehicle element's position and the dismount element's position, if applicable.
- Under what conditions you move and where.
You must then position fighting vehicle teams and the dismount teams to make the best use of the platoon's total combat power; and establish and maintain control of the platoon. You also must assign sectors of fire for the entire platoon and each element, squad, and team, as appropriate.
7. Methods of Employment.
There are three methods of employing M2 platoons in defensive operations:
- Fighting vehicle teams and dismount teams on the same position.
- Fighting vehicle element and dismount element on separate positions.
- Mounted on a single position.
Teams on the Same Position. Your platoon defends with the fighting vehicle teams and the dismount teams on the same battle position when possible, because this method takes maximum advantage of the platoon's defensive capability. You can defend against both mounted and dismounted attacks yet still move rapidly to another battle position or conduct a counter attack. Within the battle position, the fighting vehicle teams may be positioned with, forward of, on a flank of, or behind the dismount teams.
Fighting Vehicle Teams with Dismount Teams. You direct the fighting vehicle teams to remain with the dismount teams when the terrain provides good observation, fields of fire, cover, and concealment for both teams (Figure 1-11). This is usually the preferred method because it simplifies control, insures mutual support, and facilitates remounting of the M2s by the dismount teams.
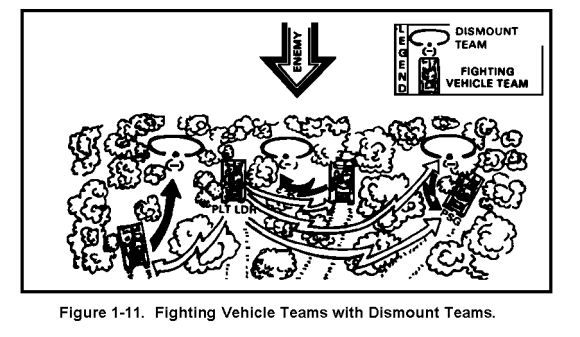
You assign each squad a primary position and sector of fire. Within the sector of fire, assign target reference points (TRPs) to control the massing and shifting of fire. You may also assign alternate positions and sectors of fire. Designate which squads will man observation posts (OP) and give a general position for each OP. Supervise the positioning of each M2, insuring that it ties in with the other M2s according to your concept of the defense. Then, insure that each squad leader positions his dismount team to complement the M2s fires, provide security, and (to the extent possible) orient on dismounted avenues of approach. When using this technique, you control the platoon through your squad leaders, who retain control of both the dismount team and the fighting vehicle team.
Fighting Vehicle Element Forward on Same Battle Position. You initially employ the fighting vehicle element forward of the dismount element when it is necessary to gain better observation and fields of fire and thus, take advantage of the M2 weapons (Figure 1-12). You position the dismount element to the rear to avoid unnecessary exposure to enemy fire directed at the M2s. Direct the dismount elements to prepare the fighting positions and obstacles. Assign each fighting vehicle team a primary forward position and at least one alternate position and sector of fire. Also, assign positions to be occupied after displacement. Designate dismount team positions and sectors of fire that complement the fighting vehicle element displaced rearward.
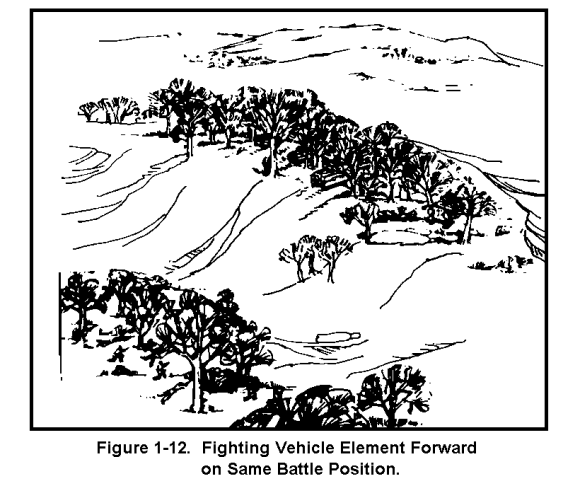
When the fighting vehicle element is forward, you should directly control the element. Your platoon sergeant controls the dismount element. Your squad leaders should be positioned where the primary fight is expected. In all cases, position yourself to stay abreast of the situation while still providing maximum control where the primary fight is expected.
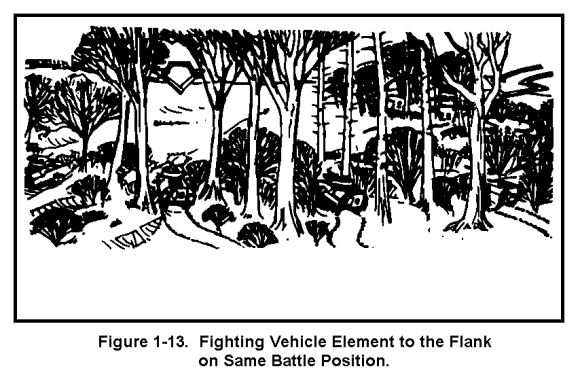
Fighting Vehicle Element to the Flank on Same Battle Position. You should position the fighting vehicle element to the flank of the dismount element when the battle position has two avenues of approach--one with long-range and one with short-range fields of fire. This allows for good positioning of both the fighting vehicle element and dismount element; each is positioned on terrain best suited to its capabilities.
Position each BFV and dismount team, and assign primary and alternate positions and sectors of fire. These positions should be mutually supporting (Figure 1-13). During limited visibility, you may have to reposition a dismount team closer to the fighting vehicle element to provide it local security.
Fighting Vehicle Element to the Rear on Same Battle Position. You position the fighting vehicle element to the rear when covered positions are available for the dismount element but not for the fighting vehicle element, when the terrain is too restrictive for vehicle movement, or when multiple mounted avenues of approach exist. You place the fighting vehicle element in a position to overwatch the dismount element.
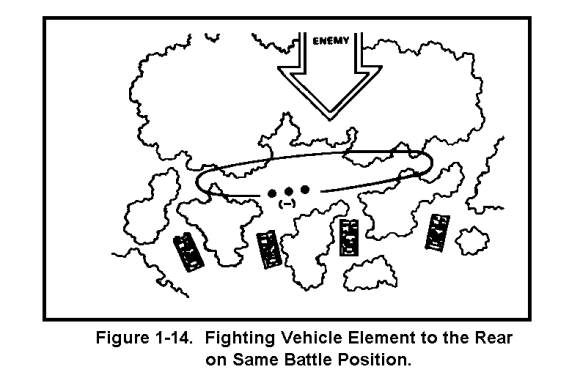
This method is best suited for avenues of approach that represent a dismounted threat.
You must recognize that the use of the 25-mm automatic gun in support of dismount teams requires some safety considerations. These are:
- High explosive 25-mm rounds arm 10 meters from the automatic gun and explode on contact.
- Armor-piercing discarding sabot (APDS) rounds discard their plastic sabots to the front of the automatic gun when fired. This necessitates a 175-meter safety fan to the front of the 25-mm automatic gun.
Elements on Separate Positions. The company or company team commander may elect to employ the fighting vehicle elements and dismount element separately, at least initially (Figure 1-15). With this method, the elements are physically separated and may be less capable of supporting one another. Hence, the elements are more vulnerable and control becomes more difficult. There are two ways this can be done.
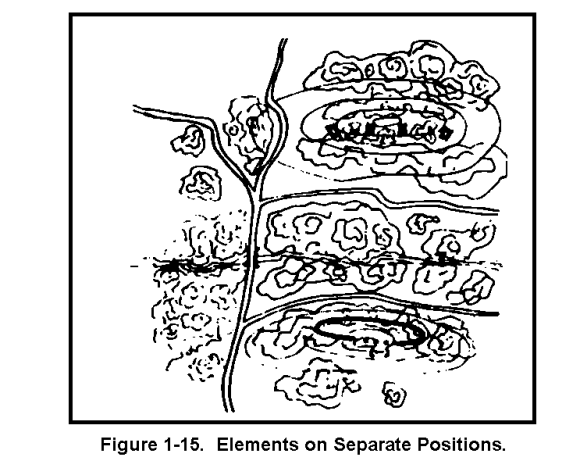
One way is to deploy the fighting vehicle element well forward to perform a specific mission. In this situation, you must not accept decisive engagement with the enemy by the fighting vehicle element, because the element does not have a dismounted fighting capability. Dismount teams that cannot be appropriately used forward are left in the rear to improve positions and emplace obstacles. Once the fighting vehicle element has completed its mission, it returns to the dismount element's position.
Another variation would have the two elements fighting from two adjacent battle positions and rejoining only to move from those positions. This method is used when the dismount element is needed in one location and the fighting vehicle element in another and both can be effectively employed from separate battle positions. Situations where this might arise are:
- The primary position for the dismount element does not allow adequate fields of fire for the M2 weapons.
- Sufficient forces are not available and the commander needs to cover separate mounted and dismounted avenues of approach.
- The dismount element must occupy heavily wooded or rugged terrain that the M2s cannot traverse.
You must ensure covered and concealed routes are designated to the remount point for both the fighting vehicle element and dismount element. The remount point should be located as close to the dismount element as possible.
Mounted on a Single Position. Your platoon defends mounted from a single position when maximum advantage can be gained by long-range antiarmor engagement with the M2 weapons and no major advantage can be gained by deploying a dismount element. This method may be used when your platoon must fight immediately upon occupying a position and time does not allow preparation of dismounted fighting positions, or when you have been alerted to be ready to move to another battle position on short notice (Figure 1-16).
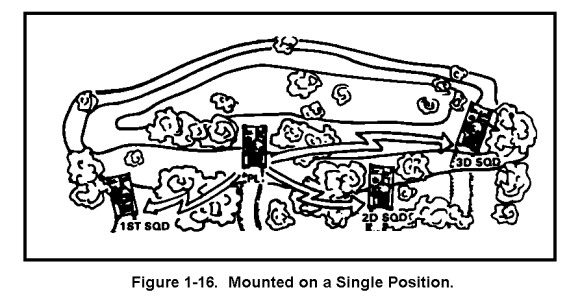
You must ensure that each squad dismounts a small force (two or three men) for local security each time it halts. The remainder of the dismount teams should deploy and begin preparing fighting positions if a long stay is anticipated.
8. Summary.
This concludes the discussions on employing an M2 platoon on battle positions. We covered the three methods of employment: fighting vehicle teams and dismount teams on the same battle position; vehicle and dismount elements on separate positions, and mounted on a single position. The advantages and disadvantages of each method were discussed along with the tactical considerations that will require you to vary the employment methods. We will now cover how to conduct a defense with an M2 platoon.
PART D - CONSOLIDATE AND REORGANIZE A M2 BRADLEY PLATOON
1. General.
When the enemy attacks, your BFVs that have been designated to engage at long range, fire at priority targets, and then move to alternate positions. Some of these BFVs may be designated to engage enemy armor with TOWs, while other engage enemy command and control vehicles, infantry carriers, and air defense artillery (ADA) weapons with the 25-mm gun. As the enemy advances, friendly tanks begin to engage enemy tanks. Friendly obstacles, covered by direct and indirect fire, break up enemy formations and deny enemy elements mutual support. As enemy vehicles move into primary engagement areas, they are engaged on the flanks and rear by BFVs. Dismounted infantry, preferably located on reverse slopes for protection or on hindering terrain, engage enemy elements at relatively close ranges using their Dragons, LAWs, SAWs, and company's small arms. If the company's defensive plan calls for movement to subsequent positions to complete the destruction of the enemy, your BFVs and dismounted infantry move by covered and concealed routes to remount points and then to subsequent positions. Once the enemy has been destroyed, units reorganize and resupply and prepare for subsequent missions.
2. Control of Initial Fire.
When your M2 Bradley platoon is defending against an attacking enemy force, you must engage with longest-range weapons first. To have an effective defense you must also engage targets with the proper weapons systems, and control fires, both indirect and direct. You control the opening of initial fire in stages, based, in part, upon the effective range of the weapons available. A typical sequence might be:
| WEAPON | |
| Indirect Fire | |
| TOW 2 | |
| 25-mm Cannon | |
| 25-mm Cannon (APDS) | |
| 7.62-mm M240C Machine gun | |
| M249 SAW | |
| Dragon | |
| M16 | |
| M203 | |
| LAW |
3. Methods of Controlling Fire.
You must establish a simple and effective means of controlling the fires of the platoon to insure that the frontage is properly covered. The following methods can be used:
- Standing Operating Procedures. SOPs are actions squad leaders and platoon members perform automatically without command. This eliminates many commands and simplifies control, but SOPs must be well understood by all members and thoroughly rehearsed during training.
- Wire. Use wire whenever possible to communicate instructions to subordinate leaders. Wire is easily broken by artillery, small arms, grenades, etc., however, so a backup communications plan must be established.
- Radio. There are several radios in the M2 platoon to assist in controlling the platoon during battle. An alternate communications plan must be established in case of jamming or radio failure.
- Oral. This is an effective method of control unless the leaders are too far away or the noise of battle makes it impossible to hear.
- Prearranged Signals. These are either visual or sound signals, such as pyrotechnics or blasts on a whistle. These signals should be included in the company or platoon SOP and must be clearly understood by all platoon members.
- Arm-and-Hand Signals. This is an effective method of control when the leaders can see each other.
- Personal Contact. In many situations, you will have to move from leader to leader to issue instructions.
- Passing Orders from Man to Man. This is an effective method when the order is simple and time is not critical.
4. Engagement of Targets with Proper Weapon System.
You engage target by type of weapon as outlined below:
| WEAPON | |
| TOW | |
| 25-mm Cannon | |
| 7.62-mm M240C Machine gun | |
| M249 SAW | |
| Dragon | |
| Rifles/Automatic Rifles | |
| LAWs | |
| M203 |
5. How Fighting Vehicle Elements Defend.
The BFV equipped platoon can defend better against a greater variety of threats than previous mechanized platoons. With the BFV and its 25-mm gun, TOW, and 7.62-mm coaxial machine gun, infantry can now defeat mounted attacks at longer ranges and win the close-in fight. In the defense, the BFV's fire power is employed in the following manner:
- TOW. Primary targets for the TOW are enemy tanks. Because of the small number of TOW rounds on the BFV, it is critical not to waste missiles on targets that can be killed by other weapons. The basic rule for TOW use is to engage enemy tanks as soon as they are in range and on the flanks. Accurate preparation of a range card aids the gunners and Bradley commanders in determining that enough exposure time is available for a hit.
When a TOW is fired, the BFV must move to an alternate firing position to avoid enemy return fire. Once two TOWs have been fired, the launcher must be reloaded. The BFV should move to a hide position, reload, and then move to an alternate firing position. Hide positions were discussed in Part C of this Lesson. You must be kept informed of missiles on hand for firing. You or your platoon sergeant should request resupply during any lull in the battle, even if only a few missiles are needed.
- 25-mm gun. The 25-mm gun, firing APDS ammunition, can defeat the BMP1 and other light armored vehicles (BTR, BRDM) out to 2,200 meters. By engaging BTRs and BMPs as they come into range within the platoon position, you can separate the enemy infantry from his tanks by forcing him to dismount. Once dismounted, the enemy infantry is vulnerable to small arms and indirect fires. The 25-mm gun can continue to engage BTRs or BMPs, or switch to high explosive incendiary-tracer (HEI-T) to destroy or suppress dismounted infantry or thin-skinned vehicles. As with the TOW, time to reload the weapons system must be planned. APDS should be reserved for targets that cannot be killed with HEI-T. Also, HEI-T should be held for targets that cannot be killed or suppressed with the 7.62-mm coaxial machine gun. HEI-T and APDS should be reloaded at every chance to avoid running out of ammunition during an enemy attack. Adding ammunition to existing links is quicker than loading empty weapons. When changing from one type of 25-mm ammunition to another, the first round fired will be of the type previously selected because that round is already chambered.
- 7.62-mm coaxial machine gun. The coaxial machine gun is effective in suppressing antitank guided missiles (ATGMs) and enemy machine gun positions, defeating thin-skinned vehicles, forcing armored vehicles to button up, and engaging troops on foot or riding on the outside of tanks. The 7.62-mm coaxial machine gun should be used whenever possible to conserve the larger caliber ammunition. Keeping the coaxial machine gun at maximum ammunition load is just as critical as for the 25-mm gun. It should be reloaded to capacity at every chance.
The BFV leader moves to an alternate firing position to avoid effective enemy fire or to gain a better firing position in the desired sector of fire or engagement area. This movement may be directed by the fighting vehicle element leader or may be done automatically by the squad leader if his position has been discovered and targeted by the enemy. The fighting vehicle crew must avoid multiple engagements from the same firing position when the enemy is returning effective fire. Movement of individual vehicles must be coordinated so that all vehicles will not be out of firing positions at the same time. Normally, movement to supplementary positions is directed by you. This movement normally involves all parts of the fighting vehicle element moving at the same time, but it may be done by single BFVs or by pairs.
If effective enemy fire forces a BFV to leave its position, the onboard smoke-grenade launchers or smoke-screen generator can be used to conceal the vehicle's movement. Employment of smoke is discussed further in Part B, Lesson Three.
If the platoon is ordered to move to another battle position, and if its elements are located together, the fighting vehicle element may continue the fight while the rifle teams remount the vehicles. When the elements are separated, the dismount element should notify the fighting vehicle element leader before movement to the remount point. The BFV then moves to the remount point to pick them up. If either element becomes decisively engaged, then the platoon must disengage. To avoid decisive engagement, the platoon must move quickly. An enemy force traveling at 20 kilometers per hour moves 1 kilometer in only three minutes. To slow the enemy, the fighting vehicle element increases it rate of fire and the FO adjusts for indirect fire and smoke on the enemy. Emplaced barriers and mines also will slow the enemy attack. The BFV's smoke-generators, if needed, can be used to supplement the smoke provided by indirect fire. Remounting considerations are explained in greater detail in Part A, Lesson Two.
6. How Dismounted Elements Defend.
When the tactical situation requires you to dismount your platoon, the dismount elements defend in the following manner.
Defending Against a Dismounted Attack. During an attack, the enemy infantry will advance as far as possible mounted in BTRs and BMPs. When forced to dismount, usually 300-400 meters from your position, the infantry will continue the attack on foot supported by indirect fire, tanks, BTRs, and BMPs. Indirect fires should be placed as fast as possible on the enemy's dismounted forces.
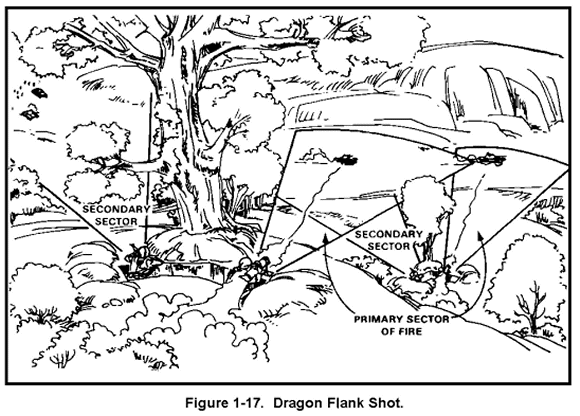
The dismounted elements should engage the attacking enemy force as soon as it comes within the element's sector of fire. Targets in the primary sector of fire have priority. But, when no targets show in the primary sector, targets in the secondary sectors are engaged.
As the enemy begins the assault, you and your FO should call for all FPFs. A heavy stream of fire is maintained until the enemy assault is halted. The rate of fire is then reduced to save ammunition.
When the enemy assault is repelled, you reorganize your positions. You get a status report from each squad, ensure that key weapons are manned, designate replacements for key leaders, and report the status to the company team commander.
Retreating enemy forces are often disorganized and exposed to fire. You should keep calling for indirect fire and be prepared to quickly remount the BFVs and counterattack, if ordered to do so.
Dismounted Infantry Defending Against a Mounted Attack. Riflemen and SAW gunners should direct their fires at exposed crew members to force them to close their hatches, and at dismounted infantry moving along with the tanks. If the enemy infantry can be separated from his tanks, the tanks become vulnerable to infantry antiarmor weapons.
Dragons are used to engage enemy tanks as soon as the tanks enter their sectors of fire. They may be fired at enemy tanks in secondary sectors of fire when no tanks are seen in primary sectors of fire. When engaging targets, antiarmor specialist should make maximum use of the frontal protection of their positions and try for flank shots at target tanks (Figure 1-17). Dragon engagement should be controlled by your squad leaders because of the scarcity of ammunition.
LAWs are fired at enemy armored vehicles that close on the rifle team's position. Squad leaders should hold LAW fire until enemy vehicles come into the protective minefield, or close enough so that LAW hits can be made on the sides of the target vehicles. A squad leader will normally have better results if his entire team hits one enemy tank with surprise volley or pair fire.
Squad leaders fire dual-purpose M203 ammunition at BTRs and BMPs, preferably from the sides. As with the LAW, they should wait until the targets are close enough to ensure a hit.
7. Preparing for the Next Attack.
When an enemy assault is repelled, you must prepare your platoon to counterattack, to continue the defense in place, or to displace. If you are directed to hold your present positions, the platoon must quickly prepare for more enemy attacks. Your platoon must take those consolidation and reorganization actions which are covered later in this part of lesson one.
8. Summary.
This completes the discussions on directing Bradley fires in the defense and conducting the defense by a Bradley platoon. We covered the importance of engaging with the longest weapons first, engaging targets with the proper weapons systems, and methods of controlling fires to ensure that the frontage is properly covered. We also discussed how the platoon employs its TOWs, 25-mm gun, 7.62mm coaxial, and the importance of moving to alternate firing positions to avoid effective enemy fire or to gain a better firing position. We also covered how the dismount elements defend against dismounted and mounted attacks, and how you must prepare your platoon for the next attack. We now move to actions the platoon must take as it consolidates and reorganize after repelling an enemy attack.
9. Consolidate and Reorganize an M2 Bradley Platoon.
When your M2 Bradley platoon is defending a position and you have just repelled an enemy assault, you must prepare to counterattack, to continue the defense in place, or to displace. You must reorganize and consolidate your platoon well enough to:
- Reestablish local security and man the most potent weapons first.
- Reestablish chain of command.
- Redistribute or resupply ammunition and weapons.
- Supervise evacuation of dead or seriously wounded.
- Reorganize platoon to compensate for personnel/vehicle losses.
- Restore communications.
- Replace obstacles and camouflage.
10. Consolidation and Reorganization.
When an enemy assault is repelled; you must immediately prepare your platoon to meet a renewed assault. To accomplish this task, you must follow many of the same procedures used for the reorganization after an offensive action:
- Reestablish the chain of command. Ensure that all key positions are filled by the remaining platoon members and that all members are made aware of the new chain of command.
- Reestablish local security. If the OPs withdrew to the defensive position, send them back out. If they did not get back, check their status and take appropriate action to get another OP(s) established as soon as possible. Implement your sleep/alert plan again as soon as feasible.
- Redistribute/resupply ammunition and weapons. Ensure your squad leaders pass out new ammunition, if available, and equalize that remaining. Take a quick inventory and request a resupply, if required.
- Repair or evacuate damaged/disabled M2 vehicles. If necessary, crossload men, equipment and ammunition to the platoon's remaining vehicles.
- Reposition fighting positions and weapons positions. If you have just repelled an attack, the enemy may have found some of your positions. Reposition those that have been compromised.
- Reestablish communication. Check your wire to ensure it was not cut during the attack. Change your pyrotechnic signals if you think the enemy may have learned what they mean.
- Evacuate and replace casualties.
- Restore camouflage and improve positions. Take caution not to overcamouflage a position. If the position was not found during the first assault, chances are it will not be found during the next try.
- Replace obstacles. If the enemy withdraws far enough and if time permits, replace obstacles, mines, and early warning devices. This is a risky task, especially if the enemy has snipers. Your troops must be careful. Request smoke to cover their movement or wait until darkness.
- Resupply. After inventories are taken, submit requests for all needed supplies.
- Use snipers. If you have snipers, this is a good time for them to be active. They may be employed with the OPs or from a vantage point on or behind the defensive positions.
- When directed, dismount team-size or squad-size patrols may be sent out.
This completes lesson one. You should know how to prepare and issue an oral platoon OPORD, how to designate primary, alternate, and supplementary positions for key weapons, how to prepare a defensive position for an M2 Bradley platoon, how to employ a Bradley platoon on battle positions, conduct the defense and direct the fires of a Bradley platoon, and how to consolidate and reorganize your platoon after repelling an enemy attack. After reviewing all the material in this lesson, you should complete the practice exercise for lesson one. Answers and feedback for the question in the practice exercise will be provided to show you where further study is required.
Practice Exercise

