

|
RDL Homepage |
Table of Contents |
Document Information |
Download Instructions |
LESSON 2
PLAN AND CONDUCT A WITHDRAWAL
| Soldier's Manual Tasks | 071-326-5833 | Plan a Withdrawal Not Under Enemy Pressure. |
| 071-326-5832 | Conduct a Disengagement by a Platoon While Under Enemy Pressure. |
OVERVIEW
TASK DESCRIPTION: Plan and Conduct a Withdrawal.
LEARNING OBJECTIVE:
TASKS: |
Identify how to plan a withdrawal not under enemy pressure and under enemy pressure, and identify how to conduct a disengagement by a platoon while under enemy pressure. |
CONDITIONS: |
You will be given subcourse material for this lesson, and a training scenario. You will complete the practice exercise at the end of this lesson. |
STANDARDS: |
The student will demonstrate his comprehension and knowledge by identifying how to plan a withdrawal not under enemy pressure, and under enemy pressure, and identify how to conduct a disengagement by a platoon while under enemy pressure. |
REFERENCES: |
The material in this lesson was derived from the following publications. FM 7-7J |
PART A - PLAN A WITHDRAWAL NOT UNDER ENEMY PRESSURE AND UNDER ENEMY PRESSURE
1. General.
A withdrawal is an operation in which a force frees itself for a new mission. It may be conducted with or without enemy pressure. When ordered to withdraw, the company or company team disengages (if in contact) and moves to the specified area. It may do this alone, or as a part of a battalion or battalion task force.
The method the company or company team commander uses to withdraw depends on enemy pressure. If the enemy is attacking or is expected to attack during the withdrawal, a withdrawal under pressure is conducted. If the enemy is not attacking and the commander thinks that by stealth he can withdraw before the enemy can react, he can conduct a withdrawal not under pressure
2. Withdrawal Not Under Enemy Pressure.
This part of the subcourse will cover planning for a withdrawal not under enemy pressure. We will cover a situation where your platoon performs as the company security force, and a situation where your platoon will be responsible for its own security.
A withdrawal not under enemy pressure is conducted with speed, secrecy, and deception. It is best done at night or during other periods of reduced visibility. Platoons conduct the withdrawal as part of a larger force to reposition for another mission (for example, to delay the enemy, to defend another position, or to attack some other place). The company commander will designate in the company OPORD whether the platoon is to act as the company security force or withdraw as part of the company and leave a platoon security force behind.
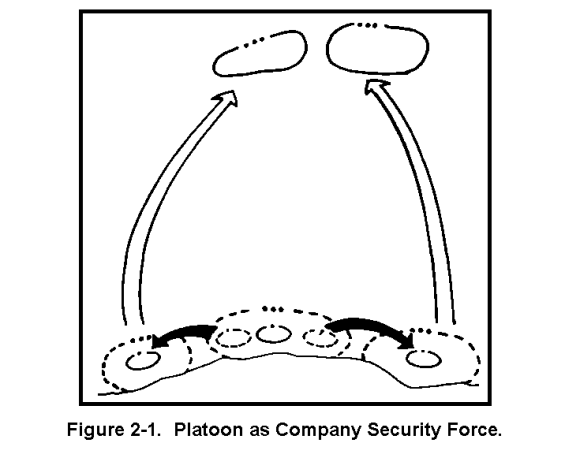
Platoon as the Company Security Force. When your platoon acts as the company security force, it is given the mission to cover the entire company area. You must plan for the repositioning of squads and weapons to cover the company's withdrawal (Figure 2-1). This includes repositioning a squad in each of the platoon positions to cover the most dangerous avenue of approach into that position, and repositioning weapons to cover the most dangerous avenues of approach into the company's position. In this situation, the security force commander will normally be the company executive officer or a platoon leader.

Platoon Responsible for Own Security. When your platoon is responsible for leaving its own security force, the force will consist of one squad, one SAW, and two Dragons (Figure 2-2). The platoon security force leader is the squad leader of the squad left in position. This squad will reposition itself to cover the platoon withdrawal and the entire platoon's area. When the withdrawal begins, each platoon security force comes under the control of the company security force commander.
Security Force. The security force (in both situations) strives to conceal the withdrawal and deceive the enemy by continuing the normal operating patterns of the company. If the enemy attacks during the withdrawal, the security force covers the withdrawal by fire. Once the company is at its next position or a designated distance from the old positions, the company security force commander will order withdrawal of the security force. These orders should be given by telephone or code-word over the radio. The security force withdraws using the same basic plan as the company main body. If under attack, the security force may have to conduct fire and maneuver to the rear until contact is broken and then assemble to move to the rear.
Quartering Party. The company commander may send a quartering party to the next position before the withdrawal starts. This party is made up of company headquarters troops, and representatives from each platoon. Platoon representatives are usually your platoon sergeant and a guide for each squad. When at the next position, your platoon representatives reconnoiter and, as appropriate, pick positions, sectors, routes, and OPs for the platoon. When the platoon arrives, the squad guides meet and guide their squads into position. Your platoon sergeant meets and briefs you on the position.
Planning the Withdrawal. With regard to planning, the company commander tells you in the company OPORD:
- When the withdrawal will start.
- Where the platoon assembly area is.
- Where the company assembly area is and what each platoon is to do upon arrival in it (when the company is assembled, it moves under its commander's control to the next position).
- What route to take from the platoon assembly area to the company assembly area.
- The size, composition, and commander of the security force.
- What are the company's and platoon's next missions.
Based on the information received from the company commander, you plan for and tell your squad leaders:
- When the withdrawal will start.
- Where the squad assembly areas are.
- Where the platoon assembly area is and what each squad is to do on arrival there.
- What routes to take from the squad assembly areas to the platoon assembly area.
- The size, composition, and commander of the security force.
- What the platoon's and squad's next mission is.
3. Summary.
This completes the discussions on a withdrawal when the enemy is not attacking. We will now cover conducting a withdrawal under enemy pressure.
4. Withdrawal Under Enemy Pressure.
A platoon's withdrawal under enemy pressure is conducted as part of a company's withdrawal. The withdrawal is conducted when the company is forced from its defensive positions, to either continue the defense or disengage and move elsewhere for another mission. Your platoon tries to disengage from the enemy by fire and maneuver to the rear. Once your platoon has disengaged and moved to the rear of its original position, the company commander will direct what it is to do next. This may include covering the rearward movement of other platoons, occupying a new defensive position, or moving to perform another mission.
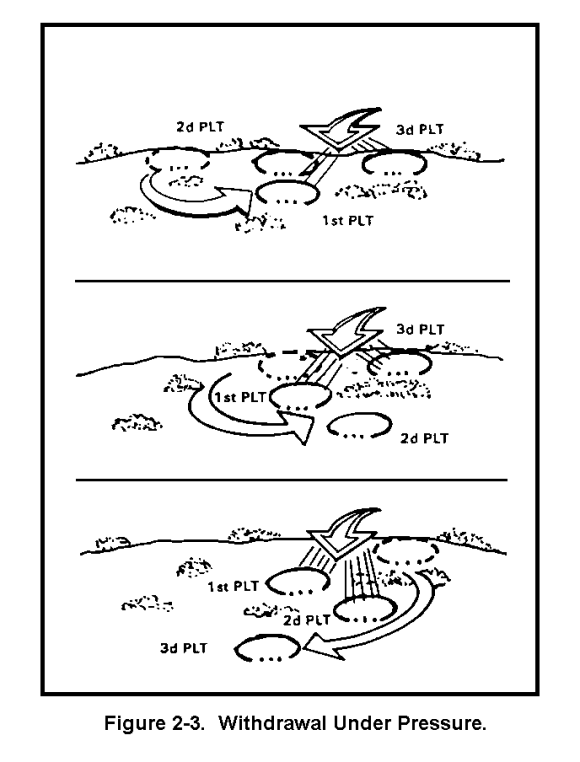
Sequence of Withdrawal. The company commander controls the sequence of withdrawal of the platoons. His decision on which platoon to withdraw first is usually based on where the enemy attacks and how heavily each platoon is engaged. Once the decision is made to withdraw, the company commander will normally order the least heavily engaged platoon to withdraw first. That platoon then disengages and moves to a position where it can overwatch the disengagement of the more heavily engaged platoons. The platoons then change roles and leap-frog to the rear using fire and maneuver. This leapfrogging will continue until contact is broken or the company reaches a new defensive position (Figure 2-3).
Methods of Disengagement. Platoons have three basic methods of disengaging from the enemy: by thinning the lines, by fire teams, and by squads. Fire and maneuver and bounding overwatch are keys to each method. The degree of fire and maneuver and bounding overwatch depends on how closely the enemy follows and the pressure he applies. These methods of disengagement are explained in greater detail in Part B of this Lesson.
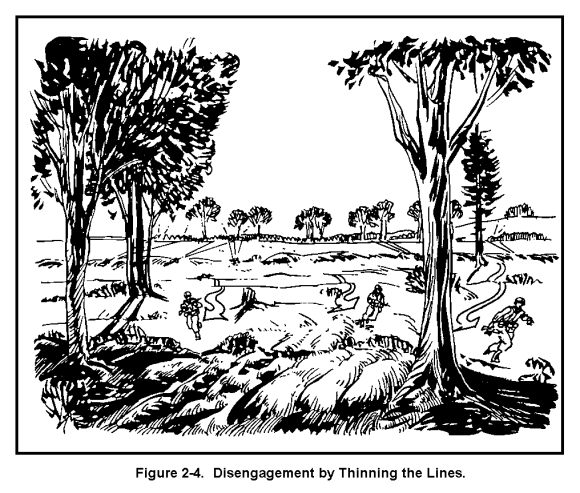
- Disengagement by Thinning the Lines. The first stage of the fire and maneuver rearward is in the squads. Squad and team leaders have men move rearward singly to where each takes a firing position to cover the move of the others as they, in turn, move back (Figure 2-4).
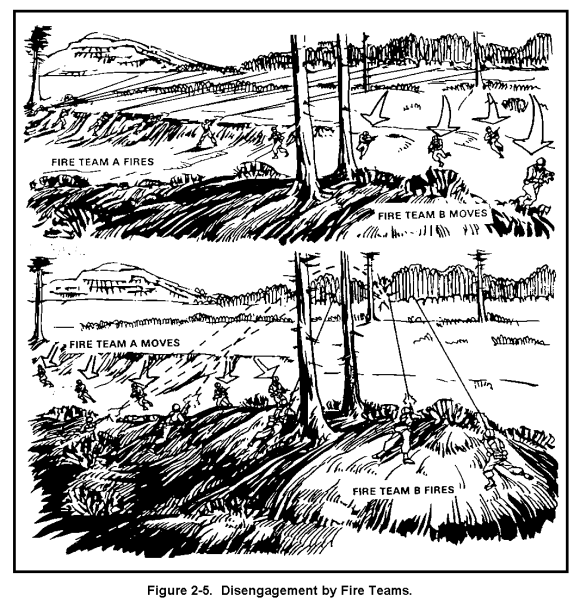
- Disengagement by Fire Teams. If enemy fire is such that thinning the lines is unnecessary, or if the squads have moved back far enough to make it unnecessary, the squads move back by fire teams. One team fires and the other moves. They alternate roles with each move (Figure 2-5).
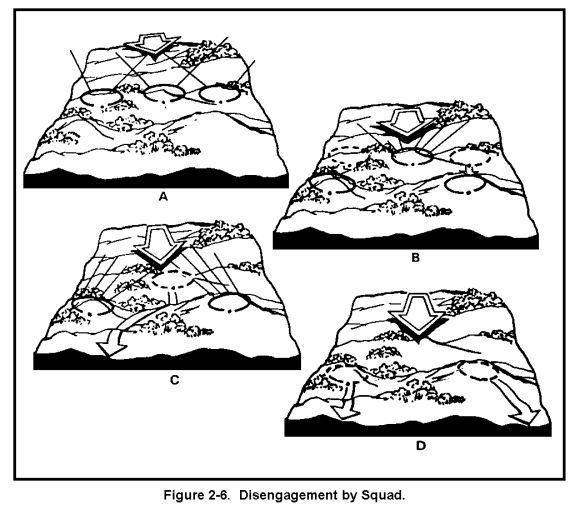
- Disengagement by Squad. If enemy fire is such that fire and maneuver by fire teams is unnecessary, or if squads have moved back to a point where it is no longer necessary, the platoon moves back by squads. You have each squad, in turn, move back covered by the fire of the others (Figure 2-6).
Your platoon may use all three methods of disengaging as it moves rearward. As enemy fire lessens, the platoon changes to the next faster method of disengagement (first by thinning the lines, then by fire team, and then by squads). It uses only those methods (or that method) necessary for its safety while moving.
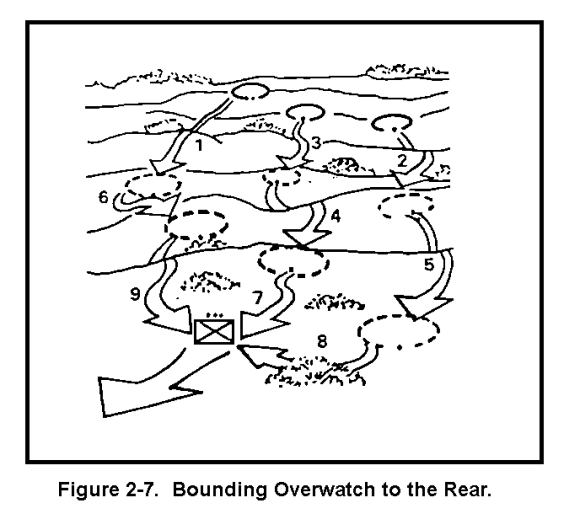
At some point in the action, the platoon can stop fire and maneuver. It will then continue its withdrawal by bounding overwatch to the rear. (Figure 2-7). This occurs when the platoon is no longer under enemy direct fire or when another platoon is covering its move. Once disengagement is complete, the platoon moves as directed by the company commander.
Because the actions taken during a withdrawal under enemy pressure depend a lot on the enemy's action (i.e., which squad is the most heavily engaged and the uncertainty of when the enemy will attack), you may have little time, if any, to plan for the withdrawal. You should therefore prepare a contingency plan for a withdrawal each time a platoon moves into a defensive position. Control measures, such as the signal to begin the withdrawal, the location of the next position, and routes to that position, should be planned and each member of the platoon should know them. Also, if time and the situation permit, each member should actually walk the route of expected withdrawal. If time permits, and before a plan for the platoon's withdrawal is begun, you should check with the company commander and find out what the company's plan is; this will ensure that your plan will support the company's.
5. Summary.
This completes the discussions on conducting a withdrawal not under enemy pressure and under enemy pressure. We discussed the composition of the security force, quartering party and planning the withdrawal not under enemy pressure. We highlighted the three methods of disengaging when withdrawing under enemy pressure, and who controls the sequence of withdrawal. Next, we will discuss in detail how a platoon disengages while under enemy pressure.
PART B - CONDUCT A DISENGAGEMENT BY A PLATOON WHILE UNDER ENEMY PRESSURE
1. General.
Your M2 Bradley platoon will disengage as part of a company or company team which is in contact.
When your platoon disengages, you must prepare a disengagement plan; control vehicle movement; direct fire and maneuver to the rear; maximize the firepower of the fighting vehicle teams to cover rearward movement; and protect the dismount element from exposure to enemy fires.
2. Planning a Disengagement.
Disengagement is the act of breaking contact with the enemy and moving away from him. You plan for the disengagement when you plan for the occupation of the battle positions. The plan must provide for the rapid remounting of the dismount teams when deployed. Keeping the platoon mounted or positioning the dismount teams with the fighting vehicle teams makes disengagement easier.
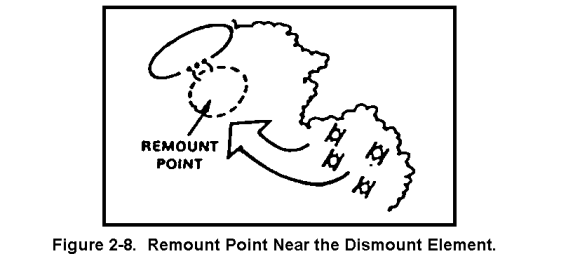
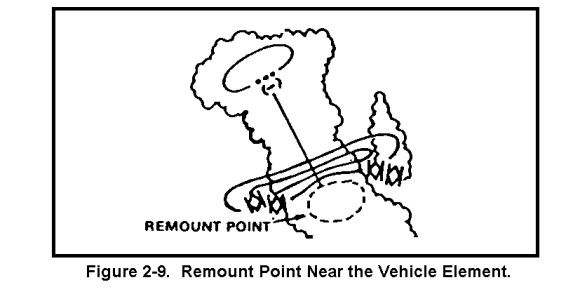
When you employ the fighting vehicle element and dismount element on separate positions, you must select a platoon remount point and routes to the remount point. The platoon remount point can be
- Near the dismount element position. For example Figure 2-8.
- Near the vehicle element position (Figure 2-9).
- Between the two (Figure 2-10).
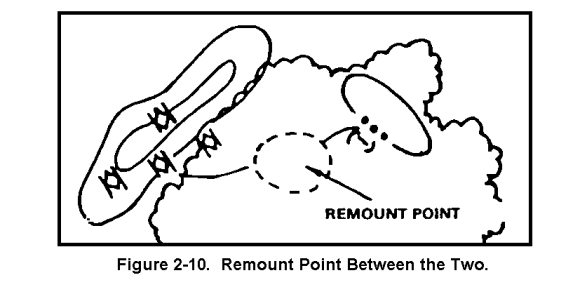
The remount point should have covered positions for the vehicles and should allow for easy remounting even when visibility is limited. Dismount team leaders must make sure their men know the location of the remount point, the location of the squad M2 in the area, and routes to the area. Routes to the remount point should be covered and allow speedy movement for both elements.
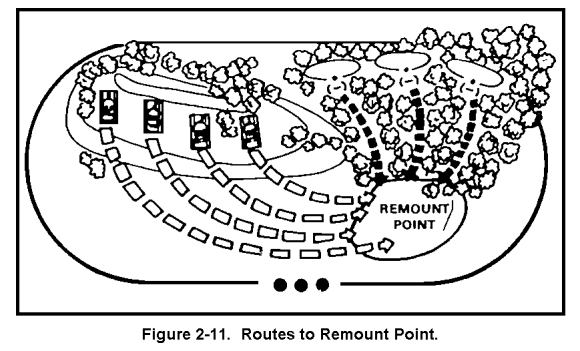
When planning for the disengagement, you should consider the following:
- M2s can move faster and have more protection from enemy small arms and artillery fragments than dismounted troops.
- The vehicle element will often shift from one firing position to another, so routes must be planned from each to the remount point.
- Following routes and finding a remount point will be difficult in battle and even more difficult during limited visibility. As a minimum, routes should be marked and reconnoitered by the drivers and track (Bradley) commanders (BC) from the vehicle element and by the dismount team leaders (Figure 2-11).
3. Directing Fire and Maneuver to the Rear.
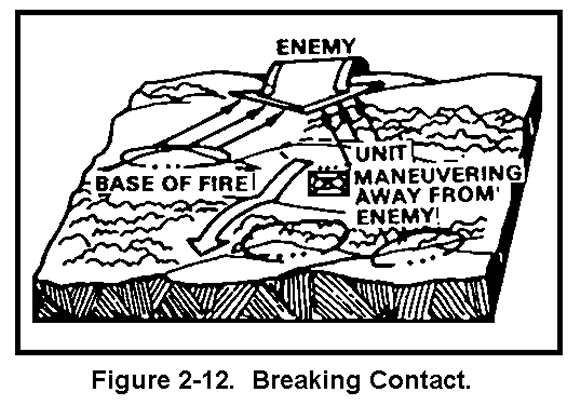
Fire and maneuver to the rear is the basic tactic for disengaging. Rapid movement and an effective base of fire are essential for a successful disengagement. You should:
- Direct one unit to act as a base of fire and hold off the enemy by fire or by holding terrain that blocks his advance while other units within the platoon maneuver to break contact (Figure 2-12).
- When the maneuvering unit gets to the next position, it provides a base of fire to cover the rearward movement of the forward unit (Figure 2-13).
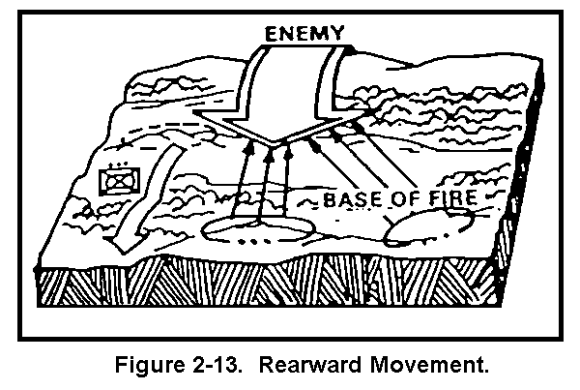
- You repeat fire and maneuver in reverse until contact with the enemy is broken, until the unit passes through a higher level base-of-fire force, or until the units are in position to resume their defense.
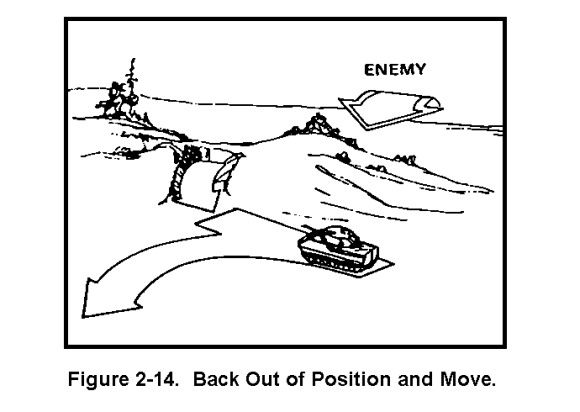
- During fire and maneuver, M2s should back out of position and move, keeping a terrain feature between the vehicle and the enemy (Figure 2-14).
- The turret weapons should remain oriented in the direction of the enemy. Firing port weapons should be manned and ready to fire, especially from the rear firing ports. This is critical when a squad is operating at a reduced strength.
- When heavy indirect or small-arms fire is hitting the dismount element location, but no enemy antiarmor fire is coming on the position, the vehicle element should move to the dismount element's positions to reduce the dismount element's exposure to enemy fires.
4. How the Dismount Element Disengages.
When the dismount and fighting vehicle elements are separated, there are three ways the dismount element can disengage. Simultaneous disengagement (moving all teams at the same time) can be used when the element is covered by another force. When the dismount element must cover its own movement, it disengages by teams or by thinning the lines.
Simultaneous Disengagement. When the dismount teams simultaneously disengage, they assemble and move as one element as fast as possible to the remount point, using standard movement techniques. Simultaneous disengagement is favored when rapid movement is critical, the fighting vehicle element is adequately covering the disengagement, and the enemy has not closed on the dismount element or cannot fire at it. Simultaneous disengagement can be used when the dismount element can move before the enemy can close on the position because of an obstacle between the dismount element and the enemy.
Disengagement by Dismount Teams. When the dismount element must cover its own movement, the dismounted element leader directs one or two teams to remain in position as a base of fire. The rest of the dismount element maneuvers to the rear.
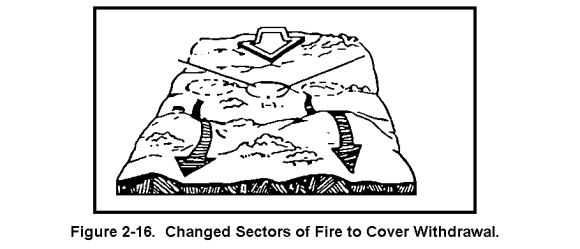
Teams left in position must fire into the entire dismount element's sector to cover the maneuver of the dismount teams (Figure 2-15). Sectors of fire are adjusted to get better coverage of the element's sector (Figure 2-16).

The teams left in position disengage when the rest of the element is in position to cover their disengagement (Figure 2-17).

Disengagement by Thinning the Lines. When disengaging by thinning the lines, selected men from each dismount team (often one man from each fighting position) disengage and maneuver to the rear. The men remaining in position provide a base of fire to cover the maneuver.
When the rearward-moving men are in position to provide a base of fire, the rest of the element maneuvers to the rear.
The dismount element leader must determine when to move the SAWs to provide the best support. He directs the Dragons to move first. You and your squad leaders normally move last. He also directs the men remaining in position to increase their rate of fire to keep the enemy from overrunning the position. Thinning the lines is used when no one dismount team can cover the dismount element's sector because of close terrain or limited visibility.
When the fighting vehicle teams and dismount teams are employed on the same position, direct the dismount teams to disengage first. They move to the rear, link up with the vehicles, remount, and move.
Whichever technique is used, the dismount element normally disengages first, covered by the fighting vehicle element. However, if the fighting vehicle element is not in a position to support the dismount element by fire, or if the dismount team is heavily engaged, the fighting vehicle element may have to disengage first and move to a position to assist the disengagement of the dismount element. Whichever method is used, there are two basic ways the fighting vehicle element can disengage.
5. Disengagement by the Fighting Vehicle Element.
If the fighting vehicle element is covered by another force, simultaneous disengagement may be used. If the fighting vehicle element must cover its own movement, it disengages by teams.
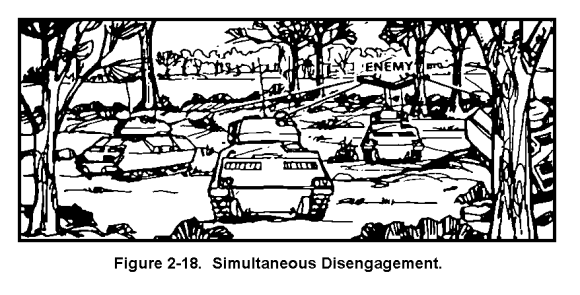
Simultaneous Disengagement. When the fighting vehicle element disengages simultaneously, it moves as one unit as quickly as possible. You use this method when the fighting vehicle element is covered by another force and speed is the most critical factor. If dismount teams are deployed, the fighting vehicle element either moves to the remount point to pick up the dismount teams, or it may have to attack the enemy by fire from a new position to allow the dismount teams to disengage (Figure 2-18).
Disengagement by Teams. When the fighting vehicle element must cover its own disengagement, you can leave one, two, or three vehicles in position as a base of fire while the rest maneuver to the rear. The fighting vehicle teams left in position must cover the entire sector until the maneuvering vehicles reach positions they can use to provide a base of fire.
The number of vehicles left as the base of fire depends on the enemy situation and how quickly the fighting vehicle element must disengage.
The fighting vehicle teams receiving the heaviest tank and antitank guided missile fire are normally disengaged first. It is extremely critical, however, that other fighting vehicle teams, improved TOW vehicles, or tanks be able to cover the sectors of disengaging M2s.
6. Fire Support.
You request indirect fire and smoke through your FO or the company team commander to cover the platoon's move. Use high explosive ammunition against enemy troops, and smoke to screen exposed routes the platoon must cross. The M2's smoke screen generator can also be used to cover the platoon's movement. You use the smoke grenade launchers if the vehicles are having difficulty breaking contact. As stated, employment of smoke is covered in greater detail in lesson three.
If outside direct fire support is needed to allow your platoon to disengage, ask the company or company team commander for assistance. If the covering fire of other elements is not sufficient to allow your platoon to move, you may have to use a combination of mounted and dismounted fire and maneuver.
This completes lesson two. You should know how to plan a withdrawal not under enemy pressure and under enemy pressure. You should also know how a platoon disengages while under enemy pressure. After reviewing all the material in this lesson, you should complete the practice exercise for lesson two. Answers and feedback for the questions in the practice exercise will be provided to show you where further study is required.
Practice Exercise