|
RDL Homepage |
Table of Contents |
Document Information |
Download Instructions |
LESSON 3
OTHER ROLES FOR THE M2 BRADLEY WHILE IN THE DEFENSE
| Soldier's Manual Tasks | 071-326-5913 | Employ an M2 BFV Platoon in the Aerial Role. |
| 071-450-0037 | Supervise Employment of Smoke. | |
| 071-326-5804 | Conduct a Point Antiarmor Ambush by an M2 Bradley squad. |
OVERVIEW
TASK DESCRIPTION: Other Roles for the M2 Bradley while in the Defense.
TASKS: |
Identify how to employ an M2 BFV Platoon in the Aerial Role, supervise employment of smoke, and conduct a point antiarmor ambush by an M2 Bradley squad. |
CONDITIONS: |
You will be given the subcourse material for this lesson, and a combat (training) scenario. You will complete the practice exercise at the end of this lesson. |
STANDARDS: |
The student will demonstrate his comprehension and knowledge by identifying how to employ an M2 BFV Platoon in the Aerial Role, supervise employment of smoke, and conduct a point antiarmor ambush by an M2 Bradley squad. |
REFERENCES: |
The material in this lesson was derived from the following publications. FM 7-7J |
PART A - EMPLOY AN M2 BFV PLATOON IN THE AERIAL ROLE
1. General.
Your M2 Bradley platoon will operate in a tactical environment in which the enemy has both fixed-wing and rotary-wing aircraft in the close air support role. Therefore, you must establish air surveillance for hostile aircraft as well as ground targets. You must insure members of your platoon are aware of aircraft engagement rules, and direct evasive actions when engaged by attacking aircraft. You will also be required to direct the platoon fires to destroy or suppress aerial targets, including airborne and airmobile infantry.
2. Early Warning System.
To effectively defend against an air attack, you make maximum use of cover, concealment, camouflage, dispersion, and early warning. The best measure to avoid an air attack is concealment. Enemy aircraft can attack any ground force whose location has been discovered. The sighting of a few soldiers or vehicles can lead to the disclosure of a whole unit, even if the rest of the unit is well hidden. Units must also be proficient in the use of their weapons in air defense.
You establish an early warning system to preclude a surprise attack. All track commanders (BC) and OPs should have air watch instructions included in their duties, and alertness for enemy aircraft should be required as part of normal observation. OPs will not always have a good view of the air around them, in which case, a special airguard should be detailed.
3. Air Watch Instruction and Duties.
All BCs and dismounted soldiers should be alert for:
- Sun reflection from aircraft canopies and cockpit windows.
- Flash from rotating helicopter blades.
- Smoke or vapor trails from jet aircraft, missiles, and rockets.
- Dust and excessive movement of tree tops and bushes in a particular area caused by the downdraft of helicopter blades.
- Noise from helicopters, and from jets breaking the sound barrier.
4. Threat Jet Aircraft Tactics.
To successfully defend against attacking jet aircraft, it is essential to be familiar with enemy tactics and not be surprised by the trailing jet team. A common enemy tactic is to have one team of two jet aircraft attack a target, followed by a second team 1 to 3 miles behind (Figure 3-1). The teams try to surprise the target and divert attention and defensive fire. When the lead team spots a target, it notifies the trailing team and then pops up in full view of the target.
This attracts fire to the lead team while the trailing team, which has not yet been seen, comes in for a high-speed, low-altitude attack. The attack is usually level, under 1,000 feet, with cluster bomb units released along the long axis of the target. The lead team then makes a sharp, reverse turn to attack the target close in, firing cannon and rockets or dive-bombing for maximum effect. This tactic has a double effect:
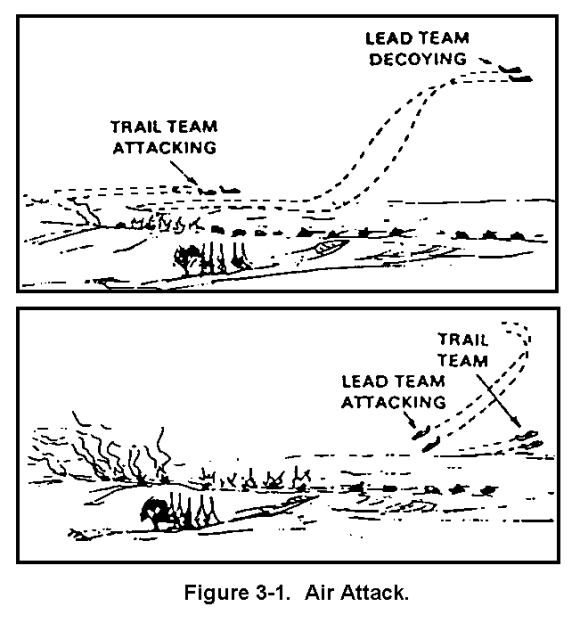
- If the target is surprised by the enemy's lead team and does not take evasive action, the trail team will obtain maximum results with the cluster bomb units.
- If the target only evades the first attack and does not concentrate fire on the lead team, the lead team will get maximum results with rockets and bombs on its return pass.
Attack helicopters also fight in teams of two or more. They are more agile and maneuverable than jet aircraft and use ground cover and concealment to hide, while engaging from stand-off positions.
5. Bradley Weapons' Capabilities and Limitations.
The 25-mm gun and the 7.62-mm coaxial machine gun can elevate to +59 degrees. The 25-mm gun has three rates of fire: single shot, 100 rounds per minute, and 200 rounds per minute. For air defense, the 200-rounds-per-minute rate should be used by firing HEI-T in 25-round bursts (unless the target is a Hind, a Threat helicopter). This allows a rapid rate of fire without using too much ammunition. If the target is a Hind, APDS should be used.
The 7.62-mm coaxial machine gun has a cyclic rate of fire of 650 to 950 rounds per minute. The maximum effective range is 900 meters. Because of jet aircraft's high speed while flying a crossing course, the 7.62-mm coaxial machine gun should be used to engage them instead of using the 25-mm gun. Helicopters, when they are in range and flying a crossing course at high speed, should also be engaged using the 7.62-mm coaxial machine gun. The ready load for the coaxial machine gun is 800 rounds with 1,540 additional rounds stowed. The advantage in using the coaxial machine gun is its greater cyclic rate of fire, larger stowed load, and its faster reload than the 25-mm gun.
6. Techniques of Engagement.
Specific rules for engaging aircraft should be covered in the unit SOP. These are based on policies of higher headquarters. Insure all personnel in your platoon are aware of them. In the absence of such guidance:
- Immediately engage all attacking aircraft.
- Immediately engage all helicopters positively identified as hostile.
- Engage when friendly air defense units are observed engaging enemy aircraft.
- Engage hostile jet aircraft not attacking the friendly position only after ordered to fire.
Likely areas where enemy helicopters may be hiding--behind hills and treelines--should be suppressed by fire just as ground target areas are suppressed. You can do this by indirect fire of mortars, artillery, and the M2's 25-mm automatic gun and 7.62-mm coaxial machine gun.
M2s must take evasive action when engaging or being engaged by hostile aircraft. This reduces the effectiveness of the hostile aircraft's fire. Direct your platoon to:
- Seek cover and concealment.
- Keep dispersion between vehicles.
- Move with frequent changes of speed and direction while turning away from the hostile aircraft's axis of attack.
- Avoid use of light at night.
Your best defense against attacking enemy aircraft is to:
- Immediately concentrate volume fire on any attacking aircraft.
- Take evasive action and disperse.
- Create a smokescreen between the M2s and attacking helicopters to counter the helicopters' weapons, particularly antitank guided missiles.
You concentrate volume fire by two methods:
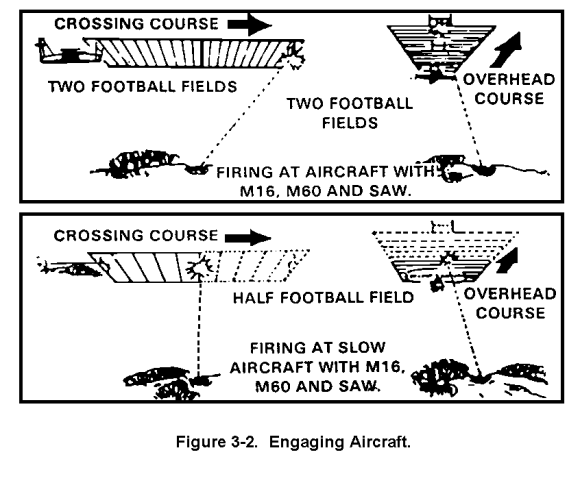
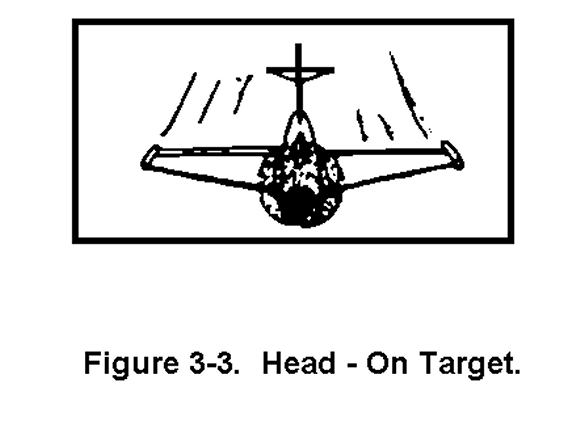
- Directing all platoon fires ahead of the aircraft, letting it fly through the cone of fire (Figure 3-2). When the aircraft is flying a crossing course, the platoon uses a lead of 200 meters--two football fields--against fast-moving aircraft, and a lead of 50 meters (half a football field) against helicopters. If the aircraft, either jet or helicopter, is flying directly forward, the platoon fires should be directed slightly above the nose (Figure 3-3). BCs should not try to track or traverse with a high-speed aircraft; it flies too fast.
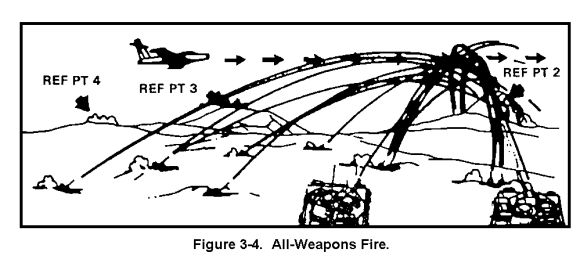
- A second technique to engage high-speed aircraft is to designate a reference point or a series or reference points. Alert your platoon to get ready and, as the aircraft approaches a reference point, order, "ENEMY AIR, REFERENCE POINT 2--FIRE." All M2s and all dismounted soldiers raise their weapons to a 45-degree angle over the reference point and fire (Figure 3-4).
- If a hovering helicopter is detected, you direct the M2s or engage it with the 25-mm automatic gun, using high explosive incendiary tracer. If troops are rappelling when sighted, fires remain directed at the helicopter, not the troops, because it is a better target.
When airborne troops are detected, a lead must be applied to compensate for the airborne soldier's rate of descent. A lead of two heights (forms) below the soldier should be used when employing the 7.62-mm M240C machine gun or the SAW. As with the other engagements, all available fires of the platoon are used.
Pilots who have bailed out of disabled aircraft should not be considered as airborne troops. Engaging parachuting pilots violates the covenants of the Geneva Convention.
7. Summary.
This completes the discussions on employing the M2 in an aerial defense role. We discussed the importance of cover and concealment, having an early warning system, threat air tactics, M2 weapons' capabilities, and techniques of engagement. We will now move to a discussion on how to employ smoke by an M2 platoon.
PART B - SUPERVISE EMPLOYMENT OF SMOKE
1. General.
Smoke obscures vision and degrades most sighting devices. Both friendly and enemy forces use smoke to reduce their opponent's ability to see, move, and fight. Both forces may use smoke to screen their own movement, and they may place smoke to deceive. Thermal-imagery sights and viewers provide the means to see and shoot through most smoke.
2. Smoke Devices.
The BFV has two types of onboard smoke devices, and a thermal-imagery sight to see through smoke. The smoke devices are the M257 smoke-grenade launcher and the smoke-screen generator.
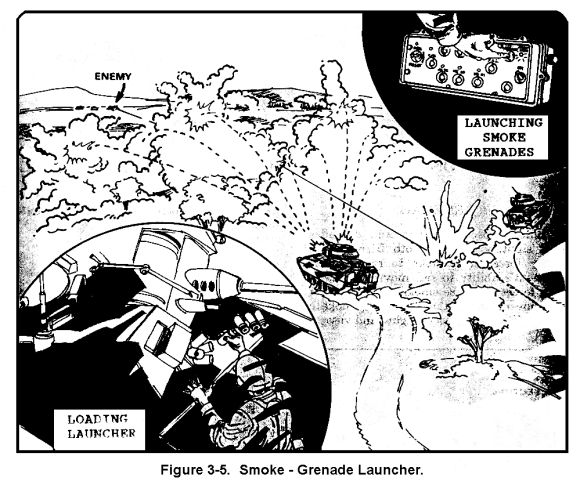
Smoke-Grenade Launcher. The M257 smoke-grenade launcher is used to spread a smoke screen quickly. There are two four-tubed launchers, one on each side of the turret. Eight smoke grenades are simultaneously launched electrically by the BC or gunner from the turret (Figure 3-5).
Four more smoke grenades are stowed in the ammunition box above each grenade launcher. The total number of rounds carried on the vehicle is 16. This system must be reloaded by hand from outside the vehicle.
The grenades are filled with red phosphorus. Upon activation, a dense cloud of white smoke is created from ground level up to a minimum height of 7 meters, by 70 meters wide, and between 20 and 50 meters from the vehicle. All this action takes 2 to 6 seconds. The cloud lasts from 1 to 3 minutes, depending on wind speed and other weather conditions (Figure 3-5).
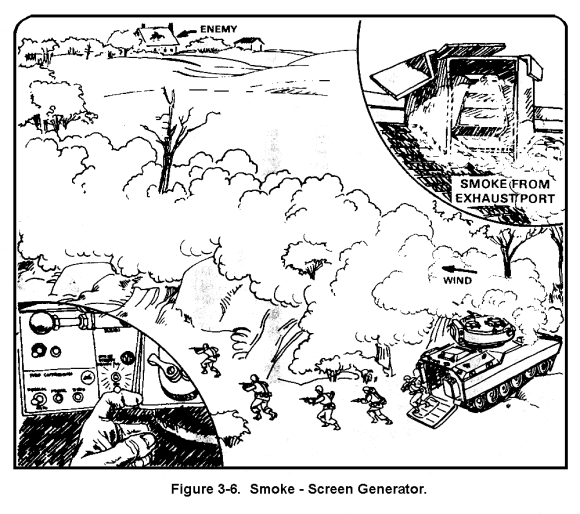
Smoke-Screen Generator. The BFV smoke-screen generator uses the engine exhaust system to furnish a continuous stream of smoke. Smoke is created by injecting raw diesel fuel into the engine's exhaust manifold. This emits a large amount of smoke from the right front side of the vehicle for as long as wanted (Figure 3-6).
Smoke is a major factor on the battlefield. Measures should be identified and techniques practiced that allow your platoon and squads to use smoke, both enemy and friendly, to their advantage.
3. Tactical Considerations in a Smoke Environment.
Your platoon can use smoke to screen movement between positions; occupation of, withdrawal from, or reoccupation of the positions; or in a counterattack. This smoke is supplied by the vehicle using the smoke-screen generator. The smoke can also cover displacement between delay positions. It can deceive the enemy as to the location and number of vehicles employed on each position, and it can slow the enemy enough to let the platoon occupy new positions.
Because there are only 16 smoke grenades per vehicle, the use of the grenade launcher must be controlled. The limited number of smoke grenades make it necessary for you to take advantage of all other smoke sources and conserve smoke grenades for self-defense. During movement, you might direct a certain squad to launch its smoke grenades to counter antiarmor fires.
The 70-meter-wide smoke screen may not screen the entire platoon from the enemy gunners. If not, you could then direct another squad to launch its smoke grenades. All vehicles must take evasive action to get full advantage from the smoke screen.
If a smoke screen is needed to cover the crossing of an open area, the smoke-grenade launcher can be used to set up the smoke screen, followed by smoke form the smoke-screen generator.
4. Smoke Countermeasures.
Smoke reduces the attacker's and the defender's ability to acquire targets, navigate, and control their forces. The use of smoke must be carefully planned to insure that the intended advantage is gained.
Detailed plans must be made and everyone must know what actions are to be taken in a smoke environment. A detailed reconnaissance of the area must be carried out using all available resources (radars, aerial photographs, maps, etc.). In the defense and as time permits, routes to subsequent positions should be reconnoitered in depth.
During movement, terrain features, wood-lines, riverbeds, and man-made features can be used to guide on. Before smoke is employed, or if the BFVs vision of the target or reference point is obscured, the gunner should lay the 25-mm gun on the target or reference point and turn on the stabilization system. The turret will remain oriented in the general direction of the target or reference point. It will not point exactly at the target or reference point. The gunner must maintain constant pressure on the gunner's control palm grips without turning the turret while the stabilization is engaged.
You must plan the use of the thermal-imagery sight to see through smoke. The 10-minute cooldown period needed before the thermal sight can be used requires that it be turned on well before the platoon moves through its own or the enemy's smoke.
The smoke is controlled by the driver using the smoke-screen generator switch on his control panel. A platoon of BFVs can produce enough smoke with these smoke-screen generators to screen the company, depending on speed of movement, wind speed, and direction, and other weather conditions.
Smoke used to conceal movement is more effective when precautions and evasive actions are also used. Whenever possible, smoke should be produced from a covered or concealed position. A woodline or defilade position may be used to conceal the vehicles generating the smoke screen to cover an open area which must be crossed. Evasive action - that is, a zigzag pattern - should be used when creating a smoke screen while moving to take advantage of the concealment resulting from the smoke screen.
5. Summary.
This completes the discussions on employment of smoke by an M2 Bradley platoon. We covered the onboard smoke devices; the smoke-grenade launcher, and the smoke-screen generator and the tactical considerations for operating in a smoke environment, including smoke countermeasures. We will now cover the conduct of a point antiarmor ambush by an M2 BFV squad.
PART C - CONDUCT A POINT ANTIARMOR AMBUSH BY AN M2 BFV SQUAD
1. General.
The purpose of an antiarmor ambush is to destroy armored vehicles. A squad can conduct a dismounted antiarmor ambush, but the limited number of dismount troops in the squad may have to be augmented. In this part of the subcourse you have given one of your squad leaders the mission to conduct an antiarmor ambush. You have also given him the location for the ambush. After you finished issuing your instructions, the squad leader begins by organizing his squad.
You, as the squad leader must organize the antiarmor ambush so that the squad can destroy enemy armor vehicles and provide fire support and security. When you organize an antiarmor ambush, you must:
- Understand the mission and situation.
- Determine the personnel available for the mission.
- Assign the personnel to the required elements.
- Brief each team on its duties.
- Determine the most effective role of the M2 (vehicle element).
Your antiarmor ambush plan must provide for:
- Destruction of enemy armor.
- Fire support during the ambush and withdrawal.
- Security for the ambush.
With these considerations, you organize the teams necessary to accomplish the mission and assign men to those teams based upon the terrain, enemy, time, and men available.
2. Organization.
When the M2 squad performs the mission of conducting an antiarmor ambush, you organize the squad into two teams, the armor killer team and support/security team.
- Armor Killer Team. This team has the mission to destroy armored vehicles. The M2 is normally the primary weapon system of this team. The TOW missile is the primary heavy-armor- defeating weapon due to its tank-defeating capability. The 25-mm automatic gun and 7.62-mm coaxial machine gun provide greater supplemental firepower.
LAWS, Dragons, and SAWs, may be used to supplement the fires of the M2. Whenever possible, you position yourself with this team to control the antiarmor fires. To be useful, however, the M2 must have concealed routes into and out of the ambush site. The vehicle should be placed in a concealed, hull-down position. All precautions must be taken to protect the M2 because it is the primary means of escape.
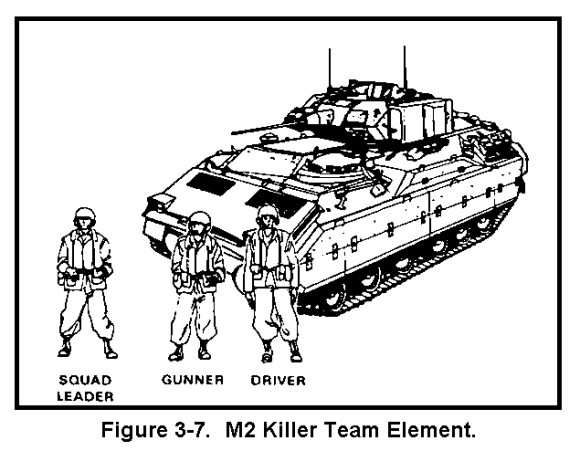
If the M2 is used as the killer team element, it is organized as shown in Figure 3-7.
Where the terrain does not lend itself to the use of the M2, the Dragon is the primary weapon of this team. LAWs, and SAWs may be used to supplement the fire of Dragons. Where fields of fire are very short (less than 100 meters), LAWs may be the primary antiarmor weapon. When LAWs are the primary antiarmor weapon, your armor-killer team must be larger so it can mass LAW fire into the kill zone to insure destruction of enemy armored vehicles.
If the dismount team is used in very close terrain, the M2 is used to cover the dismount team's withdrawal. You place it where it can best support by fire with its 25mm automatic gun and coaxial machine gun.
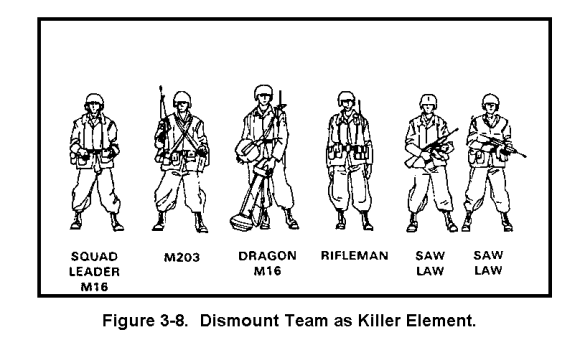
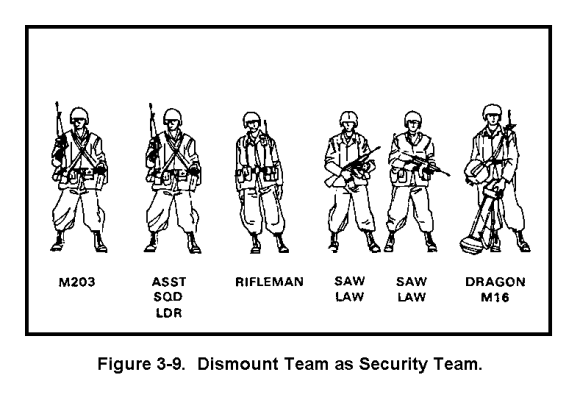
When the vehicle is not used with the killer team, your killer team may be organized as shown in Figure 3-8.
- Support/Security Team. This team provides early warning and security for the ambush. It may also be positioned to cover the withdrawal of the armor-killer team. The team is armed with LAWs to keep enemy vehicles from outflanking them. The team must have a means of communication to provide early warning.
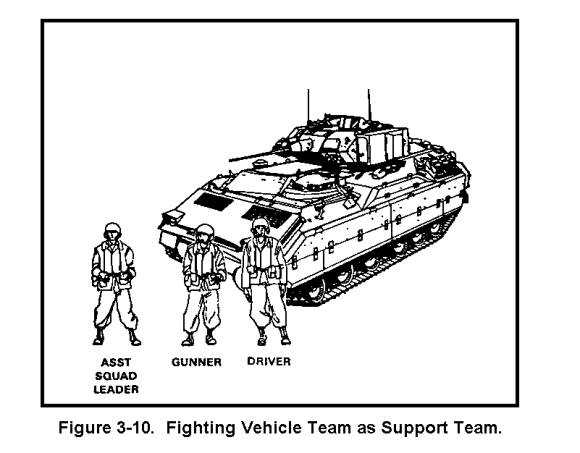
When the dismount team is used as the killer team, the vehicle team is used as the support team and is organized as shown in Figure 3-10. It should be noted that one of these men should dismount to provide local security.
Your platoon leader will normally give you the location of the ambush site in a fragmentary order. When possible, you should try to reconnoiter the site, on the ground or by air. As a minimum, conduct a thorough map reconnaissance. If a ground reconnaissance was not conducted, you organize for both possibilities-that is, the use of either the vehicle team or the dismount team as the killer team.
You plan for support by coordinating with your platoon leader to have planned fires in the kill zone and along the route of withdrawal. These may be mortar and/or artillery and should include smoke or white phosphorous rounds to hamper enemy fires.
You plan to use mines to create an obstacle between the kill zone and the firing positions if a natural obstacle does not exist. Mines can also be used in the kill zone itself or with the security/support team to enhance the security of a flank. Plan to use both antiarmor and antipersonnel mines. Also, plan manmade obstacles, such as abatis, when possible.
3. Summary.
This completes the discussions on organizing an antiarmor ambush, we now move to the conduct of an ambush.
4. Conducting An Antiarmor Ambush.
The Bradley squad leader, you, as the platoon leader, tasked to conduct the antiarmor ambush, has completed his planning and organized his squad into two teams. You remind him that his mission is to destroy or disable armor vehicles without being discovered before hand.
You also remind him that the conduct of the antiarmor ambush must be well planned and thought out. The situation and mission may not always allow him to observe all of the following steps and guidelines, but he must try to:
- Reconnoiter the site, on the ground or by air when possible. As a minimum, he should conduct a thorough map reconnaissance.
- Conduct rehearsals, time permitting. These can include what to do if engaged by the enemy before arrival at the site, what to do if the site is attacked by enemy infantry, how to approach the site, and how to leave the site. Insure that each member of each element understands what he is to do. If only able to conduct a map reconnaissance, he should plan and rehearse the contingency missions.
5. Ambush Site.
The successful ambush will depend upon, among other things, how quickly your squad arrives at the site, executes the ambush, and departs. At any time, the M2 may be lost to hostile action or mechanical failure. You must be prepared to use another means of transportation for withdrawal, whether it be by foot, another vehicle, or helicopter.
Upon arriving at the site, you post security and reconnoiter the exact location of the ambush. A good ambush site should be where:
- Enemy vehicles are likely to enter. Do not plan kill zones in places where the enemy may not cross.
- The terrain makes it difficult for other armor vehicles to bypass a destroyed vehicle and assault the ambush squad.
- The kill zone permits the M2 or Dragon gunner to hit the flank of a target vehicle.
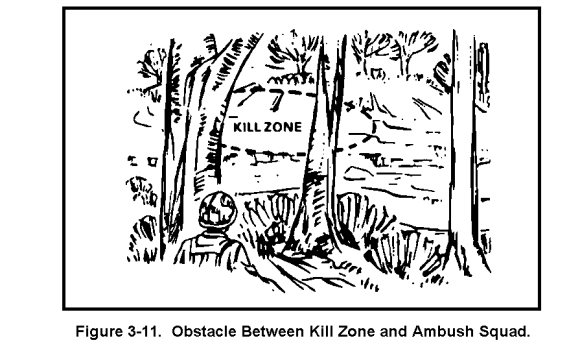
- A natural obstacle is between the kill zone and the ambush squad (Figure 3-11). If there are no natural obstacles (and time permits), your squad can make artificial obstacles, such as minefields.
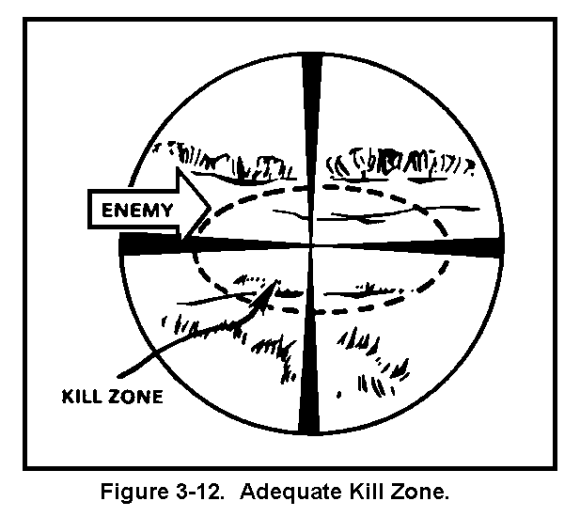
- The kill zone is large enough to permit the M2 or Dragon gunner to acquire, fire, track, and hit a target vehicle (Figure 3-12). Generally, if the gunner looks through his sights at the kill zone and there are no obstructions in the field of view, the kill zone is large enough. When using the TOW, the half-sight method is used to determine if the kill zone is large enough. If the Dragon is to be used to supplement the TOW (M2), use the full-sight method for the Dragon to determine the adequacy of the kill zone.
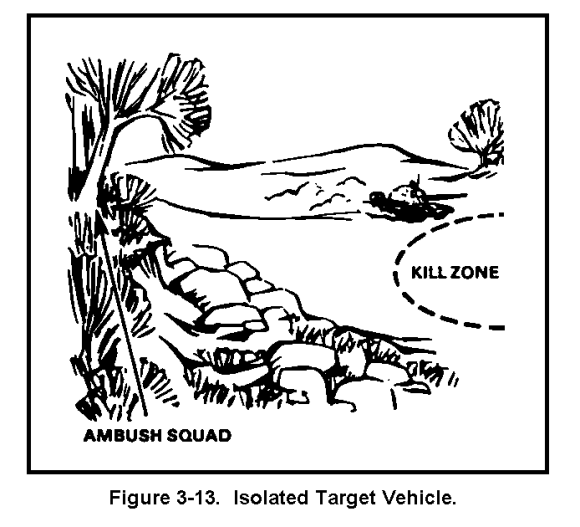
- A target vehicle is isolated and has no other enemy armor overwatching it (Figure 3-13).
- If the M2 is used in the armor-killer team, an M2 hull-down or hide position must be available.
6. Security at Ambush Site.
The support/security team moves into position to establish security. These elements may have to be repositioned after the armor-killer team sets up. Once the ambush site is secure, you position the armor-killer team. Since the primary weapons system available to the antiarmor ambush is the M2, you should always try to locate the kill zone at the maximum effective range (3,750 meters) from the ambush site.
7. Kill Zone.
You and the gunner choose the best firing position and move to it. When the vehicle is in position, the gunner ensures that all weapon systems are loaded and ready to fire, to include conducting the TOW self-test. He also ensures the cargo hatch is closed completely.
When a long-range ambush (1,000 to 3,750 meters) is established, the role of the dismount team is to provide security. In positioning the support/security team, consider the distance between fighting vehicle and dismount team. Position them far enough out to provide security, yet close enough to allow for a quick remount and to provide adequate protection from enemy indirect fire.
If the dismount team is used as the armor-killer team, then the Dragon becomes the primary weapon system. You should locate the kill zone at the maximum effective range (1,000 meters) from the ambush site. When a medium ambush is established (200 to 1,000 meters), you position the antiarmor weapon (Dragon) and then the SAW to cover the kill zone. The remainder of the dismount team provides security for these two weapons.
If electing to conduct a close-in ambush (within 200 meters), you plan for the use of all available LAWS. You position the individual members of the squad, insuring that each position has:
- Good fields of fire into the kill zone.
- Cover and concealment.
- An obstacle between it and the kill zone.
- Covered and concealed withdrawal routes for the squad.
Once in position, you designate positions within the kill zone to be covered by the various weapon systems. You plot indirect fires on the kill zone or your own position, and along the route of withdrawal.
In establishing the ambush, you must provide a position for the M2, whether it be in the armor-killer team or support/security team.
8. Terrain around Ambush Site:
You must improve the ambush position as time permits. Also prepare and improve the M2 position and individual positions.
Place Claymore mines, explosives, or smoke pots on fake firing positions and rig for remote firing. They will deceive the enemy as to the location and size of the ambush force and confuse him.
If you are sure that the enemy cannot see the impact, you can call for check rounds from whatever indirect fire unit(s) is in support. In most cases, a FO will not be with you, so you must call for fire through the FO attached to the platoon.
You rehearse so that each man knows his job before, during, and after the ambush.
9. Execute the Ambush.
Long-range ambushes are executed by firing the TOW. Once the round impacts, cover the withdrawal with smoke. To increase the speed of withdrawal, dismount only those men needed to ensure local security of the BFV.
You execute medium-range ambushes by firing either the TOW (if the M2 is used as the killer team) or the Dragon (if the dismount team is used as the killer team.) Once the round impacts, team members whose weapons have the range to reach the kill zone fire their weapons to cover the withdrawal of the antiarmor specialist. Other members of the dismount team who are providing security shoot if they see enemy within their sector. As soon as the antiarmor specialist has moved to where he cannot be fired at by the enemy, the remainder of the dismount team moves to the remount point and links up with the M2.
You conduct a close-in ambush when fields of fire are short (200 meters or less). Plan for the use of all LAWs by the dismount team. If the vehicle is to be used, the 25mm automatic gun using APDS ammunition should be its selected weapon. In a close-in ambush, you must mass a high volume of antiarmor weapons to insure destruction of the enemy vehicle.
You position yourself with the armor-killer team in order to initiate the ambush.
Have indirect fires impact on the kill zone as the ambush is executed.
If enemy dismounted infantry precede armored vehicles into the kill zone you must decide if they pose a threat to the ambush. If they can outflank the ambush site before the enemy armor can be hit, you may decide to withdraw without making contact and try to set up another ambush along the avenues of approach somewhere else. If the enemy infantry is an immediate threat to the squad or appears to be ready to find or trip any mechanical devices, you intitiate the ambush with automatic weapons. The M2 engages the enemy with the 7.62-mm coaxial machine gun. All actions are executed exactly as planned, to include smoke and indirect fire, except that the armor-defeating weapons are not fired. When mounted enemy infantry approaches the kill zone of the armor ambush, the carriers are treated like light tanks. They are allowed to close, then they are destroyed one at a time.
Because of the speed with which other enemy armored vehicles may react to the ambush, and the responsiveness of enemy artillery, you spring the ambush, break contact, and get out of the area as rapidly as possible. The support/security team's role varies with the type of ambush. For example:
- In the long-range ambush, the support/security team provides local security because its weapon cannot affect action in the kill zone. Determine how much security and how far out it needs to be placed. Balance this against a quick withdrawal. The larger the force and the greater the distance from the vehicle, the slower the withdrawal.
- When a medium-range ambush is conducted, most of the dismount team provides security, since most of their weapons will be unable to influence the action in the kill zone. You may elect to position the machine gun to engage dismounted infantry preceding the enemy armor.
- When a close-in ambush is conducted, the support/security team provides both security and support. It must provide flank security and also supporting fires into the kill zone to mass fires. It must also engage any secondary vehicles that enter the kill zone. It provides suppressive fires to withdraw the killer team.
Your squad withdraws under the cover of indirect fire and smoke. If the M2 can be detected in a long-range ambush, it should fire its smoke grenades. In a medium-range and close-in ambush, the chances of detection are greater, and it normally would fire its smoke grenades. The squad withdraws along predesignated routes to the remount point. Once linkup has been accomplished, the squad withdraws along a previously reconnoitered route.
If possible, you must maintain communication with your platoon leader at all times.
This completes lesson three. You should know how to employ the Bradley in an aerial role, how to employ smoke and how to organize and conduct a point antiarmor ambush by and M2 BFV squad. After reviewing all the material in this lesson, you should complete the practice exercise for lesson three. Answers and feedback for the question in the practice exercise will be provided to show you where further study is required.
Practice Exercise

