

|
RDL Homepage |
Table of Contents |
Document Information |
Download Instructions |
Defensive operations are conducted to retain ground, gain time, deny the enemy access to an area, and destroy attacking forces. Successful defensive operations incorporate the defensive characteristics of preparation, disruption, concentration, and flexibility.
1. Conduct of the Defense. This paragraph provides a standard sequence of events that a platoon takes in planning, preparing for, and executing defensive operations. The conduct of the defense normally follows the sequence listed below (Figure 2-49).
Figure 2-49. Platoon Defend.
Figure 2-49. Platoon Defend (continued).
- Prepare for combat.
- Move to defensive positions.
- Establish defensive positions.
- Determine enemy intentions and locations.
- Initiate contact or actions against the enemy.
- Fight the defense.
- Reorganize.
a. Prepare for Combat. (For a detailed discussion of troop-leading procedure, see Part A.)
(1) The platoon leader receives the company warning or operation order.
(2) The platoon leader quickly issues a warning order.
(3) The platoon leader begins making a tentative plan.
(4) When possible, the platoon leader (and squad leaders and Bradley commanders) reconnoiter the defensive position and the route(s) to it. At a minimum, a map reconnaissance should be made.
(5) Based on his reconnaissance and any additional information, the platoon leader completes and issues his plan.
(6) The platoon sergeant ensures that all squad and section leaders check weapons, communications equipment, accessories for missing items and serviceability, preventive maintenance checks and services (PMCS) (the platoon leader spot-checks).
(7) The platoon sergeant makes sure that the platoon has POL, ammunition, food, water, and medical supplies on hand, in quantities prescribed by the platoon leader. (Squads and platoons should plan to prestock an additional basic load of ammunition on the defensive position.)
(8) All soldiers camouflage themselves, their equipment, and vehicles to blend with the terrain.
(9) The platoon rehearses applicable drills and tasks.
(10) The platoon leader makes final inspection of weapons (bore sight, zero, and test fires weapons, if possible), equipment (include communications checks), and personnel (include camouflage).
(11) If an advance party is used, the platoon leader, platoon sergeant, and advance party leader (normally a squad leader) review advance party activities and redistribute equipment to the advance party (for example, tripods, stakes).
(12) If not already moving, the platoon leader initiates the movement of his platoon.
b. Move to Defensive Positions. The platoon applies fundamentals of movement:
(1) Do not move vehicles directly forward from covered and concealed positions.
(2) Move on covered and concealed routes.
(3) Avoid likely ambush sites.
(4) Enforce camouflage, noise, light, radiotelephone, and litter discipline.
(5) Maintain all-round security, to include air guards.
(6) Use formations and movement techniques based on METT-T.
c. Establish Defensive Positions. When an advanced party is not used, the platoon halts short of the defensive position in a covered and concealed position, and establishes local security.
(1) The platoon leader, squad leaders (Bradley commanders, if possible), and a security element conduct a leader's reconnaissance. The reconnaissance party enters the position from the rear.
(a) The leader's reconnaissance:
- Maintains security. This includes the period during the occupation of the position as well as the leader's reconnaissance.)
- Checks for enemy activity, or signs of past enemy activities, obstacles, booby traps, and NBC contamination.
- Confirms and adjusts BFV and squad positions and sectors of fire from those in the tentative plan. Normally the platoon leader assigns and adjusts machine guns and antiarmor positions. (This includes a reconnaissance forward of the positions to verify what routes the enemy will use and how he may approach over different routes [mounted and dismounted].)
(b) The platoon occupies the designated position. Guides control the movement of the platoon into position.
(2) The platoon occupies its position. The platoon leader:
(a) Establishes security (to include OPs, hasty perimeter, or security patrols).
(b) Positions BFVs and squads, machine guns, and any attachments.
(c) Assigns sectors of fire, engagement priorities, and other fire control measures. Sites crew-served weapons.
(d) Chooses the platoon CP location.
(e) Assigns alternate and supplementary positions and routes to them.
(f) Develops an obstacle and direct-fire plan. Sites obstacles to support placement of crew-served weapons.
(g) Develops a fire support plan with the platoon FO (includes final protective fires, and fires used to support repositioning the platoon to alternate or supplementary positions).
(h) Ensures that communications have been established from the company CP and to the BFVs and squad positions. (Responsibility for establishment of communications is from higher to lower.)
(i) Confirms all positions and squad sector sketches before soldiers begin digging (includes range cards for all BFVs and antiarmor and crew-served weapons).
(j) Collects BFV and squad sector sketches and consolidates them into a platoon sector sketch. He forwards a copy to the company CP.
(k) Ensures that his platoon is tied-in with platoons on its left and right. (Responsibility for adjacent unit coordination is left to right and higher to lower.)
(l) Develops a reconnaissance and surveillance plan IAW the company plan (includes the location of PEWS).
(m) Walks positions to confirm that they meet standards.
(n) Walks forward of positions, if possible, to check camouflage and confirm dead space.
(o) Checks on wire and mine teams. The platoon leader ensures that protective wire is outside of hand-grenade range from the fighting positions. He checks to ensure that tactical wire lies along the principal direction of fire (PDF), the final protective lines (FPL), or the left and right limit of weapons.
(p) Briefs the platoon sergeant on the logistics plan (includes resupply and casualty evacuation routes).
(q) Issues platoon order and checks soldier knowledge and understanding. (All soldiers must be aware of friendly forces forward of the position; for example, patrols, reconnaissance platoons, major units, and their return routes. They must also know the signals or conditions to initiate fires, shift fires, fire FPF, and cease fires; and to reposition to alternate and supplementary positions.)
(r) Reconnoiters alternate and supplementary positions, routes into and out of the platoon position, and counterattack route, if required. (This includes good and limited visibility reconnaissance.)
(s) Plans and conducts rehearsals. The platoon rehearses the fire plan (that is, when and where to shift fires); movement to alternate and supplementary positions; counterattack; and linkup of BFVs and squads, if on separate positions.
(t) Checks the platoon reconnaissance, surveillance, and security plan, the patrol plan, and the radio watch.
(3) As time permits, the platoon continues improving the position .
d. Determine Enemy Intentions and Locations. The platoon establishes and maintains OPs. It also conducts security patrols as directed by the company commander. Patrols, OPs, and individual soldiers use eyes, ears, BFV optics and thermal sights, night surveillance devices, binoculars, PEWS, and so forth to detect the enemy approach.
e. Initiate Contact or Actions Against the Enemy. Once the enemy is detected, the platoon leader:
- Alerts the Bradley commanders, squad leaders, platoon sergeant, and his forward observer.
- Reports the situation to the company commander.
- Calls in OPs. (The squad leader or platoon leader may decide to leave the OP in place if the soldiers manning it can provide effective flanking fires, their position affords them adequate protection, or their return will compromise the platoon position.)
- Calls for and adjusts indirect fire when the enemy is at maximum range.
- Initiates the fires of his platoon on command from the company commander (long-range fires) and IAW the company or platoon fire plan.
Leaders and individual soldiers return to their positions at the same time and prepare to fire on command from the platoon leader. (Soldiers returning to their positions may compromise the platoon location. They may need to stay in place rather than return or to exercise caution while returning.)
f. Fight the Defense. The platoon leader determines if the platoon can destroy the enemy from its assigned positions.
(1) If the answer is YES, the platoon continues to fight the defense.
(a) The platoon leader or FO continues to call for indirect fires as the enemy approaches. The platoon normally begins engaging the enemy at maximum effective range. It attempts to mass fires and initiate them at the same time to achieve surprise. Long-range fires should disrupt enemy formations; channelize him toward engagement areas; prevent or severely limit his ability to observe the location of friendly positions; and destroy him as he attempts to breach tactical obstacles.
(b) Leaders control fires using standard commands, pyrotechnics, and other prearranged signals. The platoon increases the intensity of fires as the enemy closes within range of additional weapons. Squad leaders work to achieve a sustained rate of fire from their positions by having buddy teams fire their weapons so that both are not reloading them at the same time.
(c) In controlling and distributing fires, the platoon and squad leaders consider:
- The enemy's range.
- Priority targets (what to fire at, when to fire, and why).
- Nearest or most dangerous targets.
- Shifting to concentrate fires on their own or as directed by higher headquarters.
- Ability of the platoon to engage dismounted enemy with enfilade fires, grazing fires, and flank shots against enemy vehicles.
(d) As the enemy closes on the platoon's protective wire, the platoon leader initiates FPF. The following actions occur at the same time.
- Automatic weapons fire along interlocking principal directions of fire (PDF) or FPLs. Other weapons fire at designated PDF. The M203 grenade launchers engage enemy in dead space or against enemy attempts to breach protective wire.
- The platoon continues the fight with Claymore mines and hand grenades.
- If applicable, the platoon leader requests indirect FPF in support of his positions.
(e) The platoon continues to defend until the enemy is repelled, or the platoon is ordered to disengage.
(2) If the answer is NO, the platoon leader:
(a) Reports the situation to the company commander.
(b) Continues to engage the enemy as the designated company support element, or repositions the platoon (BFVs and or squads of the platoon) as directed by the company commander to:
- Continue fires into the platoon sector (engagement area).
- Shift to alternate or supplementary positions.
- Reinforce other parts of the company.
- Counterattack locally to retake lost fighting positions.
- Withdraw from an untenable position using fire and movement to break contact. (The platoon leader should not move his platoon out of position if it will destroy the integrity of the company defense.)
| NOTE: | In any movement out of a defensive position, the platoon MUST employ all direct and indirect fire means available to suppress the enemy long enough for the platoon to move. |
g. Reorganize. The platoon remans key weapons, reestablishes security, provides first aid and prepares wounded soldiers for evacuation, and redistributes ammunition and supplies. The platoon relocates selected weapons to alternate positions if leaders believe that the enemy may have pinpointed them during the attack and adjusts other positions to maintain mutual support. The platoon also reestablishes communications. It reoccupies and repairs positions, and prepares for renewed enemy attack. The platoon repairs damaged obstacles and replaces mines and booby traps.
(1) Squad and section leaders provide ammunition, casualty, and equipment (ACE) reports to the platoon sergeant. Bradley commanders also provide fuel status. The platoon sergeant consolidates the ACE reports, reviews his ACE report with the platoon leader, and forwards it to the company commander (or XO).
(2) The platoon leader reestablishes the platoon chain of command.
(3) The platoon sergeant coordinates for resupply and supervises the execution of the casualty and EPW evacuation plan.
(4) The platoon continues to improve positions. The platoon quickly reestablishes OPs and resumes patrolling as directed.
2. Defensive Techniques. The techniques used by platoons to perform assigned missions and functions are as follows:
a. Defend a Battle Position. A platoon defends from a battle position to concentrate its fires, limit its maneuver, or place it in an advantageous position to counterattack. The basic methods of employing the platoon are same battle position, same avenue of approach; same battle position, different avenues of approach; different battle position, same avenue of approach; different battle positions, different avenues of approach.
(1) BFVs and dismounted infantry on the same battle position covering the same avenue of approach (Figure 2-50).
Figure 2-50. Same Battle Position, Same Avenue of Approach.
(a) Using this method, the platoon can defend against mounted and dismounted attacks and move rapidly to another position. However, because of the differences in capability of the dismounted and mounted element, use of this technique usually prevents the most effective use of either element.
(b) Within the battle position, the BFV may be positioned with the squads forward or around the vehicles for security.
(c) The BFVs remain on the same battle position as the squads when the terrain provides good observation, fields of fire, and cover and concealment to both dismounted infantry and BFVs.
(d) Employing both elements of the Bradley platoon on the same battle position covering the same avenue of approach is the most conservative use of the Bradley platoon. Its primary advantages are:
- Facilitates command and control functions within the platoon because of the proximity of both the vehicle and dismount elements as well as their orientation on the same approaching enemy.
- Facilitates remounting of vehicles.
- Provides increased security for BFVs because of the proximity of friendly dismounted troops.
(2) BFVs and dismounted infantry on the same battle position covering different avenues of approach (Figure 2-51).

Figure 2-51. Same Battle Position Different Avenues of Approach.
(a) When the battle position has two equally dangerous avenues of approach, one with long-range and one with short-range fields of fire, the fighting vehicle element is positioned to take advantage of its long-range fires, and the dismount element is placed for short-range fires. This allows good positioning of the fighting vehicle element and the dismount element because each is positioned on terrain best suited to its capabilities. During reduced visibility, the platoon leader often directs repositioning of some of the dismounted element to provide adequate local security for the BFVs.
(b) Plans must be made to shift BFVs if a dismounted avenue of approach becomes the most dangerous and the mounted is ignored by the enemy.
(3) BFVs and dismounted infantry on different battle positions covering the same avenue of approach (Figure 2-52).
Figure 2-52. Different Battle Positions, Same Avenues of Approach.
(a) If positioned on separate battle positions, BFVs and dismounted infantry must fight in relation to each other when covering the same avenues of approach. This means BFVs can provide the dismounted infantry with supporting fires from their primary, alternate, or supplementary positions. Both elements are positioned to engage enemy forces on the same avenue of approach, but at different ranges. There are basically three techniques to accomplish this.
- The First Technique. Place the dismounted infantry close enough to the engagement area to employ all dismounted weapons. The BFVs are placed in depth to enhance the antiarmor fires and engage the enemy formation in depth. This technique enables the platoon to mass all its fires.
- The Second Technique. Place the BFVs to engage the enemy in a specific EA and place the dismounted infantry in the most probable route for enemy infantry to use once the BFVs force them to dismount. This technique allows the platoon to take advantage of the BFVs' long-range firepower. The disadvantage is that dismounted infantry may not get into the fight, and all the platoon's firepower is not massed.
- The Third Technique. This is especially useful in restrictive terrain. Dismounted infantry is placed in choke points and BFVs are placed to support the infantry by destroying enemy armor as they seek to bypass, by engaging in a supplemental EA, or by firing into the same EA as the dismounted infantry.
A planning figure for separation of the mounted and dismounted elements is a maximum of three fourths of the effective range (about 1,500 meters) of the BFV's primary armament: the 25-mm gun.
(b) The fighting vehicle element can be employed forward of the dismounted element on the same avenue of approach. This allows for better observation and fields of fire, and better use of the BFV's weapons (Figure 2-53).
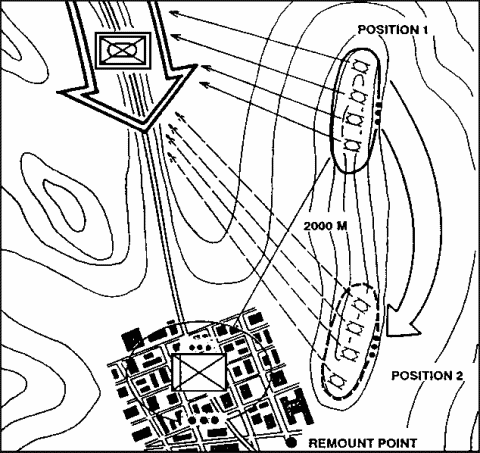
Figure 2-53. BFVs Dispacing to support Dismount Element.
(c) The dismount element should use available time to prepare fighting positions and obstacles. When the enemy attacks, BFVs normally engage enemy formations and, at a prearranged signal or event, move to alternate positions to the flank or to the rear of the dismount element. The timing of this move is critical. While maximum advantage can often be gained by employing the fighting vehicle element forward, the vehicles become more vulnerable to enemy fire as the enemy closes.
(d) The leader of the dismount element must be able to conduct operations without the support of the BFVs. The quantity and type of weapons, ammunition, mines, equipment, and supplies for the dismount element must be considered.
(e) BFVs may be employed well forward to perform a specific task; that is, a screen or guard. A section with a squad can also conduct security operations. Normally, this is done under the direction and control of the company/team commander.
(4) BFVs and dismounted infantry on different battle positions and different avenues of approach. When a Bradley platoon's mounted and dismounted elements are not going to be fighting in relation to each other, the control of both elements should be consolidated at company team level using the company team executive officer. The commander may consolidate dismount elements in one location and deploy the platoon's BFVs separately in the following situations:
(a) A large number of dismounted soldiers are required to hold a position, for example, key terrain.
(b) Primary positions for the dismount element do not allow adequate fields of fire for the BFV's weapon.
(c) The dismount element must occupy heavily wooded or rugged terrain that the BFV cannot traverse.
(d) When both a mounted and dismounted avenue of approach must be defended and the terrain cannot be defended from the same battle position.
b. Defend in Sector. A platoon defends in sector to prevent enemy forces from passing the rear boundary of the sector, retain flank contact and security, and ensure unity of effort with the company scheme of maneuver. The defense in sector maximizes the combat abilities of the platoon. It allows the platoon to fight throughout the depth of the sector using dispersed small-unit tactics.
(1) The platoon is usually assigned a sector within the company sector (Figure 2-54). The platoon leader may in turn assign sectors to elements, sections, and squads to permit maximum freedom of action for them to defend. They call for fire support through the platoon net. FOs may be attached or, as a minimum, leaders must be prepared to assist in calls for supporting fires.
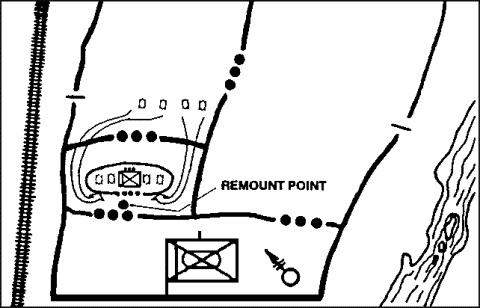
Figure 2-54. Assigned Sectors.
(2) All elements (mounted/dismounted) coordinate with each other and conduct detailed reconnaissance of each sector and identifies all likely enemy avenues of approach, choke points, kill zones, obstacles, patrol bases, and cache sites. They also identify all tentative positions.
(3) The platoon leader confirms the selected tentative sites and incorporates them into his concept (Figure 2-55). He designates initial positions and the sequence in which successive positions are to be occupied. He gives each element specific guidance concerning contingency plans; rally, mount, and dismount points; and other coordinating instructions.
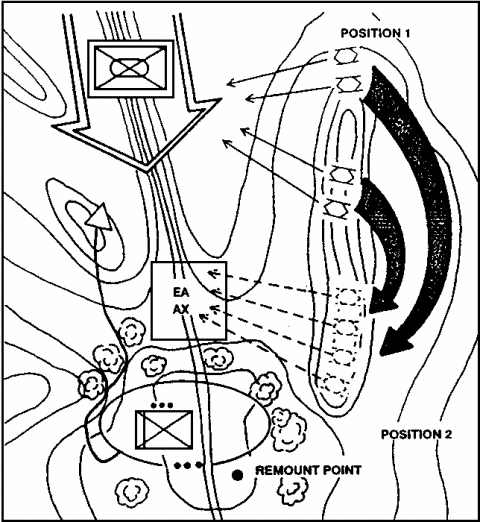
Figure 2-55. Concept of the Operation for a Defense in Sector.
(4) All elements then prepare the defense in the sequence designated by the platoon leader. They initially prepare the primary position and then a hasty supplementary position, and then they select the alternate position. Elements improve the positions as time permits.
(5) When security warns of approaching enemy, the squad and section occupy their primary positions and prepare to engage the enemy. As the enemy moves into the choke point or kill zone, the squad and section initiates an ambush. They engage the enemy targets only as long as squads and sections do not become decisively engaged. Squads and sections then move to their next position and repeat the same process. The leader must plan the disengagement. Supporting positions, the use of smoke, and rehearsals are key to effective disengagements. Depending on METT-T factors, the entire battle may be fought this way. Some variations of this technique include the following:
(a) Allowing the enemy to exhaust himself reacting to numerous ambushes, then conducting a violent counterattack along previously rehearsed routes to complete the destruction of the enemy. The platoon leader can do this by retaining direct control over a large portion of the platoon and committing it at the decisive moment. An alternative is to use prearranged signals to consolidate the platoon at a rally point; then to conduct the counterattack.
(b) Having the forward ambush teams hold their fire until the lead elements of the enemy formation hit another ambush deeper in the sector. Then the team ambushes the next enemy element as it passes through the kill zone. This technique destroys the cohesion of the enemy and is especially effective if the ambush eliminates the command group of the enemy unit.
(c) Planning indirect fires to cause more enemy casualties at ambush sites along a well-defined route.
(6) Casualty evacuation and resupply of ammunition and water are particularly difficult when defending this way.
c. Defend a Strongpoint. Defense of a strongpoint is seldom used by mechanized forces. When a platoon defends a strongpoint, it must retain the position at all costs until ordered to withdraw (Figure 2-56). A platoon uses a strongpoint to accomplish one of the following:
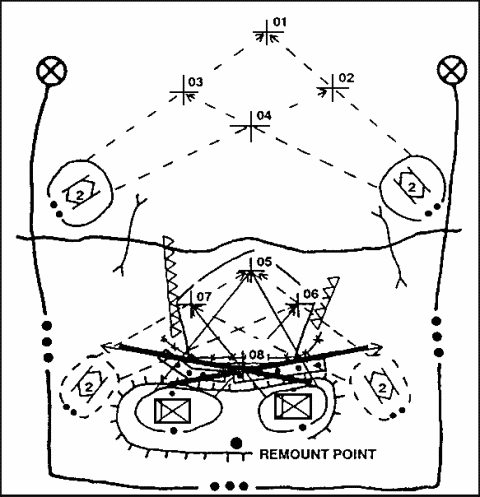
Figure 2-56. Defending a Strongpoint (BFVs Outside of Strongpoint).
- Hold key or decisive terrain critical to the company or battalion scheme of maneuver.
- Provide a pivot point for the maneuver of friendly forces.
- Block an avenue of approach.
- Canalize the enemy into friendly engagement areas.
d. Defend a Perimeter. The major advantage of the perimeter defense (Figure 2-57) is the preparedness of the platoon to defend against an enemy avenue of approach. A perimeter defense differs from other defenses in that:
Figure 2-57. Perimeter Defense.
- The trace of the platoon is circular or triangular rather than linear.
- Unoccupied areas between squads and vehicles are smaller.
- The flanks of the squads and sections are bent back to conform to the plan.
- The bulk of combat power is on the perimeter.
- The reserve is centrally located.
e. Defend on a Reverse Slope. The estimate of the situation often leads the commander to employ his elements, especially his dismounted infantry, on the reverse slope. If the dismounted infantry are on a mounted avenue of approach, the dismounted infantry must be concealed from enemy direct-fire systems, which they cannot effectively engage. This means dismounted infantry should be protected from enemy tanks and observed artillery fire. This applies even when friendly forces are fighting with their tanks and long-range ATGMs (Figure 2-58).
Figure 2-58. Reverse-Slope Defense Options.
(1) The majority of dismounted infantry weapons are not effective beyond 600 meters. In order to reduce or preclude destruction from enemy direct and indirect fires beyond that range, a reverse-slope defense should be considered.
(2) This conflicts, to some extent, with the need for the maximum observation forward to adjust fire on the enemy as well as the need for long-range fields of fire for friendly tanks, BFVs, and ATGMs. In some cases, it may be necessary for tanks, BFVs, and ATGMs to be deployed forward while the dismounted infantry remain on the reverse slope. These vehicles withdraw from their forward positions as the battle closes. The vehicles' new positions should be selected to take advantage of the BFV's long-range fires to get enfilade shots from the depth and the flanks of the reverse slope.
(3) At night, the nature of the threat may change and dismounted infantry may occupy the forward slope or crest to deny it to the enemy. In those circumstances, it is feasible for a dismounted element to have an alternate night position forward.
(4) The area forward of the topographical crest must be controlled by friendly forces through aggressive patrolling and active as well as passive reconnaissance means. The platoon should use all of its night vision devices to deny the enemy undetected entry into the platoon's defensive area. The BFVs are a key part of the platoon's surveillance plan and should be positioned to take advantage of its thermal sights. The enemy must not be allowed to take advantage of reduced visibility to advance to a position of advantage without being taken under fire
(5) Advantages of a reverse-slope defense are:
- Enemy ground observation of the position, including the use of surveillance devices and radar, is masked.
- Enemy cannot engage the position with direct fire without coming within range of the defender's weapons.
- Enemy indirect fire will be less effective due to lack of observation.
- Enemy may be deceived about the strength and location of positions.
- Defenders have more freedom of movement out of sight of the enemy.
(6) Disadvantages of a reverse-slope defense are:
- Observation to the front is limited.
- Fields of fire to the front are reduced.
- Enemy can begin his attack from a closer range.
(7) The decision to position forces on a reverse slope is normally made by the commander. He positions forces on a reverse slope when:
- He wishes to surprise or deceive the enemy about the location of his defensive position.
- A forward slope might be made untenable by direct enemy fire.
- Occupation of the forward slope is not essential to achieve depth and mutual support.
- The fields of fire on the reverse slope are better or at least sufficient to accomplish the mission.
- The forward slope position is likely to be the target of concentrated enemy artillery fires.
(8) BFVs offer the platoon additional opportunities regarding positioning. They can initially be positioned forward to take advantage of their protection from artillery and their ability to engage the enemy at long ranges. After an initial engagement, BFVs may move over or around the crest line and through the dismounted infantry on the reverse slope to a position that is either on the flanks or farther in depth to the rear.
(9) Obstacles are also necessary in a reverse-slope defense. Since the enemy will be engaged at close range, obstacles should:
- Prevent the enemy from closing too quickly and overrunning the positions.
- Facilitate disengagement.
3. Basic Tactics. The turret weapons of the BFV allow it to fight against the enemy, while the dismounted infantry are used in restrictive terrain to their best advantage.
a. Bradley-equipped platoons can fix or substantially limit the movement of the attacking enemy, thus allowing tanks to deliver a powerful counterattack.
b. The fixing of the enemy (denying him the ability to withdraw part of his force for employment elsewhere) is done by BFVs using their firepower and maneuverability. At the same time, the dismounted infantry digs in on restrictive terrain or on a reverse slope and fully exploits the advantage of the defender to prepare the battlefield. On dismounted avenues of approach, the platoon leader can use the M249 in the machine gun role to fix the enemy and make use of its heavy firepower in the final protective fire.
c. The BFV's antiarmor and antipersonnel firing systems combined with its survivability are optimized through the use of movement, cover and concealment, dispersion, mutual support, flank shots, and employment in depth.
4. Priority of Work. The priority of work is the leader's method of controlling the preparation of the defense. Each duty position should have its own priority of work. The leader adjusts the priority of work based on METT-T factors and on his intent for the operation.
a. Platoon Leader.
- Establish local security. He may set up OPs, a hasty perimeter, or conduct security patrols.
- Conduct leader's reconnaissance with his squad leaders (BC if possible).
- Position BFVs, squads, Dragons, machine guns, and any attachments.
- Choose the CP location.
- Assign alternate and supplementary positions.
- Assign sectors of fire, engagement priorities, and other fire control measures.
- Develop an obstacle and fire plan.
- Develop a fire support plan (with the FO).
- Check the CP.
- Brief the platoon sergeant on logistics.
- Verify communications to higher and lower units.
- Make a sector sketch and send one copy to the commander IAW the platoon SOP.
- Confirm all positions (before digging starts) to include interlocking fires.
- Coordinate with left and right units.
- Direct the location for the PEWS.
- Check positions and preparations constantly. Look at them from the enemy's point of view; immediately correct deficiencies.
- Check soldiers' knowledge.
- Check dead space.
- Check security.
- Reconnoiter routes to and from alternate and supplementary positions, and routes used on a counterattack. Brief squad leaders and Bradley commanders.
- Plan and conduct rehearsals of movement to and between primary, alternate, and supplementary positions.
- Check the security and alert plan, the patrol plan, the radio watch, and the logistics.
- Rehearse the counterattack plan.
- Supervise.
b. Platoon Sergeant.
- Set up the M8 chemical alarm.
- Establish the platoon CP (and alternate CP); lay wire to squads, BFVs, OPs, attached elements, MAWs, and machine guns.
- Send runner to guide wire from company to platoon.
- Supervise the emplacement of BFVs, squads, MAWs, and machine guns.
- Supervise preparation of range cards.
- Request and allocate pioneer tools, barrier material, rations, water, batteries, and ammunition.
- Help the platoon leader prepare the sector sketch.
- Set up ammunition resupply point.
- Set up EPW collection point.
- Set up casualty collection point.
- Coordinate medical support to include supplies for platoon aidman and combat lifesaver.
- Designate latrine area and supervise the digging of the platoon slit trench.
- Establish the security and alert plan, the radio watch, the sleep plan, and the PMCS schedule; brief the platoon leader.
- Rest and conduct personal hygiene.
- Supervise.
c. Bradley Commander.
- Position BFV.
- Establish security (driver, gunner, or BC mans turret weapons system at all times unless told otherwise).
- Coordinate with left and right BFV and squad.
- Prepare range card.
- Boresight turret weapons system.
- Ensure wire is laid to the BFV.
- Issue rations, water, ammunition, pioneer tools, and barrier materials.
- Pass additional information and changes to plans.
- Reconnoiter alternate and supplementary positions.
- Conduct maintenance on BFV.
- Supervise.
d. Squad Leader.
- Establish local security.
- Ensure wire is laid to squad and BFV.
- Position squad, weapons, and soldiers; and assign sectors of fire.
- Ensure soldiers manning the OP have a position to return to.
- Draw a squad sector sketch and submit copy to platoon leader.
- Walk the position. Check sectors of fire, range cards, aiming stakes, and dead space by getting into each position and sighting weapons.
- Coordinate with left and right squad and BFV.
- Have soldiers begin digging after platoon leader checks position .
- Issue rations, water, ammunition, pioneer tools, and barrier material.
- Pass additional information and changes to plans.
- Supervise wire or mine teams.
- Give a warning order for planned patrol missions.
- Set up squad alert and security plan.
- Reconnoiter alternate and supplementary positions, routes, and counterattack plan with the platoon leader, then brief team leaders.
- Designate squad urine areas.
- Post and brief OPs.
- Rest and conduct personal hygiene.
- Supervise.
e. Team Leader.
- Assist the squad leader as directed.
- Supervise.
5. Weapons Emplacement. The success of the defense depends on the positioning of soldiers and weapons. To position their weapons effectively, all leaders must know the characteristics, capabilities, and limitations of their weapons, the effects of terrain, and the tactics used by the enemy. Platoon leaders should position weapons where they have protection; avoid detection; and surprise the enemy with accurate, lethal fires. In order to position the weapon, the platoon leader must know where he wants to destroy the enemy and what effect he wants the weapon to achieve. Additionally, the platoon leader must consider whether his primary threat will be armored vehicles or dismounted infantry. His plan should address both mounted and dismounted.
a. Individual BFVs. Leaders must position BFVs where flank engagements will occur. This means placing fighting positions on the flank of enemy avenues of approach.
(1) BFVs use defilade positions when in the defense. Defilade positions are classified as either turret-down or hull- down. A turret-down position uses terrain to mask most of the BFV, with only the ISU exposed to the Threat. Because the TOW, when erected, is above the ISU, it may be fired from this position without exposing more of the BFV than necessary as long as the missile has 18 inches of clearance. Targets cannot be engaged with the 25-mm from this position. A hull-down position exposes only as much of the BFV as needed to engage targets with the three primary weapon systems.
(2) Flank positions in restrictive terrain provide windows of opportunity to engage the enemy and afford the BFV additional protection from enemy overwatching fire (Figure 2-59).
Figure 2-59. Flank Positions.
The basis for this technique is to limit exposure by deliberately restricting a BFV's sector of fire. The BFV is exposed only to the targets at which it is firing. It then shifts to other firing positions as targets are destroyed. These positions restrict observation and vulnerability to only one segment of the platoon's engagement area; therefore, only those targets that can be seen (and engaged) by the BFV can return fire.
(a) Use a hide position when possible and stay in it until the enemy is in the area where the platoon plans to kill him. A prone or dug-in observer forward gives a much smaller signature than a BFV.
(b) Have a backdrop and avoid anything that catches the eye.
(c) Position to the flank of an enemy approach and behind frontal cover. It is far easier for an attacker to acquire and kill targets to his front than those to his flank or rear.
(d) Use covered routes into and out of firing positions.
(e) Use a guideline of 75 meters or more between primary and alternate BFV positions.
(f) Do not construct berms. More than 20 feet of dirt is needed to be effective. They also make it easier for the attacker to spot the position.
(g) Avoid positions that expose weapons to large numbers of enemy systems. It is best to hide weapons from the major portion of the enemy formation. The weapon should be able to engage one or two of the enemy vehicles at a time. It must be able to shift its sector of fire to engage other portions of the enemy's formation (Figure 2-60).
Figure 2-60. Hidden Position With Smaller Fields of Fire.
(3) Battlefield dust, smoke, fog, and darkness normally limit observation and fields of fire. When engagement ranges are reduced, flanking fires, use of obstacles, mutual support with infantry, and covered and concealed positions increase in importance. Because of battlefield obscuration, weapons must be positioned to fight during limited visibility or be able to quickly move to limited visibility positions.
b. Dragon Methods of Employment. The platoon leader's assessment of the tactical situation govern Dragon employment. Based on the situation, the platoon leader may employ all four Dragons, or none at all. He has two options open to him for their employment: centralized or decentralized control.
- Centralized Control. The platoon leader controls the fires of his Dragon gunners, either by physically locating the weapons in his vicinity, and personally directing their fires, or by grouping them together under the control of the platoon sergeant or another individual the platoon leader designates.
- Decentralized Control. Dragon gunners operate with, and are controlled by their squad leaders. The squad leader may need to employ one fire team as a Dragon team. The platoon leader normally gives the command for opening fire.
(1) Firing Position. Firing positions must cover the armor avenue(s) of approach in the platoon's sector. The desirable characteristics of a Dragon firing position are:
- Gunner observation of assigned sector to maximum range of weapon (if possible).
- Good fields of fire.
- Cover and concealment.
- Mask clearance.
- Security.
- Concealed routes.
- Capability for flanking fires.
- Backblast area.
(2) Fields of Fire. The gunner must be able to keep the target in the sight of the weapon until the missile impacts. Hilly and wooded terrain could permit the target to become masked during tracking, causing the gunner to lose sight of and miss the target.
(3) Cover and Concealment. The major vulnerability of the Dragon is the gunner's exposure to enemy direct and indirect fires while tracking the missile. A position detected by the enemy is easily destroyed. Cover is protection from enemy fire. Items used for cover include walls, trees, logs, and sandbags. Concealment is denial of observation by the enemy, both ground and air. Of primary importance is the backblast or launch signature effect of the missile when launched. Every effort must be made to prevent the enemy from detecting the launch signature. This is done by clearing away all loose sticks and rocks behind the launcher, wetting down the backblast area, and engaging from the flanks and rear. Excess movement in the position must be avoided to prevent detection. Overhead cover is difficult to provide because of the clearance required for the Dragon's backblast. Overhead cover should still be constructed based on this requirement and improved as time permits. Overhead cover is vitally important to prevent detection by air.
(4) Routes. The Dragon gunner must have routes to displace from primary to alternate and supplementary positions in the defense. Routes into, out of, and between positions must provide good cover and concealment, and facilitate speed of movement.
(5) Mutual Support. Firing positions should provide for mutual support with other Dragons and TOW. Fields of fire should overlap and be carefully integrated.
(6) Security. Provisions should be made to provide security for Dragon gunners to the front, flanks, and rear. Such security could include protective mines, OPs, RSTA devices, and individual fighting positions.
(7) Target Engagement. Leaders must specify to Dragon gunners, either in their plans and orders, or by platoon SOP, target priorities and rules for engaging multiple targets. Dragon gunners should be assigned sectors of fire to preclude more than one weapon engaging the same target at the same time. When engaging targets, gunners ensure they can track the target until impact.
(8) Oblique Fire. Whenever possible, gunners engage targets with oblique fire. Platoon and squad leaders, when selecting positions, try to emplace the gunner in a position that permits him to cover his sector with oblique fire. It is difficult for the enemy to retrace the flight path of a missile to its launch site when the missile moves obliquely across their front, as opposed to being launched from a head-on position. Forces generally orient to their front and are therefore more vulnerable to fires from their flanks.
c. Machine Gun Emplacement. These are the platoon's main weapons and are positioned first if the enemy is a dismounted force. Once the machine guns are sited, the leader positions riflemen to protect them. The guns are positioned to place fire on the locations where the platoon leader wants to concentrate combat power to kill the enemy.
(1) The M249 is the main weapon for the squad's defense. The squad leader positions the M249 to accomplish the squad's mission. It provides a high volume of lethal, accurate fires to break up and stop enemy assaults. The M249 is effective at forcing enemy armor to fight buttoned up. It also provides limited effects against lightly armored vehicles.
(2) Each gun is given a primary and secondary sector of fire. Their sectors of fire should overlap each other and those of adjacent platoons. A gunner fires in his secondary sector only if there are no targets in his primary sector, or when ordered to do so. Each gun's primary sector includes an FPL or a PDF. The gun is laid on the FPL or PDF unless engaging other targets. When FPFs are called for, the gunner shifts to and engages on the FPL or PDF.
(a) Final Protective Line. Where terrain allows, the platoon leader assigns a machine gun an FPL. The FPL is a line along which grazing fire is placed to stop an enemy assault. Grazing fire is no more than 1 meter above the ground (about hip high). The FPL is fixed in elevation and direction. FPLs are used best in conjunction with an obstacle to slow, delay, or stop the enemy. If possible, FPLs should overlap. Dead space in an FPL is covered by Claymore mines or M203 fire. Assistant gunners or squad leaders walk the FPL if time permits.
(b) Principal Direction of Fire. When the terrain does not lend itself to an FPL, the platoon leader assigns the machine gun a PDF (Figure 2-61). The gun is positioned to fire directly down this approach rather than across the platoon's front.

Figure 2-61. Principal Direction of Fire.
(c) Dead Space. A soldier walks the FPL to find dead space. The gunner watches the soldier walking down the line and marks spaces that cannot be grazed. The dead space is covered by obstacles, grenade launcher fire, or mines.
d. Grenade Launchers. The M203 is the squad leader's indirect fire weapon. He positions it to cover dead space in the squad's sector, especially the dead space for the machine guns. The M203 gunner is also assigned a sector to cover with rifle fire. The high-explosive, dual-purpose (HEDP) round is very effective against lightly armored vehicles such as the BMP-1 and the BTR.
e. Rifles. The leader assigns positions and sectors of fire to each rifleman in the platoon. Normally, he positions the riflemen to support and protect the machine guns and antiarmor weapons. They are also positioned to cover obstacles, provide security, cover gaps between platoons and companies, or provide observation.
6. Range Cards. A range card is a sketch of a sector that a direct fire weapon system is assigned to cover. (A reproducible Standard Range Card [DA Form 5517-R] is in FM 7-8.) A range card aids in planning and controlling fires, aids the crew in acquiring targets during limited visibility. It is also an aid for replacement personnel or platoon or squads to move into the position and to orient on their sector. During good visibility, the gunner should have no problems maintaining orientation within his sector. During poor visibility, he may not be able to detect lateral limits. If the gunner becomes disoriented and cannot find or locate reference points or sector limit markers, he can use the range card to locate the limits. The gunner should make the range card so that he becomes more familiar with the terrain in his sector. He should continually assess the sector and if necessary, update his range card.
a. Description. To prepare a range card, the gunner must know the following:
(1) Sectors of Fire. A sector of fire is a piece of the battlefield for which a gunner is responsible. He may be assigned a primary and a secondary sector. Leaders use sectors of fire to ensure that fires are distributed across the platoon's area of responsibility.
(a) A sector of fire is assigned to cover possible enemy avenues of approach. Leaders should overlap sectors to provide the best use of overlapping fire and to cover areas that cannot be engaged by a single weapon system.
(b) The leader assigns left and right limits of a sector using prominent terrain features or easily recognizable objects, for example, rocks, telephone poles, fences, or emplaced stakes. The gunner should index the TOW into the ISU. This reticle position does not induce superelvation into the fire control system to find the left and right limits. Superelevation causes changes in the field of view between APDS-T, HEI-T, and coax when ammunition and range changes are selected. Using the TOW reticle also allows the gunner to scan his sector without making ammunition and range changes during scanning procedures. The turret indicator light and the azimuth indicator are also used to assist in determining sectors of fire. Ammunition is designated for each TRP and reference point as prescribed by the platoon SOP or METT-T.
(2) Target Reference Points/Reference Points. Leaders designate natural or man-made terrain features as reference points. The gunner uses these reference points in target acquisition and range determination process during limited visibility. There will also be predesignated TRPs, which must be seen to be useful as TRPs or indirect fire targets. At least one TRP should always be in view using low magnification.
(a) The commander or platoon leader designates indirect fire targets used as TRPs so that target numbers can be assigned. If TRPs are within the sector of fire, the BC points them out and tells the gunner their designated reference numbers. TRPs should be heated so that the crew can acquire them with thermal sights.
(b) Normally, a gunner has at least one TRP but should not have more than four. The range card should show only pertinent data for reference points and TRPs.
(3) Dead Space. Dead space is any area that cannot be observed or covered by direct fire systems within the sector of fire. All dead space within the sector of fire must be identified to allow the BC and platoon leader to plan the use of fires (for example, mortars, artillery) to cover that area. The crew, working with their wingman vehicle crew, must walk the engagement area so that the gunners can detect dead spaces through the ISUs.
(4) Maximum Engagement Line. The depth of the sector is normally limited to the maximum effective engagement range of the vehicle's weapon systems; however, it can be less if there are objects that prevent the gunner from engaging targets at maximum effective engagement range. To assist in determining the distance to each MEL, the gunner or BC should use a map to make sure the MELs are shown correctly on the range card. MEL identification assists in decreasing the ammunition used on an engagement.
(5) Weapon Reference Point. The WRP is an easily recognizable terrain feature on the map. The WRP is used to assist leaders in plotting the vehicle's position, and to assist replacement personnel in finding the vehicle's position.
b. Preparation Procedures. The gunner prepares two copies of the range card. If alternate and supplementary firing positions are assigned, two copies are required for these as well. A copy is kept with the vehicle, and the other is given to the section leader for his sketch.
(1) Draw the weapon symbol in the center of the small circle. Draw two lines from the position of the BFV extending left and right to show the limits of the sector (Figure 2-62).
Figure 2-62. Placement of Weapon Symbol and Left and Right Limits.
(2) Determine the value of each circle by finding a terrain feature farthest from the position that is within the weapon system's capability. Determine the distance to the terrain feature. Round off the distance to the next even hundredth, if necessary. Determine the maximum number of circles that will divide evenly into the distance. The result is the value of each circle. Draw the terrain feature on the appropriate circle on the range card. Clearly mark the increment for each circle across the area where DATA SECTION is written. For example, in Figure 2-63 a hilltop at 3,145 meters is used. The distance is rounded to 3,200 meters, divided by 8, and equals 400. Thus, each circle has a value of 400 meters.
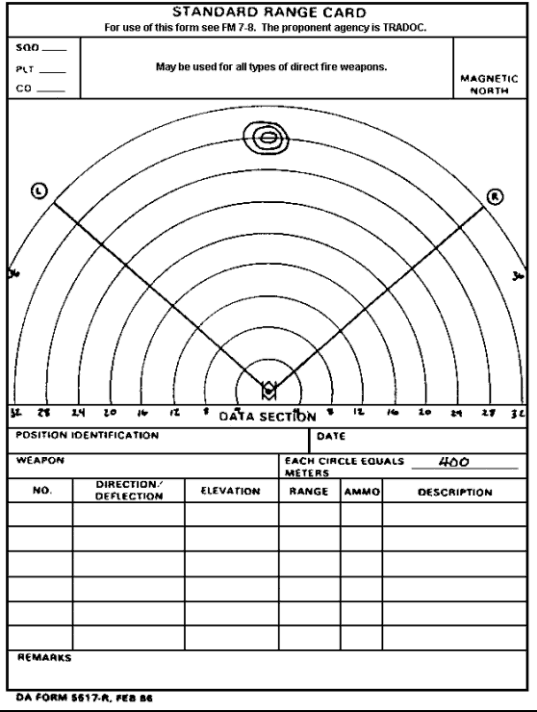
Figure 2-63. Circle Value.
(a) Figure 2-64 shows a farmhouse at 2,000 meters on the left limit. The right limit is noted by the wood line at 2,600 meters. Determine the distance to these features by using a map or a hand-held laser range finder. The platoon forward observer will have a hand-held laser range finder. Note how the circle markings can assist in positioning the features on the range card.
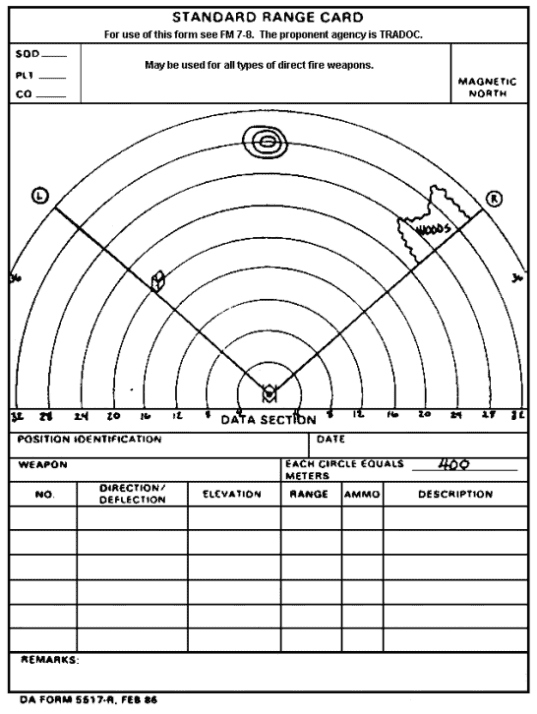
Figure 2-64. Terrain Features for Left and Right Limits.
(b) Draw all TRPs and reference points in the sector. Mark each of these with a circled number beginning with 1. Figure 2-65 shows the hilltop as RP 1 and a road junction as RP 2 and road junction RP 3. There are times when a TRP and a reference point are the same point (for example, RP 2 and RP 3 above). The TRP is marked with the first designated number in the upper right quadrant, and the reference point marked in the lower left quadrant of the cross. This occurs when a TRP is used for target acquisition and range determination. Road junctions are drawn by first determining the range to the junction, by drawing the junction, then finished by drawing the connecting roads from the road junction.
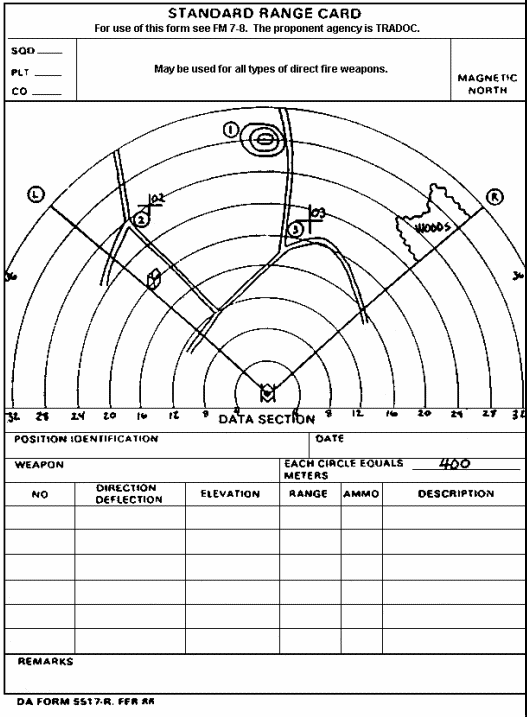
Figure 2-65. Target Reference Points/Reference Points.
(c) Dead space is shown as an irregular circle with diagonal lines drawn inside ( Figure 2-66). Any object that prohibits observation or coverage with direct fire will have the circle and diagonal lines extend out to the farthest maximum engagement line. If the area beyond the dead space is engageable, then the circle is closed. For example, an area of lower elevation will have a closed circle, because the area beyond it is engageable.
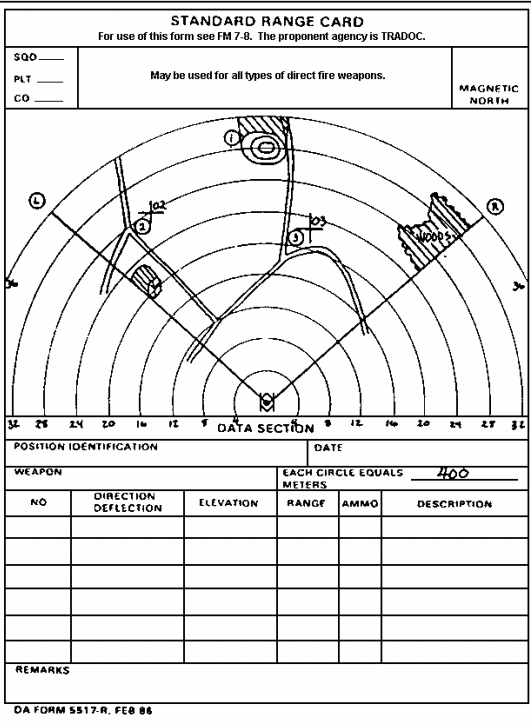
Figure 2-66. Dead Space.
(d) Maximum engagement lines are shown as in Figure 2-67. MELs are drawn at the maximum effective engagement range per weapon if there is no dead space to limit their range capabilities. Note how the MEL for HE extends beyond the dead space in Figure 2-66. This indicates a higher elevation where HE area suppression is possible. MELs are not drawn through dead space. The maximum effective ranges for Bradley weapon systems are:
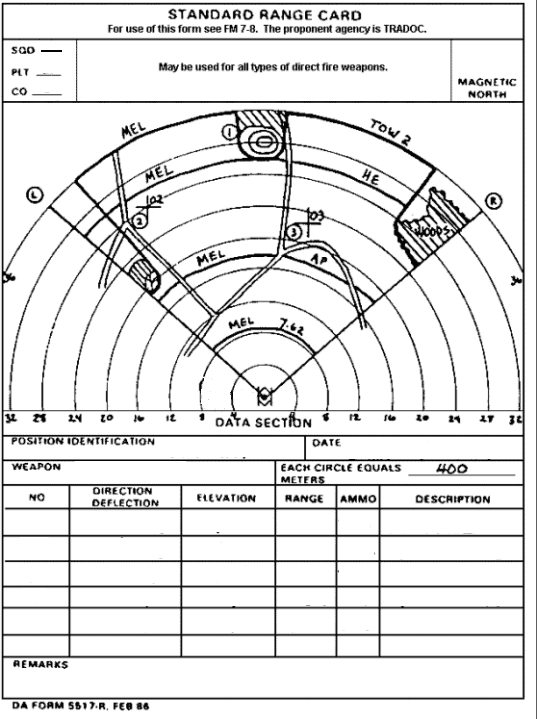
Figure 2-67. Maximum Engagement Lines.
| COAX | 900 meters (tracer burnout) | |
| APDS-T | 1,700 meters (tracer burnout) | |
| HEI-T/TOW (Basic) | 3,000 meters (impact) | |
| TOW 2 | 3,750 meters (impact) |
(e) The WRP shown in Figure 2-68 is represented as a line with a series of arrows extending from a known terrain feature and pointing in the direction of the Bradley symbol. This feature is numbered last. The WRP location is given a six- digit grid. When there is no terrain feature to be designated as the WRP, the vehicle's location is shown as an eight-digit grid coordinate in the remarks block of the range card. (In Figure 2-68, the WRP is number 4.)
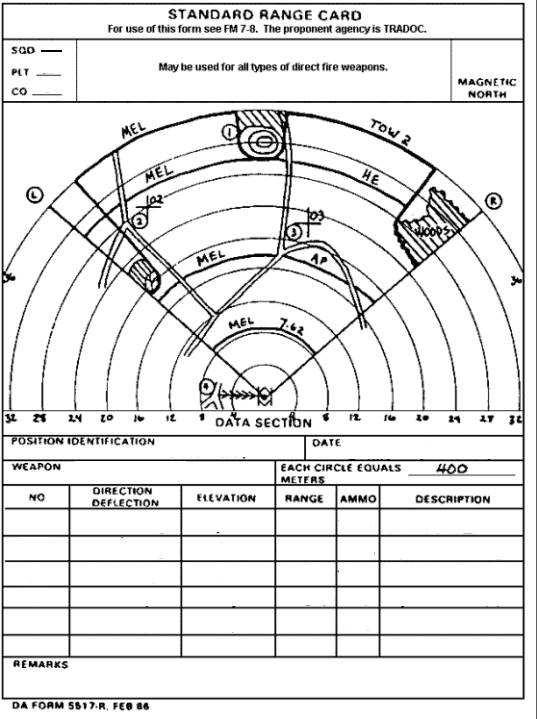
Figure 2-68. Weapons Reference Point.
| NOTE: | When the WRP cannot be drawn precisely on the sketch, due to the vehicle location, it is drawn to the left or right nearest the actual direction. |
(3) Complete the data section. (Figure 2-69)
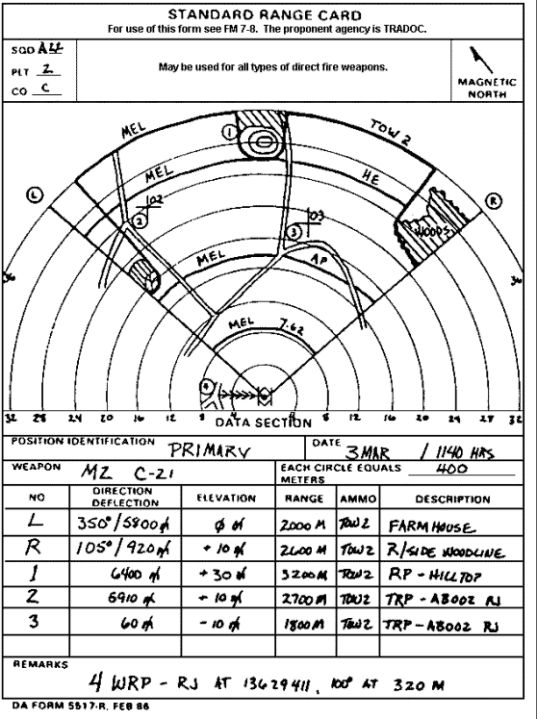
Figure 2-69. Completed Range Card.
(a) Position Identification. List either primary, alternate, or supplementary. Alternate and supplemental positions must be clearly identified.
(b) Date. Show date and time the range card was completed. Range cards are like fighting positions, constantly being updated. The date and time are vital in determining the current data.
(c) Weapon. The weapon block indicates M2 and the vehicle bumper number.
(d) Circles. Each circle equals ____________ meters. Write in the distance, in meters, between circles.
(e) NO (number). Starting with L and R limits, then list TRPs and RPs in numerical order.
| NOTE: | The platoon leader may designate a vehicle to be dedicated for AP, HEI-T, or TOW targets. This is dictated by platoon SOP or as needed by METT-T. |
(f) Direction/Deflection. The direction is in degrees and taken from a lensatic compass. The most accurate technique is to have the gunner aim at the terrain feature, and to have the driver dismount and align himself with the gun barrel and the terrain feature to measure the azimuth. To achieve correct deflection and elevation readings of the terrain feature, select TOW. Show the deflection reading taken from the BFV's azimuth indicator in the deflection block next to the magnetic azimuth.
(g) Elevation. Show the gun elevation reading in tens or hundreds of mils. The smallest increment of measure on the elevation scale is tens of mils. Any number other than "0" is preceded by a "plus" or "minus" symbol to show whether the gun needs to be elevated or depressed. Ammunition and range must be indexed to have an accurate elevation reading.
(h) Range. Distance, in meters, from vehicle position to L and R limits and TRPs and RPs.
(i) Ammo. List types of ammunition used.
(j) Description. List the name of the object; for example, farmhouse, wood line, hilltop.
(k) Remarks. Enter the WRP data. As a minimum, WRP data include a description of what the WRP is, a six-digit or eight-digit grid coordinate of the WRP, the magnetic azimuth and the distance from the WRP to the vehicle position.
(4) Complete the marginal information at the top of the card (Figure 2-69).
(a) Unit description - bumper number, plt, co. Never indicate a unit higher than company.
(b) Magnetic north. Orient the range card with the terrain and draw the direction of the magnetic north arrow.
c. Firing Position. After a range card has been completed, the position should be marked with ground stakes. This enables the Bradley or a replacement Bradley to reoccupy the position and be able to use the range card data.
(1) Stake the Position. Before the Bradley is moved, the position should be staked. Three stakes are required to effectively mark the position as shown in Figure 2-70.
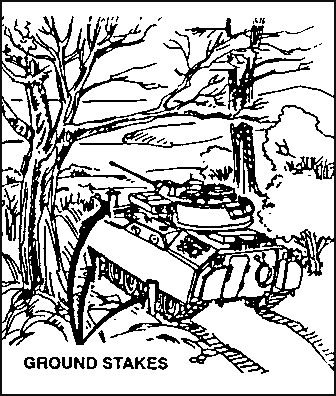
Figure 2-70. Stake the Position.
(a) One stake is placed in front of the Bradley. It is centered on the driver's station and just touching the hull. The stake should be long enough for the driver to see it when in position. The other two stakes are placed parallel to the left track and lined up with the hub on the front and rear wheels. The stakes should be placed close to the Bradley with only enough clearance to move the Bradley into position.
(b) The stakes should be driven firmly into the ground. Engineer tape or luminous tape can be placed on the friendly side of the stakes so that the driver can see them. A rock is placed at each of the front two corners of the vehicle to assist in reoccupation if the stakes are lost.
(2) Move into the Position. If the situation permits, a ground guide can be used to assist the driver.
(a) If a ground guide cannot be used because of enemy fire, the driver moves the Bradley in, parallel to the side stakes, with the front stake centered on the driver's station.
(b) Once the Bradley is in position, the gunner should index the range and azimuth for one of the TRPs on the range card. If the sight is aligned on the TRP, the Bradley is correctly positioned. If the sight is not aligned on the TRP, the gunner should tell the driver which way to move the vehicle to align the sight on the target. Only minor adjustments should be necessary.
(c) If the stakes are lost and the position is not otherwise marked, the vehicle is moved to the approximate location. The BC or gunner can use a compass to find the left and right limits. The vehicle should be moved until it is within 6 to 8 inches of exact position, if time allows.
7. Types of Positions. Defensive positions may be classified as primary, alternate, or supplementary. All positions should provide observation and fields of fire for the weapon systems within the platoon's assigned sector. Defensive positions should take advantage of natural cover and concealment even before soldiers begin to camouflage them. The platoon improves its ability to reposition by using covered and concealed routes, by using communications trenches, and by rehearsing the repositioning by fire and movement.
a. Primary. A primary position provides a soldier, weapon system, or platoon/squad the best position from which it can accomplish the assigned mission.
b. Alternate. Alternate positions allow soldiers, weapon systems, squads, or platoons to cover the same sector of fire covered from the primary position. Alternate positions are occupied when the primary position becomes untenable and when engaging enemy forces in order to prevent detection.
c. Supplementary. Supplementary positions provide the best means to accomplish a task that cannot be accomplished from the primary or alternate positions. Platoon leaders normally locate supplementary positions to cover additional enemy avenues of approach and to protect the flanks and rear of the platoon position.
8. BFV Positions. For a detailed description of BFV positioning, see paragraph 5 and paragraph 14.
9. Squad Positions. As a guideline, a squad can physically occupy a front of about 100 meters. From this position, it can defend 200 to 250 meters of frontage. The frontage distance between two-man fighting positions should be about 20 meters (allowing for a lazy W configuration on the ground; this would put fighting positions about 25 meters apart physically). Every position should be observed and supported by the fires of at least two other positions. One-man fighting positions may be located closer together to occupy the same platoon frontage. The distance between fighting positions depends on the leader's analysis of the factors of METT-T. In determining the best distance between fighting positions, the squad leader must consider:
- The requirement to cover the squad's assigned sector by fire.
- The need for security; that is, prevent infiltrations of the squad and platoon positions.
- The requirement to prevent the enemy from using hand grenades effectively to assault adjacent positions, should he gain a fighting position.
10. Platoon Positions. The platoon leader assigns each section and squad a primary position and sector of fire. He should also assign supplementary positions. BCs and squad leaders normally select alternate positions for their BFVs and squads. The platoon leader designates responsibility for manning OPs and gives a general location for each OP. Each squad and vehicle section must cover its own sector of fire and overlap into those of the other squad or section. Flank sectors should overlap those of adjacent platoons.
11. Sector Sketches. Gunners prepare the range cards. Squad leaders prepare squad sector sketches. Section leaders prepare section sketches, and the platoon leader prepares the platoon sketch.
a. The platoon leader or platoon sergeant can use acetate on a map or a hand drawn sketch to draw the platoon sketch. Accurate and detailed sketches aid in fire planning, distribution of fire, and control of the platoon fires.
b. The squad leaders and section leaders make two copies of their sector sketches; one copy goes to the platoon leader, the other remains at the position. The squad leaders and section leaders draw sector sketches as close to scale as possible, showing (Figure 2-71):

Figure 2-71. Squad Sector Sketch.
- Main terrain features in the sector and the range to each.
- Each primary position.
- Engagement areas or primary and secondary sectors of fire covering each position.
- M249 machine gun FPLs or PDFs.
- Type of weapon in each position.
- TRPs/reference points in the sector.
- OP locations.
- Dead space.
- Obstacles.
- MELs for all BFV weapon systems.
- MELs for Dragons and AT4s.
- Indirect fire targets.
c. Squad leaders and section leaders prepare their sketches and submit them to the platoon leader. Gunners submit their range cards to the mounted section leader. The platoon leader combines all the sketches and range cards to prepare a platoon sector sketch.
d. A platoon sector sketch is drawn as close to scale as possible and includes a target list for direct and indirect fires. One copy is given to the company commander, one to the mounted leader, and the third copy to the dismount leader. As a minimum, the sketch shows ( Figure 2-72):

Figure 2-72. Platoon Sector Sketch.
- Primary and secondary sectors or engagement areas.
- Primary, alternate, and supplementary Bradley vehicles and squad positions.
- Remount points.
- Dragon and M249 machine gun positions with primary sectors of fire.
- M249 FPLs or PDFs.
- MELs for TOW, 25-mm, coax weapons.
- OPs.
- TRPs and reference points.
- Mines and other obstacles.
- Indirect target locations and FPF location (if applicable.)
- Position and sector of flanking unit vehicles.
- Priority of engagement by bumper number.
e. Platoon leaders coordinate with adjacent platoons. Squad leaders coordinate with adjacent squads so that all positions and all platoon and squads are mutually supporting. The platoon leader checks to ensure this coordination has taken place. Coordination normally is initiated from left to right. Gaps between positions are covered by fire as a minimum and contact points are established to ensure friendly forces meet at some specific point on the ground to tie in their flanks. The information exchanged includes:
- Locations of primary, alternate, and supplementary positions; and sectors of fire for BFVs, machine guns, and Dragons.
- Location of dead space between platoons and how it is to be covered.
- Location of OPs.
- Location and types of obstacles and how to cover them.
- Patrols to include size, type, time of departure and return, and routes.
In many cases, a sector sketch can be exchanged that accomplishes most of this. In some cases, BFVs may be positioned to support the dismount element and flank platoons. This may be a compromise position that must be occupied to tie in a vulnerable flank. Since platoons defend as part of a company team, platoon leaders must be especially careful of tying in their flanks.
f. Because platoons dismount their infantry in the defense, the remount must be planned in detail. This is especially true where subsequent movement is an integral part of the defensive plan or when the dismount and vehicle elements are separated. The inability to plan and execute a speedy remount causes the advantage of the BFVs' speed to be negated as the vehicles are forced to wait for the dismounted infantry to link up and remount. Planning for the remount at platoon level should include:
- Remount rehearsal.
- Remount location.
- Reconnaissance of route to the remount point by both the vehicle and dismount elements during good and limited visibility.
- Marking the route to the remount point.
- Signals to initiate the remount and contingencies for limited visibility, loss of communications, and loss of leaders.
12. Fire Control Measures. Bradley commanders and squad leaders should use the fire control principles and basic fire control and distribution measures discussed in Part A to assist with the proper concentration and distribution of fires in the defense. To prevent fratricide and conserve the platoon's combat power when possible, forces must avoid engagements close to friendly infantry or vehicles.
13. Coordination. Coordination between adjacent platoons, squads, or sections is normally from left to right and from front to rear. Information exchanged includes the following:
- Location(s) of leaders.
- Location of primary, alternate, and supplementary positions and sectors of fire of machine guns, antiarmor weapons, squads, and sections.
- Route to alternate and supplementary positions.
- Location of dead space between squads and platoons and how to cover it.
- Location of OPs and withdrawal routes back to the platoon's, squad's, or section's position.
- Location and types of obstacles and how to cover them.
- Patrols to be conducted to include their size, type, times of departure and return, and routes.
- Location, activities, and passage plan for reconnaissance platoon and other friendly forces forward of the platoon's position.
- Signals for fire and cease fire and any other signals that may be observed.
- Engagement and disengagement criteria.
14. Fighting Positions. This paragraph discusses techniques for the construction of infantry and vehicle fighting positions. Infantrymen use hasty; one-, two-, and three-soldier; machine gun; medium and light antitank positions. BFVs use hull- and turret-defilade positions. Soldiers must construct fighting and vehicle positions that protect them and allow them to fire into their assigned sectors. Tables 2-4 and 2-5 provide characteristics of individual and crew-served fighting positions, respectively. Table 2-6, provides dimensions of vehicle positions. (For more information, see FM 5-103.)
Table 2-4. Characteristics of Individual Fighting Positions.
Type of Position |
Estimated Construction Time (man-hours) |
Equipment Requirements |
Direct Small Caliber Fire |
Indirect Fire blast and Fragmentation (Near-Miss*) |
Indirect Fire Blast and Fragmentation |
Nuclear Weapons** |
Remarks |
|
HASTY |
|||||||
Crater |
0.2 |
Hand tools |
7.62-mm |
Better than in openno overhead protection |
None |
Fair |
|
|
Skirmisher's trench |
0.5 |
Hand tools |
7.62-mm |
Better than in openno overhead protection |
None |
Fair |
|
|
Prone position |
1.0 |
Hand tools |
7.62-mm |
Better than in openno overhead protection |
None |
Fair |
Provides all-round Cover |
|
DELIBRATE |
|||||||
|
One-soldier position |
3.0 |
Hand tools |
12.7-mm |
Medium artillery no closer than 30 ft - no overhead protection |
None |
Fair |
|
|
One-soldier position with 1½ ft overhead cover |
8.0 |
Hand tools |
1 2.7-mm |
Medium artillery no closer than 30 ft |
None |
Fair |
Additional cover provides protection from direct hit small mortar blast |
|
Two-soldier position |
6.0 |
Hand tools |
1 2.7-mm |
Medium artillery no closer than 30 ft - no overhead protection |
None |
Fair |
|
|
Two-soldier position with 1½ ft overhead cover |
11.0 |
Hand tools |
12.7-mm |
Medium artillery no closer than 30 ft |
None |
Good |
Additional cover provides protection from direct hit small mortar blast |
|
LAW Position |
3.0 |
Hand tools |
12.7-MM |
Medium artillery no closer than 30 ft - no overhead protection |
None |
Fair |
|
| ||||||||||||||||||||||||
Table 2-5. Characteristics of Crew-Served Fighting Positions.
|
Type of Position |
Estimated Construction Time (man-hours) |
Equipment Requirements |
Direct Small Caliber Fire |
Indirect Fire blast and Fragmentation (Near-Miss*) |
Indirect Fire Blast and Fragmentation |
Nuclear Weapons** |
Remarks |
|
Dragon position |
4.0 |
Hand tools |
12.7-mm |
Medium Artillery no closer than 30 ft-no overhead protection
|
None |
Fair |
|
|
Dismounted TOW position |
11.0 |
Hand tools |
12.7-mm |
Medium Artillery no closer than 30 ft - no overhead protection |
None |
Fair |
|
|
90-mm RCLR position |
6.0 |
Hand tools |
12.7-mm |
Medium Artillery no closer than 30 ft - no overhead protection protection |
None |
Fair |
|
|
Machine gun position |
7.0 |
Hand tools |
12.7-mm |
Medium Artillery no closer than 30 ft - no overhead protection |
None |
Fair |
|
|
Machine gun position with 1½ ft overhead cover |
12.0 |
Hand tools |
12.7-mm |
Medium Artillery no closer than 30 ft |
None |
Good |
|
|
Mortar position |
14.0 |
Hand tools |
12.7-mm |
Medium Artillery no closer than 30 ft - no overhead protection |
None |
Fair |
|
| ||||||||||||||||||||||||
a. Protection. Fighting positions protect soldiers by providing cover through sturdy construction, and by providing concealment through positioning and proper camouflage. The enemy must not be able to identify the position until it is too late and he has been effectively engaged. When possible, soldiers should site positions in nonobvious places, behind natural cover, and in an easy to camouflage location. The most important step in preparing a fighting position is to make sure that it cannot be seen. In constructing fighting positions, soldiers should always:
- Dig the positions armpit deep.
- Fill sandbags about 75 percent full.
- Revet excavations in sandy soil.
- Check stabilization of wall bases.
- Inspect and test the position daily, after heavy rain, and after receiving direct or indirect fires.
- Maintain, repair, and improve positions as required.
- Use proper materiel. Use it correctly.
| NOTE: | In sandy soil, vehicles should not be driven within 6 feet of the positions. |
b. Siting to Engage the Enemy. Soldiers must be able to engage the enemy within their assigned sectors of fire. They should be able to fire out to the maximum effective range of their weapons with maximum grazing fire and minimal dead space. M203 fires are planned where dead space is found. Soldiers and leaders must be able to identify the best location for their positions that meet this criteria. Leaders must also ensure that fighting positions provide interlocking fires. This allows them to cover the platoon's sector from multiple positions and to provide a basis for final protective fires.
c. Preparation by Stages. Leaders must ensure that their soldiers understand when and how to prepare fighting positions based on the situation. Soldiers normally prepare hasty fighting positions every time the platoon halts (except for short security halts), and only half of the platoon digs in while the other half maintains security. Soldiers prepare positions in stages and require a leader to inspect the position before moving on to the next stage. See the following example.
***** EXAMPLE *****
STAGE 1. The platoon leader checks the fields of fire from the prone position and has the soldier emplace sector stakes (Figure 2-73).

Figure 2-73. Stage 1, Preparations of a Fighting Position.
- Sector stakes emplaced (primary sector).
- Grazing fire log or sandbag positioned between the sector stakes.
- The aiming stake(s), if required, is emplaced to allow limited visibility engagement of a specific target.
- Elbow holes are scooped out.
- The outline of the position is traced on the ground.
- Fields of fire are cleared for both primary and secondary sectors.
- The leader inspects the position.
STAGE 2. The retaining walls for the parapets are prepared at this stage. These ensure that there is at least a one- helmet distance from the edge of the hole to the beginning of the front, flank, and rear cover (Figure 2-74).
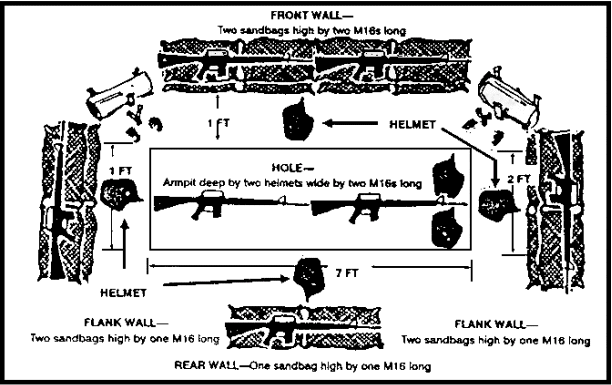
Figure 2-74. Stage 2, Preparations of a Fighting Position.
- The front wall is two to three sandbags (or logs) high. For a two-soldier position, it is about two M16 rifles long.
- The flank walls are the same height, but only one M16 rifle long.
- The rear wall is one sandbag high and one M16 long.
- If logs are used, they must be held firmly in place with strong stakes.
- The leader inspects the position.
STAGE 3. During stage 3, the position is dug and the dirt is thrown forward of the parapet retaining walls and then packed down hard (Figure 2-75).
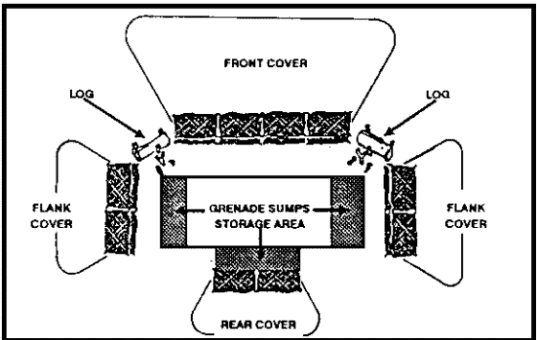
Figure 2-75. Stage 3, Preparations of a Fighting Position.
- The position is dug armpit deep.
- The parapets are filled in order of front, flanks, and rear.
- The parapets and the entire position are camouflaged.
- Grenade sumps are dug and the floor sloped toward them.
- Storage areas for the two rucksacks may also be dug into the rear wall.
- The leader inspects the position.
STAGE 4. The overhead cover is prepared (Figure 2-76).
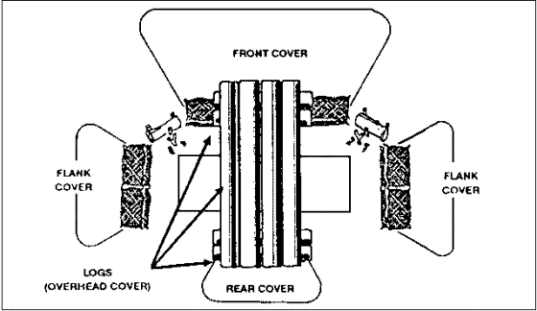
Figure 2-76. Stage 4, Preparations of a fighting Positions.
- Five to six logs 4 to 6 inches in diameter and two M16s long are placed over the center of the position.
- Waterproofing (plastic bags, ponchos) are placed on top of these logs.
- Then 6 to 8 inches of dirt or sandbags are put on top of the logs.
d. Types of Fighting Positions. Because there are many different types of fighting positions, the number of personnel, types of weapons, the time available, and the terrain dictate the type of position.
(1) Hasty Fighting Position. Soldiers prepare this type of position when there is little or no time to prepare fighting positions (Figure 2-77). They locate it behind whatever cover is available. The position should give frontal protection from direct fire while allowing fire to the front and oblique. A hasty position may consist simply of a rucksack placed beside a tree or large rock. For protection from indirect fire, a hasty fighting position should be in a small depression or hole at least 18 inches deep. The term hasty position does not mean there is no digging. Even if there are only a few minutes, a prone shelter can be scraped out or dug to provide some protection. This type of position is well suited for ambushes or for protection of overwatching element during raids and attacks. Hasty positions can also be the first step in construction of more elaborate positions.
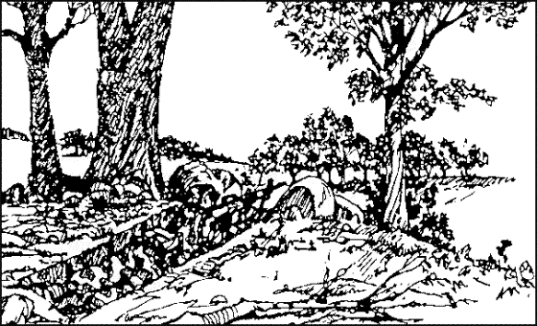
Figure 2-77. Hasty Fighting Position.
(2) One-Soldier Fighting Position. This type of position allows choices in the use of cover; the hole only needs to be large enough for one soldier and his gear. It does not have the security of a two-soldier position. The one-soldier fighting position must allow a soldier to fire to the front or to the oblique from behind frontal cover. (Figure 2-78.)
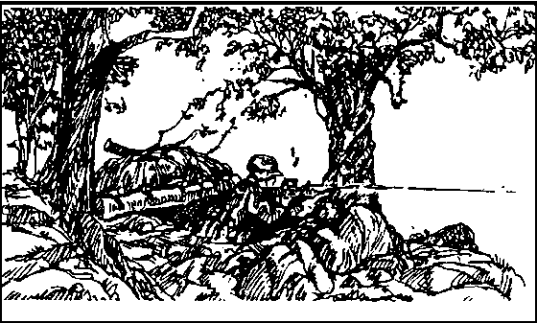
Figure 2-78. One-Solider Fighting Position.
(3) Two-Soldier Fighting Position. A two-soldier fighting position can be prepared in close terrain. It can be used where grazing fire and mutual support extend no farther than to an adjacent position. It can be used to cover dead space just in front of the position. One or both ends of the hole are extended around the sides of the frontal cover. Changing a hole this way lets both soldiers see better and have greater sectors of fire to the front. Also, during rest or eating periods, one soldier can watch the entire sector while the other sleeps or eats. If they receive fire from their front, they can move back to gain the protection of the frontal cover. By moving about 1 meter, the soldiers can continue to find and hit targets to the front during lulls in enemy fire. This type of position requires more digging and is harder to camouflage. It is also a better target for enemy hand grenades (Figure 2-79).
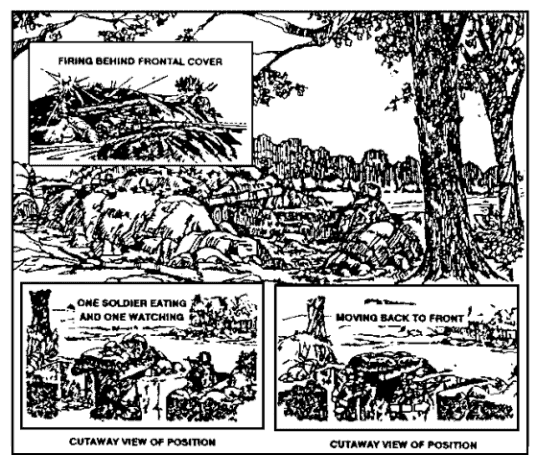
Figure 2-79. Two-Soldier Fighting Position.
(4) Three-Soldier Fighting Position. A three-soldier position has several advantages over the other types of positions. There is a leader in each position, which makes command and control easier. It supports continuous, secure operations better than other positions. One soldier can provide security; one can do priority work; and one can rest, eat, or perform maintenance. This allows the priority of work to be completed more quickly than in a one-soldier or two-soldier position. This position allows the platoon to maintain combat power and security without either shifting personnel or leaving positions unmanned. It provides 360-degree observation and fire, and it is more difficult for the enemy to destroy, because he must kill or suppress three soldiers.
(a) When using three-soldier positions, the leader must consider the several things. Either the distance between positions must be increased or the size of the squad's sector reduced. The choice depends mainly on visibility and fields of fire. Because the squad leader is in a fighting position that will most likely be engaged during the battle, he cannot exert personal control over the other two positions. The squad leader keeps control over the battle by:
- Clearly communicating plans and intent to his squad to include control measures and fire plans.
- Using prearranged signals like flares, whistles, or tracers.
- Positioning key weapons in his fighting position.
- Placing his fighting position so that it covers key or decisive terrain.
- Placing his fighting position where his team might be able to act as a reserve.
(b) The three-soldier emplacement is the T-position. This basic design can be changed by adding or deleting berms, changing the orientation of the T, or shifting the position of the third soldier to form an L instead of a T. (Figure 2-80.)
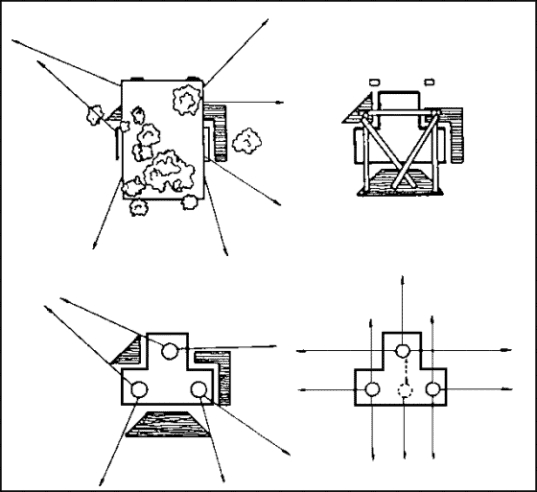
Figure 2-80. Three-Soldier T-Postion.
The first layout of the position is oriented to fire on expected enemy avenues of approach from any direction(s). Berms are added based on METT-T factors. They cannot block observation or fire into assigned primary or alternate sectors. Berms should be designed to support overhead constructions. Logs of sufficient diameter (4 to 6 inches) or long pickets are used to support overhead cover for the position. They are placed a minimum of one foot back from the edge of the hole, or one fourth the depth of the hole, whichever is greater. The position is completed when natural camouflage materials are added to hide the position and strengthen it.
(5) Machine Gun Position. The primary sector of fire is usually to the oblique so that the gun can fire across the platoon's front. The tripod is used on the side that covers the primary sector of fire. The bipod legs are used on the side that covers the secondary sector of fire. When changing from primary to secondary sectors, the gunner moves only the machine gun. Occasionally, a sector of fire that allows firing directly to the front is assigned, but this can reduce the frontal cover for the crew when firing to the oblique. (Figure 2-81.)
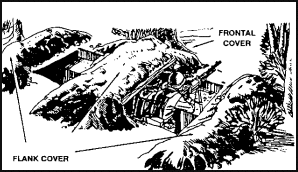
Figure 2-81. Machine Gun Position.
(a) After the platoon leader positions the machine gun, he marks the position of the tripod legs and the limits of the sectors of fire. The crew then traces the outline of the hole and the frontal cover (if it must be improved).
(b) The crew digs the firing platforms first to lessen their exposure in case they have to fire before they complete the position. The platforms must not be so low that the gun cannot be traversed across its entire sector of fire. This reduces the profile of the gunner when he is firing and reduces the height of the frontal cover.
(c) After digging the firing platforms, the crew digs the hole. They first place the dirt where frontal cover is needed. They dig the hole deep enough to protect them and still let the gunner fire the gun with comfort, usually about armpit deep. When the frontal cover is high and thick enough, the crew uses the rest of the dirt to build flank and rear cover. Trench- shaped grenade sumps are dug at various points so that either soldier can kick a grenade into one if needed. Overhead cover for a machine gun position is built the same as for a two-soldier position.
| NOTE: | In some positions, a machine gun might not have a secondary sector of fire; so, only half of the position is dug. |
(d) When there is a three-soldier crew for a machine gun, the ammunition bearer digs a one-soldier fighting position to the flank. The ammunition bearer's position is connected to the gun position by a crawl trench. From his position, the ammunition bearer can see and fire to the front and to the oblique. Usually, the ammunition bearer is on the same side as the FPL or PDF. This allows him to see and fire his rifle into the machine gun's secondary sector, and to see the gunner and assistant gunner.
(6) Dragon Position. The Dragon can be employed from hasty or completed positions. However, some changes are required. (Figure 2-82.)
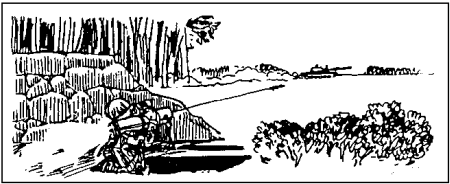
Figure 2-82. Dragon Position.
DRAGON BLACKBLAST AND MUZZLE BLAST MUST BE CONSIDERED TO AVOID INJURING PERSONNEL. WHEN A DRAGON IS FIRED FROM A COMPLETED POSITION, THE MUZZLE END OF THE LAUNCHER MUST EXTEND SIX INCHES BEYOND THE FRONT OF THE HOLE. THE REAR OF THE LAUNCHER MUST EXTEND OUT OVER THE REAR OF THE HOLE. |
(a) As the missile leaves the launcher, the stabilizing fins unfold. During firing, the gunner must keep the weapon at least 6 inches above the ground to allow room for the fins to unfold. The hole is only waist deep to allow the gunner to move while tracking a target. Because of the height of the Dragon gunner above ground level, the frontal cover should be high enough to hide his head and, if possible, the back blast of the Dragon. A hole is dug in front of the position for the bipod legs.
(b) When the Dragon can be fired only in one direction, the position is adjusted to have cover and concealment from all other directions and should be fired to the oblique. This protects the position from frontal fire and allows engagement of the target from the flank. Both ends of the launcher must extend out over the edges of the hole.
(c) Overhead cover must be built on the flanks. Cover must be large enough for the gunner, the tracker, and the missiles. Overhead cover that allows fire from underneath it can be built if the backblast area is clear. However, overhead cover must be well camouflaged.
(d) Selection and preparation of alternate positions for a Dragon have a high priority since the Dragon is an important weapon and is easy to detect. When preparing an alternate position, the gunner should select and improve a covered route to it so he can move to the position under fire.
(7) Light Antitank Weapon, AT4 and Flash Positions. The LAW, the AT4, and the Flash can be fired from infantry fighting positions. If the LAW, AT4, or Flash is to be fired from a two-soldier position, the gunner must ensure that the other soldier is not in the backblast area. The front edge of a fighting position is a good elbow rest to help the gunner steady the weapon and to gain accuracy. The LAW or Flash gunner leans against the front or side wall of the hole for greater stability when firing (Figure 2-83). When firing the AT4, the gunner leans against the rear wall--his elbows are not supported.
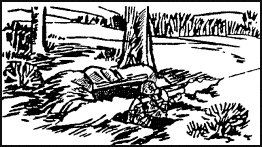
Figure 2-83. Light Antitank Weapon Position.
e. Trenches. When there is time and help, trenches should be dug to connect fighting positions so soldiers can move by covered routes. The depth of a trench depends on the type of help and equipment available. Without engineer help, platoons dig crawl trenches (about 3 feet deep by 2 feet wide); with engineer help standard trenches are dug. The trench should zigzag so the enemy cannot fire down a long section of it. Platoons normally dig crawl trenches because engineer assets are usually limited. Platoons use crawl trenches to conceal their movement into and within positions to provide minimum protection. Trenches use a zigzagging or winding pattern. Spoil is placed on parapets, normally on each side of the trench. If the trench runs across a forward slope, all the spoil is placed on the enemy side to make the forward parapet higher. All spoil needs careful concealment from enemy direct observation. (Figure 2-84.)
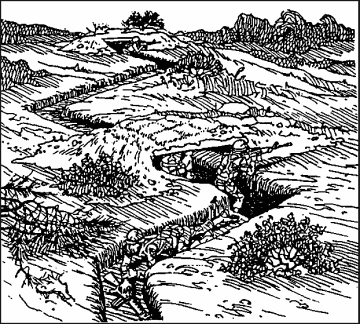
Figure 2-84. Crawl Trenches.
f. Vehicle Positions. Initially, vehicles use natural cover and concealment in hide positions to increase survivability. As time, assets, and situation permit, positions are prepared using organic excavation equipment or engineer support. Priority is given to those vehicles containing essential equipment or supplies. Crews should use these fighting positions for individual protection as well.
(1) Parapets positioned at the front of or around major weapons systems provide improved protection from direct fire and from blast and fragments of indirect fire artillery, mortar, and rocket shells. At its base, the parapet should be at least 8 feet thick. The parapet functions as a standoff barrier for impact-detonating direct fire HEAT and ATGM projectiles. The parapet should cause the fuses to activate, thereby increasing survivability for the protected vehicles. If the enemy uses kinetic energy, direct fire armor-piercing, or hypervelocity projectiles, it is impractical to construct parapets thick enough for protection. To protect against these projectiles, deep-cut, hull defilade, or turret defilade positions are prepared. The dimensions for fighting and protective positions for essential vehicles are constructed no larger than needed.
(2) Success on the battlefield requires maneuver among fighting positions between main gun firings. Maximum use of terrain is required to conceal fighting vehicles maneuvering among fighting positions. After a major weapon system fires its main gun, the vehicle should move concealed to another position before firing again. If the major weapon system immediately reappears in the old position, the enemy knows where to fire his next round. Table 2-6 summarizes the dimensions of the hasty and deliberate vehicle positions discussed in the following paragraphs.
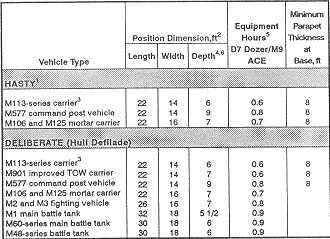
Table 2-6. Dimensions of vehicle positions.
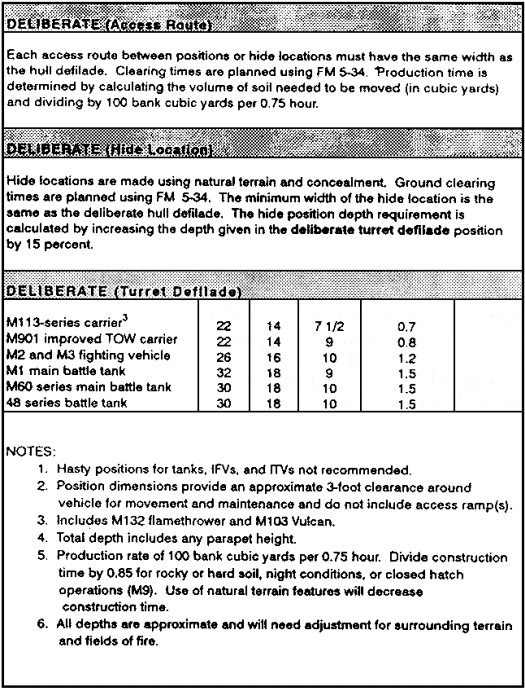
Table 2-6. Dimensions of vehicle positions (continued).
(a) Hasty Positions. Hasty fighting positions for combat vehicles including APCs, CEVs, and mortar carriers take advantage of natural terrain features. These positions are prepared with a minimum of construction effort. A frontal parapet, as high as practical without interfering with the vehicles' weapon systems, shields from frontal attack and provides limited concealment if properly camouflaged. Protection is improved if the position is made deeper and the parapet is extended around the vehicle's sides. Because of the false sense of security provided by parapets against kinetic energy and hypervelocity projectiles, hasty vehicle fighting positions with parapets are not recommended for tanks, BFVs, and ITVs. Hasty fighting positions do offer protection from HEAT projectiles and provide limited concealment if properly camouflaged. As the tactical situation permits, hasty positions are improved to deliberate positions.
(b) Deliberate Positions. Deliberate fighting positions are required to protect a vehicle from kinetic energy and hypervelocity projectiles. The position is constructed in four parts: hull defilade, concealed access ramp or route, hide location, and turret defilade. (Figures 2-85, 2-86, and 2-87.)

Figure 2-85. Developing Deliberate Fighting Positions.
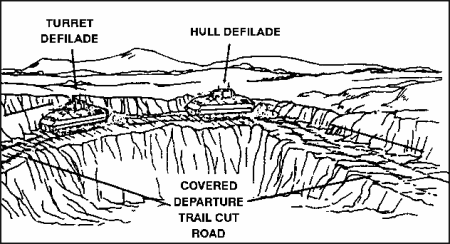
Figure 2-86. Enhanced Natural Position.
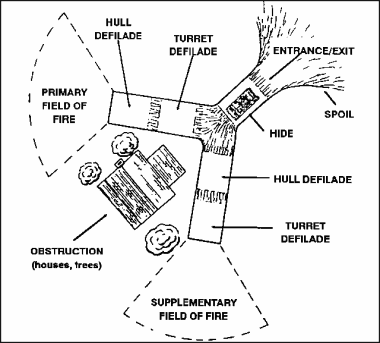
Figure 2-87. Top View of Y-Shaped Fighting Position.
(3) Positions formed by natural terrain are best because of easy modification. If preparation is necessary, extensive engineer support is required. Each position is camouflaged with either natural vegetation or a camouflage net, and the spoil is flattened out or hauled away. All fighting positions for fighting vehicles (tanks, BFVs, ITVs) are planned as deliberate positions. Since the lack of time usually does not allow the full construction of a deliberate position, only some parts of the position are prepared. For example, the complete fighting position for a BFV requires the construction of a hull defilade,turret defilade, concealed access ramp or route, and hide location all within the same fighting position. The maneuver team commander uses organic and engineer earthmoving assets and usually only constructs parts of the fighting position.
(4) Digging hide locations and concealed routes between fighting positions is normally not practical due to the lack of engineer assets and time. Engineer assets are used to dig the hull and turret defilade positions only. The ramps and concealed routes should require only partial clearing and leveling with blade tanks or engineer equipment because natural concealed routes and hide locations are used. If time permits, the commander expands the fighting position to all four parts, including a hide and turret defilade location. The access ramp from the hide location to the hull defilade position usually provides turret defilade for a vehicle at some point on the ramp. This location can be marked with engineer tape and a chemical light so the driver knows when to stop. This fighting position affords maximum protection and maneuver for the BFV.
GO TO:
Table of Contents