|
RDL Homepage |
Table of Contents |
Document Information |
Download Instructions |
LESSON 4
MINE-CLEARANCE OPERATION
Critical Task: 051-192-3050
OVERVIEW
LESSON DESCRIPTION:
This lesson discusses the procedures used to plan and conduct a mine-clearance operation. This discussion includes the three elements of a company/team (security/assault, support, and sweep); the three route-clearance methods (linear, combat, and combined); the two types of sweep operations (deliberate and hasty); and mine threats, locations, disposition, and removal techniques.
TERMINAL LEARNING OBJECTIVE:
| ACTION: | You will learn to identify and describe the procedures used to plan and conduct a mine-clearance operation. You will identify the requirements for each task. You will understand the task organization, clearance methods, clearance types, and mine removal techniques and will recognize the disposition of suspected mines. |
| CONDITION: | You will be given the material contained in this lesson. |
| STANDARD: | You will correctly answer all practice-exercise questions at the end of this lesson. |
| REFERENCES: | The material contained in this lesson was derived from FM 5-250 and FM 20-32. |
INTRODUCTION
Moving forces and material to any point in an AO is basic to combat power and often determines the combat operation's outcome. Maneuverability relies on the availability of lines of communication (LOC) within the AOs. During stability and support operations, clear LOC are essential to the movement of forces within the AOs. It is necessary to conduct clearance operations to ensure that LOC enable safe passage of combat, combat support, and combat service support organizations.
4-1. General. A mine-clearance operation is a combined arms operation. To conduct clearance operations, a battalion task force (TF) will normally focus a company/team as the main effort on the route proposed as the main supply route (MSR). The company/team is task-organized into three elements to ensure effective clearance operations:
- Security/assault. This element is comprised of two maneuver platoons and the maneuver company/team executive officer (XO). This element's mission is to provide flank security, rear security, and protection to the sweep element. It also neutralizes any hostile forces encountered by the clearance element. Additionally, this element has the responsibility to search for any suspected off-route mines.
- Support. This element is comprised of a maneuver platoon, an engineer squad, a mortar section, a medical team, a psychological operations (PSYOP) team, an explosive ordnance disposal (EOD) element (or one that is on call), and a forward observer. This element's mission is to control fires and fix the hostile force for the security/assault element to neutralize.
- Sweep. This element is comprised of a maneuver platoon, an engineer platoon (minus), and the maneuver team commander. The sweep element's mission is to sweep the route and reduce any mine or explosive threat.
4-2. Sweep Teams.
a. Within the sweep element, the engineer platoon (minus) is further task-organized into sweep teams. A sweep team is a trained detection team that searches for mines and explosive devices. A sweep team's organization depends on the type of sweep mission and the dimensions and condition of the road. A platoon-size sweep team can normally clear a 6-meter-wide path and a squad-size sweep team can normally clear a 2-meter-wide path. Additional engineer assets are necessary if the route is wider or if time does not permit multiple passes. Table 4-1 outlines a sweep team's personnel and equipment requirements.
Table 4-1. Personnel and equipment requirements for a sweep team
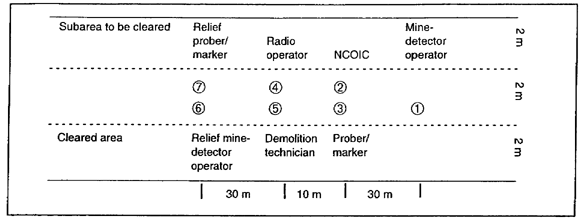
b. The normal configuration for a squad-size sweep team is seven soldiers in a modified column (Figure 4-1). The squad leader supervises the entire sweep team's operation. This configuration is best-suited for sweeping routes in friendly territory that are not under constant surveillance.
Figure 4-1. Squad-size sweep team
c. The NCOIC (or squad leader) will task-organize his element into the following configuration to conduct sweep operations.
(1) Soldier 1 (mine-detector operator) leads the sweep team and covers a 2-meter-wide path.
(2) Soldiers 2 (NCOIC) and 3 (prober/marker) follow 30 meters behind Soldier 1 and are centered in the cleared lane. The prober/marker is responsible for marking the cleared lane on both sides.
(4) Soldiers 6 (relief mine-detector operator) and 7 (relief prober/marker) follow 30 meters behind Soldiers 4 and 5 and are centered in the cleared lane. If the squad is not capable of filling all seven positions, the relief marker/prober position can be eliminated from the formation.
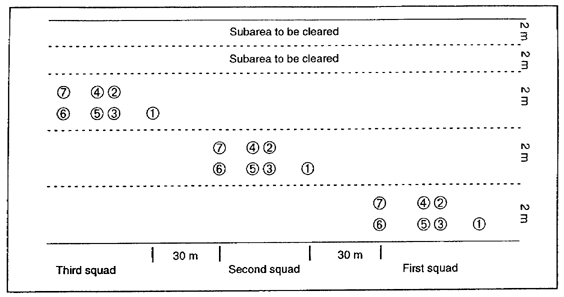
d. The engineer platoon leader has the option to configure the platoon into squad-size sweep teams and place them in echelon to clear a route (Figure 4-2) or to use the platoon-size configuration.
4-3. Clearance Methods.
a. The information gathered from the intelligence preparation of the battlefield (IPB) and the reconnaissance effort determines the clearance method and the type of sweep operation to conduct. The clearance method and the type of sweep depend on the situation, the available time, the threat level, and the available assets. Generally, the platoon leader or PSG will determine the clearance method and the type of sweep to be conducted. In all cases, the maneuver force should establish static security positions at critical locations following completion of route clearance.
Figure 4-2. Sweep teams in echelon
b. There are three route-clearance methods—linear, combat, and combined:
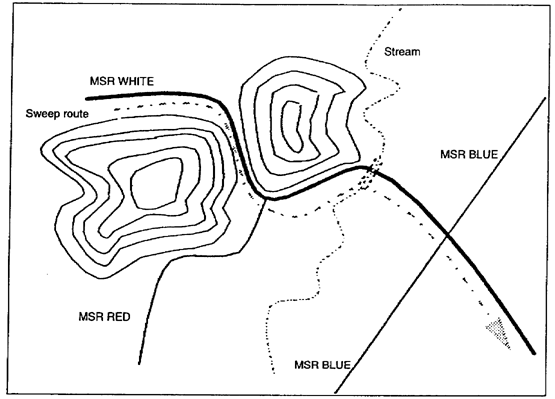
- Linear. Sweep and security teams begin clearing from Point A and complete it at Point B (Figure 4-3). This method provides the best route coverage. Although this is an effective method, it is not the most secure method in a high-threat environment. It is time intensive and constrains the maneuver commander's flexibility.
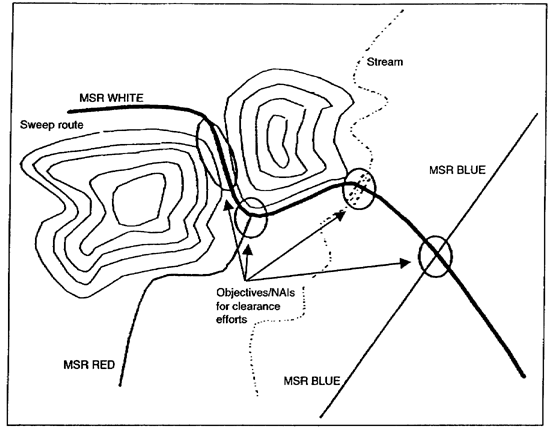
- Combat Whereas linear clearance focuses on a specific route, combat clearance focuses on specific points along a route (Figure 4-4). IPBs and engineer battlefield assessments (EBAs) of a route can identify high-threat areas for likely mine and ambush locations. These areas become named areas of interest (NAIs), or objectives, for combat clearance missions. This method divides a route into sections according to the number of suspected high-threat areas. Once the sweep element (maneuver and engineer forces) secures and sweeps these areas, the route is considered clear. Combat forces can patrol the route from these objectives to ensure that the route is secure, and if necessary, the sweep element can sweep the surrounding area if a minefield is found. Following the seizure of these objectives, the commander must assume a moderate risk that the high-threat areas identified by his S2 and force engineer and cleared by the sweep teams might still contain mines. Combat clearance is ideal for dismounted (light) forces since it provides the maximum use of surprise and concealment.
- Combined. This method combines the complete clearance capabilities of the linear clearance method with the security and surprise element of the combat clearance method. This is a two-phased, force-intensive operation and may require a battalion-size effort, depending on the route's length.
IPBs and EBAs identify high-threat areas and target them as NAIs and/or objectives to secure. Then clear obstacles and enemy forces prior to the movement of the sweep elements. The sweep team then moves down the road and clears any obstacles missed or not identified during the planning process. This method's main advantage is that the TF commander has immediately secured his MSRs and can push out to find the enemy with a high degree of confidence that follow-on forces will be much safer.
Figure 4-3. Linear clearance method
4-4. Sweep Operations. There are two types of sweep operations—deliberate and hasty. These clearance operations can be modified to meet the TF's time and equipment limitations. The commander assumes a greater risk when modifying the clearance type.
a. Deliberate sweep.
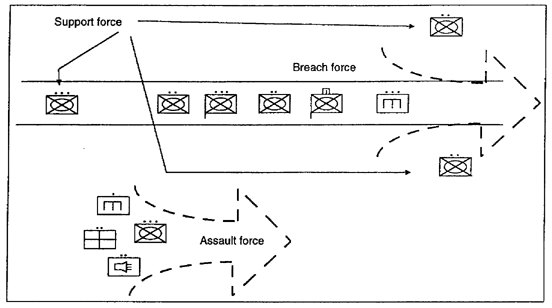
(1) A deliberate sweep (Figure 4-5) is very thorough and includes a complete sweep of the entire road (shoulders, culverts, ditches, and bridges). It is the most time-consuming sweep operation and relies on electronic (primary) and visual (secondary) detection systems. The sweep element is dismounted to focus its attention on the entire length of the route.
Figure 4-4. Combat clearance method
(2) The security/assault element (company-size) clears and secures at least 100 meters on the flank and 100 meters forward to clear possible enemy direct-fire systems and possible overwatch elements in front of the sweep element. This not only allows the sweep element to focus solely on the route but also clears the area of off-route and command-detonated mines. If enemy contact is made, the support force fixes the threat while the security/assault force reacts. The sweep element withdraws to a location that provides concealment and/or security.
(3) Mechanical detection provides a third detection means and is the only method used to proof the route after the sweep team has passed through the area. The deliberate sweep includes a route reconnaissance and looks at all route areas to include bypasses. The deliberate sweep focuses on thoroughness rather than speed. This method is very slow and tedious (an average of 80 to 100 meters can be covered per hour) and should only be used when time is not a factor.
b. Hasty sweep.
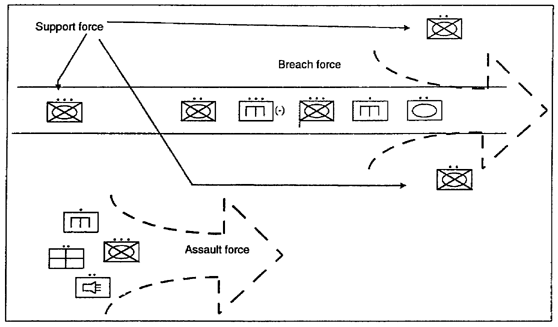
(1) A hasty sweep (Figure 4-6) consists of visual inspection, physical search or probing, and the use of mine detectors. It is the fastest, most risky method and is suited for an armored or mechanized team. It relies primarily upon visual detection (thermal sights or the naked eye) for minefield identification. The sweep element looks for mines, wire, or
other minefield indicators (such as disturbed earth and obstacles). The road surface, culverts, ditches, and bridges are inspected and searched. Visual detection is accompanied by a mechanical proofing system, such as the mine-clearing roller (MCR), as an additional detection system. Sweep teams use electronic mine detectors to check all suspected areas. The security/assault and support teams consist of a maneuver platoon to provide overwatching fire and/or security.
Figure 4-5. Deliberate route clearance
Figure 4-6. Hasty route clearance
(2) Actions upon enemy contact are the same as in a deliberate sweep. This technique's primary objective is speed, moving at about 3 to 5 kilometers per hour (kph). This method is extremely similar to the instride breach method when encountering minefields. The sweep team focuses on identifying immediate risks to traffic, neutralizing those risks, and continuing on with the mission. A hasty sweep is used during the combat clearance method to validate the areas that were not deliberately cleared by the sweep team. It is also used if the mission, enemy, terrain, troops, and time available (METT-T) analysis does not permit a deliberate sweep or if the need for a road to be opened is urgent. Additional time and distance factors may be imposed.
(3) A light force may not have an MCR but can conduct the same sweep method with an improvised roller system, or the force can use a sandbagged, 5-ton truck moving backwards as a last resort. Using MCRs or their equivalent is absolutely imperative due to the high risk of encountering a minefield. The mine rake or mine plow is not a satisfactory substitute because it destroys road surfaces.
4-5. Improvised Mine Threat.
a. Mines are employed conventionally by military forces organic to the host nation or its enemies and also by terrorists against allied forces or the host-country populace. In these cases, the threat increases due to the improvised methods in which the mines were emplaced. In conventional mine emplacement, a pattern emerges from the emplacing force's doctrine, and the threat can easily be reduced by this knowledge. There is less of a pattern in improvised mining methods, which makes detection and removal very difficult.
b. Improvised mining has many different employment techniques. In most of the techniques described below, an unexploded ordnance (UXO) can easily be employed in place of a mine. It is extremely important that the sweep team's NCOIC ensures that the team members understand and recognize these techniques.
(1) Coupling mines. Coupling is done by linking one mine to another, usually with a detonating cord. When the initial mine is detonated, it detonates the linked mine. This technique is used to defeat countermine equipment.
(2) Boosting mines. Buried mines are stacked atop one another, and the farthest mine from the surface is fused. This reduces the probability of detection and increases the blast force.
(3) Sensitizing antitank mines. On some nonmetallic AT mines, the pressure plate can be cracked and the spring removed or the mine's explosive can be cut into smaller blocks and be employed as powerful AP mines. Metallic AT mines can have the pressure plate removed and be employed in the same manner. Alternatively, a pressure-fused AP mine can be placed atop an AT mine.
(4) Mixing training mines with live mines. Training mines can be employed at the start of a minefield with live mines emplaced toward the end. The sweep element believes that the minefield is phony and becomes complacent in its reduction activities. When using this technique, live mines are painted to resemble training mines.
(5) Daisy-chaining mines. Command-detonated and AP mines are commonly used in daisy chaining. The mines are linked with trip wires or detonating cord. As in coupling, all the mines will detonate when the initial mine is detonated.
4-6. Mine Locations. Whether using conventional or improvised mining, hostile forces normally place more than one mine in each mined area. The NCOIC must ensure that the team members do not focus detection efforts solely on a horizontal mine threat (such as on the ground or in culverts). The mine threat is also vertical (such as in trees or attached to an overpass). Clearance efforts must accommodate the three-dimensional battlefield. Mines may be placed in—
- Frequently used roadways and road junctions.
- Brush and other traffic obstructions placed on roadways.
- Bridge bypasses and fording sites.
- Obvious turnarounds, bypasses, culverts, ditches, and shoulders.
- Key logistic points (water, fuel, food).
- Debris along a route.
4-7. Mine Disposition.
a. The sweep team's NCOIC will direct the team to take the following actions after finding a suspected mine:
- Pinpoint the suspected mine and mark the location. Do not leave any mine unmarked.
- Search for electric wires or trip wires in the immediate area. Trace the wires in both directions to determine if items are attached to them. If nothing is attached and the IPB does not state otherwise, cut loose trip wires and electric wires.
Never cut taut trip wires. Alert the security element to search for an enemy who is overwatching a command-detonated mine. Keep troops away from the mine until all wires are traced and cut. Be alert for booby traps and ambush. If booby traps are found, use the clearance procedures outlined in FM 20-32 |
- Conduct probing as follows (all other personnel should stay at least 30 meters away):
— Roll up your sleeves and remove your jewelry to increase sensitivity. Wear a Kevlar helmet, with the chin strap buckled, and a protective fragmentation vest.
— Use a slender, nonmetallic object as a probe.
— Visually inspect the area to be probed.
— Stay close to the ground and move in a prone position to reduce the effects of an accidental blast.
— Scan forward up to 2 meters and to the sides up to 3 meters for mine indicators.
— Probe the suspected location, and uncover the object for identification, exposing only enough of the object to see whether it is a mine or debris.
— Use sight and touch to detect trip wires, fuses, and pressure prongs.
— Probe every 5 centimeters across a 1-meter front.
— Gently push the probe into the ground at an angle less than 45 degrees.
| DANGER
Pushing the probe's tip straight down may detonate a pressure fuse. |
— Apply just enough pressure on the probe to sink it slowly into the ground.
— If the probe encounters resistance and does not go into the ground freely, carefully pick the soil away with the probe's tip and remove the loose dirt by hand. Care must be taken to prevent detonating a mine.
— If a solid object is touched, stop probing and carefully remove the surrounding soil with two fingers from each hand to determine what the object is.
- If the object is a mine, remove enough soil to show the mine type. Mark its location and then notify the NCOIC. Do not attempt to remove or disarm the mine. Use explosives to destroy detected mines in place or use a grapnel hook and rope to cause mines to self-detonate. Do not use metal grappling hooks on magnetic-fused mines.
- If the object is debris, get in a protected position and carefully remove the debris with a grapnel hook and a rope. Be alert for booby traps or AHDs wired to the debris.
4-8. Mine-Removal Techniques.
a. After locating and marking a mine, it can be bypassed, detonated in place, pulled out by a rope or a wire, or neutralized and removed by hand. The OIC decides the method to use depending on the mine's location, the mine type, the fuse type, and the tactical situation. The operation order (OPORD) addresses mine removal methods and actions, which are rehearsed prior to executing the mission. The team NCOIC assesses the situation and directs the team members to remove the mines.
c. Hand-placed charges are the standard demolition materials used to destroy mines in place (see FM 5-250). A 1-pound block of explosive placed next to a mine is sufficient to detonate most mines. A charge must be placed next to each mine in a group, then the charges can be connected and detonated simultaneously.
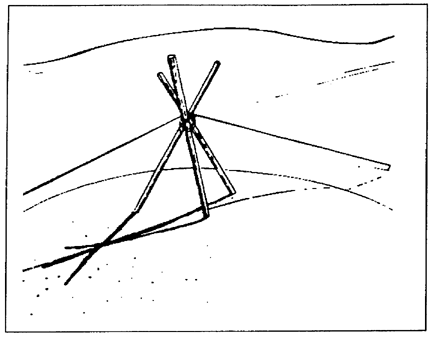
d. Use rope or wire to pull a mine out of its emplaced position. This is a safe method and only detonates mines equipped with AHDs. It also reduces noise and cratering. A tripod (Figure 4-7) designed to obtain vertical lift on a mine makes it easier to pull a mine out of a hole on the first attempt. Use the following procedures to remove mines:
- Uncover only enough of the mine to expose a handle or a projection. Attach a 60-meter-long rope or wire to the mine or engage a grapnel. If there is no projection, engage a grapnel hook on the bottom side of the mine, opposite the direction of pull.
- Wait at least 30 seconds before leaving cover and approaching the mine if the mine type is unknown. This guards against the possibility of a delay firing mechanism.
- Ensure that the covered area is not mined. Take cover and lie in a prone position at least 50 meters from the mine. Pull the rope to remove the mine from the hole.
- Dispose of the mine according to the unit directive or SOP.
Figure 4-7. Tripod
4-9. Safety. The NCOIC ensures observation of the following safety procedures:
- Wear helmets and flak jackets to protect you from fragmentation. Sweep team members should wear Improved Body Armor System, Individual Countermine (IBASIC) protective garments if available.
- Sandbag all vehicle floorboards.
- Disperse vehicles at 50-meter intervals. This ensures that if one vehicle detonates a mine it will not cause casualties in other vehicles.
- Allow only one person at a time at a suspected mine location.
- Assume that mines and explosive devices have been equipped with AHDs until proven otherwise.
- Do not run and move in previously cleared areas only.
- Open the hatches on armored vehicles to vent the pressure pulse from a mine detonation.
- Wear ballistic and laser protective spectacles (BLPS) or lightly tinted, protective eyewear to reduce eye fatigue and improve your ability to recognize mine indicators.
4-10. Reports. The NCOIC submits progress and completion reports until the clearance operation is complete. Progress reports must be timely and accurate. Report format and frequency is established in the OPORD prior to the execution of the clearance mission.
GO TO:


