

CHAPTER
4 Close
Air Support Planning
Close Air Support Planning
(A TTP for Planning CAS Employment)
The availability of Close Air Support (CAS) to the maneuver brigade offers the commander an extremely effective means to project combat power beyond the range of direct fire weapon systems. CAS, together with field artillery, electronic warfare, and engineer effort, forms the backbone of the brigade's deep operations--the portion of the battlefield in which favorable conditions can be set for the close fight. CAS gives the brigade significant flexibility and lethality in conducting deep operations which, when used in concert with other deep attack systems, can have a devastating effect on the enemy. Sadly, the full effects of CAS are rarely achieved during a campaign at the National Training Center (NTC).
Throughout a campaign, a brigade's efforts to employ CAS are routinely thwarted by a number of factors. These include: multiple target grids generated from a variety of sources, ineffective airspace deconfliction, lack of SEAD (both lethal and non-lethal), and lack of qualified terminal air controllers at the right place and at the right time. Gradually, integrating CAS into the operation becomes viewed as "too hard to do." Indeed, CAS is too hard to do with little or no prior planning or poor execution training. Generally, the brigade intends to employ CAS but does not plan to employ CAS. The transition from intent to planning is obviously the key to success. Unfortunately, precious few tactics, techniques, and procedures (TTPs) exist to assist the brigade in planning for CAS employment. This chapter presents step-by-step TTPs developed at the NTC for CAS employment.
STEP 1: The targeting team determines, from the commander's intent, what enemy formation and function they need to attack with CAS. Once this is determined, the process of identifying where to target CAS during the operation can begin. Be sure to synchronize the proposed target locations with current and proposed targeting products of the Intelligence Preparation of the Battlefield (IPB) process and scheme of maneuver (i.e., TAIs, DPs, EAs, HVTs, etc.). Consider all options (branches and sequels) from the wargame process and condense the numerous potential air strike options into as few as possible. This will serve to focus your planning efforts within a constrained planning timeline and should provide a catalyst for massing multiple systems for the obvious advantages of mutual support and massing of fires.
STEP 2: Graphically portray the potential CAS targets on the fire support overlay. A standard target symbol can be used as long as it is easily distinguishable from an artillery target. A different color (blue for example) may be used or CAS and annotated in the upper right quadrant of the target symbol. This different color is only to highlight the target for all members of the staff and doesn't necessarily have to be a separate target from a planned artillery target. Also, do not get fixated on a single six-digit grid point because CAS (FAC-As in particular) will use that grid as a start point for an area search. In the desert, a FAC-A can potentially see 10 to 20 or more square kilometers of real estate at a time (numerous enemy formations or positions), so you need to focus his search. Once CAS has identified the correct enemy to engage, they can then adjust accordingly.
STEP 3: Construct a CAS Target Box (CTB) for each CAS target area which is not defined by a standard doctrinal targeting term, i.e., EAs, TAIs, etc. The remarks of the CAS Target Card (Step 5) should contain details of the EA or CTB and the target in which the particular enemy formation could be found based on the course of action for which the target area was developed. Although we anticipate engaging the enemy at the CAS target, the remarks will define the area within which:
Compose a 9-line for each CAS target. You can expect to update some data prior to actual execution, but this will save a tremendous amount of time during the mission coordination and briefing process.
STEP 4: This is the final step in construction of the CAS components of the fire support overlay. The components include ACAs, IPs, FSCMs (current and planned), artillery firing positions (current and planned), ADA, and Army airspace command and control (A2C2). Although some of these components are common to the fire support overlay, the combination of these graphics will greatly enhance the deconfliction of systems and fires prior to the battle. Graphically portray the triggers or decision points for each CAS target area (EA, CTB, etc.). Note: The trigger to bring CAS onto a specific target area should not be confused with a trigger to launch "strip alert" planes or to request "immediate CAS." The trigger to bring CAS on station is included on a synchronization matrix and is computed-based on how long it will take to get fighters to an IP. The trigger or decision point we are focused on is that point (location) the enemy formation reaches which activates a particular target area for the engagement. The trigger must be far enough from the target area to allow enough time to execute a variety of tasks associated with the attack into the CAS Target Area. Consider what tasks must be accomplished using the following timeline.
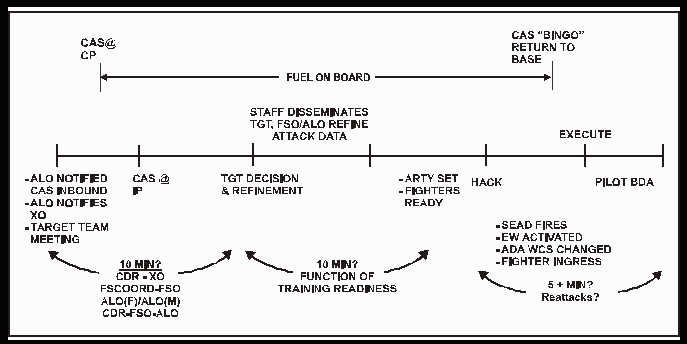
The timeline is based on NTC rotational averages for brigades over the previous year. Normal time from contact with fighters to actual execution is 20 minutes. Many attacks have gone "Bingo" before even getting a target approved. Appendix A of FM 6-20-10, The Targeting Process, contains good time planning data for placement of decision points.
STEP 5: Construct CAS Target Cards for each CAS target area. CAS Target Cards are 5X8 cards containing vital information regarding a CAS mission against a specific target in a specific target area. A separate CAS Target Card should be developed for each EA, TAI, CTB, Enemy battle position, etc. The CAS Target Card is the tool for the detailed planning of CAS. It serves as the planning checklist for a particular CAS engagement. The obvious benefit is that the details are addressed during the planning process, and we will not be forced to figure out ACAs, SEAD, control, and the like during the execution of the mission. The CAS Target Cards should be disseminated to all fire support elements and the artillery battalions (DS and R). The line number/row number reference system permits efficient updates during planning, preparation (rehearsals), and execution (e.g., change Line 3B of CAS Target Card No. 1 from DS Battalion, one round DPICM to DS Battalion, one round HE/PD). An example of information on a CAS Target Card with a legend explaining line entries is shown below.
| TRIGGER: CAS TARGET CARD NO. | ||
| LINE | A | B |
| 1 | TARGET
GRID: TARGET ALT: | TARGET DESCRIPTION: |
| 2 | ACA: | CONTROL:
ALTERNATE: |
| 3 | SEAD
TARGET: NON-LETHAL: | METHOD OF FIRE/CONTROL: |
| 4 | IP: | IP-TARGET TIME: |
| 5 | INGRESS/EGRESS:
OFFSET: L or R | ATTACK
ZONE: STAY ABOVE ALT: |
| 6 | EFFECTS: | MARKING: |
CAS Target Card Legend:
Trigger: The enemy formation and location which will cause us to employ CAS into the EA, CTB, etc. This trigger must be located far enough from the target area to allow sufficient time to set the conditions for CAS (Target approval, ACA disseminated, Staff dissemination , SEAD, etc). The trigger will also alert us as to which target area the enemy is approaching. If the trigger is located at a point that the enemy commander has more than one option in his route (i.e., a road intersection at which he can go northwest or southwest), the trigger becomes a decision point for us as well.
CAS Target Card No: This number is used for ready reference by all agencies to synchronize planning and updating of attack information. The card is built to support an attack against the enemy formation identified in Line 1B.
Line 1A: UTM grid and altitude in feet MSL for the CAS Target.
Line 1B: The enemy formation and disposition (moving, dug-in, etc.) that CAS will attack.
Line 2A: The Airspace Coordination Area that is planned for this particular target area. Include code names and grids.
Line 2B: Call sign and location of primary and backup controllers who will have final control for the attack. Ground FACs located with friendly forward elements are probably the best terminal controllers for close engagements to prevent fratricides.
Line 3A: UTM grid for planned SEAD. The grid may be refined as intelligence information is gathered. If artillery is providing SEAD, include the artillery target number. If another system (Army Aviation, USAF), then indicate the system. If non-lethal SEAD is planned (jamming, AEW, etc.) indicate the system and its effects.
Line 4A: Initial Point. A well-defined point which is easily distinguishable visually or electronically, used as a starting point for the fighters on their attack run against the target. The IP should be deconflicted from firing battery/mortar locations (i.e., not over them or directly in front of them). The IP works best for deconfliction of indirect fire gun-target lines and aircrew orientation to friendlies if it is lateral to the BCT zone or sector.
Line 4B: The time, in minutes and seconds, that the aircraft will take to fly from the IP to the target. The time will vary significantly by type of aircraft. This time is important when planning SEAD fires; it can help determine how long ACAs will probably be in effect, how long friendly ADA systems will be at a more restricted condition (i.e., "yellow, hold") and what influence the airstrike may have on the scheme of fires.
Line 5A: Ingress/Egress: The ingress and egress routes an aircraft may be required to follow. It is used to describe approach, abort, and exit instructions for the target attack. Offset Left or Right: Offsets (in conjunction with attack zones) increase ground troop safety, help the fires coordination process, orient aircrews onto targets faster and help TACPs identify the attacking aircraft faster (especially at night).
Line 5B: Attack Zone: Is two magnetic headings given to the aircraft which forms a "cone" with its apex at the CAS Target (see Altitude Separation TTP article for a more in-depth discussion of an attack zone). It is used to orient aircraft onto attack headings which facilitate final control, deconfliction, time, lateral and/or altitude separation efforts. Stay Above Altitude is the minimum altitude aircraft can fly over the target area when conducting altitude separated attacks. It is determined by the effects of fires (i.e., the bursting radius of high explosive ordnance or the maximum ordinate indirect fire gun-target line trajectories).
An example of Line 5A and B might be: "Use ACAs Blue and White for ingress, attack zone is 35 to 100 degrees magnetic, offset left, stay above 4,500 feet MSL, egress west then north back to IP Tango on ACA Blue."
Line 6A: The effects desired on the target from this attack. (The desired effects helps determine type of munitions and number of sorties required to execute.)
Line 6B: The method of marking the target that will be used (white phosphorus, laser spot, etc.). If laser spot is to be used, indicate who will provide the spot (COLT, OH-58D, etc.) Also remember the attack zone for a laser attack is restrictive and doesn't necessarily conform to the altitude separation TTP offered in Chapter 3. Refer to J-Pub 3-09.1, Joint Laser Designation Procedures, and J-Pub 3-09.3, JTTP for the Employment of CAS, for in-depth information on laser marking requirements and techniques.
STEPS 1 through 5 outline a planning technique for employment of CAS. This technique incorporates planning considerations which are necessary for well-executed, timely, "first pass" fighter attacks. In execution, these tools are used to bring CAS to bear on the battlefield, with minimum confusion and delay.
A Sample CAS Target Card filled out (items in bold print) with each meaning follows.
| TRIGGER: NAI 5 CAS TARGET CARD No. 5 | ||
| LINE | A | B |
| 1 | TARGET
GRID: NK
404224
TARGET ALT: 3,960 | TARGET
DESCRIPTION: ARMOR, MOVING EAST |
| 2 | ACA: TEXAS, NO FIRES WEST OF 43 N-S GRID LINE | CONTROL:
RAVEN
10
ALTERNATE: FAC-A |
| 3 | SEAD
TARGET: NK
423215 (2S6)
NON-LETHAL: 56th MI JAM MRR COMMAND NET | METHOD
OF FIRE/CONTROL: ONE BTRY, HE/VT; CONTINUOUS; CAS TOT 1515 |
| 4 | IP: Z (T IS ALTERNATE) | IP-TARGET TIME: 1 MIN, 15 SEC |
| 5 | INGRESS/EGRESS:
N
OF 24 E-W/BACK TO IP Z
OFFSET: L or R | ATTACK
ZONE: 220
- 105 MAG
STAY ABOVE ALT: N/A |
| 6 | EFFECTS: DESTROY THREE CBT VEHS | MARKING: COLT 3, NK 426237, LASER SPOT IF NECESSARY |
In this example, the card was developed for engagement of the lead MRB of an attacking MRR at CAS 1. When the lead MRB was acquired (at trigger NAI 5, as in this example), the Fire Support Officer announced that CAS 1 was activated and all fire supporters referred to CAS Target Card No. 1 for coordinating data. The controlling Tactical Air Control Party (TACP) (RAVEN 14) knew he would control.
The 2S6 ADA system was acquired visually by COLT 3 so Line 3 (SEAD target grid) was quickly updated to suppress the latest known ADA threat. By referring to Line 3, all executors are quickly updated by the FSO with SEAD refinement data; the FSE, IEWSO and FDC knew the ACA and intent for SEAD. In this case, "Continuous" in Line 3B is a SOP standard suppression mission where the artillery battery fired a sustained rate of from -1 to +2 based on the CAS TOT. (Another key point is on Line 2a, ACA "TEXAS." The SEAD CFF "continuous" allows the SEAD battery to "violate" this ACA; all other fire support agencies cannot fire into ACA TEXAS.)
No stay above altitude was given (Line 5B) because the artillery and CAS targets were laterally separated. The ACA instructions (Line 2A) in conjunction with the instructions to the fighters (Lines 5A and B) served to deconflict the simultaneous engagement of the artillery against the 2S6 and the CAS against the MRB. The Air Defense Officer coordinated his weapons control status based on the TOT to minimize the BCT's ADA exposure. The 9-line CAS briefing was completed by extracting the data from the card.
SUMMARY
This chapter has explored some TTPs for rapidly employing CAS on the battlefield. Regardless of the technique used, thorough planning is the only way to ensure success. Fire support overlays and CAS Target Cards offer one way to systematically walk through the planning process and serve as a checklist for the planners. As an additional benefit, the CAS Target Cards truly are planning documents that can be used during execution. The "what-to-coordinate" data discussed in this chapter is vital to planning CAS employment and should be studied, included in SOP, and trained.
Note: This is a modified version of an article written by (then CPT) MAJ Samuel R. White, Jr., "A Technique for the Employment of Close Air Support (CAS)." It was originally printed in CALL Newsletter No. 95-10, Jul 95, National Training Center's "Fighting with Fires II." The TTPs offered in that article and the planning sequence example are superb and worth studying.
|
NEWSLETTER
|
| Join the GlobalSecurity.org mailing list |
|
|
|