

The Tank Mine-Clearing Blade Eagle or Albatross?
by CPT John T. Ryan, CPT P. Kevin Dixson, and SFC James L. Richardson
"Red 1, this is Black 6; send the plow tank forward."This article provides units with techniques and procedures for the mine-clearing blade employment, and addresses how to solve and prevent some of the most common problems with this equipment.
2LT Bill Hardy sent his wingman forward to clear a path through the enemy minefield.
This was the crew's first actual use of a plow, and their ability to employ it properly
concerned him. The platoon rehearsed breaching in the assembly area, but did not drop
the plow, fearing it might break and be unavailable for the mission. A loud explosion
interrupted LT Hardy's thoughts.
"Red 2, this is Red 1. SITREP, over."
"Red 1, this is Red 2. We didn't have enough spoil in front of the blade when we hit
the first mine and it blew up and broke our track."
"Send the backup tank, over."
"Red 1, this is Red 2. We can't. The plow on the backup tank dropped accidentally
just after LD and broke -- it's not back up yet, over."
"Great," thought LT Hardy. "The other plow is still in the UMCP on 13. How am I
going to explain this to the CO?"
LT Hardy's experience is all too frequent at the National Training Center. The tank mine-clearing blade (plow) is a critical task force asset, but units seldom use it to its full potential. Frequent mechanical failures, insufficient crew training, and improper tactical employment often make the plow seem like an albatross to the units that have one. These problems occur in a vicious circle. Often the lack of crew training causes a mechanical failure or maintenance problems.
In turn, the frequent maintenance problems prevent the crew from training with the plow, which results in tactical employment problems.
According to FM 20-32, Mine/Countermine Operations, the mine clearing blade (plow) ". . . is used to extract and remove land mines from the minefield. It consists of a blade arrangement with scarifying teeth to extract mines, a moldboard to cast mines aside, and leveling skids to control the depth of the blade."
GENERAL
"The mine-clearing blade lifts and pushes mines, which are surface-laid or buried up to 12 inches, to the side of a track. The blade creates a 58-inch cleared path in front of each track. The skidshoe for each blade exerts enough pressure to activate most single-pulse mines and effectively clears a section of the centerline by explosive detonation. This action may disable the blade. A dog bone and chain assembly between the blades defeats tilt-rod-fused mines."FM 20-32 further states that the mine plow will not defeat multiple impulse pressure fuses and that mines armed with antihandling devices, antidisturbance devices, or magnetic and seismic fuses may activate and disable the blade when lifted. So, while the mine plow is an effective tool for clearing a lane through an obstacle, it is not "mine proof" and units must use caution when considering its use as the sole means of mechanical breaching. However, maintenance problems disable more plows at the NTC than mines do.
MECHANICAL FAILURE
The adage "training is maintenance and maintenance is training" certainly applies to the mine plow. During a 14-day rotation at the NTC, a typical Bn/TF has an average of two out of six tank mine plows fully mission capable (FMC) for any given mission. This seriously impacts the unit's ability to conduct countermine operations. Many commanders even decide not to train or rehearse with the operational plows because they feel if they get broken, they won't be fixed any time soon.Although the plow can successfully execute a mechanical breach when less than FMC, plow crews are not as effective. The need to manually raise and lower the blade, or the inability to plow effectively due to missing parts significantly increases the chance that enemy fires or mines will prevent the crew from accomplishing its mission.
The following three plow maintenance failures account for approximately two thirds of all NTC plow failures:
- (1)
Broken
lifting straps.
(See
Figure
1
(101K
size) ).
- a) The nylon lifting straps that raise and lower the blade suffer much abuse, and are cut and frayed by concertina wire or other sharp objects. They then break under load. TECHNIQUE: To prevent damage to the straps, some units bolt wire catchers, similar to those on the old M-151 bumper, on the moldboard in front of the straps.
- b) The straps also break frequently when the crew attempts to lift the blade with spoil on it. RESULT: The straps bear the additional load of the spoil, and they break.
- (2) Inoperative electric lifting motor.
- a) The most common problems with the motor is the armature brushes burn out or one of several electrical relays malfunctions. The only authorized repair for burn-out brushes is to have a DS-level mechanic replace the entire motor. The German-made motors often take several months to come in after ordering.TECHNIQUE (used by NTC contract mechanics): File the brushes from an old M-1 or M-2/3 starter down to size and place them in the lifting motor. RESULT: Plow downtime reduced from several months to three or four hours.
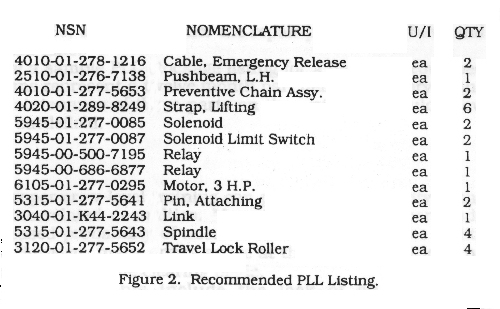
- b) The electrical relays are not particularly hard to acquire through normal supply channels, but most tank units do not keep them on hand. TECHNIQUE: In a pinch, check with a sister mechanized battalion for the part. The relays (see Figure 2 (92k size) for NSN) are identical to those found in the M2/3 electrical system.
- (3) Sheared travel lock spindle and brackets. The travel lock spindle usually shears when the blade drops or hits something while the vehicle is moving at high speeds. When the spindle shears off, the downward motion of the blade causes the remainder of the spindle to bend or break the bracket in which it is mounted. For some reason, the spindles on the left travel lock break considerably more often than the right and, in every case, the bracket breaks through the bolt holes. The only way to fix the bracket is to replace the entire pushbeam. This is a very time-consuming operation, which the crew can avoid if they use caution when driving with the blade. Once the plows break, units seldom get the parts to repair them during the rotation. Most units maintain very little, if any, PLL for the plow since it is a kit and not a reportable item. Units are reluctant to add these additional lines to their already limited PLL listing. Therefore, they must order the repair parts which have an exceptionally slow turnaround time. TECHNIQUE: The items listed (see Figure 2) are a sample PLL stockage listing for a battalion equipped with 12 blades. These items are based on a 12-month demand history at the NTC. RESULT: Rapid plow repair on the battlefield.
- a) The nylon lifting straps that raise and lower the blade suffer much abuse, and are cut and frayed by concertina wire or other sharp objects. They then break under load. TECHNIQUE: To prevent damage to the straps, some units bolt wire catchers, similar to those on the old M-151 bumper, on the moldboard in front of the straps.
CREW-LEVEL TRAINING
Proper crew-level training can prevent the majority of the mechanical failures and mine-related casualties for plow crews. More importantly, proper plow training will lead to more rapid, effective obstacle breaches, which will increase the probability of overall mission success. However, many crews arrive at the NTC with little or no formal training or experience with the mine plow.- Causes
of the problems:
- 1)
Lack of an Army-wide comprehensive training and licensing program for tank
crews. Such a program would ensure that crews meet the standard before operating
the plow on the battlefield.
- 2) Unit apprehension about using the plow in training for fear of breaking it, or because the unit has no operational plows with which to train.
- 3) Most units only train those crews assigned to plow tanks. TECHNIQUE: Due to vehicle maintenance, or other tactical considerations, nonplow crews often must employ the plow in a battle, and the results are disastrous. Units should thoroughly train and license all tank crews on the plow tank.
- 4) There is no single source manual for all of the crew-level tank mine plow doctrine, tactics, techniques and procedures.
- 2) Unit apprehension about using the plow in training for fear of breaking it, or because the unit has no operational plows with which to train.
Crew-level employment skills
Plan
Many leaders fail to consider the effect the 7,560-pound blade kit (plow) has on the tank when they develop their plans. While the plow has little effect on the tank's overall speed, it greatly reduces its maneuverability in rough terrain. Crews who try to traverse rough terrain at high speeds cause most of the mechanical failures by ramming the plow into rocks, wadis, etc. In many cases, the crews are simply trying to keep up with the rest of the unit. TECHNIQUES: 1) When planning movement or maneuver routes, keep the rate of movement to a speed the plow tanks can safely negotiate. 2) Position the plow tanks on the right side of the unit formation if possible. Drivers of plow tanks cannot see to the right side of the tank because the power cable enters the tank through the right periscope opening. This makes it difficult for the driver to maintain formation and interval without a lot of guidance from the TC.Prepare
Problem: Drivers often inadvertently leave the ON/OFF power switch on the control box in the "ON" position. Subsequently, they sit or step on the RAISE/LOWER switch and cause the lifting motor to engage while the plow is in travel lock. RESULT: This quickly burns out the lifting motors and the relays.TECHNIQUE:
Securely mount or stow the control box in the driver's compartment and disconnect the main harness from the slave receptacle until ready for actual use.Problem: Crews neglect to properly prepare the blade prior to an operation. RESULT: Many real-life and simulated battle-damage casualties and failures.
TECHNIQUES:
- 1)
Attach the moldboard extensions to ends of the moldboards before plowing. RESULT:
The extensions push the spoil and mines clear of the lane so they do not roll
back down under the plow tank's tracks.
- 2) Ensure the travel-lock hitch pins are in the travel lock until it is actually time to drop the plow. RESULT: This prevents the travel lock from disengaging prematurely and dropping the blade.
- 3) Adjust the plowing depth to an 8-inch, 10-inch, or 12-inch depth, based on the expected soil type - the softer the soil, the greater the depth. The plow will not work effectively in some types of soil - rocky or frozen ground.
- 4) Secure the emergency release cable handle near the driver's hatch with tape or a strap. RESULT: When the driver has to use the emergency release to lower the plow, he will not have to climb out of the hatch to reach it. A piece of 100-MPH tape will hold it in place by the driver's hatch.
- 5) Stow the manual lifting strap and the tools required to open the No. 1 skirt together in an easily accessible place. RESULT: Allows the crew to rapidly secure them and raise the blade manually if necessary.
Execution
- Crew-level TECHNIQUES:
- 1) When you receive the order to initiate plowing, seek cover if possible, pull the travel-lock hitch pins, attach the main electrical harness to the slave receptacle, and move to the beginning of the lane. Do not move the tank at high speeds with the travel-lock pins removed as the plow is likely to drop unexpectedly and damage the plow and injure the crew.
- 2) At the beginning of the lane, orient the tank in the proper direction of travel before dropping the blade. The blade achieves the best plowing width during straight-line plowing.
- 3) Close all of the hatches and traverse the main gun tube to the side to prevent damage by mine detonation under the blade.
- 4) Do not drop the plow too close to the minefield. RESULT: Plow does not reach proper plowing depth prior to striking the first mine. FM 20-32, Mine/Countermine Operations, states the lane should begin 100 meters from the estimated leading edge of the minefield. The lane should also extend for another 100 meters beyond the estimated far edge of the minefield to ensure it extends through the entire minefield. This allows for a tactical safety factor. TM 9-2590-509-10 states the crew must lower both moldboards at least 32 feet (10 meters) prior to the beginning of the cleared lane to allow the moldboards to reach operating depth. Therefore, in a deliberate breach situation, drop the plow 100 meters out from the minefield and begin plowing; if you make unexpected contact with a minefield, ensure you begin plowing at least 10 meters from the first visible mine, even if you have to back straight up first.
- 5) You can lower the mine plow while the tank is moving up to 8 to 10 mph (13 to 16 kph). However, you should use caution when lowering the blade while moving. It can cause damage to the blade and injure the crew.
- 6) When operating laterally on a slope, always drop the uphill plow first.
- 7) Although the blades will plow through concertina wire effectively, the wire will often cut the nylon lifting straps - avoid wire if possible.
- 8) At the conclusion of plowing, buck up the tank approximately two meters to clear the blade from the spoil prior to lifting. Otherwise, the additional weight of the spoil may break the lifting straps.
- 2) Ensure the travel-lock hitch pins are in the travel lock until it is actually time to drop the plow. RESULT: This prevents the travel lock from disengaging prematurely and dropping the blade.
TACTICAL EMPLOYMENT
The individual and crew-level skills required to operate the tank mine plow are the foundation for proper tactical employment. Units equipped with plows should train all tank crews in the use of the plow. Trained crews give Bn/TF-level tactical planners confidence in planning the employment of tank mine plows and using the asset to its fullest potential.Plan
Effective breaching operations begin in the planning phase. Task organization of the tank mine plows is a critical first step. TECHNIQUE: To become a reliable breaching asset, commanders should mass all mine plow tanks. (FM 71-123, p. 6-107) This is a tactical decision based on METT-T. RESULT: Massing plow tanks together achieves more consistent results because of easier command and control and the ability to rehearse as a team.Breach site selection is another planning task. Plows perform better on flat terrain. Terrain analysis will reveal the most advantageous ground to plow on. A rapid increase or decrease in elevation affects the depth setting on a plow, making it harder to maintain the proper amount of spoil in front of the blade.
TECHNIQUE:
The commander should visualize the breach site in his OPORD. Use terrain overlooking the site or a terrain model. Place emphasis on the critical actions that occur in the vicinity of the breach site, including when and where to release the travel-lock hitch pins and drop the blade, and where to begin plowing.Prepare
Rehearsals are critical in the employment of the tank mine plow. A "fullup" rehearsal on similar terrain is the most effective way to prepare crews. If time does not permit a full-up rehearsal, crews should at least drop the blade and plow a few meters to ensure the depth setting is appropriate.TECHNIQUE:
Commanders should rehearse redundancy when employing plows. Rehearsing the exact order the commander intends to employ the plows, and their relation to the support force will increase the survivability of the crews. Coupled with thorough precombat inspections of the blade, this should limit the number of surprises at the breach site.Execute
To successfully execute the breach, units have to protect the blade tanks.TECHNIQUE:
Allow the plow crews to find a covered and concealed position to prepare for operations, then direct the crews to the beginning of the lane.Before directing crews to the beginning of the lane, the commander should ensure that conditions have been set for successful plow employment. Setting the conditions includes:
- 1)
suppressing enemy direct fire systems before the commitment of the plow tanks,
as the
enemy will target them immediately.
- 2) obscuring enemy observation of the breach site. Use artillery-delivered smoke and smoke pots on the enemy side of the obstacle.
- 3) securing the breach site.
- Correct employment sequence (FM 71-1, p. 3-45)
PROCEDURE:
- 1) Lead with a mine roller to identify the edge of the minefield.
- 2) Fire and detonate an M173-projected demolition charge, or MICLIC, to destroy most of the mines in the lane.
- 3) "Proof" the lane with a mine roller or a mine plow.
TECHNIQUE:
Since most units do not have or use the mine roller, they must visually identify the edge of the minefield, then fire the MICLIC and proof the lane with the mine plow. Simply plowing through the minefield without first firing the MICLIC is a high-risk operation, as the first few mines are likely to disable the plow and the crew. - 2) obscuring enemy observation of the breach site. Use artillery-delivered smoke and smoke pots on the enemy side of the obstacle.
The
tank mine-clearing blade (plow) is a valuable asset which, when maintained
and employed correctly, will significantly enhance a unit's ability to mechanically
breach obstacles. Proper blade training and maintenance will result in fully
mission-capable equipment and trained crews available when the mission requires
it. If LT Hardy uses the techniques and procedures described in this article,
he'll have nothing but success to explain to his commander.
 To
the TABLE OF CONTENTS
To
the TABLE OF CONTENTS
To
The Brigade And Battalion Task Force Planning Process
 To
Rehearsals: A Key to Success
To
Rehearsals: A Key to Success
|
NEWSLETTER
|
| Join the GlobalSecurity.org mailing list |
|
|
|