

CHAPTER 14
Maintenance
The rules and routines outlined for a maintenance program for any electrical wiring system are determined primarily by the selection, location, and installation of the original equipment installed. Maintenance is merely a system of routines designed to keep the equipment in satisfactory operating condition through periodic inspection, cleaning, testing, tightening, adjusting, and lubricating. These basic maintenance operations should be set down in the above-listed order, and the various duties should be delegated to specific electrical personnel to prevent operating breakdowns. This chapter reviews and outlines the various procedures and recommended practices necessary to perform maintenance and troubleshooting.
Section I. Preventive Maintenance
INSULATION
The insulation materials designed to shield or protect the conductors from accidental contact with other conducting substances are built into the conductor during manufacture or may be installed in the field as part of the system's installation. Since it is important to maintain these protective coatings or shields on the wire conductors, ensure that preventive maintenance includes periodic tests and checks to expose potential trouble locations where the wire insulation has become frayed or where protective devices have been damaged. Tape, repair, or replace such wire areas and locations as required.
Conductor shielding installed in the field (such as antishort bushings and damage protection) should always be maintained and should be replaced when dislodged or damaged. To ensure a trouble-free system, routinely inspect and maintain conductors and conductor-enclosure supports. Replace damaged electrical parts, components, and conductors immediately.
LOOSE FITTINGS
To avoid the possibility of short circuits, the maintenance organization responsible for power distribution in an electrical system should periodically spot-check the electrical fittings. These fittings include such items as conduit couplings, connectors, and box-entry devices. Check fittings for looseness or separation and tighten or reclamp them as necessary.
CAPACITORS
Since the static capacitor or condenser remains charged after being disconnected from the energy source, you must not inspect it and work on it until it is completely discharged.
CONDUCTOR CONNECTION
The conductor connections made to electrical devices or other conductors should also be included in the periodic maintenance checks to determine the condition of solder splices, wire taps, and terminal connections. Loose, partly contacting, or partly broken connections at the screw terminals or splices of an electrical device can cause short circuits, arcing and burning, and radio interference. This may result in the rapid oxidation of the connecting materials or a dangerous short circuit if the free wire contacts other metallic components that are grounded. Moreover, the increased resistance resulting from a loose or poor connection increases the voltage drop in the circuit, causing inefficient operation of the devices on the system. If this increased resistance in the wire or terminal connections is high enough, the heat resulting from the resistance in an electrical connection may cause a fire by igniting surrounding materials. 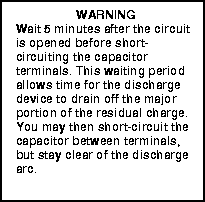
DEVICES
Periodically inspect all operating devices in the wiring system for defects. As outlined in Chapter 3, the inspection checks include normal operation and operation under the rated load. Any devices that fail these tests, are broken, or are loosely supported in their mountings should be replaced or repaired to prevent operation breakdown or potential hazard to personnel. If breakage repeatedly occurs in specific locations, replace electrical devices with items that are able to withstand the use or relocate outlets and switches.
Section II. Circuit Testing
WHAT TO TEST FOR
Although you may have de-energized a circuit by pulling the main switch, removing a circuit fuse, or tripping a local switch, you must recheck the circuit with an indicating instrument such as a test lamp or a voltmeter before starting work. The voltage rating of the test lamp should be twice the estimated voltage of the circuit because the electrician cannot be positive of the voltage when spot-checking. A series combination of test lamps, each rated at the estimated voltage, will also serve this purpose. Check the voltage rating by placing the test prods of the instrument on the hot and neutral circuit wires at the fuse, the circuit-breaker panel, the device (receptacle, lamp, switch), or the outlet box where the work is to be done.
SHORT CIRCUITS OR GROUNDS
The most important thing to check for is a short circuit, which results when two bare conductors of different potential come in contact with each other. For example, if a hot wire touches something that is grounded, such as a neutral wire, a grounding wire, or a metal box, it causes a short circuit. This could happen because insulation is damaged, a staple has penetrated the cable, or the wiring is incorrect. If a conductor inadvertently contacts a metallic part of a wiring system, such as a motor frame or conduit, the system is sometimes said to be grounded instead of having a short circuit. Grounds or short circuits can be solid, partial, or floating.
Solid
A full voltage can be measured across the terminals of a blown fuse when the load is disconnected from the circuit. Because the circuit resistance is very low and the current is very high, the fuse blows or the circuit breaker trips immediately.
Partial
The resistance in the short-circuit path is partially lowered but still remains high enough to prevent enough current flow to blow the fuse or trip the circuit breaker. Grounds of this type are generally more difficult to locate than solid grounds. You can detect a partial ground or short in a light circuit operated from a two- or three-phase source by the dim operation of some lights while others are operating normally.
Floating
The resistance of the defect in the system varies from time to time. Grounds of this type may be present in an electrical system for some time before their existence becomes known. A floating ground is indicated when fuses are blown on the phase side of a circuit a number of times, and a circuit test shows no defects in the system. In grounds of this type, fuse trouble may not occur for several days; then the ground reappears and the fuses are blown again.
OPEN CIRCUITS
You can test for an open circuit if you have time. However, an open circuit is usually the result of an incorrect, loose, or missing connection at a box; and it can be spotted and corrected quickly after the device is installed and the service is turned on.
WHEN TO TEST
Test the circuit at the rough stage, while the wiring is still exposed and problems are easy to spot and correct. Switches, receptacles, and light fixtures are not installed at this stage; but hot, neutral, and grounding wire splices should be made so that each -circuit is continuous to the last box. Retest the circuit after installing walls, ceilings, and floors (before adding final touches) because a nail will occasionally penetrate the wiring and cause a short.
WHAT TO TEST WITH
You can purchase a continuity tester (Figure 14-1), or you can easily make your own. The idea of these testers is quite simple. A battery provides the power source, and a light (if a continuity tester) or a doorbell (if a homemade tester) provides a signal when the circuit is complete.
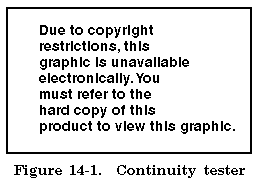
PURCHASED CONTINUITY TESTER
Continuity testers are available in several forms. One form contains a battery and a light; another uses a battery and a buzzer or a bell. Use either form to tell whether a circuit is open or broken or whether a short circuit exists.
HOMEMADE CONTINUITY TESTER
Use a doorbell and a 6-volt, dry-cell battery to make your own continuity tester. Connect one battery terminal to one doorbell terminal with a short piece of wire. Next, connect a 2-foot wire to the other terminal on the doorbell. Momentarily touch the free wire end to the free battery terminal to test for correct connections; the doorbell should ring.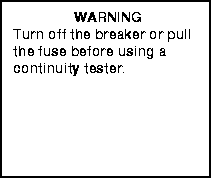
EXAMPLE OF TESTER USE
You have just completed a circuit from the distribution center to a new light fixture, and you need to test the circuit before turning on the breaker. Do not put a light bulb in the fixture. Put a continuity tester between the breaker end of the hot wire and the ground. Attach the alligator clip of the tester to the neutral bus bar and touch the end of the hot wire with the tester probe. Have someone turn the light switch on and off. If the tester does not light (or ring), you have not shorted the hot wire. Now, put the light bulb in the fixture and have your helper repeat the switching. If the continuity tester lights (or rings) with the switch on and does not with the switch off, the circuit is working correctly. After testing, put the new hot wire into the circuit-breaker terminal and energize the circuit. A continuity tester can also be used to determine whether or not a cartridge fuse is good.
HOW TO TEST
First, check your wiring visually. Start at the distribution center and walk through each circuit looking for problems. Think about what each wire is supposed to do and verify that the circuit is correctly wired.
TESTING FOR SHORT CIRCUITS
To ensure that your test will run the entire length of a circuit, temporarily join the hot wires at each switch location. This simulates the ON position and thereby extends the circuit test to include the wiring from the switch to whatever it will control.
At the service-entrance panel, hook one lead of the tester (the alligator clip of a continuity tester or the free wire of a homemade tester) to the neutral bus bar. Touch the hot wire of each circuit to the tester (the tester probe or the free battery terminal) one at a time. The circuit should be open (no bell or light); if the light comes on or the bell rings, there is a short in that circuit.
When testing circuits at a subpanel, run the above test twice. First, hook the clip to the neutral bus bar to check the hot-wire/neutral-wire circuits. Then, hook the clip to the grounding-wire terminal to check the fault-current circuits.
TESTING FOR OPEN CIRCUITS
Although testing for open circuits can wait until the power is turned on, you may want to check the continuity of the ground-fault circuit (the bonding of the conduit sections) if the wiring involves conduit that will be covered. One method of doing this at each box is to touch the neutral wire and the box to the two ends of the tester. The light should come on or the bell should ring; if it does not, check for a loose connection along the neutral or conduit path.
FINDING A SHORT
First, ensure that the free-device wires at each box are not inadvertently touching each other or the metal box. If the wiring is exposed, you should be able to see the problem by carefully checking the circuit. If you cannot find the problem or if the wiring has already been covered, undo the wire splices at the next-to-the-last box on the circuit and retest the circuit at the distribution center. Continue this procedure by moving closer to the source each time until the circuit tests open. You have now isolated the short between the box where the circuit checked open and the previous box or at one of those boxes.
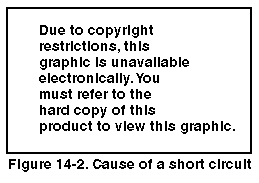
DETERMINING THE CAUSE OF A SHORT
Most short circuits occur in flexible cords, plugs, or appliances. Look for black smudge marks on faceplates or frayed or charred cords connected to a dead circuit. Simply replace the damaged cord or plug before installing a new fuse or resetting the breaker.
TROUBLESHOOTING
Follow the troubleshooting procedures outlined in Table 14-1 when a malfunction occurs or a fuse repeatedly blows.
Figure 14-2 shows the procedures for determining the cause and location of a malfunction in a circuit.
Section III. Generator Maintenance
Regular and systematic maintenance helps ensure that a generator operates as required at all times. Preventive maintenance is important because it allows the operator to discover and correct defects before they cause serious damage or equipment failure. This section describes the maintenance procedures required for all electrical generator sets. Refer to the operator's manual for the PMCS that are required for a specific generator.
PREVENTIVE MAINTENANCE CHECKS AND SERVICES
Perform regular PMCS as shown in Table 14-2.
Equipment operators must identify and write down all faults and shortcomings of the equipment. Stop operating the equipment immediately if the deficiency could endanger personnel or damage the equipment. Operators can repair most of the faults they identify. If they cannot repair them or if replacement parts are required, they must record the problem or the defective part number(s) on DA Form 2404 and submit the form to organizational maintenance (see DA Pamphlet 738-750).
TESTING
Test an electrical generator set before operation, periodically during operation, and after parts are repaired or replaced. These tests ensure that the generator is working properly, will not malfunction under different load conditions, and can maintain the load. Maintaining the load when the set is in operation reduces carbon buildup in the internal-combustion engine.
Operators can test a generator set with the equipment it was designed to power or with a load bank. The load-bank method is preferred because it lets the operator set up and control the power specifications. The load bank should be used to test generators that frequently operate with little or no load.
The load bank is a self-contained test unit that is mounted in a cabinet and generates no power. It operates on an external power source through the system being tested. Cables are required to connect the load bank to the generator. Some load banks are designed to operate automatically. Others are operated manually to maintain a minimum load on the generator.
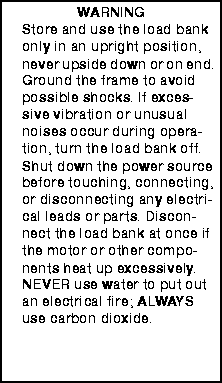
The load test is made by adding increments of resistive or reactive electrical loads to the generator. Operators can change increment combinations to simulate any electrical load within the bank's rating. For example, the load bank can test the output of generator sets rated for single-phase, two-wire, 120/240 volts; three-phase, three-wire, 240 volts; and three-phase, four-wire, 120/208 or 240/416 volts. The tests can be applied at frequencies ranging from 50 to 1,000 cycles per second.
COMMON EQUIPMENT MALFUNCTIONS
While PMCS usually keeps an electrical generator set operating as required, malfunctions do occur. Operators can correct most equipment failures or unsatisfactory performance. Table 14-1 identifies common malfunction symptoms, probable causes, and possible solutions. If the suggested solution does not correct the malfunction, report to the next higher level of maintenance.
NOTE: Any malfunctions that are beyond the scope of the operator or the crew must be reported to organizational maintenance.
Section IV. Miscellaneous Equipment Maintenance
HOUSEKEEPING
ROTATING EQUIPMENT
Electrical rotating equipment is manufactured to operate at a particular temperature, rated in degrees above ambient temperature. This term limits the maximum operating temperature of the equipment, which is derived by adding the rating to the atmospheric temperature of the operating location. For example, if a motor is rated at 30°F above ambient and the temperature of the surrounding area is 80°F, the maximum operating temperature of the motor would be 110°F. To help maintain the operating temperature below the danger point, you must keep the equipment clean and dry. Excessive amounts of dust or moisture on equipment surfaces act as an insulator and prevent the heat from dissipating into the atmosphere through the equipment housing. Poor housekeeping conditions in a wiring area or wiring installation increase the possibility of short circuits.
LIGHTING
The efficiency of a lighting installation is reduced when poor housekeeping conditions prevail. When dirt collects on reflectors, lamps, walls, or ceilings, the initial or designed foot-candlepower of the installation drops. Though original installations are usually planned with an expected drop of 10 to 15 percent in candlepower, lack of proper cleaning may drop the lighting output as much as 50 percent. For proper maintenance under normal conditions, fixtures and lamps should be cleaned at least every 3 months. Clean them more frequently when working in conditions that are dirtier than normal.
STORAGE
Store electrical materials and tools in or on shelves, racks, or cabinets. Proper storage helps minimize the number of grounds or short circuits in an electrical circuit because the possibility of accidental damage to conductor insulation is reduced. Good storage facilities can reduce the time required for wiring installation because damaged conduit, fittings, cable, and supports can create time-consuming problems on the job.
TOOLS AND EQUIPMENT
Maintain tools and equipment in good operating condition and replace them when broken. Never use improperly operating equipment. Inspect tool handles periodically for tightness and correct positioning with reference to their working surface. Insulate handles against shock hazard when possible. Keep drills, chisels, saws, and similar cutting tools and equipment sharp. Cover workbench surfaces and surrounding floor areas with rubber insulation.
FLUORESCENT LAMP REPAIRS
Tubes, starters, ballasts, and tube holders (also called sockets) are the components usually involved in the repair of fluorescent lamps. All components are easy to replace, and most repairs are a matter of substitution. Table 14-2 shows common symptoms, causes, and solutions of problems in fluorescent lamps.
TUBES
To remove a double-pin fluorescent tube, twist it a quarter turn in either direction and gently pull it out. Install a new tube by pushing it into the tube holders and twisting it a quarter turn to lock it in place. Remove a single-pin tube by pushing it against the spring-loaded tube holder until the other end can be removed. To replace a tube, put the tube pin in the spring-loaded tube holder and push until the other end can be inserted.
STARTERS
Remove the fluorescent tube to gain access to the starter. Remove the starter by twisting it a quarter turn counterclockwise and then pulling it out of its socket. Place a new starter in the socket and twist it a quarter turn clockwise.
TUBE HOLDERS
Tube holders vary considerably, so it is wise to take the one you are replacing with you when buying a new one. To remove a damaged tube holder, first disconnect the wires. If the wires are connected by terminal screws, loosen them to free the wires. If the tube holder has push-in wire connectors, release each wire by inserting a small screwdriver or a nail into the slot next to the connection. Take out the mounting screw and remove the tube holder. (On some models, you may have to take the end bracket off the fixture so you can slide off the tube holder.) Install the new tube holder by reversing the procedure.
BALLASTS
Shut off all current in the lamp, and disassemble the fixture until you get to the ballast. In table models, the ballast is located in the base of the lamp; in ceiling or wall-mounted models, the ballast is in the metal enclosure that is attached to the ceiling or wall.
The replacement ballast is already wired, and about 5 inches of each wire will be sticking out of the ballast. Remove the old ballast by cutting all the wires coming out from it about 5 inches from the ballast and removing the mounting screws. Mount the new ballast, and then connect the wires. Strip about 1/2 inch of insulation from the end of each wire, and use a medium-size wire nut for every two wires. When working with a ballast, match the color-coded wires correctly by connecting red to red, blue to blue, and so forth. Check your work against the wiring diagram printed on the ballast.
POLE-LINE HARDWARE
Salvage pole-line hardware that becomes surplus due to line removals, alterations, and maintenance work. Discard hardware that has been materially reduced in strength by corrosion or rust. The condition of bolts passing through crossarms or brackets is difficult to determine because the point of greatest corrosion is usually hidden from view. As a rule, replace a bolt when the head is rusted over.
LUBRICATION
All rotating equipment rotates in housings on a ball, a roller, or sleeve bearings. To ensure maximum operating performance, routine PMCS should include lubrication according to the lubrication orders for the equipment. The type of lubricant, the lubricating period, and the points of lubrication are often attached to the equipment as a data plate. It is equally important not to overlubricate by using too much oil or grease or by shortening the lubrication intervals, because overlubrication can also cause equipment to malfunction. When oil or grease comes in contact with insulated conductors, it hastens their deterioration. Overlubrication causes overheating and leakage, and oily or greasy equipment surfaces collect dust and abrasive materials in the air. If the surfaces are not cleaned promptly, this dirt can cause wear on the bearing ends as well as eventual breakdown of the equipment.
|
NEWSLETTER
|
| Join the GlobalSecurity.org mailing list |
|
|
|