CHAPTER 5
MARKSMANSHIP
This chapter gives guidance for instruction and development of MK 19 gunnery skills. It provides data needed to develop training programs, plans, and lessons used to build the gunners' confidence and skill in firing the MK 19. Marksmanship training ensures that each soldier keeps his combat firing skills at a level consistent with the unit's mission. During war, skills that have been maintained supply a base for MK 19 training (see Appendix B).
Section I. PREPARATORY MARKSMANSHIP TRAINING
Preparatory marksmanship training for the MK 19 covers the firing positions, the MK 19 fighting position, use of the T&E mechanism and manipulation exercises. Thorough instruction during the preparatory training and exercises helps ensure efficient use of time and ammunition during range firing. Both the diagnostic and intermediate tests are in Appendix B.
5-1. FIRING POSITIONS
Use the basic positions as follows during training and range firing of the MK 19:
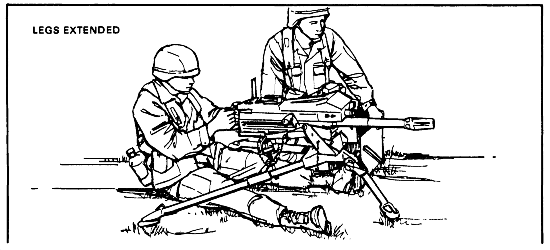
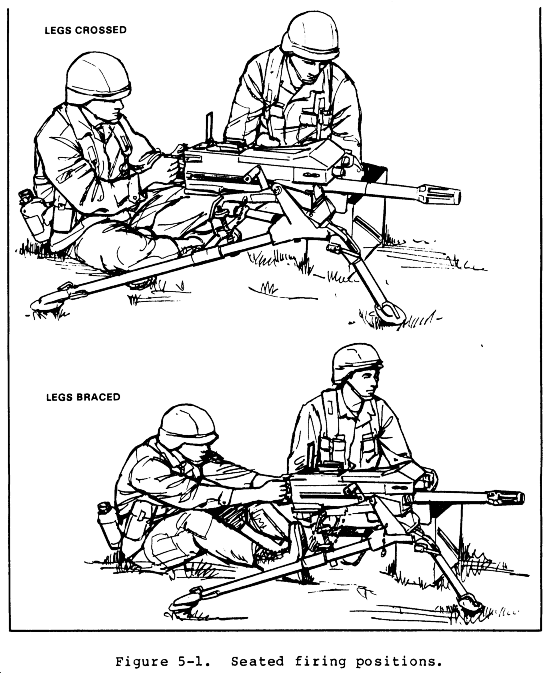
a. Sitting. When the tripod is used in the low or high position, sit directly behind the gun between the trail legs of the tripod. Extend the legs under the tripod, cross them, or brace the feet on the tripod (Figure 5-1). Place the elbows on the inside of the thighs for support when crossing the legs or bracing the feet on the tripod.
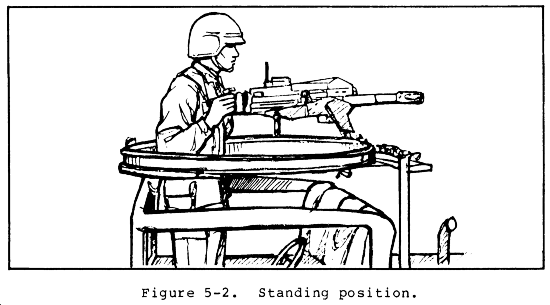
b. Standing. When the MK 19 is mounted on a vehicle, stand with both hands on the control grips and the thumbs resting on the trigger. Keep the elbows against the body, the body forward, and the chest against the hands to brace the gun (Figure 5-2).
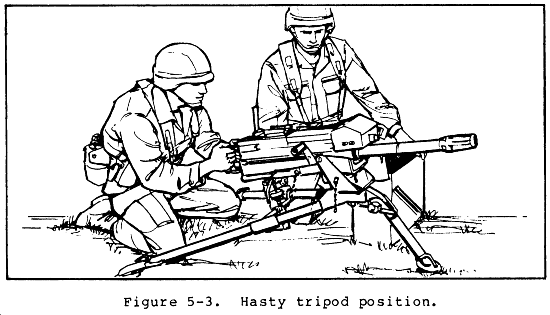
c. Kneeling. When the MK 19 is in a fighting or hasty tripod-mounted position (Figure 5-3), kneel and grasp the control grips with thumbs on the trigger.
5-2. FIGHTING POSITION
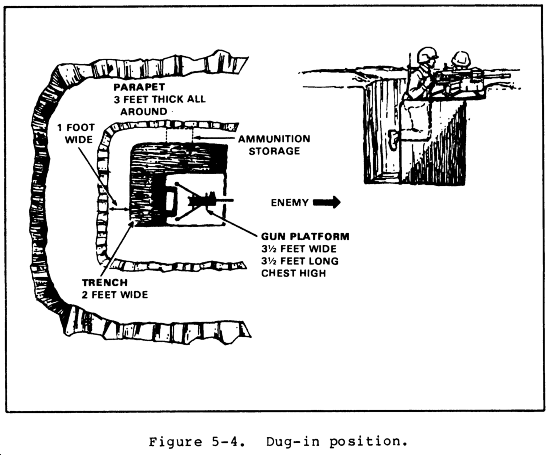
A fighting position is dug when the unit has time to prepare it or is in a defensive position. Make the fighting position as follows (Figure 5-4):
a. Position the MK 19 so it is oriented on the center of the assigned sector of fire. Mark the position of the tripod legs and trace the outline of the firing platform, which will be dug about 3 inches deep.
b. Dig the position in the shape of an L around the firing platform. The position should be chest-deep and wide enough to allow the MK 19 crew to load, operate, and place effective fire on assigned sector of fire. The position can be made so that the gunner can fire from the kneeling position by digging the desired depth directly behind the gun.
c. Use dirt from the hole to build flank parapets 18 inches thick. Dig the ammunition storage area into the left wall of the "L" and close to the ground.
d. Make sure the wall behind the firing platform is sloped to allow for entrance to and exit from the fighting position.
e. Build overhead cover:
(1) Put flank support logs, 4 to 6 inches in diameter, on top of each other along the entire length of the flank parapets.
(2) Put logs, 4 to 6 inches in diameter, side by side across the support logs as the base for the overhead cover.
(3) Put a waterproof layer over the base logs.
(4) Put 18 inches of dirt on top of the waterproofing material.
(5) Mold and camouflage the cover to blend with the terrain.
f. Camouflage the position with natural materials such as rocks, logs, live bushes, and grass.
5-3. TRAVERSING BAR AND T&E MECHANISM
Use the T&E mechanism to engage preselected target areas at night or during degraded conditions. Record direction and elevation readings from the traversing bar and T&E mechanism. Record all readings in mils.
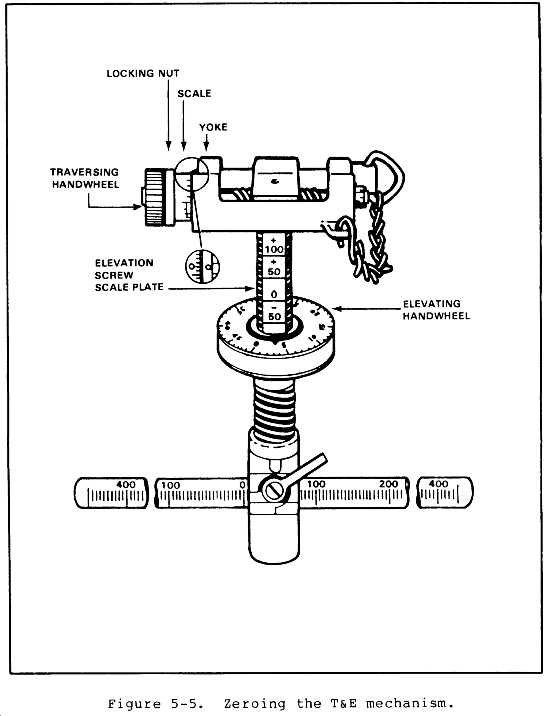
a. Zero the T&E. Before the T&E can be used effectively to engage targets, it must be zeroed (Figure 5-5). Zeroing is a simple process if the following method is used:
(1) To zero the traversing handwheel, hold the T&E so the traversing handwheel is on your left as you look at it. Turn the traversing handwheel toward you until it stops. Loosen the locking nut slightly. Align the 0 on the scale with the 0 on the elevating screw yoke. Hold the scale with the 0's aligned, and tighten the locking nut. Make sure the 0's stay aligned. Turn the traversing handwheel two complete revolutions away from you. If doing this at night, count 50 "clicks" away from you.
(2) To zero the elevating handwheel to the upper elevating screw, align the two 0's. Rotate the elevating handwheel up or down until a 0 with a line below it is visible on the upper elevating screw. Position the elevating handwheel so the indicator is pointing at the 0 on the handwheel.
(3) Zero the elevating mechanism sleeve to the lower elevating screw. Rotate the elevating mechanism sleeve all the way up; rotate it down until it stops; note the number of complete turns. Rotate the elevating mechanism sleeve up half that many turns. Position the slide lock lever to face you. Attach the T&E to the tripod and gun.
b. Lay the gun for direction. When a sector of fire has been assigned, pick up the rear legs of the tripod and shift the tripod until the muzzle of the weapon points to the center of the sector of fire. Once the MK 19 is laid for direction, firmly stamp in the tripod shoes and place sandbags on the legs. This aids stability and may prevent accidental movement.
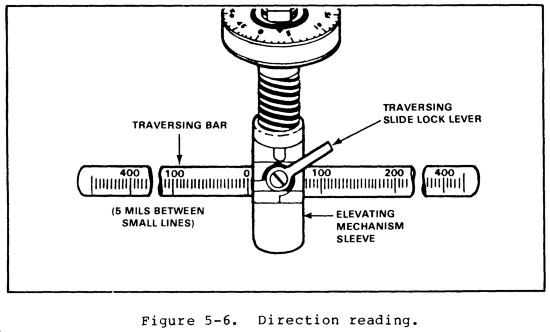
c. Obtain and record direction readings to all targets within the sector of fire (Figure 5-6). Loosen the traversing slide lock lever and move the slide along the traversing bar until the MK 19 is laid on the center of a point target or on either flank of a linear target. Lock the traversing bar and read the direction from the scale on the traversing bar. If the left edge of the traversing slide does not fall exactly on a 5-mil tickmark, move the left edge of the traversing bar slide back to the next smaller mil reading. Use the traversing handwheel to complete the initial lay. Obtain a reading to the target by the direction of the MK 19 barrel. If the barrel is moved to the right, record a right reading. Read the number on the traversing bar from the left side of the traversing slide lock. If the barrel is moved to the left and the traversing slide lock is on the right side of the zero, record a left reading. After taking a direction reading for a target, measure the width of the target in mils using the traversing handwheel to move across the target. Reposition the traversing mechanism before moving to another target.
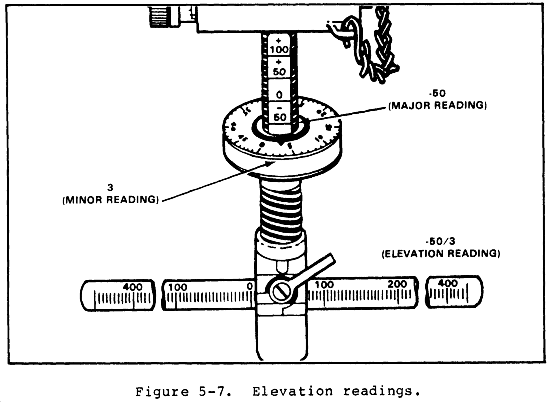
d. Obtain elevation readings. Ensure the MK 19 is laid on the center base of the target. Read the elevation from two scale: the first, or major, part from the elevating screw plate scale; the second, or minor, part from the elevating handwheel. Separate the two part from the elevation reading with a slash "/", for example, -50/3. An elevation reading may not be valid on any other T&E than the one from which it was read. If the number of threads is increased or decreased after the data is recorded, accurate fire cannot be placed on the target. For example, if a weapon is freed to engage a secondary sector, and the base of the T&E mechanism is rotated, the data is wrong unless the same number of thread are exposed before and after the move.
(1) Major reading. The elevating scale plate is graduated in 50-mil increments from -250 to +100. Except for the zero, each number has a plus or minus sign above it. All numbers, including zero, have an index line below them. To get the major elevation reading, hold the T&E so that your eyes are even with the top of the elevating handwheel. The major reading (for example, -50) is the first number, with an index line, that is visible above the handwheel (Figure 5-7).
(2) Minor reading. The elevating handwheel scale is marked in fifty increments of 1 mil each (Figure 5-7). The minor reading, which has no plus or minus sign, is the number that lines up with the pointer. The minor reading represents the number of mils the gun is laid below the major reading, for example, 3.
(3) Verify a direction elevation reading by firing and adjusting on the target.
(4) Use the dry-fire method to get data to targets without live firing and adjusting. Set the rear sight on the range to the target, lay the gun on the center base of the target, and take direction and elevation readings. Use the dry-fire method only when firing is not feasible.
NOTE: Correct range setting is critical because any discrepancy will cause and error in the elevation when the target is engaged.
5-4. EXERCISES
The exercises include sighting and aiming, sight setting and laying, manipulating, determining the range, and preparing a range card.
a. Sighting and Aiming Exercises. There are two sighting and aiming exercises. The first calls for the use of the sighting bar:
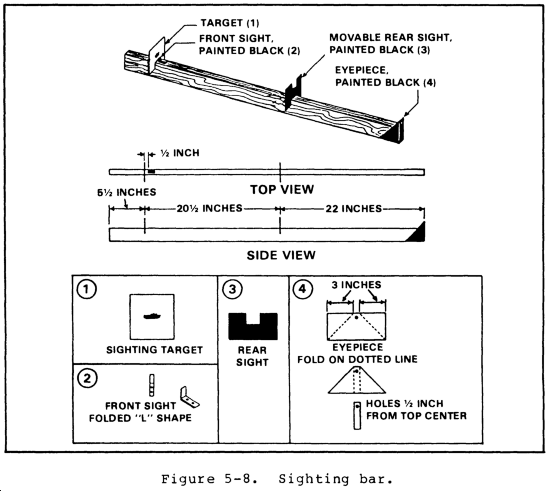
(1) This exercise teaches how to get the correct sight picture, and also teaches alignment methods. Sight alignment means lining up the front and rear sights, with the top center of the front sight blade appearing in the center of the rear sight. Sight picture means lining up the front sight, the front sight blade just target, with the tip of the front sight, and the touching the bottom center of the target. Gunners must show skill in aligning sights correctly and in getting the correct sight picture, using a sighting bar Figure 5-8). Gunners must correctly show the point of aim, after sight alignment, 8 out of 10 times.
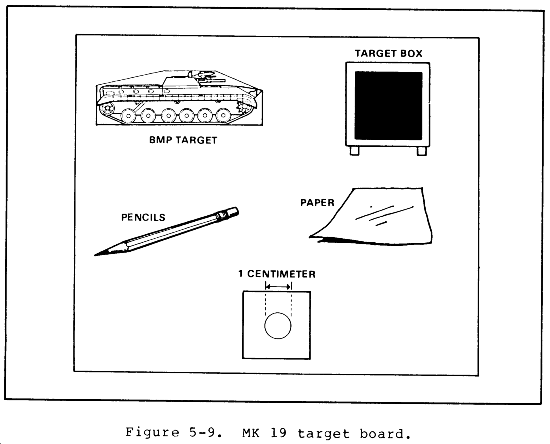
(2) The second sighting and aiming exercise, used with the MK 19 and target board, gives the gunner a chance to apply lessons learned during the first exercise. Place the target board (Figure 5-9) 10 meters from the muzzle of the MK 19. Use the T&E mechanism to get the correct sight picture on each target that is called out. When the gunner feels he can sight and aim, the coach checks and critiques the gunner's ability to change from the start point on the target board to any new target called by the coach.
NOTE: This exercise will continue until the gunner is skilled in sighting and aiming.
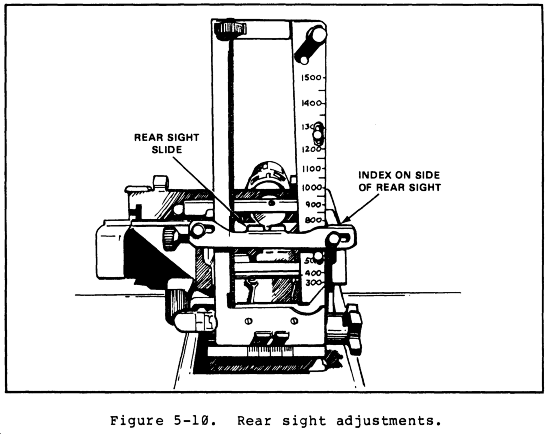
b. Sight Setting and Laying Exercises. The first show each exercise before beginning instruction. exercise teaches the soldier how to set the rear sight quickly and correctly (Figure 5-10). The second builds accuracy and speed in laying the gun on an aiming point, and allows extra practice in sight setting. Explain and show each exercise before beginning instruction.
(1) Sight setting exercise. Explain that, by turning the elevating screw knob, the soldier can make minor adjustments in elevation. All major adjustments will be made with the slide release. Have one soldier act as gunner and another act as coach. Announce the range, for example, EIGHT HUNDRED; have the soldier in the gunner's position repeat the range, set the sight at the announced range, assume the correct gunner's position and announce UP. The soldier acting as coach checks the setting of the slide and points out any errors. The soldiers work in pairs, change roles, and go through the exercise until each one can correctly and rapidly set the sight.
(2) Sight setting and laying exercise. The MK 19 target board is used in this exercise. Explain that the exercise starts with the sight leaf down and the sight slide at 500 meters. Ranges of less than 400 meters or greater than 1,500 meters will not be announced. Have one soldier acts as gunner and another as coach at the gun. Announce an aiming point and range; for example, TARGET NUMBER ONE, ONE TWO HUNDRED. Pause after each element to allow the gunner time to repeat it. After the gunner repeats each element, have the gunner: set the sights; manipulate the gun by turning the T&E handwheels until the sights are aligned on the chosen aiming point; assume the correct gunner's position; and report UP. The soldier acting as coach checks the sight setting and lay of the gun. The soldiers work in pairs, changing roles until each is skilled in doing the exercise.
c. Manipulation Exercise. Manuipulation means shifting the direction of the gun from one point to another. There are two manipulation exercises:
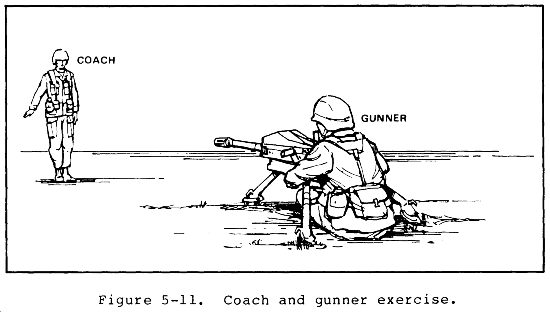
(1) The first exercise gives the gunner practice in manipulation. The coach stands ten paces in front the gun and uses hand signals to show the direction in which the gunner is to move the muzzle (Figure 5-11). The gunner works the handwheel to manipulate the gun. The coach observes and makes needed corrections. When the gunner reacts quickly and can manipulate the gun as he has been shown, his instruction may continue.
NOTE: This exercise continues until the gunner is skilled in sighting and aiming.
(2) Once the soldier knows the basics of sighting and aiming, and can assume a good firing position give him the second manipulation exercise. Show how to manipulate the weapon to get a correct initial lay and how to skillfully shift the direction of the weapon to successive points. Ensure the instructions are known and followed:
(a) Place the MK 19 target board 10 meters from the muzzle of the gun.
(b) Make large shifts in direction by releasing the traversing slide lock lever and moving the slide to the right or left. Make small changes in direction by turning the traversing handwheel with the left hand. One click on either T&E handwheel moves the strike 1 mil (1 centimeter on the target).
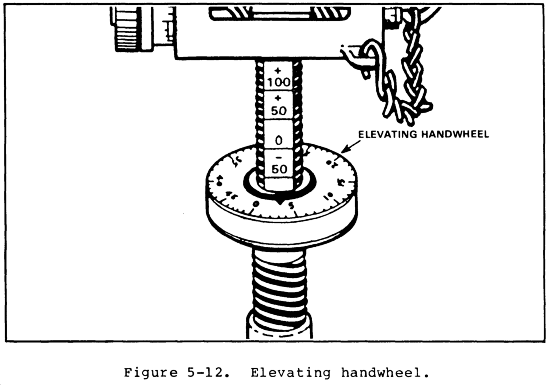
(c) Manipulate for elevation by rotating the elevating handwheel with the left hand (Figure 5-12).
d. Range Determination Exercise. Range determination means finding the distance between the gunner's position and his target. The gunner's ability to engage a target depends on his ability to correctly find the range to the target. Under combat conditions, ranges may not be known in advance; the effectiveness of fire depends largely on the accuracy of the range used. There are several methods for finding range. Some of these are: estimating visually, firing the weapon, measuring range from a map or aerial photograph, and pacing the distance. Binoculars or laser range finders may be used--see Chapter 6, Section II, Range Determination.
e. Range Card Exercise. A range card is a record of the firing data needed to engage predetermined targets within a sector(s) of fire at night or during degraded conditions. The range card may also be used to aid in target engagement during good visibility. It aids the leader in preparing his defense plan. Predetermined targets in the secondary sector are engaged by use of field expedients. A range card has two parts: a sketch section and a data section. Although the sketch is not drawn to scale, the data referring to the targets must be correct. DA Form 5517-R is standard range card to be used Figure 5-13).
(1) Range cards are prepared in duplicate. One copy stays at the gun position, and the other is sent to platoon headquarters. Complete range cards are prepared for primary position, and partially complete range cards are prepared for alternate and supplementary positions. Range cards are prepared on arrival in a position, regardless of the planned length of stay. The gunner, aided by the assistant gunner, prepares the range card(s). Range cards are revised often during occupation of a position.
(2) Once the leader has decided where the firing position will be, the gunner prepares the range card(s).
(3) The range card is prepared as follows:
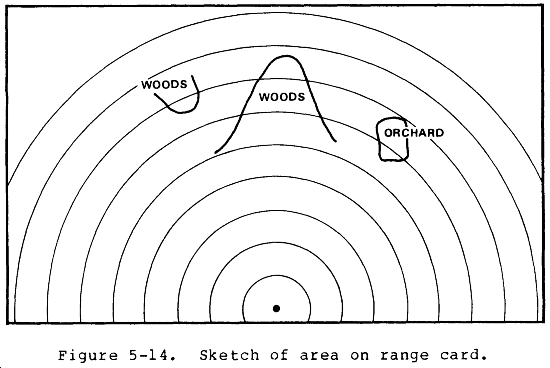
(a) Draw a sector sketch, covering the entire sector. Make the sketch as large as possible, not to exceed the largest circle. For a large area covered by trees or woods, draw only the outline and label the area "woods" or "orchard" (Figure 5-14).
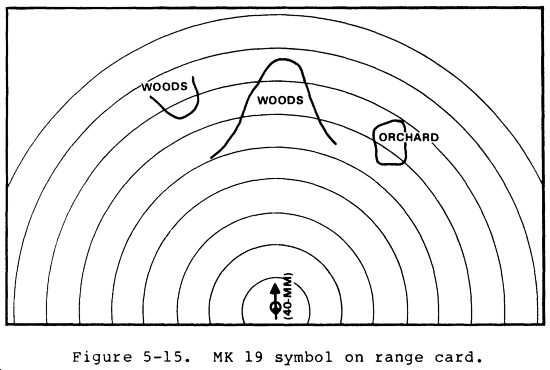
(b) In the lower center of the sketch section, show the firing position by drawing the symbol for the weapon (Figure 5-15).
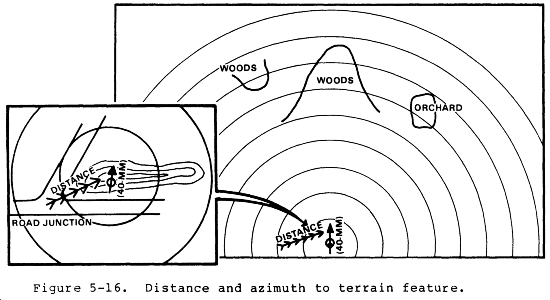
(c) Show the location of the firing position by drawing a sketch of a nearby recognizable terrain feature. Label it and draw an arrow to the weapon symbol. Add the distance and azimuth from the terrain feature to the firing position (Figure 5-16).
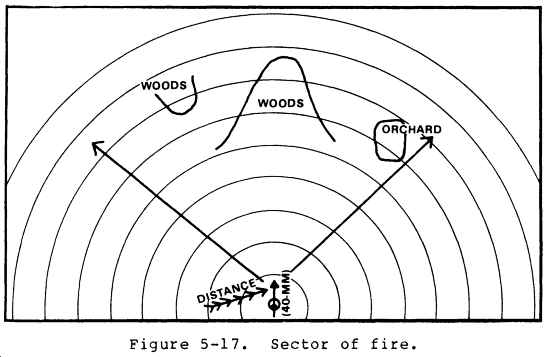
(d) Draw lines from the weapon symbol to reflect the left and right limits (Figure 5-17).
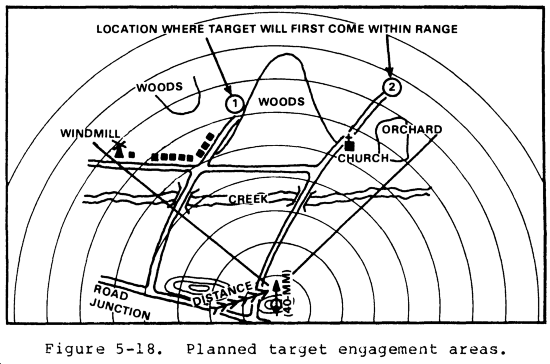
(e) Number the planned target engagement locations from left to right, and write them on the range card (Figure 5-18).
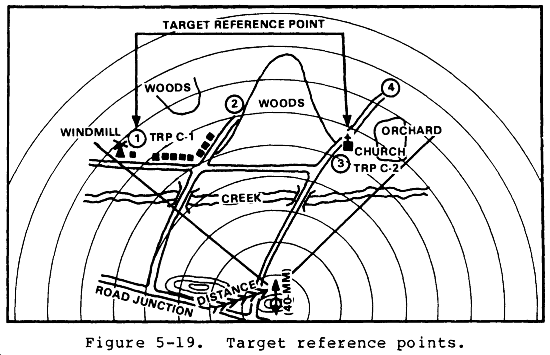
(f) Number the target reference points (TRPs) from left to right, and write them on the range card (Figure 5-19).
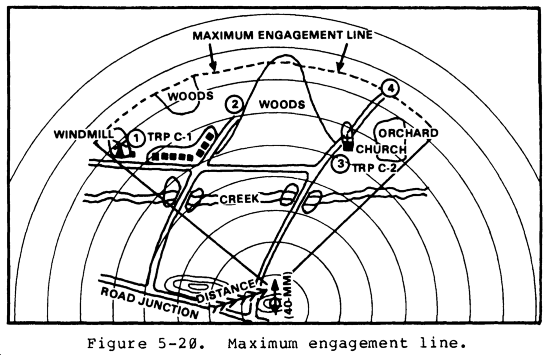
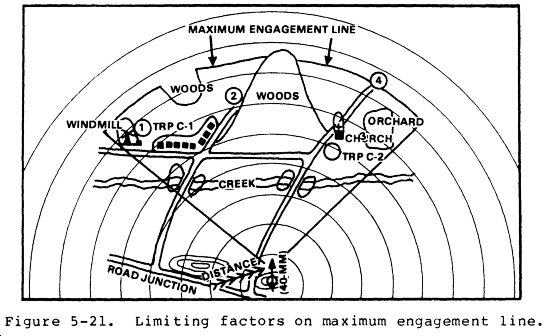
(g) If no limiting factors exist, the maximum engagement line curves and joins the left and right sector-of-fire boundaries at the maximum engagement range (Figure 5-20). If limiting factors exist, draw the maximum engagement line in front of the limiting terrain features (Figure 5-21).
(h) Fill in the marginal information at the top of the card (Figure 5-22):
- Unit description--never show unit higher than company level.
- Magnetic north--orient the range card with the terrain and find the direction of magnetic north with a compass. Draw a magnetic north arrow using the straight edge of the compass.
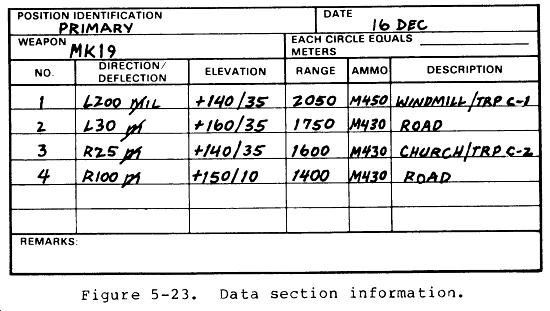
(i) Fill in the data section (Figure 5-23):
- Position identification--write primary, alternate, or secondary.
- Weapon--MK 19, grenade machine gun.
- Date--write the day and month.
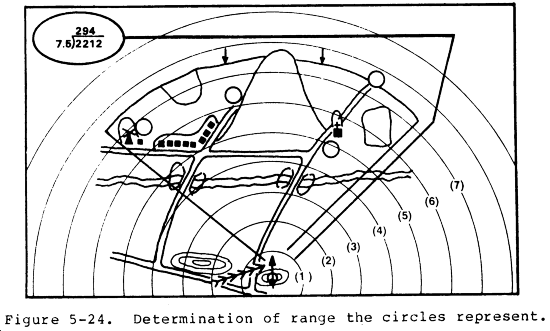
- Each circle equals 294 meters--write in the distance in meters between the circles. To find the distance, count the intervals from the weapon to the maximum engagement line. Divide the number of intervals into the range. This gives the distance between circles (Figure 5-24). For example:
|
2,212 meters = 294 meters between circles |
|
7.5 intervals |
- Number--starting with number 1, write the numbers as listed for TRPs and target engagement locations.
- Direction/deflection--write the mils from the traversing bar and handwheel.
- Elevation--write the elevation from the elevating screw plate scale and the elevating handwheel.
- Range--distance in meters from the weapon to the TRP or target engagement area.
- Ammunition--write the type of round issued for the mission.
- Description--list the name of the object, for example: road, windmill, or church. If the item is a TRP, list the TRP number also.
Range firing gives hands-on MK 19 firing experience to the soldier who has completed the Intermediate Gunnery Test. Use the procedures in this section to set up and conduct range firing. Range firing includes zeroing procedures, observation and adjustment for fire, instructional firing, and qualification firing.
5-5. DESCRIPTION
There are three types of ranges which may be used for MK 19 live fire training. Regardless of which range is used, the MK 19 may be fired from either a tripod or a vehicle.
a. 40-mm Grenade Machine Gun Range. This range is designed for the conduct of individual firing exercises and qualifications. Details about this range may be found in FM 25-7.
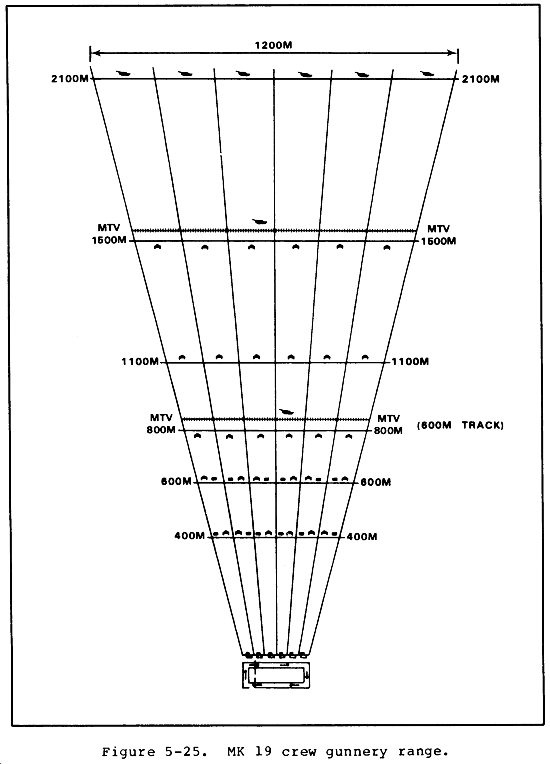
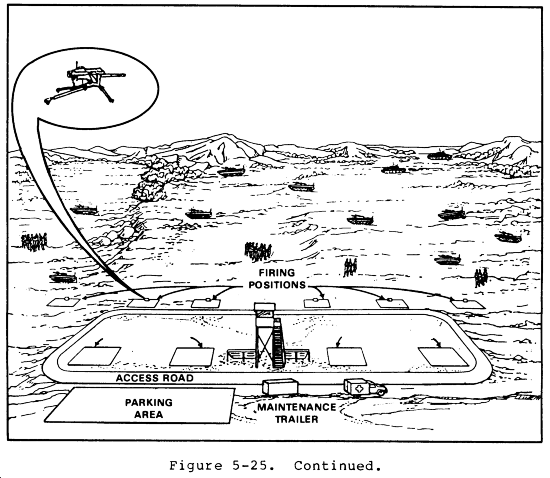
b. MK 19 Crew Gunnery Range. When an MPRC is not available, a MK 19 range may be used. The MK 19 range (Figure 5-25) is designed only for 40-mm machine gun firing--individual, squad, or platoon exercises and qualifications may be conducted on this range.
(1) The MK 19 target engagement area should have uniformly level or upward-sloping terrain, with targets such as BMPs, thin-skinned vehicles, or dismounted troops. The firing line has six positions, which are 50 meters apart. The control tower is 20 meters behind the firing line so tower control personnel can observe the entire firing line. The ammunition point is at least 75 meters behind the firing line, and 50 meters from all weapons. The concurrent training area is at least 100 meters from the firing line in an area that will not interfere with range firing.
(2) The two types of targets on the range will be area and point targets. Point targets include troop targets with four or less silhouettes or BMP targets at less than 1,100 meters. Area targets include troop targets with more than four silhouettes or BMPs at greater than 1,100 meters.
c. MPRC. The multipurpose range complex (MPRC) is the range suggested for MK 19 live fire training. It is used to train mechanized, motorized, combat support, and combat service support units. The design and traits of this type of range are described in FM 25-7. Only the M385 or the M918 practice round is used on this range.
5-6. OPERATION
Use range operation procedures any time live fire is conducted on the range. These procedures are the same for all range firing exercises.
a. Send gun crews to the bleachers. Brief them on range setup, fire commands, and safety procedures. Explain exercise needs as defined by the unit commander, or as they are to be done per the firing tables (Appendix C).
b. Divide the crews into groups and assign each group a firing point and an AI (assistant instructor). Ensure they are directed to their firing points and are shown their assigned sectors of fire. Have the AIs ensure that all crews have the equipment needed to perform the task.
c. Conduct the exercise. For example: GUNNER, WHEN I SAY BEGIN, PLACE THE MK 19 INTO OPERATION ON THE TRIPOD (ORGANIC CARRIER) WITHIN ____ MINUTES. ARE THERE ANY QUESTIONS? (PAUSE) BEGIN. At the end of the given time period, direct: STOP. AIs, CRITIQUE YOUR CREWS AND GIVE ME YOUR "UP" SIGNAL WHEN YOU HAVE FINISHED.
5-7. COACHES
The instructor may arrange for a coach to be present at each gun during following prepartory training, exercises, and instructional firing. Successful marksmanship training depends greatly on the coaches. Well-trained and well-rehearsed gunners or crew members may be assigned as coaches. The coaches--
a. Require the gunner to inspect his gun and equipment.
b. Help the gunner place the gun on target.
c. Require the gunner to explain the exercise which he is about to perform.
d. Observe the gunner's position, grip, and manipulation during simulated firing.
5-8. FIRING
Firing the MK 19 is not hard. However, to be effective, the gunner must be able to skillfully manipulate the trigger and T&E. The following steps are simple, but the gunner must remember: to estimate the distance to the target, to set the sights for the distance, to manipulate the T& E, to press the trigger, and to fire a single round. (Since the MK 19 is a fully automatic weapon, this can only be done by "popping" the trigger once.) He must spot the impact of the first round and adjust to the target before firing a second round. If the impact is in the target area, he should begin firing three- to five-round bursts. This whole process can be done in a matter of seconds, the longest part being the flight time of the round. To fire the weapon:
a. Place the safety on FIRE.
b. Endure the charger handles are in the forward and upright position.
c. Place the hands on the control grips, and the thumb(s) on the trigger.
d. Press the trigger to fire.
WARNING THE FIRST BURST IS THE HARDEST TO CONTROL. ENSURE THAT THE GUN'S RECOIL DOES NOT CAUSE THE BARREL OF THE WEAPON TO DROP. KEEP IT ELEVATED. |
5-9. ZEROING PROCEDURES
Zeroing is important in gunnery of the MK 19 and is crucial for hitting targets at ranges of 600 meters or more. The following is the correct way to zero the MK 19 to the gunner:
a. Loosen the range plate screw. Move the leaf sight plate to the midpoint between the two studs. Tighten the range plate screw. Move the rear sight slide to the meter mark that represents the distance to the target. For example, move to the 400-meter mark to zero on a target known to be 400 meters away. Set the windage knob at the zero index line.
b. Align the sights on the base of the target using the T&E mechanism.
c. Fire a single round and spot the impact of the round. If it is on target, fire another short burst to confirm the zero. If the round is not on target, go on to the next step.
d. To adjust for a round that is not on target, do the following:
(1) If the round is short or long, adjust the elevation knob. Estimate how short or long the round is. If the round is short, use this estimate to adjust the elevation knob clockwise, which moves the sights up onto the target. To adjust for a long round, turn the elevation knob counterclockwise to bring the sights down to the target. For example, if the rounds impact 10 mils short, adjust the elevation knob 10 mils up by turning it clockwise. Realign the sights and adjust the gun back on target using the T&E before the next round is fired.
NOTES: 1. If the adjustment was correct, the second round should be on target. If so, fire the rest of the rounds to confirm the zero. If not, repeat the previous step.2. If the impacts are not observed, bold adjustments may be needed.
(2) If the round is to the right or left, adjust the windage knob. Estimate how far to the right or left the sight needs to move to bring the rounds on target. To adjust to the right, turn the windage knob clockwise; to adjust to the left, turn it counterclockwise. For example, if the rounds impact 10 mils to the right, adjust the sight 10 mils to the left by turning the windage knob counterclockwise. Realign and adjust the sights back on target using the T&E before the next round is fired.
(3) Once the zero is completed, align the range plate scale at the exact range of the zero, and tighten it.
e. Point out errors and explain their effect.
5-10. OBSERVATION AND ADJUSTMENT FOR FIRE
Observation and adjustment gives the soldier a chance to practice adjustment of fire by observing trajectory and impact or by re-laying often on the target using the sights. Live fire training is held on the firing range after the methods are explained in the classroom.
a. When firing on targets, adjust by moving the burst into the target. Based on the strike of the rounds, adjust the number of clicks for elevation and direction needed to move the center of impact onto the target. This does not call for the use of sights. For example, fire at a target 500 meters away; the rounds impact 20 meters short and 50 meters right. Use the T&E handwheels, moving the muzzle left and up the proper number of clicks, to manipulate the gun onto the target.
b. Another procedure is the adjusted aiming point method. Use the sights and select an aiming point calculated to place the second burst on target. For example, fire at a 500-meter target; the rounds impact 20 meters short and 10 meters right. Rapidly select another aiming point about 20 meters beyond and 10 meters to the left of the target, lay on that aiming point, and fire.
5-11. LIVE FIRE
The live fire gunnery exercise train and qualify MK 19 gunners. There are seven firing tables, four for practice and three for qualification. See Appendix C for the firing tables. Sample scorecards may be seen in Figure 5-26.
|
NEWSLETTER
|
| Join the GlobalSecurity.org mailing list |
|
|
|


