Like indirect fires, direct fires must be controlled. The commander must determine the following before executing a hasty attack:
- Who will initiate direct fires into the objective area and from where will they be initiated?
- What is the aim point for the support element? When do they shift fires and where do they shift fires to?
- What is the limit of advance for the assault force?
To determine the answers to these questions the commander must look at the enemy he is facing, the terrain he is operating in, and the forces he has to bring to bear against the enemy.
Once the troop has initiated its attack and enemy resistance in the objective area has ceased, the troop may begin consolidating in preparation of continuing its mission. Have one or both scout platoons dismount scouts to sweep the area quickly for prisoners and other items of tactical value. Immediately establish a hasty defense with tank/AT platoons oriented on high-speed approaches into the troop position, and with scout platoons oriented on expected high-speed enemy approaches at OPs out from the defensive position. Position the mortar section and have the guns lay on the most likely enemy avenue of approach. Redistribute ammunition and balance crews as time allows. Replace key leaders quickly. If time is available and enemy counterattack unlikely, begin resupply operations.
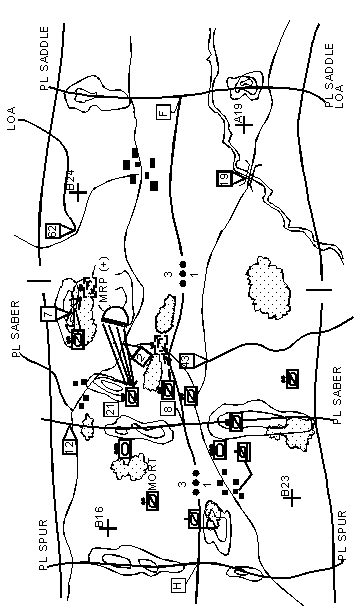
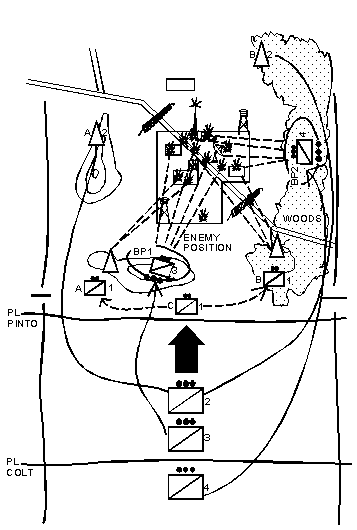
A troop is conducting a zone reconnaissance moving toward its limit of advance (LOA). As the 3d platoon crosses the ridge (PL SABER) in its zone, Charlie scout section is hit by enemy tank cannon and heavy machine-gun fire from concealed positions near checkpoint 2. The platoon immediately takes cover and reports contact to the troop commander. The troop commander acknowledges and immediately moves to link up with the platoon leader. The platoon sergeant calls for indirect fire to suppress the enemy force. Under this protection, the platoon leader orders dismounted reconnaissance through the woods on the enemy's right to find his flank. He then sends his Bravo scout section forward on the enemy's left to find his other flank and to determine if the enemy is mutually supported by other enemy forces near checkpoint 2. The platoon leader and two scouts dismount, move in closer, and determine the enemy force consists of a reinforced MRP, two tanks, and three BMPs, in a hasty defensive position. Scouts report what appear to be minefields forward and to the flanks of the enemy position. The Alpha section identifies the right flank of the enemy position and discovers the flank is not protected by obstacles and not covered by direct-fire weapons (see Figure 5-6).
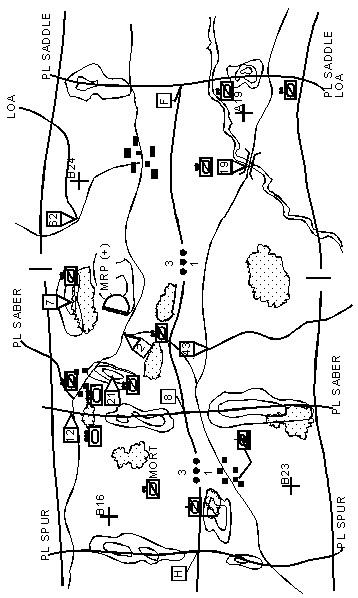
En route to the 3d platoon's zone, the troop commander tells the 1st platoon to continue reconnaissance forward to the LOA and find out if other enemy forces are providing mutual support to the enemy platoon in the 3d platoon's zone. He also tells the platoon leader to establish a screen along the LOA in his platoon zone. He then tells the 4th platoon to join the 2d platoon near checkpoint 12, using the ridgeline to cover its move, and prepare to conduct a hasty attack. Using TIRS, he outlines a route that runs from checkpoint 12 around the western edge of the village to checkpoint 7, then to a position from which it can engage the enemy on his most vulnerable flank (see Figure 5-7).
 Figure 5-6. Develop the situation.
 Figure 5-7. Set for hasty attack.
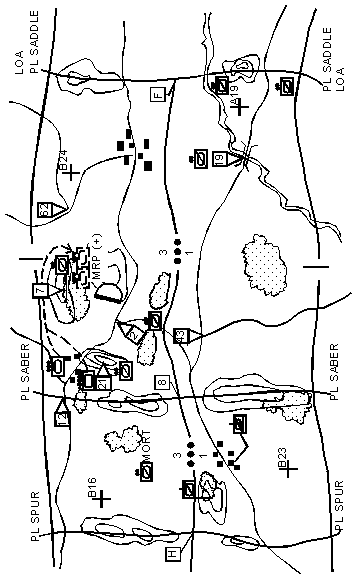
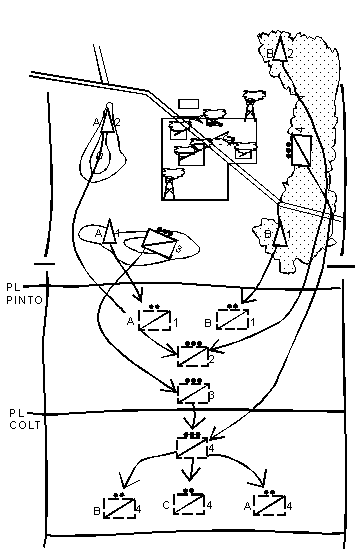
After a first-hand look at the situation in the 3d platoon's zone, the troop commander decides to attack. He tells the FSO to continue suppressing the enemy. Next, he tells the 3d platoon leader to establish a base of fire from covered positions near checkpoint 21. The 3d platoon is tasked to destroy or suppress all AT weapons observed. While heavy suppressive fires are raining on the enemy force, the commander joins the tank platoons at checkpoint 12 and leads them into the attack. After passing checkpoint 7, the tank platoons begin maneuvering. The troop commander tells the FSO to shift his fires on routes of withdrawal behind the enemy position. The tank platoons go around the woodline, deploy abreast, and attack by fire (see Figure 5-8).
Two tanks in the 4th platoon are hit and damaged; one soldier is killed and three are injured. The tank platoons consolidate in covered and concealed positions near checkpoint 7. Scouts from the 3d platoon move in quickly, capture several wounded prisoners, and search the vehicles and dead for anything of intelligence value. The 3d platoon leader orders one scout squad to stay and secure the prisoners, and then takes the rest of the platoon forward to finish zone reconnaissance up to the LOA.
The 1SG leads the medics and M88 to the 4th platoon's casualties and picks up the prisoners the 3d platoon secured. The XO coordinates with the S4 for immediate resupply, then collects and transmits final reconnaissance reports to the squadron.
A deliberate attack is an offensive mission conducted to defeat enemy forces in dug-in and prepared defensive positions or strongpoints. It is preceded by intensive intelligence gathering using sources such as patrols, aerial photographs, reconnaissance by fire, radio intercepts, radar surveillance, satellite reconnaissance, and prisoner interrogation. Large volumes of indirect preparatory fires are normally used. Detailed tactical planning and rehearsal of the attack are crucial to success.
 Figure 5-8. Tank platoons move into position for the hasty attack.
The cavalry troop alone cannot conduct a deliberate attack against prepared defensive positions. It usually participates with its parent squadron or other combined arms force as one of the three major elements in a breaching and assault operation. The troop can serve as the overwatch/support element,the breaching element(if reinforced with engineers), or the assault element. Doctrine for attacking a complex obstacle or a strongpoint is found in FM 71-1 and FM 17-95-10.
A raid is an attack into enemy territory for a specific purpose, with no intent to gain or hold terrain. The troop returns to friendly lines after the attack.
The cavalry troop normally conducts a raid against clear, well-defined targets whose destruction will have an adverse effect on an enemy force. Good targets for a troop raid are enemy artillery, rear service units, or command and control headquarters.
During a raid, the following critical tasks must be accomplished:
- Coordinate and establish a restricted fire area around the raid area.
- Reconnoiter the troop's direction of attack from the point of departure to the objective.
- Establish visual contact with the enemy. Reconnoiter and determine the best place to initiate the attack.
- Establish a base of fire element to suppress the enemy force.
- Establish a maneuver element (usually one or both tank platoons) to move to a position of advantage over the enemy and attack them by fire.
- Suppress the enemy force with long-range direct fires while the maneuver element moves up to begin its attack.
- Establish surveillance on enemy avenues of approach to the objective, where follow-on enemy maneuver units would most likely appear.
- Attack the enemy by fire or by fire and movement to defeat them. Finish quickly.
- Establish security to protect the withdrawal of the remainder of the troop.
- Return rapidly to friendly lines and enter at the designated passage point.
A raid achieves its purpose through speed, violent execution, and surprise. The troop's maneuver should produce that effect. There will probably not be a chance to reconnoiter before the attack; speed and surprise generate the security needed. Consequently, the troop might not always take the mortar section, combat trains, or command post. Vehicles disabled on a raid may be left behind in the interests of speed and security for the entire troop. When the troop receives a FRAGO to conduct a raid, the commander should receive the following graphic control measures from the S3 or squadron commander: a point of departure along the line of departure or line of contact, a direction of attack, an objective, a route of withdrawal, and a passage point to enter friendly lines. Analyze the terrain and the enemy situation, then issue the troop FRAGO.
The FSO should coordinate with the squadron FSO to establish a restricted fire area around the raid area. The 1SG should coordinate for immediate resupply of Class III and Class V when the troop returns. Have one scout platoon take the lead and reconnoiter the troop direction of attack from the point of departure on the line of departure to the objective. The lead platoon should establish visual contact with the raid objective to confirm the troop's scheme of maneuver and establish surveillance of the objective. The other scout platoon may act as the base-of-fire element, and follow about 1 kilometer behind the lead platoon. Have the lead platoon guide it into an overwatch position to deliver long-range suppressive fires on the enemy. Consolidate the tank platoons, move forward to join them, then follow about 1 kilometer behind the second scout platoon.
Once the base-of-fire element is set, have the platoon suppress the enemy with direct and indirect fires. Guide the maneuver element into a position to attack by fire. Finish quickly and move out.
Tell the scout platoon performing reconnaissance and surveillance tasks to screen and protect the withdrawal of the remainder of the troop back to friendly lines. Have the other scout platoon lead the way back on the designated route of withdrawal, and have the tank platoons follow. Stay back and supervise the conduct of the rear screen until all troop elements have entered friendly lines. Consolidate and resupply the troop with fuel and ammunition as soon as possible. Get ready to fight again.
The squadron is defending in sector astride a likely Threat regimental zone of attack. The three armored cavalry troops are deployed abreast with the tank company in reserve. The squadron frontage is about 10 kilometers wide. Threat forces attack from the march. Squadron elements in the northern half of the sector are softened with long-range preparatory fires delivered by rocket and artillery forces. As artillery fires increase in intensity, the fire support element and the advance guard battalion of the regiment deploy from the march into prebattle formation and then attack. The advance guard battalion is quickly defeated by the concentrated fires of the northern cavalry troop and a surprise counterattack by the tank company. The squadron rapidly repositions to meet the assault of the regimental main body. Within one hour, the regimental main body approaches the line of contact with two MRBs abreast. Their axis of advance indicates most of their combat power will be concentrated in the northern half of the squadron's sector. Artillery suppressive fires increase as the Threat battalions deploy into attack formation. Aeroscouts report two 122-mm artillery battalions of the regimental artillery group moving into firing positions about 4 kilometers behind the attacking combat maneuver units. In this situation, with good defensible terrain, the squadron commander decides to concentrate the combat power of the troops, the tank company, and his available artillery in the north to defeat the advancing maneuver forces. He orders the southern cavalry troop to conduct a raid behind enemy lines to destroy the regimental artillery group simultaneously.
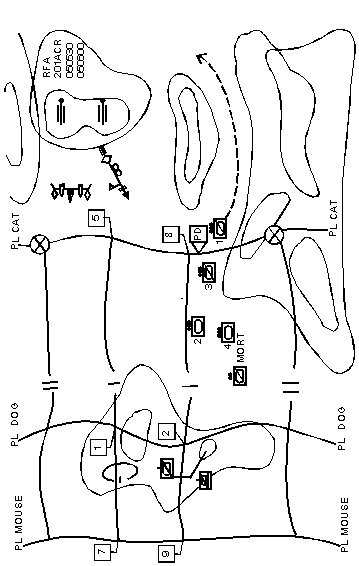
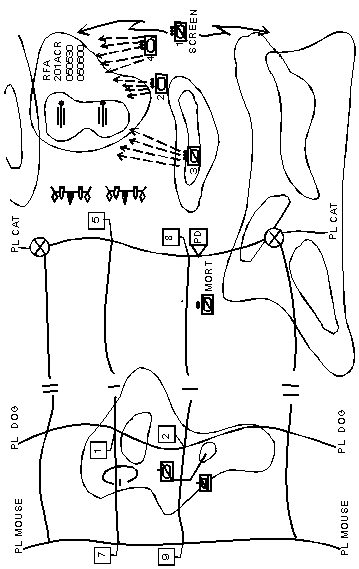
The troop commander quickly analyzes the terrain, and then issues a FRAGO to the troop. He tells the 1st platoon, which is currently on the screen line, to take the lead and reconnoiter the troop's direction of attack from the point of departure on the LD to the objective area. The platoon is tasked to establish visual contact with the Threat artillery units and to locate the best covered and concealed approach into their flanks or rear. The troop commander tells the 3d platoon to follow about 1 kilometer behind the 1st platoon and establish a base of fire to suppress and fix the artillery units. He orders the 2d and 4th platoons to consolidate rapidly near the point of departure. He tells the mortar section to remain in the troop sector. Priority of fires goes to the 1st platoon. As the 1st platoon approaches the point of departure, the troop FSO coordinates with the squadron FSO to establish a restricted fire area around the raid area. Once it is established and confirmed by the FSO, the troop commander orders the 1st platoon forward (see Figure 5-9).
 Figure 5-9. Heavy troop raid (part one).
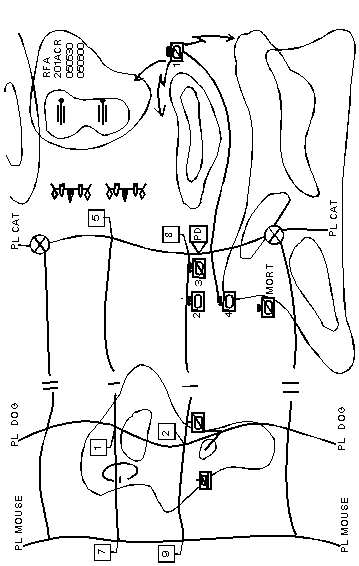
The 1st platoon makes visual contact in about 10 minutes, and continues to reconnoiter for a good axis of attack. The 3d platoon moves into an overwatch position about 1,800 meters away and lays down a curtain of suppressive fire with chain guns, TOW missiles, and mortar fire. While suppressive fires are delivered, the tank platoons maneuver into the left rear of the artillery units, then deploy abreast and attack the Threat artillery battalions by fire (see Figure 5-10).
After silencing the battalions, the troop commander immediately orders the 3d platoon to lead the troop back to friendly lines along the designated route of withdrawal. The 2d and 4th platoons follow while the 1st platoon screens the withdrawal of the troop. The troop commander joins the 1st platoon and supervises the conduct of the rear screen until all troop elements have reentered friendly lines (see Figure 5-11). The troop returns to defensive positions, and the 1SG begins resupply actions.
The light troop should consider the raid target when planning its operation. A combination of weapon systems may best suit the destruction of the raid objective rather than operating in pure platoons. A mix of weapon systems may also assist in security of the objective during the raid. The troop scramble should be considered as a possible task organization when planning a raid.
 Figure 5-10. Heavy troop raid (part two).
 `
Figure 5-11. Heavy troop raid (part three).
Example steps of a light troop conducting a raid are as follows:
- Troop moves in column, platoons in a vee. Troop is a scramble organization with platoons integrating the AT vehicles into the scout sections. Each scout platoon is running two sections of three vehicles plus the platoon leader. See Figure 5-12.
- Lead platoon (1st platoon) conducts reconnaissance forward of the troop.
- 1st platoon establishes contact with the objective, then secures the flanks and conducts surveillance of the objective.
- 2d platoon, second in the order of movement, moves through 1st platoon, establishes security on the far side of the objective, orienting on the mounted avenues of approach into the objective area.
- 3d platoon establishes an attack position vicinity of BP1. 4th platoon establishes an attack position vicinity of BP2.
- Troop commander initiates the attack with indirect fires. 3d and 4th platoons move and attack by fire from BP1 and BP2.
- Troop engages enemy position using TOWs to destroy hard targets and fires from caliber .50 and MK-19s for soft targets and suppression of enemy defenses.
- Troop uses indirect fires to cover their withdrawal.
- 1st platoon covers the troop withdrawal.
- 4th platoon displaces first, followed by 3d platoon, then 2d, then 1st.
- Troop moves in column, platoons in vee with 1st platoon providing rear security. 4th platoon conducts a rapid zone reconnaissance forward of the troop as it moves toward friendly lines. See Figure 5-13.

Figure 5-12. Light cavalry troop conducts a raid using a troop scramble.
 Figure 5-13. Light cavalry troop completes the raid and returns to friendly lines.
Choose your next action:
Go to Chapter 6
Return to FM 17-97 Table of Contents
|
NEWSLETTER
|
|
Join the GlobalSecurity.org mailing list
|
|
|
