

|
RDL Homepage |
Table of Contents |
Document Information |
Download Instructions |
LESSON 2
COMPANY TEAM OFFENSE
TASK
Identify offensive concepts, characteristics and functions, use of tanks and mechanized infantry, Threat defensive tactics, movement and control measures, and movement to contact. Conduct of the attack, assault, consolidation, reorganization, limited visibility offensive operations and fortified strongpoints.
CONDITIONS
Given the subcourse material for this lesson, a training scenario and extracts, as applicable, the student will complete the practical exercise at the end of this lesson.
STANDARDS
The student must demonstrate his comprehension and knowledge by understanding offensive concepts, characteristics, and functions; use of tanks and mechanized infantry; Threat defensive tactics; tactical movement and control measures; movement to contact, conduct of the attack, assault, consolidation and reorganization; limited visibility offensive operations; and team role in the reduction of a fortified strongpoint.
REFERENCES
This lesson will provide information on company team offensive techniques, use of tanks and mechanized infantry, and conduct of the attack and visibility operations.
Learning Event 1:
IDENTIFY THE OFFENSIVE CONCEPTS, CHARACTERISTICS, AND FUNCTIONS
OFFENSIVE CONCEPTS, CHARACTERISTICS, AND FUNCTIONS
This learning event provides information on the five major types of offensive operations: movement to contact, hasty attack, deliberate attack, exploitation and pursuit. These attacks can be conducted independently or they can be conducted as part of a larger unit operation. The company team can also participate in special purpose operations, that include: reconnaissance in force, attacks from a defensive posture (spoiling attacks and counterattack), diversionary operations (feints and demonstrations), and raids.
CHARACTERISTICS OF OFFENSIVE OPERATIONS
The fundamental characteristics of offensive operations are concentration, surprise, speed, flexibility, and audacity.
Concentration. Concentration of effort is essential to the attacker's success. In order to achieve concentration, you will integrate all firepower and shock action to be used at the decisive place and time to destroy the enemy. Ideally in this attack, concentration occurs at the point of the enemy's weakness.
Surprise. Since you have the initiative, you can usually choose the time, place, and method of attack in order to strike the enemy at the unexpected time and place. Avoid the obvious whenever possible and strike the enemy at his weakest point to achieve success.
Speed. Speed promotes surprise, keeps the enemy off balance, contributes to the security of the attacking force and degrades the enemy's countermeasures which cannot keep pace. Speed is an essential factor in maintaining the momentum during the attack and is carefully planned and built into the operation.
Flexibility. While your planning for the attack will be detailed, your subordinate leaders must understand your intent so well that they can exploit battlefield opportunities as they occur, if communications fail. Though detailed planning is essential, you must expect uncertainties and be prepared to cope with them and adjust the operation accordingly.
Audacity. You must have the bold courage to exercise your judgment and take decisive action in a fast-paced, constantly-changing situation.
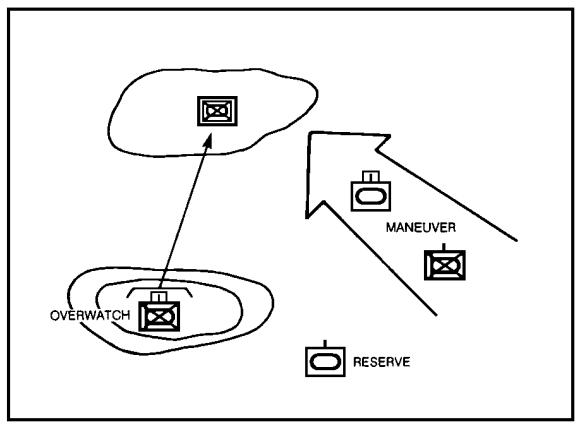
Your tank and mechanized company team normally attacks as part of a closely synchronized battalion task force effort. As part of the task force, your company team may overwatch, maneuver, or be in reserve (Figure 16). In a fast moving situation, your company may conduct its own attack against an unprepared, moving, or weak enemy force. The attack may be hasty (little time for planning, reconnaissance, coordination, or preparation) or deliberate (when time is available to do all of the above). You may attack under full or limited visibility conditions. In all cases, the tactics and techniques described in this section apply.
FIGURE 16. BASIC OFFENSIVE FUNCTIONS.
All tank and BFV forces attack in a synchronized effort of firepower and maneuver. Tanks, ITVs, BFVs, and dismounted infantry are maneuvered to positions of advantage to destroy the enemy. The firepower of these forces are used in conjunction with supporting artillery, mortar, and close-air-support fires to isolate, suppress, and destroy the enemy forces. When you mass fires, you gain fire superiority over the enemy which facilitates your maneuver.
FIGURE 17. FIRE AND MANEUVER.

Maneuver brings your assault force into new, and more advantageous positions to allow you to defeat the enemy. (See fire and maneuver in Figure 17).
Learning Event 2:
IDENTIFY THE USE OF TANKS AND MECHANIZED INFANTRY
TANKS AND MECHANIZED INFANTRY
This learning event will focus on the employment of tanks and mechanized infantry in the attack. Tanks and dismounted infantry attacking different axis and BFVs providing support by fire; tanks and BFVs supporting by fire only; BFV in overwatch; effectiveness of weapon systems; company teams using escape routes; suppressing the enemy using indirect fires and using smoke to obscure the enemy's vision.
METHODS OF EMPLOYMENT
There are two general methods to employ tanks and mechanized infantry together in an attack: tanks and mechanized infantry (mounted or dismounted) attacking on one axis and tanks and BFVs supporting by fire only. See Figure 18, for tanks and dismounted infantry attacking different axis and Figure 19, for Bradley's supporting by fire.
FIGURE 18. TANK AND DISMOUNTED INFANTRY ATTACKING DIFFERENT AXIS
AND BFVs PROVIDING SUPPORT BY FIRE.
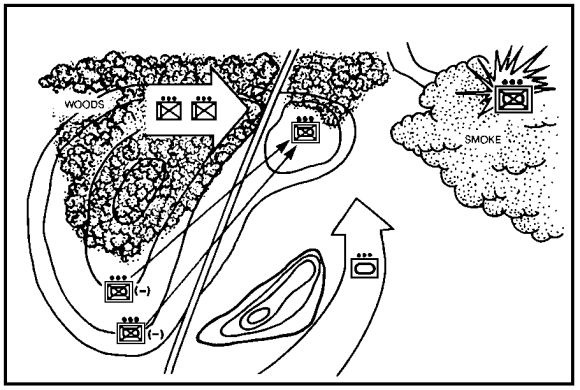
FIGURE 19. BFVs SUPPORTING BY FIRE ONLY.
Regardless of the method or combination of methods used, you must organize your force to maximize the capabilities of both your mechanized infantry and tanks.
- The role of attached mechanized infantry in tank-heavy teams is to assist the advance of the tanks by--
- Breaching or removing antitank obstacles.
- Assisting in the neutralization or destruction of enemy antitank weapons.
- Designating targets for the tanks.
- Protecting the tanks against enemy infantry and handheld antitank weapons.
- Leading the attack dismounted when necessary.
- Clearing and assisting in the consolidation of the objective.
- The role of attached armor to infantry-heavy teams is to assist the advance of your infantry by--
- Providing mobile protected firepower to assist the team's advance.
- Neutralizing or destroying hostile weapons by fire and movement.
- Clearing paths for dismounted infantry through wire.
- Neutralizing fortified positions with direct fire.
- Supporting dismounted infantry by direct fire.
- Providing protection against long-range antitank fire.
- Leading the attack whenever possible.
The mobility and armor protection of the BFV will help you move your infantry across the battlefield quickly. There are basically three choices of dismounted points available to you. These are:
- Short of the objective. This is usually not within range of small arms and handheld antiarmor weapons. Tactical conditions may force you to seek a dismount point short of the objective. You should look for an easily recognizable area that provides cover from enemy direct fires. If possible, it should be out of hand grenade range and outside the acceptable safety limits of your supporting fires. You should consider the following advantages and disadvantages.
- Advantages:
- Dismounted infantry are protected from small arms and observed indirect fires while dismounting.
- Troops can be oriented as they approach the objective.
- Control can be established in the dismount point.
- Supporting artillery and mortar fire can suppress the enemy while the infantry is dismounting.
- Disadvantages:
- The dismounted infantry are exposed longer to enemy small arms and indirect fire as they move forward in the assault.
- Suitable dismounting points are likely to be targeted for enemy indirect fires.
- Advantages:
- Dismounting on the objective. This form of attack should be undertaken if surprise has been achieved or the enemy antiarmor defense is weak.
- Advantages:
- Greater speed and shock action.
- Infantry remain protected longer from enemy small arms fire.
- Supporting fires can continue longer.
- Disadvantages:
- There can be difficulty in orienting in BFVs to their specific objectives.
- There can be difficulty in establishing control at the dismount point.
- The BFV is particularly vulnerable to short-range antiarmor weapons.
- A high volume of suppressive fire is required to support the infantry when they dismount.
- Advantages:
- Dismounting once through the objective. The occasion may arise when a mounted attack may be more effective if dismounting is carried out after passing through the objective. The state of the enemy antiarmor defense will dictate whether this is feasible. You should consider the following advantages and disadvantages:
- Advantages:
- The infantry fight will start form an area and direction unexpected by the enemy.
- The troops can be oriented more readily on their objective.
- Control is more easily established when not on the objective.
- The shock effect on the enemy of mechanized troops moving through their position is likely to be considerable.
- Disadvantages:
- This method may run afoul of enemy positions in depth.
- A suitable dismount point might still be targeted for enemy indirect fires.
- There is a danger of fratricide from the assaulting troops.
- It is still desirable to face the BFV toward the objective before dismounting, but the act of turning around makes them more vulnerable and changes the relative positions of assaulting infantry commanders/leaders, and possible tanks.
- Assaulting BFVs are very vulnerable as they move through the enemy position.
- Advantages:
When considering where to dismount, your aim should be to keep the infantry mounted as long as it is tactically sound to do so.
Having planned where you expect to dismount, you must be prepared to change that dismount point if the situation dictates. You must be well forward so that you can personally judge the situation and make the appropriate decision. The BFV offers the means to carry your assaulting infantry on to, or as near as possible to, your objective, fresh and fit to fight. The demoralizing effect on the enemy of the sudden arrival of mechanized infantry, closely supported by tanks, will often decide the outcome of the battle.
Tanks usually lead an integrated formation. You must consider the distance desired between the tanks and BFVs before starting the assault. This distance is based on METT-T.
- Mission. If the mission required rapid, closely controlled movement and closely coordinated, dismounted infantry action, the BFVs will be alongside or closely following the tanks.
- Enemy. The type of enemy unit you are assaulting influences the location of the BFVs in the assault.
- Terrain. If the terrain is rolling or rough, affording numerous defilade positions, your BFVs may accompany or closely follow the tanks.
- Troops. Your task organization will also influence your formations and the relative position of your BFVs. Few or no tanks will require BFVs in the assault spearhead.
- Time. The less time you have, the closer your BFVs must be to the tanks. This cuts down reaction and response time and permits faster reorganization.
OTHER TACTICAL TECHNIQUES AND CONSIDERATIONS
Optimizing Your Fires While Avoiding Enemy Fire. Threat tactics show that you must locate and destroy his antiarmor vehicles to defeat his defenses. The success of your attack is determined by how well you optimize your antiarmor fires.
The Tank. The tank is your best assault and the best antiarmor weapon. It will habitually lead your attacking force unless the terrain or enemy prevents its forward movement; then infantry will dismount and lead, while tanks and APCs/BFVs provide overwatch. Do not employ your tanks along the open, high-speed avenues of approach, unless you are able to suppress enemy antiarmor fires or obscure your movement by smoke. Accurate ATGM and tank fire make any exposed assault over open terrain prohibitive.
The BFV. Your TOW missiles and 25-mm cannon of the BFVs provide direct fires on identified targets. You will normally not use the BFV as an assault weapon. Move your BFVs far enough behind your leading element to gain a degree of protection, yet FAR ENOUGH FORWARD TO BE ABLE TO QUICKLY PROVIDE ANTIARMOR SUPPORT FOR LEADING ELEMENTS. (See Figure 20.)
The Dragon. The Dragon provides additional antiarmor fire for your infantry platoons. They give the infantry platoon an ability to defeat enemy armor, fortifications, and weapons positions when tank and TOW missile fires are not available. The weight and bulk of the Dragon limit the number of rounds carried forward when dismounted. The Dragon's role is secondary to that of your two primary antiarmor systems, the tank and the TOW missile. Your Dragons and LAWs supplement these fires as necessary. Dragons normally accompany a dismounted maneuver element to destroy targets that cannot be engaged by overwatching tanks and TOW missiles/BFVs.
FIGURE 20. BFVs IN OVERWATCH.
The LAW. The LAW is issued as a round of ammunition. Because of the light weight, ease of use, and the expendability of the launcher after firing, it is a good weapon to carry when the infantry dismounts. The LAW is the best infantry antitank weapon at ranges less than 100 meters because TOW missiles and Dragons have a minimum distance of 65 meters.
Fire Control. Basic rules for controlling fires include:
- Engage the enemy as rapidly as possible.
- Expose only those weapons actually firing.
- Distribute fires to ensure complete coverage of enemy targets.
- Engage the most dangerous targets first.
- Maximize coordination of artillery with direct fires.
- Avoid target overkill.
FIGURE 21. MAXIMIZE THE EFFECTIVENESS OF WEAPON SYSTEMS.
AVOIDING THE ENEMY'S ANTIARMOR FIRES
Use all available cover and concealment. If the enemy cannot see you, he cannot mass his fires to destroy you. Despite its obvious advantage, moving along covered and concealed routes extracts a price from you; your speed is reduced, your control problems are increased, and your unit is more vulnerable to handheld and other short-range infantry weapons.
Never skyline or move directly forward form a defilade position.
Avoid dusty terrain when possible; it betrays the movement of armored vehicles.
When you must cross an open area, first dismount personnel (with binoculars), and have them move to carefully observe the area for possible enemy positions before you emerge from cover. If enemy locations are identified or suspected, then suppress or smoke them prior to crossing.
When traveling at this speed...it takes about this long to travel 1,000 meters.
| 12 mph/20 kmph | 3 minutes |
| 15 mph/25 kmph | 2 minutes and 30 seconds |
| 24 mph/40 kmph | 1 minute and 30 seconds |
| 36 mph/60 kmph | 1 minute |
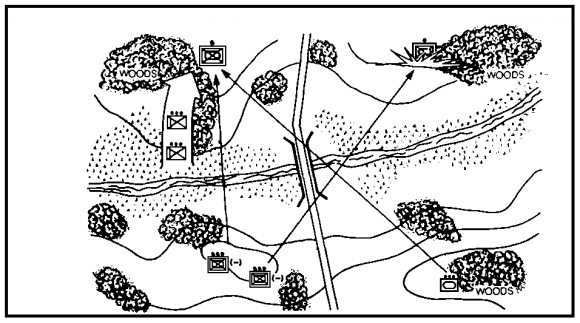
FIGURE 22. COMPANY TEAM USING AN ESCAPE ROUTE.
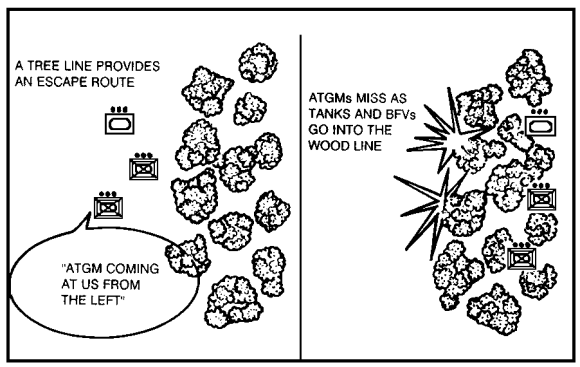
Cross open areas as rapidly as possible. Use rapid rushes from covered position to covered position. (If you are exposed for less than 30 seconds, it will be extremely difficult for an enemy ATGM gunner to acquire, fire, track, and hit you at a long range.)
In situations where use of covered routes would be too time-consuming, then at a minimum, plan routes that have escape valves available.
The enemy will use obstacles to canalize you into his kill zones and to slow your progress. DON'T ALLOW OBSTACLES TO PUSH YOU INTO FIRE SACKS. When faced with the possibility of being canalized by obstacles, remember to avoid open areas that could place you in his kill zones. When you expect extensive obstacles, infantry and engineers should be located well forward with the assault forces.
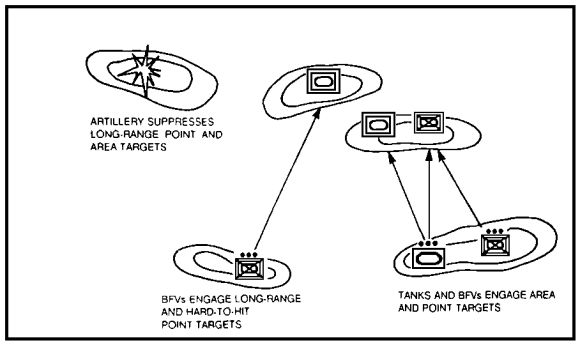
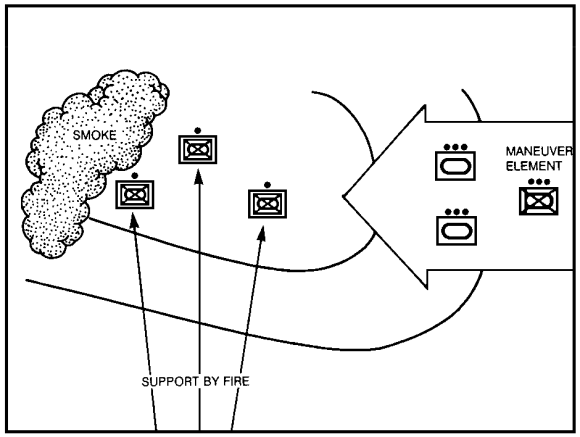
Artillery and mortars are your best means of suppressing antiarmor weapons. Indirect fire weapons have great flexibility in engaging targets, covering larger areas, are less exposed while firing, and are relatively easier to resupply.
Place indirect fire on top of the identified or suspected enemy positions.
When you don't know the enemy's position, use smoke near your force to degrade enemy point fires.
FIGURE 23. INDIRECT FIRE SUPPRESSING THE ENEMY.
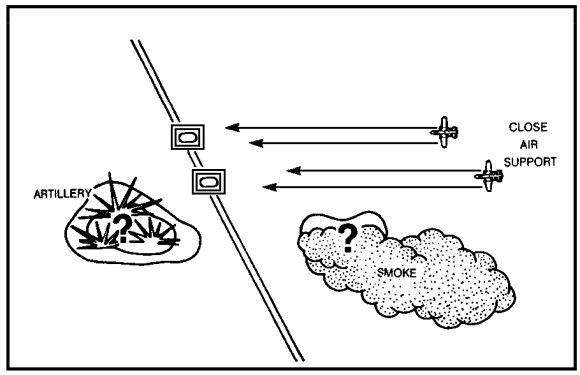
Direct fires complement indirect fires in suppressing enemy weapons. You strive to overwatch your movements with direct fires for a variety of reasons. Direct fires are immediately available. Even under ideal conditions, it will take 2 to 3 minutes to get indirect fires on target. By having direct-fire weapons overwatch, you can immediately suppress enemy fires. Direct antitank fires can destroy armored vehicles. Indirect fire weapons have only a limited ability to destroy armored vehicles.
It is difficult to accurately place point fires into an area where artillery is firing because of the dust and smoke generated by the artillery. However, obscuration can also degrade your ability to provide effective overwatching/suppressive fires.
In general, use direct fires for destroying close-in and protected point targets; use artillery to suppress longer range point and area targets, and to provide smoke to cover movement.
FIGURE 24. SMOKE OBSCURES ENEMY GUNNER'S VISION TO
EXTENT THAT ACCURATE, CONTINUOUS TRACKING IS IMPOSSIBLE.
Learning Event 3:
IDENTIFY THREAT DEFENSIVE TACTICS
This learning event will highlight tactics used by the threat forces in their defense. The areas to be covered are: prepared defense, hasty defense, threat defense prior to the attack, during the attack and counterattack. Other areas include: threat withdrawal by breaking contact, using covering forces, rear security, or the main body.
THREAT DEFENSIVE TACTICS
"Know the enemy and know yourself, and in a hundred battles you will never be in peril. When you are ignorant of the enemy but know yourself, your chances of winning or losing are equal. If ignorant both of your enemy and yourself, you are certain in every battle to be in peril." Sun Tzu. 400-320 BC, The Art of War.
Knowing the enemy's intentions, capabilities, and tactics is very important when planning and conducting an operation. It is, after all, threat actions on the battlefield that cause you to react as you do in a given situation.
Prepared Defense. The first forces you will encounter is the security echelon. These forces report your movement, attempt to canalize your approach, strip away reconnaissance. They may include tanks, reconnaissance vehicles, infantry carriers, and dismounted elements in the security echelon. Once you have fought your way through the security echelon, you will encounter the main defense zone as illustrated in Figure 25.
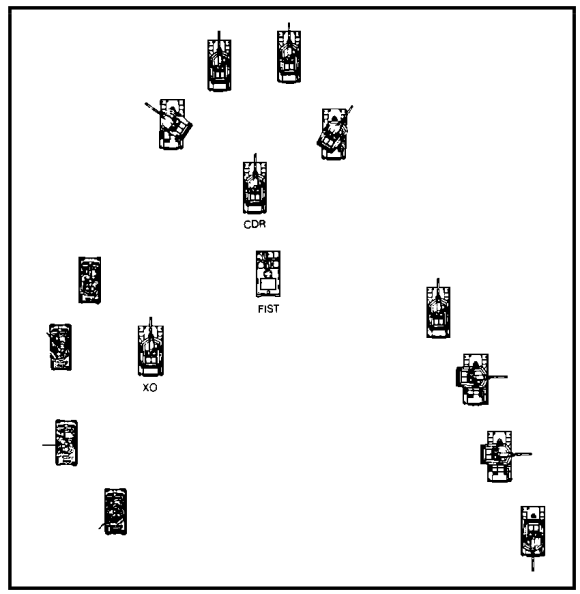
FIGURE 25. MOTORIZED RIFLE BATTALION IN A DELIBERATE ZONE.
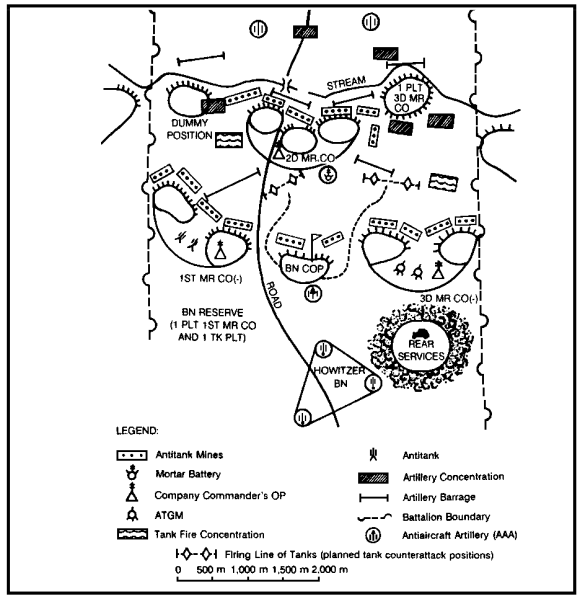
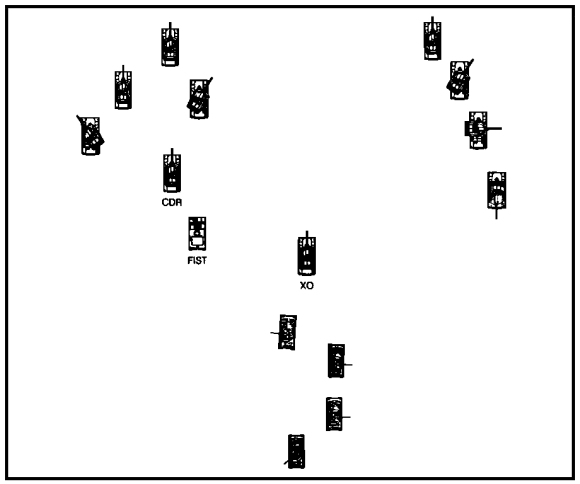
The motorized rifle battalion (MRB) could also defend with two companies forward and one farther back. Based on METT-T, the threat battalion is usually assigned a frontage of 3,000 to 5,000 meters, with a depth of approximately 2,000 meters. The defense area is organized in a single echelon. The companies are deployed in platoon strongpoints on armor restrictive terrain. In addition to the battalion organic weapons, first-echelon battalions are normally reinforced with a tank company and ADA elements from the regiment. Figure 26 depicts the threat forward companies.
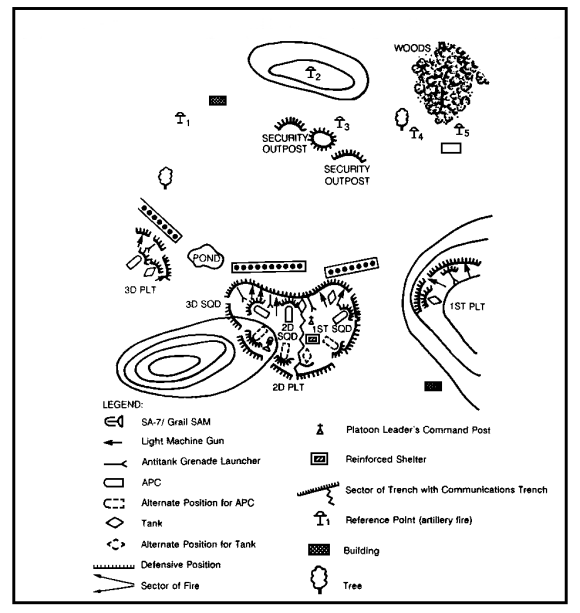
FIGURE 26. THE MOTORIZED RIFLE COMPANY STRONGPOINT.
Regimental antitank reserves occupy assembly areas near the regimental command post with up to four deployment areas prepared for occupation. The areas between strongpoints are not really gaps but fire sacks. These sacks are preplanned in front of and within the battle area and are covered by flanking antiarmor fires, if possible. Fire sacks are kill zones for armored formations. To maximize fires into these packets, each antitank weapon has an assigned primary and secondary sector of fire. In addition, commanders at all levels make extensive preparations and plan to maneuver antitank weapons to maximize their fires against any penetrations.
Mines and obstacles are used to canalize you into his kills zones, to slow your movement once you are in the kill zones. These mines and obstacles will also protect their strongpoints. Areas that cannot be covered by direct fires are covered by outposts and patrols.
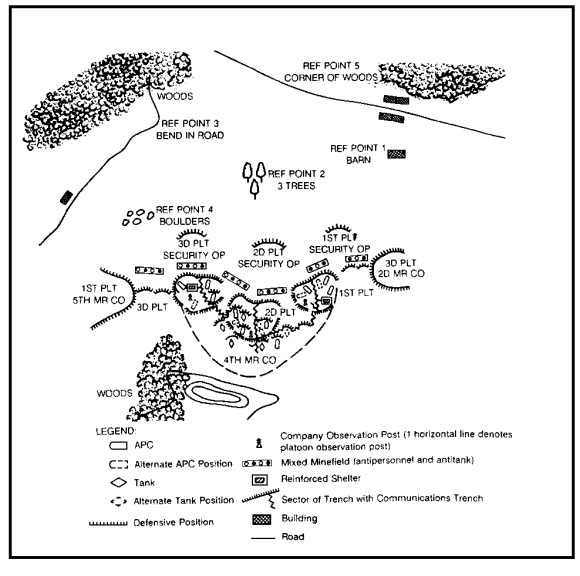
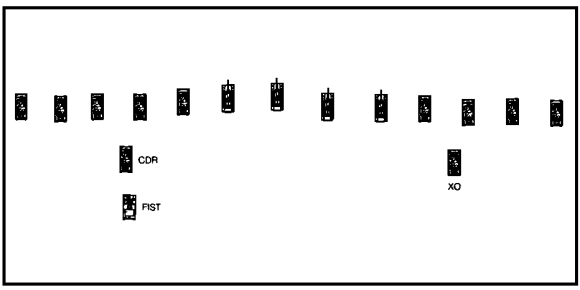
In some instances, the BMPs of the forward platoons will be positioned with the rear platoon providing overwatching fires. There is extensive trench work in the rear platoon area. All infantry are dug in as well as time permits. Communication trenches are dug laterally between platoons and to the company headquarters. Alternate positions are prepared. Both tanks and BMPs will be dug in. A company occupies a position approximately 500 meters wide by 250 meters deep. Platoons are broken down into squad strongpoints with up to 100 meters between squads.
FIGURE 27. THE PLATOON DEFENSIVE POSITION.
Hasty Defense. Some differences between the deliberate and hasty defense are the width of the front is smaller (3 kilometers versus 5 kilometers for a motorized battalion) with smaller gaps between positions.
THREAT DEFENSIVE FUNDAMENTALS
Hold at All Cost. First-echelon regiments and below are required to stubbornly defend their position even if by passed.
Destroy Tanks. Threat doctrine stresses that the destruction of our tanks will cause an attack to collapse, therefore, antitank weapons are given first priority in positioning.
Use Obstacles and Firepower. Threat doctrine emphasizes maximum use of terrain to strengthen his defenses. He wants to canalize you into fire sacks where the massed firepower of tanks, antiarmor weapons, and artillery can be used to destroy you.
Retain Reserves. Mobile antiarmor reserves are retained in the second echelon to block penetrations. At battalion level and above, tank reserves are retained to conduct counterattacks.
THREAT DEFENSIVE DEPLOYMENT
The threat recognizes two types of defense. The prepared defense, which is utilized when the advance is going to be halted for more than a few hours. The hasty defense, which is most often utilized by the first-echelon units in offensive action when their advance has been stopped. The major difference between the two types is the size of sectors, number of engineer assets, and location of tanks.
- Tanks are located farther back in defensive positions because there is not enough time to dig in.
- There is less use of trenches, obstacles, and mines.
- Simpler fire plans are prepared for both antiarmor and artillery fires.
- The security zone does not extend as far forward and is not as strong.
These differences are, of course, in degree rather than in design. For example, individual positions will be prepared and hasty obstacles and mines emplaced and improved as time and situation permit. It follows that the longer a unit is in a hasty defensive position, the more that defense will resemble a deliberate defense.
CONDUCT OF THE DEFENSE
Prior to Your Attack. Threat forces will fire intense counterbattery fires to preempt and, if possible, neutralize our artillery preparations. Possible assembly areas will be targeted. Troops in defensive positions will occupy shelters to protect against nuclear, chemical, and conventional fire. Radio-listening silence is maintained throughout this phase.
During Your Attack. As soon as your attack is launched, fire from all the enemy's available weapons will be brought to bear against you. His first-echelon battalions will not withdraw even if bypassed or surrounded. Threat forces are taught to establish a 360-degree defense. As penetrations are made, the second echelon and reserve may deploy to counterattack or may move to block our penetration from alternate positions.
Thrust will be attacked in the flanks by tank and antitank reserves. Hasty minefields may be laid to contain the penetration. Chemical and nuclear strikes may be used against dangerous thrusts. Illumination will be used as necessary to support night operations.
The Counterattack. Counterattacks are planned at every level. Counterattacks require the authority of the next superior commander before they can be launched. Counterattacks will generally be launched from a flank often using a switch position as a deployment line.
HOW THE THREAT WILL WITHDRAW
A threat commander accepts the fact that a withdrawal may be necessary to create a favorable situation for counterattack. All withdrawals require the authority of the next superior commander.
Breaking Contact. Withdrawals take place at night whenever possible. They are covered by intense artillery fire and airstrikes, and may be preceded by local counterattacks. If carried out in daylight, they are normally hidden by smoke.
Covering Forces. The withdrawal of the main body is covered by motorized rifle and tank platoons left in the forward battalion areas to portray an unchanged defense. Covering detachments left in contact withdraw when the main body has passed through the rear security.
Rear Security. A rear security force, reinforced with tanks, occupies a defensive position astride the withdrawal routes before the main body begins to move. It moves back occupying a series of preplanned defensive positions holding each for a specified period. Flank security of units is used throughout.
Main Body. The main body usually withdraws directly to its next defensive position in march column without occupying any intermediate positions.
Threat defenses are based on a series of mutually supporting defensive positions protected by mines and obstacles with interlocking fields of fire from blank units and supported by fires from artillery and mortars. The main strength of this defense comes from the collective strength of the mutually supporting positions rather than the strength of individual strongpoints. However, it must be emphasized that what has been presented represents the doctrinal basis for threat force defense at battalion and lower levels. What you might actually find on the battlefield will depend on local circumstances.
Learning Event 4:
IDENTIFY TACTICAL MOVEMENT AND CONTROL MEASURES
This learning event will provide information on the considerations governing the conduct of tactical movement; company team missions; combat formations; and movement techniques.
CONSIDERATIONS
The company team will take in consideration the following elements during conduct of a tactical movement to contact and the approach phase of attack:
- Reconnaissance.
- Dispersion.
- All-round security.
- Cover and concealment.
- Speed.
- Observation and fields of fire.
- Maneuver space.
- Command and control.
Reconnaissance. "Many tanks are lost through the failure of the crews or the platoon leader to make foot reconnaissance. Before exposing a valuable tank and the lives of its crew to the danger of destruction by crossing an area unreconnoitered, a reconnaissance with glasses should be made. Here again we have the question of haste and speed. It may seem a waste of time to take a look, but it is certain death to get on the front slope within effective range of undiscovered antitank weapons or lurking enemy tanks." LTC G.S. Patton, Lettered Instruction No. 3, 20 May 1944.
Dispersion. Dispersion gives you increased ability to react flexibly and protect your force from losing its freedom of maneuver. The faster your force moves, the more dispersion in depth it must have. Lateral dispersion decreases your control and ability to move rapidly, but increases flank security. You should disperse your force laterally and in depth when the enemy situation is unclear or the terrain is very open. This allows you to make contact with the smallest element possible.
All-round Security. You must always maintain all-round security while moving. Your fighting vehicles and dismounted infantry orients their weapons to the front, flanks, and rear. Air guards constantly search for approaching enemy aircraft. All local security measures supplements the security forces established by higher headquarters. These measures provides early warning of enemy activity. Flank and rear security may be used when your unit task force is moving independently.
Cover and Concealment. In spite of years of instruction, tanks will go up tank lanes such as cart track, open river bottoms, small roads or paths, or along hedges--all of which any intelligent antitank gunner will have arranged to over. Due to maneuver experience, tanks seek visual cover afforded by bushes, failing to remember that these do not stop bullets. The only cover behind which a tank has any security is that afforded by earth defilade.
Speed. Once your coordinated attack has begun, your assault must close with the enemy as rapidly and violently as possible. The slower you are moving forward, the longer you will be exposed to enemy fire. This gives the defender time to react and reposition to defeat your assault. Speed increases the momentum of your attack, but it also degrades your control and limits your ability to react. Nothing chokes a kill zone faster than a headlong charge into an unexpected obstacle.
Observation and Fields of Fire. Your overwatch element must have adequate observation, long-range weapons and sights, and fields of fire to suppress enemy resistance.
Maneuver Space. The avenue of approach you select must provide adequate maneuver space for your company. A two-lane road is an adequate avenue for a division, provided there is no enemy resistance. A company team making a movement to contact or hasty attack will generally need a maneuver corridor 800 to 1,200 meters wide. This is greatly dependent on the terrain and the enemy. Maneuver formations will be explained in greater detail in combat formations.
Command and Control. Officers and noncommissioned officers must oversee and ensure that all weapons of their respective commands are functioning. They cannot see this by simply accompanying the movement; they must direct it. You and the company chain of command are on the battlefield to control your unit. Your selection of maneuver formations and speed of movement must balance your need for control with the tactical requirements of terrain and enemy resistance.
COMPANY TEAM MISSIONS
The Team as a Maneuver Element. The company team is normally given the mission of seizing an objective. The objective may be occupied by enemy forces or undefended. Continued maneuver, attack by fire, or bypass is conducted form this objective.
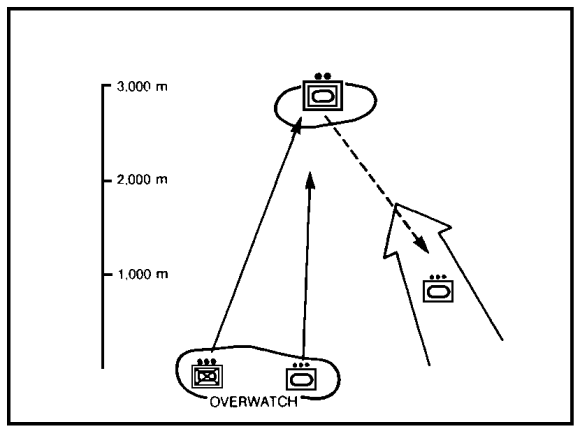
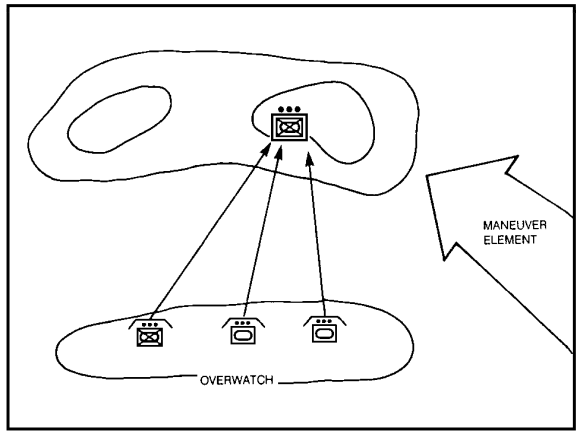
The Company Team as an Overwatch or Support-by-Fire Element. Frequently, the company team will be given the mission of overwatching or supporting by fire the maneuver or assault of other company teams. The task force commander gives the company team a battle or overwatch position for this mission. The company observes and provides information about the enemy to the maneuver element. It places destructive, suppressive fires on known and suspected enemy positions, adjusts indirect fires to support the maneuver force, protects it against counterattacks, and provides any other assistance.
Coordination with the assault team(s) is critical. Face-to-face coordination, to include joint-leader reconnaissance and attendance at orders is done if at all possible so the overwatching commander completely understands the scheme of maneuver and fires of the assault team(s).
If reconnaissance of one support-by-fire position is possible, a detailed scheme of occupation and a fire plan should be made.
Fire Control. Graphic control measures permit the overwatch element to stay aware of the location of the maneuver force to preclude fratricide. Colored smoke, flares (for thermal sights), and pyrotechnic signals are used to mark targets and to indicate shifting or lifting fires.
The Team as a Task Force Reserve. The company team may be designated as task force reserve and move in the depth of the task force formation. Its general location is normally specified, as are possible missions of the reserve. The commitment of the reserve is the most critical decision of the task force commander. The reserve may be assigned one or more of the following missions/tasks:
- Assume the mission of an attacking company team.
- Attack form a new direction.
- Support the attacking company team(s) by fire.
- Clear a position that has been overrun or bypassed by the attacking company team(s).
- Maintain contact with adjacent units and flank security.
- Provide flank security to the task force.
- Protect or assist during the consolidation on the objective.
- Guard and evacuate prisoners.
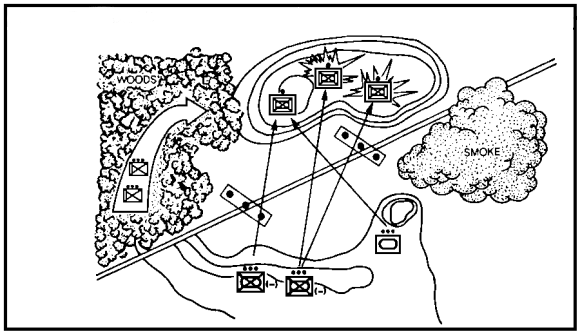
FIGURE 28. COMPANY TEAM OVERWATCH AS PART OF THE TASK FORCE ATTACK.
- Protect key intersections and bridges.
- Block a counterattack.
As with the overwatch mission, face-to-face coordination with the lead company team commanders is made if at all possible.
The team maintains its position but does not become decisively engaged by enemy action against the lead company teams. Traveling and traveling overwatch is used; leaders move near the front of their formations to facilitate control and reactions.
COMBAT FORMATIONS
By designating the formation to be used by your company team you:
- Establish the relationship of one platoon to another on the ground.
- Express where you envision the enemy to be and how you intend to react to contact.
- Establish where you want your firepower.
- Establish the degree of security you desire.
There are five basic combat formations (combat column, wedge, vee, echelon, and line) you can use at the company team/platoon level. Your formation need not be the same as the task forces unless you are so directed. For example, the task force could be advancing in a column while one or more of its companies was advancing in a wedge formation. Similarly, your platoon leaders will select the formation they think most appropriate for the current situation, unless you direct otherwise.
A combat formation is not rigid. Terrain and common sense will frequently dictate minor modifications. The following examples of combat formations are to be considered only a general guide. During a movement to contact, for example, greater dispersion provides better security, more flexibility, and more time to maneuver your forces in response to enemy contact.
Combat Column. This formation is a modification of the standard column formation whenever there is a possibility of enemy contact and the terrain allows for dispersion. This formation increases security against enemy air and artillery attacks by its greater dispersion. It also--
- Provides good security and permits maximum fire to the flanks, but restricts fire to the front.
- Facilitates control.
- Facilitates rapid deployment in other formations.
- Provides the depth/time needed to deploy your platoons once enemy contact has been made.
- Facilitates rapid movement.
(See combat column formation.)
FIGURE 29. COMBAT COLUMN FORMATION.

- Wedge.
- Permits excellent fire to the front and good fire to each flank.
- Facilitates control.
- Permits sustained effort and provides flank security.
- Is often used when the enemy situation is vague and contact is imminent.
FIGURE 30. WEDGE FORMATION.
- Vee.
- More difficult than the wedge to maintain orientation.
- Control is difficult in wooded areas.
- Provides more firepower to the front than the wedge and good fire to the flanks.
- Maintains freedom of maneuver of one platoon after contact has been made and rapid transition to the assault.
- Facilitates rapid deployment into any other formation.
- Is used when the probability of enemy contact is high.
FIGURE 31. VEE FORMATION.
The line formation should be used when emerging from smoke, crossing crests, leaving woods, and assaulting an objective. It is used in supporting positions (overwatch and support by fire.) This formation--
- Permits maximum fire to the front or rear, minimum fire to the flanks.
- Is the most difficult to control.
- Is less secure due to the lack of depth.
- Permits closing on the objective in minimum time.
FIGURE 32. LINE FORMATION.
- Echelon.
- Similar to the column formation but with platoons staggered to the left or right.
- Control is difficult, especially in wooded terrain.
- Provides the best security to the echeloned flank for the higher formation.
- Is used when the task force faces a significant flank threat.
- Facilitates deployment perpendicular to the line of march.
Positioning of Platoons. The specific location of your platoons within the company team formation should be established by you, based on the factors of METT-T and the current situation. The location of specific tanks may be varied based on the platoon leader's estimate of the situation. Some basic considerations in positioning platoons include:
- Tanks lead the assault against automatic weapons, antipersonnel mines, wire entanglements, and enemy armored units.
- Tanks and infantry move together in the assault against entrenched infantry, jungle position, heavily fortified areas, towns, and villages as well as during periods of low visibility.
- Infantry and engineers lead the assault against constructed antitank defenses (such as tank ditches, abatis, and minefields), across defended river lines, through heavy woods within cities, and in mountainous terrain. Tanks and BFVs will provide overwatch and support by fire.
MOVEMENT TECHNIQUES
Tactical movement techniques are used in conjunction with formations. They allow you to establish the relative degree of security appropriate for your team's movement.
Learning Event 5:
IDENTIFY MOVEMENT TO CONTACT, CONDUCT OF THE ATTACK, ASSAULT, CONSOLIDATION, AND REORGANIZATION
The movement to contact is an offensive operation designed to gain or regain contact with the enemy.
CHARACTERISTICS OF A MOVEMENT TO CONTACT
- The enemy situation is vague.
- The unit conducting a movement to contact will lead with a minimum of its combat power forward, thereby freeing the bulk of its combat power to maneuver.
- The unit will use formations and movement techniques that allow for the greatest amount of flexibility and security.
ELEMENTS OF A TASK FORCE MOVEMENT TO CONTACT
A unit conducting a movement to contact is organized in two successive elements, a security force and the main body. This organization permits the depth of formation necessary to provide early warning and reaction time for the commander. Companies in the main body move using techniques that maximize control, speed, and flexibility. The main body is prepared to react to the situation based on the actions of the security force.
The security element, often referred to as the advance guard, performs a vital function for the task force. The advance guard company team protects the task force from surprise by observing and reporting enemy activity. It maintains surveillance, provides early warning to the main body, impedes and harasses the enemy with supporting indirect fires, and destroys enemy reconnaissance elements within its capability. The mission of the advance guard are to--
- Report contact to the task force maneuver.
- Collect all information on the enemy to expedite the commander's decision.
- Select tentative fighting positions for on-coming task force units to permit them to overwatch and suppress enemy defenses.
- Attempt to penetrate enemy security elements and reach and identify the enemy main force.
- Perform chemical and engineer reconnaissance.
- Bypass or breach in stride hasty obstacles.
The main tasks of the advance guard are to perform reconnaissance and forward security in addition to or in place of the battalion scout platoon. In relatively open terrain, a tank-heavy team, augmented by engineers, permits the greatest flexibility. This force has the firepower and versatility to develop the situation after enemy contact, breach minor obstacles, secure small terrain features, and clear villages and small wooded areas.
The lead company in a battalion task force movement to contact provides forward security to the task force. The specific tasks you are assigned and degree of risk you will accept depend on METT-T and--
- The task force commander's intent.
- The route or axis and rate of advance of the task force.
- The frontage to be covered by your company.
- The fire support available.
- Possible assistance from tactical aircraft and from air cavalry units or Army aircraft.
- The mission of the company team upon discovery of the enemy (hasty defense, fix the enemy, bypass).
You will often be expected to conduct a hasty attack to destroy small enemy forces that attempt to impede your advance. An SOP, consisting of simple battle formations (such as combat column and wedge), and battle drills (such as contact and action) is useful in dealing with light opposition.
Your company maintains continual observation to its front and flanks. You must advance with boldness and decision, being prepared to accept necessary losses in the discharge of your mission. You should never allow the greater part of your force to remain inactive on a road, in the open, or in front of an obstacle while your leading tanks engage the enemy at long range. Instead, deploy rapidly mass your available firepower against the enemy force and attack.
If you are unable to overcome enemy resistance quickly, the task force commander may require you to establish a base of fire to support the maneuver and attack by the task force. The attack may be an envelopment using your company team as a pivot or penetration. As the maneuvering force approaches the objective and the fires of your team are masked, you will move to a more advantageous position to support the assault.
When moving cross country, you should advance in combat column or wedge formation over a broad front. Moving in a combat column is preferred in less open areas since it provides greater security because of the formation's depth. If the terrain is rough, it may be necessary to move by bounds. Each platoon moves forward on the axis you assign, taking advantage of available cover and concealment, searching for indications of enemy activity, and employing reconnaissance by fire against possible enemy locations. If one of the platoons in the team meets resistance on its axis, those platoons nearest it support by fire. They should limit their maneuvering for better firing positions to their own respective axis if possible. If the resistance is too strong for the company team to overcome, you either request supporting fires from the task force and attack the enemy position or request permission to bypass the resistance after reporting its location and nature to the task force commander.
A night advance is conducted generally in the same manner as a daylight advance. Distances between elements are shortened, frontages may be reduced, the rate of advance is slower, and supporting fires are less effective; however, the possibility of gaining surprise is greatly increased.
ACTIONS ON CONTACT
A movement to contact operation often results in a meeting engagement. Such engagements occur when contact is made with the enemy suddenly, with little or no prior information concerning his size, location, and disposition. The enemy force may be stationary or moving. When contact is made, your reaction in the first few seconds/minutes may determine if you win or lose the fight. A number of actions must take place immediately.
Return Fire, Deploy, and Report. The platoon under fire moves aggressively using fire and movement to suppress the enemy, seeks covered and concealed fighting positions, and establishes a base of fire. These actions will be accomplished through battle drills executed by the platoon and section or squad. The platoon leader reports contact to the company team commander. The overwatching platoon returns fire immediately. The company team FSO requests indirect fires on the reported enemy position.
Develop the Situation. The element in contact continues the fight and gains information. The density and type of enemy fire, position(s) and orientation of obstacles, and other terrain information tells much about the enemy. The element in contact must be audacious without being rash. Your platoon in contact reports all information to you. You move to a vantage point to see the situation personally, if possible. Your XO reports the situation to the task force. If the platoon in contact is unable to maneuver or develop the situation, you will maneuver another platoon(s) and use indirect fire to put pressure on the enemy in an effort to develop the situation.
Choose a Course of Action. Based on your estimate of the situation, you will recommend one of the following courses of action to the task force commander:
- Continue to develop the situation further.
- Conduct an ambush.
- Conduct a hasty attack to one flank of the enemy.
- Bypass.
- Fix the enemy while the task force bypasses or conducts a hasty attack.
- Hasty defense.
CONDUCT OF THE ATTACK
"Battles are won by fire and by movement. The purpose of the movement is to get the fire in a more advantageous place to play on the enemy. This is from the rear or flank." George S. Patton, Jr., War As I Knew It, 1947.
ACTIONS OF THE COMMANDER IN THE ATTACK
Leaders must lead. This does not mean being the first vehicle in the unit but does mean being able to see the progress of the lead platoon in your team. Your main function on the battlefield is to command and control your company. You must go wherever and accept whatever risks necessary to perform that function. By all means use cover and concealment to position yourself but move to where you can see the fight and control your unit.
Your commander relies on you to keep him advised of all changes in the situation. Your XO assists you in this task. He stays on the task force net and monitors the team's internal net to stay abreast of the tactical situation.
METHODS OF ADVANCE
Movement in Mass. Wherever and whenever possible, tanks proceed rapidly in mass to the objective without halting. You can reduce casualties by shortening the time of exposure to enemy fire, by rapid movement to the objective, and by keeping the objective covered with supporting fire.
FIGURE 33. COMPANY TEAM MOVING IN MASS.
Movement by Bounds. When enemy contact has been established or when enemy forces are known to be in the immediate vicinity, you should move by bounds. Movement by bounds increases security, but reduces the speed of the advance. However, when you move by bounds, move as rapidly as the terrain permits. Your tanks remain stationary the minimum time necessary to support the advance of other tanks and BFVs.
FIGURE 34. PLATOON BOUNDING SECTIONS.
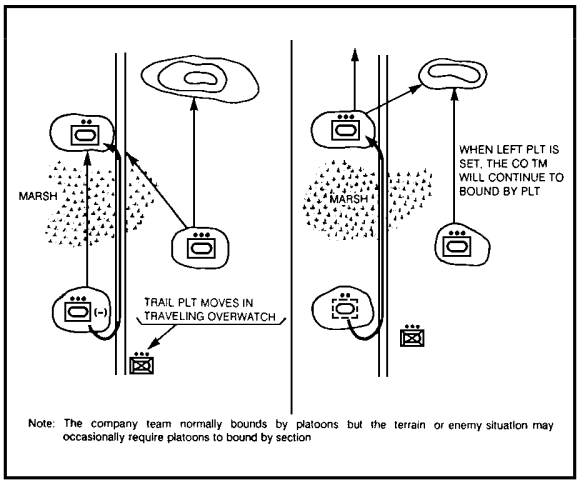
When you cannot move rapidly in mass and the terrain and enemy dispositions require that movement of some tanks be covered by other tanks or BFVs, you must move by bounding overwatch. Normally, bounds are made by platoons. Although sections move by bounds less often, platoons must be thoroughly trained to bound by section if necessary.
FIRE AND MOVEMENT
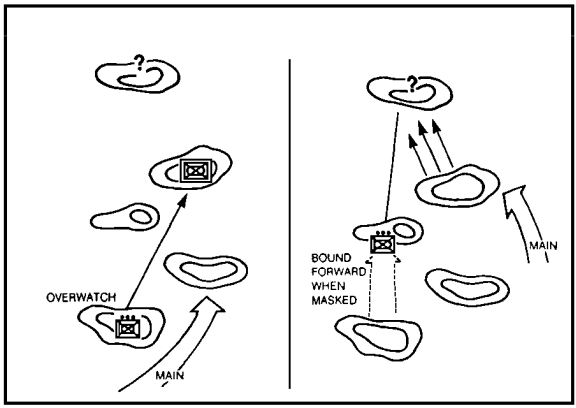
Fire neutralizes, suppresses, demoralizes, and destroys those enemy forces it can reach. Movement brings this firepower into positions from which it extends and completes its work of destruction. Maneuver consists of fire and movement. Fire, direct and indirect, placed on the enemy to reduce his capability to interfere with friendly moving elements is a base of fire. The base of fire permits the forward movement of friendly forces and suppresses enemy direct-fire weapons.
The base of fire and overwatch are not synonymous terms. The overwatch element can observe the friendly movement and respond with immediate suppression of enemy positions that engage the moving element. If no enemy is visible or engages the moving force, the overwatch element does not necessarily fire.
The base of fire actively suppresses an objective with direct and indirect fire. The base of fire always fires at the objective to support the moving unit's assault.
The base of fire for a company team is determine by the task organization of the team. Tank-heavy teams use tanks to build the base of fire. Mech-heavy teams may have to use BFVs to support the mounted movement by fire. When using the BFV as the base of fire, you should consider two possible disadvantages. The first is a slow time of flight for the TOW missile when engaging bunkers or tanks, and the second is that BFV dismounted infantry squads have difficulty joining the battle. The 25-mm chain gun is an excellent suppressive weapon against all but enemy tanks. In most circumstances, when enemy tanks are present, a tank is a better suppression weapon than a BFV.
FIGURE 35. TANKS LEADING DISMOUNTED INFANTRY WITH BFVs PROVIDING
THE BASE OF FIRE (OVERWATCH).
The maneuver force normally does not advance beyond the effective supporting range of the base of fire. To allow continuous support, the maneuver and overwatch elements switch roles, or the overwatch element displaces forward by bounds keeping in supporting distance of the maneuver element as depicted in Figure 36.
FIGURE 36. MANEUVER AND OVERWATCH ELEMENTS SWITCH ROLES.
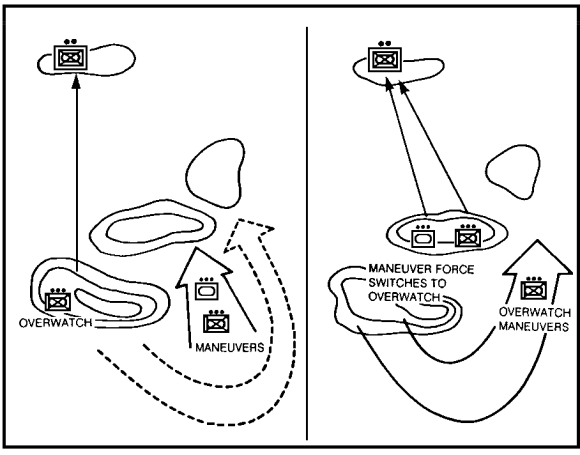
Normally, the base of fire element moves forward on order after the objective has been occupied by the maneuver force. In very fluid situations, it may be necessary for the two elements to alternately fire and move, each supporting the other. (See Figure 37.)
FIGURE 37. OVERWATCH DISPLACES BY BOUNDS.
Common Considerations:
- The moving force should neither mask overwatching fires nor move outside their protective umbrella.
- The overwatch element should--
- Provide protection to the moving force by observation and the ability to call indirect fires as well as by providing direct fires.
- Be controlled by one individual to facilitate control and distribution of fires. He must have direct communication with the maneuver force.
- If possible, cover the flanks and rear of the moving elements as well as to its front.
- Have covered and concealed positions.
- The movement element must also observe to the flanks to acquire enemy weapons that might engage its flank(s).
- Normally, you accompany the moving element; your XO controls the overwatch element.
- The moving elements should all use one radio net to facilitate control. The overwatch element should do likewise.
- Engineers, if available, accompany the maneuver element to breach obstacles and destroy fortified positions.
- Air defense systems, if available, are with the overwatch element.
SUMMARY
REMEMBER that suppression is the key to movement.
HOW TO ASSAULT
The assault is the actual overrunning and setting of an occupied enemy position. The assault is either mounted or dismounted. The assault may be conducted by the team moving in mass or by use of fire and movement.
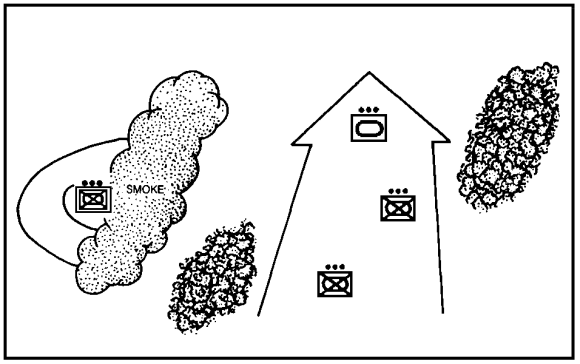
Mounted assaults are conducted against a moving enemy force or where the enemy's defenses are weak and can be suppressed. Tanks lead followed by the BFVs. BFVs protect against dismounted infantry and provide suppression to the flanks. The assault force moves through to the far side of the objective as rapidly as possible. Infantry dismounts to mop up resistance and clear the objective.
FIGURE 38. DISMOUNTED ASSAULT SUPPORTED BY TANKS AND BFVs.
A dismounted assault is conducted by infantry supported by tanks and BFVs. The dismounted assault is required when obstacles and enemy antitank fires preclude tank assault or when the enemy's defenses and terrain provide good dismounted approaches. The dismounted infantry clear the enemy or obstacles as quickly as possible to allow the tanks to move forward. Considerations for this type of attack are:
- Indirect fires are moved just ahead of the dismounted force.
- Coordination between the dismounted infantry and overwatching tanks and BFVs is difficult. Colored smoke, use of flares (for thermal sights), and other measures are used to designate targets and shift supporting fire forward of the infantry are critical.
An assault is most often conducted with tanks, dismounted infantry, and BFVs. Your infantry moves mounted as far forward as tactically feasible. Dismounting them too early slows down the assault and increases their exposure to small arms and indirect fires that the tanks and BFVs will attract. Dismounting infantry too late exposes tanks, BFVs, and their infantry to destruction by handheld antitank weapons. Key considerations for effective assaults are:
- The assaulting force must detect and destroy enemy antitank systems. Modern defenses are built around antitank systems with dismounted infantry positioned to protect the antitank systems. Neutralization of the defender's antitank weapons is the key to an effective assault.
- Assaults across skylines or through open areas should be avoided. If open areas must be traversed, smoke can assist in concealing the movement.
- Two other indications of danger are destroyed--friendly vehicles and defiles. Destroyed vehicles usually indicate an enemy engagement area or fire trap. Defiles through choke points or obstacles are frequently covered by fire.
- All-round security must be maintained. Because of the considerations cited above, you must expect and react to enemy fire from any direction. The natural tendency is to focus on the direction of movement and the assigned objective.
- Maintain mutual support between tanks, BFVs, infantry, and fire support. Attack to isolate the defender form his support. As much as possible, you should attack only one or two enemy weapon positions or part of a dismounted infantry defensive position at a time. Other supporting enemy positions are fixed by company or task force elements.
- A balance between speed and synchronization must be maintained. Moving too slowly allows the enemy to reposition and adjust to defeat your attack. Moving too fast can destroy the synchronization of your attack and be equally damaging to success.
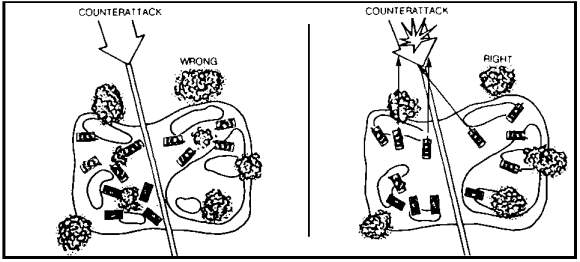
CONSOLIDATION ON THE OBJECTIVE
The actual occupation of the objective is a critical time. You have totally destroyed the enemy or he has surrendered. Your control is most difficult at this time. This is also the time when an aggressive enemy will deliver a carefully planned and coordinated counterattack.
You should assigned a sector to each platoon in your attack plan. As soon as the assault is complete, each platoon should move quickly to its assigned sector and take up a hasty defensive position. The company prepares to hold the objective against enemy counterattack or continue the attack, depending on the mission.
If the enemy counterattacks to regain the objective, normal defensive action is conducted. The measures taken against enemy counterattacks are planned before the attack and included in the attack order.
FIGURE 39. CONSOLIDATION OF THE OBJECTIVE.
REORGANIZATION ON THE OBJECTIVE
Reorganization must be rapid yet thorough. Each platoon leader reports his casualties, ammunition expenditures, fuel status, and vehicle status to you and your XO. The XO or 1SG passes it on to the task force. These reports must be rendered at the earliest possible moment since they contain information needed in subsequent planning and orders.
If personnel losses are heavy, crew and squad members are reassigned. Survivors of vehicles which were damaged during the attack move to the objective where they temporarily replace casualties.
Ammunition is redistributed from disabled vehicles. The maintenance section makes such repairs as the time available will allow.
The commander is responsible for the evacuation of--
- Wounded personnel, both friendly and enemy, in his zone of action.
- Intelligence information, maps, and so forth.
- Disabled vehicles.
- Prisoners of war.
- KIAs.
If the attack is to be continued, the reorganization should not be considered a lengthy affair. This gives the enemy no opportunity to rally. Necessary FRAGOs issued updating the attack plan.
Learning Event 6:
LIMITED VISIBILITY OFFENSIVE OPERATIONS AND TEAM ROLES IN THE REDUCTION OF A FORTIFIED STRONGPOINT
Limited visibility attacks are conducted to--
- Achieve surprise.
- Avoid heavy losses.
- Exploit success and maintain momentum.
- Keep pressure on the enemy.
- Exploit our advantage in night vision devices.
The techniques for the night attack (with slight modifications) apply to attacks when visibility is reduced by other conditions.
A night attack may be nonilluminated or illuminated. In either case, illumination is always planned. The attack may start nonilluminated and end illuminated. Normally, the task force commander decides which method to use or when to illuminate; on occasion this decision could be made by the company team commander, if the tactical situation warranted it. Sources of illumination may be hand-fired flares, grenade launcher illumination rounds, artillery and mortar illumination rounds, or aircraft flares. Night sights and night vision devices are used to aid movement and control.
The company team may conduct either a mounted or dismounted night attack. A mounted attack is normally conducted to maintain the momentum of the attack against enemy forces occupying hastily prepared positions. A dismounted night attack is normally conducted to achieve surprise.
To conduct a night attack by stealth, the commander must have detailed intelligence about the enemy. Preparations may take several days. Sometimes the attack can be made by stealth to a point and then illumination used the rest of the way. For example, the enemy may have obstacles to the front of his positions that can best be cleared or breached before using illumination. Suppressive fire is placed on the enemy to cover breaching operations. Illumination is used as needed.
Control of platoons and weapons is much more difficult at night. Strict light and noise discipline is required.
- Control measures are more restrictive when visibility is limited.
- Assembly area. Smaller and closer to the LD than for a daylight attack.
- Attack position. Routinely used for a night attack, preferably in defilade and easy to enter and exit; usually the last available covered and concealed position.
- Line of departure (LD). Same as in daylight.
- Point of departure (PD). The exact place where the company team crosses the LD. The company team will normally cross using the traveling technique. There may be more than one PD. It should be easy to identify. If necessary, guides should be posted to help with control.
- Release point (RP). During a dismounted night attack, each company team commander releases control of his infantry platoons to the platoon leaders at the platoon RP. Each platoon leader releases control of his squads to the squad leaders at the squad RP. RPs are far enough back to let units deploy before they reach the probable line of deployment (PLD).
- Direction of attack. Same as used in daylight.
- Axis of advance. Same as used in daylight.
- Route. During a dismounted night attack, the company team commander normally picks the route from the company team RP or assembly area to the platoon RP. Each platoon leader picks the route from the platoon to the squad RP. Guides may be used to help in the movement from the RP to the PLD.
- Probable line of deployment (PLD). The PLD is the place from which the company team conducts the assault if enemy contact has not already been made. It should be as close to the objective as possible on an easily identifiable terrain (such as road, trail, or woodline).
- Objectives. Same as used in daylight.
- Limit of advance. The battalion task force commander or the company team commander establishes a limit of advance to help control his attack and prevent assaulting elements from being hit by friendly fires (fratricides).
This limit should be easy to recognize during limited visibility. It should be far enough beyond and to the flanks of the objective to give security elements space to perform their mission. Fire support elements can engage enemy forces beyond this line without clearance from the supported unit.
- Formations and movement techniques. The commander decides what the company team formation will be and whether tanks or infantry will lead. Each platoon's formation depends on its position in the company team formation, the terrain, and the enemy situation.
The company team may cross the LD in column with platoons in column when--
- Visibility does not permit any other formation.
- Distance to the objective is great.
- Early contact with the enemy is not expected.
If the company team is in contact with the enemy and the distance to the objective is short, the LD may be the PLD. In this case, the company team crosses the LD/PLD on line, with the platoons also on line.
The distance between platoons is based on the visibility, terrain, and any other factors that affect control. Since visibility is poor, the company team normally moves either by traveling or by traveling overwatch. Bounding overwatch is difficult to do at night, even with the help of night vision devices.
- Both direct and indirect fires are planned as in daylight attack. However, these fires are not delivered until the company team is ready to assault or is discovered by the enemy, if the emphasis is on stealth. Some weapons may fire before the attack and keep up a pattern to deceive the enemy or to help cover the company team's movement with noise. This will not be done if it discloses the attack.
- Indirect fire is more difficult to adjust when visibility is poor. If doubt exists about exact friendly troop locations, indirect fire is directed at enemy positions beyond the objective and then walked onto the objective. Illumination rounds, fired to burn on the ground, can be used to mark objectives and keep the company team oriented.
- Smoke is planned to further degrade the enemy's observation, and yet not restrict friendly movement or hinder the breaching of enemy obstacles. Smoke is not used on the objective during assault because it would obscure enemy positions.
- Illumination is always planned for a night attack. That gives the commander the option of calling for it if he needs it. The task force commander normally controls illumination but may authorize the company team commander to call for it when needed. If the commander decides to use illumination, it should not be called for until the assault is initiated or the attack is detected. It should be placed on several locations over a wide area to confuse the enemy as to the exact place of the attack. It should also be placed beyond the objective to help assaulting elements see and fire at withdrawing or counterattacking enemy troops. Once used, illumination must be continuous because attacking elements will have temporarily lost their night vision. Any break in illumination may also reduce the effectiveness of suppressive fire. Squad, section, and platoon leaders do not use hand flares before the commander has decided to illuminate the objective.
- In severely reduced visibility, the stabilized guns of the tanks and BFVs may be used as navigational aids. The guns can be pointed on a predetermined azimuth before movement, then the stabilization system turns on. As the vehicle moves, the gun will always point in the same direction. It is only necessary for the driver to follow the gun tube for the remainder of the route.
- Consolidation at night presents special difficulties. It is very easy to miss enemy on or near the objective, especially if the objective is large. Dispersion between vehicles and soldiers must be less than in daylight to ensure mutual support. Leaders must physically check each vehicle's/soldier's fighting position and ensure that OPs are established. It is especially important to coordinate face to face the tie-in of adjacent platoons and companies. Because of these inherent difficulties, the exhaustion of team members, and the probability of enemy counterattack at first light, stand to is critical. The team must be awake, alert, and ready to adjust positions, recheck the objective, and defeat an enemy counterattack at first light.
One of the greatest dangers to a night attacker comes from friendly fires. Improving gunner vehicle ID skills can help. Some techniques that can be used include--
- Lateral coordination before and during the battle. Find out where units on your right and let will be, what formation they will be in, and their exact routes. Find out the same about the units to your front (normally the scouts), and the units to your rear (those providing you with overwatch). Make sure that they know the same about you. During movement keep everyone informed of where you are and especially about any route changes or delays. Always watch for units getting ahead or behind; if they do, take appropriate action.
- Ensure understanding. Make sure all your leaders know this same information. Rehearse your attack over similar ground, at night if possible. Observe the rehearsals of your subordinates and conduct briefbacks with each of your key leaders including any attachments.
- Tighten fire control. During night attacks, consider using weapons tight or even weapons hold, especially if friendly forces are to your front or in a known direction (such as weapons hold to the left. B company is attacking on our left).
- Tank thermal sights and weapons stabilization are useful in night navigation. The vehicle commander and gunner can aid the driver by using the sights to observe the terrain and talk to the driver along the route.
ASSAULT OF A FORTIFIED STRONGPOINT
The assault of a thoroughly prepared strong point is the most difficult of all offensive missions. Company teams generally do not assault fortified strongpoints by themselves. Attacks against fortified areas and strongpoints are extremely costly in terms of time, equipment, and casualties, and should be attempted only when there is not acceptable alternative.
A fortified position is attacked by a combined arms assault force consisting of tanks, mechanized infantry, field artillery, engineers, and tactical air when available. Special items of equipment and ammunition may be required.
The key differences that a company team commander should recognize and expect are:
- It is usually a dismounted infantry mission where tanks, BFVs, and other heavy supporting weapons fire from protected overwatch positions to cover the assaulting infantry.
- Tanks will still lead the mechanized infantry as close as possible to the objective.
- The actual assault is made by dismounted infantry. A properly prepared enemy fortified or strongpoint position will normally cause a mounted assault to be impracticable.
- The METT-T analysis could cause the company team to task organize below the platoon level (for example, an infantry platoon with an engineer squad attached). Where terrain is restrictive, a tank section might be OPCON and fully integrated into the mechanized infantry platoon's mission. This is an exception based on METT-T and not the rule.
The most obvious problem in overcoming a fortified strongpoint is overcoming the extensive obstacle belt(s) protecting it. Enemy obstacles, like our own, are usually covered by direct and indirect fires.
BASIC CONCEPTS FOR BREACHING OBSTACLES
Complex obstacles take time and engineer support to emplace and are designed to block major avenues of approach to deny key terrain to the attacker. Usually they form part of an enemy strongpoint defensive position. Company teams breach complex obstacles as part of a deliberate task force operation. As you approach the enemy, you may encounter his outer defensive obstacles in his security zone, particularly mines. You must carefully decide whether to bypass or breach the obstacle in stride. A bypass may lead into an enemy kill zone. A breaching operation may consume more time and result in casualties. If the obstacle is to be breached, the company team conducts a hasty (in stride) breach using the equipment on hand to maintain momentum or participate in a task force hasty or deliberate attack. Hasty (in stride) breaching is preferable to forcing a way through an obstacle, but less desirable than bypassing.
If the necessary equipment is not available, you may have to force your way through the obstacle or move back to a hasty defensive position until a deliberate breaching operation can be started. Although not a desirable breaching method, you may have to bull through the obstacle to complete your mission. In doing this, you must direct a vehicle or personnel to breach a lane. The most expeditious and least costly way to force a breach in a minefield is to use minerollers and plows. Any solution is preferable to bogging down in front of an obstacle and taking casualties from direct and indirect fires.
Your reconnaissance will dictate whether you attempt a hasty (in stride) breach with your mechanized company team or report the requirement for a task force deliberate breach.
A successful hasty (in stride) breach depends on speed and surprise to overcome the obstacle before the enemy can focus his defense to defeat you. Armored vehicles roll through and over wire obstacles without stopping. When wire and mines are integrated, grappling hooks can tear away the wire, quickly followed by mine plows and rollers to clear and path through the unexploded mines. Unless you infiltrate an obstacle and breach it by stealth, dismounting soldiers to breach obstacles is both risky and time consuming. While your hasty (in stride) breach is occurring, the rest of your team deploys on the flanks suppressing known or suspected enemy positions. Once the obstacle is breached, your team surges through, overwhelms the remaining enemy and continues the offensive movement. In conducting a hasty (in stride) breach, the company team organizes internally to perform the same functions as the task force performs in conducting a deliberate breach. That is to say the company supports the breach with suppressive fire, breaches the obstacle, and assaults through to the other side. The determination of when the company team can effect a hasty (in stride) breach and when the task force must organize an deliberate breach is a function of METT-T. The more elaborate the defenses, the more organization, effort, and combat power is required to overcome them.
In the task force plan, usually your company team is only required to perform one of the three major missions: support force, breaching force, or assault force. FM 90-13-1 provides additional information on counter-obstacle operations.
THE SUPPORT FORCE
The support force leads in the movement to the obstacle. The essential capability of the support force is effective, long-range, direct-fire suppression of enemy defensive positions. The support force is tank-heavy and includes available antitank units, the mortar platoon, and air defense weapons.
The support force forms the base of fire for the breaching operation, overwatches the other elements, and gains fire superiority over enemy direct-fire weapons. It also provides air defense coverage using attached air defense weapons and its own small-arms and automatic weapons. If the support force cannot do these things, the obstacle breach will fail.
THE BREACHING FORCE
The breaching force follows the support force to the obstacle, passes around or through the overwatch position, and begins to clear a lane through the obstacle. The essential capability of the breaching force is the reduction or removal of obstacles. The breaching force is engineer and infantry heavy and includes all available specialized breaching equipment such as CEVs, AVLBs, MICLIC line charges, mineplows, minerollers, and so forth.
The breaching force cuts through the obstacle opening lanes in each successive layer of the obstacle. Minefields are breached using the equipment available beginning with the line charge to detonate mines. The mineroller proofs the passage for the assault force. CEVs and AVLBs are used as necessary to destroy obstructions and bridge gaps/ditches. The breaching force operates under obscuration to maintain the momentum of the attack. When necessary, the breaching force may follow and reinforce the assault force.
THE ASSAULT FORCE
The assault force follows the breach force in the movement to the obstacle. The assault force must be able to move rapidly through the obstacle on the lanes created by the breach force. The assault force then attacks to destroy enemy forces defending the obstacle. It continues the attack to either expand the lodgement and roll up the enemy flanks or pushes on deep into the enemy rear depending on its mission. The primary requirements for an assault force are mobility and firepower. The composition of the assault force depends on the nature of the enemy defense and the terrain. It is infantry heavy when assaulting an enemy strongpoint, tank heavy when facing a mobile enemy defense.
ASSAULT CROSSING OF OBSTACLES
Suppression. Suppression of enemy direct-fire defenses is the problem of the support force. It has a difficult task because it must be able to put direct fires on enemy positions, adjust indirect suppression, and smoke from artillery and mortars, as well as provide air defense coverage in the assault crossing area. Its positions are normally under enemy observation, at least initially, and receive enemy defensive fires as a result. The support force must take up positions that leave the way clear for the breach and assault elements yet allow the support force to perform its mission. Ultimately, the support force will follow the other elements through the breach and rejoin the fight on the other side.
Obscuration. Smoke or natural obscuration are imperative in assault breaching unless enemy defenders are totally destroyed or suppressed by the support force. Specialized engineer equipment and dismounted engineers and infantry are extremely vulnerable to enemy direct and indirect fires which he will have registered on his obstacle. Obscuration seriously complicates command and control of the breach force and tends to slow and confuse the separate elements of the breach force. It may also make direct fire from the support force impossible. Thorough training, preparation, and rehearsal can overcome these difficulties and permit the breaching force to maintain direction, cohesion, and momentum.
Security. Ideally, the obstacle is breached after securing the far, or enemy, side. Friendly forces can reach the far side of the obstacle by infiltration, bypass, air assault or minor breach. Elements on the far side of the obstacle are part of the support force, operating under the breach force commander. They secure the exits of the breach and assist in suppressing enemy fire. Usually, however, security must be provided by the fires of the support force alone operating on the friendly side of the obstacle.
Reduction. Reduction of the obstacle is the most complicated part of the assault crossing. As the breach force commander, you are located well forward to see the action and control events.
As the breaching force moves forward, you will place obscuration and suppressive fires on the objective area and on the antitank ditch and berm. Shift the fires to the enemy fortifications and emplacements once your soldiers have breached the minefield(s). To clear the trenches and bunkers of defending enemy infantry, you should use VT and delay-fuze settings.
In most cases, one of your platoon leaders will control the mineroller and plow tanks from a close-in position. The mineroller tanks lead the initial columns of your breaching force. The mineroller tanks move in a vee formation about 75 to 100 meters lateral dispersion. The third mineroller tank, towing an M173 projected demolitions charge or MICLIC, will follow centered and to the rear approximately 100 meters. The two forward mineroller tanks check for an irregularly shaped minefield. The breach should occur at the narrowest part of the minefield to facilitate crossing. The mineroller tank towing the MICLIC may carry an engineer to help operate the line charge. The MICLIC mineroller tank also acts as a backup should one of the lead mineroller tanks be halted. Each of the mineroller tanks will carry a distinctive pole and marker flag/pennant. The pole and pennant is used to mark the forward edge of the minefield.
When the mineroller tank pulling the MICLIC demolition charge is in place, the loader fires the MICLIC charge from inside the tank. The demolition charge is detonated, creating a gap 8 x 100 meters.
Since the flight path of the line charges are erratic, a second projected demolition charge is not normally used to further any breaching. Instead, the roller tanks continue from the end of the existing breached area forward after proofing the line charge breach lane. The roller tanks follow a staggered path so that one of the rollers on the second tank moves in a path between that of the rollers on the first tank. This procedure does not guarantee destruction of 100 percent of the mines because the rollers will not cover all the ground between the lead tank's tracks. The area rolled, however, will allow relatively safe passage of other vehicles such as BFVs, which are not as wide as tanks. Engineers will be required to manually clear this area afterwards.
If there is an antitank ditch, the mineroller tank(s) move forward making sure a path is cleared all the way to the edge of the ditch. The platoon leader remains at the entrance of the minefield, providing overwatch. Mineplows immediately assume the mission of the roller tank(s), if is knocked out.
While the mineroller (or mineplow) tanks are proofing the path through the minefield to the antitank ditch, the engineers move behind them to mark the edges of the breach. The engineers move to the edge of the antitank ditch on the path cleared by the tanks, check for booby traps, and assist in providing suppression on the berm.
While the tanks and engineers are negotiating the minefield, you should move to a location to control and, if necessary, lead an assault against initial enemy security positions. This position is situation dependent; however, it should be close to the breach site (200 to 300 meters). You are responsible for the traffic flow into the area around the breach site and must make sure a build-up area does not occur and that vehicles and personnel enter and exit the area swiftly without stopping. Vehicles and personnel remain dispersed to prevent becoming lucrative targets for massed fires.
FIGURE 40. MINE-ROLLER TANKS LOCATING MINEFIELDS.
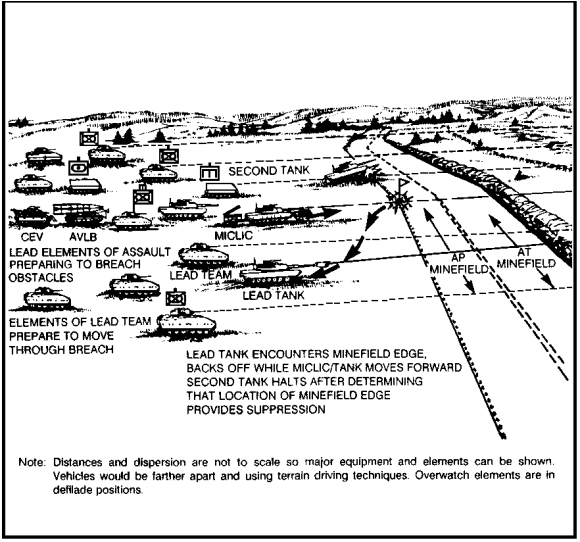
When the mineroller tanks have found the edge of the minefield, the mineroller tank with the line charge will move forward. The first mineroller tanks back up approximately 5 1/2 tank lengths (approximately 50 meters). The mineroller tank with the MICLIC moves on line 50 to 60 meters from the edge of the minefield. The length of the anchor line connecting the demolitions charge to the MICLIC sled is 64 meters long. The combined length of the mineroller, tank, and the MICLIC tow cable is 16 meters; therefore, it is necessary for the front edge of the mineroller to be 50 meters back from the edge of the minefield. This standoff allows the anchor line to overlap the estimated edge of the minefield.
FIGURE 41. MINE-ROLLER TANK WITH MICLIC.
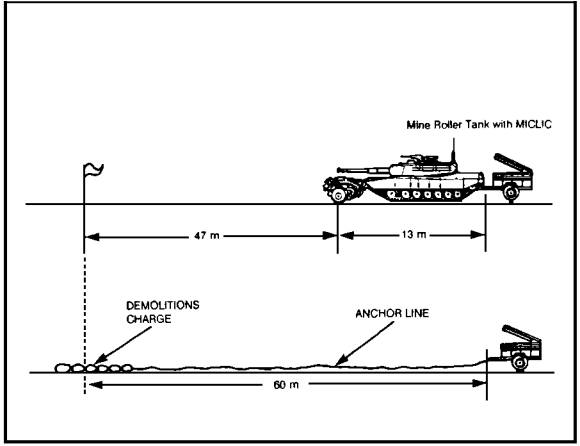
As soon as the engineers begin movement into the minefield, your lead infantry platoon follows them. Initially, one mounted squad and the platoon leader remain at the entrance to the minefield breach to provide overwatching fires. Two infantry squad vehicles then move to a location behind the engineers and dismount their rifle teams. Rifle teams move across the antitank ditch and clear the berm to the sides of the proposed crossing site. The squad vehicles pull back behind the roller tanks.
While the crossing site area is being cleared of enemy infantry, the AVLB is signaled forward and directed into position by the engineer leader. The bridge is emplaced and the AVLB launcher withdraws completely out of the minefield.
The overwatching rifle team that remained at the entrance to the breach now moves through the minefield breach on foot to the crossing site to assist in securing the berm.
The first vehicle to cross to the other side is a mineroller tank followed by the platoon leader's tank, which immediately engages any targets identified by the infantry securing the crossing site on the antitank ditch berm. Infantry platoons not involved in securing the berm cross the ditch and move directly toward their dismount point. BFVs are firing with 25-mm chain gun and coaxial machine gun fire to destroy enemy security positions and secure the far side of the breach. They are reinforced by the platoon that secured the berm as soon as possible. Should the mineroller tank leading the assault group on the far side of the antitank ditch encounter another antitank minefield, it continues to breach a gap in the newly discovered minefield.
FIGURE 42. BREACHING FORCE MOVING THROUGH BREACH
INTO ASSAULT OF SECURITY POSITIONS.
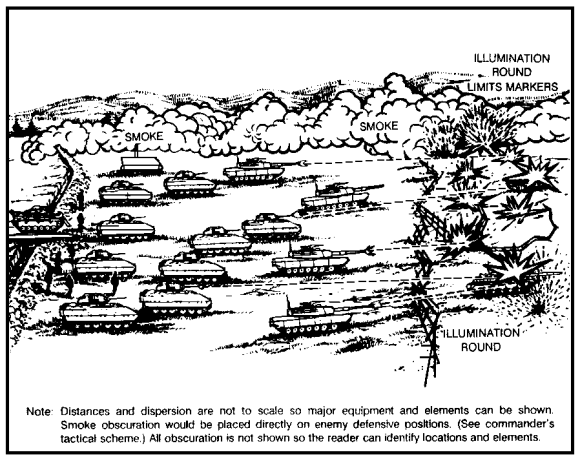
The CEV is also called forward by your engineer platoon leader to demolish logcribs, abatis, and similar obstacles. If not needed for this purpose, its dozerblade is employed to backfill the ditch adjacent to the bridge. Once this is accomplished, it moves to any additional lanes breached by the engineers and fills the ditch at those locations.
The individual in charge of the lane through the minefield (usually the battalion XO), ensures the steady flow of traffic through the breach site by positioning himself in a location where he can observe and control actions at the site.
ASSAULT OF THE ENEMY TRENCHLINE
Often a complex obstacle protects an enemy strongpoint. The reduction of a strongpoint is a time-consuming, costly business undertaken only when there is not alternative. Once through the obstacle, the assault on the strongpoint continues. This is the mission of the assault force.
As the lead elements of the breach force are closing on the enemy's security positions on the far side of the antitank ditch, the assault force crosses the breach site and moves through the breach force into the assault.
If you are the assault force company commander, you will accompany the first infantry platoon in the assault on the fortifications. By being well forward, you can influence the battle and ensure all efforts are coordinated. Because of its peculiar signature as a command and control vehicle, your FIST vehicle remains on the near side of the breach until the platoons have all crossed. The company FSO will move where he is able to observe and adjust indirect fires on the objective. Artillery illumination rounds may be placed on the objective--either in daylight or reduced visibility conditions--to assist in control of the assaulting elements and to ensure that they attack the proper objective. The illumination rounds provide an easily visible reference point on which to guide. The objective may be bracketed with two or more illumination rounds allowing for visual guides for each assault element to assist in accurate adjustment of indirect fires and placement of direct fires through battlefield obscuration.
Once your company has crossed to the far side of the, antitank ditch and is moving on the objective, they prepare to breach the final set of obstacles in front of the main defensive fortifications. Tanks and infantry BFVs move directly through/over the wire. Infantrymen remain mounted to preclude hitting any antipersonnel mines emplaced directly in front of the enemy positions. Once over the close-in protective wire, infantrymen immediately dismount and begin the assault on the trenches. The BFVs should move as close to the trenchline as possible before dismounting the troops.
Clearing the trenches and bunkers of the strongpoint is small-unit action conducted by teams, squads, sections, and platoons. Tanks suppress weapon positions and maneuver to prevent terrain or friendly troops from masking their fire.
Practice Exercise