

|
RDL Homepage |
Table of Contents |
Document Information |
Download Instructions |
LESSON 1
COMPANY TEAM ORGANIZATION
TASK
Identify command and control responsibilities, command and support relationships, troop-leading procedures, operations order, and command and control of operations.
CONDITIONS
Given the subcourse material for this lesson, a training scenario and extracts, as applicable, the student will complete the practical exercise at the end of this lesson.
STANDARDS
The student must demonstrate his comprehension and knowledge by understanding command and control responsibilities, command and support relationships, troop-leading procedures, operations order, and command and control of operations.
REFERENCES
GENERAL
In this lesson, the division of tasks among key subordinates will be discussed. You will look at the delegation of responsibilities by the commander, and the process of troop-leading procedures. This lesson will also cover the importance of combat orders, and the extreme difficulty in controlling combat operations.
Learning Event 1:
IDENTIFY THE COMMAND AND CONTROL RESPONSIBILITIES OF COMPANY TEAM IN OFFENSIVE OPERATIONS
COMMAND AND CONTROL RESPONSIBILITIES
This learning event focuses on the responsibility among key leaders. Each leader must know his job and how the company team functions while executing its missions. This learning event provides basic guidance on the duties and responsibilities of your executive officer, platoon leaders, company fire support officer, first sergeant, and other key personnel in your company headquarters. At company level, the effective exercise of command and control depends primarily on leadership, training, sound SOPs and drill, the effective use of control measures and good communication techniques.
DUTIES OF KEY PERSONNEL
The Executive Officer. The XO is the second in command. He will take charge of the second most important area or function on the battlefield. This important area will be determined by the commander. The battalion task force operations center will receive continuous routine reports from the XO during battle. Prior to the battle, he must coordinate with his battalion for combat service support. He must be aware of the tactical situation so that he can brief the commander, and be prepared to take over if the commander becomes a casualty. The XO's position during battle is normally well forward, where he will not engage in the actual fight. He is positioned in his assigned armored vehicle in the nearest available overwatch position, so that he can observe, and communicate with both the battalion task force and lateral units.
The Company Fire Support Officer (FSO). The FSO develops a fire support plan, which complements the tactical plan. Once the commander approves the fire support plan, it is forwarded to the fire support element (FSE) at the battalion task force tactical operations center (TOC). He rides with the company team commander, or uses his own fire support vehicle (FSV). The FSO calls for and adjust fires at the direction of the company team commander. He is also responsible for coordinating close air support (CAS).
The Platoon/Section Leaders. The platoon leaders of the mechanized, tank, and attached combat support elements are responsible for training, tactical employment, and logistics of their platoons. Each platoon leader must know how to tactically employ their platoon weapons and know their capabilities. The cross-attached platoon leader must advise the company team commander of his platoon's capabilities and how they can best support the company's mission.
The First Sergeant. The first sergeant assists the commander by performing assigned duties, and advises the commander on enlisted matters. He supervises the company team's administration, precombat inspections, combat service support, maintenance, and training matters. The first sergeant receives CSS reports from the platoon sergeants. Once the operation begins, he will continue coordination with the platoon sergeants and the XO for other requirements. Medical and maintenance personnel are dispatched when required. The first sergeant is normally in charge of the company team combat trains.
The Supply Sergeant. The supply sergeant requests, receives, issues, stores, maintains, and turns in supplies and equipment for the company team. He is in charge of the company team assets in the battalion task force field trains. He brings all required supplies forward to the company team personnel. His immediate supervisor is the HHC commander.
The Nuclear, Biological, and Chemical (NBC) NCO. The NBC NCO assists the commander in planning and conducting NBC operations, and training of the company's NBC teams. He relays NBC reports between the company team and the battalion. He advises the commander on contaminate areas and maintains the radiation status chart. The NBC NCO in a tank company will operate as far forward as the situation will permit with the XO in the XO's vehicle. In a mechanized infantry company, he will normally operate forward, or from the company combat trains.
The Armorer. The armorer assists the supply sergeant when required. He is primarily responsible for the repairs of small arms of the company team. He must be immediately available to repair the company team's small arm weapons.
The Master Gunner. The master gunner is the commander's primary advisor on armored vehicle gunnery training and techniques. One master gunner is assigned to a tank company and a total of four are assigned to an infantry company. The master gunner is an expert on the technical aspects of armored vehicle hulls, turrets, and weapon systems. He may also serve as the company operations sergeant, and the vehicle commander in the absence of the commander. He occupies the gunner's position in the commander's vehicle.
The Tactical Communications Chief (Infantry Companies). The tactical communications chief is responsible for the installation, operation, and maintenance of switchboards, telephones, field wire communications, FM radios, and the distribution of CEOIs. He is well forward with spare parts and test equipment to perform essential repairs and maintenance on all communications equipment. He is normally located with the company team executive officer.
Maintenance Team Chief. The maintenance team chief is attached from the battalion task force maintenance platoon, where he supervises the company maintenance team. He makes decisions on the evacuation of damage vehicles or repairs them in place. In the absence of the first sergeant, he leads the company team combat trains. The maintenance team chief ensures that maintenance team personnel are directed to the locations of damaged vehicles. He manages the maintenance team mechanics, evacuation assets, and keeps track of the tactical situation.
Senior Aidman. The senior aidman is attached from the battalion task force aid station. He supervises the company team medics, and administers first aid to casualties. He assists in training soldiers to perform buddy aid, and giving training to combat trains personnel in handling mass casualties. The senior aidman keeps track of the tactical situation, and advises the first sergeant on the status of casualties and any additional assets needed for evaluation.
Tank Commanders and Squad Leaders. These leaders select and prepare fighting positions, maneuver their vehicles and weapons system. They enforce discipline and take good care of their soldiers.
Soldiers. The individual soldier maintains his equipment and employs his weapon to destroy the enemy. He reports what he sees, prepares for combat and fights. His most important assets are his skills, initiative, character, and how he improvises with minimum assets.
CONCLUSIONS
Various tools have been developed over the years to assist a company commander in executing and accomplishing tactical operations. To ensure his unit accomplishes its missions, a commander must initiate command and control.
Learning Event 2:
IDENTIFY THE COMMAND AND SUPPORT RELATIONSHIP OF A COMPANY TEAM IN OFFENSIVE OPERATIONS
COMMAND AND SUPPORT RELATIONSHIP
This learning event provides information on units attached or cross-attached to other units. As a commander, you must establish command relationship with other units, a line of authority, and required support to accomplish the mission.
Assigned Elements. These are elements assigned to another unit, and depends on the unit for full support. These assigned elements can either be in the form of a unit, personnel, and equipment. These elements are employed by the commander and supported with company assets.
Attached Elements. These elements are not organic to your company. During employment, your company must provide all logistical support in an operation. At company level, this is the most common command relationship.
OPCON Elements. These elements are employed by the commander but not organic to his unit. Unlike attached elements, an OPCON element may have unique equipment and other sustainment needs, but will not be provided logistical or administrative support by your company.
Direct Support Elements. Direct support element receives all logistical support from the parent unit. This element responds directly to the supported force's request for support.
INFORMAL RELATIONSHIPS
There are relationships other than formal relationships that will exist between units on the battlefield. Cooperation must occur when units are adjacent to each other; occupying the same area; maneuvering through the same area; and are given part of the same task to accomplish. Close cooperation requires coordination. Commanders must talk to each other to know how they can assist in the accomplishment of the mission.
Combat support and combat service support element in or adjacent to the company team's area of operation should coordinate positioning resupply and evacuation of casualties. The executive officer and first sergeant will assist the commander in coordination. Conflicting directives can be clarified by the task force S3 or the commander.
CONCLUSION
At times, sections and platoons, as well as your company, may be attached or cross-attached to other units. The command relationship that you have with other units will assist you and other units in accomplishing the mission.
Learning Event 3:
TROOP-LEADING PROCEDURES FOR COMPANY TEAM IN OFFENSIVE OPERATIONS
This learning event will provide commanders with the necessary tools in planning tactical operations, making sound decisions; and making estimates of the situation. Troop-leading procedures are the commander's basic tools for planning the estimate and the decision making process. These procedures are accomplished concurrently rather than sequentially, where possible. Most of the estimate will fall within step 3 of the troop-leading procedures, and is continuously updated. Troop-leading procedures begins when you receive a mission and ends when you complete that mission. These procedures consist of a series of actions used for planning, coordinating, executing, and supervising tactical operations.
COMMANDER'S (OPERATIONS OFFICERS) ESTIMATE OF THE SITUATION
Receive the Mission. The mission is received as an oral or written order. Usually an advanced notice will be given of a mission in a warning order format. Planning should begin immediately with any available information. Planning should be reversed to allocate time for proper planning. See reverse planning schedule below. Commanders should allocate two-thirds of the available time to their subordinates to do their planning and preparation. The battalion task force orders group have the opportunity to coordinate with other company team commanders and the battalion task force staff. The FSO should accompany you to the orders group so that he can talk to the battalion FSO about the battalion task force fire support plan.
REVERSE PLANNING SCHEDULE
| TASKS TO BE COMPLETED | |||
| Cross LD/LD. | |||
| Conduct passage of lines. | |||
| Conduct road march. | |||
| Platoon leader time, backbrief, supervise, and implement sleep plan as required. | |||
| Issue oral order with sketch map. | |||
| Make decision and complete plan. | |||
| Conduct reconnaissance with XO, platoon leaders, and FSO, and conduct liaison with units as required. | |||
| Make tentative plan. | |||
| Issue warning order/update as required. |
Issue Warning Order/Begin Preparations. A warning order includes, as a minimum, the situation, such as mission type (attack, delay, defend or withdraw). Start time of the operation, and the time and place you will issue your OPORD. The warning order should be issued as soon as possible. Precombat checks and any additional information that will assist your unit in preparing for the mission. As additional information becomes necessary. Follow-up information or a warning order should be given to your unit.
Make Tentative Plan. To reach a tentative plan, you continue your estimate of the situation. As a minimum, you will analyze the situation according to the factors of METT-T. From this analysis, you will develop possible courses of action. At this point, you may not have enough information to decide which course of action is best to take. Graphic control measures, based on your map reconnaissance, may support your courses of action. Discussing the estimate of the situation with your subordinates will assist them in getting to work on their plans.
Start Necessary Movement. Based on the tentative plan, it may be necessary to begin movement immediately or initiate other preparations. As this plan is developed, additional warning orders, FRAGOs, or movement instructions may be issued. Company SOPs should establish procedures to alert the unit for movement and to report readiness. When attaching and detaching, the following items must be coordinated:
- Time and place of linkup.
- Recognition of signals.
- Call signs/ frequencies/secure variable.
- Company team SOP.
- Tactical situation.
- CSS status and requirements.
Reconnoiter. The commander, platoon leaders, company XO, company FSO, and a security element will conduct a leader's reconnaissance on the terrain where the operation will be conducted. The first sergeant and platoon sergeants will supervise the company team's preparations. The reconnaissance will be as extensive and detailed as possible. If time is not available to do a good physical reconnaissance, a map reconnaissance must be conducted. The purpose of the reconnaissance is to continue the estimate process, confirming or denying the tentative plan. A reconnaissance must be organized and based on a plan. As a leader, you may task subordinate elements with reconnaissance mission to gain information and to assist you in your decision making process. In the platoon's area of responsibility, they may reconnoiter:
- Cover and concealment.
- Observation and fields of fire.
- Obstacles (natural and man-made).
- Key terrain.
- Avenues of approach (friendly and enemy).
- Vehicle positions (primary, alternate, and supplementary).
- Routes the company team will use.
- Fire control references (TRPs and EAs).
- LD and phase lines (if they can be seen).
- Terrain to the company's flank and rear, especially along boundaries.
- Danger areas.
- Known or suspected enemy locations.
Complete the Plan. At this stage, all available facts have been gathered. You have analyzed and compared alternate courses of action and decided on the best course of action. Information gained from the reconnaissance operation, finalization of the concept of operation and other detailed information can be consolidated and completed. You must take actions to compensate for any disadvantages associated with the course of action. All plans should be kept as simple as possible, so that your subordinates understand your intent as well as the task you want them to accomplish. Your plan should be flexible enough to enable you to react quickly and effectively to all changing situations. Your plan should be organized according to the five-paragraph format. Organization under this format will ensure items are covered in the OPORD, or the FRAGO, together with your SOP. These items are:
- Fire support plan (with company FSO).
- Obstacle plan.
- Coordinating instructions.
- Chemical protection measures (MOPP level, decontamination sites)
- Coordination with adjacent units (front, flank, and rear).
- Coordination with higher headquarters.
- Coordinate with battalion for additional support assets if required.
- Attached units.
- Combat service support.
- Communications.
- Command and control measures (graphic).
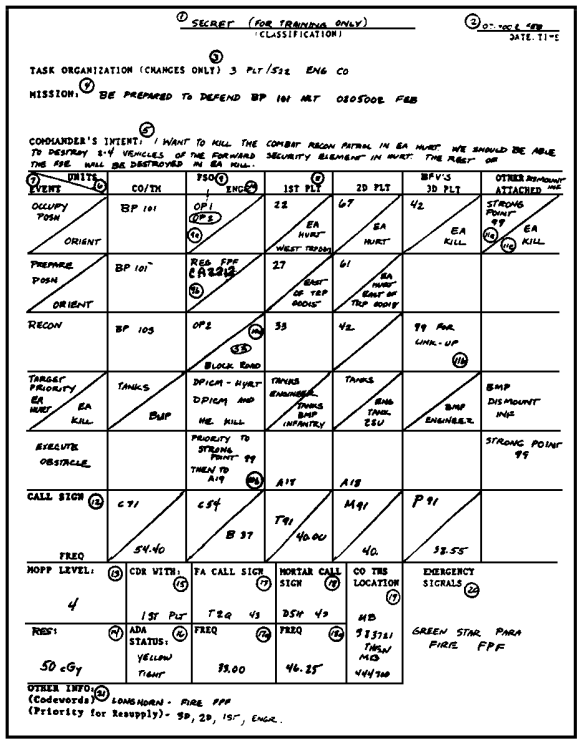
To assist you and your subordinates in completing and executing your plan, use the sample matrix below. This matrix is designed to replace a verbal order with an overlay, sketch, or terrain model. It will also aid the company commander in developing and executing the order. The matrix will provide subordinates with information of the commander's intent, and how he intends to execute the offensive mission.
FIGURE 1. COMMANDER'S INTENT/OFFENSIVE MATRIX.
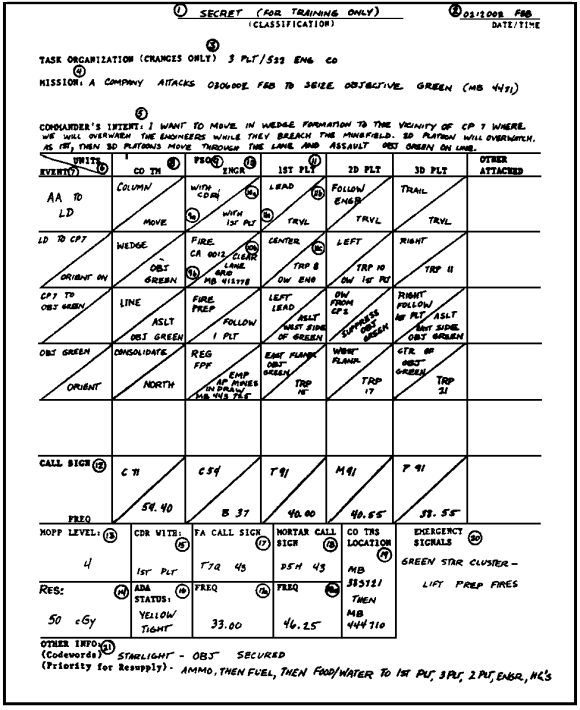
Table 1 will provide input to the above matrix.
TABLE 1. KEY TO EXECUTION MATRIX.
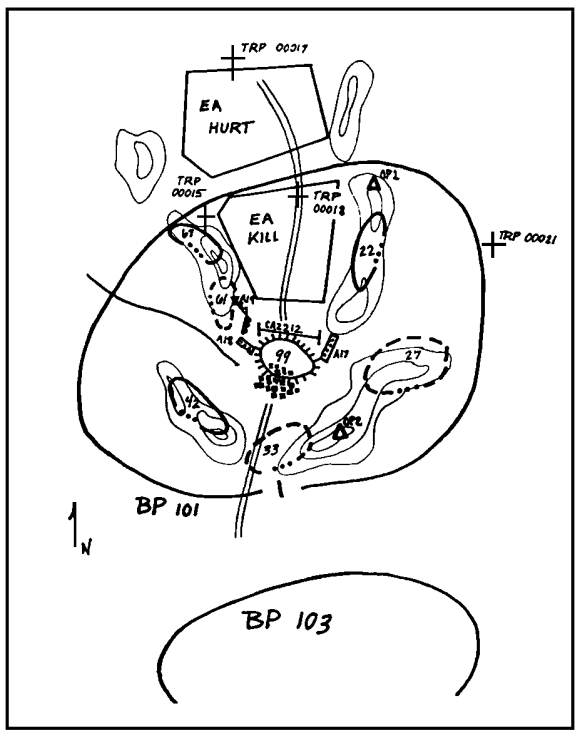
FIGURE 2. AXIS OF ADVANCE.
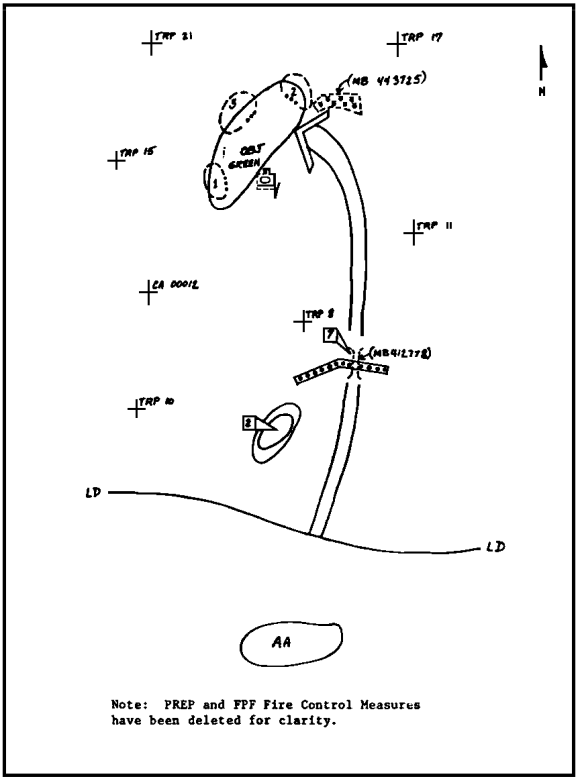
The axis of advance and location of preplanned targets during the offensive operation are given in the above figure.
To assist you and your subordinates in completing and executing your plans for defense, a defensive matrix on the commander's intent and other information is provided at Figure 3.
Issue the Order. You should issue the order at the time and place stated in the most recent warning. If possible, issue the order overlooking the terrain on which the operation will be conducted. If this is not possible, use any aids that can help your subordinates visualize the terrain. Some aids that can assist are maps, overlays, sand tables, terrain tables, and terrain sketches. Before starting the order, make sure everyone has copied the operation overlay and matrix and oriented their maps properly. Discuss your intent and concept of the operation by appointing a word picture of how you visualize the upcoming operation, to include contingencies and the company's reaction to those contingencies. Make all subordinate leaders understand how their mission fits in the overall scheme of maneuver and support your intent. Before concluding the order, have your subordinates repeat back to you the critical instructions you gave them.
Supervise. After you have issued your orders, your subordinates will use the time remaining to complete their troop-leading procedures. As these preparations are underway, you should supervise your subordinates as they carry out your instructions. Give them a reasonable amount of time to execute their orders, then check them by a combination of briefbacks, rehearsals, and inspections.
Briefbacks consist of your subordinates briefing you on their plans after they have conducted their reconnaissance and completed their estimate of the situation. This should be done before they issue their orders, which gives you a chance to modify their plans if you need to. Always allow your subordinates the time to make the required modifications and don't make them wait for your approval to issue their orders. You may want briefbacks individually or together as the situation allows; generally it is better to have all leaders brief back at one time. This allows you to make essential changes to the operation and conduct final coordination with all key leaders at one time. Don't forget to include your XO, FSO, and first sergeant in this process.
Rehearsals. Practice the critical actions your unit takes to accomplish the mission. You conduct rehearsals to make sure your unit can accomplish these actions given its state of training, the orders you have issued, and the terrain and weather conditions you expect to encounter.
FIGURE 3. COMMANDER'S INTENT (DEFENSIVE MATRIX).
Sketches of the defensive matrix, and how it is executed, is provided at Figure 4.
FIGURE 4. DEFENSIVE MATRIX (CONTINUED).
There are several ways to conduct rehearsals. One way is to conduct an exercise with the entire company team. This method is most frequently used when preparing for a complex mission and time is available to conduct the rehearsal in a secure area. Examples of such missions are an assault breach of a strongpoint position or a deliberate defense of battle positions. Always try to conduct full rehearsals, especially when you receive an attached platoon that you have not worked with before. Another technique is to conduct the exercise at reduced intervals and speeds. This technique is most often desirable when space is limited, or you want to crawl initially. A third technique is to conduct the rehearsal with key leaders. This rehearsal may be done either mounted or dismounted. Another variety of this method is to conduct the rehearsal on a terrain model or sand table.
When conducting rehearsals, emphasize those events that trigger different contingencies. This helps your subordinates understand your intent. Go over fire support as well as maneuver during the rehearsal. Practice what targets will be fired, when they will be fired, and who is responsible to call for and adjust them. Rehearse backup procedures in case the leader responsible to call for and adjust a mission becomes incapacitated.
Inspections are carried out by physically checking to see what is being done. An operational checklist may be helpful as a memory cue to you and your subordinates. This checklist is part of your unit SOP. Your company checklist should use the same general format as the platoon checklists. If you require your platoons to turn in their checklists at a specific time, it will give you a snapshot look at your company. For example, you may want such a report halfway through your preparation time to gauge your progress and perhaps redirect your priority of tasks. Filled-in checklists ARE NOT a substitute for your personal inspection of preparations. It isn't necessary for you to conduct a formal inspection to check on the progress of your platoon's preparations. Just look and see what is being done. You can often tell how well your NCOs have done their precombat checks by simply walking through your positions. Talk to your soldiers. They'll tell you how much information has filtered down to them and what they have done to get ready for the next mission.
When you spot deficiencies, correct them. Remember that on-the-spot corrections give you the chance to train your subordinates and reinforce the chain of command. When something is obviously wrong, bring it to the attention of the man in charge and make him fix it. The following list of indicators may assist you in inspecting the preparations of your unit:
- Do soldiers know what the company is doing and where they fit into their platoon leader's plan?
- Do the soldiers know what visual signals, call signs, and frequencies are being used? How about challenge and passwords?
- How well are your fighting vehicles prepared to move? Can you see soldiers using preventive maintenance checklists to conduct before-operations checks? Are camouflage nets up or down?
- Are fighting vehicles in positions where they can boresight and complete their prepare-to-fire checks?
- What has been done with the ammunition boxes used for resupply? Are they disposed of properly, still waiting to be opened, or broken open in a pile?
- Are vehicle load plans being enforced?
- Are soldiers wearing their equipment properly?
Coordination is another necessary task while you and your chain of command are supervising your unit's preparations. Responsibility for coordination is generally the same as for establishing communications: higher or lower, rear to front, and left to right. Use your XO, first sergeant, and other leaders to help you in completing the coordination necessary to accomplish the mission. Some critical items which require coordination are:
- Adjacent units to tie in flanks and provide mutual support. Planned maneuvers and security such as OPs and patrols must be coordinated.
- Overwatch, battle handover, and passage of lines: exchange routes, fire plans, and recognition signals.
- Engineers to confirm obstacle locations and ensure they are covered by fire.
- ADA and GSR to make sure their positioning does not give away the team's position, that they support the company team with air defense protection and information on likely avenues of approach, and to make sure their leaders know when and how the company team will move.
- The battalion S2 for reconnaissance and surveillance plans.
- The battalion S4 for CSS plans to include LRP locations, UMCP, aid station, prestocks, combat trains, and decontamination sites.
ESTIMATE OF THE SITUATION
The estimate of the situation is your basic problem-solving tool. It helps you make sound decisions by developing the most effective solution to a tactical problem with the time and information available. Although the estimate of the situation follows a logical, sequential format, you generally don't have time to conduct a formal, in-depth analysis on the battlefield. Memorize the format of the estimate and the planning tools contained in this section until they are instinctive to you, so that you can make a sound decision quickly. The key word, METT-T, summarize the facts bearing on the tactical problem at hand. It stands for mission, enemy, troops, terrain (and weather), and time available. METT-T represents the input into the estimate process. During mission analysis and analysis of the situation, you analyze these factors in relation to each other, given the facts available. When facts are not available to continue the estimate, you must make logical assumptions based on your experience and knowledge. The purpose of this analysis is to form conclusions, or deductions as to how these factors influence your courses of action. Analyze the mission in relation to the enemy and the terrain, the enemy in relation to your own troops and the time and space available, and so on.
Based on your deduction, you use the estimate to develop alternate courses of action. You analyze each course of action and attempt to visualize the outcome. Then, you compare the outcome of each course of action to see which is best. The last step is to make a decision. The decision is the output of the process and forms the concept of the operation.
Every time you make a decision, you should use the estimate process. Obviously, you will repeat it many times before and during a tactical mission. You will consistently update your estimate based on new METT-T information that becomes available, and use the estimate to modify decisions.
A detailed description of the estimate process is given below:
Analyze the Mission. The company team's mission consists of the primary task, or task to be accomplished and the purpose to be achieved. The mission will also include any constraints on your action. It contains elements of who, what, when, where, and why. How the mission will be accomplished is found in paragraph 3 of the OPORD. The purpose of a mission analysis is to enable you to fully understand the assigned mission. You must be able to identify specified and implied tasks. Identify and understand all tasks that are conditional to your success. To do this, identify what must be accomplished and in what sequence. Specified tasks are stated in the following portions of the battalion task force order:
- Battalion task force mission statement.
- Scheme of maneuver.
- Specific instructions.
- Coordinating instructions.
- Execution matrix.
- Operations overlay.
Implied tasks are additional tasks that may not be stated, but are required to accomplish the mission. Implied tasks are not routine or inherent tasks that must be performed to accomplish the mission, such as refueling and rearming which are a matter of SOP. Responsibilities such as providing flank security for the company or clearing an area of enemy forces are inherent implied tasks and should be addressed in paragraph 3 of the OPORD. Having identified the specific and implied tasks that are essential to the mission accomplishment, you place those essential tasks in your restated mission. This becomes the first consideration in your estimate of the situation and paragraph 2 of the company OPORD.
The battalion commander will articulate the mission so that you fully understand his intent and the intent of the brigade commander. Intent as a minimum will convey why the task force has been given its mission, the results expected, and in broad terms how the task force commander visualized achieving those results. Intent is important because of the confusion and communication problems associated with combat. The intent must be articulated by commanders at every level and understood two levels up. Commanders should always keep the intent simple, clear, and specific. If you cannot tell your men what you want in a sentence or two, then rethink your mission. An example of commander's intent follows:
I INTEND TO DEFEND BATTLE POSITION 50 UNTIL WE CAN DESTROY THE ADVANCE GUARD OF THE 1ST ECHELON BATTALION.
Analyze the Situation. You will analyze the situation by gathering information about the terrain, enemy, time, and troops. The battalion S2 conducts the intelligence preparation of the battlefield (IPB). The products of the IPB are as follows:
- Event/situation template.
- Terrain analysis.
- Weather data.
- Intelligence annex to the OPORD.
- Priority intelligence requirements and intelligence collection tasks.
Terrain analysis is an examination of the military aspects of the terrain and their effects on friendly and enemy capabilities to move, shoot, and communicate. Weather analysis should be done concurrently with terrain analysis as it has major impact on operations.
The military aspects of terrain include the five factors of OCOKA:
O - Observation and fields of fire.
C - Cover and concealment.
O - Obstacles.
K - Key terrain.
A - Avenues of approach.
- (O) Observation and fields of fire. Terrain and vegetation affect capabilities of friendly and enemy forces to observe one another and engage each other with direct-fire weapons. Dead space must be identified and covered with sensors and/or indirect fire. In the offense, however, dead space may assist in the movement of friendly forces. Terrain affording good observation and fields of fire should be selected as potential overwatch positions. In the defense, fields of fire may have to be constructed or improved by cutting down trees, power lines, and vegetation. Intervisibility (the ability to see, unobstructed, from one point to another) is another factor of observation and fires. In the defense, battle positions must be selected so that the friendly forces' fields of view and fires overlap.
When planning your operations, particularly in defensive operations, you may wish to determine a profile of your area of operation. A profile is helpful in determining visibility (defiles), identifying areas that are hidden, and planning for earth moving (engineer work).
- (C) Cover and concealment. Cover is protection from enemy fire. Concealment is protection from enemy observation. Ideally, a position will have both. Cover and concealment are essential in providing your company protection against direct and indirect fires, and in deceiving the enemy about your location and intentions. Advances in technology, such as thermal sights, have affected the availability of concealment. When you use routes or occupy positions where cover is not available, consider the capability of thermal sights to see through foliage and during limited visibility conditions.
- (O) Obstacles. Obstacles are natural or man-made restrictions of two basic types--tactical obstacles and protective obstacles. Tactical obstacles are employed to reduce the enemy's ability to maneuver, mass, and reinforce; and to increase his vulnerability to fires. Individual obstacles are designed to produce one of four primary functions in order to accomplish this--to disrupt, to turn, to fix, or to block. Protective obstacles are a critical part of force survivability. Obstacles must be observed and targeted by direct and/or indirect fire. The following are examples of existing obstacles:
- Canals.
- Swamps.
- Dense forests.
- Built-up roads.
- Railroad beds.
- Deep, steep-sloping ravines.
- Common cities and towns.
- Rivers.
- Minefields.
- Tank ditches.
- Abatis.
- Tank wall.
- Road craters.
- Barbed wire.
The following are examples of reinforcing obstacles,
- (K) Key or decisive terrain. Key terrain is that terrain which, if controlled by a force, affords an advantage. Decisive terrain is that which, if controlled, offers a decisive advantage to the owner. Key or decisive terrain could be a dominating hill overlooking the low ground, a major road junction, or even a river or stream crossing site. Key terrain must be controlled by friendly forces, fire, obstacles, or the relative positioning of friendly forces. Key terrain dominates, controls, or influences avenues of approach.
- (A) Avenues of approach. Avenues of approach are air or ground routes of an attacking force of a given size (platoon, company, battalion, and so forth) leading to its objective or key terrain in its path. Avenues are evaluated in terms of their--
- Potential to support maneuver (trafficability and space).
- Access to the terrain and adjacent avenues.
- Degree of canalization.
- Cover and concealment.
- Observation and fields of fire.
- Obstacles.
- Ease of navigation.
- Trafficability.
- Maneuver space.
The following are general characteristics of mounted, dismounted, and air avenues of approach:
- Mounted avenues of approach:
- Open, firm ground with little or no vegetation.
- Slopes not greater than 45 percent.
- No waterlogged soil (swamps, bogs, stream banks, or rain-soaked areas).
- No trees 8 to 10 inches in diameter, with less than 5 meters separation.
- Streams must be less then 3 meters wide and 1.5 meters deep with rocky bottoms.
- Dismounted avenues of approach:
- Moderately wooded areas with passable slopes (no cliffs).
- Trails and roads through densely wooded areas.
- Built-up areas.
- Fields with grown-up vegetation.
- Air (high performance) avenues of approach:
- Wide valleys with landmarks easily recognized from the air.
- Road networks.
- Air (helicopter) avenues of approach:
- Narrow valleys with hills and wooded areas as backdrops.
Avenues of approach may contain mobility corridors and cross-compartments. Mobility corridors are areas within the avenues of approach that permit movement and maneuver. They are generally open areas with good routes for rapid movement and mutual support. When obstacles, either existing or reinforcing, cross an avenue of approach, they form lines of resistance called cross-compartments.
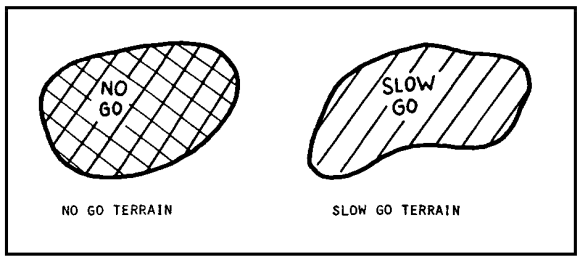
As you analyze avenues of approach, your mission will determine the dimensions of the area you need to analyze. Study the S2's terrain analysis to determine the overall terrain conditions in the battalion task force area of operations. Next, analyze the terrain that influences your mission. Mark out the existing obstacles to mounted and dismounted movement. Existing obstacles are classified as either SLOW GO or NO GO terrain for mounted and/or dismounted movement. NO GO terrain requires special equipment or engineer support to cross. SLOW GO terrain hinders movement to a lesser degree. It does not require special equipment or engineer support to cross, although such support may be used to enhance mobility. When depicting NO GO and SLOW GO terrain on an overlay, mark the NO GO terrain in dark red and SLOW GO terrain in light red or orange. Cross-hatching may also be used to differentiate between NO GO and SLOW GO terrain as shown in Figure 5.
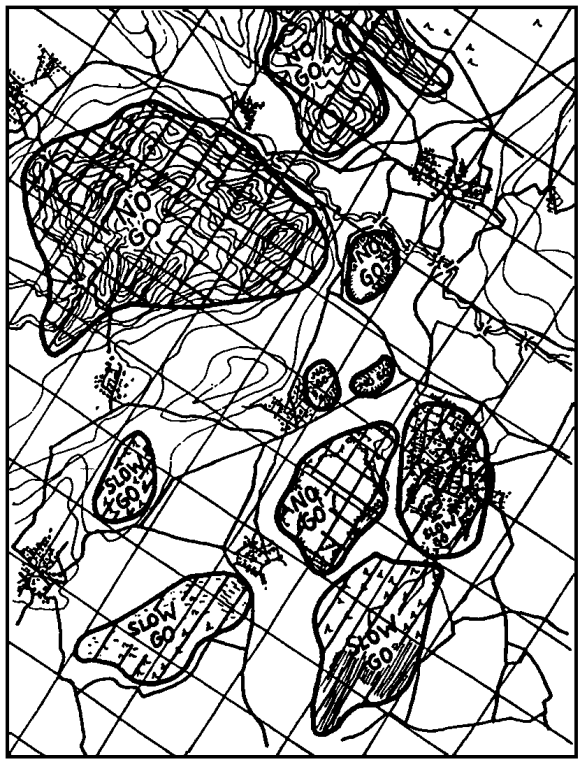
FIGURE 5. MOBILITY CORRIDORS.
The next step is to identify mobility corridors for battalion, company, and platoon formations. Use the battalion/company/platoon information below to determine the size of the element that can deploy along each mobility corridor. Figure 6 shows an example of how it is done.
FIGURE 6. MOBILITY CORRIDORS (CONTINUED).
Now you are ready to identify the avenues that your forces and the enemy can use to maneuver. This enables you to estimate alternate courses of action available to you and the enemy commander. When analyzing enemy avenues of approach, use your knowledge of the enemy's doctrine, and your common sense to form reasonable deductions.
Two parallel platoon mobility corridors could form a company avenue of approach as long as they are consistent with the company's frontage. A single platoon mobility corridor could accommodate a company in column although it could not properly deploy into attack formation. Obviously, a commander who used such an approach would be taking a risk. However, you shouldn't ignore even the smallest mobility corridor in your planning.
Draw the avenues of approach that you have identified in red or blue depending on whether they are friendly or enemy avenues. Place the unit symbol of the size and type of unit that can use the avenue where it starts. Label each avenue with a number, code word, or letter. An example of this method is shown in Figure 7.
Mark Avenues of Approach by Size/Type of Unit. Even the best planned attack of an armor force can be stopped by unexpected adverse affects of nature. An armor force attacking up a steep hill, for instance, can be stopped by ice. Weather affects terrain, equipment, visibility, and soldiers. Snow, dust, humidity, and temperature extremes all impact on human efficiency and limit the utility of weapons and equipment. Soldiers tend to seek shelter and neglect tasks that expose them to the elements. Poor visibility makes local security more difficult and decreased trafficability impedes maneuver. Generally, inclement weather favors the attacker, even though mobility and command and control are degraded. Defending troops are likely to be less alert and weapons will not be as effective. An attacker can more easily close with, isolate, and destroy a defending force during limited visibility conditions. The following is a summary of weather effects.
| ELEMENT | EFFECTS ON |
| Temperature Barometric Pressure Humidity Precipitation Visibility Light Data |
Soldier, Gunnery, Equipment Gunnery Soldier, Equipment Soldier, Trafficability, Equipment Observation Observation |
FIGURE 7. MARK AVENUE OF APPROACH BY SIZE/TYPE OF UNIT.
The completion of the terrain and weather analysis assists in developing courses of action.
Enemy forces are analyzed to determine their composition, disposition, and most probable course of action. During step 3 of the estimate process, use the enemy's most likely courses of action to wargame against our courses of action. When not in contact at company level, most current information about the enemy is provided by the battalion S2. Once contact with the enemy has occurred, you and your fellow company team commanders will have more information than the S2. He can analyze only what you and others report to him. Specifically, you are interested in the following information:
- What is the enemy's composition, strength, and capability?
- What is the enemy's disposition, what avenues of approach support his tactics and size?
- How long has the enemy been in his current location?
- If he is defending, how are his forces arrayed, where are his kill zones?
- Does he have reserve forces and where are they?
- What tactics will he use and what are his courses of action?
- Has the enemy employed chemical agents, nuclear weapons, or electronic warfare?
- What are his chemical capabilities?
- If he has used NBC, what degree of success has been achieved?
The S2's IPB often will provide many of the answers to the questions listed above. Templating enemy forces on the terrain will provide clues to the enemy's disposition and courses of action.
Templating combines your analysis of the enemy and the terrain. Take what the enemy's doctrinal template says he will do and compare it to the terrain. A doctrinal template is the normal pattern of positions for the enemy's forces without considering the terrain. Examples of doctrinal templates that reflect enemy tactics are contained in Chapters 3 and 4. Study and memorize these templates.
With the doctrinal template firmly in mind, you are ready to do a situational template. Modify the doctrinal template to fit the enemy's strength and the terrain available to him.
Put yourself in the enemy commander's shoes. What would you do if you were in his position? From this analysis, you should be able to deduce two or three possible enemy courses of action. Prioritize these courses of action from most likely to least likely. The following are examples of enemy courses of action that you might encounter in defensive mission:
- Course of action A--most likely. The enemy will attack in two echelons with one company on AA1 and one company on AA2. If his first echelon is stopped, he will conduct a dismounted attack on AA3 with the second-echelon company.
- Course of action B--least likely. The enemy will conduct a meeting engagement using AA1 as a march route. The CRP will attempt to use AA3 to bypass our defenses. The FSE will attempt a hasty attack on AA1. If the FSE is stopped, the battalion main body will attack on AA2 and AA3 with a company on each avenue.
Time and Space. Time is the critical factor that drives planning and execution. You receive your first indication of the available time from the battalion warning order. The time the company has to execute or be prepared to execute the mission determines the detail of planning. You analyze time in relation to the tasks to be accomplished and the space to be covered by movement. When analyzing the tasks to be accomplished, a reverse-planning schedule is a useful tool, especially when the operation is time phased, involving scheduled fires. When using this method, you start with your first objective and plan backwards through each intermediate objective or task to the beginning of the operation (such as the LD).
Another technique is used when the operation is controlled by events rather than time-phased. In this case, estimate the time for each task independently to get an appreciation for the length of time each task will take. Some considerations of time are:
- Time for subordinates to prepare and disseminate orders.
- Movement times from assembly areas or present positions to SP, RP, sectors, battle positions, attack positions, or lines of departure.
- Estimate time from crossing the line of departure to seizing the objective or specific key terrain, and sequencing of units and events associated with it.
- Length of time key terrain must be held.
- How long the company will have to consolidate and reorganize before an enemy counterattack.
- How long it will take the enemy to decide and react.
- How your time estimate schedule will be affected by imposing varying levels of MOPP.
- Speed of execution may take priority over security. Operations and formations will be adjusted accordingly.
Time/Distance Formula. The time/distance formula is used to calculate movement time of friendly forces, movement time of enemy forces, and engagement times (windows). The time/distance formula is: T=D/R (T=Time, D=Distance, and R=Rate of March). Example: If your unit must move 1 kilometer or .6 miles and your rate of march is 17 kilometers per hour, or 10 miles per hour, it will take you: T=1/6 of an hour or .06 hour. The number of minutes is equal to 60 x .06 or 3.6 minutes. Apply the time/distance formula using the size of the area where targets will be exposed for a particular distance (for example: field 1 kilometer wide) and rate the movement speed expected by the threat forces.
Troops Available. You must know what troops, equipment, and combat support, and combat service support you have at your disposal. The basic question you must answer is, "Do I have enough to accomplish the mission?" Compare your force to the enemy's considering the terrain and space in which you have to operate.
Make sure you have the correct status of your unit. As a minimum, you need to know--
- Numbers of weapon systems (tanks, BFVs, rifle teams).
- Availability of critical weapons based on mission requirements.
- State of training and discipline.
- Physical condition and degree of fatigue in the soldiers.
- The state of unit morale and its effect on both mission accomplishment now and in the future.
- How the platoons have performed on past missions, to include any special capabilities the platoons might have.
- Location and disposition (amount of movement required by platoons to assembly and move to the location of the operation).
- State of maintenance and supply.
- Available support from other company teams. Will another company team support the attack by fire? Can disengagement be covered by another company?
- Combat support assets available to the company and those in support; their status, location, capabilities, and mission. Are indirect fires available? Does the company team have priority of fires from mortars or artillery, a priority target or FPF?
- Combat service support available (can battalion push critical supplies forward? How far is the MSR and collection points? Is air MEDEVAC available?)
- The effects of the weather on your men and equipment.
Develop Courses of Action. With the information you have received, you will develop at least two courses of action based on the restated mission. Courses of action represent possible solutions to the accomplishment of the mission. They basically answer the questions who, what, when, where, and how. Courses of action, although stated in general terms, are formulated in sufficient detail to distinguish one from the other and, together with a sketch, provide a basis for a flexible analysis.
You probably don't have enough troops to meet all of the requirements without maneuvering some or all of your force. Devise at least two ways to counter the enemy's capabilities with sufficient numbers of tanks, BFVs, and/or rifle teams.
The analysis of a course of action will identify the advantages and disadvantages. The criteria for your evaluation of a course of action are broken into three groups: mission accomplishment, principles of war and AirLand battle imperatives, and significant factors identified during wargaming. Your analysis is best accomplished by wargaming each course of action. In addition to comparing courses of action, the wargaming process will lead you to the identification of decision points.
Wargaming is a disciplined and orderly approach to the analysis of a course of action. It is a conscious attempt to visualize the flow of a battle when given the friendly course of action, an enemy's course of action, and a piece of ground. It represents an attempt to foresee the action, and reaction, and counteraction dynamics of a battle, realizing that the enemy is not passive but will try to thwart and circumvent your actions.
As you wargame your actions versus the enemy's actions, think about the following:
- How the enemy is likely to react to your actions.
- What actions you should take to counter the enemy's reaction.
- How much risk you take with each of your actions.
- When you must trigger each action to achieve the desired results (identify the trigger points).
- Which enemy actions provide clues to his course of action.
- When you must commit yourself to a course of action (identify the decision points).
- How you could shift to another course of action if the enemy takes a less likely course of action.
Decision points are points in time and space where you are required to make a critical decision. Decision points give you a point of reference during the execution of an operation. General Patton stated it clearly in 1941 when he said, "It is a mistake to make a decision too early, and it is a mistake to make a decision too late." Decision points, therefore, take into account the time required to make a decision.
Decision points are based on an in-depth analysis of the military aspects of terrain and enemy doctrine. At company level, they include any area where the company becomes more vulnerable to the enemy's actions. Examples of danger areas are choke points, streams/river-crossing sites, large open areas (kill zones), cross compartments, and areas of suspected enemy occupation. If chemical weapons have been used, any low ground may have a higher concentration and duration of chemical agents.
Company actions that can be triggered by a decision point are:
- Execute direct or indirect fires.
- Change in movement technique.
- Formation change.
- Overwatch position established.
- Establish breaching teams.
- Use of smoke.
- Reconnaissance by fire (direct and indirect).
- Move to supplementary positions.
Trigger points take into account the lead time necessary for your unit to react. This is related to the control measures you establish and the instructions you give to your subordinates. For example, you might use a phase line or a set of TRPs as a reference to initiate direct fires or a specific maneuver. Other control measures that could be used as trigger points are: checkpoints, TIRS, objectives, and engagement areas. Trigger points are normally related to specific events or enemy actions. Examples: "When we cross PL RED, we will enter a wedge formation" or, "When the enemy crosses between TRPs 305 and 307 1st and 2d Platoons will initiate TOW missile fires."
Compare Courses of Action. In order to determine the best course of action, you must compare all courses of action. The comparison is based on the products of your analysis, including factors of METT-T and wargaming each course of action. You may often be comparing the courses of action in your mind even before you have formally stated them. A technique of comparison that you may use is shown in Table 2. This matrix allows you to use the plus and minus system. You may want to develop this further by weighing a particular element. Weighing can be done with additional plus (+) or minus (-) marks or a numerical value system.
The decision you make on the best course of action forms the basis of your plan and must be made logically. Having compared all available courses, one course should stand out as the best choice.
After deciding on a single course of action, you will pursue the planning and execution until events or information (received) changes your estimate of the situation.
Having decided on a single course of action, you begin refining the course of action into a plan that can be executed by your company. The tentative plan will serve as the basis of your operations order. The operation order format provides a valuable tool ensuring you have provided enough detail in your plan. The technique you may use is to first establish your maneuver graphics, sequence each event (based on your wargaming), and portray this on your maneuver overlay.
TABLE 2. SAMPLE COMPARISON MATRIX FOR OFFENSIVE OPERATION.

Learning Event 4:
IDENTIFY COMBAT ORDERS
This learning event is designed to give you the minimum information needed in an operation order. This information is not all inclusive. Depending on the mission you receive and the situation, additional information may be added or deleted.
Combat Orders
It is important as a company team commander that you understand the task force commander's concept of the operation and the task force operations order, and relay it to your soldiers in a logical, understandable manner. This is done through combat orders.
A combat order is how you transmit future missions to your soldiers. At company team level, these combat orders will normally be given orally, because of the lack of time available. As a company team commander, you will use three types of combat orders:
- The warning order.
- The operations order (OPORD).
- The fragmentary order (FRAGO).
Warning Order
A warning order is used to notify your company team of an upcoming action. It is an oral or written message. You will immediately issue a warning order when you receive and analyze a mission from battalion. This will allow your soldiers time to prepare themselves and their equipment for combat. Even though the order is brief, it must contain as much of the following as possible:
- Brief discussion of the situation.
- Mission.
- Time of the operation.
- Earliest time of movement.
- Any specific instructions (attachments/detachments).
- Time and location where the OPORD will be delivered.
There is not a prescribed format for the warning order, however, the following is a suggested format:
- Addresses: Identify to whom the order pertains.
- Warning Order: The order should begin with the words WARNING ORDER to make sure all understand what it is.
- Nature and Time of Operation: Use enough detail to allow your subordinates to set priorities and begin preparing. State the mission, if known.
- Earliest Time of Movement: If possible, you should give the earliest time of movement to the company. This will help them set priorities by the time sequence.
- Special Instructions: Special instructions should include change in task organization, MOPP level, coordinating instructions, or any other necessary instructions not given elsewhere in the order.
- Time and Place: Give the time and place the OPORD will be given.
- Acknowledgement: Request acknowledgement from subordinate to ensure they received and understand the order.
Upon receiving the warning order, platoon leaders should prepare their own warning order to issue to their subordinates.
Operation Orders
As a company team commander, you will issue an OPORD to your subordinates to provide them with the essential information required to conduct the operation and convey the commander's intent. The OPORD is issued orally at the company level and follows the five-paragraph field order format. The format will help you gather your thoughts and ensure that all required information is presented in a logical manner. The OPORD should be issued using an overlay, execution matrix, and sketch map or terrain model whenever possible. See OPORD overlay.
FIGURE 8. OPORD OVERLAY.
SAMPLE FIVE-PARAGRAPH FIELD ORDER:
TASK ORGANIZATION.
1. SITUATION.
a. Enemy Forces. The enemy forces paragraph provides information about the enemy, weather, and terrain that is vital to your mission. This information includes as much of the following as possible:
- Location of enemy forces.
- Strength.
- Type of equipment.
- Enemy's capabilities.
- Enemy's most probable course(s) of action.
- Weather and terrain.
b. Friendly Forces. As a minimum, this paragraph should include:
- Mission of next higher level commander.
- Intent of the next higher commander.
- Higher commander's scheme of maneuver.
- Mission of unit on the immediate left.
- Mission of unit on the immediate right.
- Mission of any units issued by your higher commander that are essential to the operation (counterattack force).
- Supporting or reinforcing units available.
c. Attachments and Detachments. List all company team attachments and detachments and the time they become effective. If this information was given in the task organization paragraph, this paragraph is not needed.
2. MISSION. The mission statement is a clear, concise statement of your essential tasks and addressees who, what, when, where, and why.
3. EXECUTION.
a. Intent. Explain what you are trying to do. A statement of your intent should be short and crisp--not more than three or four sentences.
b. Concept of the Operation.
(1) Maneuver. In this subparagraph, you describe how you visualize the battle being fought. Your description must be a clear, concise visualization of the scheme of maneuver. This subparagraph must leave subordinates a framework in which to operate without further guidance if necessary.
(2) Fires. The scheme of fires to support the overall concept of the operation is placed in this subparagraph. Some items that may appear in this subparagraph are:
- Priority of fires.
- Priority targets.
- Indirect-fire target engagement priorities.
- Your specific responsibilities for executing designated targets.
- Indirect fire restrictions.
- Illumination.
- Preparatory fires (time/duration).
- Close air support.
- Employment of nuclear and chemical fires.
- Final protective fires (FPF).
(3) Intelligence and Electronic Warfare. This subparagraph contains information on the use of patrols and OPs.
(4) Obstacles, Mines, and Fortifications. This subparagraph contains information on engineer efforts to support overall scheme of maneuver. Priority of support (main effort) and priority of effort (mobility, countermobility, survivability). Work effort of organic assets is also included.
c. Specific Instructions/Subunit Missions. List all maneuver units that are under your command, even if they have no additional specific tasks that need to be identified.
d. Tasks to Combat Support Units. This paragraph describes those specific tasks that must be accomplished by combat support units and are not specified or implied elsewhere. Combat support units are listed in the same order in which they appear in the task organization paragraph.
e. Coordinating Instructions. This paragraph lists information or tactical instructions that pertain to two or more elements. This is the last subparagraph of paragraph 3. Items that may appear are:
- Critical times (SP, LP, checkpoints).
- Formations to be used.
- Order of march.
- Route of march.
- Alternate routes.
- Control measures including passage lanes, passage points, contact points, identification.
- MOPP level.
- Actions on contact.
- Actions at danger areas.
- Rehearsal time and place.
- RES.
- Inspection times and place.
- Rules of engagement.
- Special reports or information requirements.
- Air defense warning and weapon control statuses.
4. SERVICE SUPPORT.
a. General. This paragraph provides instructions on the location and general movement of your company team trains.
b. Material and Service.
(1) Supply. Addresses the specific classes of supply as required. All supply information that is not SOP is placed here. Examples are:
- Priority of resupply.
- Resupply points.
- Rations to be used.
- Location of task force combat and field trains.
(2) Transportation. Information on the location of supply routes, logistic release points (LRPs), and priorities on the routes.
(3) Services. Instructions for evacuation of KIA, water points, and other services.
(4) Maintenance. Instructions on recovery and evacuation of battle-damaged vehicles and maintenance priorities and procedures. Location of the task force UMCP.
c. Medical Evacuation and Hospitalization. The location of the task force aid station and any special procedures for evacuation of WIAs and wounded EPWs.
d. Personnel. Instructions on the handling of EPWs, replacements, and priority of manning replacements.
e. Civil-Military Cooperation. Information on civil affairs (curfew, host-nation support, and so forth) and psychological operations in support of civil affairs.
f. Miscellaneous. Any information or instructions not previously covered are mentioned here.
5. COMMAND AND SIGNAL.
a. Command. This paragraph includes any special instructions not covered by SOP, including:
- Your location.
- Location of the XO.
- Location of task force commander.
- Location of task force main command post.
- Succession of command.
b. Signal. All communications instructions, if not in the SOP are placed here. Items covered include:
- CEOI index and edition.
- Listening-silence instructions.
- Challenge and password.
- Antijamming frequency.
- Antijamming code words.
- Special signals (star clusters, flags, and so forth).
FRAGMENTARY ORDER
FRAGOs contain missions of immediate concern to your subordinate elements and are used to adjust to rapidly changing battlefield conditions. They are normally issued orally at the company team level. You use FRAGOs when the time does not permit a complete OPORD, or when a change to an existing OPORD is necessary. There is no specific format for the FRAGO. To ensure understanding, the five-paragraph field order format is useful. Only the information required for your subordinates to accomplish their mission is given.
FRAGOs are issued in a timely manner. They are brief and concise, relaying the commander's intent and concept.
EXAMPLE WARNING ORDER:
WARNING ORDER:
ADDRESSEES: XO, Plt Ldrs, FSO, 1SG.
TIME OF OPERATION: NLT 301800Z Oct 19--.
NATURE OF OPERATION: Prepare to defend BP 52. Orders Group B with quartering party to move along Route Bear at 0100 to BP 52. XO to move remainder of company along Route Bear IAW task force movement plan.
EARLIEST TIME OF MOVE: SP 300500Z OCT 19--.
TIME/PLACE ENTIRE ORDER IS TO BE ISSUED: BP 52 (ES 625913), AT 300300Z OCT 19--.
ATTACHMENTS/DETACHMENTS: None.
ACKNOWLEDGEMENT:
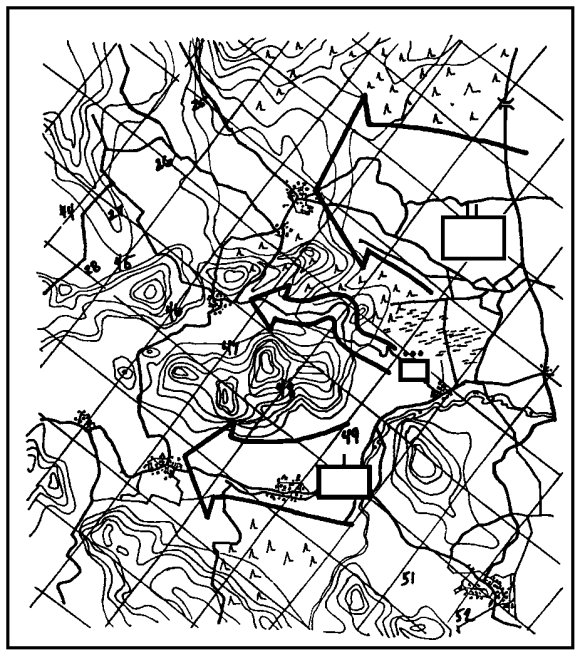
SAMPLE ORAL ORDER: This is an example of a company commander's oral operations order for the defense of BP 52 as part of TF 2-10's defense in sector. Company B, 2-10 Armor is composed of a tank company base with three tank platoons (M1). From a vantage point located at platoon BP 52-2 (6291 grid square), the company commander issued this order to his orders group:
"Okay men, we are located here at BP 52-2, grid ES623913, facing north."
See sample oral order below.
CO/TM/TRP ORAL OPORD EXAMPLE FORMAT:
TASK ORGANIZATION.
1. SITUATION.
a. Enemy Forces.
(1) Recent Activities.
- The TF is facing elements of the 73d MRD, consisting of 181st MRR, 199th MRR and the 129th MRR.
- All three regiments are equipped with T-64 and T-72 tanks; BMP or BTR and normal support assets (arty, ADA, eng, atk hel, AT).
- Enemy has been attacking for three days and will use airmobile and attack helicopters in task force rear especially vic Sinking Creek Hill (ES5985) and Garfield (ES5681).
- Enemy has nuclear and chemical capability with FROG or MRL.
FIGURE 9. SAMPLE ORAL ORDER.
(2) Enemy Disposition/Composition in Task Force Zone.
- 85 percent strength; morale good.
(3) Most probable course of action. Enemy will attack in our TF sector with one regiment. We can anticipate seeing one MRB followed by a second MRB.
(4) Weather/Terrain. Temperature is 78 degrees, BMNT 0420, sunrise 0435, sunset 1850, EENT 1905. Heavy rain recently has reduced trafficability of roads. No rain or fog predicted for the next two days.
b. Friendly Forces.
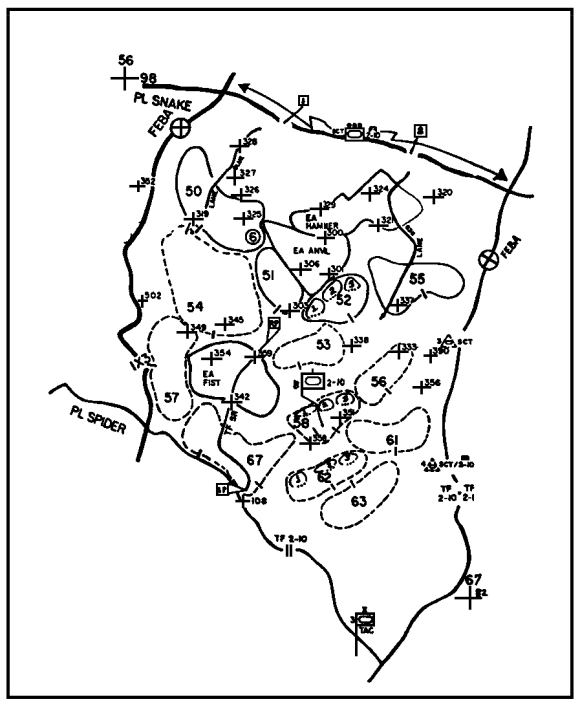
Higher. TF 2-10 will defend in sector form ES57968 to ES656921, 301000Z Oct 19--, assist passage of CF units and accept battle handover and o/o counterattack to defeat the enemy forward of PL Spider. Task force commander wants to strip away enemy recon to confuse and blind the enemy as to our fighting positions. The enemy will then be surprised in our engagement area. The critical event for the task force is the defeat of the enemy attack on EA FIST.
Left. TM D or on west (left flank) defends from BP 50, and o/o defends from BPs 54 and 57. TM A/2-95 also to our west defends BP 51 and o/o defends from BP 53 and 67.
Right. Co C/2-95 (-) on our east (right flank) defends from BP 55 and o/o defends from BPs 56 and 61.
Forward. 1-201 ACR conducts covering force operations to our front; they will withdraw to an assembly area vic Garfield (ES5681) to refit and rearm.
Rear. TF 2-95 Mech (-) reinforces 1/201 ACR. After withdrawal of CF, defends BP 31 and becomes the brigade reserve. On order, they attack enemy airmobile forces landing in the brigade rear areas.
Scouts. Our scout platoon is screening between the TF and the CF and will occupy contact points 1 and 2. Upon their withdrawal, they will establish OPs 3 and 4.
Mortars. Battalion 4.2-inch mortar platoon is in GS to our TF. They are located initially in E8612943 and will displace to subsequent positions o/o.
Eng.
ADA.
CAS. The TF has CAS on call.
2. MISSION. Co B def BP 52 (ES627914) 301800Z OCT 19--, assist passage of the CF and accept battle handover along PL SNAKE. On order, defend BP 58 (ES623877), BP 62 (ES645870), and counterattack to destroy the enemy in EA FIST.
3. EXECUTION.
a. Intent. I want to destroy any enemy recon vehicles in EA Hammer. The enemy will probably deploy his lead MRB to push through EA Hammer and enter EA Anvil. I want to destroy at least two MRCs in Anvil. However, if the enemy gets eight or more vehicles past TRPs 306-301, we will displace to BP 58 and continue the fight.
b. Concept of the Operation.
(1) Maneuver. We will initially defend BP 52 with 1st plt at 52-1, 2d plt at 52-2, and 3d plat in 52-3--all oriented on EA ANVIL. The scouts will coordinate and assist passage of the CF and TM Mech will guide the CF down Lane Red. When the scouts and the CF are clear, we will engage the enemy. The trigger point is when their lead vehicles reach TRP 300. 1st and 2d plts engage tanks, mobility-enhancing equipment, and BMPs. 3d Plt hit C3 BMPs and ADA. We will destroy the two lead MRCs from this position. If the enemy gets eight vehicles past TRPs 306-301 (breakpoint), we will displace to BP 58. Sequence of movement is 3d, 2d, and 1st in that order. We will conduct internal overwatch. For the specific locations and orientations, look at the execution matrix. At BP 58, we counterattack by fire into the eastern half of EA Fist, thus supporting TM Mech's counterattack by fire and maneuver. On order, the TF will counterattack IAW brigade counterattack plans.
(2) Fires. Scouts will have initial priority of fires, o/o Co B, Tm A, Tm D, and Co C 2-95 (-), respectively. Within the company, priority is to 3d Plt, then 1st and 2d. We have no priority targets. Indirect fires will be used to slow the enemy initially, then assist destruction during the counterattack. Smoke will be used to assist moves to subsequent positions. There are no restrictions at this time. All TRPs are recorded as artillery targets.
c. 1st Plt. Occupy BP 52 (1). Orient on TRP 306. (BB 4034) Prepare BP 58 (1). Orient on TRP 354. (BB 4038) Recon BP 62 (1).
d. 2d Plt: Occupy BP 52 (2). Orient on TRP 330. (BB 4040) Prepare BP 58 (2). Orient on TRP 359. (BB 4039) Recon BP 62 (2).
e. 3d Plt: Occupy BP 52 (3). Orient on TRP 329. (BB 4028) Prepare BP S8 (3). Orient on TRP 359. (BB 4027) Recon BP 62 (3).
f. Air Defense: AD warning status: Yellow. Weapons status: Tight.
g. Obstacles, Mines, Fortifications: Platoons authorized to emplace hasty protective minefields in front and to flanks of platoon BPs. Mines and obstacles must be marked, recorded, and guarded if they cut roads or trails.
h. Coordinating Instructions:
(1) Recon routes, report to me NLT 1400 tomorrow, here.
(2) XO move with 2d Plt.
(3) 1SG locate with company combat trains initially ES633902; move to BP 63 on order.
(4) FSO locate with me.
(5) MOPP level: MOPP 1 in effect until 300415Z Oct 19--, then MOPP 2. All sleeping personnel in MOPP 2. Monitor at all times. Chemical paper mounted on vehicles.
(6) OEG Rate: 80cGy.
(7) PIR--report any.
(a) 2d echelon elements.
(b) Attempts by enemy to break contact.
(c) Enemy MOPP status.
(8) Rehearsal Times and Locations: 1400 hours tomorrow, here.
4. SERVICE SUPPORT.
a. General.
(1) Co Cbt Tns loc is on BP 58 (ES633902).
(2) Co Fld Tns loc with TF Fld Tns.
(3) TF Cbt and Fld Tns loc ES588874 o/o ES601840 Fld Tns ES645713 w/BSA, o/o move with BSA.
b. Material/Services.
(1) Class I. Three days MRE on all vehicles.
(2) Class II. Top off before departure from AA.
(3) Class V. BP 58 prestocked with 20 APDS NLT 1600 hours tomorrow.
(4) Evac KIA.
(5) Maintenance.
Loc of UMCP. ES593868.
Other.
c. Medical Evacuation and Hospital.
(1) Evac WIA. Per SOP.
(2) Location of TF/Sqdn Aid Station with TF Cbt Tns.
d. Personnel. Per SOP.
e. Civil-Military Cooperation. Curfew: 2200-0500 daily. Treat captured violators as EPWs.
f. Miscellaneous. Permission granted to destroy all classes of supplies to prevent capture except Class VIII.
5. COMMAND AND SIGNAL.
a. Command.
(1) Co Cdr located with 1st Plt.
(2) XO located with 2d Plt.
(3) TF TOC located at ES616893 o/o ES903857.
(4) TF Cdr located with Co D.
(5) Succession of command is per SOP.
b. Signal.
(1) CEOI Index: 2-68 Edition A.
(2) Challenge and Password. MILK TOAST.
(3) Listening Silence: In effect until enemy contact.
(4) Emergency Signals:
- Emergency signal to evacuate BPs is:
- 1st: 2 green clusters.
- 2d: 1 green, 1 red.
- 3d: 2 red.
- If you want to move: 2 white parachutes.
- Approval: 1 white cluster.
- Company signal to request move is one red star cluster. TF approval is one green cluster.
Time now is 0345.
What are your questions?
I will be around to your positions at ------ for backbriefs.
Learning Event 5:
IDENTIFY THE COMMAND AND CONTROL OF OPERATIONS FOR A COMPANY TEAM IN OFFENSIVE OPERATIONS
COMMAND AND CONTROL OF OPERATIONS
Controlling combat operations is extremely difficult and, in some cases, impossible once combat has been opened. The frictions of war can inhibit an operation so profoundly as to bring an operation to a rapid and unfavorable conclusion.
This learning event is designed to be used in conjunction with your planning. It gives specific techniques that will enable you to reduce confusion and execute your plan.
What You Must Do as a Commander. You must select your own position carefully. Be in a position to see your lead element or the most critical platoon. Use terrain and weather to conceal your movements from the enemy, but position yourself to maintain either visual or radio contact with your platoons. Use a navigator on your vehicle to maintain your current location on the ground.
Talk to other company commanders to synchronize your actions. When something critical happens, send the battalion commander a quick SITREP. Your XO may assist by reporting to task force on the operations/intelligence net (if there is one) or on the task force command net. If you lose contact with the battalion, take every step possible, short of abandoning your mission, to reestablish communications. Until communications is restored, continue to take those actions that best accomplish the battalion commander's intent.
Use your XO as your second in command. Use him to monitor the battalion frequency, make reports to the battalion on the tactical situation, and keep track of the locations and actions of adjacent and supporting units. When you can't make direct contact with one or more of your platoons, use him as a radio relay or position him where he can control those elements.
See the battlefield. Constantly probe for information about the enemy and the terrain. Be prepared to change and update your estimate of the situation at any time. Think ahead and identify potential threats and opportunities. When it becomes clear that your original concept won't work, or a better alternative presents itself, modify your plan rapidly and aggressively to fit the changing situation.
Issue timely and clear FRAGOs. Tell your platoon leaders what your intent is, what their mission is, where to move, where to point their weapons, and when to shoot. Issue warning orders to give your platoons time to react to all possible upcoming missions. Keep your subordinates posted on the enemy situation and what other units in the task force are doing.
Demand that your subordinates maintain contact with you, and keep you informed of their situation. If you cannot communicate with your subordinates, you have lost control of the situation and failed in your primary mission on the battlefield. Sacrifice anything to maintain command and control of your unit. If the platoon leader is issuing instructions on his net, or is dismounted, make sure the platoon sergeant is monitoring the company command net. Drill your subordinates in spot reports and situation report procedures.
Encourage your platoon leaders to talk to each other and coordinate their actions. Use SOP drills that are simple and can be cued by brief commands. Use checkpoints and terrain features to control maneuver to specific positions. Use TRPs, cardinal direction, and the clock system to orient fires.
Ensures all-around security to give yourself time and space to react. Your SOP should specify vehicle and personnel responsibilities when moving. Establish OPs when stopped, even for a short time. Make sure your elements maintain good dispersion laterally and in depth. Don't let your unit become fragmented after a rapid dash across an open area. Use your dash speed over short stretches to maintain control and orientation of the movement.
Take measures to avoid fratricides. Enforce recognition signals during passage of lines, relief in place, and any situation where two different elements are collocated. Keep our subordinates posted on friendly locations within your field of view. Fire only on positively identified enemy targets across boundaries and where friendly units are known or suspected to be located. During limited visibility, take special precautions, use visual signals that you can see with the naked eye, and make sure your crews know how to recognize enemy vehicles through thermal sights.
SUCCESSION OF COMMAND
It is essential that the personnel outlined in the succession of command thoroughly understand the intent and concept of the operation so they can take command of the unit and execute the mission successfully if the situation arises.
You prescribe the succession of command within your organization. Normally, the succession of command is governed by the company SOP but may be realigned based on unit mission or personnel turbulence. This should be stated in paragraph 5 of the operations order. An example of a succession of command would be:
- Commander.
- Executive Officer.
- 1st Platoon Leader.
- 2d Platoon Leader.
- 3d Platoon Leader.
- Fire Support Officer.
- First Sergeant.
When giving the order, you should state the location of each leader if differing from the company SOP. As a minimum, you must state where you will locate and where you want the XO to locate. As stated in Section II, you should position yourself at the most critical location and your XO at the second most critical location.
COMMUNICATIONS (SIGNAL)
The communication means available to the company are dependent on the individual skills of the soldiers, equipment, and your desires as the company commander. Skill in communications depends greatly on the SOP and how well the unit is trained in that SOP. Different means of communication have different capabilities and limitations, and each should complement the other so the company does not rely on one particular means. Dependence on one means endangers command and control, while use of several means strengthens that control. This builds redundancy into the command and control system. The company has four basic means of communication: wire, messenger, sound-and-visual signals, and radio.
Wire. Wire will be used as the primary means of communication for OPs, fixed battle positions, strongpoints, combat trains, and assembly areas.
Messenger. The use of messengers should be covered in detail in the company SOP. Messengers should be dispatched whenever your unit occupies an assembly area, battle position, or consolidates on an objective. Messengers should move from platoon vehicles to platoon, then platoon to company. For example, individual soldiers are dispatched to the platoon sergeant's vehicle to report their status. The platoon leader will dispatch a messenger to the commander's vehicle to receive any instructions upon consolidating the platoon. The platoon sergeant will dispatch a messenger to the XO's vehicle and report the status of the platoon. Upon consolidating the unit status, the XO will dispatch a messenger to the first sergeant and personally report the status to the commander. Messengers are slower and more vulnerable to the hostile fire than other means of communication, but using a messenger is the most secure method of communication. Messengers should rehearse routes (if possible), both in daylight and darkness, and should carry written messages to enhance accuracy.
Sound-and-Visual Signals. Sound-and-visual signals may be included in the battalion CEOI extract or company SOP. Signals not included in the SOI may be established for use within the company, provided they are changed frequently to avoid being compromised, and are understood by all. Sound-and-visual signals include lights, flags, hand signals, pyrotechnics, and different types of noise (metal-on-metal, rifle shot, whistle, bell).
Radio. Radio is the primary means of communication when enemy contact is made. To avoid detection by enemy direction-finding (DF) equipment, the company must use all other means to communicate until it becomes absolutely necessary to use the radio. Brevity on the radio is the key in reducing EW signature.
You operate on your own company net and monitor the battalion net. The XO operates on the battalion command net and monitors the company net. The first sergeant operates on the battalion administrative/logistics net (ALN) and monitors the company net (if he has two-net capability). Platoon leaders operate on their net and monitor the company. See company/team command radio net.
FIGURE 10. COMPANY/TEAM COMMAND RADIO NET.
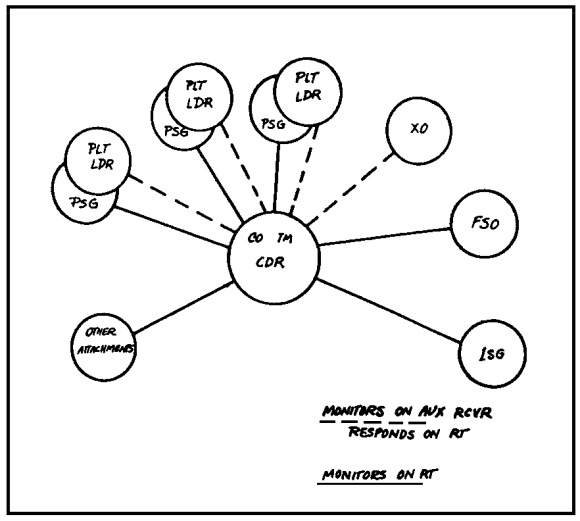
Under some circumstances, you may elect to put all stations on the same net, for example, the company command net. This facilitates quick or simultaneous response, overcomes the temporary breakdown in command when key leaders are lost, and gives you maximum control over your unit. Serious drawbacks include--
- Great susceptibility to jamming and unintentional interference/override.
- Quickly overloads the net if strong net discipline is not practiced.
- Difficulty in quickly reestablishing communications on the platoon nets if that is required.
You may wish to use this technique, depending on the training and discipline of your unit, during long road marches, while in assembly areas, while in a reserve position, or when consolidating survivors after a battle.
The XO must keep you informed yet avoid transmitting trivial data. He monitors the battalion command net and relays critical information received on that net to you as necessary. The XO coordinates or directs movement and support that the commander cannot control from his forward position. The XO basically frees you to fight the battle.
The eavesdrop system is a technique used within the company to effectively utilize information passed over the command net. It is used on all nets from battalion down to platoon. This system requires certain stations to monitor message traffic on a given net, even if they are not the direct recipients of the message. Command net traffic is sent to or from the commander. The platoon leaders, XO, Co FSO, and first sergeant will monitor the traffic and take appropriate action.
During the execution of the battle, lateral communications between platoon leaders and between commanders is critical. Platoon leaders must talk to each other throughout the battle to keep informed on what is happening on the battlefield. Each platoon leader must tell the platoon leader on his flank or rear what the enemy is doing, what actions he is taking, what his plans are, and provide recommendations to the other platoon leaders and the company commander. The company commander must monitor the lateral communications between platoons and know exactly what is happening in his area. The commander will give orders based on the tactical situation. All platoon leaders will monitor the command net and transmit critical information.
Some aids in maintaining effective radio communications are:
- Keep radio transmission time short (10 seconds). When a long report must be submitted by radio, use the word break to break the message into smaller segments.
- Make clear, concise transmissions.
- When direct FM contact is broken, set up relays; if this fails, go to high ground to reestablish contact.
- Submit initial enemy contact reports immediately, send more complete information later.
- Police the net. Transmission should be prioritized. A suggested priority list is--
- Initial contact with the enemy.
- Major changes in the situation.
- Fire coordination.
- Lift fires.
- Shift direct fire.
- Artillery adjustment.
- Artillery target effect.
- NBC-1 report.
- Full spot reports.
- SHELREPs.
- Obstacle reports (such as bridge classification).
- Logistical reports (may receive a higher priority during the late stages of an engagement).
You must always be prepared for the unexpected, and if your communications fail, you must react quickly. Training, SOPs, and battle drills become critical in the absence of electronic communications. The most clear and concise order you can give is, "FOLLOW ME, DO AS I DO."
Communication Responsibilities. It is incumbent on all levels of command to gain and maintain communications with their appropriate headquarters and personnel. The traditional communications responsibilities are listed below:
- Senior to subordinate. A senior unit is responsible for establishing communications with a subordinate unit. An attached unit is considered subordinate to the command to which it is attached.
- Supporting to supported. A supporting unit is responsible for establishing communications with the supported unit.
- Reinforcing to reinforced. A reinforcing unit is responsible for establishing communications with the reinforced unit.
- Lateral communications. Responsible for establishing communications between adjacent units may be fixed by the next higher commander or by SOP. If responsibility is not fixed by orders, the commander/leader on the left will establish communications with the unit on the right (left to right). The commander of a unit positioned behind another unit establishes communications with the forward unit (rear to front).
- Restoration. Regardless of the responsibility, all units take prompt action to restore lost communications.
Communications Security/Discipline. Communications security (COMSEC) denies or delays unauthorized persons from gaining information of value from telecommunications and effectively interrupting communications. The company commander can achieve communications security by enforcing the use of authentication procedures to make sure only authorized stations are on the net and by restricting the use of radio transmitters.
Radio transmitters should be restricted to administrative use only when out of enemy contact. Normally, all radios other than the commander's and subordinate leader's should be on radio-listening silence. Silence will only be broken on enemy contact, or when orders need to be passed. Conditions under which radio restrictions may be broken must clearly be established and understood by all operators. SOPs or orders must reflect the following conditions:
- Use wire or messenger whenever possible.
- Reduce transmission times.
- Have each subordinate leader strictly enforce net discipline.
- Site antennas with a terrain feature between them and the enemy.
Antijamming and Direction Finding. Antijamming procedures used by radio operators include: recognition, continued operations, reporting, use of low power, antenna masking, frequent authentications, and actions on effective jamming.
- Recognition. Operators attempt to identify the cause of the interference. It should not automatically be assumed that the enemy is employing jamming techniques as symptoms are often similar to other types of radio interference. The receiver antenna should be removed to determine whether a signal is being generated internally by the receiver. If the interference decreases with the antenna removed, then the interference is external and the problem may be enemy jamming.
- Continued Operations. Radio operations should continue in a normal manner, once jamming has been identified, to mislead the enemy on effectiveness of his jamming. Normal operations will continue until orders are received to clear the net.
- Reporting. All operators must report jamming to their higher headquarters. This report should be sent by another means of communications, such as wire, messenger, or secure FM radio.
- Use of Low Power. Low-power transmission reduces the chance of the enemy detecting the signal. If the signal cannot be heard, the transmitter cannot be located by radio direction-finding equipment.
- Antenna Masking. Hiding radio signals behind terrain is a simple method to defeat radio direction finding. Radio waves bend and are reflected by buildings and mountains. When this happens, it is difficult to determine the original direction form which the wave was transmitted, but the strength of the signal is affected very little. Radio antennas should be erected as low as possible, while still maintaining adequate communications with subordinate, higher, and adjacent units.
- Frequent Authentication. Radio operators and leaders should be aware of imitative communication deception (ICD). ICD is frequently used by an enemy to prolong communications. Operators should know who is normally operating on the net so voices can be recognized. use of secure radio equipment also helps to alleviate ICD. If suspicious stations enter the net, immediate authentications should be required.
- Actions on Effective Jamming. The unit SOP must establish the procedure to follow on effective jamming of a company net. The decision to switch to another net will be made by the company commander or, in his absence, the XO. When changing frequencies, try to leave one radio on the old frequency temporarily to police the net of any station that missed the code word to change frequencies. Beware of attempts to solicit the new frequency by unidentified stations in the old net. Report frequency changes to higher headquarters as soon as possible along with MIJIFEEDER (meaconing, intrusion, jamming, and interference) report.
READINESS CONDITIONS
Readiness Conditions Status (REDCON). The REDCON status is a standardized way to adjust your unit's posture to move and fight. Use of these levels of readiness enables you to respond as quickly as possible to changing situations, and to conduct necessary tasks such as security, rest, feeding, and work while stationary.
- REDCON 1--Full alert, ready to move and fight.
- All personnel alert and prepared for action.
- Vehicles loaded, secured, and weapons manned.
- Platoons ready to move on notification.
- Engines started.
- REDCON 2--Stand to complete, ready to fight.
- Precombat checks complete.
- Equipment stowed (except for wire, NBC alarms, and communications gear).
- Vehicles and weapons manned.
- Vehicles started together on order from company team commander (over hotloop).
- Prepared to move or fight in position, infantry is dismounted in fighting positions.
- Status reports submitted to company team command post.
- Vehicles ready to move in 15 minutes, if Class IV (mines, concertina, overhead cover, and sandbags) are abandoned.
- REDCON 3--Reduced alert.
- Fifty percent of each crew, squad stand down for feeding, rest, and maintenance.
- Remaining personnel man vehicles, OPS (including air guards, weapons, prepare positions and obstacles, and monitor radios and phone).
- Vehicles ready to move within 30 minutes of notification. Most Class IV can be recovered.
- REDCON 4--Minimum alert.
- OPs manned and one-man alert per platoon, monitor radios and man turret weapons.
- Vehicles ready to move in one hour. All Class IV, not permanently emplaced, can be recovered.
MANEUVER CONTROL
SOPs, Battle Drills, and Doctrinal Formations. Unit SOPs, battle drills, and doctrinal formations are used to simplify our control of maneuver. These documents establish standardized procedures, actions, and techniques for the conduct of tactical operations.
SOPs are used to standardize procedures for reporting, formations and movement techniques, command and control, logistics, and administrative operations. Normally, only those situations and operations that are consistently recurring are addressed. Generic SOPs have been published that can be used as a base document in establishing your SOP.
Battle drills are standardized actions taken by crews, squads, and platoons. Details on battle drills can be found in FM 17-15.
Doctrinal formations and movement techniques are used to establish tank positions, movement patterns such as bounding, and responsibilities within platoons and companies.
Vehicle Recognition System. The company (in accordance with the battalion SOP) should develop a system for friendly vehicle recognition. This system must be functional on the nonlinear, obscured battlefield during periods of daylight and limited visibility. Visual and thermal recognition systems will assist in command and control and fire distribution during the haze and confusion of the battlefield. Vehicle marking systems have limited success of preventing fratricide. You can best prevent fratricide by thorough rehearsal and supervision of movement, clear understanding of your plans and orders, and control of your direct-fire weapons. Once the battle is joined, vehicles moving at random around the battlefield are at great risk unless positively identified as friendly.
One method that can be used consists of large contrasting numbers or base symbols representing the company, platoon, and vehicle. For example: Company A, 1st Platoon, 4th Tank would have the number 114. The shape or color of the base symbol indicates the battalion within the brigade. FC 71-6 shows how similar signs can be built and mounted. See Figure 11 below for an example of numbering identification system.
FIGURE 11. NUMBER IDENTIFICATION SYSTEM.
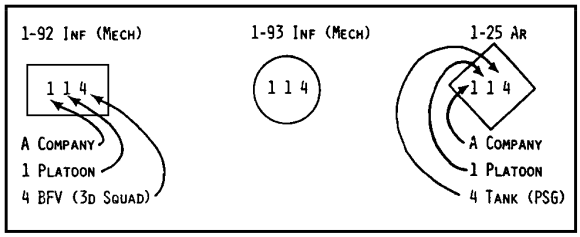
FIRE CONTROL
Controlling and coordinating fires is just as vital to the success of the operation as controlling and coordinating movement. You must direct your fire in the right amounts at the right time to achieve the desired results. The result desired can be summed up in three words: destroy, neutralize, and suppress.
Destroying a target means putting it out of action permanently. To destroy a weapon system such as a tank or a machine gun, you must eliminate its main armament and mobility. You don't have to kill all the men in a unit to destroy it. Inflicting 30 percent or more casualties on an enemy unit in a short period of time can render it permanently ineffective. This, however, depends on the type of unit you are up against, their morale, and how much protection they have available.
Neutralizing a target puts the target out of the battle temporarily. It will become effective again when casualties are replaced and the damage is repaired.
Suppressing a target prevents a target from placing effective fire on friendly forces. The effect of suppressive fires usually lasts only as long as the fires are continued.
Principles of Fire Distribution. There are two types of targets: point target and area target. Point target causes your fires to converge on a particular target and achieve concentration of fire (Figure 12). Point targets are normally designated by shifting from target reference points (TRPs).
The following considerations should be made when controlling fires on point or area targets:
- Shoot at the enemy first, before he can return fire or move to cover.
- Know where friendly troops are located (shift when they are exposed).
- Use each weapon in its best role.
- Completely cover an area target with fire, but avoid target overkill.
- Mass fires on point targets to achieve destruction and neutralization.
- When in doubt, destroy the most dangerous target first.
- Destroy the enemy one bite at a time by suppressing portions of his unit and destroying other portions of his unit.
See area target and how it is engaged in Figure 13, below.
FIGURE 12. POINT TARGET.
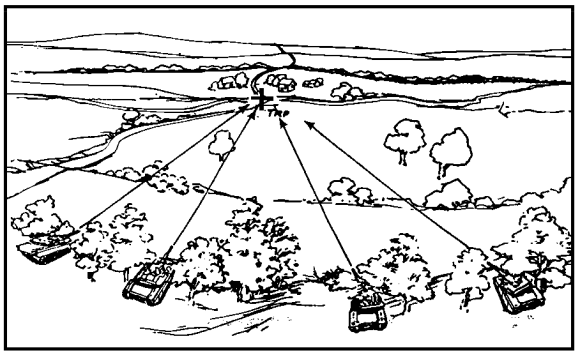
FIGURE 13. AREA TARGET.
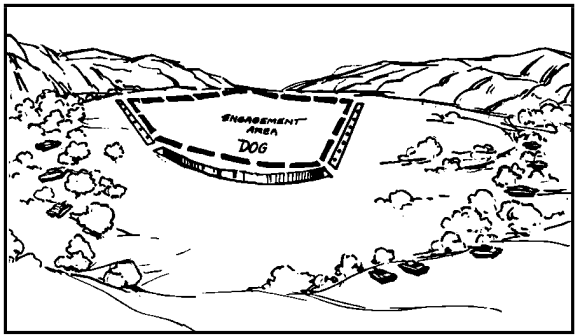
Platoon Sector of Fire. Near half/far half is a technique used most commonly when the terrain is so open that there are not specific features to provide a reference point for the platoons. In this case, platoons are given specified portions of the engagement area. Example: 1st Platoon is responsible for the near half (closest to friendly forces) and 2d Platoon is responsible for the far half of the engagement area.
Techniques for Controlling Fires. Graphic control measures are used to establish areas of responsibility, points of reference, or actual targets.
Sectors of fire should be designated for each platoon in the company by the company team commander. In turn, the platoon leaders will designate sectors of fire for their individual tank, BFV, and squads. Sectors of fire at all levels are generally given using TRPs. For example: 1st Platoon's primary sector of fire is from TRP 104 to TRP 106. Sectors of fire should overlap to provide mutual support between positions and weapon systems (BFVs, tanks). To designate sectors of fire, the company commander can use distinct terrain features, clock system, or limiting stakes. (See Figure 14.)
Engagement Priorities. Tanks, BMPs, BRDMs, and other vehicles may all appear in an armor formation. Each of these systems have different capabilities and pose a different type or level of threat at different ranges. You must determine which targets are most dangerous and assign engagement priorities. Assign engagement priorities according to your mission. Generally, BFVs should engage BMPs, ZSUs, and other light-armor vehicles. Tanks engage tanks. TOW missiles sharpshoot command and control engineer, and ADA vehicles. This general rule is not intended to restrict you. You must decide what engagement priorities your unit will use for any given situation. You may also decide to assign different engagement priorities to different platoons. Example: 1st Platoon engage BMPs then tanks, 2d Platoon engage ZSU 23-4s and BMPs, 3d Platoon engage tanks then BMPs.
FIGURE 14. PLATOON SECTORS OF FIRE.
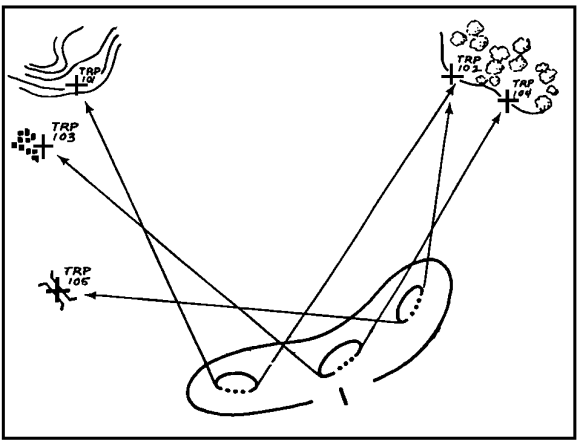
FIGURE 15. NEAR HALF/FAR HALF TECHNIQUES.
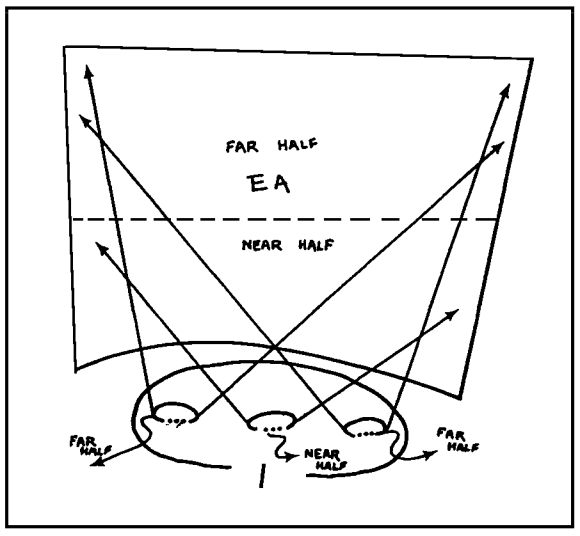
You can initiate the fires of your unit in a number of ways. The three predominant methods are, event, time, or on command. The cue for the event method is when an enemy force crosses a particular point on the ground (phase line); when using on command to initiate fire, the radio is normally used. However, an alternate means of communications must be set up to make sure all platoons receive the message. An example of this would be green star cluster. Time can be used to initiate direct-fire weapons; however, it is most commonly used with artillery to destroy known or suspected enemy locations.
Commands can be used to control fires as well as initiate them. Fire commands are given based on the following format and example:
| C8Q (net call sign) | |
| Weapon/Ammo (optional) | 2 ROUNDS SABOT |
| Description | 10 BMPs/2 T80s |
| Location | TRP 104 |
| Control-Pattern Technique (optional) | FRONTAL |
| Execution | ON MY COMMAND--FIRE |
You can control your direct fires by platoons or as an entire company. To accomplish this by platoons, you alert which platoon the fire command is for ("1st Platoon"). The three patterns of fire are: frontal, depth, and cross. The three techniques of engagement are: simultaneous, alternating, and observed.
Fire commands are predominantly used at the platoon level for control. When they are used at company level, you must allow additional time for the platoon leaders to relay your commands down to their subordinate or you must put all firing vehicles in the same radio frequency. This technique is useful in planning an ambush. Fire commands are best used to achieve massed fires, target destruction, and surprise from a defensive position. This surprise is best achieved using simultaneous technique. You may transition during a battle through several techniques. For example, you may begin with a single simultaneous engagement (to achieve shock and surprise), then follow with alternating fire to destroy the enemy targets, and finally, you might return to simultaneous fire to break off an engagement or during the enemy assault of your position.
You may deliberately order the engagement of the enemy at different times for different weapon systems. If you wish to achieve mass surprise fire, you would order each system to engage at a point in time that will result in all of the rounds arriving in the target area at the same time. Artillery and mortars followed by TOW missiles normally take the longest to reach their targets. Your FSO can provide you with the information on the time of flight of the indirect fires. By planning the time of flight to the targets of your weapon systems, you can place all effective fire on the enemy at one time. You may also consider initiating the engagement with TOW missiles and tank main gun fires followed by artillery. This will permit the direct-fire weapons a clear shot picture, unobscured by dust and smoke.
Indirect fires must be lifted and shifted in order to achieve maximum suppression, enemy destruction, and to protect friendly forces. Indirect fires may be executed on a prearranged time schedule or may be lifted and shifted on command. When shifting and lifting fires on command, it will be necessary to anticipate the time involved to relay your transmission to friendly artillery batteries, and the time it takes for friendly or enemy forces to move into or away from those fires.
Restricting weapons use may be useful in a variety of operations where you may want to make sure your personnel only engage positively identified enemy. It is used most often in restrictive terrain, limited visibility operations, during linkup (or relief) operations, or when friendly units are fighting on separate converging axis. The best technique is the use of restrictive fire control graphics such as restricted fire lines.
OPERATIONS SECURITY (OPSEC)
To successfully accomplish your tactical plan, you must deny the enemy information about your actions and intentions. The OPSEC measures you take to accomplish this goal fall into three categories:
- Countersurveillance--measures taken to protect the true status of friendly activities and operations.
- Countermeasure--measures taken to eliminate or reduce the enemy intelligence and electronic warfare (EW) threat to US Army activities.
- Deception--measures taken to create a false piece of friendly activities and operations.
Countersurveillance consists of signal security, information security, and physical security.
- Signal security has been discussed in the preceding section on communications.
- Physical security is physical protection of equipment, materials, installations, and activities. You use both active and passive measures to achieve physical security. Security forces, barriers, and anti-intrusion devices are used to establish physical security. Passive measures include camouflage, concealment, pattern painting, and noise and light discipline.
- Information security is the protection of both classified and unclassified information that may be of value to the enemy.
Weapons, ammunition, classified documents, and sensitive items should be safeguarded at all times. When not in use, sensitive items should be stored out of sight. Careless equipment security can lead to compromise of your unit's capabilities and limitations. For example, if your company team moves through a seemingly secure town with limited visibility devices and ammunition on display, enemy infiltrators or sympathizers may obtain information about unit capabilities.
During combat operations, do not allow foreign nationals and observers in or near the unit's area or positions. Establish procedures for handling civilians that intrude into your area, in accordance with your higher command's policy and the law of war.
Brief your soldiers on what not to include in the mail. Mail can be a valuable intelligence source. Examples of items that should not be in letters include--
- Unit identification, size, location, or capabilities.
- Knowledge of future operations.
- Specific mention of commander's names.
- Acknowledgement of heavy losses or poor morale.
Whenever the company team departs a position, a thorough police of the area should be conducted to ensure that no item of intelligence value is left behind. Have your soldiers police as they go to avoid possible compromise.
Countermeasures are used to overcome specific enemy intelligence operations. Once you have determined an area where your force is vulnerable to surveillance, you must develop a countermeasure to prevent the enemy from exploiting that vulnerability. Such countermeasures may include deception.
Deception operations are taken to mislead the enemy. They may include the following:
- Ruse.
- Display.
- Feint.
- Demonstration.
Most deception operations are planned and directed at levels above battalion. However, you may find it useful to employ deception as part of your scheme of maneuver to deceive the enemy or cause him to react a certain way. You must coordinate with battalion for approval before initiating deception operations. Some techniques include:
- Visual. Showing actual or dummy movement, equipment, or activity at a believable time in a believable place.
- Sound. Engines running, track noise, hatch closing, digging, and gunfire.
- Odor. Diesel fumes and cooking odors.
- Electronic. False transmissions and remote locations for radios can be used.
Active Security Measures. Security measures designed to protect against surprise, observation, and infiltration are planned at both battalion and company level. The battalion S2 is responsible to assist the S3 in planning security, surveillance, reconnaissance, and counterreconnaissance measures. As the company team commander, you are responsible to ensure that your security measures support and complement the battalion plan and meet your own security needs.
You will use a combination of OPs, patrols, sensors (such as platoon early warning system), and night-observation systems to provide early warning. Ambushes and reaction forces are used to destroy enemy reconnaissance forces.
Stand To. Stand to is a period of maximum preparedness at first light in the morning and at darkness in the evening. This ensures that every man is ready for action and that every man adjusts to the changing light conditions. As a minimum, stand to is conducted from 30 minutes before until 30 minutes after beginning morning nautical twilight (BMNT) and again at end evening nautical twilight (EENT).
The unit SOP should specify the actions to be taken, but as a minimum, your unit should come to REDCON 2.
Vehicle Camouflage. Camouflage is used to break up the outline of a vehicle. Natural vegetation works best. Tree branches can be placed on vehicles to break up the outline and hide distinctive features such as cupolas and tank guns. Camouflage must be natural looking. If area vegetation is green, camouflage must be replaced often.
You should use camouflage nets to hide vehicles in stationary positions especially from aerial observation. Avoid geometric patterns. Park vehicles to take advantage of natural concealment and shadows, where possible.
Vehicles are pattern painted with drab paint to reduce glare. FM 5-20 contains instructions for pattern-painting vehicles. Remove or tie down and cover windshields. Cover mirrors and headlights as well.
Dust and exhaust smoke can destroy concealment afforded by camouflage. Take the effects of dust and smoke into account in selecting positions by enforcing proper maintenance and driving. Minimize track, tire, and foot trails that could be detected from the air or form the enemy positions. In snow or sand, cover up track patterns if possible (often, the wind will take care of this). Disperse your vehicles and personnel to lessen the chance of aerial observation and detection by sensitive heat-seeking devices. Make sure your vehicles don't give away thermal signatures from their hide positions.
Light and Noise Discipline. You and your chain of command must enforce strict light and noise discipline. Even filtered flashlights and burning cigarettes can be seen for great distances, particularly with night vision devices. Shield lights needed for essential maintenance and other activities from enemy view.
Soldiers must talk and move only when necessary. At night, it is particularly important to talk in low voices and move slowly to avoid unnecessary noise. Use the following procedures to reduce the noise made by your armored vehicles:
- Don't slam hatches and doors.
- Start and move vehicles only as part of a plan or tactical plan operation.
- Start vehicles at the same time to keep enemy observers from pinpointing the type and number of vehicles started.
- Perform maintenance and resupply in areas that are masked by terrain to shield noise, preferably during daylight in covered, concealed locations.
- Sandbag and shield generators to reduce noise.
- Monitor radios from CVC helmets, not from speakers. Keep radio volume as low as possible.
Challenge and Password. Strictly enforce proper challenge and password using current challenge/password from the CEOI.
Practice Exercise