|
RDL Homepage |
Table of Contents |
Document Information |
Download Instructions |
LESSON ONE
MECHANIZED (M113) INFANTRY DEFENSE TACTICAL PLANNING AND PREPARATION
| Soldier's Manual Tasks: | ||
| 071-326-5761 | Designate primary, alternate, and supplementary fighting positions for key weapons in planning the M113 defense. | |
| 071-326-5770 | Prepare an M113 platoon element sector sketch. | |
| 071-326-5780 | Direct an M113 platoon-size element's fires in the defense using M113 defense tactics and techniques. | |
| 071-312-3004 | Construct an M60 machine gun position. | |
| OVERVIEW | ||
| TASK DESCRIPTION: | Mechanized Infantry (M113) Defense Tactical Planning and Preparation. | |
| TASKS: | Identify how to designate primary, alternate, and supplementary fighting positions for key weapons, how to plan the defense (M113) and prepare the platoon element's sector sketch (M113), how to direct the platoon element's fires in the defense, identify defensive tactics and techniques (M113), and construction of a M60 machine gun position. | |
| CONDITIONS: | Given the subcourse material for this lesson, a training scenario, the student will complete the practice exercise at the end of this lesson. | |
| STANDARDS: | The student will demonstrate his comprehension and knowledge by identifying how to designate primary, alternate, and supplementary fighting positions for key weapons, how to plan the defense (M113), how to direct the platoon element's sector sketch (M113), how to direct the platoon element's fires in the defense, identify defensive tactics and techniques (M113), and construction of a M60 machine gun position. | |
| REFERENCES: | The material in this lesson was derived from
the following publications:
FM 7-7 STP 7-11B24-SM STP 7-11BCHM14-SM-TG |
|
INTRODUCTION
The purpose of defensive operations is to repel an enemy attack and destroy the attacker. Defensive operations may also be undertaken to hold critical terrain, to gain time, or to wear down the enemy. Your mechanized infantry platoon defends as part of a company or company team and completes tasks assigned to it by the company or company team commander.
Your platoon's defensive tasks include:
- Destroying enemy tanks, BMPs, and BTRs with dismounted or mounted Dragons and light antitank weapons (AT4s).
- Suppressing enemy antitank guided missiles (ATGM) fires with the caliber .50 machine gun, dismounted machine guns, squad automatic weapons, (SAWs), grenade launchers, and rifles.
- Repelling dismounted enemy attacks.
- Providing close-in security for tanks and improved TOW vehicles (ITVs) during limited visibility and in restrictive terrain.
- Locating the enemy and providing security by manning observation posts and conducting patrols and ambushes.
- Building obstacles to slow, stop, or canalize the enemy, and providing security for obstacles.
- Conducting platoon-size counterattacks or counterattacking as part of a larger force.
PART A - DESIGNATE PRIMARY, ALTERNATE, AND SUPPLEMENTARY FIGHTING POSITIONS FOR KEY WEAPONS IN PLANNING THE M113 DEFENSE
1. General.
As a platoon leader, you must prepare your platoon to defend as part of a larger force. Once you have been assigned your platoon's sector of responsibility, you must designate primary, alternate, and supplementary positions for your antiarmor weapons and machine guns. You and your subordinate leaders must ensure that the positions:
- Cover the most likely armor avenues of approach into the platoon area with medium antitank weapons (MAWs) (heavy antitank weapons (HAWs) if attached) from the primary positions.
- Cover the most likely dismounted avenues of approach into the platoon area with M60 machine guns, and caliber .50 machine guns from the primary positions, with emphasis on protection for the antiarmor positions.
- Provide coverage of the same sectors of fire from alternate positions.
- Provide coverage of armor and dismounted avenues of approach into the platoon area from supplementary positions that cannot be covered from the primary or alternate positions. This coverage includes approaches into the flanks or rear of the platoon area.
- Take maximum advantage of all available natural cover and concealment and weapons' capabilities.
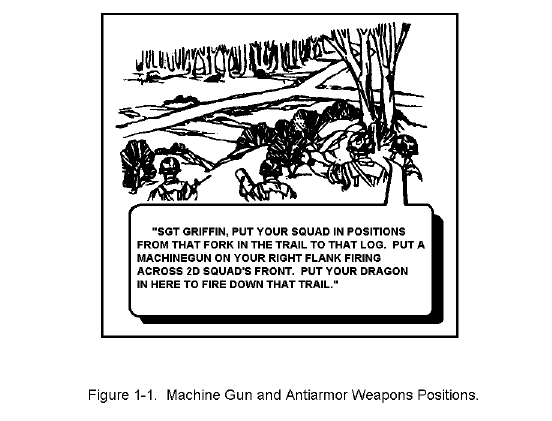
You, as the platoon leader, normally select the location for your machine guns, Dragons, any attached crew-served weapons, and armored personnel carriers (APCs). The success of the platoon's mission depends greatly on the proper positioning of those weapons to obtain their maximum sustained firepower. You must make use of all available cover and concealment to provide those weapons with maximum protection from enemy observation and fire. The enemy will concentrate his efforts on finding and destroying crew-served weapons because of their tremendous volume of destructive firepower. Primary, alternate, and supplementary positions which are described below, must be selected for your entire platoon, but positions for your machine guns and antiarmor weapons are most critical (Figure 1-1).
- Primary Position. This is the position within the platoon sector from which the crew-served weapon can best perform its mission (Figure 1-2).
-
Alternate Position. An alternate position is a position to
be occupied when the primary position can no longer be
manned and from which the same sector of fire can be covered
(Figure 1-2).
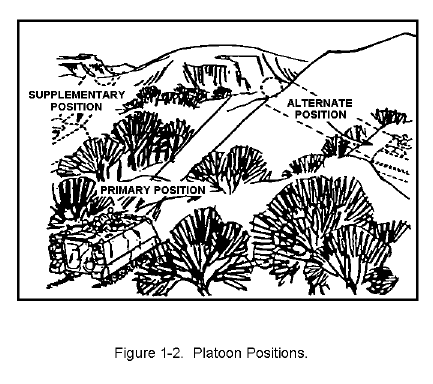
- Supplementary Position. This is a position that provides the best location for the accomplishment of a task that cannot be accomplished from the primary or alternate positions, such as providing mutual support to adjacent platoons or defending against an attack from a different direction (Figure 1-2).
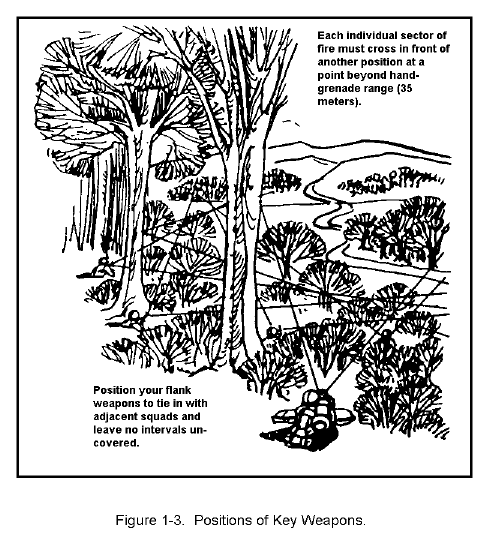
Position your key weapons where they have both cover and concealment, and good fields of fire. Strive to put them where their fires will be overlapping, integrated, and mutually supporting. Position them so that their fire will be heavier on the avenues of approach that the enemy will most likely use. The weapons placed on the flanks of your position must be tied in with the adjacent unit fires to prevent gaps (Figure 1-3).
- Cover. Even when natural cover is available, it usually must be complemented by properly prepared positions. As cover is sometimes sparse, you must be skillful in selecting positions so that all natural cover is used to the maximum extent. When no natural cover exists, positions that are well prepared will protect your men and weapons from enemy fire.
- Concealment. The enemy's greatest effort will be toward locating the weapons that hold up his attack. Therefore, clever use of terrain and camouflage is mandatory to deceive the enemy. The best foliage for concealment is alive and natural. Even at night, dead foliage can be detected by electronic sensors.
3. Machine Guns.
Machine guns are the platoon's key weapons for defense against a dismounted infantry assault and for suppressing unprotected enemy direct fire weapons. Position your machine guns laterally across the front so you can have overlapping, mutually supporting bands of fire and, where the terrain allows, final protective fires (FPF). Machine gun fire is most effective when it hits the long axis of the enemy assault formation with the long axis of its beaten zone. (Figure 1-4). When you can, position machine guns in pairs to fire final protective lines (FPL) parallel to one another. Each machine gun should be assigned:
- A primary and a secondary sector of fire.
- An FPL or a principal direction of fire (PDF).
- At least one alternate position.
4. Dragons.
Medium antitank weapons are the key to the platoon's defense against a tank threat. You should consider the following when employing these weapons:
- Deploy them laterally and in depth to cover a designated armor kill zone. That keeps them from being hit by enemy fire directed at a single point or area.
- Position them to deliver surprise fire. Do so by using the terrain to get maximum use of cover, concealment, and fields of fire to hit the enemy from an unexpected direction (flank or rear).
- Keep central control of them. Enemy fire may cause antiarmor weapons to move to alternate positions or to supplementary positions to meet an attack from another direction. Coordinate their fire to provide a timely massing of fire at the critical point. When Dragon positions are selected, consider that:
- In the least desired firing position, the prone position, the missile must be at least 15 centimeters (6 inches) above the ground.
- Obstacles that could detonate the missile, snag its fins or wire, or interfere with its guidance must be cleared. DO NOT FIRE ACROSS POWER LINES.
- The cover and concealment hiding one of these weapons must also hide its launch signature from the front. A rise in the ground that covers and conceals both the weapon and its signature is best.
- Minimum range for the Dragon is 65 meters.
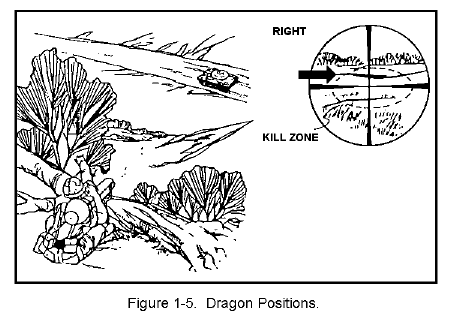
- Position the Dragon so targets will not move
behind obstacles before the missile strikes.
This is important because, when a vehicle is
engaged from the flank, it may move a few hundred
meters before the missile strikes it. If you can
see no obstacles in your field of view through
the sight, then it is clear to launch a missile
within that area to a target moving at right
angles to your line of sight (Figure 1-5).
5. Summary.
This concludes the discussion on designating positions for your platoon key weapons. We discussed the importance of selecting primary, alternate and supplementary positions for your antiarmor weapons and machine guns, having good cover and concealment, FPLs and PDFs for machine guns and positions for Dragons. We will now move to constructing an M60 machine gun position for an M113 platoon.
PART B - CONSTRUCT AN M60 MACHINE GUN POSITION FOR AN M113 PLATOON
1. General.
A well built fighting position gives the defender a marked advantage over the attacker and enhances his weapons' firing capability. Fighting positions must provide cover and concealment against aerial and ground fire and observation, and provide for mutual support among fighting positions', observation, and fields of fire. As the platoon leader, you designate the specific location and sectors of fire for the M60 position to be constructed. You ensure the position incorporates natural cover such as mounds of earth, stumps, trees, or rocks. The position must also have observation and general fields of fire. The position must provide frontal and rear protection and overhead cover for the gun crew, and allow coverage of primary and secondary sectors of fire. Specific requirements for locating the firing positions includes:
- Cover. The position should be protected by a natural or man-made parapet. The parapet should be thick enough to protect from direct small-arms fire and high enough to hide the helmets of soldiers in the position. Also, the position should be protected from indirect fire (shrapnel) by at least 12 inches of dirt and log overhead.
- Concealment. The position should not be easily detected from the front -- it should blend with surroundings so that an approaching soldier about 35 meters to the front (hand-grenade range) cannot detect it. The position must also be protected from aerial observation.
-
Fields of fire. The position must provide the gunner good
observation and fields of fire in both sectors without
destruction of natural camouflage.
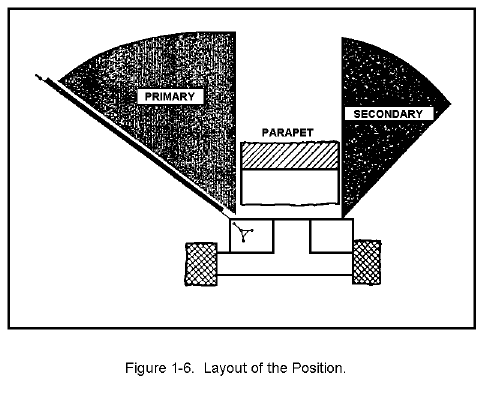
- Size and shape. The position must be armpit deep and wide enough to allow two soldiers with load-bearing equipment (LBE) to move freely. It must have two distinct firing platforms whenever possible (Figure 1-6).
- Other requirements. The position must also include a grenade trench, a sloping floor with shallow trench for drainage, and a rear parapet. The rear parapet protects against small arms fire from the rear (fire from other friendly positions or supporting fire from APCs) and from shrapnel.
2. Preparing a Machine Gun Position.
After receiving the position of the machine gun, sector(s) of fire, and the FPL or PDF from you, the crew:
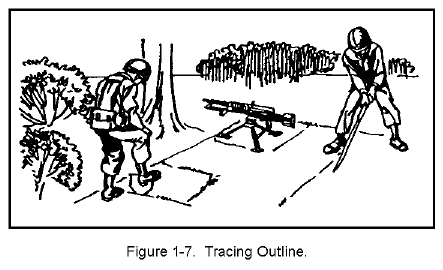
- Marks the position of the tripod legs where the gun can be laid on the FPL or PDF.
- Marks the limits of the sector of fire.
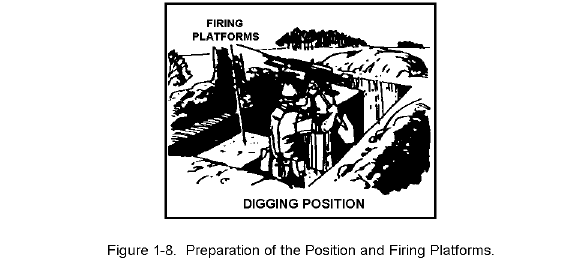
- Firing Platforms. The firing platforms are the first part of the position to be dug. After the platforms are dug 4 to 6 inches deep, the machine gun will be positioned on one of them to cover the primary sector of fire (Figure 1-8). The remaining part of the position is completed around the firing platforms. Placing the machine gun on the firing platform at this time:
- Lessens exposure if the crew has to shoot before the position is complete.
- Digging the Hole. The crew digs the hole, places some of the dirt where frontal cover is needed, and uses the rest for flank and rear cover. The hole is dug deep enough to protect the crew and still let the gunner shoot with comfort (about armpit deep).
- Grenade Sumps. Three trench-shaped grenade sumps are dug at various points so either crew member can kick a grenade into one.
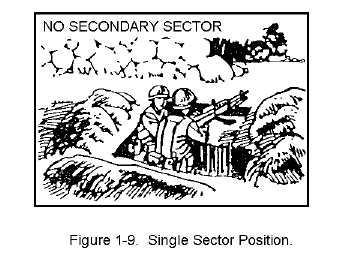
-
Single Sector Position. When a position does not have a
secondary sector of fire, only half of the position is dug
(Figure 1-9).
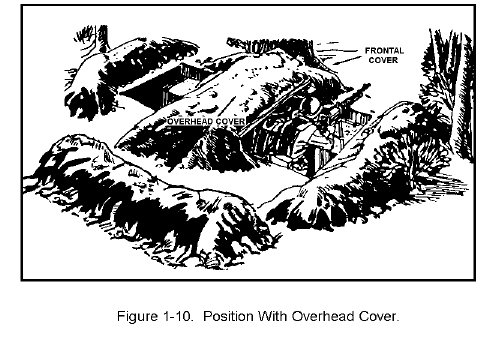
-
Overhead Cover. Overhead cover for a machine gun position
is built the same as overhead cover for a two-man fighting
position (Figure 1-10).
- Three-man Crew Position. When there is a three-man crew for the machine gun, the ammunition bearer digs a one-man fighting position to the flank. This flank position allows him to see and shoot to the front and oblique.
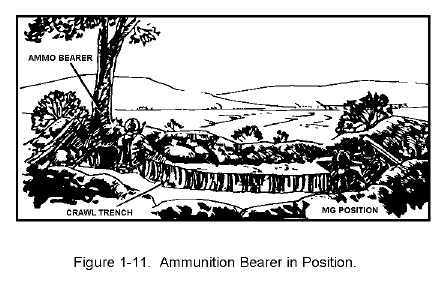
-
Ammunition Bearer Position. Usually, the ammunition bearer
is on the same side as the FPL or PDF so he can cover the
machine gun's secondary sector, and so he can see the gunner
and assistant gunner (Figure 1-11).
When you and your platoon sergeant are overseeing the construction of a fighting position for an M60 machine gun, you must make sure the crew:
- Positions the machine gun to lay on the FPL or PDF.
- Ensures that the secondary sector can also be covered.
- Outlines the position on the ground.
- Digs the firing platforms first.
- Positions the machine gun on the firing platform to cover the FPL or PDF.
- Constructs frontal cover, then constructs flank cover.
- Completes construction of the position to the extent required.
3. Summary.
This concludes the discussions on preparing an M60 machine gun position. We discussed cover, concealment fields of fire, and other requirements for locating the position. We also discussed how the crew prepares a machine gun position. We will now move to preparing a platoon sector sketch.
PART C - PREPARE A SQUAD AND A PLATOON ELEMENT SECTOR SKETCH
1. General.
A sector sketch is a rough drawing, as close to scale as possible. The sketch serves as memory aids and helps you prepare your fire plan. The parts of the squad and platoon sector sketch described below are minimum necessary to make the sketch meaningful. Your unit standing operating procedure (SOP) or commander may require more detail.
2. Team or Squad Defensive Sector Sketch.
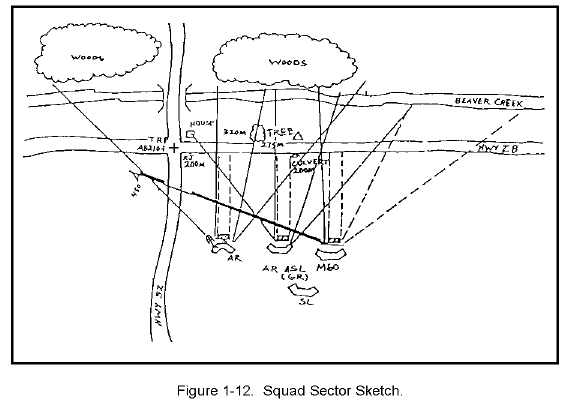
If your carrier teams and dismount teams are under squad control, each squad leader should prepare a sector sketch. (Each antiarmor specialist and 7.62-mm and caliber .50 machine gunners should prepare a range card.) The sketch helps the squad leader plan his defense, control the squad's fires, and as stated, aids you in preparing the platoon fire plan. If the squad is divided into a dismount team and a carrier team that are separated, the dismount team leader makes a team sector sketch and the carrier team leader prepares a range card.
The sector sketch (Figure 1-12) shows:
- Main terrain features in the sector and the range to each.
- Each primary position.
- Engagement areas or primary and secondary sectors of fire of each position.
- Dismounted machine gun FPLs or PDFs.
- Type of weapon in each position.
- Maximum engagement ranges of Dragon and caliber .50 machine guns.
- Observation post (OP) and leader positions.
- Target reference points (TRPs) in the sector.
- Dead space.
- Obstacles.
The squad sketch should be prepared based on direct observation of the sector and by using each weapon's range card. Two copies of the squad sketch should be made. One copy goes to the element leader or platoon leader. The other copy remains at the position.
3. Platoon Defensive Sector Sketch.
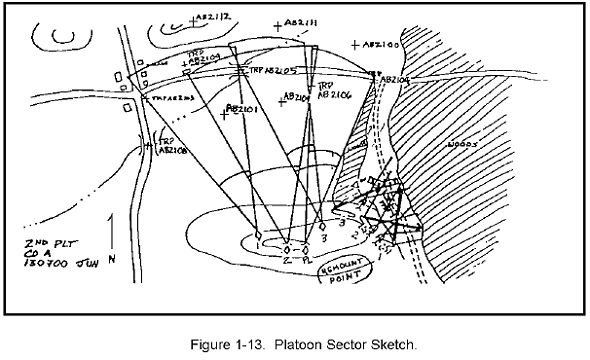
Your platoon's defensive sector sketch is drawn as closely to scale as possible, and it includes targets for both direct and indirect fires (Figure 1-13). The platoon defensive sector sketch helps the company or company team commander to integrate his defenses. It also lets you shift fires in the platoon sector without moving to determine which weapon can fire into a certain area. You then can direct (by radiotelephone, voice, or signals) which fires are to be shifted to cover the threatened area. You can also instruct all or part of the platoon to move to alternate or supplementary positions, if necessary. If the platoon is organized into a carrier element and a dismount element, each element leader should prepare an element fire plan. The sketch should show:
- APC positions with primary sectors of fire or engagement areas.
- The platoon sector.
- Squad positions (as applicable).
- Dragon and machine gun positions, with primary sectors of fire for each.
- Machine gun FPLs or PDF.
- Maximum engagement range.
- OPs.
- Target reference points (TRP)(if applicable).
- Mines and other obstacles.
- Indirect-fire target locations.
- The indirect fire FPF location (if allocated).
- The location of the platoon command post (CP) and OP.
- Unit designation (no higher than company level) and date-time group.
As stated, the parts of the sector sketch described above are the minimum necessary to make the sketch meaningful. Unit SOP or the command may require more detail.
The sector sketch is devised as follows:
- Machine guns are assigned primary and secondary sectors of fire. Within the primary sector, the gunner is assigned an FPL or PDF, as appropriate.
- Each medium antitank weapon to cover the primary sector of fire is normally assigned a primary position and one or more alternate firing positions. Only primary positions with primary sectors of fire are shown on the sketch. If a supplementary position is assigned, it is also shown. (Secondary sectors of fire from the primary position may be included if so ordered by the unit commander.)
- Target reference points are labeled in accordance with (IAW) unit SOP. TRPs are plotted on an overlay to help identify target locations and aid the control of direct and indirect fires. They should be plotted using manmade objects or terrain features within the platoon area. Indirect fires must be coordinated with the forward observer.
- If the platoon/element has been allocated an FPF, it should be positioned across the most dangerous avenue of approach. The company/perimeter commander has final authority for placing FPFs, but he may ask for your recommendation.
- Any obstacle in the platoon area (stream, defile, dense woods, buildings, etc.) should be noted on the overlay. Manmade obstacles, such as minefields and defensive wire, are noted with the appropriate military symbol.
- Indirect fire targets (mortar and artillery) should be plotted in front of, on, and behind the platoon/element position. The location and number of each target are shown on the overlay by number as received from the forward observer (FO). Indirect fires must be coordinated with the FO.
At least two copies of the platoon sector sketch should be prepared, one for you and one for the company commander. If time permits, additional copies may be given to each subordinate team or squad. Your platoon sector sketch must be forwarded to the company commander as soon as possible to facilitate company fire planning.
4. Summary.
This concludes the discussion on preparing a squad and a platoon sector sketch. It was stated that the sector sketch helps the leader plan his defense and control fires. The minimum information required in the sketch, such as, main terrain features with range to each was presented. We will now move to directing an M113 platoon fires in the defense and identifying defensive tactics and techniques for an M113 platoon.
PART D - DIRECT A M113 PLATOON SIZE ELEMENT FIRES IN THE DEFENSE, AND IDENTIFY DEFENSIVE TACTICS AND TECHNIQUES FOR AN M113 PLATOON
1. Defensive Tactics and Techniques.
Your platoon's defense must capitalize on the APC's firepower and mobility, the Dragon's thermal vision equipment, and the dismounted infantryman's fighting capability.
Carrier teams with Dragons are best used to defend against mounted attacks along open avenues of approach.
Dismount teams are best used to defend against dismounted attacks along avenues that restrict mounted movement.
Seldom is it possible to position the carrier teams where they will not be subject to dismounted attack, or to position the dismount teams where the enemy cannot use his armored vehicles. Thus, it is essential that leaders and commanders carefully position and control carrier teams and dismount teams to make the most of the platoon's total combat power. This is not a simple matter: the APC firing the caliber .50 machine gun or Dragon is chiefly a medium-range weapon system, but the dismounted infantryman is most effective at short ranges. If the two are properly used, they complement and mutually support each other.
2. Control Techniques.
When the entire platoon is mounted, control is relatively simple. When dismount teams are deployed, control becomes difficult. There are two ways for you to control the carrier teams and dismount teams:
- Squad Control. The carrier team and dismount team remain under squad leader control only when the two teams are collocated. Because the two teams are together, this method improves control, concentrates firepower, and increases security. The squad leader may remain in the vehicle or dismount, whichever allows him to best control the entire squad and influence the fight.
- Platoon Control. When the carrier teams are positioned away from the dismount teams, the teams are formed into a carrier element and a dismount element, each under platoon control. In this situation, you must decide which element has the most important mission and from which position you can best control the entire platoon and influence the action. Whichever element you decide to be with, you control the other element through your platoon sergeant.
3. Methods of Employment.
There are three methods of employing platoons in defensive operations:
- Carrier teams and dismount teams on the same battle position.
- Carrier element and dismount element on separate battle positions.
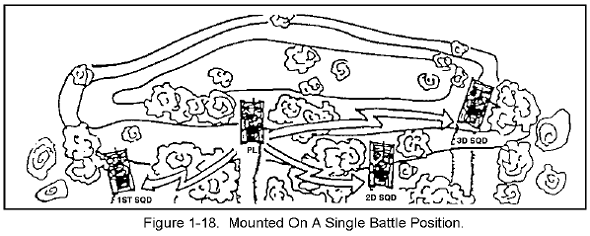
- Platoon mounted on a single battle position.
As discussed in Part A, no matter what the method of employment, the entire platoon and each element and team can be assigned primary, alternate, and supplementary defensive positions.
In a primary position, a unit or individual can best fight to accomplish the assigned mission.
In an alternate position, generally adjacent to the primary position, a unit or individual can perform the original task when the primary position becomes untenable or unsuitable.
In a supplementary position, a unit or individual can accomplish a task that cannot be accomplished from the primary or alternate positions.
- Carrier Teams and Dismount Teams on the Same Battle Position. When possible, your platoon defends with the carrier teams and the dismount teams on the same battle position (Figure 1-14). This method takes greatest advantage of the platoon's defensive capability. Using it, the platoon can defend against mounted or dismounted attacks, move rapidly to another battle position, or conduct a counterattack.
Within the battle position, the carrier teams may be positioned with the dismount teams, or they may be forward of, on a flank of, or behind the dismount teams.
The carrier teams remain with the dismount teams when the terrain provides both teams with good observation, fields of fire, and cover and concealment. This is the preferred method because it simplifies control, insures mutual support, and facilitates remounting the vehicles.
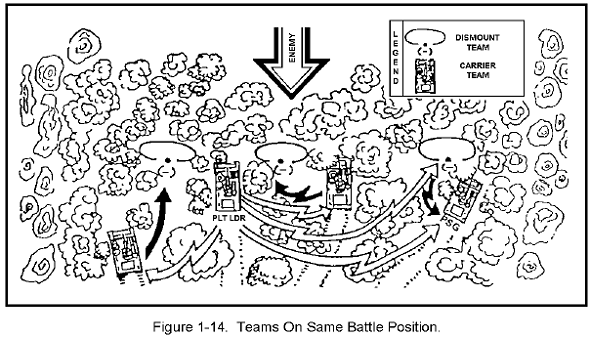
You, as the platoon leader, assign each squad a primary position and sector of fire. You may also assign alternate positions and sectors. You give a general location for each OP and designate which squad will man OPs.
You supervise the positioning of each APC, insuring that it ties in with the other APCs according to your concept of the defense. Each squad leader positions his dismount team (complemented by the vehicle's fires) to provide security oriented on dismounted avenues of approach.
When using this technique, each squad leader retains control of the dismount team and the carrier team. Each squad leader positions himself where he can observe and control his squad's operations. A squad leader can usually observe the battlefield and control the carrier fires better from the carrier.
Initially, and when it is necessary to gain better observation and fields of fire and thus take better advantage of mounted weapons, the carrier element can be employed forward of the dismount element. In that case, the dismount element is positioned to the rear to avoid unnecessary exposure to enemy fire directed at the APCs. The dismount element should use available time to prepare fighting positions and obstacles. When the enemy attacks, the carrier element normally will engage enemy formations at maximum range and, when endangered, move to alternate positions to the flank or to the rear of the dismount element. The timing of this move is critical. While maximum advantage can often be gained by employing the carrier element forward, the carriers become more vulnerable to enemy fire as the enemy closes.
In most situations, the squad leaders will stay in the same element with you. Because the carrier element will be the first to see and engage the enemy, and because timing of movement to alternate positions is so critical, you may decide to stay with the carrier element. Your platoon sergeant then would be the dismount element leader. Sometimes, tactical considerations dictate other methods. For example, when the primary fight is expected to be dismounted, it may be wise to leave the squad leaders with the dismount element while you stay forward with the carrier element. As the situation develops, you may move with the carrier element or dismount in a position where you can better control both elements. This allows you to stay abreast of the situation and still provide maximum control where the primary fight is expected.
You should assign each carrier team a primary forward position and at least one alternate position. You should also assign positions to be occupied after displacement. Similarly, you or your platoon sergeant assigns each dismount team a primary and alternate position and a sector fire, which complement the carrier element's positions once the vehicles have displaced rearward. Carrier element leaders should also plan supplementary positions to maintain security in case one or more vehicles are disabled during the initial engagement.
When the battle position has two avenues of approach, one with long-range and one with short-range fields of fire, the carrier element is positioned on the same battle position but to the flank of the dismount element (Figure 1-15). This allows good positioning of the carrier element and the dismount element because each is positioned on terrain best suited to its capabilities. Such positioning may allow for a more determined defense, but, in the heat of battle, remounting the carriers by the dismount element may be difficult.
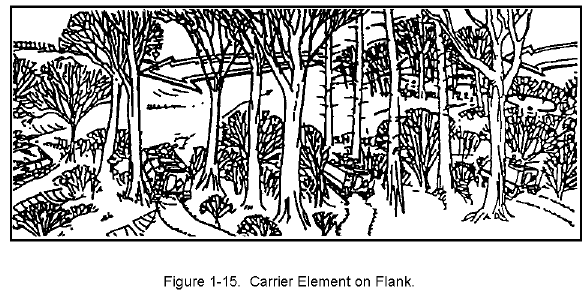
The carrier element and the dismount element should not be separated beyond mutual supporting distance. You should personally direct the positioning of each APC, if possible; assign sectors of fire to the dismount team; and assign primary and alternate positions and sectors of fire to crew-served weapons and ground-mounted Dragons. If you are called to the company command post on arrival at the battle position, your platoon sergeant lays in the platoons. In that case, you have the responsibility of checking the platoon defense on your return.
During reduced visibility, you may find you need to reposition a dismount team, (for example, nearer to the carrier element), to provide local security.
When covered positions are available for the dismount element but not for the carrier element, when the terrain is too restrictive for vehicle movement, or when multiple mounted avenues of approach exist, the carrier element is positioned on the same battle position but to the rear of the dismount element (Figure 1-16). You should position the carrier element so that it can overwatch the dismount element. You may decide to keep the carrier element in a centralized hide position.
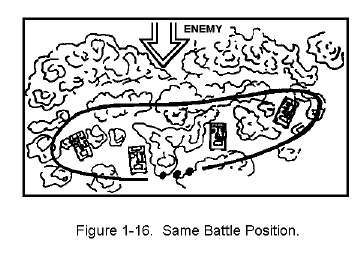
This allows the carrier element to make a quick move and mass its fires on whichever avenue of approach the enemy uses. (Hide position will be discussed later in this Part of the subcourse and in lesson two.)
This method is best suited to avenues of approach that represent a dismounted threat.
- Carrier Element and Dismount Element on Separate Battle Positions. The company or company team commander may decide to employ the carrier element and dismount element separately. With this method, the separated elements may be less able to support each other (Figure 1-17).
Control is difficult when the elements are separated since the two elements will have different missions. The company or company team commander may choose to control both elements directly, by having both element leaders on the company or company team command net. If so, the commander will normally tell you which element to be with.
Leaders of dismount teams must plan operations that do not need the support of their vehicles. The quantity and type of weapons, ammunition, mines, equipment, and supplies to be with the dismount element must be taken into account. How long the teams will operate separately and how quickly the dismount teams must be able to remount are important planning considerations.
The carrier element may be employed well forward to perform a specific mission. When its mission is completed, the carrier element displaces and rejoins the dismount element. This method may be used when the commander wants to use the APCs for antiarmor engagements well forward of the dismount element's intended positions. In such fights, the carrier element must avoid decisive engagements because the element lacks a dismounted carrier capability. Dismount teams which cannot be used forward appropriately are left in the rear to improve positions and emplace obstacles. Once it has returned to the dismount element's position, the carrier element can fight using any of the methods discussed earlier.
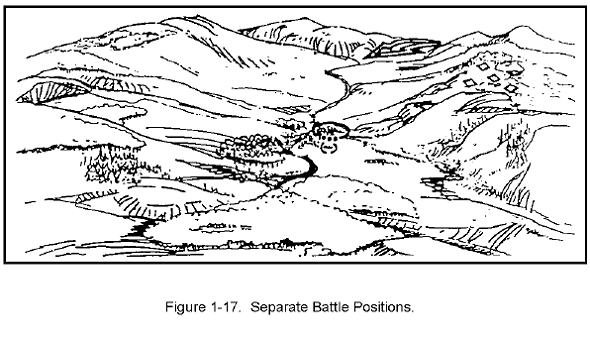
Another variation with the carrier element and dismount element on separate positions is to have the two elements fighting from two adjacent battle positions covering the same avenue of approach, and rejoining only to move from those positions.
A company or company team commander may use this plan when he needs the dismount element in one location and the carrier element in another, and when both can be employed from separate positions. This situation might arise when:
- The primary position for the dismount element does not allow adequate fields of fire for the carrier weapons.
- Sufficient forces are not available to cover separate mounted and dismounted avenues of approach.
- The dismount element must occupy heavily wooded or rugged terrain that the APCs cannot traverse.
When this variation of adjacent position is used, a key consideration is how and where the two elements will link up. Both elements need covered routes to a concealed remount point where the dismount elements can rejoin the carrier element. Because the carrier element can move faster than the dismount element and has more protection against small arms and indirect fires, the platoon remount point should be as close to the dismount element as possible.
During limited visibility, the company or company team commander may change his plans to provide additional security for the carrier element. This can be done by moving a dismount team to the carrier element's position or by rejoining the platoon on a single battle position.
-
Platoon Mounted on a Single Battle Position. The platoon
defends mounted from a single position if the most
advantage can be gained by medium-range antiarmor
engagement with mounted Dragon systems and no major gain
can be made by deploying a dismount element. This method
is used only in a hasty defense when the platoon is going
to be in position for only a short time. Staying mounted
simplifies your control of the platoon and improves the
platoon's ability to react and move quickly. Besides, it
reduces troop exposure to indirect fire and provides an
excellent posture to exploit an enemy weakness by
counterattack. This method may also be used when the
platoon must fight immediately upon occupying a position or
when the platoon is alerted to be ready to move to another
battle position. It should be remembered, however, that
the carrier will draw return fire which will endanger the
mounted squad (Figure 1-18).
Normally, staying mounted is the least desirable method of employment. The major disadvantage is that less short-range firepower can be produced, and local observation and security are reduced. The platoon is more vulnerable to an attack by dismounted infantry forces. Each squad, by SOP, should dismount a small force (two or three men) for local security each time it halts. These men are led by the team leader. They use natural cover and concealment. If the enemy does not attack, the remainder of the dismount teams should deploy and prepare fighting positions.
4. Battle Positions.
A defender has certain natural advantages the attacker does not have. These include a better knowledge of the terrain, ability to better use the terrain for protection and concealment, and a better opportunity to plan the fight. It is essential that platoons and squads select and occupy their positions carefully. If they do not, they lose many of the defender's advantages.
5. Carrier Team Positions.
The firepower of the caliber .50 machine gun and Dragon is one of the platoon's greatest assets. Hence, you first consider where to position the APCs, and then, if the situation allows, build the platoon defense around them. Ideally, each vehicle's position provides:
- Good fields of fire into the most likely avenues of enemy approach.
- Cover, especially to the front.
- Concealment from both ground and air observation.
- Covered and concealed routes to and between positions and to the platoon remount point (if applicable).
- Mutual support between positions.
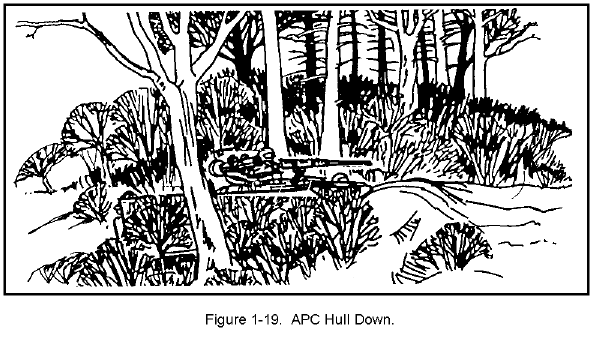
Hull-down positions should be occupied whenever possible. In such positions, mounted weapons are least exposed to enemy fire, and the hull is protected by cover (Figure 1-19). By camouflaging the weapons, the APC is then difficult to detect, yet the mounted weapons can still be fired. When first occupying a hull-down position, the caliber .50 machine gun should be fully depressed to insure that close-in targets can be engaged without moving the vehicle. If available, engineer assets can assist the platoon in preparing hull-down positions.
Each vehicle should have a primary position and as many alternate positions as needed to cover the entire sector of fire. Supplementary positions may be designated to cover secondary sectors of fire. All mounted weapon systems should be considered when positions are selected and prepared.
Dragons can kill tanks out to 1,000 meters. This is within effective range of a tank's main gun (usually between 1,500 and 2,000 meters). This gives the tank a stand-off advantage. To offset the advantage, APCs must have good hull-down positions, suppress enemy tanks with indirect fire, coordinate tube-launched, optically-tracked, wire-guided (TOW) missile fire and Dragon fires, and insure that tanks fired on are in range.
This kill probability of the Dragon rises if it hits the tank's weaker side armor. Flank engagements are advisable because a tank crew's observation and the tank's main gun are normally oriented to the front. Thus, a side or flank engagement reduces the chances of being detected while it improves the chances of a kill. As discussed earlier, the Dragon system positions must offer unobstructed fields of fire and a clear backblast area.
In some defensive situations where the emphasis is on the dismount element to hold ground, the carrier element will have to make the best possible use of less than ideal terrain. The use of the mounted carrier must be weighed against its possible loss.
The APC cannot survive against antiarmor missiles, tank fire, or BMP and BTR fire. Thus, the vehicle is subject to being suppressed or destroyed by enemy fire. The best way the vehicle can overcome this disadvantage is to stay concealed and deliver surprise flank fire on enemy tanks or other armored vehicles.
When a carrier has fired on an enemy formation, it probably will attract return enemy fire. This APC should, if possible, pull back into a defilade position and another APC, as yet unseen by the enemy, should fire on an enemy vehicle that is firing at the first APC. This is mutual support.
The enemy will attempt to suppress the carrier with direct and indirect fire and smoke. So, the carrier element should be positioned to get as much separation as possible between APCs while still mutually supporting each other. This cuts down the chances of two or more APCs being suppressed by the same enemy fires.
6. Hide Positions.
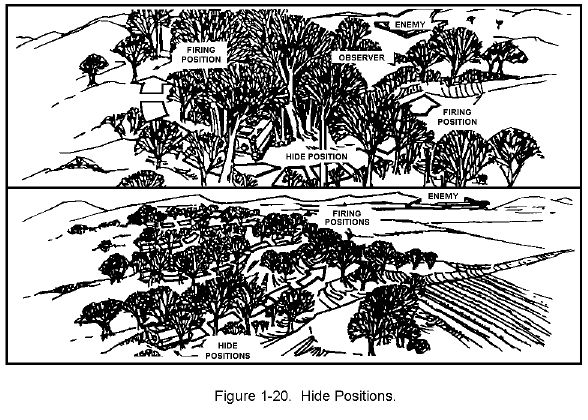
When covered and concealed positions are not available for the APCs, initially it may be necessary to hide the vehicles in well-concealed positions to the rear. If the carrier teams are collocated with the dismount teams, the dismounted infantrymen can observe the sector and call the carrier forward to preselected firing positions when enemy targets are in firing range. The hide-position technique may be used by individual carrier teams or by the entire carrier element. If the elements are separated, the carrier element leader may have to dismount and move forward to observe the sector.
The use of hide positions helps avoid early detection by enemy ground forces. Also, it can help avoid detection by enemy air. Routes from hide positions to firing positions should be concealed so that the vehicles moving forward will not be detected and engaged by the enemy. Communications between the observers and carrier element can be by prearranged visual signals, wire, or radio. By having several firing positions for a single hide position, each APC is able to engage targets with caliber .50 machine gun or Dragon and then move to another firing position before the enemy can effectively return fire (Figure 1-20).
A variation of hide positions may be used by the entire platoon to gain protection from intense enemy artillery barrages when the platoon has not had time to prepare adequate fighting positions. By staying mounted and moving to covered and concealed positions to the flank or rear of the intended position, the platoon can wait through an enemy barrage and then occupy the position when the barrage ends. You must position yourself to allow observation of enemy avenues of approach so that you can decide the proper time to move the platoon into position. As discussed earlier, route selection is critical to avoid disclosure of friendly positions. Timing is critical since the enemy only employs barrages if his maneuver forces are in position to exploit them.
7. Dismount Team Positions.
The company or company team commander's concept of the defense normally specifies when the dismount teams are to be deployed and where they are to be positioned. When possible, the platoon's defense is built around the APC and the dismount element's fighting capabilities. The dismount teams are best employed against enemy dismounted infantry, so they should be positioned in areas where the enemy is most likely to fight on foot. Such areas include small towns, rugged terrain, and thick woods.
Seldom is it possible to position the dismount teams in areas that will preclude the enemy's use of armored vehicles; hence, you must plan for the dismount teams to fight a mounted and dismounted enemy threat. Restrictive mounted approaches, such as secondary roads, trails, and roads bordered by natural obstacles, are areas well suited for the dismount team's defense against a mounted enemy.
The dismount team members are usually placed in two-man positions. The squad leader should consider whether to remain mounted or to dismount the APC and leave the gunner and driver as the carrier team. If the sector being defended is narrow, then the number of positions may be reduced. If a sector is wide, then it may become necessary to occupy positions with only one man. (Remember to maintain two-man positions on crew-served weapons such as the M60 machine gun if a gunner is designated.)
Even though it is a small organization, the dismount team has lots of combat power. To fight enemy dismounted attacks, it is armed with one M60 machine gun, three M16A1 rifles (one if the M60 is manned), two M203 grenade launchers (each mounted on an M16A1 rifle), two SAWs, and assorted hand grenades and antipersonnel mines. Against enemy mounted attacks, the dismount team can employ the Dragon, AT4s, the M203 high explosive dual-purpose (HEDP) round, and antitank mines.
The distance between dismount teams will be determined by enemy capabilities, the terrain, visibility conditions, strength of the dismount teams, and their location with respect to the carrier teams.
If each squad has its dismount team dismounted and collocated with its carrier team, distances between squads can be increased. Still, each squad should tie in its fires with the other squads to provide mutual support.
When the dismount element and carrier element are separated, the teams within each element should be mutually supporting, and should be positioned to render this support.
Where possible, the dismount element's fires reinforce and protect the carrier element. Dismounted infantry should be positioned to maximize the effects of the terrain so that the enemy has limited fields of fire/observation into friendly positions. Friendly artillery and mortar fire should be planned with priority going to support of the dismount element.
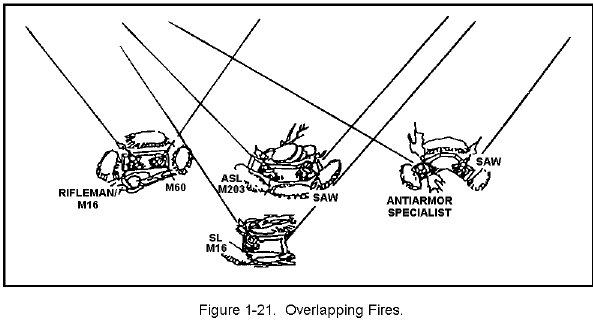
When preparing the dismount element position, the first thing the element leader does is explain to the dismount team leaders how the carrier teams are to be used. He then assigns each team leader a sector, tells him where to position his machine gun, (if manned), and Dragon (if not mounted), and assigns sectors of fire for each weapon. The dismount element leader insures that key weapons are mutually supporting and that no gaps appear in the element's sector. Overlapping sectors of observation and fire between adjacent weapons, fighting positions, and teams provide mutual support within the element's sector (Figure 1-21). This fire must be enough to stop enemy soldiers from penetrating the position or isolating any part of the dismount element. Obstacles should be planned and emplaced to support the fire plan. Engineer assets, whenever available, should be used to the maximum extent to emplace obstacles and/or to prepare positions.
Protection against enemy indirect fire is a major consideration when preparing dismount team positions. The enemy has the capability to concentrate large amounts of indirect fire. Intense barrages can be expected before any attack. The barrages will continue until the last possible moment before the enemy closes on friendly positions. If dismount teams are deployed, they must be protected. If there is no time to prepare fighting positions with overhead cover, and the APCs are on the same position, dismount teams should mount their APCs until the indirect fire is shifted past the platoon's position. Then the teams can quickly reoccupy their fighting positions under the APCs' covering fires and prepare for the enemy's dismounted attack.
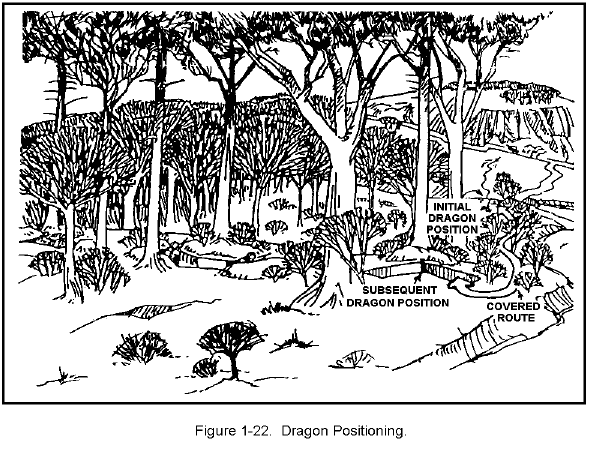
Since the dismount teams are normally employed in areas that restrict mounted movement, Dragon positions with suitable engagement ranges may not be available (Figure 1-22). If this is the case, Dragons initially may be positioned forward or on the flanks of the dismount element to obtain better fields of fire. As discussed, Dragons should be positioned to obtain flank shots whenever possible. In the absence of Dragon targets or when Dragon missiles have been expended, antiarmor specialists fire their M16A1 rifles.
Machine guns and SAWs are the dismount element's main weapons to stop infantry attacks. As a rule, all the platoon's machine guns/SAWs are brought to the dismount element's position. The machine guns should be used on tripods with traversing and elevating mechanisms. Their positions should provide sectors of fire across the dismount element's front, interlocking with the carrier element and adjacent platoons, when possible. Machine gun positions should have frontal cover. As mentioned in Part A, machine guns are most effective when delivering enfilade fire down the line of the enemy assault formation (Figure 1-23).

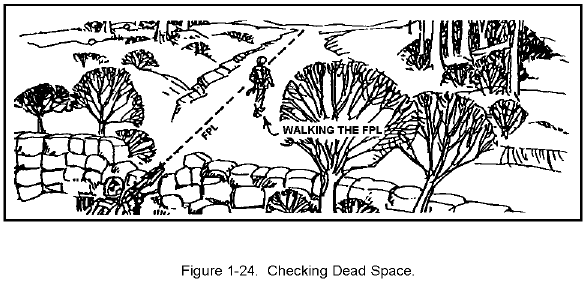
Where it can be done, machine guns are assigned a final protective line (FPL). An FPL is a line where, with interlocking fire and obstacles, you plan to stop an enemy dismounted assault. Generally, it is across the front of the battle position. A machine gun FPL should supply as much grazing fire as possible. Grazing fire is to be no more than 1 meter above the ground (about hip high). Dead space is any area along the FPL that cannot be hit with grazing fire. Dead space is found by having a man walk the FPL. The machine gunner eyes the man walking down the line and records on his range card areas grazing fire does not cover (Figure 1-24). Dead space should be covered by fires from the grenadiers using the M203. Additionally, indirect fire, such as mortars, can be planned on dead space. Where possible, FPLs should overlap so that the loss of a machine gun will not leave a gap.
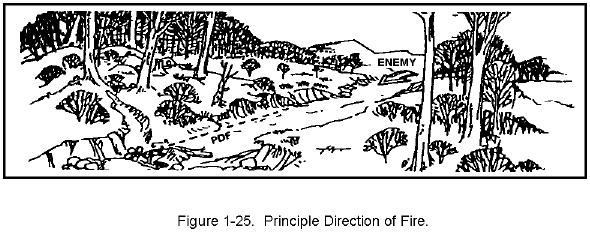
Sometimes, a gully or ditch may lead into a position. If so, a machine gun may be positioned to fire directly down the approach rather than across the team's front. This machine gun will be assigned a principal direction of fire (PDF) down the approach (Figure 1-25).
A machine gun is always laid on its FPL or PDF unless engaging other targets. The FPL machine guns should be fired all at the same time and on signal.
The M60 requires an assistant machine gunner. He should be assigned a sector that helps secure the machine gun position, cover gaps in the machine gun fire, or overlap the machine gun's sector, if no gaps exist. If the gunner becomes a casualty, the assistant mans the machine gun. If a mounted enemy attack closes within 400 to 500 meters, the assistant should fire his weapon at any exposed enemy track commanders on tanks, BMPs, BTRs. This would force them to close their hatches; thus, it would intensify their control problems.
The two SAWs should be positioned to cover gaps in the machine guns' sector. If there are no gaps, SAWs should be assigned sectors that overlap the machine guns' sector. This will insure coverage throughout the team's sector.
The AT4s are the dismount teams' primary close-in antiarmor weapon. Each dismount team should have several AT4s in its position. A soldier's sector of fire for the AT4 is the same as for his primary weapon.
Enemy approaches into the position should be covered with mines. (Employment of mines requires battalion approval.) To cover dead space that cannot be hit with grenade launchers and to supplement the dismount element's fire, Claymores and other antipersonnel mines can be used. A Claymore must be fired by a soldier who can see its sector of fire. Claymores can be double wired so that they can be fired from either the position they protect or the adjacent position. If more than one Claymore covers the same sector, the dismount team leader should establish a firing sequence. Since there is only 100 feet of wire with the Claymore, care should be taken to insure that soldiers in adjacent positions are not in the Claymore's backblast area.
Antitank mines are used for close-in protection against mounted assaults. It is best to place antitank mines on likely tank routes where they can be covered by AT4 and Dragon fire. At least one mine should be emplaced per two-man position; more can be used depending on how vulnerable the dismount team is to armored attack. When mines are used, appropriate reports must be made and locations recorded. All antitank mines should be removed before leaving the position. If this is not possible, such as when a withdrawal is ordered, a report that mines were left in place must be made to proper authority.
The dismount team leader must concentrate his efforts on controlling the team's fires. He only fires his own weapon to designate targets or in situations where additional firepower is needed.
The dismount element leader and team leaders must be in positions from which they can control their men. The dismount team leader will normally be located toward the center of the team. He may have to occupy a position by himself, or with the Dragon gunner, or near the machine gunner. He should position himself where he can see the entire team and its assigned sector. Ideally, he should be able to see the dismount element leader. The dismount element leader must find a position that lets him overlook the element's entire sector or at least the most critical part of it. When possible, he should have visual contact with the carrier element or a part of it.
8. Indirect Fire.
Most indirect fire planning is done by the company commander and the fire support team (FIST) chief. Based on your guidance, targets are identified by the FO party attached to your platoon. This target list is forwarded to the FIST chief who consolidates the list and incorporates it into the company's target list. A copy of the company target list is given to you. You and your FO check the target list to insure that fire is planned on all enemy avenues of approach and on known or likely enemy positions in the platoon sector of fire. If more targets are needed, the FO requests them through the FIST chief. The FO normally stays with the same element you are with.
The company commander may assign a mortar or artillery final protective fire (FPF) - a prearranged barrier of fire - to a platoon area. You must plan its location with your FO and the FIST chief. It should cover the most threatening approach with high explosives (HE) quick on dismounted approaches or dual-purpose improved conventional munitions (DPICM) on mounted approaches. The FPF is planned close to the platoon position, but not close enough to endanger friendly troops. The FO will advise you on how close to the dismount teams an FPF can be fired with no danger to the troops. This varies with the type of weapon and ammunition fired. When assigned an FPF, you will have authority to call for it unless the company commander retains authority. The FPF is essentially fired as a last resort to stop an enemy assault. On signal, it is fired continuously until it is ordered stopped. All other platoon weapons fire while the FPF is being fired. The widths, by weapons, of impact areas of typical FPFs are:
| WEAPON | UNIT/NUMBER | WIDTH OF FPF |
| 81-mm mortar | (3 mortars) | 100 meters |
| 81-mm mortar | (6 mortars) | 200 meters |
| 107-mm mortar | (3 mortars) | 150 meters |
| 107-mm mortar | (6 mortars) | 300 meters |
| 155-mm howitzer | BATTERY (6 HOWITZERS) | 300 meters |
| 155-mm howitzer | BATTERY (8 HOWITZERS) | 400 meters |
9. Security.
You set up a security system for your platoon to keep the enemy from observing or surprising the platoon. This system is based on guidance from your company commander, the enemy situation, terrain, and visibility conditions. Your squads will normally be required to conduct stand-to according to unit SOP. A stand-to is a period of maximum preparedness at first light in the morning and at darkness in the evening. This insures that the unit is ready for action and that every man adjusts to the changing light conditions. As a minimum, stand-to is conducted 30 minutes before beginning morning nautical twilight (BMNT) and 30 minutes after end evening nautical twilight (EENT). The SOP should specify the actions to be taken, but as a minimum they should insure that:
- Troops are awake, dressed, and ready for combat.
- Vehicles are topped off with fuel and stocked with a basic load of ammunition.
- Weapons are cleaned, serviced, assembled, and ready for action.
- Radios are turned on and tested (briefly).
- All vehicles are loaded to the extent possible, less the deployed dismount teams, are ready for short-notice moves.
As a minimum, an OP is established, within small arms support range and with communications to provide security for the platoon.
10. Directing Platoon Fires In The Defense.
When your platoon is defending against an attack, you must, control the opening of initial fires; control the rate and distribution of fires; shift fires to the most dangerous targets, as required; and halt the platoon fires, as required.
When the enemy attacks, your platoon will hold its position except on order of the company commander. A successful defense defends on each element accomplishing its mission. When attacked, you must:
- Control the element's fire, to include the opening of initial fire, shifting of fire to the most dangerous targets, and fire discipline.
- Identify targets and request indirect fire to suppress or destroy them.
- Shift men and weapons within the element's position, as required.
- Keep the company commander informed.
Controlling the opening of initial fire is done in stages, based, in part, upon the effective range of the weapons available. A typical sequence might be:
| Weapon | Range |
| Indirect fire | 1,000 meters (plus) |
| Dragon | 1,000 meters |
| Caliber .50 | 1,600 meters |
| M60 Machine Gun | 1,100 meters |
| M16 | 300 meters |
| M203 | 300 meters |
| AT4 | 200 meters |
When an enemy force attacks, hold your platoon's small-arms fire until the force comes within effective rifle range (300 meters), or until the force reaches a point (a road, a stream, or an open area) designated by the company commander as a fire-at-will line. Tell your squad/team leaders to open fire when the enemy reaches that line. If there is no fire-at-will line, you may establish one for your platoon or for each separate squad/team, depending on the terrain. This line will help you place effective surprise fire on the attacker. (The same procedure applies to anti-armor fires, although the effective range will vary.)
The priority of targets is determined by the type of weapon:
| Weapon | Primary Target |
| Dragons | Tanks/BTRs/BMPs |
| AT4s | BMPs/BTRs/Tanks |
| Rifles | Infantry |
| Caliber .50 | Infantry/light vehicles |
| M60 Machine Guns | Infantry |
| Grenade Launchers | Infantry/BMPs/BTRs |
If the enemy assault hits only part of the platoon's front, unengaged squads should shift their fires to that area. The team leaders and squad leaders who are unengaged must guard against enemy movement in their own sectors.
Riflemen must be disciplined in the use of automatic fire. Semiautomatic fire is more effective than automatic fire. You must insure that your men understand that the most effective way to cover a target is by using systematic, semiautomatic fire - that is, selective firing, making every shot count.
You must have a simple and effective means of controlling the fires of your platoon to insure that your frontage is properly covered. You use:
- Standing Operating Procedures (SOP). SOPs are actions that your squad/team leaders and platoon members perform automatically without command. Their use eliminates many commands and simplifies your job control, but they must be well understood by all members and thoroughly rehearsed during training.
- Wire. When you have the time and equipment available, wire is an excellent means of communicating instructions to your squad leaders and key crew-served weapons. Remember, however, that wire is easily broken by artillery, small-arms fire, grenades, etc., so you must insure that you have a backup plan.
- Radio. Use of your squad radios will assist you in controlling your platoon during the battle. Insure, however, that you have an alternate plan of communicating in case of jamming or radio failure.
- Oral. This is an effective method of control unless the squad and team leaders are too far away or the noise of battle makes it impossible to hear.
- Prearranged signals. These are either visual or sound signals such as pyrotechnics or blasts on a whistle. These signals should be included in the company or platoon SOP and must be clearly understood by all platoon members.
- Arm-and-Hand Signals. This is an effective method of control when the squad/team leaders can see you.
- Personal Contact. In many situations, you will have to move from one squad/team leader to another to issue instructions.
- Passing Orders from Man-to-Man. This is an effective method when the order is simple and time is not critical.
11. Summary.
In this part, defensive tactics and techniques were discussed. Including control, methods of employment for an APC platoon, carrier and dismount teams positions, indirect fire and security. We also discussed how you control the platoons fires in the defense. Which included, control of the opening of initial fire, fire-at-will line, priority of targets based on the type weapon, and the means you use to control fires to ensure that your frontage is properly covered.
This completes lesson one. You should know how to designate fighting positions for key weapons, how to prepare squad and platoon sector sketches, control and position an APC platoon in the defense, and supervise the construction of an M60 machine gun position. After reviewing all the material in this lesson, you should complete the practice exercise for lesson one. Answers and feedback for the question in the practice exercise will be provided to show you where further study is required.


