

|
RDL Homepage |
Table of Contents |
Document Information |
Download Instructions |
LESSON TWO
CONDUCTING MECHANIZED (M113) INFANTRY DEFENSE
| Soldier's Manual Tasks: | ||
| 071-326-3008 | Control platoon APC's in the defense. | |
| 071-430-0006 | Conduct a defense by an M113 platoon. | |
| 071-430-0002 | Conduct a defense by an M113 squad. | |
| 071-430-0007 | Consolidate and reorganize an M113 platoon following enemy contact while in the defense. | |
| 071-410-0015 | Direct dismount from an M113 vehicle in the defense. | |
| OVERVIEW | ||
| TASK DESCRIPTION: | Conduct Mechanized Infantry (M113) Defense | |
| TASKS: | Identify cover and concealment, control of platoon APCs, conduct a platoon defense, a squad defense, perform consolidation and reorganization after enemy contact in the defense, and direct dismount from an M113 in the defense. | |
| CONDITIONS: | Given the subcourse material for this lesson, a combat (training) scenario, the student will complete the practice exercise at the end of this lesson. | |
| STANDARDS: | The student will demonstrate his comprehension and knowledge by identifying, cover and concealment, control of platoon APCs, conduct a platoon defense, a squad defense, consolidation and reorganization in the defense, and directing dismount from an M113 in the defense. | |
| REFERENCES: | The material in this lesson was derived from the
following publications:
FM 7-7 FM 21-3 STP-7-11B24-SM |
|
PART A - CONTROL A MECHANIZED PLATOON M113s IN THE DEFENSE
1. General.
When your platoon is defending, you must position the platoon's APCs in defensive positions covering the designated avenues of approach. You have to determine the best tactical position or combination of positions for each APC in your platoon so that each has cover, concealment, and a good field of fire, and best supports the platoon in accomplishing its mission.
There are two tactical positions for APCs: hide and hull-down.
- Hide. In this position, the vehicle is completely covered and concealed. However, fields of fire are not available to the caliber .50 machine gun or Dragon.
- Hull-down. This is a firing position in which the vehicle is covered from the enemy, but clear fields of fire are available for either the machine gun or Dragon.
3. Selecting and Occupying Positions.
You must consider the following factors when selecting positions for your APCs:
- Do not destroy camouflage when moving into an area. Pick vehicle positions before moving into the area, then move the vehicles into positions. Remove or camouflage track marks to decrease the chance of detection by aerial observation.
- Ensure APCs can support the dismount element by fire. Ensure APCs can rapidly rejoin the dismount element using covered and concealed routes.
- Position APCs on terrain that takes maximum advantage of the longer-range fires of both the Dragon and the caliber .50 machine gun.
- Ideally, targets should be engaged from hull-down firing positions. However, if a hull-down position is not available, the APC should occupy a hide position with an observer placed forward. When a target approaches, the APC is quickly moved to a firing position from which it can best shoot the target. After firing, the APC may quickly move to an alternate or hide position to evade counterfire.
- Plan for the preparation and occupation of alternate and supplementary positions. Care must be taken to select and reconnoiter covered and concealed routes to these locations.
- Plan and coordinate both direct and indirect fires. Assign sectors of fire to each APC and ensure that accurate range cards are constructed. Plan use of all available indirect fires in your sector through the company fire support team.
- Use reliable means to communicate with the observers and with the remainder of the platoon to ensure timely and effective engagement of targets. Check your communications periodically to be sure they will work when you need them.
4. Summary.
This concludes the portion on controlling APCs in the defense. We discussed hide and hull-down positions for APCs, and how to select and occupy positions. We will now move to conducting a defense by an M113 platoon and disengagement by an M113 platoon.
PART B - CONDUCT A DEFENSE BY AN M113 PLATOON
1. General.
When the enemy attacks, all available weapons are brought into play. Beginning at extended ranges, ITVs, attack helicopters, artillery, mortars, and tactical air are directed against enemy formations. As the enemy advances, friendly tanks begin to engage enemy tanks. This fire is reinforced by the suppressive fire of caliber .50 machine guns against enemy BMPs and BTRs. When the enemy is within 1,000 meters, Dragons are used against enemy tanks and personnel carriers. At closer ranges, the fires of the dismounted infantry, the caliber .50 machine guns, and indirect fires are added to the battle to engage dismounted infantry. If orders are to retain the defensive position, the dismount teams repel the assault. They are supported by the close and continuous fires of the APC. If the mission calls for the platoon to displace before becoming decisively engaged, dismounted elements quickly remount at a remount point to the rear of the fighting position. The platoon then displaces to its new location covered by tanks and the overwatch fires of ITVs.
2. How Carrier Teams Defend.
Your carrier team must use its mobility, firepower and armor protection to the best advantage in the defense. The carrier team using the Dragon on the viscous mount can defeat armor to ranges of 1,000 meters and using the caliber .50 machine gun can provide suppressive fire to 1,600 meters. Because the carrier team can be organized to fit the situation, the inclusion of an M60 and M203 to the carrier element can increase its security and suppressive fire capability.
The carrier team's antiarmor system is medium range, therefore, they are not used alone except where terrain does not allow longer fields of fire. Generally, your carrier element will not be used alone but in conjunction with the ITV and tank element. ITVs begin engaging enemy forces at 3,000 meters to maximize their stand-off advantage. If the enemy draws closer to the 1,500-meter range, ITVs displace to the flanks and rear or to deeper battle positions while tanks and Dragons pick up the fight. If the company team is organized with battle positions in depth, your carrier teams after firing may displace to alternate firing positions or disengage and displace to other battle positions. Tanks generally displace overwatched by ITVs, and other tanks.
Your carrier team must be prepared to move to alternate firing positions to avoid enemy return fire. If effective fire is not received after firing the first missile, a second missile may be fired from the same position. Because the APC's mobility is limited, the timing of the decision to move is critical.
The caliber .50 machine gun is effective in suppressing ATGMs and machine gun positions, defeating thin-skinned vehicles, forcing armored vehicles to button up, and engaging troops riding on the outside of tanks or dismounted. The caliber .50 machine gun should be used whenever possible to conserve use of the Dragon. Whenever terrain does not permit mounted use, the caliber .50 machine gun should be employed ground mounted on a tripod with the traversing and elevating mechanism. This employment is more accurate than the free gun on the APC in delivering final protective fires. It should be remembered that ground-mounted employment decreases the mobility of the gun and increases redeployment time.
Your carrier team leader must move the vehicle to alternate firing positions to get away from effective enemy fire or to gain a better firing position in the desired sector of fire or engagement area.
This movement may be directed by the carrier element leader or may be an automatic action of the team leader. The carrier team must avoid multiple shots from the same firing position when the enemy is effectively returning fire. Movement of individual vehicles must be coordinated so that all vehicles will not be out of firing positions at the same time. Normally, when a threat exists in the platoon's secondary sector, you direct movement to supplementary positions. This movement normally involves all parts of the carrier element moving at the same time, but it may be done by single APCs or by pairs (sections).
If effective enemy fire forces a carrier team to leave its position, grenade launchers (if on board) can be used to conceal the vehicle's movement. Your platoon can use smoke to screen movement between positions; to screen occupation of, withdrawal from, or reoccupation of positions; or to screen a counterattack. The smoke can also cover displacement between delay positions. It can deceive the enemy as to the location and number of vehicles employed on each position, and it can slow the enemy enough to let the platoon occupy new positions.
Because there are only 16 smoke grenades per vehicle, the use of the grenade launcher must be controlled. The limited number of smoke grenades makes it necessary for the platoon to take advantage of all available smoke sources and conserve smoke grenades for self-defense. During movement, you might direct a certain squad to launch its smoke grenades to counter antiarmor fires. The 70-meter-wide smoke screen may not screen the entire platoon from the enemy gunners. If not, you could then direct another squad to launch its smoke grenades. All vehicles must take evasive action to get full advantage from the smoke screen.
If a smoke screen is needed to cover the crossing of an open area, the smoke-grenade launcher can be used to set up the smoke screen.
If your platoon is ordered to move to another battle position, and if its elements are located together, the carrier element may continue the fight while the dismount teams remount the vehicles. When the elements are separated, the dismount element, as soon as it reaches the remount point, should notify the carrier element. The carrier element then moves to the remount point to pick them up. If either element becomes decisively engaged, then the platoon must disengage. Normally, the company or battalion will take action to relieve pressure. (See Part C, Lesson Two.)
To avoid decisive engagement, the platoon must move quickly. An enemy force traveling at 20 kilometers per hour (kmph) (12 miles per hour (mph)) moves 1 kilometer in only 3 minutes. To slow the enemy, the carrier element should increase its rate of fire. The FO should call for indirect fire and smoke. Emplaced obstacles and mines also will slow the enemy attack.
Your platoon is especially vulnerable to enemy fire while it is moving. Machine guns and M203s should be oriented to the rear. Techniques of retrograde movement are discussed as part of disengagement (See Part C, Lesson Two).
3. How Dismount Teams Defend.
Your dismount teams must be prepared to defend against dismounted as well as mounted attacks.
- Defending Against a Dismounted Attack. During an attack, the enemy infantry will advance as far as possible mounted in BTRs and BMPs. When forced to dismount, the infantry will continue the attack on foot supported by indirect fire, tanks, BTRs, and BMPs. Indirect fires should be placed on the enemy's dismounted forces as fast as possible.
The dismount teams should engage the attacking enemy force as soon as it comes within the element's sector of fire. Targets in the primary sector of fire have priority. But, when no targets show in the primary sector, targets in the secondary sectors are engaged. If machine guns are shifted to fire into secondary sectors of fire, assistant gunners should check primary sectors, between bursts, to guard against any enemy movement in the primary sector.
As the enemy begins the assault, you request and employ all FPFs. Machine guns fire on their FPLs or PDFs, and FOs call for mortar and artillery FPFs. A heavy stream of fire is maintained until the enemy assault is halted. The rate of fire is then reduced to save ammunition.
When the enemy assault is repelled, you must be ready to counterattack retreating enemy forces. Retreating enemy forces are often disorganized and exposed to fire. While the dismount element's ability to pursue is limited, the element leader should keep calling for indirect fire and be prepared to quickly remount the APCs and counterattack, if ordered to do so.
- Defending Against a Mounted Attack. You should coordinate the employment of indirect fires on enemy infantry riding on tanks, at exposed crew members to force them to close their hatches, and at dismounted infantry moving along with the tanks. Riflemen and automatic riflemen should direct their fires to cause the same effect. If the enemy infantry can be stopped, his tanks become vulnerable to medium and close range antiarmor weapons.
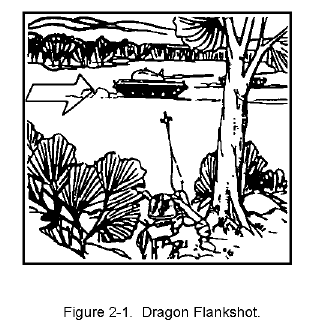
Dismounted Dragons are used to engage enemy tanks as soon as the tanks enter their sectors of fire. Primary sectors of fire are set up for flank shots (Figure 2-1). Dragons may be fired at enemy tanks in secondary sectors of fire when no tanks are seen in primary sectors of fire. When engaging targets, antiarmor specialists should make maximum use of the front protection of their positions and try for flank shots at target tanks. All dismounted Dragon engagements should be controlled by the dismount team leaders.
AT4s are fired at enemy armored vehicles that close on the dismount team's position. Dismount team leaders should hold AT4 fire until enemy vehicles come into the protective minefield or close enough so that AT4 hits can be made on the sides of the target vehicles. A dismount leader will normally have better results if his entire team hits one enemy tank with surprise volley or pair fire.
Grenadiers fire dual-purpose ammunition at BTRs and BMPs, preferably from the sides. As with the AT4, they should wait until the targets are close enough so they can make hits.
4. Summary.
This concludes the discussions on conduct of the defense. We discussed how carrier teams defend and how dismount teams defend against dismounted and mounted attacks. We covered the importance of engaging enemy forces at long ranges particularly with ITVs in order to maximize their stand-off advantage, moving the carrier team to alternate firing positions to avoid enemy return fire, employment of FPFs against dismounted attacks and use of Dragons, AT4s and grenadiers by the dismounted teams against mounted attacks. We will now discuss actions your platoon must take when it is ordered to disengage.
PART C - CONDUCT A DISENGAGEMENT BYA PLATOON WHILE UNDER ENEMY PRESSURE
1. General.
As the enemy closes, and based on orders from the task force commander, the company or company team commander will decide how long to hold defensive positions. The company or company team may be required to remain and fight as long as possible or it may be required to disengage and displace to another position. A platoon, as part of a company or company team, may disengage to defend from another battle position, to prepare a counterattack, to delay, to withdraw, or to prepare for some other mission.
Fire and movement to the rear is the basic tactic for disengaging. All available fires are used to stop the enemy and allow platoons to move away from the enemy. The company or company team commander may move his platoon and mass fire to stop or slow the enemy advance before beginning the movement away from the enemy. A heavy volume of antiarmor fire will force the enemy to dismount his infantry and thus slow his mounted advance. Artillery and mortar HE fire and smoke, as well as mines (conventional or scatterable), will also add to the enemy's confusion, slow the momentum of his mounted attack, and help conceal the movement of friendly units. Small arms and indirect fire can be used against an attack by dismounted troops.
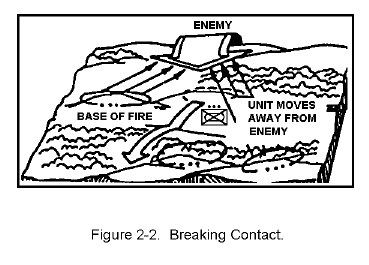
A base of fire is formed to cover other units moving away from the enemy. One unit acts as the base of fire, holding off the enemy by fire or holding terrain that blocks his advance, while other units move to break contact (Figure 2-2).
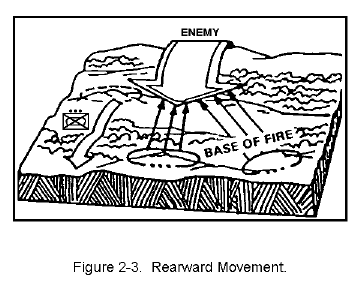
When the moving units get to the next position, they provide a base of fire to cover the rearward movement of the forward unit (Figure 2-3).
Fire and movement in reverse is repeated until contact with the enemy is broken, until the units pass through a higher level base-of-fire force, or until the units are in the next position to resume their defense.
When facing a mounted enemy attack, antiarmor weapons are the most effective weapons for the base of fire. For that reason, movement of those antiarmor weapons must be closely controlled. Normally, ITVs fire and move back first, followed by APCs, then tanks.
In close terrain, when facing a dismounted enemy attack, or with visibility limited, the ITVs and tanks may have to move first, covered by the infantry and their APCs.
The tactics used by your platoon to disengage from the enemy can differ according to how the platoon is deployed, how the company or company team plans for disengagement, and other factors, but some actions apply in all cases:
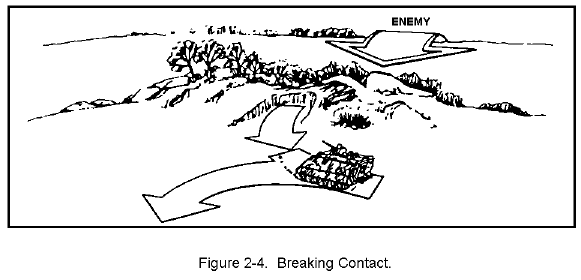
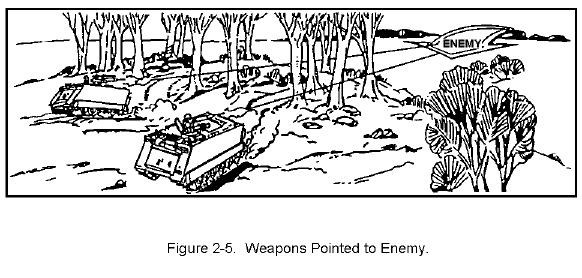
- The vehicle-mounted weapons should remain pointed in the direction of the enemy (Figure 2-5).
- Rapid movement and an effective base of fire are the keys to a successful disengagement.
2. Plans For A Disengagement.
Plans for a disengagement must be part of any battle position occupation plan. If dismount teams are deployed, a plan for rapid remounting must be made. Keeping the platoon mounted or placing the dismount teams with the carrier teams simplifies this process.
When your platoon employs the carrier and dismount elements on separate positions, platoon remount points and routes to the remount points must be chosen. The platoon remount point can be:
Near the dismount element position.
- Near the carrier element position.
- Between the two.
Within the remount point, covered positions for vehicles should be chosen that allow for easy remounting even during limited visibility. Dismount team leaders must be sure their men know the location of the remount point, where the squad carrier is at that point, and routes to the point. Routes to the remount point should be covered and allow speedy movement for both elements. Considerations for planning are:
APCs can move faster and have more protection from enemy small arms fire and artillery fragments than dismounted troops.
The carrier element often will shift from one firing position to another, so routes must be planned from each position to the remount point (Figure 2-6).
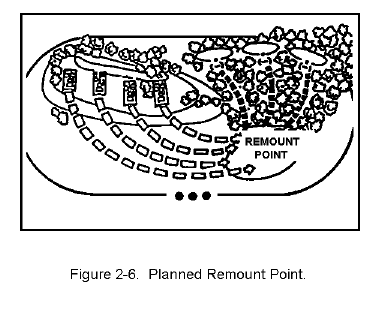
Following routes and finding remount points will be difficult in the heat of battle and even more difficult during limited visibility. As a minimum, routes should be marked and reconnoitered by the carrier element drivers and team leaders (TLs) and by the dismount team leaders.
3. How The Dismount Element Disengages.
When the dismount and carrier elements are separated, there are three ways the dismount element can disengage. Simultaneous disengagement (moving all teams at the same time) can be used when the element is covered by another force. When the dismount element must cover its own movement, it disengages by teams or by thinning the lines.
- Simultaneous Disengagement. When the dismount teams simultaneously disengage, they assemble and move as one element as fast as possible to the remount point, using movement techniques.
Simultaneous disengagement is favored when rapid movement is critical, the carrier element is adequately covering the disengagement, and the enemy has not closed on the dismount element or cannot fire effectively at it. Simultaneous disengagement can be used when the dismount element can move before the enemy can close on the position because of an obstacle or distance between the dismount element and the enemy. It can also be used when other units of the company, company team, or battalion task force are adequately covering the disengagement.
- Disengagement by Dismount Teams. When the dismount element must cover its own movement, one or two teams must stay in position as a base of fire. The rest of the dismount element moves to the rear. Teams left in position must fire into the entire element's sector to cover the movement of the other dismount teams. Sectors of fire are adjusted as necessary to get better coverage of the element's sector.
The teams left in position disengage when the rest of the element is in position to cover their disengagement.
Movement to the rear by alternating teams is kept up until contact is broken. Once contact with the enemy is broken, the disengagement is complete, and the dismount element moves to the remount point using proper movement techniques.
Disengagement by dismount teams has the advantage of simplicity in that the dismount teams stay together. It is used when one or two teams can effectively cover the entire dismount element's sector.
-
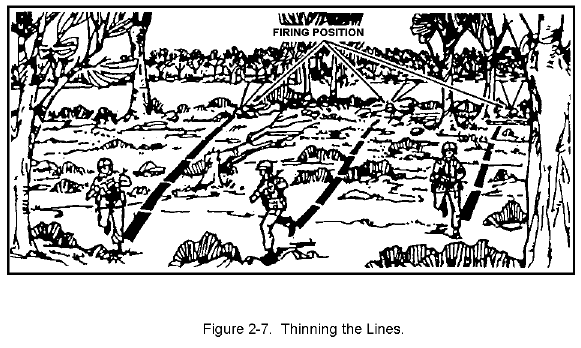
Disengagement by Thinning the Lines. When disengaging by
thinning the lines, selected men from each dismount team
(often one man from each fighting position) disengage and
move to the rear. The men still in position become the
base of fire to cover the movement (Figure 2-7).
-
When the rearward-moving men are in position to provide a base of
fire, the rest of the element moves to their rear (Figure 2-8).
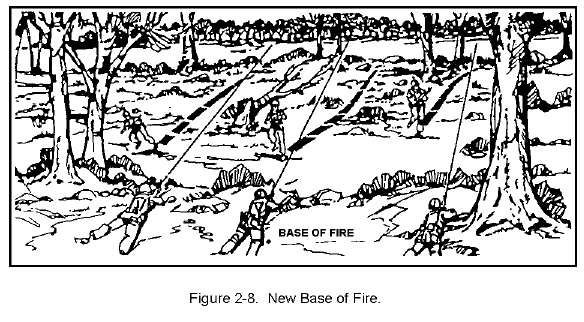
Machine guns may move with either the first or last group, whichever best supports the movement. The Dragon has a 65-meter minimum arming range, so it is usually wise to move the Dragons first. The elements and squad leaders normally move last. As one group disengages, men remaining in position increase their rate of fire to keep the enemy from overrunning the position. As with other methods if disengagement, this process is carried on until contact is broken.
Disengagement by thinning the lines allows an even distribution of fire across the dismount element's sector during the disengagement. It is used when no one dismount team can cover the dismount element's sector because of close terrain or limited visibility. But because teams are separated, control is more difficult than when disengaging by teams. If dismount teams are organized into two fire teams, the assistant squad leader moves with the first disengaging team personnel and takes charge of them.
- Disengagement of Dismount Teams When Employed With the Carrier Team. When the carrier teams and the dismount teams are employed on the same position, the dismount teams normally move to their rear while the APCs provide a base of fire. The carrier teams then quickly move to their rear, link up with the infantry, remount, and move out. The dismount teams can use any of the disengaging techniques discussed earlier. The method selected usually will be dictated by the enemy situation, the terrain, and the carrier teams' ability to serve as a base of fire.
4. How The Carrier Element Disengages.
Because of the carrier element's speed and firepower, it is usually best for the dismount element (when deployed) to disengage first while covered by the carrier element. But, if the carrier element is not in a position to support the dismount element by fire or if the dismount element is heavily engaged, the carrier element may have to disengage first and move to a position to assist the dismount element in disengagement. Whichever method is used, there are two basic ways the carrier element can disengage. If the carrier element is covered by another force, simultaneous disengagement may be used. If the carrier element must cover its own movement, it disengages by teams. These methods are similar in concept to those used by the dismount element.
- Simultaneous Disengagement. When the teams of the carrier element disengage simultaneously, they move as one unit as quickly as possible. This method is normally used when the carrier element is covered by another force and speed is the most critical factor. If the dismount teams are already mounted, the entire platoon moves, using movement techniques, to a position designated by the company or company team commander. If the dismount teams are deployed, the carrier element moves to the remount point to pick up the dismount teams, or it may have to attack the enemy by fire from a new position to allow the dismount teams to disengage. Once the dismount teams have disengaged, the carrier element again disengages, either by all carrier teams simultaneously or by individual carrier teams, as the situation warrants.
- Disengagement by Carrier Teams. When the carrier element must cover its own disengagement, one, two, or three vehicles can be left in position as a base of fire while the rest move to the rear. The carrier teams left in position must cover the entire sector until the moving vehicles reach positions they can use to provide a base of fire.
The number of vehicles left as the base of fire depends on the enemy situation and how quickly the carrier element must disengage.
The carrier teams receiving the heaviest tank and ATGM fire are normally disengaged first. It is critical that other carrier teams, ITVs, or tanks be able to cover the sectors of the disengaging APCs. This will prevent the enemy from moving quickly into the friendly positions through the gap left by the rearward moving APCs.
Regardless of the method used, the carrier teams keep up fire and movement to the rear until they disengage or are in position to serve as a base of fire for the dismount teams or for other platoons. Execution must be aggressive and well controlled. Carrier teams told to cover the rest of the element's disengagement must step up their rates of fire while teams moving to the rear quickly move, taking advantage of covered and concealed routes. Mounted weapons should remain oriented in the direction of the enemy during movement.
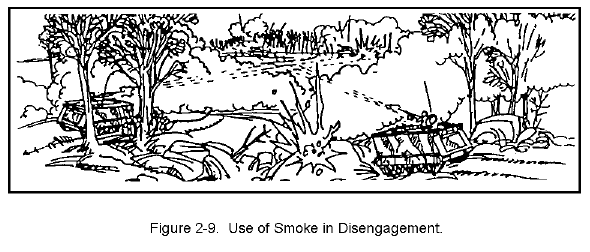
To cover the platoon's move, you should request indirect fire and smoke through your FO or the company team commander. He is used against enemy troops and smoke is used to screen exposed routes the platoon must cross. If the vehicles are having difficulty breaking contact, smoke grenade launchers should be used (Figure 2-9).
If direct fire support is needed to let the platoon disengage, you should ask the company or company team commander for assistance. If the covering fire of other elements is not enough to allow it to move, you may have to use a combination of mounted and dismounted fire and movement.
During a disengagement, the company team commander may direct a platoon to cover the movement of other platoons by occupying battle positions and firing into assigned areas or by holding terrain.
5. Summary.
This concludes the discussions on disengagement from enemy contact. We discussed how a platoon breaks contact and moves to the rear. We covered how you as a platoon leader must plan for disengagement, and how your dismount and carrier elements disengage. We will now discuss how to consolidate and reorganize a platoon following enemy contact while in the defense.
PART D - CONSOLIDATE AND REORGANIZE AN M113 PLATOON FOLLOWING ENEMYCONTACT WHILE IN THE DEFENSE
1. General.
When an enemy assault is repelled or when the platoon is moved to a new defensive position, you and your subordinate leaders must prepare to counterattack, to continue the defense in place, or displace. If you are directed to hold your present positions, the platoon must quickly prepare for more enemy attacks.
You must plan the required reorganization of the platoon and consolidation of the objective, and include your plan in your order to the squad-size-element leaders. The plan is tentative and flexible and may be changed as the situation requires, but it must be complete and as detailed as possible.
2. Reorganization.
Reorganization is the restoration of order within the unit and the preparation of the unit for further combat. The preparation should:
- Reestablish the chain of command. Fill all key positions from the remaining element members, and insure that all members are made aware of the new chain of command. (Man the positions of APC gunners and drivers with the best qualified personnel available).
- Redistribute/Resupply Ammunition. Dismount team leaders inventory and redistribute remaining ammunition. Ammunition from casualties is given to survivors. New belts are placed in machine guns; partial belts are relinked. If the squad vehicle is nearby, the dismount team gets additional ammunition from the vehicle. Ammunition status is reported to the dismount element or to you. Carrier team leaders/gunners make a quick count of remaining ammunition. Ammunition status is reported to the carrier element or to you. The carrier element leader may also redistribute ammunition among the APCs. You or your platoon sergeant consolidate the entire platoon's ammunition status reports, and then requests resupply from the company or company team commander. If necessary, send a vehicle to pick up more ammunition. Barrels on machine guns should be changed if time permits and spare barrels are on hand.
- Evacuate the Dead and Seriously Wounded. The wounded are treated and, when possible, returned to duty. The seriously wounded are evacuated to the rear, as are the dead. After casualties are evacuated, all sectors of fire must be checked to insure they are still covered. Leaders must insure that positions are readjusted, as needed, to cover any gaps left by casualties or disabled APCs. Casualty reports are submitted and unit rosters are updated to reflect losses.
- Ensure all prisoners of war (PW), enemy material, and information are collected, reported, and evacuated, if possible.
- Ensure all crew-served weapons are manned and positioned on likely enemy avenues of approach. If there are casualties among leaders or on critical weapons, replace them with other men.
- Give the team/company/perimeter commander a situation report (SITREP) that includes the tactical situation, personnel strength, ammunition, and enemy strengths and captured documents.
3. Consolidation.
In consolidation in the defense, when an enemy assault is repelled, you immediately prepare your platoon to meet a renewed assault. To accomplish this task, follow these actions:
- Reestablish local security. If the OPs withdraw to the defensive position, send them back out. If they did not get back, check their status and take appropriate action to get another OP(s) established as soon as possible.
- Use snipers, this is a good time for them to be active. They may be employed with the OPs or at a vantage point-on or behind the defensive positions.
- Restore camouflage and improve positions. Take caution not to overcamouflage a position. If it was not found during the first assault, chances are it will not be found during the next try.
- Reestablish communication. Check the wire to insure it was not cut during the attack. Change pyrotechnic signals if the enemy may have learned what they mean.
- Replace obstacles. If the enemy withdraws far enough and if time permits, replace obstacles, mines, and early warning devices. This is a risky task, especially if the enemy has snipers. Troops must be careful. Request smoke to cover their movement, or wait until darkness.
- Reposition fighting positions and weapons positions. If the platoon has just repelled an attack, the enemy may have found some of the positions. Reposition those that have been compromised. (APC positions should be relocated, as their signature has more than likely given their position away, and because they are the enemy's primary target.)
- Implement sleep/alert plans as soon as possible.
4. Summary.
This completes the discussions on consolidation and reorganizations actions you must take following enemy contact in the defense. We discussed the importance of developing tentative and flexible plans that may be changed as the situation requires, the restoration of order and preparation for further combat (reorganization), and the need to immediately prepare your platoon to meet a renewed assault (consolidation). We will now cover how you and your subordinate leader train for, and direct dismount from an M113 vehicle in the defense.
PART E - DIRECT DISMOUNT FROM AN M113 VEHICLE IN THE DEFENSE
1. General.
Squads and platoons move mounted whenever possible. This conserves the infantryman's energy and takes advantage of the APC's mobility and armor protection. When the infantry dismounts, the dismount team must do so rapidly. Both dismount and carrier teams must be able to react with little or no instruction from the squad leader. This part of the subcourse explains how to dismount tactically.
Before every operation, each squad and you, as the platoon leader, should establish who is to dismount and with what weapons and equipment, and who is to remain in the carrier team. This should be in the unit SOP and modified as necessary for each situation.
When there are personnel shortages, changes should be made to insure key positions (squad leader or carrier team leader, gunner, assistant squad leader, and driver) are filled and that key dismounted weapons (Dragon, M60 machine gun if designated, SAWs, and M203 grenade launcher) are manned.
There must also be a clear understanding of who is to be the dismount team leader and who is to be the carrier team leader. Generally, the squad leader dismounts when the whole dismount team dismounts. The team leader/caliber .50 gunner takes charge of the carrier team. The dismount team leader takes control of the dismount team. Both team leaders take orders from the squad leader unless the platoon leader tells them otherwise. If the squad leader decides to fight the dismount team as two fire teams, he will be in charge of one of these teams. The squad must have well-practiced procedures for rapidly dismounting the vehicle and organizing on the ground for combat operations.
2. Squad Leader's Alert For Dismount.
- Dismount Alert. Each squad leader must keep all of his squad informed, and alert as to possible dismount situations. As soon as the squad leader knows where and how he wants to dismount, he will give the driver instructions and give the squad members in the troop compartment the dismount alert. The dismount alert should include the following:
- Warning - "Prepare to dismount."
- Dismount team composition - "Standard team" or "No Dragon."
- Dismount team leader - "I will dismount" or "SGT Jones, dismount."
- Exit method - "Ramp" or "Door."
- Dismount instructions - "Dismount left."
If the dismount is a result of enemy contact, the alert may include "action left/right/front" if the driver is unable to orient the front of the carrier toward the enemy.
- Actions of soldiers in Troop Compartment. The squad leader's dismount alert should trigger an automatic reaction among soldiers in the troop compartment:
- Each man secures his weapon and proper ammunition, LAW, or Dragon.
- Each man places his weapon on SAFE and loads it.
- The team leader notifies the squad leader when everyone in the troop compartment is ready to dismount.
- The squad leader keeps his combat vehicle crew (CVC) helmet or headset on until he gives the order to dismount or the ramp is lowered. This insures that the squad leader can monitor any last-minute changes he gets from you.
- Actions of Driver and TL/Gunner. The driver should always be on the alert for covered and concealed positions. When he hears the squad leader's dismount alert, he must respond without delay to the squad leader's orders. Whenever possible, he should stop the vehicle in a covered/concealed position with the vehicle pointed at the enemy. This aids the gunner because the mounted weapons will not have to be traversed. It also puts the carrier directly between the enemy and the dismounting personnel. The TL/gunner directs the driver to the proper dismount point and helps point the vehicle at the enemy.
3. Dismount Exits And Order.
- Dismount Exits. There are two exits that the dismount team can use to dismount the APC - the ramp and the ramp door. The ramp is the easiest and fastest. If the ramp cannot be used or the squad leader wants to dismount only a few personnel, the ramp door may be used.
Your platoon should have a well-rehearsed SOP sequence for dismounting. Normally, this is from the rear to the front. When the ramp is used, the personnel on both sides of the troop compartment can move out at the same time. When the door is used, only one man at a time can get out.
- Dismount Order. When the vehicle is in the right position and correctly oriented, the squad leader gives the order to dismount. If the ramp is used, the dismount order is the driver's signal to lower the ramp. If the ramp door is to be used, the squad leader's dismount order is the signal to open the door. The squad leader removes his CVC helmet, puts on his steel helmet, and dismounts.
4. Actions of the Dismount Team.
The dismount team should move 20 to 30 meters away from the vehicle in the direction specified in the dismount alert (left, right, or rear). The men immediately hit the ground using the best cover and concealment available and face outward toward the enemy. As soon as the dismount team leader accounts for every man and gets oriented, he gives instructions for movement to accomplish the team's mission or to link up with the other dismount teams to form the dismount element.
5. Tactical Considerations.
Whether in contact with the enemy or not, you make every effort to dismount in a covered and concealed location. It may be possible to deploy the dismount teams without the enemy detecting the dismount. This adds to the dismount team's security and lessens the chance they will be engaged by surprise fire.
During darkness, only red interior lights should be used in the vehicle if it is necessary to see to get equipment or to look at a map. This helps the infantrymen gain their "night vision" before dismounting. As soon as the dismount team leader lets the squad leader know that everyone in the troop compartment is ready to dismount, the troop compartment red lights should be turned off. This prevents a violation of light discipline when the ramp is lowered or the ramp door is opened.
6. Safety.
The carrier team must know the dismount team's location. The gunner should keep the driver oriented so that he does not endanger dismounted infantrymen as the carrier is moved. This is especially critical at night. The gunner must insure that he does not endanger the dismounted infantrymen as mounted weapons are fired.
When possible, the carrier team should wait for the dismount team to move away from the vehicle before carrier weapons are fired. This reduces the chance that enemy fires will be attracted that could endanger the dismount team. However, if suppressive fire is needed, the gunner should not hesitate to provide it.
7. Security at a Halt.
Many times when moving mounted, there will be temporary halts. This might be during overwatch, while leaders meet, or while maps are studied. In such cases, you and your squad leaders should have several men dismount for local security. These men should move far enough away from the carrier so that they can hear battlefield noises above vehicle engine sounds. They should be alert for any sign of enemy activity, on the ground or in the air. They should also watch for movement of other friendly elements.
One person in each vehicle, preferably the squad leader or gunner, must observe these dismounted security elements to relay signals of enemy activity, to provide fire support if needed, and to signal the men when to return.
8. Battle Drill.
Battle drill is a critical action to be taken in combat in response to an emergency situation. The battlefield requires platoons to move so that they can get the most out of their APC's firepower, speed, and protection. The precision and ease with which APC's move in response to orders or changing situations attest to your platoon's training level and fighting readiness. Battle drills are preplanned, and they stress changes in formation and movement in response to changes in the tactical situation. Battle drill is a critical action to be taken in combat in response to an emergency situation.
Battle drills teach team leaders to respond to commands rapidly and by force of habit, without detailed instructions. By order or signal, each APC moves at once to assume a specified position within the platoon formation. Every TL and driver must be skilled in battle drill so that they always know their vehicle's position relative to a base vehicle without further word from you.
You command and control your platoon by using standing operating procedures rather than detailed instructions. This prevents confusion and frees you to concentrate on locating and engaging the enemy.
9. Battle Drill Training.
When conducting battle drill training, one thought should be kept in mind: Start with easy-to-do tasks and work progressively up to the complicated, more difficult ones. Classroom work on the blackboard and practice in wheeled vehicles are good ways to start. Drivers and squad leaders can practice dismounted on a parade field if necessary.
Battle drill practice in APCs should begin on the easiest-to-use terrain available - open and relatively flat - and progress to wooded areas where command and control are more difficult.
As the platoon begins to master basic battle drills, you can vary the battle drill program. You can integrate training in such subjects as communications, air defense, occupation of a battle position, and march security.
Battle drill training never ends. Practice goes on as long as the platoon is in the field. The platoon goal is to move and react quickly, instinctively, and effectively under all conditions.
10. Battle Drill Examples.
This part of the subcourse illustrates standard mechanized battle drills for dismounting the APC.
Figure 2-10 is only a graphical example and should not be taken as the only way to execute a mechanized battle drill. For example, the figures show the dismount team arrayed near the vehicle and in a linear fashion; in combat the dismount team may move away from the vehicle and seek cover, as dictated by the terrain.
- Performance Reminders For Conducting Dismount From The APC:
- The squad leader alerts the dismount team.
- The driver looks for a covered and concealed position.
- The gunner uses the caliber .50 machine gun to suppress the enemy.
- The vehicle is halted in the best available covered and concealed position.
- The dismount team dismounts in the following order:
- No. 5, 9, 8, 6, 1, 7, 4, (dismount right).
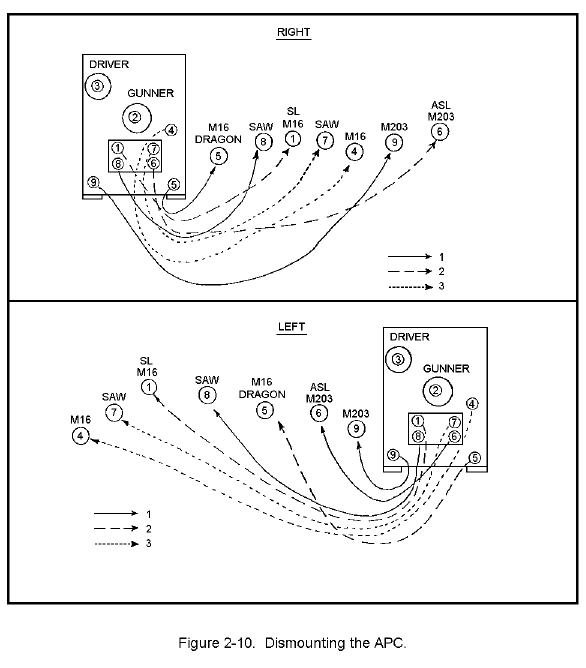
As the dismount team dismounts, the members orient to the front of the vehicle, which should be facing toward the enemy.
The dismount battle drill terminates when the last man exits the vehicle and orients to the front. The battle drill does not necessarily require the exact dismount sequence shown. The dismount team may not "layout" as depicted but may dismount and move out in a specific direction.
11. Summary.
This completes lesson two. You should know how to control APCs in the defense, conduct a platoon defense, consolidate and reorganize your platoon after enemy contact and direct dismount from an APC in the defense. After reviewing all the material in this lesson, you should complete the practice exercise for lesson two. Answers and feedback for the question in the practice exercise will be provided to show you where further study is required.
IN0498 Edition C Examination