

|
RDL Homepage |
Table of Contents |
Document Information |
Download Instructions |
An obstacle is any natural or man-made obstruction that turns, fixes, disrupts, or blocks the movement of a force. The platoon must know how to employ obstacles and how to breach and clear obstacles. (See FM 5-34 and FM 5-102 for additional information concerning obstacles.)
1. Employment of Obstacles. Obstacles are used in all operations but are most useful in the defense. Engineers normally construct obstacles with help from the platoon. There will be times when the platoon must build obstacles without engineer help. In such cases, the leader should seek engineer advice on the technical aspects. Platoon leaders must always consider what materials are needed and how long the obstacle will take to construct.
In the offense, the platoon uses obstacles to:
- Aid in flank security.
- Limit enemy counterattack.
- Isolate objectives.
- Cut off enemy reinforcement or routes of withdrawal.
In the defense, the platoon uses obstacles to:
- Slow the enemy's advance to give the platoon more time to mass fires on him.
- Protect defending squads and sections.
- Canalize the enemy into places where he can more easily be engaged.
- Separate the enemy's tanks from his infantry.
- Strengthen areas that are lightly defended.
a. Functions. Obstacles perform one of four tactical functions--disrupt, turn, fix, or block.
(1) Disrupt. These obstacles are used to disrupt assault formations, attacking the low-level command and control while the attacker is under direct fire.
(2) Turn. Turning obstacles move and manipulate the enemy to the force's advantage by enticing or forcing him to move in a desired direction, by splitting his formation, by canalizing him, or by exposing his flank.
(3) Fix. Fixing obstacles slow and hold the enemy in a specific area so that he can be killed with fires, or the obstacles generate the time necessary for the force to break contact and disengage.
(4) Block. Blocking obstacles are complex, employed in depth, and integrated with fires to prevent the enemy from proceeding along a certain avenue of approach. Blocking obstacles serve as a limit, beyond which the enemy will not be allowed to go.
b. Principles of Employment. When employing obstacles, the leader considers the following principles.
(1) Support the Tactical Plan. Obstacles supplement combat power, decrease the mobility of the enemy, and provide security for the platoon. While considering enemy avenues of approach, the leader also considers his own movement requirements such as routes for resupply, withdrawal, counterattacks, patrols, and observation posts.
(2) Tie In. He ties in his reinforcing obstacles with existing and natural obstacles. He must also coordinate the obstacle plan with his plans for fire support.
(3) Covered by Observation and Fire. He ensures that all obstacles are covered by observation and fire. This reduces the enemy's ability to remove or breach the obstacles and increases the possibilities of placing fire on the enemy when he encounters the obstacles.
(4) Constructed in Depth. He emplaces obstacles so that each new obstacle encountered by the enemy attrites the enemy force and causes a desired and controlled reaction. Proper use of obstacles in depth weakens the enemy and significantly increases the overall desired effect.
(5) Employed for Surprise. An obvious pattern of obstacles would disclose locations of platoons and weapons. Friendly forces must avoid readily visible patterns.
2. Types of Obstacles. The two types of obstacles are existing and reinforcing.
a. Existing Obstacles. Existing obstacles are those natural or cultural restrictions to movement that are part of the terrain when battle planning begins. The location and characteristics of natural or cultural obstacles have a direct relationship to the plan of operations and the positioning of forces. Existing obstacles should be easily converted into more effective obstacles, they should be in defilade from enemy observation, they should be where friendly observation and fires can prevent enemy breaching, and they should be difficult to bypass. Existing obstacles include the following.
(1) Steep Slopes. Varying degrees of incline are required to stop different types of vehicles. Tanks can negotiate slopes as steep as 60 percent. Craters, mines, abatis, and induced landslides increase the obstacle value of slopes.
(2) Escarpments. Vertical (or near-vertical) cuts and walls over 1½ meters high cannot be crossed by vehicles without some type of breach. Thick rock walls, railroad embankments, and steep fills along highways are examples of escarpments.
(3) Ravines, Gullies. and Ditches. Ravines, gullies, and ditches are obstacles to wheeled vehicles. If over 5 meters wide, these obstacles are usually effective against tracked vehicles.
(4) Rivers, Streams and Canals. The major obstacle value of rivers, streams, and canals is that they must be crossed by special means: deepwater fording or surface or aerial means. The ease of crossing by deepwater fording and surface means is determined by the width and depth of the water obstacle, the water velocity, and the condition of the banks and bottom.
(5) Swamps and Marshes. Swamps and marshes, where firm ground is lacking or is a meter or so below water level, are effective obstacles against all types of vehicles. They also severely restrict the mobility of infantry.
(6) Snow. Even on otherwise trafficable terrain, snow 1 meter deep becomes a major obstacle to personnel and vehicles.
(7) Trees. Heavy stands of trees that are 8 inches or more in diameter, spaced less than 20 feet apart, will eventually build up into an obstacle if tracked vehicles attempt to push them over and force their way through.
(8) Built-Up Area. The obstacle value of a built-up area depends on its size, location, and construction. The natural obstacle value of built-up areas can be increased by cratering streets; demolishing walls; overturning or derailing street or railroad cars; and constructing roadblocks from steel rails, beams, and rubble. When reinforced with mines and barbed wire, such obstacles protect against armored, mechanized, and infantry forces.
b. Reinforcing Obstacles. Reinforcing obstacles are those specifically constructed, emplaced, or detonated to tie together, strengthen, and extend existing obstacles. Careful evaluation of the terrain, to determine its existing obstructing or canalizing effect, is required to achieve maximum use of reinforcing obstacles. Installation time and manpower are usually the two most important factors. Infantry platoons provide the most readily available source of manpower. Reinforcing obstacles include the following.
(1) Road Craters. Road craters are effective obstacles on roads or trails if the areas on the flanks of the crater are tied into steep slopes or mined areas.
(2) Abatis. An abatis is an obstacle created by cutting down trees so that their tops are crisscrossed and pointing toward the expected enemy direction. It is most effective for stopping vehicles in a forest. This obstacle may be reinforced with mines and booby traps.
(3) Ditches. Ditches across roads and trails are effective obstacles. Large ditches in open areas require engineer equipment.
(4) Log Hurdles. Log hurdles act as "speed bumps" on roads. They are easily installed and are most effective when used in conjunction with other obstacles.
(5) Log Cribs. A log crib is constructed of logs, dirt, and rocks. The logs are used to make rectangular or triangular cribs that are filled with dirt and rock. These are used to block narrow roads and defiles. Log cribs must be solidly built to stop tanks.
(6) Log Posts. Log posts embedded in the road and employed in depth can effectively stop tracked vehicles. If they are not high enough to be pushed out of the way, posts can cause a tracked vehicle to throw a track if it tries to climb over. If employed with wire and mines, they can also slow infantry.
(7) Rubble. Rubble from selected masonry structures and buildings in a built-up area will limit movement through an area and provide fortified fighting positions.
(8) Wire Entanglements. Wire entanglements impede the movement of infantry and, in some cases, tracked and wheeled vehicles. The materials used in constructing wire entanglements are relatively lightweight (compared to other obstacles) and inexpensive, considering the protection they afford.
(a) Triple Standard Concertina Fence. The most common wire entanglement a platoon or squad may build is the triple standard concertina fence. It is built of either barbed wire concertina or barbed tape concertina. There is no difference in building methods ( Figure 2-105). The material and labor requirements for a 300-meter triple standard concertina fence are--

Figure 2-105. Concertina Fence.
o |
Long pickets--160 |
o |
Short pickets--4 |
o |
Barbed wire, 400-meter reels--3 |
o |
Staples--317 |
o |
Rolls of concertina--59 |
o |
Man-hours to erect--30 |
First lay out and install pickets from left to right (facing the enemy). Put the long pickets five paces apart, and the short (anchor) pickets two paces from the end of the long pickets. The enemy and friendly picket rows are offset and are placed 3 feet apart. Now lay out all rolls of concertina. Place a roll in front of the third picket on the enemy side, and two rolls to the rear of the third picket on the friendly side. Repeat this step for every fourth picket thereafter. Install the front row concertina and horizontal wire. Place the concertina over the pickets. Install the rear row of concertina and horizontal wire. Install the top row of concertina and join the rear horizontal wire.
(b) Concertina Roadblock. The concertina roadblock is placed across roadways and designed to block wheeled or tracked vehicles. The roadblock is constructed of 11 concertina rolls or coils placed together, about 10 meters in depth, reinforced with long pickets five paces apart. The rolls or coils should not be tautly bound, thus allowing them to be dragged and tangled around axles, or tank road wheels and sprockets. Additionally, wire is placed horizontally on top of the concertina rolls or coils. (See Figure 2-106.)

Figure 2-106. Concertina Roadblock.
(c) Tanglefoot. Tanglefoot is used where concealment is essential and to prevent the enemy from crawling between fences and in front of emplacements. The obstacle should be employed in a minimum width of 32 feet. The pickets should be placed at irregular intervals of 2½ feet to 10 feet, and the height of the barbed wire should vary between 9 to 30 inches. Tanglefoot should be sited in scrub, if possible, using bushes as supports for part of the wire. On open ground, short pickets should be used.
(9) Mines. Mines are one of the most effective tank and personnel killers on the battlefield. Minefields that an infantry platoon or squad most commonly emplace are the hasty protective, point, and phony.
(a) Hasty Protective Minefield. In the defense, platoons and BFV squads lay hasty protective minefields to supplement weapons, prevent surprise, and give early warning of enemy advance. A platoon can install hasty protective minefields, but only with permission from the company commander and only when he has permission from higher headquarters.
- Three reports are also required: intention, initiation, and completion. Hasty protective minefields are reported to the company commander and recorded on DA Form 1355-1-R. The leader puts the minefield across likely avenues of approach, within range of and covered by his organic weapons. If time permits, the mines should be buried to increase effectiveness, but they may be laid on top of the ground in a random pattern. The BFV platoon's basic load of mines consists of two per vehicle. Additional mines may be requested through the supply system and delivered by LOGPAC.
- The minefield should be recorded before the mines are armed. The leader installing the minefield should warn adjacent platoons and tell the company commander of the minefield's location. When the platoon leaves the area (except when forced to withdraw by the enemy), it must remove the minefield or transfer the responsibility for the minefield to the relieving platoon leader. Only metallic mines are used in hasty protective minefields. Booby traps are not used in hasty protective minefields; they delay removal of the mines. The employing platoon must make sure that the minefield can be kept under observation and covered by fire at all times. The following example describes how to lay a hasty protective minefield.
-------EXAMPLE-------
After requesting and receiving permission to lay the minefield, the platoon leader and BFV squad leaders reconnoiter to determine exactly where to place the mines. The leaders find a need to use antitank mines to block enemy vehicles at the bridge and the ford. The leaders decide that antipersonnel mines are needed to protect the antitank mines and to cover the likely avenues of approach of enemy infantry (Figure 2-107).
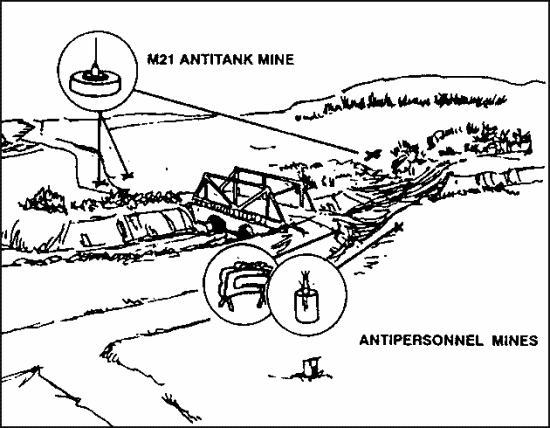
Figure 2-107. Antipersonnel and Antitank Mines in a Hasty Protective Minefield.
While the soldiers are placing the mines, the platoon leader finds an easily identifiable reference point in front of the platoon's position, but well behind the minefield. The platoon leader records the minefield using a reference point (in this example, the concrete post) (Figure 2-108). The row of mines closest to the enemy is designated A and the succeeding rows are B, C, and so on.
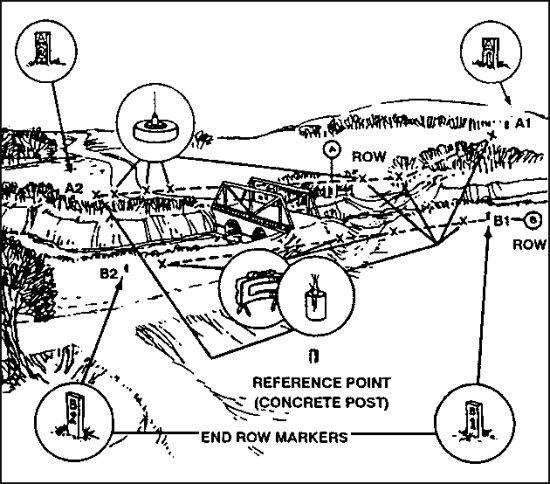
Figure 2-108. Leader Visualizes Hasty Protective Minefield.
The ends of a row are shown by two markers. They are labeled with the letter of the row and number 1 for the right end of the row and number 2 for the left end of the row. The rows are numbered from right to left, facing the enemy. The marker can be a steel picket or wooden stake with a nail or a can attached so that it can be found with a metallic mine detector.
After determining the rows, the platoon leader places a row marker 15 to 20 paces to the right (outside) of the first mine.
In this case, the row marker is B. From the concrete post, the platoon leader measures the magnetic azimuth (in degrees) and paces the distance to row marker B-1. ( Figure 2-109.)
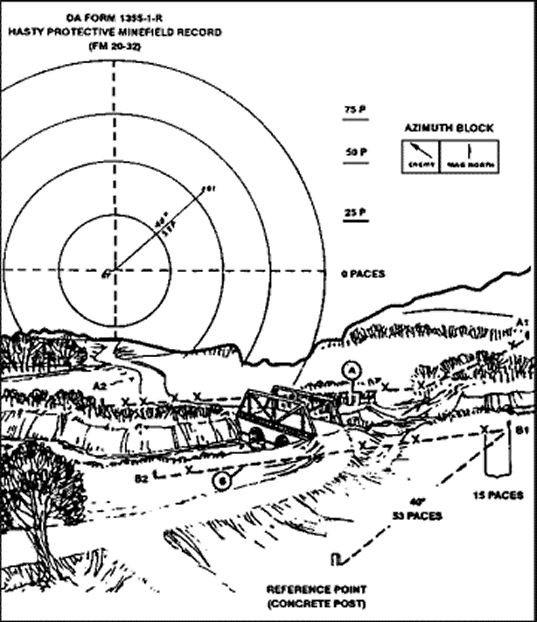
Figure 2-109. Marking and Recording Minefield.
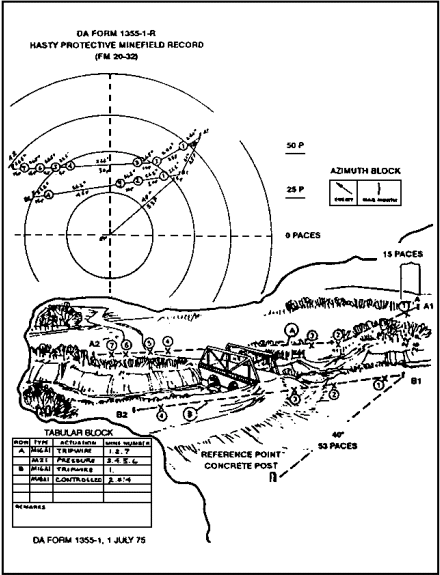
Figure 2-109. Marking and Recording Minefield (continued).
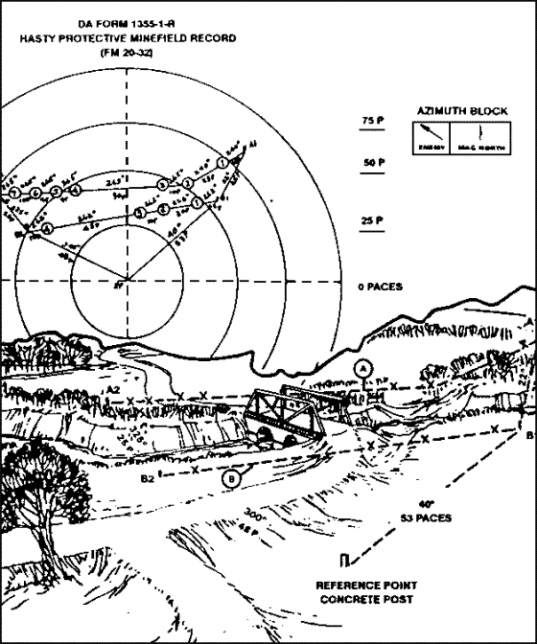
Figure 2-109. Marking and Recording Minefield (continued).
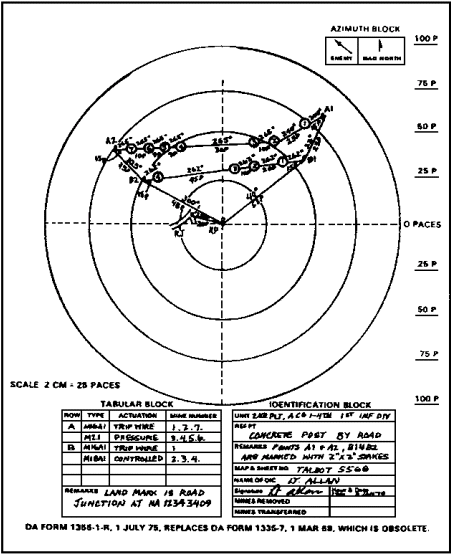
Figure 2-109. Marking and recording minefield (continued).
-------END OF EXAMPLE-------
The platoon leader places a marker at B-l and records the azimuth and distance from the concrete post to B-l on DA Form 1355-1-R.
Row A marker is placed in the same manner as row B. Next, from B-1 the platoon leader measures the azimuth and distance to A-1. He then measures the azimuth and distance from A-1 to the first mine in row A and records the location of the mine. The distance and azimuth from the mine to the second is then measured and recorded. The process continues until all locations have been recorded, as shown. The platoon leader gives each mine a number to identify it in the tabular block of DA Form 1355-1-R. When the last mine in row A is recorded, the platoon leader measures an azimuth and distance from the last mine to an arbitrary point between 15 and 25 paces beyond the last mine. He places a marker here and calls it A-2. He then follows the same procedure with row B.
When the platoon leader finishes recording and marking the rows,he measures the distance and azimuth from the reference point to B-2, and from B-2 to A-2, and records them.
The platoon leader now ties in the reference point with a permanent landmark that he found on the map. He measures the distance and the azimuth from this landmark to the reference point. The landmark might be used to help others locate the minefield should it be abandoned. Finally, he completes the form by filling in the tabular and identification blocks.
While the platoon leader is tying in the landmark, the soldiers arm the mines nearest the enemy first (row A). The platoon leader reports that the minefield is completed and keeps DA Form 1355-1-R. If the minefield is transferred to another platoon, the gaining platoon leader signs and dates the mines transferred block and accepts the form from the previous leader. When the minefield is removed, the form is destroyed. If the minefield is left unattended or abandoned unexpectedly, the form must be forwarded to the company commander. The company commander forwards it to battalion to be transferred to more permanent records.
When retrieving the mines, the soldiers start at the reference point and move to B-1, using the azimuth and distances as recorded. They then move from B-1 to the first mine in row B. However, if B-1 is destroyed, they move from the reference point to B-2 using that azimuth and distance. They will now have to shoot the back azimuth from B-2 to the last mine. The stakes at A-1, B-1, A-2, and B-2 are necessary because it is safer to find a stake when traversing long distances than to find a live mine.
(b) Point Minefields. Point minefields disorganize enemy forces and hinder their use of key areas. Point minefields are of irregular size and shape, and include all types of antitank and antipersonnel mines, and antihandling devices. They should be used to add to the effect of existing and reinforcing obstacles, or to rapidly block an enemy counterattack along a flank avenue of approach.
(c) Phony Minefields. Phony minefields, used to degrade enemy mobility and preserve friendly mobility, are used to simulate live minefields and deceive the enemy. They are used when lack of time, personnel, or material prevents use of actual mines. Phony minefields may be used as gaps in live minefields. To be effective, a phony minefield must look like a live minefield by either burying metallic objects or making the ground look as though objects are buried.
3. Enemy Obstacles. Platoons bypass and breach enemy obstacles. The decision to bypass or breach is based on the mission, the situation, and the assets available.
a. Bypassing. Obstacles are bypassed if at all possible. When bypassing an obstacle, the leader reports its type and location to higher headquarters. The leader must be alert for enemy contact when bypassing, because the enemy normally covers the bypass routes by fire.
b. Breaching. A breach is the employment of any means available to break through or secure a passage through an enemy obstacle. There are four types of breaches: 1. in-stride, 2. deliberate, 3. assault, 4. covert. For more information, see FM 90-13-1.
4. Breaching and Clearing Obstacles. Leaders must know the techniques used to overcome reinforced obstacles. Some obstacles may not restrict infantry units, but will restrict vehicular movement. The platoon may have to clear obstacles to help vehicles go forward. The platoon may not be able to keep the enemy from knowing that it is going to breach, but may keep the enemy from knowing where and when it will breach. The platoon breaches different obstacles using different techniques, types of equipment, and explosives or MICLIC, if available. Equipment and explosives may include rocket-propelled line charges, mine detectors, bangalore torpedoes, grappling hooks, direct fire weapons, and hand-emplaced explosives. Platoons breach all obstacles using the same fundamentals (SOSR):
- Suppress the enemy to allow the breach element to create a breach.
- Obscure the breach site from enemy observation.
- Secure the breach site, execute the breach, and secure the far side.
- Reduce the obstacle to facilitate movement of follow-on forces.
a. Minefields. The objective of a minefield breach is to clear a path or lane through a mined area for friendly forces to continue their mission. The selection of lane locations should take advantage of cover and concealment, overwatching fires, and the commander's scheme of maneuver. Breaching a minefield where it is first encountered before considering other possible sites is not recommended.
_______________________________________________
DANGER
CHEMICAL MINES ARE NOT BLOWN IN PLACE.
_______________________________________________
(1) Step 1. Suppress the Enemy. The enemy covering the obstacle must be suppressed.
(2) Step 2. Obscure with Smoke. Smoke is used to obscure the obstacle area and conceal friendly soldiers.
(3) Step 3. Probe and Mark Mines. A footpath or lane is probed and the mines are marked. The preferred way to clear a lane through a minefield is to use a rocket-propelled line charge or bangalore torpedo. (Figure 2-110.) The only way to clear a minefield without special equipment is to probe with a pointed nonmetallic object. One squad probes while the platoon (-) overwatches. (Figure 2-111.)

Figure 2-110. Bangalore Torpedo.
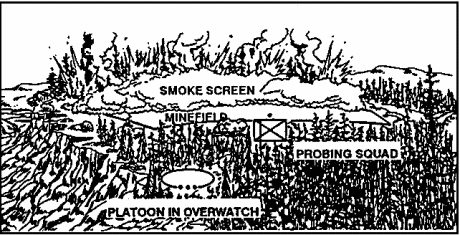
Figure 2-111. Platoon (-) Overwatches Probing Squad.
(a) The squad probing the footpath or lane through the minefield uses two probers--one in front, clearing a lane wide enough to crawl through and one prober clearing 10 meters behind and slightly to one side so that their lanes overlap.
(b) Two other soldiers crawl along behind to secure the probers, to carry additional supplies, or to take a prober's job if one becomes a casualty. The probers should be rotated often to keep them from getting tired or careless, or both. (Figure 2-112.)

Figure 2-112. Probing for Mines.
(c) The probers wear their protective vests, Kevlar helmets, and carry their NBC masks. They roll up their sleeves and remove rings and watches. LBE, rucksacks, weapons, and other metallic equipment are carried by other members of the breach force.
______________________________________________________________
______________________________________________________________
| NOTE: | If in a contaminated environment, probers must maintain protective posture. |
(d) If the probe meets resistance and does not go into the ground freely, the prober picks the soil away with the tip of the probe and removes the loose dirt by hand. If it is a mine, they remove enough soil to see what type of mine it is and mark its location without attempting to remove or disarm the mine.
____________________________________________________________
DANGER
IF THE PROBE IS PUSHED STRAIGHT DOWN, ITS TIP CAN
DETONATE A PRESSURE FUZE.
___________________________________________________________
| NOTE: | If a soldier is injured in a minefield, all other soldiers freeze. The nearest soldier probes his way to the injured soldier, applies first aid, and carries him out--carefully moving back through the probed lane. |
(4) Step 4. Secure the Far Side. As soon as the breaching element has probed a lane, it or another element secures the far side. Infantry forces should secure the far side of an obstacle as quickly as possible. This helps keep the enemy from attacking or placing fires on the breach site. When breaching an obstacle for vehicles, if the infantry can bypass on foot, leaders should designate an element to bypass the obstacle and secure the far side while breaching effort is on-going. That element should have machine guns; light and or medium antiarmor weapons; and a map, compass, and a pair of binoculars or a thermal sight to call for and adjust fires.
(5) Step 5. Reduce the obstacles. Marked mines are destroyed with explosives or grappling hooks. Metallic mines must be destroyed before moving soldiers through the lane.
(6) Step 6. Mark Cleared Lane. The squad marks the cleared lane.
(7) Step 7. Move Unit Through the Obstacle. The leader moves the unit through the obstacle.
b. Tank Ditches. SOSR is applied in breaching tank ditches (Figure 2-113). Infantry can reduce tank ditches by bringing down the sides of the ditch with D-handled shovels, helmets, or explosives. An armored combat earth mover, tank with blades, or combat engineer vehicle should be used to reduce the obstacle quickly.

Figure 2-113. Clearing a Tank Ditch.
c. Craters. SOSR is applied. A crater is reduced using the same steps as a tank ditch.
d. Wire. SOSR is applied. If vehicles are available, they should be used to pull wire entanglements off assault paths, detonating antipersonnel mines in the process. Another method is for soldiers to prepare and emplace material over the wire to make an assault footpath. The assaulting unit must first clear the wire of antipersonnel mines before laying material onto the wire. Another method is to cut through the wire obstacle as described below, after suppressing the enemy and obscuring their visibility. The clearing squad uses wire cutters, bangalore torpedoes, or explosives to remove the wire. The clearing squad checks for and marks booby traps. One squad breaches, while the platoon (-) overwatches. Tank fire, combat engineer vehicle fire, and massed indirect and direct fire can help breach the wire, if available. As soon as the breach element has cleared a lane, it secures the far side. Marked mines are destroyed with explosives or grappling hooks. Then, the cleared lane is marked.
GO TO:
Table of Contents