|
RDL Homepage |
Table of Contents |
Document Information |
Download Instructions |
This part discusses formations, movement techniques, and actions during mounted and dismounted movement for mechanized infantry platoons and squads.
1. Formations. Formations are arrangements of elements, vehicles, and soldiers in relation to each other. Platoons use formations for control, flexibility, and security. Leaders choose formations based on METT-T. Platoon leaders are normally up front in formations during mounted movement, and team leaders are up front in formations during dismounted movement. This allows them to lead from the front and lead by example. All Bradley commanders (mounted) and soldiers (dismounted) in the formations must be able to see their leader. The speed of movement and distance between vehicles or soldiers in formations will vary according to the METT-T situation at the time. Each vehicle or person will be guarding and searching a different sector to provide all-round security while on the move. Platoons use column, line, echelon, and wedge formations for mounted movement. The dismounted platoon uses column and line formations.
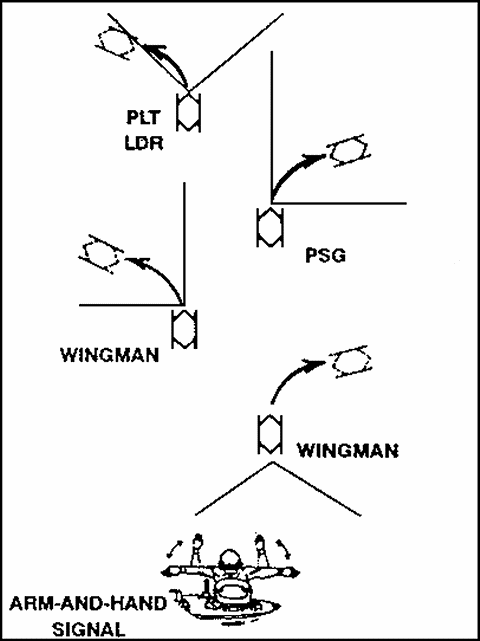
a. Mounted. Column, line, echelon, and wedge formations, modified as necessary, determine the position of vehicles in relation to each other and the orientation of turrets in sectors of responsibility for scanning and fire. This allows the platoon to act appropriately in most situations and during most conditions. Action on enemy contact, as well as the requirement to change formations on the move, must be a matter of implementing one of a series of standard, thoroughly trained drills. Herringbone and coil are the security formations used when the vehicles are not moving.
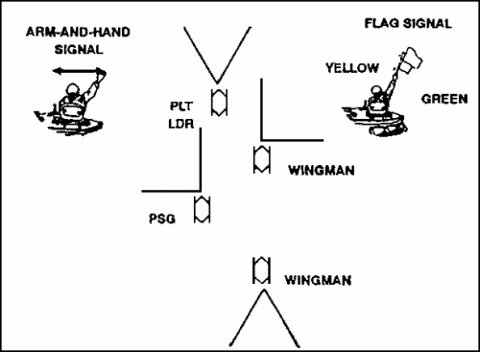
(1) Column. The column formation is used for road marches, for movement during limited visibility, and when passing through defiles or other restrictive terrain (Figure 2-20). The column simplifies control, provides good security, and permits maximum firepower to the flanks.
Figure 2-20. Column Formation.
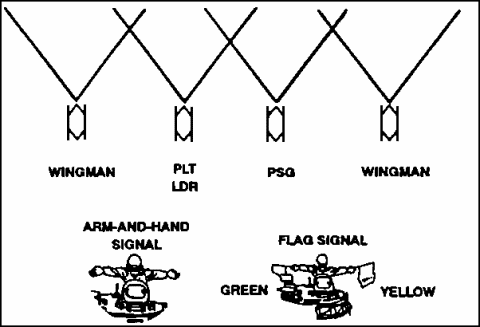
(2) Line. The line formation is used when assaulting a weakly defended objective, crossing open areas, or in a support-by-fire position (Figure 2-21). This formation provides maximum fire to the front. The distance between elements depends on terrain.
Figure 2-21. Line Formation.
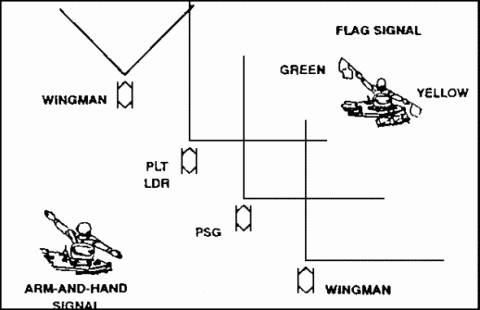
(3) Echelon. The echelon formation permits excellent firepower to the front and to either the right or left flank (Figure 2-22). It is normally used when a platoon is to cover an exposed flank of a larger force.
Figure 2-22. Echelon Formation.
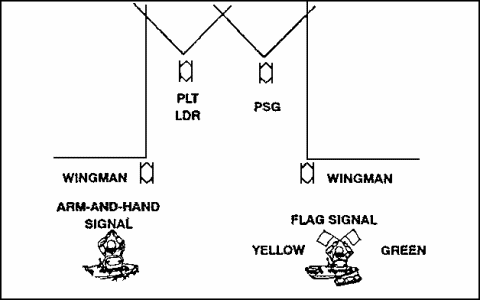
(4) Wedge. The wedge formation permits excellent firepower to the front and good fire to each flank (Figure 2-23). The wedge formation is often used when the enemy situation is vague.
Figure 2-23. Wedge Formation.
(5) Herringbone. The herringbone is used to disperse the platoon when traveling in column formation (Figure 2-24). It may be used during air attacks or when the platoon must stop during movement. It lets the platoon move to covered and concealed positions off a road or from an open area and establish all-round security without detailed instructions being issued. The vehicles are repositioned as necessary to take advantage of the best cover, concealment, and fields of fire. Fire team members dismount and establish security.
Figure 2-24. Herringbone Formation.
(6) Coil. The coil is used to provide all-round security and observation when the platoon is stationary (Figure 2-25). It also is useful for tactical refueling, resupply, and issuing platoon orders. Security is posted to include air guards and dismounted fire teams. The vehicle turrets are manned.
Figure 2-25 Coil Formation.
b. Dismounted. Squads normally move mounted until the situation requires them to dismount. The squad moves alone or as part of the platoon's dismount element. The platoon's mounted element or other fire teams of the dismount element normally overwatch the movement of the dismounted squad. The dismount element uses a variety of formations.
(1) Fire Team Formations. Fire team formations describe the positioning of soldiers in relation to each other. Each formation has advantages and disadvantages. The leader must weigh these in light of his METT-T analysis (Table 2-1).
|
|
WHEN NORMALLY USED |
CHARACTERISTICS |
|||
|
|
|
|
|
||
|
FIRE TEAM
FIRE TEAM |
BASIC FIRE TEAM FORMATION
CLOSE TERRAIN |
EASY
EASIEST |
GOOD
LESS FELIBLE |
ALLOWS
ALLOWS IMMEDIATE FIRES TO THE FLANKS MASKS MOST FIRES TO THE REAR |
ALL-ROUND
LEAST |
Table 2-1. Comparison of fire team formations.
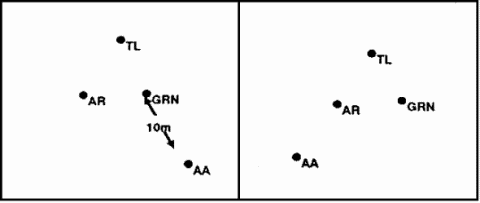
(a) Wedge. The wedge is the basic formation for the fire team. The interval between soldiers in the wedge formation is normally 10 meters. The wedge expands and contracts depending on the terrain. When rough terrain, poor visibility, or other factors make control of the wedge difficult, fire teams modify the wedge. The normal interval is reduced so that all team members can still see their team leader and the team leaders can still see their squad leader. The sides of the wedge can contract to the point where the wedge resembles a single file. When moving in less rugged terrain, where control is easier, soldiers expand or resume their original positions (Figure 2-26).
Figure 2-26. Fire Team Wedge.
(b) File. When the terrain precludes use of the wedge, fire teams use the file formation (Figure 2-27).
Figure 2-27. Fire Team File.
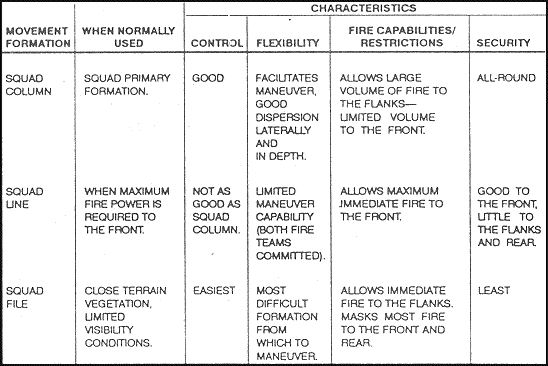
(2) Squad Formations. Squad formations describe the relationships between fire teams in the squad. They include the squad column, squad line, and squad file. A comparison of the formations is in Table 2-2.
Table 2-2. Comparison of Squad Formations.
(a) Squad Column. The squad column is the squad's main formation. It provides good dispersion laterally and in depth without sacrificing control, and facilitates maneuver. The lead fire team is the base fire team. Squads can move in either a column wedge or a modified column wedge (Figure 2-28). Rough terrain, poor visibility, or other factors can require the squad to modify the wedge into a file for control purposes. As the terrain becomes less rugged and control becomes easier, the soldiers assume their original positions.
Figure 2-28. Squad Column With Fire Teams in Column.
(b) Squad Line. The squad line provides maximum firepower to the front ( Figure 2-29). When a squad is acting as the base squad, the fire team on the right is the base team.
Figure 2-29. Squad Line.
(c) Squad File. When not traveling in a column or line, squads travel in file. The squad file has the same characteristics as the fire team file. If the squad leader wishes to increase his control over the formation, exert greater morale presence by leading from the front, and be immediately available to make key decisions, he will move forward to the first or second position. Additional control over the rear of the formation can be provided by moving a team leader to the last position (Figure 2-30).
Figure 2-30. Squad File.
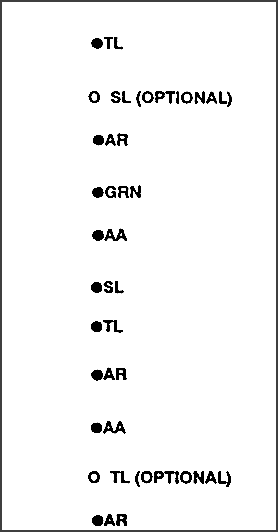
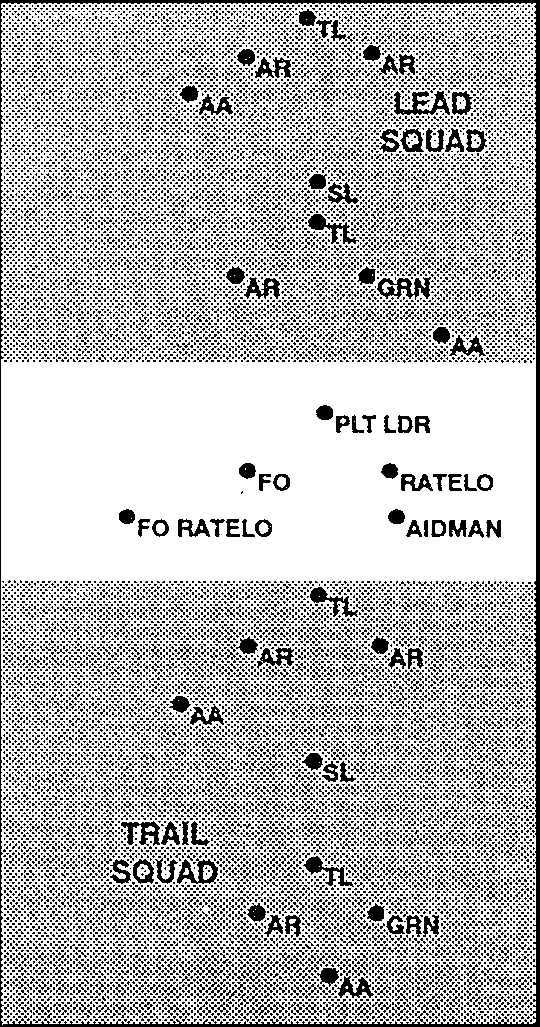
(3) Platoon Formations. The platoon uses the column or line formations. (Figures 2-31 and 2-32).
Figure 2-31. Platoon Column.
Figure 2-32. Platoon Line.
(a) Column. The column is the platoon primary movement formation. It provides good dispersion both laterally and in depth, and simplifies control. This formation can deliver a limited volume of fire to the front and high volume to the flanks. The lead squad is the base squad.
(b) Line. It provides good lateral dispersion. In this formation, the platoon can deliver the greatest amount of fire to the front. The platoon leader designates the base squad. The transition from movement techniques to maneuver must be done quickly to attain the initiative.
2. Movement Techniques. A movement technique is the manner a platoon uses to traverse terrain. There are three movement techniques: traveling, traveling overwatch, and bounding overwatch. The selection of a movement technique is based on the likelihood of enemy contact and the need for speed. Factors to consider for each technique are control, dispersion, speed, and security (Table 2-3). Movement techniques are not fixed formations. They refer to the distances between vehicles (mounted movement), soldiers, teams, and squads that vary based on mission, enemy, terrain, visibility, and any other factor that affects control.
|
MOVEMENT TECHNIQUES |
WHEN NORMALLY USED |
CHARACTERISTICS |
|||
CONTROL |
DISPERSION |
SPEED |
SECURITY |
||
|
TRAVELING TRAVELING OVERWATCH BOUNDING OVERWATCH |
CONTACT NOT LIKELY CONTACT POSSIBLE CONTACT EXPECTED |
MORE MOST |
LESS MORE MOST |
FASTEST SLOWER SLOWEST |
LEAST MORE MOST |
Table 2-3. Movement Techniques, Uses, and Characteristics.
a. Mounted.
(1) Traveling. Traveling is used when contact with the enemy is not likely and speed is needed (Figure 2-33).
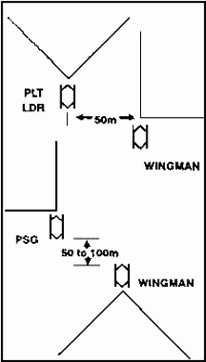
(2) Traveling Overwatch. Traveling overwatch is used when contact is possible. A platoon in traveling overwatch may move in a column, wedge, or echelon formation with turrets oriented into assigned sectors of responsibility (Figure 2-34).
(As noted earlier, the platoon should move mounted in sections-- one under the platoon leader's control, the other controlled by the platoon sergeant.)
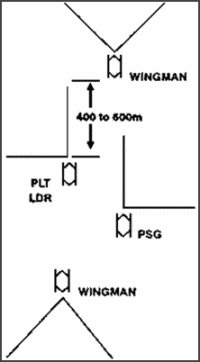
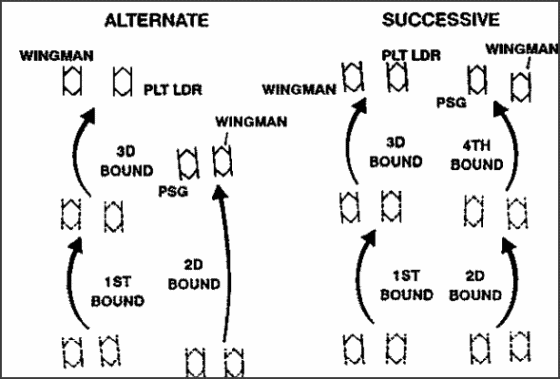
(3) Bounding Overwatch. Bounding overwatch is used when contact is expected. Platoons execute bounding overwatch in alternate or successive bounds (Figure 2-35). Platoons use alternate bounds when speed is important and when terrain is open. They use successive bounds to move deliberately or when terrain is restrictive.
Figure 2-35. Methods of Bounding Overwatch.
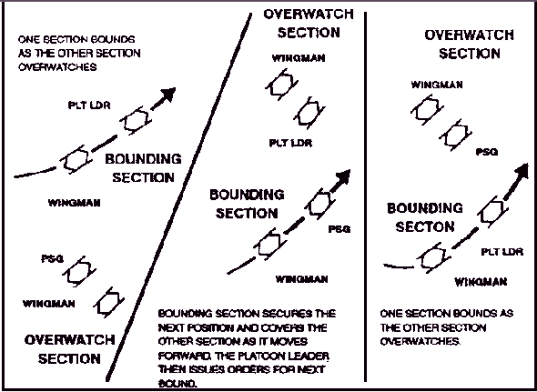
(a) When the platoon uses mounted bounding overwatch, one or two vehicles bound while the others overwatch from a stationary position (Figure 2-36). When the new position is reached, the bounding fire teams dismount for local security. If the new position is relatively open, the bounding section may not need dismounted personnel to secure the position. As soon as the position is secured, the bounding section covers the rest of the platoon as they move forward. The process is repeated for subsequent moves.
Figure 2-36. Bounding Overwatch.
(b) The vehicles in the overwatch should follow the platoon or company SOP for weapons-ready posture. For example, all BFVs might have their TOW launchers erected and self-tested with one of the BFV's designated to fire, and another ready to fire its 25-mm gun or 7.62-mm coaxial machine gun. Each gunner should be prepared for immediate engagement in accordance with the platoon leader's fire control and distribution plan. Designated gunners should have their thermal sights on.
Those BFVs chosen to have the 25-mm gun ready should select the proper ammunition and rate of fire, and turn the range index knob to the estimated range of the most likely target. Those BFVs selected to have the 7.62-mm coaxial machine gun ready also turn their range control knob to the range of the most likely target. This arrangement ensures that the overwatch force can provide immediate and accurate fire support with the proper weapon and ammunition. This can be adjusted to fit the enemy situation, terrain, and availability of ammunition and missiles.
b.Dismounted. The platoon normally remains mounted until forced to dismount. When it dismounts, it uses the following techniques.
(1)Traveling. This technique is not used often when contact is not likely, because the platoon normally remains mounted (Figure 2-37). Sometimes, the platoon has missions that require the dismount element to operate independent of the BFVs. The traveling technique is normal for trailing platoon dismounted elements in a company dismounted formation. The element's formation is adjusted to fit the situation.
Figure 2-37. Traveling, Squads Dismounted.
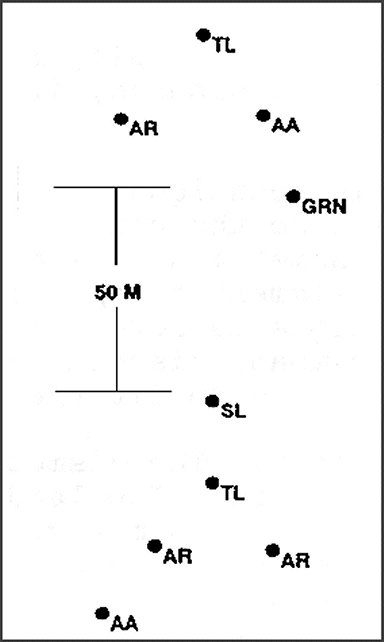
(2) Traveling Overwatch. The dismount element normally uses a column or wedge formation. The lead team tries to move at least 50 meters, but preferably 100 meters or more, in front of the rest of the element. The BFVs may be even farther to the rear or to a flank (Figure 2-38).
Figure 2-38. Traveling Overwatch, Squads Dismounted.
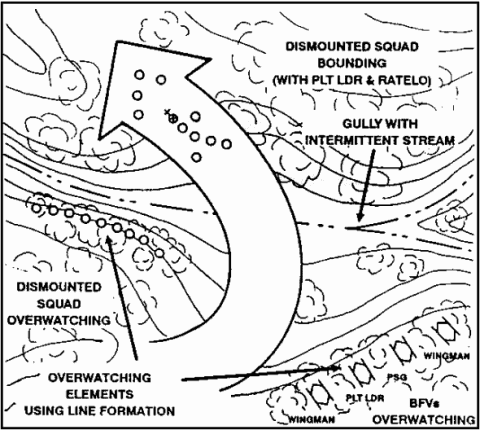
(3) Bounding Overwatch. When contact is expected and the terrain does not permit mounted movement or when the dismount element is separated from the vehicles, the platoon (-) bounds with the dismount element deployed (Figure 2-39).
Figure 2-39. Bounding Overwatch, Squads Dismounted.
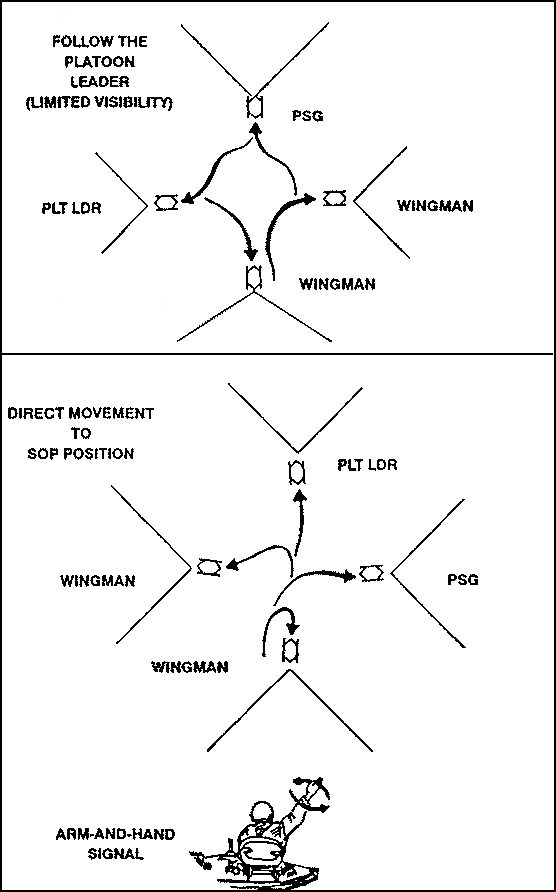
(4) Movement During Limited Visibility Conditions. At night or when visibility is poor, a platoon must be able to function the same as during day. It must be able to control, navigate, maintain security, and move at night or during limited visibility.
(a) Control. When visibility is poor, the following methods aid in control:
- The platoon uses vehicle night vision devices when mounted and selected personnel use night vision devices when dismounted.
- Leaders move closer to the front.
- The platoon reduces speed.
- The platoon uses small strips of luminous tape or chemical light on the rear of vehicles or helmets to ensure the vehicle or soldier behind them can maintain visual contact.
- Leaders reduce the interval between vehicles, soldiers, and squads to make sure they can see each other.
- During dismounted movement, leaders conduct head counts at regular intervals and after each halt to ensure personnel accountability.
(b) Navigation. To assist in navigation during limited visibility, leaders use:
- Terrain association (general direction of travel coupled with recognition of prominent map and ground features).
- Dead reckoning (compass direction and specific distances or legs). At the end of each leg, leaders should verify their location.
- Resection.
- Movement routes that parallel identifiable terrain features.
- Guides to marked routes.
- GSRs to vector platoons to the proper location.
- Position-location devices.
- Thermal sights.
(c) Security. For stealth and security in night moves, squads and platoons:
- Use radio-listening silence.
- Use terrain to avoid detection by enemy surveillance or night vision devices.
- Make frequent listening halts during dismounted movement.
- Mask the sounds of movement with artillery fires.
c. Individual Movement Techniques. Individual movement techniques include the high and low crawl and short rushes (three to five seconds) from one covered position to another. (See FM 21-75.)
d. Other Movement Situations. The platoon can use other formations for movement.
(1) Movement with Armored Vehicles. For a detailed discussion of BFV and tank operations, see Part I.
(2) Movement by Water. Platoons avoid crossing water obstacles when possible. Leaders should identify weak or non swimmers when crossing water in BFV and pair them with a good swimmer in their crew/squad.
3. Actions at Danger Areas. The infantry platoon normally moves mounted to take full advantage of the firepower, speed, and protection of the BFV. When moving through forested areas, towns, or where there is a possibility of an ambush, the platoon leads with the dismounted infantry to protect against enemy short-range ATGM. Defiles, bends in roads, or river crossing sites are likely enemy locations.
a. Rifle squads or engineers when available are deployed to breach obstacles, to find a route around impassable terrain, and to provide security. Because the BFV is vulnerable to short-range ATGM, suspected vehicle ambush areas must be treated with caution. If available, fire from tank main guns can be used to force through hastily constructed obstacles, after the obstacle area has been secured by infantry. This technique keeps the momentum up and does not require that the force wait for engineers to be brought forward.
b. One of the major tasks of the lead element is protection of the company or company team from surprise attack. The lead platoon must clear each possible ambush site unless instructed otherwise.
c. When a danger area is encountered that makes an enemy ambush possible, the company team commander makes the determination as to how much risk he will take. If speed is critical, he may choose to take a greater risk and not dismount, or he may choose to stay mounted but move forward only a small element. If he has reason to believe that an ambush is likely, then he will probably dismount the infantry. He may also reconnoiter by fire into the likely enemy position.
DANGER
|
d. In each situation where dismounted infantry lead BFV's and tanks, the company team commander decides whether tanks or BFVs move directly behind the dismount element. Tanks are normally preferred, because their large main guns and machine guns can deliver immediate, devastating fire, and they have much better armor protection than the BFVs. Regardless of whether tanks or BFVs are the overwatch force, they must be ready, once contact is made, to suppress enemy weapons that endanger the dismounted infantry.
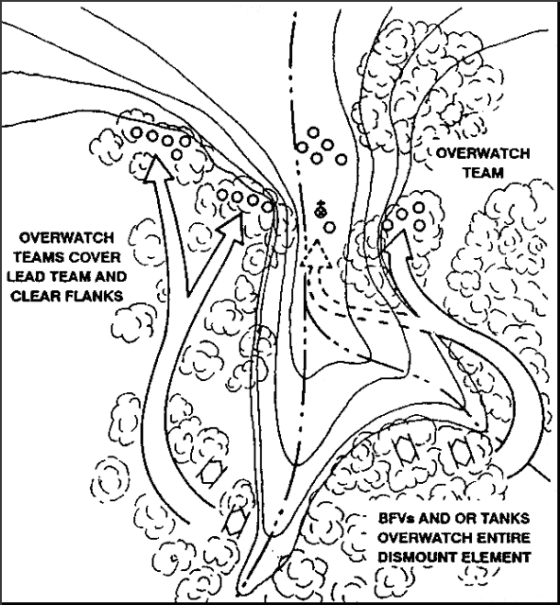
e. A defile is a narrow passage that constricts the movement of soldiers. It is an ideal ambush site. If a defile is encountered that forces the company team to move in single vehicle file for a significant distance, the commander might choose to lead with dismount infantry (Figure 2-40). Common defiles for mechanized platoons are roads or trails across streams or through swamps and heavy forests. When clearing a defile, the dismount element clears each side far enough from the choke point to make sure that there are no ambushes. It also checks the surface for evidence of mines. Because contact should be expected at defiles, the leading squad should use bounding overwatch.
Figure 2-40. Clearing a Defile.
f. If a platoon is given the task of clearing a road as part of a movement to contact, it must use caution. The enemy often employs antiarmor weapons on a bend in the road so that he can ambush lead vehicles without trailing vehicles overwatching. A bend in the road and its shoulder may also be mined; therefore, squads must carefully check bends in roads.
g. A bridge must be considered an obstacle or possible ambush site and approached as such. It must be cleared before it is crossed.
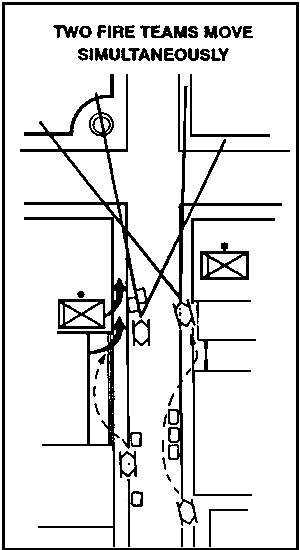
h. Infantrymen normally dismount to lead through urban areas (Figure 2-41). Vehicle movement through a village or town is generally limited to streets and infantrymen must clear buildings along the way. The infantrymen move down a street with squads staggered along the street sides. The infantrymen move along side the buildings, clearing each building as they advance. As it moves, each platoon makes sure there are no enemy positions left in the buildings on its side of the street. Each team looks for enemy in the upper floors of the buildings on the other side of the street. Tanks or BFVs provide overwatch. A single platoon should be responsible for clearing a single street to enhance command and control.
Figure 2-41. Dismount Element Leading.
GO TO:
Lesson 2 Part D
Table of Contents


