

|
RDL Homepage |
Table of Contents |
Document Information |
Download Instructions |
LESSON 1
ROW MINEFIELD
| Critical Tasks: | 051-192-2026 |
| 051-192-3029 | |
| 051-192-3030 | |
| 051-192-3031 |
OVERVIEW
LESSON DESCRIPTION:
This lesson discusses the responsibilities and procedures of minefield siting, marking, laying, and recording parties. It provides basic information on the responsibilities and actions of minefield parties and the materials used by these parties. It discusses the steps required for each party to complete the emplacement of a row minefield.
TERMINAL LEARNING OBJECTIVE:
| ACTION: | You will learn to identify the requirements, responsibilities, and procedures used to direct minefield siting, marking, laying, and recording parties in the emplacement of a row minefield. |
| CONDITION: | You will be given the material contained in this lesson. |
| STANDARD: | You will correctly answer all practice-exercise questions at the end of this lesson. |
| REFERENCE: | The material contained in this lesson was derived from FM 20-32. |
INTRODUCTION
Minefields must be marked to prevent fratricide. Marking ensures that friendly soldiers do not accidentally enter a minefield. All obstacles must be integrated into the maneuver force's fire plan and, therefore, must be sited; minefields are no exception.
PART A - DIRECTING A SITING PARTY
1-1. General. The siting party consists of a noncommissioned officer in charge (NCOIC) and one or two soldiers with a vehicle to carry material. If a vehicle is not available, the party should consist of three soldiers. There are two phases to siting a minefield. The first phase is the siting of the individual minefield or the whole obstacle group. The same siting party should site all minefields within a certain obstacle group to ensure that the obstacle group has the intended effect. This combined arms effort is discussed extensively in FM 20-32. The second phase is the actual siting of each minefield, which is done when the platoon completes the group siting and starts individual minefield emplacement.
1-2. Siting Procedures.
a. Because siting is usually done in daylight, personnel take appropriate physical-security measures and set out all control markers well ahead of the actual laying.
b. The NCOIC obtains the minefield sketch from the officer in charge (OIC) and identifies the following:
- The location of the starting, ending, and turning points for the irregular outer edge (IOE) baseline and each row.
- The location and number of safety lanes or gaps.
d. The NCOIC will start the siting at an identified Landmark 1 and site the left (or right) boundary fence and the start row markers as A1, B1, C1, and so on (Figure 1-1). Rows should be no closer than 15 meters if they contain antipersonnel (AP) mines, or 8 meters if they contain only antitank (AT) mines. The siting party measures distances and takes azimuths to use in preparing the recording form. If the tactical situation permits and the marking party is ready, fence construction may begin.
e. If the minefield is to have an IOE row, the siting-and-recording party proceeds across the IOE and establishes I1, I1E, I2, I2E, and so on, until reaching the end (discussed in Part C). FM 20-32 discusses this process is detail.
f. Siting personnel proceed down the right (or left) boundary to start row marker A1. Proceeding from A1 to A2, they place intermediate markers as required. When the siting party reaches A2, they install the end row marker. This procedure is repeated from B1 to B2, C1 to C2, and so on until they install all of the required control measures.
g. The siting party establishes Landmark 2 and the left (or right) rear fence location. The siting party sites a mine dump near the minefield.
h. When siting is complete, the siting party NCOIC transfers the information to the recording party NCOIC. The siting party then augments other parties as directed.
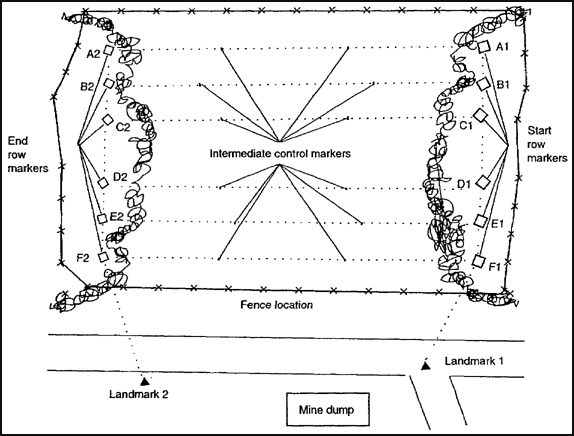
Figure 1-1. Site layout
PART B - DIRECTING A MARKING PARTY
1-4. Marking Materials. The materials used to mark minefields are in the number 2 marking set. A fully assembled set consists of a fence with one or two strands of barbwire fastened between posts, with signs indicating that mines are present (Figure 1-2). Chemical lights are included to use for warning at night.

Figure 1-2. Minefield marking
1-5. Marking Techniques. The commander may decide to mark individual minefields or to mark the group as a whole obstacle group (Figure 1-3). Depending on the minefield's size and location, either technique may have the advantage of using fewer resources or labor. Normally, marking individual minefields in a fix-obstacle group requires fewer resources than marking the group in its entirety. The opposite is usually true for disrupt-, turn-, and block-obstacle groups. The commander does not base the decision to mark individual minefields or the whole obstacle group solely on logistical considerations. He considers the amount of tactical or sustainment movement required in and around the obstacle group as well as the capability of the unit's C2 forces.
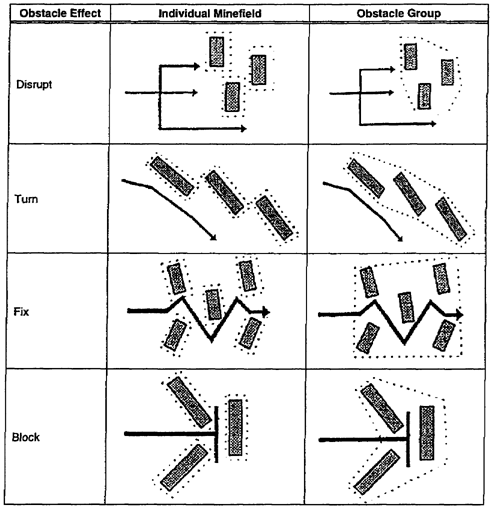
Figure 1-3. Marking of individual minefields and obstacle groups
1-6. Marking Procedures.
b. The marking party constructs the perimeter fence as described in the following steps.
Step 1. The NCOIC assigns the duties for marking the minefield. Personnel are required to install the pickets and the barbwire or concertina and to place warning signs and lights.
Step 2. The NCOIC obtains the following information from the OIC:
- The location of the rear starting point.
- A sketch (if available) showing the approximate location of the boundary fence.
- Instruction on whether to use any existing fences.
- Instruction on whether the minefield's front boundary (enemy side) is to be marked.
- The number, width, and location of safe lanes or gaps.
- The type of illumination.
- The type of marking set to use.
- Any other pertinent information.
Step 3. If the rear starting point is on the right, the NCOIC directs the marking party to install pickets counterclockwise. If the rear starting point is on the left, the NCOIC directs the marking party to install pickets clockwise. They install the pickets in a manner that will not disclose the minefield's outline and at least 15 meters away from any mine.
Step 4. If laying the minefield from right to left, the NCOIC directs the marking party to install a picket at a point that is at least 15 meters to the right of the rear row marker. If laying the minefield from left to right, the NCOIC directs the marking party to install a picket at a point that is at least 15 meters to the left of the rear row marker.
Step 5. The marking party continues installing pickets 15 meters apart until the entire boundary line is completed.
Step 7. The marking party hangs standard warning signs (triangular in shape and 20 x 28 centimeters) on the upper strand of wire. The signs should be spaced about 10 to 50 meters apart and face away from the minefield. The regular mine sign has a red background with the word MINES printed in white letters.
PART C - DIRECTING A LAYING PARTY
1-7. General. The laying party consists of an NCOIC, four soldiers, and a vehicle to carry mines. Soldiers normally lay row minefields from a vehicle to speed up emplacement. They use any tactical or wheeled vehicle for mine laying but consider the vulnerability, capacity, and trafficability when selecting a vehicle. Before preparing a vehicle for mine laying and emplacing the mines, drive the vehicle in a random pattern across the minefield. The random pattern deceives the enemy by masking the actual laying pattern. Personnel load enough mines so that each vehicle can complete an entire row or rows before reloading, but they do not stack fused mines more than two-high.
1-8. Laying Procedures. The OIC directs and controls the overall emplacement drill. Normally, several rows are laid at once. Drill procedures are as follows:
a. Vehicles arrive on site and proceed down the right (or left) boundary of the minefield to their assigned row. The OIC details a separate party to install the IOE baseline or tasks the laying party emplacing Row A. If an IOE is required, the laying party locates the baseline at least 15 meters from Row A on the enemy side. At the start row marker, the laying vehicles move into position and prepare to lay mines (Figure 1-4).
b. The NCOIC for Row A tells Vehicle 1 to start laying mines. Vehicle 1 lays mines on the ground at the required spacing, along the control markers previously positioned by the siting party.
c. As mines are laid, the arming party moves behind the vehicle and arms the mines. Laying party personnel remove the temporary control measures installed by the siting party.
d. When Vehicle 1 moves a safe distance (about 25 meters) down Row A, Vehicle 2 begins to lay mines in Row B.
e. When Vehicle 2 moves a safe distance down Row B, Vehicle 3 begins to lay mines in Row C.
f. As Vehicles 1 and 2 finish their assigned rows, they move past the end row marker and execute a left (or right) turn and wait for Vehicle 3 to complete its row. All vehicles move in column down the left (or right) boundary to the mine dump to load the next row's mines and then move to their next assigned row.
g. The laying party repeats the laying and arming process (Figure 1-5). After Vehicles 1 and 2 have completed their second row, they execute a left (or right) turn and wait for Vehicle 3 to finish its row.
h. All vehicles exit the minefield down the right (or left) boundary and out the rear.
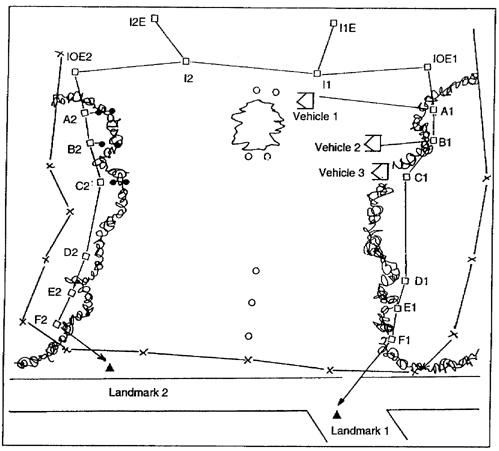
Figure 1-4. Laying Rows A, B, and C and the IOE baseline
1-9. Laying Techniques.
a. The NCOIC controls the movement of each laying vehicle, directs each vehicle to start and stop laying, and controls immediate-action drills. The NCOIC initiates a strip feeder report with the platoon sergeant (PSG) or the mine-dump NCOIC to ensure accurate accountability of mines and installed devices. After completing the row, the NCOIC transfers the strip feeder report to the PSG, the recording party NCOIC, or the mine-dump NCOIC.
b. The laying party NCOIC task-organizes his party into carrier, sapper, and digging teams. The NCOIC directs the laying party to conduct the following drill:
(1) The carrier team moves the vehicle to the row start point and lowers the armored personnel carrier (APC) ramp until it is horizontal or opens the rear door. (If using the APC ramp to distribute mines, chain the ramp open so it will support the soldier's weight.)
(2) The sapper team ties a rope to the end of the lowered ramp or tow pintle and ties a partially filled sandbag on the other end of the rope. The rope length from the end of the ramp door to the sandbag is the correct spacing between mines (Figure 1-6). The laying party NCOIC positions the team members. Soldier 1 is at the rear of the compartment, Soldier 2 sits on the edge of the APC ramp or the open door, and Soldier 3 walks behind the APC.

Figure 1-5. Laying Rows D, E, and F
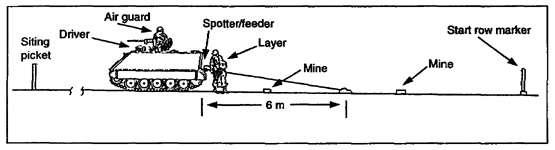
Figure 1-6. Measuring distances between mines with sandbags
(3) The carrier team moves the APC at low speed (2 to 3 miles per hour [MPH]) in a straight line toward the end row marker.
- Soldier 1 (sapper team) fuses and passes a mine to Soldier 2. Soldier 2 records all issued mines on a strip feeder report.
- Soldier 2 (sapper team) places the fused mine on the ground when the sandbag tied to the rope is even with the previously laid mine.
- The digging team follows the sapper team on the friendly side of the row and digs in the mines (the mines are left exposed for the arming party) if mines are to be buried.
- Soldiers repeat the above steps until reaching the end of the row.
- Soldier 3 (arming party) walks behind the digging team and arms and camouflages all mines in the row.
- The laying party NCOIC walks behind the vehicle and supervises the mine laying.
- Soldier 4 (sapper team) buries the pins, clips, and shipping plugs 30 centimeters to the rear of each start row marker after the mine row is armed and camouflaged.
(5) After completing the row, the laying party moves to the next assigned row when directed by the OIC.
PART D - DIRECTING A RECORDING PARTY
1-10. General. The recording party consists of an NCOIC and one soldier. All minefields (except hasty protective row minefields) are recorded on Department of the Army (DA) Form 1355. Figures 1-7, 1-8, and 1-9 show samples of a completed DA Form 1355. The laying unit prepares the standard minefield record form. The OIC signs and forwards the form to the next higher command as soon as possible. After entering the information on the form, the form is classified as SECRET; North Atlantic Treaty Organization (NATO) SECRET; or SECRET-Republic of Korea, United States (ROKUS) depending on which countries are involved. The number of copies prepared depends on the minefield type and the unit's procedures. Unit standard operating procedures (SOPs) should provide advanced guidance on how to distribute minefield information to higher, lower, and adjacent commands. The OIC circulates minefield records only on a need-to-know basis. When a record is made, reproduce it at the lowest level having the equipment to make the copies. When used for training, the recorder marks the record SAMPLE. The recorder uses two or more DA Forms 1355 to record large minefields. When changes are made to an existing minefield, he prepares a new DA Form 1355 and marks this record REVISED. It shows the minefield as it is after the changes. The original minefield number remains unchanged.
Figure 1-7. Sample DA Form 1355 (front side) for a standard-pattern minefield
Figure 1-8. Sample DA Form 1355 (inside) for a standard-pattern minefield
Figure 1-9. Sample DA Form 1355 (back side) for a standard-pattern minefield
1-11. Recording Process.
a. The recording party's primary duty is to complete DA Form 1355. This form consists of a single sheet printed on both sides. One side contains information about the minefield and the other side is a graph consisting of 1-centimeter squares for a scaled sketch of the field. The scale for plotting minefields depends on the minefield's size. To avoid using two sheets for the sketch, the recorder adjusts the scale so that one form will support the sketch. FM 20-32 provides instructions for completing a DA Form 1355.
b. The NCOIC obtains the following information from the siting, marking, and laying parties:
- The types of stakes used as boundaries and the minefield's layout from the siting party's NCOIC.
- The measurements and azimuth readings from the siting party. At a minimum, the location of the following items must be provided:
— First landmark to right (or left) rear boundary stake.
— Intermediate markers, if used.
— Right (or left) boundary toward enemy.
— IOE short rows and IOE row.
— Each row's centerline, starting from the one nearest the enemy side.
— Right (or left) rear boundary stake.
- The location of the following from the marking party's NCOIC:
— Boundary fence or markers.
— Marking signs.
— Safety lanes or gaps.
- The strip feeder reports from the laying party's NCOIC.
c. The NCOIC verifies that the measurements taken are accurate and recorded in meters. The NCOIC transfers the information obtained from the other parties to a DA Form 1355 according to the instructions given in FM 20-32.
d. The OIC or the NCOIC draws a sketch on the DA Form 1355 showing the following:
- The basic pattern of the minefield (to scale).
- Safety lanes or gaps.
- Arrows indicating the direction the azimuths are plotted.
- The location of the boundary fence and any important landmarks (roads or rivers).
GO TO: