

SECTION
VI
LIVING IN THE WINTER
To fight and win in the winter, soldiers must first learn to live and function in the harsh, cold weather environment. This includes the daily requirements of eating, drinking, camping, sleeping, and taking care of personal hygiene.
NUTRITION 1
The greater portion of what we eat and drink maintains our body heat, while only a small proportion is used to produce energy for physical work. A larger intake of calories is needed in a cold climate than in temperate zones. A soldier needs approximately 4,500 calories per day to perform hard work in the cold; otherwise, efficiency is likely to fall off rapidly. 2
The body loses liquid at an exceptional rate in arctic conditions. Regardless of how carefully one adjusts cold weather clothing, the heavy exertion of energy required to move on foot through the snow and to prepare bivouacs and defenses exacts a significant toll on the soldier in the form of moisture loss through sweating and breathing. 3Thus, eating and drinking are primary considerations in sustaining the soldier's will and capacity to fight and win in the winter.
Rations 4
In cold weather operations, soldiers may be fed any of three different types of combat rations: arctic ration, Meal, Ready-to-Eat (MRE), and the Long-Range Patrol Ration (LRPR).
- Arctic Rations. These rations have been developed to provide the 4,500 calories needed daily to effectively sustain a soldier living and fighting in the cold. They also have the correct proportion of carbohydrates, fat, and protein to sustain health -- if the soldier consumes all of his ration at each meal. Meals should be properly spaced to sustain performance. Lethargy induced by the cold, combined with the difficulty and inconvenience of cooking, may sometimes tempt soldiers to skip or skimp on meals. In cold weather, the principles of sound leadership and discipline require that meals be prepared regularly, and that the entire ration be eaten. Arctic rations, which have been described as being similar to civilian "junk food," provide snacks which can be eaten throughout the day.
- MREs. These rations provide 1,223 calories per meal. However, they do contain liquids which may freeze in cold weather. Soldiers should carry the individual, liquid-containing food items in their shirt pockets inside their field jackets or ECWCS parkas.
- LRPRs. These rations provide 1,131 calories per meal. They are lightweight, nourishing rations that can be easily prepared in hot water. Leaders must ensure that soldiers are on a four-meals-a-day regimen to gain the necessary calorie intake for living and fighting in the winter. (This ration is to be replaced by the Food Packet, Assault, containing 1,530 calories.)
Liquids 5
Soldiers operating in a cold environment lose between 3.5 and 5 quarts of fluids per day, depending on their level of exertion. This loss must be replaced each day to keep the body functioning properly and to help ward off cold injuries. Several points should be kept in mind:
- Leaders should insist that as much of the daily liquid as possible be taken as hot, noncaffeine drinks. When practical, begin main meals with soup. Between-meal snacks should be based on a hot drink with plenty of sugar.
- Potable water may be delivered to soldiers by way of unit distribution from a direct support supply unit. This is the preferred method because the water is already safe to drink. Also, some units, especially light infantry, may not have the necessary means with which to go to a water point, draw the water, and transport it back to the unit area.
- If unit distribution of potable water is impossible and supply point distribution is impractical, water may be readily available from streams, lakes, snow, or ice. However, water obtained directly from these natural sources, or other sources in which potability cannot be verified, must be purified before being provided to soldiers for consumption.
- Water from streams or lakes is more readily made potable than snow or ice, which must be melted. Fuel to melt snow and ice may be a limiting factor. Allow milky, glacial water to stand until the coarser sediment settles. Pour the clearer water off the sediment and purify it.
- If a hole is cut through ice to get water, cover it by a snow block, a board, or a poncho covered with snow to prevent refreezing. In very cold weather, break the hole open frequently. Clearly mark water holes so that they can be easily found again.
- If no free water is available and snow or ice is the only source for obtaining water, it must be melted and purified. Ice produces more water in less time than snow. When melting snow, place a small amount into the cooking pot, initially. When this snow has melted, add more to the pot. Continue this process until enough water is produced. Whatever the source of water, purify it by boiling rapidly for three to five minutes or by using water purification tablets.
- Always have a stove and fuel available to make "emergency water" in the event the primary source dries up or freezes.
Nutrition Tips for Leaders 6
- Ensure your soldiers eat all their rations.
- Allow time for hot meals, which are more satisfying than cold rations.
- Encourage soldiers to save some snacks (cookies, candy) for between meals and when on the march.
- Train your soldiers to drink plenty of hot liquids, especially noncaffeine liquids, such as soups, to prevent dehydration.
- Ensure stoves are filled each night, and that enough water has been prepared for breakfast.
- Use all available stoves when heating water since this is the most time-consuming operation. Melting and purifying sufficient snow or ice for beverages may take 45-60 minutes. Moreover, anytime the stove is operating, continue melting snow/ice.
- When operating the Yukon stove, always use a cooking pot to melt ice or snow. Keep canteens and water cans full from this reservoir. Do not use containers that have been used to store petroleum products, containers that are painted on the inside, or tightly closed containers. These containers can cause illness if used to melt snow or ice for drinking.
- Designate areas from which ice or snow will be taken for water production well away from, and upwind of, latrine and garbage disposal sites.
- Keep a plastic trash bag filled with snow handy to minimize the trips to gather snow/ice.
- Discourage your soldiers from eating snow or ice; it may reduce body temperature and can result in painful cracking of lips, making them vulnerable to infection.
- Train soldiers to refill their canteens regularly, and to carry one canteen close to the body.
- Plan so that your soldiers never have to stand around in the cold. If it is unavoidable, plan to provide hot drinks and snacks, if possible. Use the buddy system to check on the condition of the soldiers. Circulate among the troops to check for early stages of cold injury.
- Prohibit consumption of alcoholic beverages. The perceived warming effects of alcoholic beverages are illusory and are brought about by a quick release of internal body heat through increased circulation of the blood to the surface of the skin. This temporary feeling of warmth is soon lost, leaving the soldier much colder than before. It also promotes dehydration.
PERSONAL HYGIENE 7
Personal hygiene is difficult, at best, in cold weather operations. Water is precious, especially that produced from snow or ice. It should be produced and purified for consumption.
The following techniques and procedures can be used to maintain minimal personal hygiene in the field, especially if laundry and bath support is not readily available.
- Shave, if necessary, at night in the shelter so that facial oils stripped during shaving will be replenished overnight before the face is again exposed to the elements.
- Brush teeth daily. If a toothbrush is not available, chew the end of a twig into a make-shift brush. If a twig is not available, salt on a fingertip can suffice if applied gently.
- Change underwear as frequently as practical, at least twice weekly. Change socks as often as needed to keep the feet dry. Use foot powder as a dry rub to clean the feet.
Foot Care 8
- Toenails. Trim toenails straight across at approximately a 90-degree angle with the edges of the nails. This relieves pressure at the edges of the nails, permitting the nail to arch in the middle, so that the corners won't cut/dig into the skin below.
- Foot Powder. Use foot powder to dry feet. Apply powder on feet and between toes. Remove excess. Do not put foot powder in socks; extra powder may cake and hasten the onset of blisters.
- Blisters. Blisters can become a problem unless they are treated at first sign of irritation, before a blister actually forms. Tape over a developing hot spot; the bandage should be sufficiently large that the tape touches only nonirritated skin. Once a blister has formed, apply a doughnut-type bandage to relieve pressure on the blister. Again, the doughnut and bandage should be large enough to encircle the blister and avoid further irritation of the blistered area. Use tincture of benzoin to help the tape adhere to the skin; it also helps toughen the skin. Never lance or drain blisters unless they are surrounded by redness or they are oozing purulent material indicating infection. If this is the case, drain the blister, clean it with soap and water, and cover with a clean, dry dressing until it can be assessed by medical personnel.
BIVOUAC SITES 9
Tactical bivouacs (other than those established as long term or relatively permanent bases) are designed to provide temporary living accommodations within a defended position. The tactical bivouac, seldom occupied for more than one night, is normally established after last light of day, and requires minimum preparation. It is organized for a rapid and disciplined response to enemy action. A defended position is likely to be occupied for longer than a tactical bivouac and should be organized accordingly.
The layout and placement of tents or shelters must be carefully coordinated with the defense. Planning considerations are:
- All-around defense.
- Mutual support.
- Concealment
Selecting a Tactical Bivouac 10
Forested Areas. Forests provide excellent sites; camouflage is usually natural, and building materials, firewood, and wood for insulation are readily available. Pine and spruce grow on well-drained soil. Forested areas are the most desirable locations for campsites.
Marshy Ground. Frozen swampy areas are acceptable sites, as are lake shores and the banks of rivers -- if the site selected is well above flood level.
Open Country. If possible, avoid open country. It is exposed to strong winds and drifting snow, and also provides poor concealment. If open country cannot be avoided, seek natural shelters offered by depressions or situate the bivouac behind pressure ridges of ice on lakes and glaciers. If no natural windbreaks exist, dig shelters deep into the snow, and use snow blocks to construct windbreaks. Masking infrared signature must also be considered.
Mountainous Areas. Normally, these are open areas, especially above the tree line, and offer little shelter. In mountains, it is difficult to find an area large enough for a company. Usually, platoons set up near a central point; however, they still need to establish their own 360-degree defense. During high winds, pockets of comparatively still air occur in the shelter of a leeward slop; such locations should be sought. Deep valleys should be avoided as cold air gathers in such places. Avalanches can occur on steep slopes, and their likely paths must be avoided. To assess the avalanche threat, look for these signs:
- Heavy snow overlaying a crust of ice (generally the result of a freeze after a thaw).
- Steep slopes with significant snow load. Avoid likely avalanche runout zones.
- Evidence of avalanches in previous years. This may be a swath cut through the trees (branches stripped off, and broken tree stumps of varying height), or a smooth clear strip of ground running down the mountain.
Assessing the Tactical Bivouac 11
In addition to the geographic and environmental factors, consider the following tactical factors when selecting the location of the encampment.
- Proximity of the enemy.
- Likelihood of enemy patrols.
- Air threat.
- Defensibility of the encampment.
- Dominating features from which an attack could develop.
- Wind direction -- which carries sounds of movement. Situate the bivouac downwind of likely enemy approach routes, particularly when wind speeds are low.
- Escape routes if a hurried move is required.
- Availability of camouflage materials.
- In good weather or bright moonlight, situate the bivouac in an area of deep shadow such as in a wooded area or on the northern slope of a ridge.
Bivouac Site Reconnaissance 12
The reconnaissance party precedes the main body of the force to lay out the bivouac site and receive and situate the troops as they arrive. Consider the following points.
- Site the bivouac -- and a dummy site, if necessary.
- Establish track plans before anyone enters the camp. Normally, the incoming track will be extended well beyond the area of the actual campsite and may lead to a dummy position. Establish a camp track off the incoming track (preferably at an acute angle) leading into the main campsite. This track becomes primary camp track, the "main street." Establish secondary tracks leading off the main street into unit areas. Site tent groups in the unit areas, which are usually connected by a simple spoke-wheel plan.
- Select defensive sectors.
- Mark tent sites.
- Select areas for cutting brushwood.
- Members of the reconnaissance party guide main-body elements to their planned locations.
- The reconnaissance party also provides site security until arrival of the main body.
Occupying a Tactical Bivouac 13
Arrange a rendezvous whereby guides from the reconnaissance party meet the main body of troops and explain the layout of the camp and the track plan. The guides then lead the elements of the main body into their respective positions. Once in position, the commander confirms the decisions made by the reconnaissance party. Important considerations include:
- Breaking or marking the trails to be used in the camp area.
- Designating a temporary location for stacking weapons and equipment to prevent losing them in the snow while units fall in on their designated sites within the camp.
- Determining the types of field defenses to be constructed and siting them.
- Designating areas for obtaining construction materials, collecting snow and ice for water, positioning latrines, and disposing garbage.
- If tents are not used, deciding the type of improvised shelters to be constructed.
- Preparing hot meals and drinks. The first priority is preparing defenses. The timing of any meal or snack should be determined by the progress made in establishing the encampment, and the need for shelter due to weather conditions.
Protecting a Tactical Bivouac 14
A tactical bivouac must be protected by a system of listening posts, sentries, and warning devices appropriate to the proximity of the enemy based on the length of time the bivouac site is occupied and the tactical situation. A bivouac that is an integral part of a defensive position will normally get its protection as part of the overall defense plan. Other considerations are:
-
Protect tactical bivouacs by establishing listening posts and warning devices
that can be quickly positioned.
- Establish listening posts on likely enemy avenues of approach.
- Emplace trip wires and night observation devices to deceive the enemy while providing early warning.
- Approach all listening posts, observation posts, and devices outside the perimeter from the flank so enemy patrols are not led to the bivouac site.
- If a bivouac is close to the enemy or vulnerable to attack, troops not on duty should rest in their sleeping bags (with the zipper open), and be fully clothed with boots on.
- Minimize lighting in tents to preserve night vision and reduce unit signature.
- Devise an alarm system that will alert each tent commander. When the alarm is given, the occupants of a tent prepare to move, but no one moves until all are ready. Extinguish the light before the tent is vacated.
Establishing Garbage Pits 15
- Whenever possible, dispose of all garbage in pits; burn or bury it prior to departure. There should be a pit for each platoon.
- Patrols should never leave behind any evidence of their presence in an area; all waste should be carried until it can be disposed of properly to avoid giving away potential intelligence to the enemy about patrol or campsite locations or activities.
- During training, bag all trash and garbage and haul it to the rear for disposal.
Establishing Latrines 16
- Normally, a central latrine should be established if dispersion within the camp is not too great. One latrine will usually serve the needs of three to four shelters or a unit of platoon size. Chemical toilets are the preferred latrine devices. An alternate facility for training exercises is the burn-out latrine. (Federal, state, local, and many host-nation laws prohibit construction of pit/straddle, trench/cross-tree latrines.)
- The latrine must be placed downwind of the campsite, but not so far from the shelters that the placement encourages individuals to break sanitary discipline. It should be wind-proofed by branches, snow blocks, ponchos, or other available materials, and should be camouflaged.
- For training, an empty MRE box, lined with a trash bag, can suffice. Full bags can be sealed, left in the box, and then hauled to the rear.
Duties of the Tent Group Leader 17
The tent group leader should ensure that:
- Water is produced continuously.
- Sleeping space is properly allocated.
- Equipment is conveniently placed outside the tent -- with weapons and stores on one side of the door and fuel to the other side, marked to avoid loss in the snow.
- Track, camouflage, and blackout/light disciplines are maintained.
- Housekeeping duties are performed on a roster basis.
- Guards and sentries know where their reliefs are sleeping.
- Tent is de-iced and drifted snow is moved away so the tent does not sag or collapse.
- Fire precautions are observed.
- Stoves and lamps are filled outside the tent.
- Stove, lamps, and equipment are regularly maintained.
- Snow is brushed off clothing and equipment before entering the shelter.
- Soldiers dry their clothes at every opportunity.
- All rations are consumed or any remaining portions are saved for snacks, and each soldier receives and eats the proper amount of food each day.
- Cooking utensils are cleaned after each meal.
- The highest standards of personal hygiene and sanitation are maintained.
Sentries 18
In very cold conditions, sentries can remain alert only for very short periods; they cannot look into the wind for long and, in spite of frequent reliefs, can hear and see little after extended exposure to the elements. Leaders must use their judgment on how long a soldier can perform duty out in the cold. The time will vary with the temperature, degree of windchill, and visibility. The following suggestions may apply in some circumstances.
- A number of combined living and fighting positions might be established on likely enemy approaches to situate small, standing patrols, with a warning system to give notice to those in the main position of enemy approach.
- One complete sub-unit might be used to provide all sentries, allowing the remainder of the force an extended period of time out of the cold for rest and warmth.
- Doubling all guards so that one soldier is on guard and one is serving as fire guard in a shelter. Their positions can then be changed every 30 minutes or so, with the fire guard going out to relieve the sentry on the post. Both soldiers should be relieved at staggered intervals.
Heating at Night 19
- Heating shelters at night requires that a soldier in each shelter be on duty as fire guard at all times when someone is sleeping in the tent.
- A fire guard can make use of the time by cleaning his weapon and equipment, washing and shaving, and preparing hot drinks for the sentries outside.
- The advantage of heating is that soldiers will lose less body heat and conserve more energy when asleep. Their performance during the day will be correspondingly better.
- Train soldiers to dry wet clothing in a heated shelter. They should not wear wet clothing when going to sleep in their sleeping bags in an effort to dry them.
- In a heated shelter, troops are more prepared to meet an enemy threat as they need not be in their sleeping bags, but can sleep fully clothed on top of them.
| TENT
FIRES:
20 Fire can engulf a tent in less than 10 seconds and destroy it in one minute, giving soldiers very little time to react and save fellow soldiers. One fire guard was refueling a commercial kerosene radiant space heater while it was running. The soldier overfilled the gas tank and the fuel exploded. The soldier was injured by burning fuel; the tent was destroyed. More than 80 percent of tent fires are caused by human errors. The most common error is leaving a hot stove unattended. In one incident, a soldier left the stove burning after getting warm. All was well when he left the tent. When another soldier entered the tent to get some reports, he saw flames around the bottom of the stove. The tent burned to the ground in less than two minutes. In another incident, soldiers created a dangerous situation just trying to keep warm; they piled grass and pine needles on the floor for insulation. Using combustible insulating materials in tents with stoves is extremely hazardous; stoves in tents with wood floors must be in sandboxes. Soldiers should never attempt to light a burner while the burner and heater are warm. Never substitute MOGAS for the appropriate fuel. (The Yukon stove uses MOGAS.) One soldier poured fuel from an unmarked can into a paper cup to refuel a burning kerosene heater inside the tent he shared with four other soldiers. Unfortunately, the unmarked can contained MOGAS. Vapors from the MOGAS filled the tent and were ignited by a lit propane lantern hanging above the heater. Fortunately, all five soldiers exited without injury, but the tent and all the soldiers' gear were destroyed. A faulty carburetor caused one tent fire; a severed fitting on the heater head caused another. Adequate inspections and maintenance will usually catch such deficiencies, as well as leaking valves, holes in gas cans, and improper assembly. Every stove and all its components should be thoroughly cleaned and inspected before using or storing. Fuel should not be taken inside a tent warmed by fire. Soldiers should not drop cigarettes butts around combustible materials or go to sleep with a lantern or candle burning. If a tent fire does occur, soldiers must know and practice safe firefighting procedures. The first and most important task is to evacuate the tent. Do not open a stove while it is still hot, even after a flameup has subsided, because it allows fresh air to feed the fire and it will reignite. Soldiers should not attempt to remove hot stoves from tents. Hot surfaces can contact tent flaps and set them aflame. The first response is to save soldiers' lives; seconds count. |
| HOT
TIPS ON HEATING TENTS
21
|
 TM
10-4500-200-13 and TM 5-4540-202-12 contain complete instructions for the use
of space heaters and immersion heaters.
TM
10-4500-200-13 and TM 5-4540-202-12 contain complete instructions for the use
of space heaters and immersion heaters. Organizing the Tent 22
Tents are just large enough to provide sleeping space for the occupants, with a small area by the door for the cooking stove and for washing and changing. Order is necessary in such cramped quarters. Allocating space to soldiers is the responsibility of the tent group leader who considers the duty roster, order of reliefs, and the need to egress quickly in response to an alarm.
The amount of clothing worn when sleeping depends on the state of alert and whether the shelter is heated. If there is a fire, stove, or light burning, it is essential to have a fire guard on duty. Keep a knife or sharpened bayonet available to cut through the tent wall if a fire or other emergency occurs.
Breaking Camp 23
When the commander issues the order to strike tents in preparation to move, each tent group leader ensures that his tent is ready to be struck. All equipment except the tent must be packed onto the appropriate transport, ahkio (sled) or vehicle.
Pull tent poles as late as possible, and strike the tents in the order in which the move is to take place so that soldiers are not required to stand around in the cold unnecessarily. Every leader should know how much time his soldiers need to strike the tent and be ready to move. A well-trained tent group needs only 15 minutes -- provided the soldiers have at least 30 minutes to have everything except the tent packed and ready to move.
- It is essential that all garbage and latrine sites be closed and covered with at least two feet of earth or snow.
- Security of the campsite must not be relaxed, nor should track, camouflage, light or noise discipline be forgotten.
Striking Tents 24
- If a tent is slowly or improperly pitched, only the occupants suffer; however, if a tent group is slow in striking its tent, the more efficient groups will have to stand in the cold and wait for the slow tent group.
- Practice in the drills for breaking camp and striking tents is very important.
- Fifteen minutes before pull-pole time, clear the tent of everyone except the cook, who begins packing his equipment.
- Every soldier should have his rucksack packed and placed outside the tent so that he is ready to move.
Brushwood Bivouacs 25
Brushwood bivouacs take longer to build than erecting a tent, but they can be effectively camouflaged and more easily incorporated into a defensive layout. There are five main types. However, personal enterprise, imagination, and initiative can be applied to devise a comfortable shelter using a variety of materials to meet different tactical needs.
-
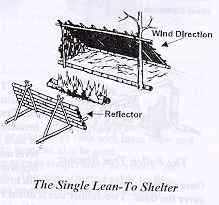
The
Single Lean-to Shelter.
26Build
this shelter with its back to the wind or it will be cold and smoke-filled
(there will be some smoke in the lean-to due to the eddying effect of any wind).
Clear the snow down to ground level, if possible, and position the main poles
so they slope with the prevailing wind. Place the top crossbar on the limbs
of two trees where they branch out from the trunk, preferably about shoulder
height. Construct the lean-to sufficiently wide to allow 24 inches of space
for each soldier, head to toe, and deep enough for the soldiers to lie down
with their packs behind their heads, protected by the sloping, overhead main
poles. This means the sloping main poles must be at least 9-10 feet in length.
Use strong timbers for the main structure. The top crossbar should be 4-6 inches
in diameter.
Complete the lean-to with the construction of a fire and a reflecting wall. Build the wall about 1.5 meters (about 4-5 feet) from the open front of the lean-to, extending the full width of it. The fire should also extend the full width so that every soldier can warm himself. It is important to build a good base for the fire if it is on snow. If available, use rounded stones from a stream bed to form a good base for the fire. Some of these stones, when heated by the fire, can be used as heat sources for exceptionally cold soldiers when placed beneath the edges of the their sleeping bags to prevent them from becoming victims of hypothermia. Football-size stones can emit heat for a couple of hours, depending on heating time and ambient temperature. Sufficient firewood should be cut to keep the fire going all night.
-
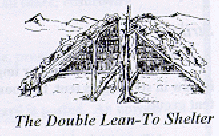
The
Double Lean-to Shelter.
27This
lean-to arrangement consists of two single lean-tos facing each other. It is
economical since only one fire is build for the two bivouacs, and no reflector
wall is needed. However, the layout is not very satisfactory in windy weather,
since the occupants of one shelter will almost certainly be troubled by smoke.
-
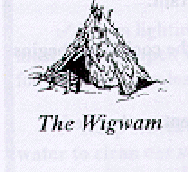
The
Wigwam.
28This
is one of the warmest and most draft-free of all the brushwood bivouacs. It
is, however, rather high, and unless it is well concealed among standing trees,
it presents a conspicuous silhouette. Large wigwams can be built to accommodate
up to ten soldiers, but one for four is most usual.
-
The
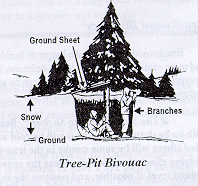
Tree-Pit Bivouac.
29Where
there is deep snow in a wooded area, a very quick bivouac can be made using
the lower branches of a tree as a roof. A shelter of this type is very easy
to conceal. It can be made for up to four soldiers. A tree-pit bivouac larger
than this is unsatisfactory as few fir trees have spreads of branches sufficiently
wide to provide cover. Two-soldier size is the most common.
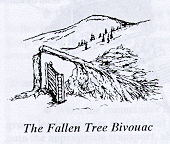
- The
Fallen-Tree Bivouac.
30This
is another quickly constructed and easily concealed bivouac. It is built using
a cut or fallen tree. If a tree has to be cut, it should have plenty of green
branches. It should be felled in the direction of the prevailing wind at such
a height that when the snow is removed down to ground level under the fallen
tree, there will be about 1-1.5 meters of headroom. Trim off the inside limbs;
use these to fill in the sides. Once sidewalls have been packed with branches,
pile up snow to prevent drafts. Use brushwood to cover the floor. Two-soldier
size is about right; larger ones are normally unsatisfactory. Build a fire
in front with a reflector wall beyond it, similar to the single lean-to bivouac.
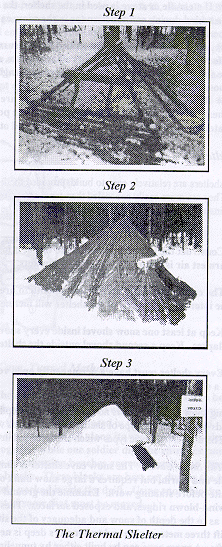
-
The
Thermal Shelter.
31The
thermal shelter was developed by the U.S. Air Force's "COOL" School which teaches
pilots and air crews how to survive in arctic-like conditions after ejection
or crash landings. The thermal shelter, designed to capture and retain heat
emitted from the earth, provides the best protection from the elements during
periods of extreme cold.
- The thermal shelter is primarily designed as a one- to two-person shelter; however, a larger shelter can be constructed to accommodate a small team or squad.
- In forested areas, a wooden framework is built, covered with a parachute, ponchos, or evergreen boughs, and covered with eight to ten inches of snow for insulation.
- In alpine regions and other barren conditions, the shelter can be constructed by piling up a large mound of snow and then digging into it. Even light powder snow will solidify enough once it is disturbed and shoveled into a mound. This variation, similar in appearance to a snow cave, is referred to as a molded-dome shelter or "Quingy Hooch."
- The key to both construction methods is to remove the snow from the ground surface, exposing the frozen soil which will then radiate thermal energy into the shelter.
- The doorway is best sealed by filling a trash bag or other large sack with loose snow and form-fitting it into the door opening. A rucksack or other bulky item can also be used.
- The shelter actually becomes more efficient as the outside temperature decreases. At -40 F outside, a temperature of +5 F has been recorded inside. This was achieved solely by the shelter's capacity to retain emitted thermal radiation; there was no additional heat provided by personnel, stoves, or candles.
- If a candle or stove is used in the shelter, the door must be cracked open or a ventilation hole must be added during construction (as in the snow cave, below). Keep a ski pole or tree limb inside and periodically check vent holes.
- In addition to the benefits gained during survival situations, the shelter can also be built to enhance forward fighting positions, surveillance posts, and other static positions away from base camps. The shelter will increase soldier comfort and lengthen the time a team can remain at perimeter positions.
- Because the conditions within the shelter are reasonably comfortable without the use of additional heat sources, thermal shelters built for static positions may provide an excellent alternative to using heated shelters when detection by infrared and other thermal devices must be avoided.
Snow Shelters 32
Snow shelters are relatively easy to build, provided there is enough snow of the proper consistency available. They are more easily concealed than tents or brushwood bivouacs. They are also very warm and easily illuminated because of their white reflective walls. The following are some important principles to consider.
- Construct the top of the entrance so that it is lower than the sleeping bench; this ensures that the warmest air is trapped around the occupants.
- The ceiling should be arched and smooth to prevent dripping. Ceilings melt back as they age, and the internal dimensions of the shelter will increase.
- Keep at least one snow shovel inside every snow shelter so that soldiers can dig themselves out if it collapses. Keep a second shovel outside the shelter.
- Every shelter must have a permanently open ventilation hole in the roof or walls; a hole made with a ski pole is quite suitable for this.
Building snow shelters follows no firm rules as the depth and condition of the snow will vary and the tactical needs may dictate the type of shelter constructed, as well as the degree of comfort that can be achieved. There are a few basic types which are described in this section.
-
The
Snow Cave.
33The
snow cave shelter is simple to build and easy to conceal. It is comfortable
and warm, but requires a large snow bank or drift. Assess the depth of snow
of a potential site before starting work. Examine the ground behind the snow
bank for protruding saplings, wind-blown ridges, and exposed surfaces. These
characteristics, if present, are often useful indicators as to the depth of
snow and adequacy of the site for a snow cave. For a two- or four-soldier cave,
a drift three meters wide and two meters deep is needed. Bigger caves require
proportionately bigger drifts. A snow cave can be built either by tunneling
or by stacking blocks of snow.
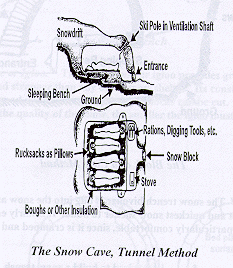
-
The
Tunnel Method.
A
tunnel is made into the snow bank or drift. Initially, there is only enough
room for one soldier to work. As progress is made, a second soldier clears
away the snow at the entrance as the first soldier excavates and enlarges the
cave. After excavating about two meters, decide the location of the sleeping
bench. If there is plenty of snow, it is best to have a sleeping bench on either
side of the tunnel, parallel to the axis of the tunnel. If the snow bank is
narrow, build the sleeping bench at a right angle to the tunnel. Use a snow
block to seal up the entrance to the tunnel; ensure that an adequate ventilation
hole is kept open.
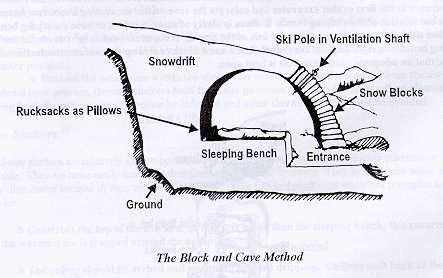
- The Block and Cave Method. If the snow is of a consistency that permits it to be cut into blocks, use the block and cave method. In the building block method of constructing a snow cave, the factors used in deciding the internal layout are the same as those used in the tunnel method. When the layout is decided, soldiers can dig straight into the snowdrift all along its width. There is plenty of room to work, and several soldiers can work together while one soldier digs the entrance tunnel to the side of the main excavation. Once the entrance and sleeping benches are completed, and the stove position is established, seal the cave with snow blocks. These blocks are best cut during the last stage of excavation as the snow is usually more densely packed inside the drift. Using snow blocks from the interior of the excavation minimizes the amount of snow that must be moved.
-
The
Tunnel Method.
A
tunnel is made into the snow bank or drift. Initially, there is only enough
room for one soldier to work. As progress is made, a second soldier clears
away the snow at the entrance as the first soldier excavates and enlarges the
cave. After excavating about two meters, decide the location of the sleeping
bench. If there is plenty of snow, it is best to have a sleeping bench on either
side of the tunnel, parallel to the axis of the tunnel. If the snow bank is
narrow, build the sleeping bench at a right angle to the tunnel. Use a snow
block to seal up the entrance to the tunnel; ensure that an adequate ventilation
hole is kept open.
- The
Snow Trench.
34The
snow trench bivouac is dug into the snow and covered to provide protection.
It is the easiest and quickest snow shelter to build. It is fairly easy to
conceal and gives good protection. It is not particularly comfortable, since
it is cramped and entry and egress can be difficult.
- At least one meter of snow is required to build a snow trench. First, mark out an area about eight feet by two feet, then dig out the trench. (Waterproof clothing is an asset when constructing the snow trench bivouac.) Lay snow spoil to one side of the trench for use on the roof later. If the ground is reached before the trench reaches shoulder height, build snow walls to gain the extra height. If two soldiers are to occupy the snow trench, widen the bottom portion to make the sleeping bench four feet wide. The top must not be too wide because bridging it to form the roof could be a problem.
- Before the roof is built, move the packs inside as it may be difficult to do so later. If possible, insulate the floor with brushwood, scrub, or moss. This should also be done before the roof is installed. Next, dig an entrance tunnel; it should be lower than the sleeping bench to retain as much warmth around the occupants as possible. The roof can be installed in a number of ways. If the available snow is reasonably compact, cut blocks and lay them across the top of the trench. Once these are in place, throw loose snow on top to seal the seams, increase the depth of overhead insulation, and enhance the camouflage. If it is not possible to use snow blocks to make the roof, cover the trench with branches or brushwood. In situations where shelter is vital for survival, use skis, ski poles, and a tent sheet to install a roof, and cover it with loose snow to hold it in place and provide camouflage.

-
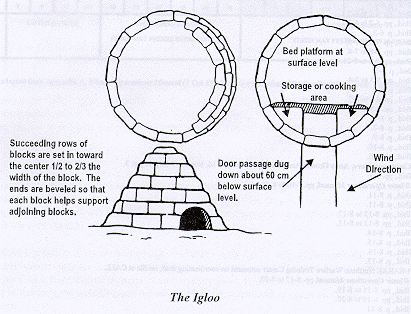
The
Snow House or Igloo.
35The
snow house or igloo provides greater protection from the weather and is warmer
and stronger than any other snow shelter. Its construction requires experience,
practice, and good quality snow from which blocks can be cut. Powdery or granular
snow is useless, and the poorer the quality of the snow, the smaller the igloo
must be. Igloos can be made for up to 10 soldiers.
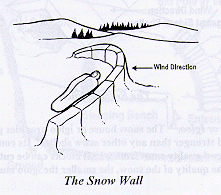
- The Snow Wall. 36If little time is available, a snow wall can provide some shelter quickly. Snow bricks are cut and laid in a semicircle with the open side away from the wind. The snow is then banked against the outer, windward side. The snow wall provides protection for cooking and sleeping against the wind and driven snow. Snow drifts will form on the leeward side.
______________________
1Winter Operations Manual (1 Oct 89), published by the U.S. Army Northern Warfare Training Center, Fort Greely, AK, pp. 6-1 to 6-4.
2Ibid., p. 6-1.
3Ibid., p. 6-1.
4Ibid., pp. 6-1 to 6-2.
5Ibid., pp. 6-2 to 6-3.
6Ibid., p. 6-3.
7Ibid., pp. 7-8 to 7-9.
8Ibid., pp. 7-8 to 7-8.
9Ibid., pp. 8-2 to 8-21.
10Ibid., p. 8-3.
11Ibid., pp. 8-3 to 8-4.
12Ibid., p. 8-4.
13Ibid., pp. 8-6 to 8-7.
14Ibid., pp. 8-5 to 8-6.
15Ibid., p. 8-7.
16Ibid., p. 8-7.
17Ibid., p. 8-9.
18Ibid., p. 8-10.
19Ibid., p. 8-10.
20Countermeasure, Army Ground-Accident Report, Volume 16, Number 9 (Sep 95), p. 3.
21Ibid., pp. 2-3.
22Winter Operations Manual, pp. 8-10 to 8-11.
23Ibid., p. 8-11.
24Ibid., p. 8-11.
25Ibid., pp. 8-12 to 8-17.
26Ibid., pp. 8-12 to 8-13.
27Ibid., p. 8-14.
28Ibid., p. 8-15.
29Ibid., p. 8-16.
30Ibid., p. 8-17.
31USARAK Northern Warfare Training Center comment on coordinating draft, on file at CALL.
32Winter Operations Manual, pp. 8-17 to 8-22.
33Ibid., pp. 8-18 to 8-19.
34Ibid., pp. 8-19 to 8-20.
35Ibid., p. 8-21.
36 Ibid., p. 8-21.

 Section
V: Individual Clothing and Equipment
Section
V: Individual Clothing and Equipment Appendix
A: Windchill Chart
Appendix
A: Windchill Chart
|
NEWSLETTER
|
| Join the GlobalSecurity.org mailing list |
|
|
|