

APPLYING DECISION-POINT TACTICS TO THE DEFENSE (cont)
EXAMPLE DECISION-POINT TACTICS BATTLE (SECURITY ZONE SCENARIO)
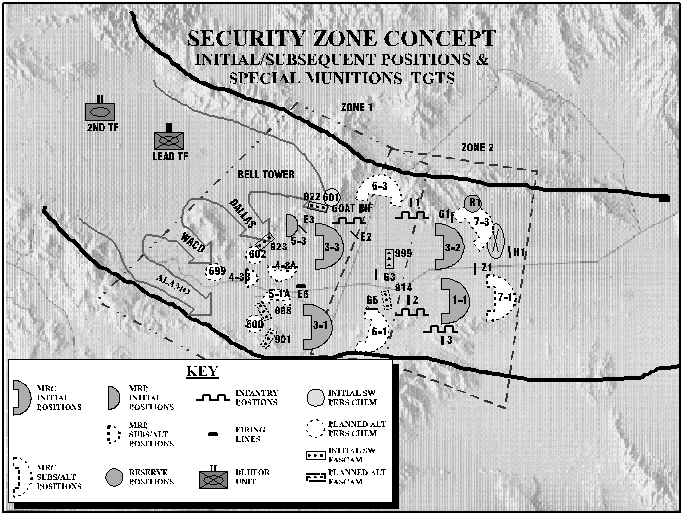
MISSION: 3d MRB, 32d GMRR establishes a security zone NLT 19XXX96 to delay enemy forces until 201400XXX96 to allow the first echelon MRB to complete the development of the division main defensive belt.
ENEMY COURSES OF ACTION: The wargame templated seven potential BLUEFOR courses of action (COA) against initial positions (zone 1) and two BLUEFOR COAs against subsequent positions (zone 2).
Zone 1 COAs:
(Brown Pass).
(Debnam Pass (NK302151)).
or ALAMO.
Zone 2 COAs:
CONCEPT OF THE OPERATION: This operation allowed the first echelon regiment to complete the development of the division's main defensive belt. The MRD commander intended to accomplish this by establishing a security zone with two MRCs forward and two MRCs back, infantry protecting the flanks, and AT-5s in depth. The two MRCs forward will attrit and the two MRCs back would delay. Infantry in the north would block and infantry in the south would disrupt. Decisive to this operation was the ability of the forward MRCs to attrit three company teams or greater from the attacking brigade. Critical to this operation was our ability to mass two MRCs worth of combat power on each task force. These two imperatives became the driving force behind each decision the MRB commander made prior to and during the fight.
MANEUVER DECISIONS: The MRB commander was confident that the two MRCs back could effectively delay five company teams or less, so he reasoned that the decisive point was to attrit three company teams or greater. Not an easy task! However, to accomplish this task, it was critical to mass two MRCs on the lead task force. The initial set was designed to quickly respond to any of the seven courses of action. For enemy COAs 1 and 2, the forward MRCs would set an "L"-shaped fire sack in the north by setting battle position (BP)'s 3-3, 4-3A, and 4-3B. For enemy COA 4, the forward MRCs would set the "L"-shaped fire sack in the south by setting BP's 3-1 and 5-1A. Enemy COAs 3, 5, 6, 7 presented another challenge, on any abreast option the forward MRCs would find themselves fighting with one MRC per task force which was unacceptable. Additionally, Colorado Wash split the sector so both MRCs again could not mass two MRCs against one task force in this terrain. Therefore, for enemy COAs 3, 5, 6, 7, the forward MRCs would be forced to withdraw to their next positions. The two forward MRCs would withdraw to BP 6-3 in the north and BP 6-1 in the south respectively. The remainder of the triggers for maneuver and fires are displayed in the decision support matrix.
COURSES OF ACTION (COAs)
Initial Unit Set Positions (All COAs): This describes initial sets and main task and purpose for each major subordinate element. Subsequent CoA descriptions only address changes to the initial sets.
penetrate PL R2.
penetrate PL R2.
Anti-Tank Company (ATC)
Zone
1: COA
No. 1 (Northern "L")
Anti-Tank Company (ATC)
- Fires COA 1 (Enemy COA 1-BELL TOWER): Fire persistent chemical target 601; shoot FASCAM No. 1, target 922 on 2nd company/team, lead TF. Strikewarn (SW) and O/O shoot FASCAM No. 2, target 999. SW and O/O shoot nonpersistent chemical on lead TF in Brown Pass. Fire 2nd nonpersistent chemical on 2nd TF to facilitate withdrawal. O/O position SOKOL vic Old Harry/ Hill 1141 to facilitate withdrawal. O/O CAS attacks to attrit trail teams of lead TF west of Brown Pass. IEW jams artillery and C2nets.
- Fires COA 2 (Enemy COA 2-DALLAS): SW and O/O fire persistent chemical target 602; restrikewarn (RSW) and shoot FASCAM No. 1, target 923 between TFs. O/O shoot FASCAM No. 2, target 923 on 2nd company/team, lead TF. O/O shoot nonpersistent chemical on lead TF in Debnam. Fire 2nd nonpersistent chemical on 2nd TF to facilitate withdrawal. O/O position SOKOL to backstop Hill 910 to facilitate withdrawal. O/O CAS attacks to attrit trail teams of lead TF west of Debnam Pass. IEW jams artillery and C2nets.
- Fires COA 1 (Enemy COA 1-BELL TOWER): Fire persistent chemical target 601; shoot FASCAM No. 1, target 922 on 2nd company/team, lead TF. Strikewarn (SW) and O/O shoot FASCAM No. 2, target 999. SW and O/O shoot nonpersistent chemical on lead TF in Brown Pass. Fire 2nd nonpersistent chemical on 2nd TF to facilitate withdrawal. O/O position SOKOL vic Old Harry/ Hill 1141 to facilitate withdrawal. O/O CAS attacks to attrit trail teams of lead TF west of Brown Pass. IEW jams artillery and C2nets.
Decision Point Conditions to Execute COA No. 1 and Withdrawal Criteria:
- BLUEFOR COA 1 or 2
- Withdrawal if three or more BLUFOR company/teams are destroyed, less than a 4/10 OPFOR remains combat effective, and break in contact is possible.
COA No. 2 (Southern "L") (Enemy COA 4 - ALAMO)
Anti-Tank Company (ATC)
Decision-Point Conditions to Execute COA No. 2 and Withdrawal Criteria:
- BLUEFOR COA 4
- Withdrawal if three or more BLUFOR company/teams are destroyed, less than a 4/10 OPFOR remains combat effective and break in contact is possible.
COA No. 3 (Withdraw) (Enemy COAs 3, 5, 6, 7 - two TFs abreast, both TFs in the Colorado)
Anti-Tank Company (ATC)
- Fires COA 3 (Enemy COA 3-WACO) SW and O/O fire persistent chemical target 699; SW and shoot FASCAM No. 1, target 999. SW and O/O shoot FASCAM No. 2, target 914. O/O shoot nonpersistent chemical on lead TF in WACO. RSW and fire 2d nonpersistent chemical on 2d TF. SOKOL held for zone 2 fight. O/O CAS attacks to attrit trail teams of lead TF west in WACO. IEW jams artillery and C2nets.
- Fires COA 5 (Enemy COA 3-BELL TOWER/DALLAS): Fire persistent chemical target 601; shoot FASCAM No. 1, target 922 on 2d company/team, lead TF. O/O shoot FASCAM No. 2, target 923. O/O shoot nonpersistent chemical on lead TF in Debnam. RSW and fire 2d nonpersistent chemical on 2d TF in Debnam. O/O position SOKOL vic Old Harry/Hill 1141 to facilitate withdrawal. O/O CAS attacks to attrit trail teams of lead TF west of Debnam and Brown passes. IEW jams artillery and C2nets.
- Fires COA 6 (Enemy COA 6-WACO/ALAMO) SW and O/O fire persistent chemical target 600; SW and shoot FASCAM No. 1, target 999. SW and O/O shoot FASCAM No. 2, target 914. O/O shoot nonpersistent chemical on lead TF in WACO. SW and fire 2d nonpersistent chemical on 2d TF on ALAMO. O/O position SOKOL vic Hill 899 to facilitate withdrawal. O/O CAS attacks to attrit/delay TFs in WACO and ALAMO. IEW jams artillery and C2nets.
- Fires COA 7 (Enemy COA 7-WACO/DALLAS) Hold 601 or SW and O/O fire persistent chemical target 699; SW FASCAM No. 1, target 999. SW FASCAM No. 2, target 996. O/O shoot nonpersistent chemical on lead TF in WACO. O/O 2d nonpersistent chemical on 2d TF in DALLAS or RSW on TF in WACO. O/O position SOKOL vic Hill 1141 to facilitate withdrawal. O/O CAS attacks to attrit trail teams of TFs in WACO and DALLAS. IEW jams artillery and C2nets.
- Fires COA 3 (Enemy COA 3-WACO) SW and O/O fire persistent chemical target 699; SW and shoot FASCAM No. 1, target 999. SW and O/O shoot FASCAM No. 2, target 914. O/O shoot nonpersistent chemical on lead TF in WACO. RSW and fire 2d nonpersistent chemical on 2d TF. SOKOL held for zone 2 fight. O/O CAS attacks to attrit trail teams of lead TF west in WACO. IEW jams artillery and C2nets.
Decision-Point Conditions to Execute COA No. 3 Withdrawal:
- BLUEFOR COAs 3, 5, 6, 7 - Two task forces abreast.
- Withdraw if situation does not allow the massing of two MRCs against one task force.
Zone 2:
COA No. 1 (South - Chod/Peanut Pass)
Anti-Tank Company (ATC)
Decision-Point Conditions to Execute COA No. 1: BLUEFOR COA south toward Chod/Peanut Gap.
COA No. 2 (North - Iron Triangle)
Anti-Tank Company (ATC)
Decision-Point Conditions to Execute COA No. 2: BLUEFOR COA north toward Iron Triangle
Decision Support Matrix: The above courses of action were converted to the following decision support to simplify execution decisions.
| SECURITY ZONE DECISION SUPPORT MATRIX (MANEUVER) | ||||||
| Zone 1 | Zone 2 | |||||
| INITIAL SET | PASSES/899 BATTLE | 876 BATTLE | ||||
| Friendly COA | COA 1 Northern L | COA
2 Southern L | COA 3 Withdrawal | COA
1 South | COA
2 North | |
| Enemy COA | 1 up/1 back Brn or Deb (COA 1,2) | 1
up/1 back 899 (COA 4) | 2
abreast or 1 x 1 Colorado (COAs 3,5,6,7 | |||
| Withdrawal Criteria | Less
than 4/10 left Dead > 3 Co/TMs If break possible | Less
than 4/10 left Dead > 3 Co/TMs If break possible | *Must
get 2 MRCs on one TF or withdrawal | NA | NA | |
| 1ST
MRC T: Delay P: Allow 4 MRBs to prep fwd pos def | 3-2 (3/8) | Hide position | Hide position | Hide position | Occupy
3-2 reconstitute the reserve Time: 8 min 30 sec | Occupy
3-2 Time: 8 min 30 sec |
| 2D
MRC T: Attrit P: Nothing>5 Co/TMs penetrate R2 | 3-1
(3/8) 1 TDAM UMZ O/O 4mrc | Move
to Fight 4-3A (2/6) 4-3B (l/2) Time: 6 min | Remain
in 3-1 W/D set 6-1 Time: 13 min | (1/2)
3-1 Delay (2/6) W/D 6-1 Time: 13 min | Remain
6-1 OO fight G5 or 7-1 Time: 10 min | Occupy
7-1 Reconst the Rsv Time: 10 min |
| 3D
MRC T: Delay P: Nothing>5 Co/TMs penetrate R2 | 3-3
(32/6) 5-3 (1-2) 1 TDAM & MOD | Remain
W/D 5-3 to 3-3 W/D set 6-3 Time: 11 min | Move/fight
5-1A W/D set 6-3 Time: 15 min | (1/2)
Delay (2/6) W/D 6-3 Time: 16 min | Occupy
7-3 Reconst the Rsv Time: 18 min | Occupy
6-3 Time: 10 min |
| 4TH
MRC T: Delay P: Allow 4 MRB to prep fwd pos def | 1-1
(3/8) | Hide position | Hide position | Hide position | Occupy
1-1 Time: 8 min | Occupy
1-1 Reconst the Rsv Time: 7 min 30 sec |
| RESERVE
P: Reinforce | R1
(1/2) 2TDAM & MSD | R1 | R1 | R1 | O/O
Occupy H2 Time: 11 min | O/O
Occupy G1 Time: 4 min |
| AT5
T: Destroy P: Allow 3-1, 3-3 to withdrawal | E2,G3,G6
1 per | E2
Remain G3 Remain G6 move to E6 Time: 7 min | E2
move to 5-1A G3 Remain G6 Remain Time: 6 min | E2
Remain G3 Remain G6 Remain | E2
to 1-1 G3 to 1-1 G6 to north 13 Time: 20 min | E2
to G2 G3 to north 1-1 G6 to H1 Time: 14 min |
| 2A45
T: Destroy P: Protect Flank of 3-2 | I1
2 systems | I1 | I1 | I1 | One
sys I1 One sys H2 Time: 20 min | I1 |
| GOAT
INFANTRY T: Block P: Prot Flk of 3-3, 6-3 | A9
-30 | Remain
A9 O/O W/D to I1 Time: 15 min | W/D
to I1 Time: 20 min | Remain A9 | W/D
to I1 Time: 20 min | O/O
W/D to I1 Time: 20 min |
| RAMPAGE
T: Block P: Prev envel of 3-2 | I1
(70) | I1 | I1 | I1 | Move
60 Inf to 1-1 Time: 30 min | I1 |
| ANGEL
T: Disrupt P: Protect flank of 1-1 | I2
(30) I3 (70) | I2
I3 | I2
I3 | I2
I3 | I2
I3 | Move
60 Inf to G1 Time: 30 min |
SPECIAL MUNITIONS DECISIONS
Special munitions play a significant role in security zone operations, but they are a limited asset. Therefore, they require decision points. The MRB was allocated one persistent target, six lines of nonpersistent, and two FASCAM minefields. Employment of these assets is time-sensitive and requires between 30 to 45 minutes to restrikewarn on a new target. The initial targets were strikewarned to cover almost all of the potential enemy courses of action. The purpose was to contribute to the direct fire fight and/or delay enemy forces and facilitate MRC maneuvers. The initial persistent chemical strikewarn target was 601 (Brown Pass), FASCAM targets 922 (Brown Pass) and 923 (Debnam Pass) and nonpersistent targets in Debnam Pass and Colorado Wadi. Artillery systems were unavailable initially to strikewarn addition nonpersistent targets. If the brigade chose to attack abreast, either all special munitions would be fired at once to facilitate a break in contact or the regiment would shoot a combination that would break the enemy's momentum and allow the MRB to set the conditions for the decisive point. FASCAM 923 was critical because Brown Pass was the fastest enemy avenue of approach. The FASCAM could buy time to set the "L"-shaped engagement area or buy time to fire persistent chemical 601. In both cases, it would assist in separating the lead TF by shooting it between company teams. Terrain would slow any movement over the Washboard; therefore, the nonpersistents were initially strikewarned in Colorado Wadi and Debnam Pass. The details of our other special munitions triggers for all seven CoAs are displayed in the artillery decision support matrix.
| SECURITY ZONE DECISION SUPPORT MATRIX (FIRES) | ||||||||
| F-Fires COAs | INI SW | COA 1 | COA 2 | COA 3 | COA 4 | COA 5 | COA 6 | COA 7 |
| Enemy
COA Route | 1
up/1 back Brown pass Bell Tower | 1
up/1 back Debnam Dallas | 1
up/1 back Colorado Waco | 1
up/1 back 899 Alamo | 2
Abreast Brwn/Deb BT/Dallas | 2
Abreast Colorado/ 899 Waco/Alamo | 2
Abreast Waco/Dallas | |
| Pers Chem | 601 | shoot 601 | RSW
602 Time: 45 min | SW
699 Time: 45 min | SW
600 Time: 45 min | shoot 601 | SW
600 Time: 45 min | Hold 601 or SW 699 |
| FASCAM No. 1 | 922 | shoot 922 | SW 923 Time: 45 min | SW
999 Time: 45 min | SW
901 Time: 45 min | shoot 922 | SW
999 Time: 45 min | SW
999 Time: 45 min |
| FASCAM No. 2 | 923 | SW
999 Time: 45 min | shoot 923 | SW
914 Time: 45 min | SW
998 Time: 45 min | shoot 923 | SW
914 Time: 45 min | shoot 923 |
| NONPER CHEM 1 | Deb
Pass | SW
Brown Time: 30 min | shoot Debnam | shoot Colo | SW
Alamo Time: 30 min | shoot Debnam | shoot Colo | Hold Deb or SW Colo |
| NONPER CHEM 2 | Colo
Wadi | SW
Brown Time: 30 min | Hold Colo | RSW
Colo Time: 30 min | SW
Alamo Time: 30 min | RSW
Debnam Time: 30 min | RSW
Colo Time: 30 min | Hold
Deb or SW Colo |
| NONPER CHEM 3 | no sys avail | SW
Brown Time: 30 min | RSW
Debnam Time: 30 min | RSW
Colo Time: 30 min | SW
Alamo Time: 30 min | RSW
Debnam Time: 30 min | RSW
Colo Time: 30 min | Hold Deb or SW Colo |
| SOKOL | TOC | Old
Harry 1141 | Backstop 910 | 3 Sisters | 899 | Old Harry 1141 | Hold for zone 2 | Old Harry 1141 |
| CAS | IP 0630 | Brown pass | Debnam | Colorado | 899 | Deb/Brwn | Colorado/
899 | Deb/Colo |
| IEW | Arty/C2 | Arty/C2 | Arty/C2 | Arty/C2 | Arty/C2 | Arty/C2 | Arty/C2 | |
| KEY: SW-Strikewarn RSW-Restrikewarn Colo-Colorado Deb-Debnam | ||||||||
HOW DECISION-POINT TACTICS WERE EXECUTED
FIRST Decision Point: The division Reconnaissance reported one task force up and one back with the lead task force moving along axis DALLAS at a moderate rate of advance. The 2d TF's initial orientation was along BELL TOWER. The MRB commander decided to execute COA 1, DALLAS option. BP 3-1 repositioned to BP 4-3A (2/6) to set bottom portion of the "L" and BP 4-3B (1/2) as flank security. The AT 5 vic G6 also repositioned vic E6 to overwatch engagement area east of Debnam. BP 5-3 continued to hold awaiting the final read on the 2d TF. Additionally, the regimental commander strikewarned persistent chemical target 602, FASCAMs No. 1. He continued to hold target 922 until the commitment of 2d TF. FASCAM No. 2, target 923 were also set to fire on trigger. The non-ersistent was set to fire on trigger behind Debnam Pass. The nonpersistent in the Colorado Wadi was held awaiting a clear read. The regimental reconnaissance then adjusted its efforts to confirm or deny commitment of the 2d task force. They were also set to trigger the FASCAM in Debnam pass.
SECOND Decision Point: The lead team of lead task force entered Debnam Pass which was blanked in BLUFOR smoke. The deception positions in Debnam Pass, smoke and fires from BP 5-3, and regimental reconnaissance BMPs caused the lead team and the task force to halt their forward movement. The BLUFOR commander had the lead team with engineers continue to look for a bypass to the deception tank ditch in Debnam Pass. Heavy BLUFOR smoke caused the OPFOR scout to trigger the execution of FASCAM 923 too early, causing the FASCAM to land in front of the lead team instead of on the 4th team. Faced with the FASCAM and the perceived forces in Debnam Pass, the BLUFOR commander ordered the lead task force to leave one team in Debnam Pass with engineers while diverting the remaining teams through Three Sisters Cut into the Colorado Wadi. This maneuver exposed the flank of BP 4-3A. Additionally, the time delay by the lead task force caused the 2d task force to come abreast oriented on BELL TOWER. Faced with a two task force abreast situation, the MRB commander's decision-point condition for withdrawal had been met. The MRB commander then ordered 4-3A to withdraw to BP 3-1 with 4-3B covering its withdrawal. BP 3-3 was ordered to withdraw to BP 6-3 with the forces in BP 5-3 covering the MRC's withdrawal from BP 3-3. The AT 5s were ordered to cover the withdraw of both MRCs. To assist in the withdrawal, the regimental commander fired nonpersistent chemicals on forces in WACO and BELL TOWER; he also fired persistent chemical 602 and reinforced these fires with CAS and HE artillery fires. The lead task force in the Colorado was initially delayed by nonpersistent chemicals and BP 4-3B, which destroyed the lead platoon, losing one BMP in the process. In reaction, the task force maneuvered into the persistent chemical. CAS, artillery and persistent chemical fires attrited two company teams from this task force, allowing the forces remaining in 4-3B to also withdraw to BP 3-1. BP 3-1 then withdrew to BP 6-1. The 2d task force was delayed in Brown Pass by fires, nonpersistent chemicals, and the brigades identification of obstacles vic BP 3-3. This delay allowed the platoon in BP 3-3 to withdraw to BP 6-3 without coming under direct fire contact.
THIRD Decision Point: Recognizing that the OPFOR forces had withdrawn, the brigade committed its 2d task force toward the Peanut/Chod Gap. The 1st TF continued to reorganize after running into the persistent chemical and direct fires from BP 4-3B. This task force had about a company/team (+) remaining. In response, the MRB commander decided on Zone 2, COA 1. The commander first withdrew one MRP from BP 6-1 to 7-1. The commander also committed the reserve from R1 to H2 and ordered BP 3-2 to reconstitute a 1/2 reserve. Because of enemy orientation, the commander decided to have BP 6-3 and Goat infantry (TF Rampage) remain in place. The AT 5s at G6 and G3 continued to cover the withdrawal and significantly attrited the lead two company teams of the 2d task force. The AT 5 at G3 then withdrew to Z1.
FOURTH AND FINAL Decision Point: As the 2d task force, augmented by the remaining company team from the 1st task force, continued to attack toward Hill 876/Peanut/Chod Gaps, the MRC in BP 6-3 reported the brigade had no northern flank security. The MRC commander in BP 6-3 recommended that he reposition his forces to vic G3 and Hill 800 and attack by fire into the brigade's northern flank. The MRB commander decided to execute this hasty attack but directed the Goat Infantry and the AT 5 in E2 to remain in position and secure the right flank of the maneuvering MRC.
MRC Execution: At this point, the execution of the operation was turned over to the cross-talking MRC commanders with the MRB and regimental CPs eavesdropping and supporting the operations with fires and other combat multipliers. The brigade, unaware of the threat to its northern flank, continued to push through the Peanut/Chod Gap. Direct fires from BP 1-1, G6, I2 and I3, and the enveloping MRC from BP 6-3, coupled with indirect fires, eventually destroyed the remaining brigade forces.
Impact of Deception on the Operation: Often the full effect of deception operations is not known by the OPFOR. In this case, we learned after the rotation that deception and pre-conceived beliefs significantly effected the BLUFOR plan and execution. One of the main ways of achieving deception goals is to reinforce pre-conceived beliefs of BLUFOR S2s and Commanders. In this particular case, the BLUFOR S2 believed that the OPFOR never fought a security zone with initial and subsequent positions as outlined in doctrine, but instead set and fought in just one location. In this case the S2 templated an OPFOR defense vicinity Iron Triangle, Hill 876, Hill 780 and Chod Hill. This template was reinforced by the UAV's detection of logistic operations, coordination meetings, and preparation of BP 3-2 and 1-1 activity in that area. Although activity was detected in and behind the passes, these forces were written off as a screening force that would displace prior to fighting. Although other intelligence sources indicated otherwise, the brigade continued to believe that the fight would be a single echelon defensive battle. It wasn't until the division MEL feed, four hours before LD, that the brigade realized that there would be serious resistance vicinity the passes. However, it was too late to change the plan. As a result, the brigade's plan was desynchronized from the start of the operation.
As mentioned in the summary, the MRB commander prepared a MRP deception position with turret hulls and a deception (shallow) tank ditch to initially show strength in Debnam Pass and, therefore, attempt to influence the brigade commander to avoid this avenue of approach. However, this actually worked against the OPFOR. As discussed above, the brigade had a plan, and it ignored intelligence reports in the passes as only screening operations. Therefore, the brigade's maneuver plan was not influenced by the deception effort until they got into the passes. During execution the deception positions delayed the enemy as planned but the early firing of the FASCAM actually forced the lead task force to maneuver out of the developing fire sack. This, in turn, forced the MRB to withdraw his forces earlier than desired.
There are two key points to this discussion. First, many units have pre-conceived ideas on how the OPFOR is going to fight and tend to believe their perceptions and not evaluate the information available. In short, they fight their plan and not the enemy. The OPFOR will and does take advantage of this errors. Second, deception operations are a dual-edged sword that can work against a plan as well as support it. More often than not they work very well if planned as part of an operation and not as an afterthought.
SUMMARY: Decision-point tactics are essential to fighting the fluid battlefield conditions present during the security zone battle. There are four imperatives to the successful execution of decision point tactics during the security zone.
Imperative 1: A unit must have good battlefield vision to clearly identify the conditions necessary to execute a specific decision. The complexity of the security zone battle maneuver plan necessitates a solid wargame and rehearsal process to assist in vision attainment.
Imperative 2: Successful reconnaissance and counter-reconnaissance efforts are essential to identifying the decision-point conditions and denying the same to the enemy.
Imperative 3: The OPFOR's highly trained crews and platoons are the foundation for execution of decision-point tactics. Complex battlefield maneuver while in contact is impossible without this capability.
Imperative 4: Deception operations in support of the security zone battle are essential to gaining the time necessary to get inside the enemy commander's decision cycle. Decision-point tactics are neither unique or new, but they form the foundation for the OPFOR's successful execution during the security zone fight. See you on the battlefield!
________________
12/8 is shorthand for two T80s and eight BMPs. Back
|
NEWSLETTER
|
| Join the GlobalSecurity.org mailing list |
|
|
|