

APPLYING DECISION-POINT TACTICS TO THE MEETING BATTLE (cont)
EXAMPLE DECISION-POINT TACTICS BATTLE (MEETING BATTLE SCENARIO)
MISSION: 32d Guards Motorized Rifle Regiment attacks from the march 090700XXX96 to destroy enemy forces and secure MRR objective vic NK5815 to facilitate the passage of follow-on divisional forces.
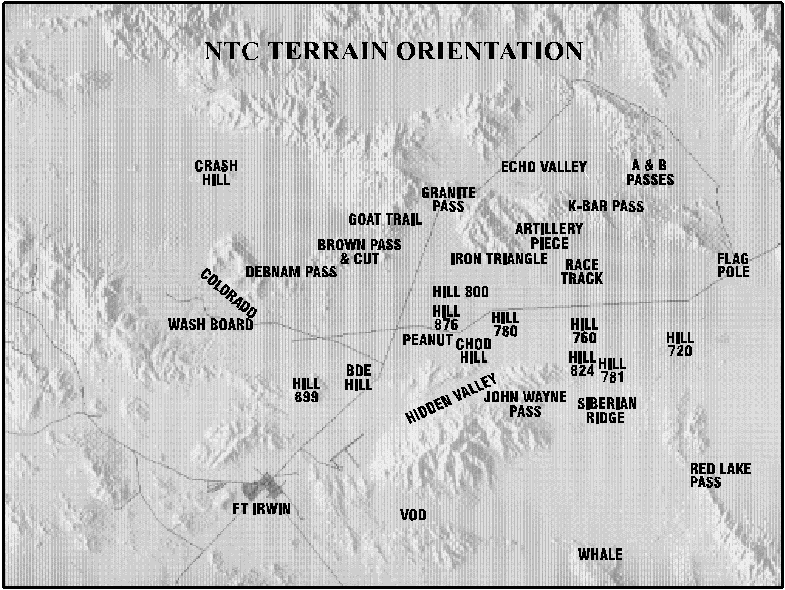
TERRAIN ORIENTATION: Shown below are common NTC terrain feature names.
ENEMY COURSES OF ACTION: The wargame templated three basic BLUFOR courses of actions (COAs). COA 1- Brigade attacks with one task force leading; second task force follows and maneuvers north or south of the lead task force. COA 2 - Brigade attacks with one task force leading; second task force commits along the same avenue as the lead task force. COA 3 - Brigade attacks with two task forces abreast.
CONCEPT: The basic maneuver concept is simple. The MRR attacks in the advance guard formation. The forward security element (FSE) moves, finds and destroys the advance guard company/team. The advanced guard main body (AGMB) moves, finds and defeats the lead task force. Upon commitment of the 2d task force, the main body MRBs maneuver to the opposite flank to envelop and destroy the 2d task force and forces remaining in the first task force. The 2d echelon MRB (-) can reinforce the FSE, AGMB, main body, or continue the attack to secure the regimental objective. Decision points are developed to facilitate these maneuver options.
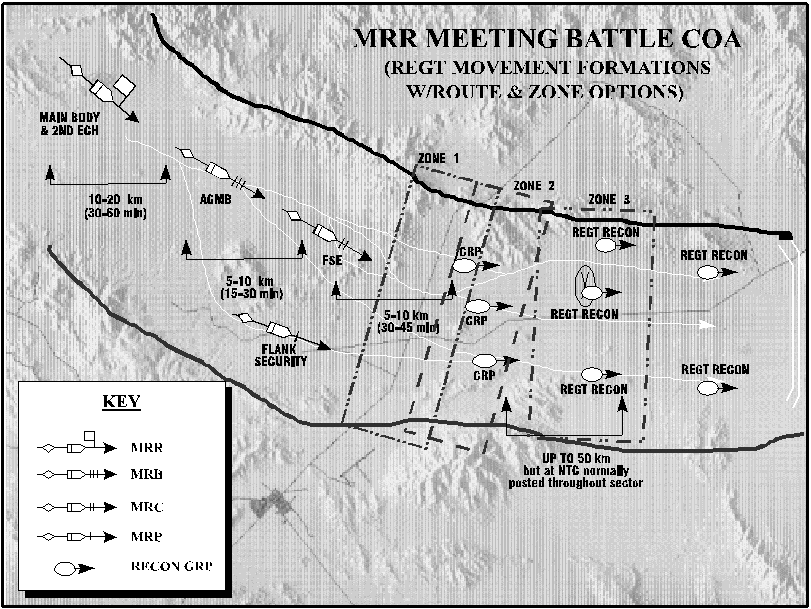
COURSES OF ACTION (COAs)
COA No. 1 (Base Plan-Zone 2)
Advance Guard. MRB attacks through Brown Pass (NK337162) with an attack orientation Hill 780/ Iron Triangle (NK423162) to fix and destroy the lead task force. On order, facilitates passage of the main body and assists in the destruction in the second task force. Assists deception effort by dispersing and portraying the main body.
Main Body
- Option North: MRB attacks abreast through Brown Pass(NK337162) with an attack orientation to Iron Triangle (NK423162), Artillery Piece (NK443173) and Racetrack (NK463141) echelon right. Right side (south) MRB (Supporting Effort) guards left side (north) MRB (Main Effort) southern flank by seizing firing lines and attriting 2d task force. Main effort MRB envelops and destroys 2d task force/brigade reserve. On order, continues attack to secure MRR objective.
- Option South: MRB attacks abreast through Debnam Pass (NK302151) with an attack orientation to Peanut/Chod/ Hill 876, Hill 780, Hill 760 echelon left. Left side (north) MRB (Supporting Effort) guards right side MRB (Main Effort) northern flank by seizing firing lines and attriting 2d task force. Main effort MRB envelops and destroys 2d task force/brigade reserve. On order, continues attack to secure MRR objective.
Anti-Tank Battalion (ATB)
- Option North: guards MRR southern flank.
- Option South: guards MRR northern flank.
2d Echelon. MRB follows and assumes main effort or reinforces FSE or AGMB. On order, exploits main effort success.
Decision-Point Conditions to Execute COA No. 1:
- Battle zone will occur vicinity Hill 876,780 and Iron Triangle.
- Option North: 2d task force attacks along the south wall.
- Option South: 2d task force attacks along the north wall.
COA No. 2 (Deep - Zone 3)
Advance Guard. MRB attacks through Brown Pass (NK337162) with an attack orientation Hill 780/Artillery Piece (NK443173) to fix and destroy the lead task force. On order, facilitates passage of the main body and assists in the destruction in the second task force. Assists deception effort by dispersing and portraying the main body.
Main Body
- Option North: MRB attacks abreast through Brown Pass (NK337162) with an attack orientation to Iron Triangle (NK423162), Artillery Piece (NK443173) and Racetrack (NK463141) echelon right. Right side (south) MRB (Supporting Effort) guards left side MRB (Main Effort) southern flank by seizing firing lines and attriting 2d task force. Main effort MRB envelops and destroys 2d task force/brigade reserve. On order, continues attack to secure MRR objective.
- Option South: MRB attacks abreast through Debnam Pass (NK302151) with an attack orientation to Peanut/Chod/Hill 876, Hill 780, Hill 760, Hill 720 echelon left. Left side (north) MRB (Supporting Effort) guards right side MRB (Main Effort) northern flank by seizing firing lines and attriting 2d task force. Main effort MRB envelops and destroys 2 task force/brigade reserve. On order, continues attack to secure MRR objective.
Anti-Tank Battalion (ATB)
- Option North: guards MRR southern flank.
- Option South: guards MRR northern flank.
2d Echelon MRB follows and assumes main effort or reinforces FSE or AGMB. On order, exploits main effort success.
Decision-Point Conditions to Execute COA No. 2:
- Battle zone will occur vicinity Hill 760 and Race Track.
- Option North: 2d task force attacks along the south wall.
- Option South: 2d task force attacks along the north wall.
COA No. 3 (Short-Zone 1)
Advance Guard. MRB attacks through Brown Pass (NK337162) with an attack orientation Brigade Hill (NK353086), Chod Hill (NK411104), to fix and destroy lead task force. On order, facilitates passage of main body and assists in the destruction in the second task force. Assists deception effort by dispersing and portraying the main body.
Main Body
- Option North: MRB attacks abreast through Brown Pass (NK337162) with an attack orientation to Iron Triangle (NK423162), Artillery Piece (NK443173) and Racetrack (NK463141) echelon right. Right side (south) MRB (Supporting Effort) guards left side MRB (Main Effort) southern flank by seizing firing lines and attriting 2d task force. Main effort MRB envelops and destroys 2d task force/brigade reserve. On order, continues attack to secure MRR objective.
- Option South: MRB attacks abreast through Debnam Pass (NK302151) with an attack orientation to Brigade Hill, Peanut/Chod/Hill 876, Hill 780, Hill 760 echelon left. Left side (north) MRB (Supporting Effort) guards right MRB (Main Effort) northern flank by seizing firing lines and attriting 2d task force. Main effort MRB envelops and destroys 2d task force/brigade reserve. On order, continues attack to secure MRR objective.
Anti-Tank Battalion (ATB)
- Option North: guards MRR southern flank.
- Option South: guards MRR northern flank.
2d Echelon. MRB follows and assumes main effort or reinforces FSE or AGMB. On order, exploits main effort success.
Decision-Point Conditions to Execute COA No. 3:
- Battle zone will occur vicinity Brigade Hill, Hill 876 and Iron Triangle.
- Option North: 2d task force attacks along the south wall.
- Option South: 2d task force attacks along the north wall.
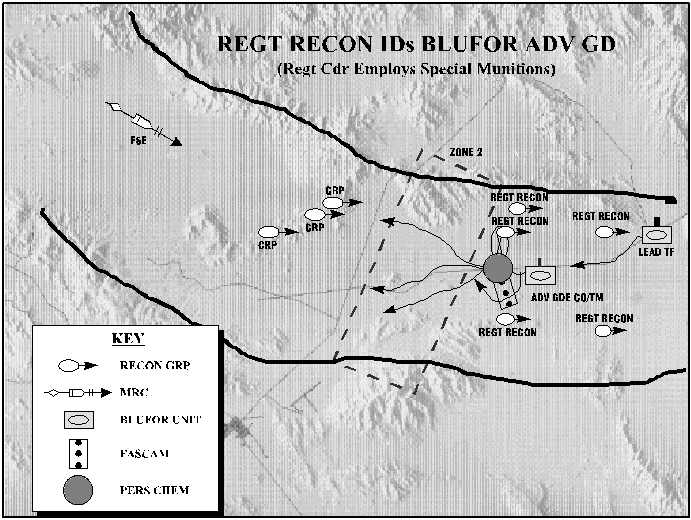
FIRST Decision Point: Division Reconnaissance reported that the advance guard company/team and lead task force moved west, centered up and would make contact with the FSE vicinity zone 2. Given the enemy's rate of march, they could reach Hill 876/IronTriangle before the FSE. Based on this information, the regimental commander made the decision to execute COA No. 2. Additionally, the regimental commander fired persistent chemical agents, nonpersistent chemical agents, smoke, and FASCAM to delay the lead task force and allow the FSE to secure initial firing lines vicinity Hill 876/Iron Triangle. Additionally, the special munitions forced the brigade to commit either north or south, giving an early lead. Regimental Reconnaissance then focused on confirming or denying the northern or southern option criteria.
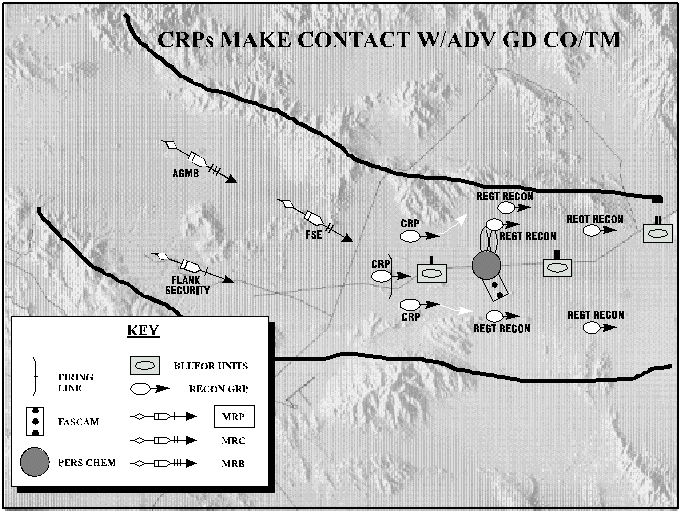
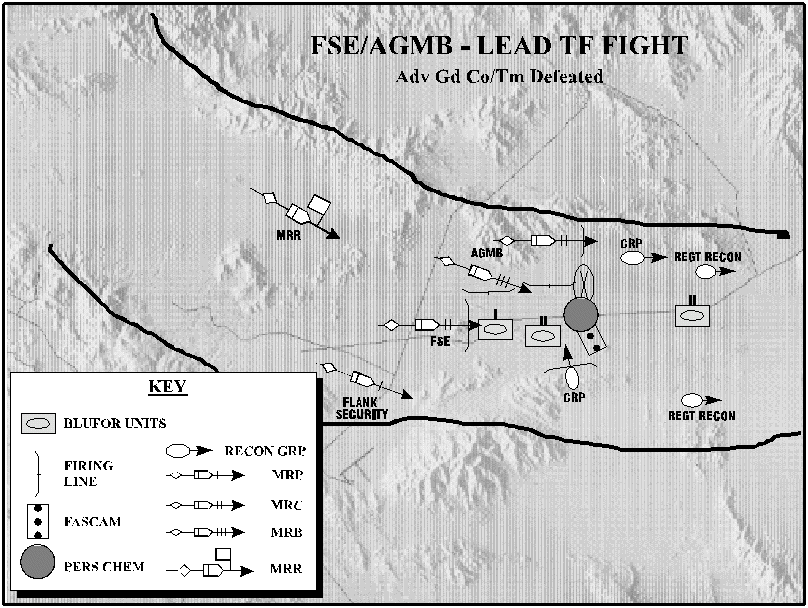
SECOND Decision Point (MRB Level): Regimental reconnaissance reported the lead tank heavy team had committed south toward Hill 780/876. The advanced guard's center CRP made contact with the BLUFOR advance guard team vic Hill 780/876. The center CRP then established firing lines vicinity Hill 876 and attempted to fix the lead team. The northern and southern CRPs continued to maneuver along the north and south walls to find the flanks of the lead team and the remainder of the first task force. The MRB commander then committed his FSE to Hill 876 and oriented the AGMB to Hill 800 and the Iron Triangle.
THIRD Decision Point (MRB Level): The regimental reconnaissance reported that the lead task force (which was delayed by the special munitions) had committed south to reinforce their advance guard team. The second task force was North of Hill 720 still centered up and had not committed north or south. The FSE had defeated the lead team and was fixing the lead task force. The MRB commander then committed the AGMB to envelop the lead task force from the north vicinity Hill 800 and the Iron Triangle. The MRB commander also committed an MRC to vicinity of the Artillery piece to secure his northern flank in case the second task force committed north. The regimental commander slowed the main body forces to prevent their early commitment prior to the BLUFOR commitment of the second task force.
FOURTH AND FINAL Decision Point (MRR Level): The regimental reconnaissance reported commitment of the second task force south toward Hill 760/780 to reinforce the lead task force. The AGMB had defeated the lead task force and forced the 2d task force to assume a hasty defense vicinity Hill 780. The regimental commander then committed his main body to the northern option. Additionally, the regimental commander directed the 2d echelon to reinforce the FSE, who had been severely attrited by the lead task force.
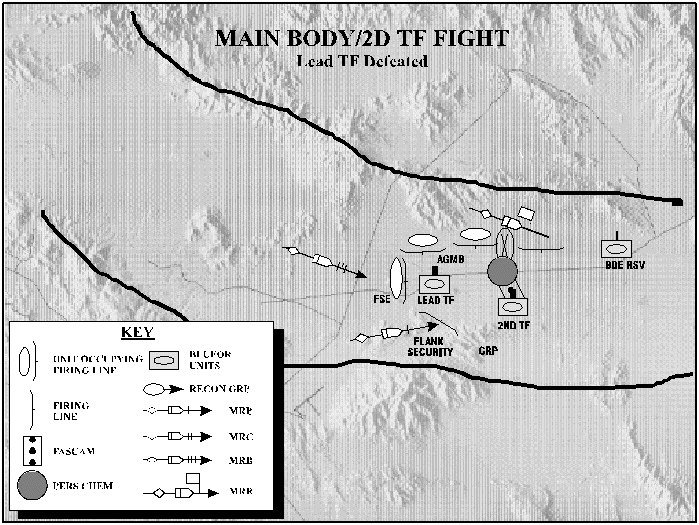
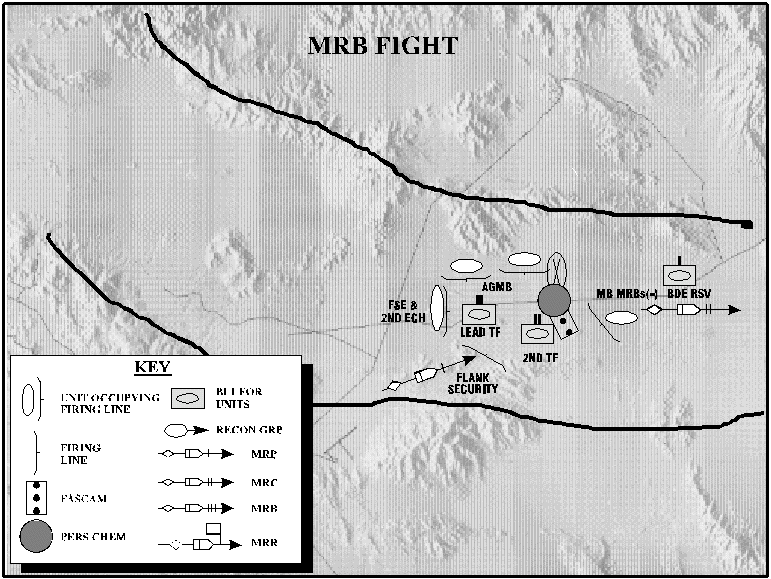
MRB EXECUTION: At this point, the regimental commander turned over the execution of the operation to the MRB commanders. The regimental CP continued to support the MRB commanders with fires and other combat multipliers. Seeing the commitment of the main body, the brigade committed its reserve in an attempt to block the OPFOR attack north of the Race Track. Main body forces destroyed the brigade reserve and continued to envelop and destroy the lead task force. The 2d Echelon attacked through the FSE, completing the destruction of the lead task force, and assisting in the destruction of the 2d task force vicinity Hill 760. Endstate: the regiment successfully destroyed both task forces and moved to its objective with two MRBs (+) remaining.
SUMMARY: Decision-point tactics are essential to fighting the fluid battlefield conditions present during the meeting battle. There are four imperatives to the successful execution of decision-point tactics during the meeting battle.
Imperative 1: A unit must have good battlefield vision to clearly identify the conditions necessary to execute a specific decision. The simplicity of the meeting battle maneuver plan, coupled with a solid wargame and rehearsal process, assists the commander in achieving battlefield vision.
Imperative 2: Successful reconnaissance and counter-reconnaissance efforts by both regimental and CRPs are essential to identifying the decision-point conditions and denying the same to the enemy.
Imperative 3: The OPFOR's highly trained crews and platoons are the foundation for the execution of decision-point tactics.
Imperative 4: Deception operations in support of the meeting battle, although not as resource-intensive as other operations, are essential to gaining the time necessary to get inside the enemy commander's decision cycle. Decision-point tactics are neither unique or new, but they form the foundation for the successful execution during the meeting battle.
|
NEWSLETTER
|
| Join the GlobalSecurity.org mailing list |
|
|
|