BUILDING
AN ENGAGEMENT AREA:
A
BLUEPRINT FOR SUCCESS
by
CPT Steven A. Shelby, Mech CO/TM Trainer, Armor Task Force Trainers, NTCA BLUEPRINT FOR SUCCESS
After a very successful movement to contact, in which the brigade has forced the OPFOR to establish a hasty defense, you realize there is a heavy price to pay for this success. Only one combat vehicle remains out of your company/team when your Observer/Controller hands you "continue the mission" instructions at 1200. Your vehicles will not be reconstitutued until 1700, and you just received a task force Warning Order (WARNO) stating that the task force will be establishing a defense to prevent a motorized rifle regiment from penetrating a phase line. The enemy situation has an MRR attacking in 18 hours with 43 tanks and 116 BMPs. Welcome to brigade force-on-force continuous operations at the National Training Center!
Task force and company/team defense is one of the most difficult missions to successfully plan and execute. Commanders are faced with limited time and a relentless enemy. They must choose where to kill the enemy, where to best position forces to do that killing, and then develop the necessary direct and indirect fire plans to synchonize the mission execution.
Units consistently demonstrate problems in successfully executing defensive missions. The common denominator with units that are successful? The ability to pick the best killing ground and then build company/team-level engagement areas to do the job.
This article details the specific techniques and accompanying procedures inherent in successful engagement areas. If units use these techniques and the procedures and tasks supporting them, then those units will be able to successfully defend - anywhere. Implied is the responsibility to incorporate these techniques and procedures rigorously into the unit Home Station training. Engagement area building, to standard, should become routine prior to any CTC deployment or deployment for a real-world operation.
TECHNIQUE
The seven sequential steps listed below represent a way to build an engagement area. While sequential, note that some steps can, and should, be done concurrently. These seven steps will be followed by 17 very specific procedures. They are procedures because each task is one that you will accomplish each time you build an engagement area. Within each procedure, there are a variety of techniques applicable. Some will be listed or diagrammed as examples. The "how to" for each procedure will be mission- and time-dependent. This article provides you with at least a start - some specific examples to enhance existing doctrine.
Seven Sequential Engagement Area Building Steps
*Can be, probably should be, done concurrently.
PROCEDURES
To execute the seven sequential steps listed above, the following 17 procedures must be executed. These are also sequential, with certain procedures appropriate to do concurrently. As listed and discussed, each procedure tie-in to the seven steps will be highlighted, as appropriate, so you can see the iterative, building-block process involved.
First, a list of the 17 procedures. Then, they will be discussed individually in detail.
- Issue an initial warning order, based on the task force warning order.
- Initiate movement to an assembly area or battle position (if necessary).
- Initiate precombat checks (PCCs) and precombat inspections (PCIs).
- Conduct initial reconnaissance of the engagement area with the task force commander.
- Update the company/team warning order.
- Conduct
the Co/Tm leaders' reconnaissance of the engagement area.
- visualize how the enemy may attack
- physically point out where to kill the enemy
- tentatively select obstacle group locations to support direct fires
- plan indirect fires to support direct fires and obstacles
- point out specific weapon system locations to kill the enemy in the engagement area with direct fires
- Develop an initial company/team fire plan.
- Finalize positions and obstacle locations.
- Occupy the company/team battle position.
- Attend the task force OPORD (this could happen any time during the EA development period).
- Complete the plan.
- Rehearse the company/team fire plan.
- Finalize the company/team fire plan.
- Prepare positions.
- Reconnoiter alternate and supplemental positions (if time permits, prepare each using the same steps and procedures).
- Update changes and information with FRAGOs.
- Continue to prepare the EA and battle positions.
Procedure No. 1. ISSUE AN INITIAL WARNING ORDER.
- Sets the conditions for building the EA
- Based on the TF warning order
- Transmit over the radio with hard copy to follow, or formally issue
- Warning
order should include:
- enemy and friendly big picture
- probable mission
- movement details
- PCC/PCI guidance
- security
- time/location for company/team leaders' reconnaissance
- initial timeline
Procedure No. 2. INITIATE MOVEMENT.
- As
necessary, move either to an assembly area, or to a designated battle position
- Procedures should be IAW unit TACSOP
Procedure No. 3. INITIATE PCC AND PCI.
- Supervised
by NCOs; checked by platoon leaders and the commander
- Critical
procedure to ensure equipment and soldiers are prepared for the mission
- Example
items of inspection:
- picket pounders
- wire gloves
- sandbags
- Class IV and V on hand
- VS 17 panels
- Target Reference Point (TRP) markers
- binoculars
- pickets
- engineer tape
- M8 alarms
- range cards
- sector sketches
- night-vision equipment
- initial boresighting
Procedure No. 4. INITIAL RECONNAISSANCE OF EA WITH TASK FORCE CDR.
- Most
critical procedure for the company/team commander
- What
the co/tm commander should receive from the TF commander and his staff:
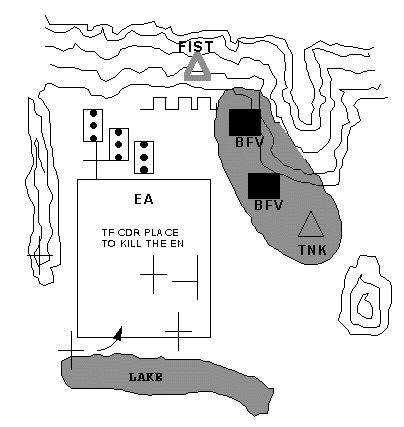
- where the TF commander wants to kill the enemy (mark the area with a standard TF TRP)
- paragraphs 1, 2, 3 of the TF OPORD; the time and location for the TF formal OPORD
- TF commander's intent for fires
- location of the co/tm sector or the tentative battle position area
- a clearly defined task and purpose that relates to the TF mission: EXAMPLES - "retain key terrain to prevent the enemy from bypassing the main effort." OR "destroy two MRCs to protect the main effort's northern flank."
- task organization changes (if any)
- co/tm specified tasks
- a good visualization of how the enemy will attack, including when, where, and how the enemy will use combat multipliers
- designation of key and decisive terrains for both friendly and enemy forces
- location and responsibilities for emplacing additional TF TRPs
- purpose for obstacle groups
- coordination requirements (beyond TACSOP-specified)
Procedure No. 5. UPDATE COMPANY/TEAM WARNING ORDER.
- Refined
after the EA reconnaissance with TF commander
- Update,
or issue for the first time the following:
- enemy and friendly situation
- co/tm mission
- commander's intent
- concept of operations sketch
- finalized timeline
Procedure No. 6. CONDUCT CO/TM EA LEADERS' RECONNAISSANCE.
Positioning of platoons is based on weapon systems, a direct fire plan, and a clear task and purpose. Once the CDR has a good idea where he wants to position his PLTs, he should perform his initial battlefield calculus. The following is an example of questions that the CDR should calculate and answer:
- How many vehicles will enter the EZ?
- How long will they be there?
- How many direct fire rounds will/can I fire in that time?
- How many vehicles will that many rounds kill?
- How many vehicles of mine will be destroyed?
- Do I need to slow him down?
- Do I need to degrade his ability?
- Where will the enemy go in the EA?
- Can I kill him there in the numbers necessary?
Once the CDR answers the above questions and mentally has thought through a direct fire plan, he should add, and physically mark, additional TRPs that will assist the CO/TM in controlling and distributing fires. Additionally, the CO/TM's or TF's obstacle concept should be physically marked with pickets and a VS-17 panel. This will allow everyone to visually see the obstacle when developing their direct fire plan, assist soldiers who will build the obstacle, and prevent someone from entering it once it is built. At the same time, the CO/TM FIST should emplace indirect fire TGTs and triggers.

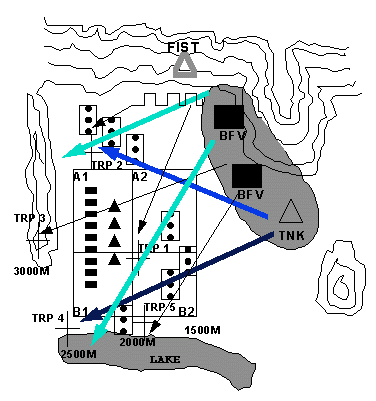
In the example shown, the CO/TM CDR has decided to tentatively position his two BFV PLTs with their dismounts in the northern portion of the BP to reinforce a turning obstacle and to utilize long-range TOW fires to attrit the enemy as they enter the EA. This will allow his TNK PLT (CO/TM's main effort) to destroy the enemy where the CO/TM CDR selected during the leaders' reconnaissance. Additionally, four direct-fire TRPs were physically marked along with the turning obstacles on the northern flank and fixing obstacles in the center of the EA.
Procedure No. 7. DEVELOP AN INITIAL CO/TM FIRE PLAN.
- Plan
should allow the co/tm to distribute, focus, shift, and mass fires to kill
the enemy anywhere in the EA.
- Develop an indirect fire plan supporting the TF scheme of fires, and the co/tm direct fire plan.
The first step in developing a fire plan is tied into the CDR's IPB. The CDR must understand how the enemy will or may attack according to the terrain. This includes what formations he could use, rates of march, times between echelons, and where he could set firing lines to fire and maneuver on your battle position. Next, the CDR should finalize his answers to his initial battlefield calculus and ensure the TF fire control measures are understood (TRPs, max engagement lines, triggers, priority targets, CFLs, and NFAs). Finally, the CDR must plan how to distribute, focus, shift, and mass fires to kill the enemy. The following are techniques to control and distribute fires:
- Simultaneous/volley fires
- Observed fires
- Alternating fires
- Fire commands
- Trigger lines
- Closest TRP
- Sectors
- Quadrants
- Enemy formations
- Target array
- Pattern
- Frontal fire
- Crossfire
- Depth of fire

After the fire plan is complete, the CDR should ask himself, "Do I have an observation plan to observe the enemy or a plan to kill the enemy?"
In the above example, the CDR decided to divide up the EA into quadrants and use his additional TRPs to help control and distribute fires. PLT sectors were assigned with the intent of using crossfires to mass one BFV PLT, one TNK PLT, and dismounted AT fires on the turning obstacle and all three PLTs on TRP 1. Triggers were established and marked for TOW, 120mm, and 25mm. Initially, distinguished BFV crews will initiate TOW fires between TRPs 3 and 4. Next, both BFV PLTs will use alternating TOW fires in the far side of A1 and B1. The TNK PLT will initially use alternating fires in A1 or at TRP 2 and be prepared to shift their fires to B1. At the 2,000-m trigger mark, the TNK PLT will volley fire into A2 or B2 while one BFV PLT remains firing TOW into A1 and B1. The other BFV PLT will begin using alternating fires with 25-mm in A2 and B2. When the enemy approaches the fixing obstacle, all three PLTs will volley-fire with 120-mm and 25-mm when the CDR issues a CO/TM fire command.
 Table
of Contents
 The
Tenets of Combat Health Support
  Building
an Engagement Area: A Blueprint for Success, Part 2
|
NEWSLETTER
|
| Join the GlobalSecurity.org mailing list |
|
|
|

