

CHAPTER 6
Synchronizing the Breach
by
MAJ Michael Kinard, U. S. Army Engineer School,
MAJ
Mark Elliott, U. S. Army Infantry School, and
MAJ
Troy Daugherty, U. S. Army Field Artillery School
 |
 |  |
| "Fire
must be concentrated at one point, and as soon as the breach is made, the equilibrium
is broken...."
--Napolean I |
Introduction
According to FM 3-34.2, "Breaching operations require precise synchronization of the breaching fundamentals (SOSRA) by support, breach, and assault forces." The majority of the problems identified with unsuccessful breach operations relate to three areas:
A lack of synchronization generally results in loss of combat power and mission failure. In this chapter, we will discuss the key activities that must take place to ensure synchronization, focusing primarily on the reverse breach planning process.
Achieving Synchronization
The keys to achieving synchronization are:
The complexity of breach operations is illustrated in Table 1-2, Breach Complexity, FM 3-34.2. A timeline should be developed to help the commander visualize the time/space requirements and, therefore, facilitate tactical patience. As an example, in restrictive terrain, a breach could take as long as 2-3 hours - much longer than a commander expects without a detailed timeline to assist in visualizing the battle.
| Action | Element | Time (Minutes) | Controlled By |
| Develop the situation (verify the boundary of the enemy obstacle system). | Force in contact | M to 2 | S3 |
| Maneuver the support force into the overwatch position. | Support | M+2 to 15 | Support cdr |
| Maneuver the assault force into the covered assault position. | Assault | M+2 to 15 | Support cdr |
| Call for artillery. | DS Artillery | M+2 to 15 | FSO |
| Build smoke. | Mortars | M+5 to 10 | FSO |
| Suppress the enemy with direct fires. | Support | M+15 to 29 | Support cdr |
| Suppress the enemy with artillery fires. | DS Artillery | M+10 to 29 | FSO |
| Maintain smoke. | DS Arty/mortars | M+10 to 30 | FSO |
| Maneuver the breach force to the breach location. | Breach | M+20 to 23 | Reduction cdr |
| Reduce the obstacle, and prepare two lanes. | Breach | M+23 to 30 | Engineer ldr |
| Place smoke pots. | Breach | M+23 to EOM | Reduction cdr |
| Shift direct fires off the objective. | Support | M+29 to 30 | Assault cdr |
| Shift indirect fires beyond the objective. | DS Artillery | M+29 to 30 | Assault cdr |
| Assault to destroy the enemy on the far side of the obstacle. | Assault | M+30 to 45 | Assault cdr |
| Reorganize to continue the mission. | TF | M+45 to EOM | S3 |
| NOTE: M = Contact with the obstacle. | |||
Reverse Breach Planning Process
The Engineer School used doctrine to develop a TTP for use in the Engineer Officer's Basic and Advanced Courses. These steps provide a framework to discuss the elements that must be addressed in breach planning. As stated above, all but Steps 4 and 5 are already conducted as part of the MDMP and Staff Estimate processes.
Step 1. Identify Available Breach Assets.
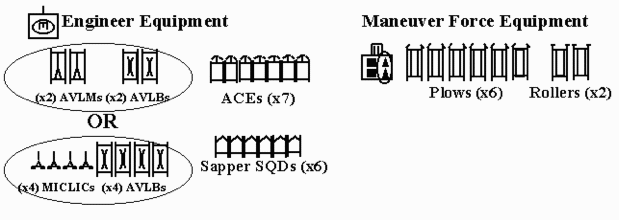
Identify all available breach assets (to include proofing and marking assets) from the task organization. This includes all operational plow tanks, rollers, engineer equipment and personnel, and any additional attached or OPCON units. The TF Engineer or Assistant Brigade Engineer (ABE) will collect this data as part of mission analysis. S-3s and engineers should both be tracking the status of breach and proofing equipment. Ensure that unit SOPs and task organization limitations are understood before task-organizing tank plows and rollers for breach operations. The use of plows and rollers in the breach calculus must take into account unit SOPs.
Many units do not know their manual breaching and marking capabilities and do not plan or track resources for dismounted engineers. Engineer companies and battalion need to establish, resource, and track manual breaching and marking capabilities to platoon level.
Step 2. Doctrinally Template Enemy Obstacles.
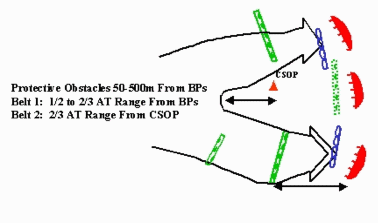
As part of the IPB during mission analysis, the engineer and S-2 begin work on the Situational Template. The engineer should utilize terrain products from higher as well as TerraBase at his level to analyze the best locations for obstacles given the S-2's understanding of the enemy situation. The engineer will use enemy doctrine and common sense to template enemy obstacles within direct fire coverage. Doctrinal distance must be adjusted when working in restrictive and undulating terrain where weapon systems cannot be used at the normal effective ranges.
Step 3. Understand Scheme of Maneuver.
As you begin developing the scheme of maneuver, include the S-2, FSO, and engineer in the process. It is imperative that all staff elements fully understand the scheme of maneuver. You might develop two COAs, one with the engineer unit as the Breach Force, while another has a maneuver unit as the Breach Force. Once you have arrayed initial forces and developed the rough scheme of maneuver, finish the reverse breach planning process prior to assigning headquarters and preparing the COA statement and sketch.
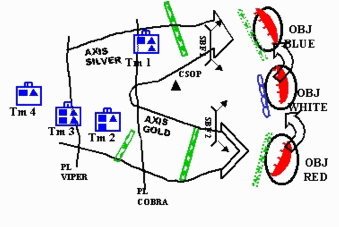
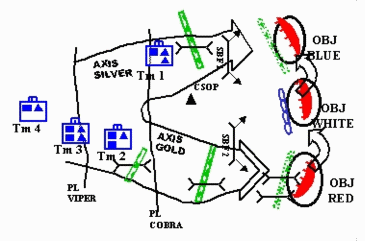
In this very simplified COA:
- Tm 1 (Support Force) moves along Axis Silver, destroys the CSOP, and occupies SBF 1, orienting on OBJs White and Blue.
- Tm 2 (Breach Force) moves along Axis Gold, breaching tactical obstacles, and occupies SBF2, orienting on OBJ Red.
- Tm 3 (Assault Force) (ME) moves along Axis Gold, breaching protective obstacles, and attacks to seize OBJs Red, White, & Blue.
- Tm 4 (Reserve) moves along Axis Gold prepared to assume the role of Tm 3.
Step 4. Identify Type of Breach and Number of Lanes Required from OBJ back to the LD.
What level of breach are we planning (Brigade, Task Force, or Company Team)? Beginning at the objective, take the main effort, usually the Assault Force, and determine how many lanes are required to get through the protective obstacles onto the objective. Then move back to the tactical obstacles and again determine the number of lanes required to move the force through the obstacle. Continue this process all the way back to the LD. Once you have completed the main effort, do the same thing for each supporting effort. Plan for at least one vehicle lane per attacking company or two per task force. CTC trends have shown that you should plan on twice that number because of forces lost and the enemy's ability to close off one or more lanes with SCATMINE. Because of this threat, lanes should also be 500-1,000 meters apart, if possible, to ensure that one SCATMINE obstacle does not close both lanes.
In this example, Tm 3 requires two lanes through the protective obstacles because of the two assaulting platoons. Each tactical obstacle requires one vehicle lane because they support movement of a company team rather than a task force.
Step 5. Identify Asset Required to Breach/Proof/Mark/Obscure.
Again starting at the objective, determine the best assets to breach, proof, and mark (BPM) each identified lane. Historically, the Breach Force will sustain 50-percent loss and must, therefore, have redundancy planned into the task organization. At the protective obstacles, we must determine whether we need footpaths or vehicle lanes and plan the breach asset accordingly. Whenever we are determining breach assets for vehicle lanes, always consider the terrain. On very broken and undulating terrain, it is difficult to use a tank plow and MICLIC because of the potential for mines being left. In those circumstances, a dismounted breach may be the best choice.
When a shortage of breaching assets exists, a decision must be made to either request assets from higher or to accept risk in a particular area. When accepting risk, one thing to consider is the Support Force's requirement for breach assets. If the Support Force contains tank plows, and if it is only one company/team, the signature left by the plowing may be marked enough to get the force safely through. Another possibility is to carry additional marking equipment in the combat trains to be issued to infantry forces task-organized within the company team, keeping the engineers massed within the Breach Force.
Once the size of the breach is determined, the chemical officer must produce a smoke estimate. This analysis will determine if the required duration and type of smoke needed for the obscuration is available to support the plan. Synchronization of artillery, smoke platoon, and smoke pots on targets can ensure success even in changing weather conditions. Typically, obstacles have preplanned fires. To defeat these, use smoke coverage 5X the size of the objective; do not always position breach in the middle of the smoke, and vary the time of entry of units into the smoke.
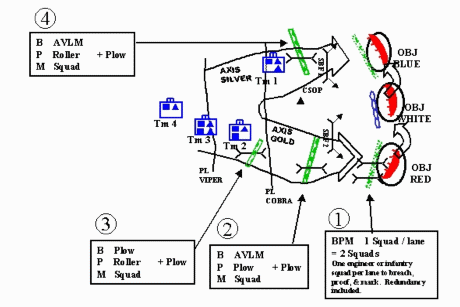
The BPM signifies the asset used to breach, proof, and mark. As discussed earlier, redundancy must be planned for each task to breach, proof, and mark. The additional plow is the 50-percent redundancy built into the breach. The plow has the capability to assume the role of either the breach or proof asset. As a planning guide, it only takes an engineer team to mark a lane; therefore, the squad allocated already has the redundancy for marking built in.
Step 6. Identify Task Organization.
Now based on the requirements, determine the task organization. Determine whether it is better to task-organize engineer assets throughout the force, thus providing some support to each element, or to mass engineer assets in one group with multiple tasks. Assign generic headquarters like you would normally do in COA development, considering the points outlined in Chapter 5.
Conclusion
By using the reverse breach planning process, you will ensure that the plan considers all the necessary tasks to get the Assault Force onto the objective. Synchronization continues throughout the wargaming process. When it comes to wargaming breaching operations, staffs must define the criteria for each of the breach fundamentals (SOSRA), don't just say ".and now we will breach" and then move onto actions on the objective. As an example, discuss in detail down to how many minutes of smoke by what asset will be used for each breach. If there are multiple breaches to be made, each one needs to be discussed in detail to ensure the same level of detail and synchronization. This will ensure that you have all the right assets in place at the right time, which after all is the key to synchronization. And the final piece of synchronization is Rehearse.Rehearse.Rehearse.
|
| |
|
NEWSLETTER
|
| Join the GlobalSecurity.org mailing list |
|
|
|