

SUPPORT BY FIRE
Support by fire is a tactical task in which the company team maneuvers to a position on the battlefield from which it can observe the enemy and engage him with direct and indirect fires. The purpose of support by fire is to prevent the enemy from engaging friendly forces. To accomplish this, the company team must maintain orientation both on the enemy force and on the friendly maneuver force it is supporting. Figures 3-24 and 3-25 (respectively) depict an example of company team support by fire as part of a task force deliberate attack. The illustrations accompanying the discussion of breaching operations in Chapter 5 of this manual show an example of platoons within the company team providing support by fire during a team breaching operation. |
|||
Planning |
The company team commander should take the following actions in planning and preparing for the support by fire operation:
- Desired effects of company team fires. - Composition, disposition, and strength of the enemy force. - Time required to suppress the enemy. |
||
Execution |
Situational awareness is a crucial factor in all support by fire operations. The company team commander should use all available intelligence and information resources to stay abreast of events on the battlefield. Additional considerations may apply. The company team may have to execute an attack to secure the terrain from which it will conduct support the fire. The initial support by fire position may not afford adequate security or may not allow the company team to achieve its task or purpose; this could force the team to reposition to maintain the desired weapons effects on the enemy. The commander must ensure that the team adheres to these guidelines while conducting the support by fire task and related operations:
- Secure positions prior to occupation by mounted elements. - Augment mounted antitank fires with Javelin fires. - Provide local security for the support by fire force. |
||
FOLLOW AND SUPPORT
Follow and support forces are employed in the offense to maintain the momentum of an operation. They do this by providing any kind of support or assistance that will relieve the lead element of hindrances that could slow its advance. Follow and support missions are usually assigned when the enemy situation is vague and speed of the operation is important. |
|||
Company team role |
The company team may be task organized to conduct follow and support missions in one of several ways:
|
||
Follow and |
Follow and support operations may require the company team to conduct a variety of tactical tasks, including the following:
|
||
The lead element will identify the enemy force that is to be fixed, bypassed, and handed over to the company team or platoon tasked with the follow and support mission. (NOTE: The lead element may also be responsible for identifying other tasks, such as those listed previously, that the follow and support force will perform.) The follow and support force receives information on the enemy or the supporting tasks from the lead element's fixing or overwatch force. The follow and support force conducts linkup with the fixing force on the ground, completes the exchange of critical tactical information, and accepts responsibility for the assigned tasks. Once this exchange is complete, the fixing force is released to rejoin the lead element. The follow and support force then executes its tasks. If enemy contact occurs, it conducts actions on contact as outlined earlier in this chapter. Refer to Figure 3-19 for an illustration of a follow and support operation. |
|||
 |
Figure 3-19. Example follow and support operation.
BYPASS
The company team may bypass an enemy force or obstacle to maintain the momentum of the attack or for another tactical purpose. The task force commander often establishes bypass criteria. Figure 3-20 provides an illustration of a team-level bypass operation. The company team commander first designates a fixing force to maintain contact with the enemy and assist the remainder of the team during the bypass. The bypassing force uses covered and/or concealed routes and, if possible, moves along bypass routes that are outside the enemy's direct fire range. The team can also employ smoke to obscure the enemy or to screen the bypassing force's movement. The team must conduct adequate reconnaissance of the route to confirm the feasibility of the bypass; the enemy may intentionally leave a bypass route unguarded to draw attacking forces into his kill sacks. Once the rest of the team clears the enemy position, the fixing platoon normally hands the enemy over to a supporting force, breaks contact, and rejoins the team. The fixing platoon may also be attached to the follow-on force. NOTE: In a task force-level bypass operation, the company team may be employed as the fixing force. | |||
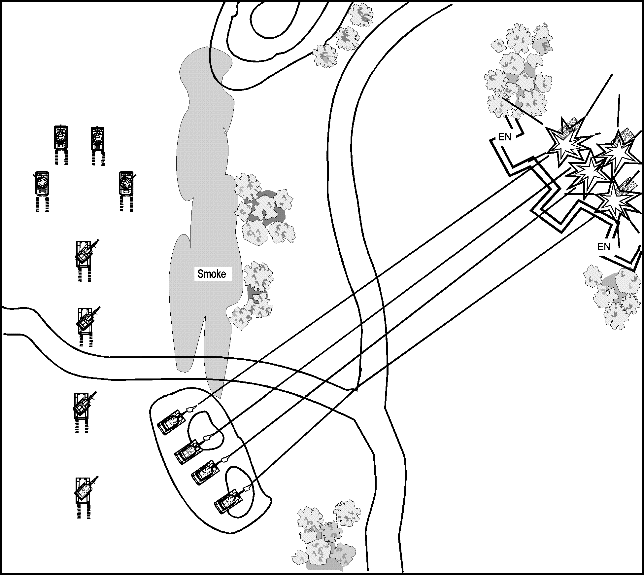 |
Figure 3-20. Example company team bypass.
CLEARANCE IN RESTRICTED TERRAIN
Introduction |
The company team may be tasked with clearance of an objective area during an attack, with the purpose of facilitating the movement of the remainder of the task force, or with clearance of a specific part of a larger objective area. Mechanized infantry teams are normally best suited to conduct clearance operations, which in many cases will involve working in restricted terrain. Situations in which the team may conduct the clearance tactical task include the following:
|
||
Terrain factors |
The commander must take several important terrain considerations into account in planning and executing the clearance task. These factors include the following, based on the OCOKA terrain analysis process:
|
||
Careful analysis of the enemy situation is a mandatory step in ensuring the success of any clearance operation. The enemy evaluation should include the following elements:
|
|||
Clearance |
Conducting clearance in restricted terrain is both time-consuming and resource-intensive. During the planning process, the commander evaluates the tactical requirements, resources, and other considerations for each of the three phases of the operation:
|
||
Approach |
The approach phase focuses on moving combat power into the restricted terrain and posturing it to begin the clearance operation. The company team commander takes the following actions:
- High ground on either side of a defile. - Wooded areas on either side of a trail or road. - Buildings on either side of a road in a built-up area. The approach phase ends when the infantry elements are prepared to conduct an attack. Refer to Figure 3-21 for an illustration of this phase of the clearance. |
||
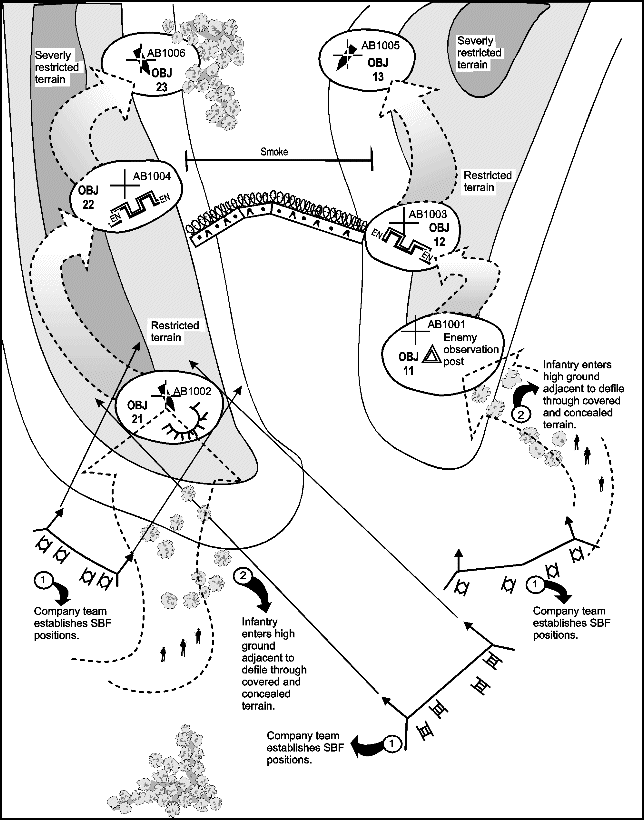 |
Figure 3-21. Company team conducts the approach to a defile.
Clear |
The clearance phase begins as the infantry squads begin their attack in and around the restricted terrain. Examples of the locations where this maneuver may take place include the following:
Figure 3-22 illustrates the clearance phase for an operation in a heavily wooded area. The following actions and considerations are applicable during this phase:
- Short engagement ranges, which may be prevalent in these operations. - Limitations in elevating the main gun. - Significant blind spots associated with targets above the tank. |
||
 |
Figure 3-22. Company team conducts clearance operation in a heavily wooded area.
Secure |
The company team must secure the far side of the defile, built-up area, or wooded area until the task force moves forward to pick up the fight beyond the restricted terrain. If the restricted area is large, the team may be directed to assist the passage of another element forward to continue the clearance operation. Figure 3-23 shows the company team securing the far side of a strip area. In completing the clearance, the company team must be prepared to take any action necessary to secure the area, such as the following:
|
||
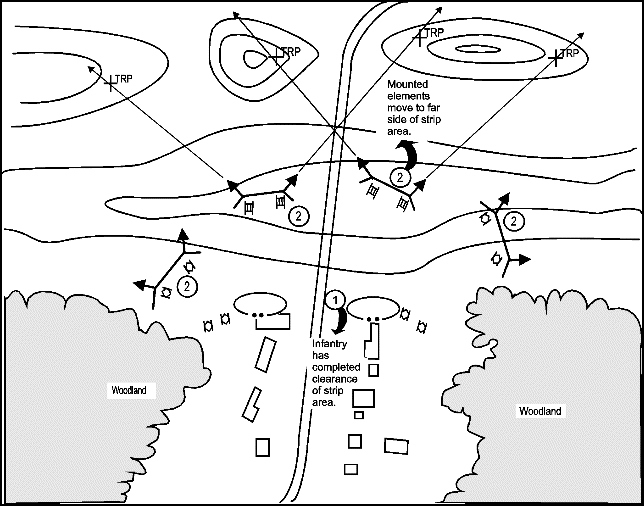 |
Figure 3-23. Company team secures the far side of a strip area.
ASSAULT
The assault is a complex tactical task that entails closure with the enemy, under fire of his weapons, to the point that the assaulting force gains positional advantage over or destroys the enemy. A company team may be required to assault prepared or unprepared enemy positions from either an offensive or defensive posture. Examples of situations requiring company teams or platoons to assault include the following:
|
|||
Planning |
There are many inherent dangers in an assault: deadly enemy fires; a rapidly changing operational environment; the requirement to execute the assault on short notice; the possibility of fratricide when friendly forces converge. Taken together, these factors dictate that the company team commander and subordinate leaders understand the planning considerations covered in the following discussion. |
||
Enemy situation |
The process of developing a clear and current picture of the enemy situation is the same in an assault as for other tactical operations. Because the company team may conduct an assault in a variety of situations, the commander will often face unique challenges in collecting and disseminating information on the situation. For example, if the company team is the assault force during a task force deliberate attack, the commander may be able to develop an accurate picture of the enemy situation during the troop-leading process. He can then produce his SITEMP, updating it as a result of battlefield reporting by the task force support and breach forces. He can also concentrate on developing thorough FRAGOs to issue new information to the team as needed. In another instance, however, the company team commander may have to develop his picture of the enemy situation on the run, after the operation has begun; he must rely more heavily on reports from units in contact and on his own development of the situation. In this type of situation, such as when the team is assaulting to complete the destruction of the enemy AGMB during a movement to contact, the commander must plan on relaying information as it develops. Again, he uses clear, concise FRAGOs to explain the enemy situation to subordinates; he must know how to develop and issue these orders quickly under the pressures of the battlefield environment. In either type of situation, it is imperative that the company team commander and his subordinate leaders make necessary adjustments to the scheme of maneuver based on the available information. This will help them to ensure that their plans are adapted to defeat the enemy they will actually face on the ground and not the enemy depicted in a SITEMP that no longer applies. |
||
Maneuver |
An assault entails closure with the enemy to gain positional advantage over him and, ultimately, to destroy him. In some situations, closure may require the company team to conduct only mounted maneuver; in other cases, the team may have to use both mounted and dismounted maneuver to assume the advantage. Factors influencing the commander's decision whether to conduct a mounted assault or one that combines mounted and dismounted elements include the following:
|
||
Fire support |
Fire support is employed for a variety of purposes in support of an assault. These include, but are not limited to, the following:
NOTE: The company team commander must be especially careful to maintain the minimum safe distance for artillery and mortar fires during the assault on the objective. |
||
Mobility and |
Conduct of an assault breach is a high-frequency task for the company team when it takes part in an assault of prepared enemy positions. The following discussion supplements the detailed examination of breaching operations in Chapter 5 of this manual. While serving as the assault force in a task force deliberate attack, the company team may have to conduct an assault breach of the enemy's protective obstacles to gain access to the objective area. Protective obstacles normally consist of antipersonnel mines emplaced to defeat a dismounted assault; they are normally integrated with existing obstacles and restricted terrain. The company team can conduct either a mounted or dismounted assault breach. The commander must determine if a mounted breach is possible based on several factors, including terrain and the enemy's antitank capabilities. The following considerations apply:
|
||
Conduct of |
During the planning and preparation phases, the commander should focus on the tactical considerations and actions that will affect the execution of the assault. The following paragraphs outline these factors, organized roughly in chronological order as they will occur on the battlefield. |
||
| Set the conditions for the assault |
Either the task force or, in limited circumstances, the company team must set the conditions for the assault. The purpose of this effort is to achieve a 3-to-1 force ratio for the assaulting force. The task force or team normally achieves this by either or both of two methods: isolation of the enemy force or portions of the objective area and/or destruction of the enemy on the objective area. Figure 3-24 illustrates this phase of the assault operation. |
||
 |
Figure 3-24. Example of a task force setting the conditions for an assault during a deliberate attack.
Isolate the enemy force or objective area. The task force or company team may use one of the following methods to isolate a particular enemy force or a particular part of the objective area:
Destroy the enemy force. The task force or company team may accomplish this by employing CAS, artillery fires, or direct fires from support by fire positions. |
|||
| Suppress the enemy on the objective |
The enemy must be suppressed to protect the assault force. The suppressing force, which normally requires at a least a 1-to-1 force ratio to be successful, may be provided by the task force or by the assaulting company team. The following considerations apply:
|
||
| Conduct actions at the assault position or the PLD |
An assault position, the last covered and concealed position short of the objective, is normally used when the company team is the assault force in a task force deliberate attack. An assault position may be used in conjunction with a PLD, or a PLD may be used in lieu of an assault position. The example in Figure 3-24 illustrates the relative position of the assault position in a task force deliberate attack. Actions at the assault position or PLD may include these critical functions:
NOTE: Figure 3-25 illustrates various phases of the assault; these actions, which are covered in the following discussion, include the assault breach, the aboveground fight, and the belowground fight. |
||
Conduct the |
The company team may need to conduct an assault breach of the enemy's protective obstacles if the enemy is fighting from prepared positions. The team can conduct either a manual (dismounted) or mounted breach. Refer to the earlier discussion of mobility and survivability considerations for the assault. |
||
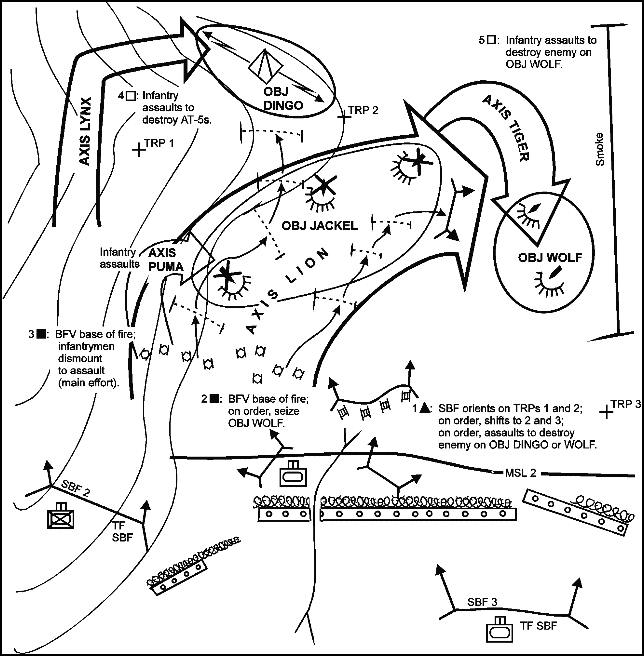 |
Figure 3-25. Example of a company team conducting an assault of an attritted MRC
as the assault force in a task force deliberate attack.
Conduct the |
The aboveground fight includes those actions taken by the company team to suppress and/or destroy the enemy on the objective using accurate direct fires. It also entails securing the objective from enemy counterattacks, direct fires, and indirect fire observers. The aboveground fight is controlled by the company team commander, who must take into account the following considerations:
|
||
Conduct the |
Belowground operations entail the clearance of enemy trench lines and bunker complexes. They are conducted by dismounted infantry and engineers in concert with tanks and BFVs under the control of infantry platoon leaders and their subordinate squad leaders. (NOTE: The company team commander must thoroughly understand the differences, in terms of tempo and other operational considerations, between the aboveground and belowground fights. His effectiveness in controlling both fights and in integrating all of his assets is a critical factor in the success of the assault operation.) For a detailed discussion of mounted and dismounted integration and drills for entering and clearing a trench line, refer to FM 7-7J. The following paragraphs outline procedures and considerations for several aspects of the belowground fight. Dismount point. The company team commander will designate where his infantry squads will dismount to begin execution of the belowground fight. These dismount points can be short of the objective, on the objective, and/or beyond the objective. The following paragraphs examine the relative advantages and disadvantages of each positioning option. Short of the objective. The advantages of dismounting the infantry squads before reaching the objective include protection of the infantrymen during the dismount process, control at the dismount point, and the ability to continue suppression of the enemy by supporting indirect fires during the dismount. Disadvantages include exposure of the infantry squads to indirect and small arms fires as they maneuver to the objective area and the possibility that suitable dismount points will be targeted for enemy indirect fires. On the objective. The primary advantages of this option are greater speed and enhanced protection of the infantry squads as the company team maneuvers to the objective area. There are several disadvantages in dismounting on the objective: difficulty in orienting the dismounted elements on specific locations and objectives while they are riding in the BFVs; problems that may arise in establishing control at dismount points; and vulnerability of BFVs to short-range antiarmor weapons. Beyond the objective. This dismount option has several potential advantages: effective control at the dismount point; greater ease in orienting the dismounted elements to the terrain and the objectives of the assault; confusion or disorientation among enemy elements when they are forced to fight in an unexpected direction. At the same time, there are significant disadvantages, including vulnerability of the company team to attack from enemy positions in depth or from enemy reserve forces; vulnerability of the BFVs to short-range antiarmor systems; and increased risk of fratricide. Support of dismounted maneuver. The company team must establish a base of fire with its tanks and BFVs; this will allow the infantry to safely dismount and then either to maneuver or to enter the trench line. The direct fire plan must be thoroughly developed and rehearsed to ensure that it will facilitate effective protection for the infantry while preventing fratricide. The commander should consider use of restrictive fire measures to protect converging forces and of other direct fire control measures, such as visual signals, to trigger the requirement to lift or shift fires. The commander must also consider specific hazards associated with the company team's weapon systems. An example is the downrange hazard for dismounted infantry elements created by the discarding petals of rounds from the team's 120-mm and 25-mm guns. The hazard area for 120-mm sabot rounds is 70 meters to the left and right of the gun-target line out to a range of 1 kilometer. The hazard area for 25-mm armor-piercing rounds extends 30 degrees to the left and right of the gun-target line out to a range of 200 meters. The use of TOW missiles creates hazards as well. TOWs have a backblast area, in the form of a 90-degree "cone," that extends 75 meters to the rear of the vehicle firing the missile; this area is divided into a 50-meter danger zone and a 25-meter caution zone. Trench and bunker clearance. The company team's base of fire element and the maneuvering dismounted infantry must maintain close coordination throughout the clearance operation. The focus of the supporting tanks and BFVs is on protecting the dismounted infantrymen as they clear the trench line or maneuver to destroy individual or vehicle positions. The base of fire vehicles normally concentrate on the destruction of key aboveground structures (especially CPs and bunkers, which normally contain crew-served weapons) and the suppression and destruction of enemy vehicles. As noted previously, the direct fire plan must be thoroughly developed and rehearsed to ensure that it will facilitate effective mutual support while preventing fratricide. Techniques for controlling direct fires during trench and bunker clearance may include the following:
NOTE: Refer to FM 7-7J for a more detailed discussion of trench and bunker clearance operations. Combined effects. Once the dismounted infantry enters the trench line, the combined effects of the company team's assets will place the enemy in a dilemma. Every action the enemy takes to avoid direct fire from the tanks and BFVs, such as maintaining defiled positions or abandoning bunker complexes, leaves him vulnerable to attack from the infantry maneuvering down the trench. Conversely, when enemy vehicles move to avoid the attacking friendly infantry or when the enemy's infantry elements stay in bunkers or CPs, they expose themselves to the fires of the friendly armored vehicles. |
||
Consolidate |
Consolidation consists of actions taken to secure the objective and defend against an enemy counterattack. The company team commander must use the troop-leading process to plan and prepare for this phase of the operation. He ensures that the team is ready to conduct the following actions that normally are part of consolidation:
|
||
Reorganize |
Reorganization, normally conducted concurrently with consolidation, consists of actions taken to prepare for follow-on operations. As with consolidation, the company team commander must plan and prepare for reorganization as he conducts his troop-leading procedures. He ensures that the company team is prepared to take the following actions:
|
||
AMBUSH
An ambush is a surprise attack on a moving or temporarily halted enemy. It may take the form of an assault to close with and destroy the enemy, or it may be an attack by fire only, executed from concealed positions. An ambush does not require that ground be seized or held. Ambushes are normally conducted by infantry forces. For a more detailed discussion of ambushes, refer to FM 7-10. |
|||
Purposes |
Ambushes are generally executed to reduce the enemy's force's overall combat effectiveness. Destruction is the primary purpose, with the goal of killing, injuring, or capturing the enemy's soldiers and destroying or capturing his equipment and supplies. Harassment, the secondary purpose of the ambush, diverts the enemy from other important missions. |
||
Operational |
The execution of an ambush is offensive in nature. The company team, however, may be directed to conduct an ambush in a wide variety of situations. For example, it may stage the ambush during offensive or defensive operations, as part of task force rear area operations, or during retrograde operations. OPSEC is critical to the success of an ambush and is a major consideration as to why the operation is normally conducted by infantry forces only. The company team must take all necessary precautions to ensure that it is not detected during the movement to or preparation of the ambush site. The team must also have a secure route of withdrawal following the ambush. |
||
Phases of the ambush |
An ambush normally consists of the following phases:
|
||
Task organization |
The company team is normally task organized into assault, support, and security elements for the execution of the ambush. |
||
Support element |
The support element fixes the enemy force and prevents it from moving out of the kill zone, allowing the assault force to conduct the ambush. The support element generally uses direct fires in this role, but it may also be responsible for calling for indirect fires to further fix the ambushed force. |
||
Assault element |
The assault element executes the ambush. It may employ an attack by fire, an assault, or a combination of those techniques to destroy the ambushed force. |
||
Security element |
The security element provides protection and early warning to the other elements of the ambush patrol. It is responsible for securing the ORP. It isolates the ambush area, both to prevent the ambushed enemy force from moving out of the ambush site and to keep enemy rescue elements from reaching the site. The security element may also be responsible for securing the company team's withdrawal route. |
||
Types of ambushes |
Once the company team receives an order to conduct an ambush, the commander must determine which of the two types of ambush operations is best suited to the situation. In a point ambush, the patrol deploys to attack an enemy force in a single kill zone. In an area ambush, the patrol is deployed to conduct multiple, related point ambushes throughout an ambush area. |
||
|
NEWSLETTER
|
| Join the GlobalSecurity.org mailing list |
|
|
|