

APPENDIX P
OBSTACLES
Section I. MINEFIELDS
P-1. GENERAL
Minefields assist in security defensive, retrograde, and offensive operations by reducing the mobility of the enemy. Minefields supplement obstacles and weapons. They also add to the user's combat power without adding more troop strength.
Characteristics and techniques for employment of antipersonnel and antitank mines are shown in illustration. (Fig. P-1.)

P-2. HASTY PROTECTIVE MINEFIELD
In the defense, platoons and squads lay hasty protective minefield to supplement weapons, prevent surprise, and give early warning of enemy advance. A platoon can install hasty protective minefield, but only with permission from the company commander. (The company commander must get permission from the battalion commander.)
Hasty protective minefield are reported to the company commander, recorded on DA Form 1355-1, and marked. The leader puts the minefield across likely avenues of approach, within range of his organic weapons and within visual observation from his defensive positions.
The minefield should be recorded before the mines are armed. The leader installing the minefield should warn adjacent platoons and tell the company commander of the minefield's location. When the platoon leaves the area (except when forced to withdraw by the enemy), it must remove the minefield or transfer the responsibility for the minefield to the relieving platoon leader.
Only metallic mines are used in hasty protective minefields. A metallic mine detector (AN/PSS-11) will help locate them. The mine detectors are in the battalion's supply section. Booby traps are not used in hasty protective minefield; they delay removal of the mines. Time may allow only the placing of mines on the surface of the ground when laying hasty minefield.
The employing unit must make sure that the minefield can be kept under observation and covered by fire at all times. Continuous observation can keep the enemy from booby-trapping, removing, or easily bypassing the mines.
The following example describes how to lay a hasty protective minefield. Although this is an example for a platoon, a squad follows the same procedure.
The platoon has moved into a battle position and is preparing to defend. Hasty protective minefields are needed to improve the defense. The platoon's basic load contains M21 antitank mines, and M16A1 and M18A1 (Claymore) antipersonnel mines with tripwires.
|
CONTENTS |
After requesting and receiving permission to lay the minefield, the platoon leader and squad leaders reconnoiter to determine exactly where the mines should be placed.
The leaders find a need to use antitank mines to block enemy vehicles at two points--a bridge and a ford (see figure).
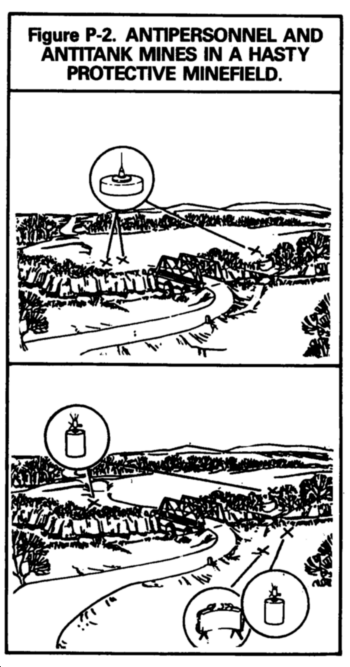
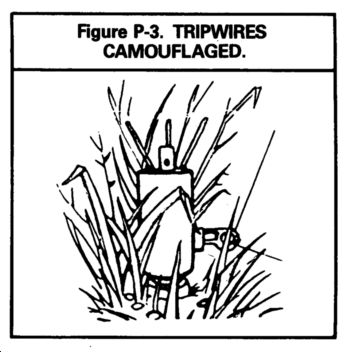
The leaders decide that antipersonnel mines are needed to protect the antitank mines and to cover the likely avenues of approach of enemy infantry. Antipersonnel mines are also needed for the open area in front of the platoon. The M16A1 antipersonnel mines will be buried, time permitting, and the tripwires camouflaged with grass or leaves.
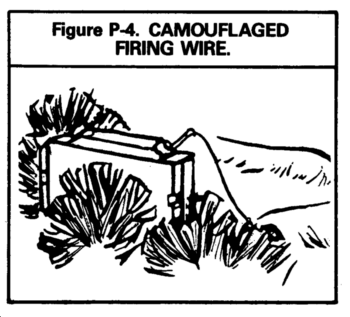
The firing wire for the Claymore will be camouflaged using grass or leaves, and it will be buried when possible.
When the leaders have decided exactly where they will lay the mines, and are ready to begin, the platoon leader reports this information to the company commander. This is called an initiation report. Next, squad leaders have their men emplace the mines. THE TROOPS DO NOT ARM OR ATTACH TRIPWIRES TO THE MINES AT THIS TIME.
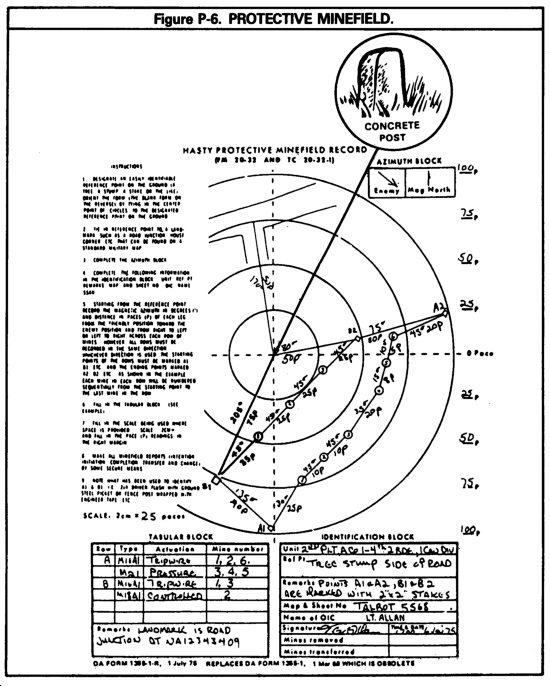
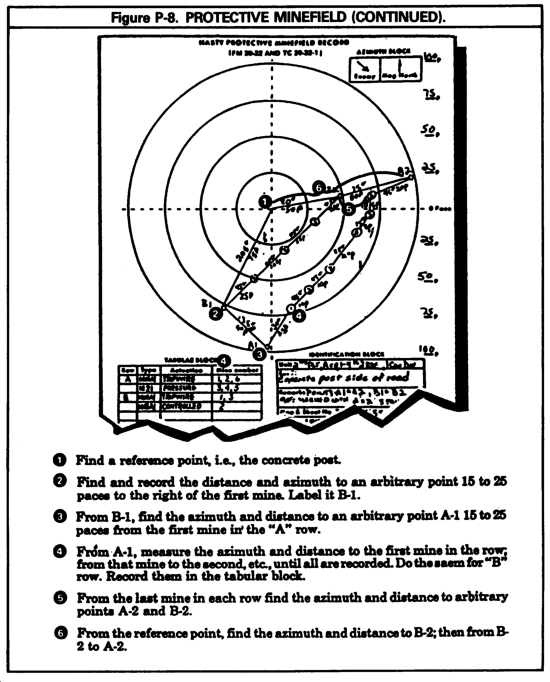
While the troops are placing the mines, the platoon leader finds an easily identifiable reference point in front of the platoon's position. In this example, he decides the concrete post to the front is an ideal reference point. The platoon leader now starts to record the minefield.
At the reference point, the platoon leader tries to visualize the minefield running in rows parallel to the defensive position. This will make the recording simpler and will later make retrieval quicker and safer. The row of mines closest to the enemy is designated A and the succeeding rows will be B, C, etc. For this hasty protective minefield, the platoon leader decides that two rows (A and B) will be enough.
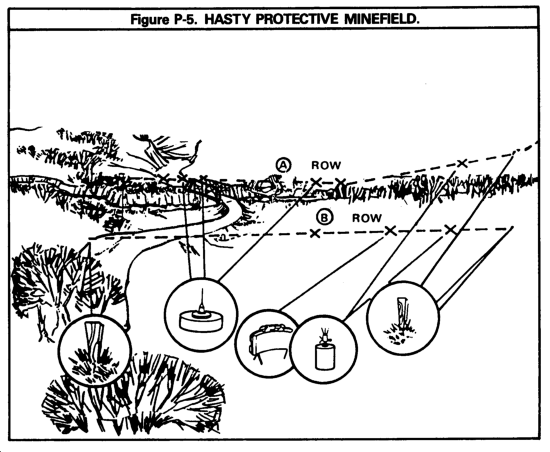
The ends of a row are shown by two markers. They are labeled with the letter of the row and the number 1 for the right end of the row and 2 for the left end of the row. The rows are numbered from right to left, facing the enemy. The marker can be a wooden stake or steel picket.
From the concrete post, the platoon leader measures the magnetic azimuth in degrees and paces the distance to a point arbitrarily selected between 15 and 25 paces to the right of the first mine on the friendly side of the minefield. This point is B-1 and marks the beginning of the second row of mines. The platoon leader places a marker at B-1 and records the azimuth and distance from the concrete post to B-1 on DA Form 1355-1-R Fig. P-6.
Next, the platoon leader measures the azimuth and distance to a point 15 to 25 paces from the first mine in row A. He places a marker at this point and records it as A-1. (Fig. P-7.)
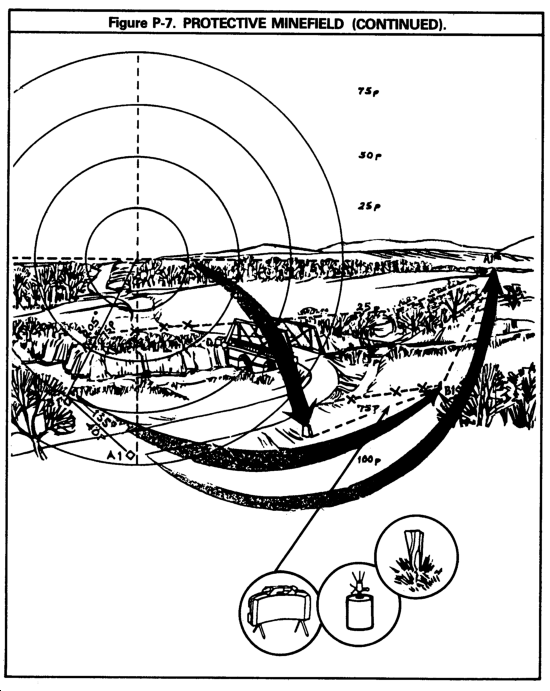
The platoon leader then measures the distance and azimuth from A-1 to the first mine in row A and records them. He then measures the distance and azimuth from the first mine to the second, and so on until all mine locations have been recorded, as shown.
The platoon leader gives each mine a number to identify it in the tabular block of DA Form 1355-1-R.
When the last mine location in row A is recorded, the platoon leader measures an azimuth and distance from the last mine to another arbitrary point between 15 and 25 paces beyond the last mine. He places a marker here and calls it A-2. The platoon leader follows this same procedure with row B.
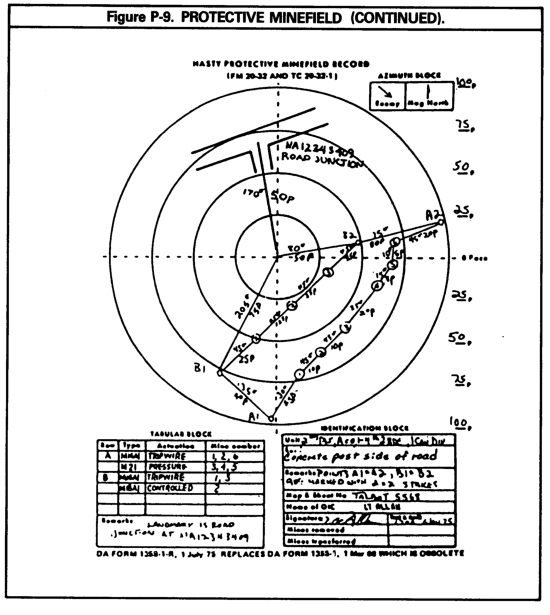
When the platoon leader finishes recording and marking the rows, he measures the distance and azimuth from the reference point to B-2, and from B-2 to A-2, and records them. If the tactical situation requires it, the last mine in the row can be an antitank mine to facilitate its retrieval. The form now looks like Fig. P-8.
The platoon leader now ties in the reference point with a permanent landmark that he found on the map if available. He measures the distance and azimuth from this landmark to the reference point. The landmark might be used to help others locate the minefield should it be abandoned. Finally he completes the tabular and identification blocks. The completed form looks like Fig. P-9.
While the platoon leader is tying in the landmark, the troops arm the mines. The troops arm the mines nearest the enemy first (row A). This lets the troops work their way back to the platoon position safely.
Now that the field is laid and the paperwork is done, the platoon leader calls the commander and reports that the minefield is completed.
As long as the unit and the minefield stay in place, the form (DA Form 1355-1-R) stays with the platoon leader. If the minefield is transferred to another platoon, the gaining platoon leader signs and dates the "mines transferred" block and accepts the form from the previous platoon leader. When the minefield is removed, the form is destroyed. If the minefield is left unattended or abandoned unexpectedly, the form must be forwarded to the company commander. The company commander forwards it to battalion to be transferred to more permanent records. In summary the steps for installing a hasty protective minefield are:
(1) Report intention to lay a hasty protective minefield and get authorization to lay it.
(2) Reconnoiter to find the best places for mines based on likely enemy avenues of approach and the platoon's ability to keep the mines under observation.
(3) Report starting of the minefield.
(4) Have the mines placed on the avenues of approach. Do not arm the mines yet. Use only metallic mines. Do not use booby trap devices.
(5) Record the minefield on DA Form 1355-1-R.
(6) Arm the mines, working from the enemy side to the friendly side.
(7) Report completion of the minefield.
(8) Always integrate mines with other defense plans.
When retrieving the mines, the troops start at the reference point and move to B-1, using the azimuth and distances as recorded. They then move from B-1 to the first mine in row B. However, if B-1 is destroyed, they move from the reference point to B-2, using that azimuth and distance. They will now have to shoot the back azimuth from B-2 to the last mine, i.e., add or subtract 180 degrees from the recorded azimuth. The stakes at A-1 and B-1 are required. Stakes at A-2 and B-2 are recommended because it is safer to find a stake when traversing long distances than to find a live mine.
Section II. WIRE AND DEMOLITIONS
P-3. GENERAL
Engineers normally have the responsibility and equipment for assisting the infantry in constructing wire and demolition obstacles. The shortage of engineers, however, may require that rifle platoons and squads build these obstacles as best they can. Obstacles should be:
Under friendly observation and covered by fire.
Concealed from enemy observation as much as possible.
Erected in an irregular pattern.
Employed in depth.
Coordinated with existing obstacles.
Of no advantage to the enemy.
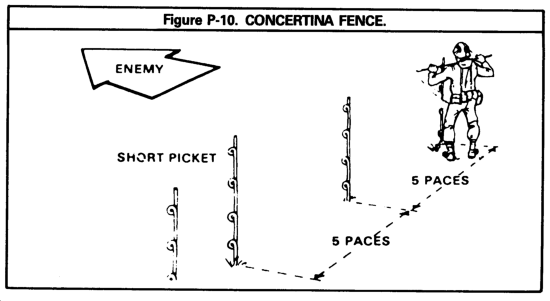
P-4. TRIPLE STANDARD CONCERTINA FENCE
Of the wire barriers a platoon or squad may build, the most common is the triple standard concertina fence. It is built of either barbed wire concertina or barbed tape concertina. There is no difference in building methods.
The material and labor requirements for a 300-meter triple standard concertina fence are listed below.
|
long pickets |
To construct a triple standard concertina fence, first lay out and install all pickets from left to right (as you face the enemy). Put the long pickets five paces apart, and the short (anchor) pickets two paces from the end of the long pickets. The enemy and friendly picket rows are offset and are placed 3 feet apart.
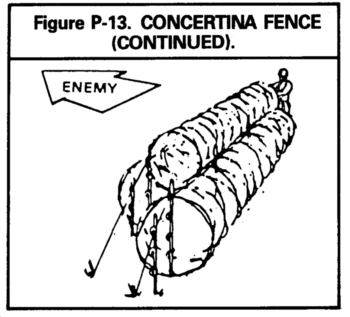
Now lay out all rolls of concertina. Place a roll in front of the third picket on the enemy side, and two rolls to the rear of the third picket on the friendly side. This step is repeated for every fourth picket thereafter.

Install the front row concertina and horizontal wire. Place the concertina over the pickets.

Install the rear row of concertina and horizontal wire.
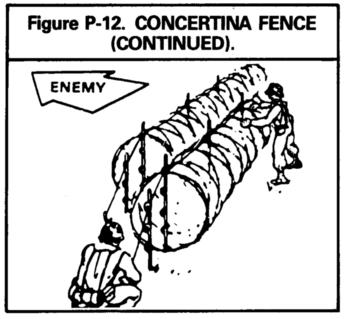
Install the top row concertina and join the rear horizontal wire.
P-5. DEMOLITION
The platoon or squad may also perform demolition work. Basic to this is proper preparation of a charge. There are two basic ways to detonate an explosive charge: nonelectrically and electrically.
Nonelectric. In the nonelectric way, troops must follow these steps:
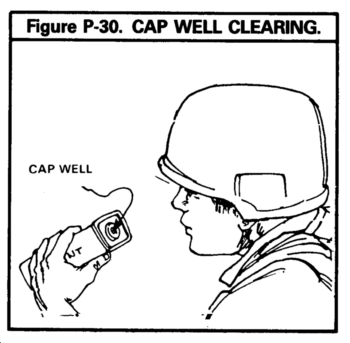
(1) Clear the cap well of a block of TNT or push a hole about the size of a blasting cap (3 centimeters [1  inches] deep and .65 centimeter [¼ inch] in diameter) in a block of C4 plastic explosive.

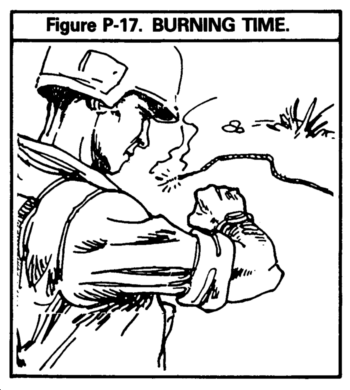
(2) Cut and discard a 15-centimeter (6-inch) length from the free end of the time blasting fuse to prevent a misfire caused by the exposed powder absorbing moisture from the air.
(3) Compute the burning time of a 91.4-centimeter (3-foot) section of fuse to help determine how much fuse is needed to allow the person detonating the charge to reach a safe distance from the explosion. Divide this burning time by 3 to find the burning time of 30.5 centimeters (1 foot). Now divide the time required to allow the person detonating the charge to reach a safe distance from the explosion by the burn time of 30.5 centimeters (1 foot). This will give the number of centimeters (feet) of fuse needed.
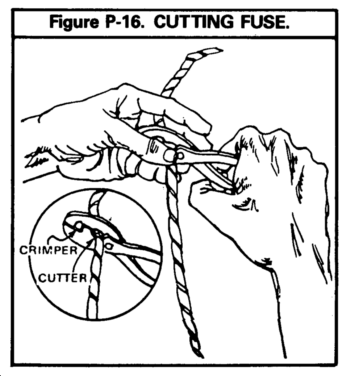
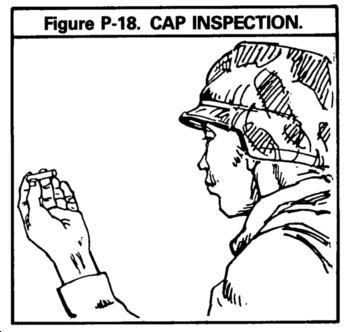
(4) Inspect the nonelectric blasting cap to insure it is clear of foreign matter.
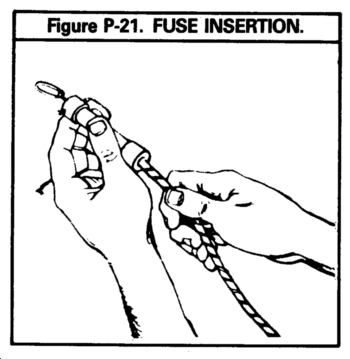
(5) Gently slip the blasting cap over the fuse so that the flash charge in the cap is in contact with the end of the time fuse. DO NOT FORCE IT IN THE CAP.
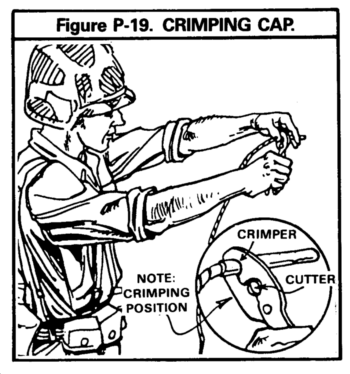
(6) After seating the cap, crimp it  inch from the open end of the cap with a set of M2 cap crimpers. Point the cap out and away from you when crimping.
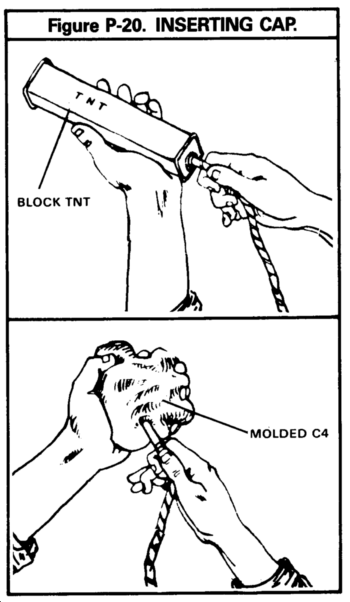
(7) When using TNT, insert the blasting cap into the cap well. When using C4, place the cap into the hole you made in the C4 and mold the C4 around the cap.
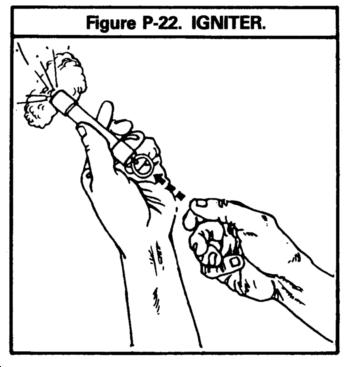
(8) Insert the free end of the fuse into an M60 fuse igniter and secure it in place by tightening the fuse holder cap.
(9) To fire, remove the safety pin, hold the barrel in one hand, and pull on the pull ring with the other, taking up the slack before making the final strong pull. If the fuse igniter misfires, it is reset by pushing the plunger all the way in and trying to fire as before. If it still misfires, replace it.
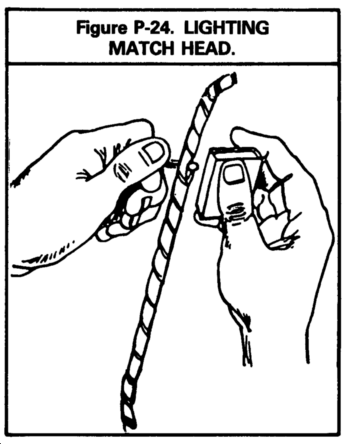
(10) If a fuse igniter is not available, a match can be used to light the fuse. Split the end of the fuse and place the head of an unlighted match in the split (make sure the match head is touching the powder train).
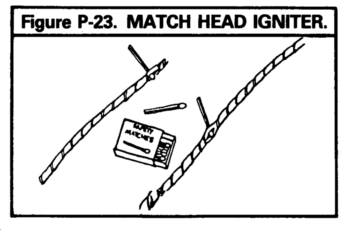
Then light the inserted match head with another flaming match or by striking the inserted match head on a match box.
(11) If the fuse burns but the explosive charge does not go off, there is a MISFIRE. When this happens, wait 30 minutes before attempting to clear it. If the misfire charge was not tamped (nothing packed around it), lay a primed charge of at least one block of C-4 or TNT beside it. If it was tamped, place at least two blocks of C-4 or TNT beside it. Do not move the misfire charge. The detonation of the new charge will detonate the misfire charge.
Electric. For the electric method, take the following steps:
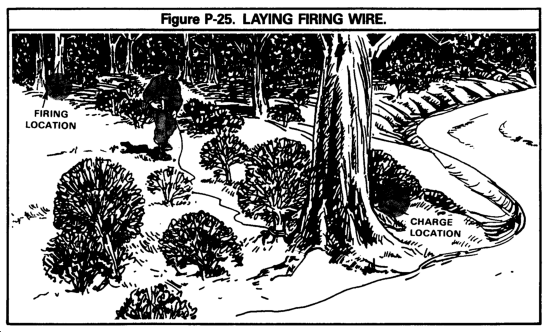
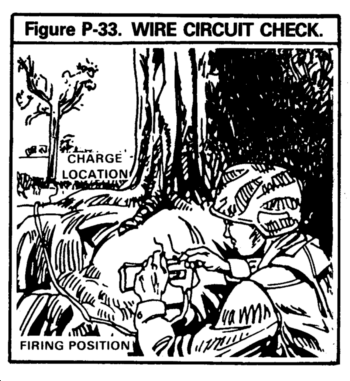
(1) After locating a safe firing position, lay out the firing wire from the charge to the tiring position. Before leaving the charge area, anchor the wire to something. ALWAYS KEEP THE FIRING DEVICE WITH YOU--DO NOT LEAVE IT AT THE FIRING POSITION.
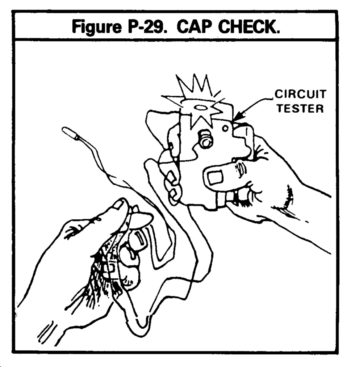
(2) Check the firing wire with a galvanometers or circuit tester to make sure the firing wire does not have a short circuit or a break. Follow these steps:
STEP 1. Separate the firing wire conductors (bare ends of the wire) at both ends. Touch those at one end to the galvanometer/circuit tester posts. The needle on the galvanometers should not move, or the light on the circuit tester should not come on. If either the light comes on or the needle moves, that firing wire should not be used because the firing wire has a short.
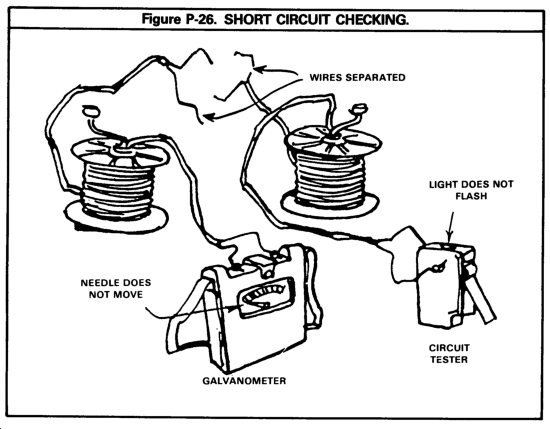
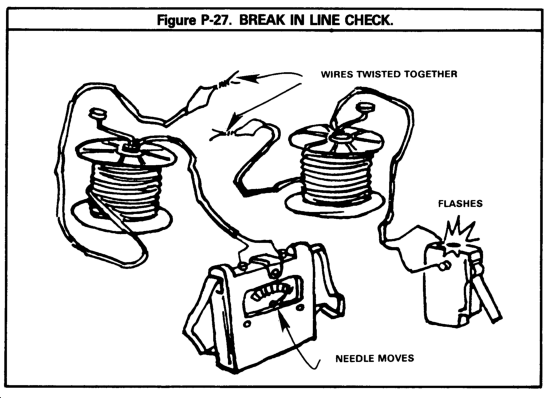
STEP 2. Twist the conductors together at one end of the firing wire and touch those at the other end to the galvanometers or M51 blasting cap test set. This should cause a wide deflection of the galvanometers needle or the light to come on in the circuit tester. No movement of the needle in the galvanometers or light on the circuit tester indicates a break in the wire.
(3) Check the blasting cap with a galvanometers or circuit tester to make sure it does not have a short. Remove the short circuit shunt. Touch one cap lead wire to one post and the other cap lead wire to the other post. When using the galvanometers, the needle should make a wide deflection. If it does, the cap is good. If the needle fails to move or only makes a slight deflection, the cap should be replaced.
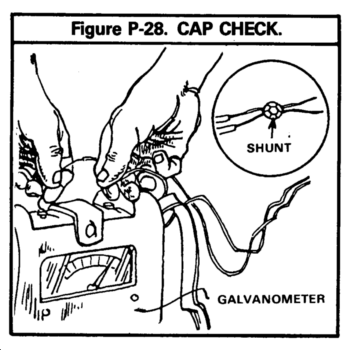
(4) When using the circuit tester, the light should come on when you squeeze the handle. If it does not, the cap should be replaced.
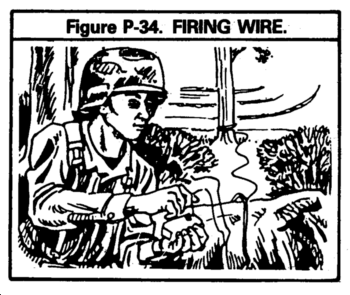
(5) Clear the cap well of a block of TNT or push a hole about the size of a blasting cap in a block of C4 plastic explosive.
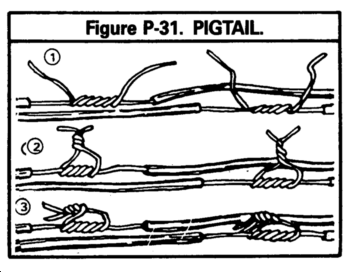
(6) Splice lead wires of cap to firing wires. (Western Union Pigtail.)
|
WARNING: CAP WIRES MUST CONNECT TO THE FIRING CIRCUIT PRIOR TO JOINING THE CAP WITH THE EXPLOSIVE CHARGE. |
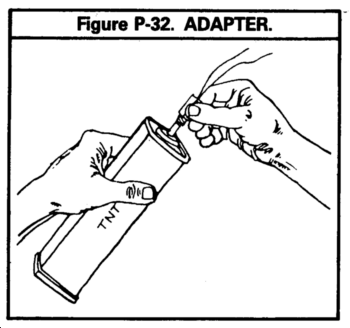
(7) Insert the cap into cap well of the TNT and secure with priming adapter, or insert the cap into the hole you made in the C4 and mold the explosive around the cap.
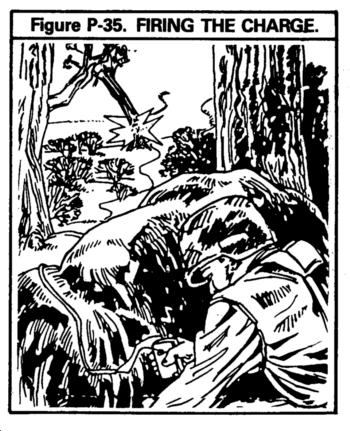
(8) Move to firing position and check the wire circuit with the galvanometers or circuit tester. (Same technique as described previously.)
(9) Fasten firing wires to the posts of the blasting machine.
(10) Operate the blasting machine--to fire the charge.
(11) If the circuit checked out and the blasting machine does not set the charge off, there is a misfire.
(12) If an untamped charge misfires, investigate immediately. If the charge is tamped, wait 30 minutes before investigating. Follow these steps:
(a) Check the firing wire connection to the blasting machine to be sure that the contacts are good.
(b) Make two or three more attempts to fire the charge.
(c) Try to fire again using another blasting machine.
(d) Disconnect the firing wire from the blasting machine and shunt the ends of the wire.
(e) Move to the charge site to investigate.
(f) Check the entire circuit, including the firing wire, for breaks and short circuits.
(g) Make no attempt to remove the primer or the charge.
(h) Place a new primed charge beside the misfire charge, if the fault has not been found.
(i) Disconnect the old blasting cap wires from the firing wire and shunt the ends of the blasting cap wires.
(j) Finally, attach the new blasting cap wires to the firing circuit, wires before priming the charge with the blasting cap. Prime the charge with the cap and attempt to fire again. The detonation will also dispose of the misfire charge.
Section III. BREACHING AND CLEARING OBSTACLES
P-6. GENERAL
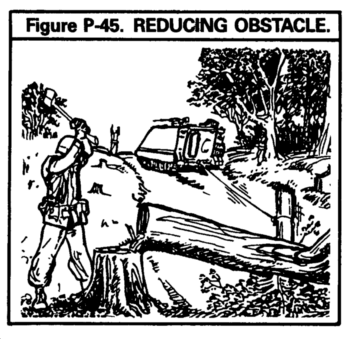
Obstacles are used to halt or slow units, or to cause them to move into an area which has been selected as a kill zone. If the enemy has selected such an area, he will have prepared it so that he can inflict great damage on any opponent moving into it. The enemy will exploit natural obstacles such as defiles, rivers, thick woods, swamps, and cliffs, and reinforce them with man-made obstacles. There are seven basic kinds of reinforcing obstacles: minefield, abatis, log crib, log wall, tank ditch, crater, and wire. Leaders must know the tactics and techniques used to overcome them and the problems which they will present.
Some obstacles may not restrict dismounted elements but will restrict vehicular movement. The platoon may have to clear obstacles to help vehicles go forward. Obstacles are normally covered by enemy direct and indirect fire to keep attacking troops from breaching them. The platoon may not be able to keep the enemy from knowing that it is going to breach, but it should try to keep the enemy from knowing where and when it will try to breach.
SUPPRESS, OBSCURE, SECURE, and REDUCE (SOSR) are key actions in the steps to breach and clear an obstacle.
P-7. MINEFIELDS
To maintain the momentum of an attack, the platoon must be prepared to breach minefields.
These steps are followed to breach a minefield:
STEP 1. SUPPRESS the enemy covering the obstacle. Artillery and mortar fire is used to suppress the enemy. If indirect fire is not available, grenade launchers and machine gun fire are used.
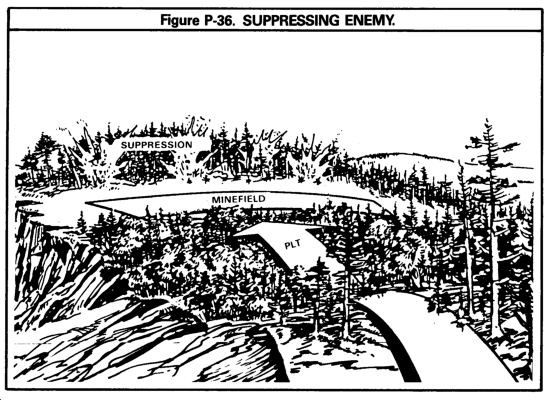
STEP 2. Request smoke to OBSCURE the obstacle area and conceal friendly troops.
STEP 3. SECURE the near side of the obstacle.
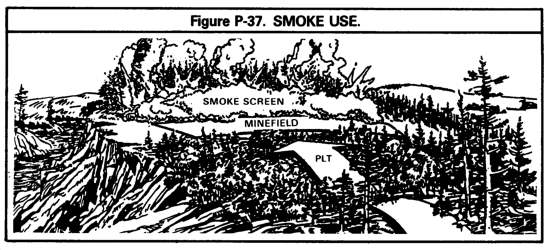
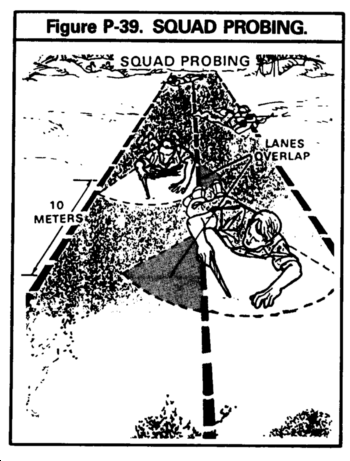
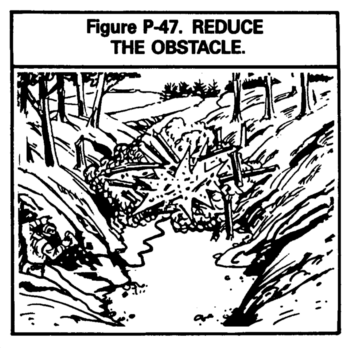
STEP 4. REDUCE the obstacle. Probe a footpath/lane and mark the mines that are found. Lead elements may be accompanied by engineers equipped with specialized mine-clearing equipment. The preferred way to clear a lane through a minefield is to use a rocket-propelled line charge or bangalore torpedo. The only way to clear a minefield without special equipment is to probe with pointed sticks. Bayonets should not be used; they can detonate antipersonnel mines and other magnetic mines. One squad probes while the platoon (-) overmatches.
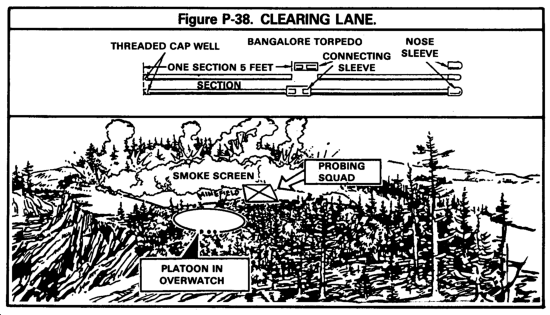
The squad probing the footpath/lane through the minefield uses two probers: one in front, clearing a lane wide enough to crawl through; and a second one, clearing 10 meters behind the first prober and slightly to one side so that their lanes overlap. The probers should not carry their weapons, field packs, load-carrying equipment, helmets, etc. Their equipment is carried by other squad members. Two other men crawl along behind to secure the probers, to carry additional supplies, or to take a prober's job if one becomes a casualty. The probers should be rotated often to keep them from getting tired and/or careless. The probe will be pushed in at an angle and when a hard object is felt, stop and mark.
|
NOTE: If available, mine detectors should be used to clear the minefield. |
The probers mark mine locations with sticks, engineer tape, cloth, or toilet tissue. They do not try to remove mines.

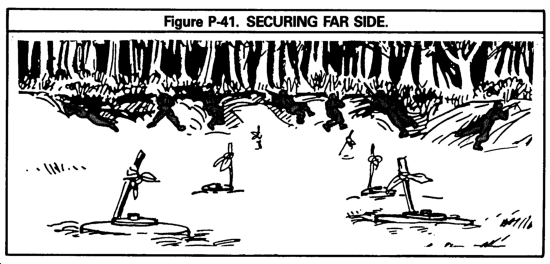
STEP 5. Secure the far side. As soon as the probers have cleared a lane, the squad that cleared it moves through the lane, and secures the far side of the minefield.
STEP 6. When time permits, destroy the marked mines with explosives (two 1-pound charges placed within a foot on each side of the mine).
STEP 7. Mark the cleared lane.
STEP 8. Move the unit through the obstacle.

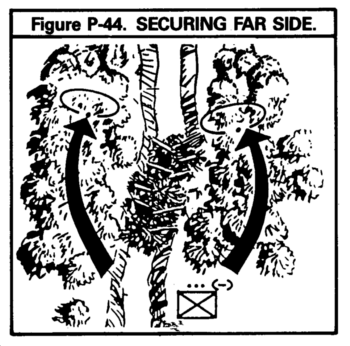
P-8. ABATIS
a. An abatis is an obstacle created by cutting down trees so their tops are crisscrossed and pointing toward the expected enemy direction. It is most effective for stopping vehicles in a forest. The trees are left attached to the stumps as high as possible to make removal more difficult. This obstacle may be reinforced with mines and booby traps.
b. These steps are followed to clear an abatis:
STEP 1. SUPPRESS the enemy covering the obstacle.
STEP 2. Request smoke to OBSCURE the obstacle area and conceal friendly troops.
STEP 3. SECURE the far side of the obstacle.
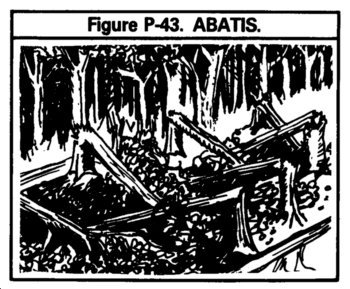
STEP 4. REDUCE the obstacle. Mines and booby traps must first be found and then neutralized by exploding them with C4, or by pulling their tripwires with grappling hooks and long ropes. Use pioneer tools or explosives to cut the trees from their stumps. Tracked and wheeled vehicles can be used to pull the logs out of the road.
P-9. LOG CRIB
A log crib is an obstacle constructed of logs, earth, and rocks. The logs are used to make cribs, which are filled with earth and rock. These are used to block narrow roads and defiles.
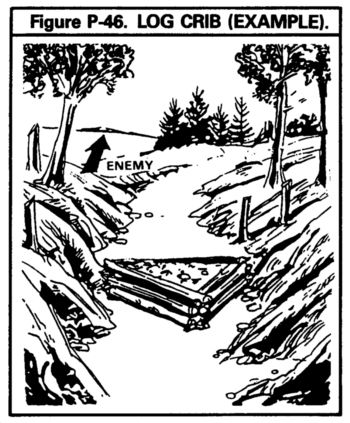
These steps are followed to clear a log crib:
STEP 1. SUPPRESS the enemy covering the obstacle.
STEP 2. Request smoke to OBSCURE the obstacle area and conceal friendly troops.
STEP 3. SECURE the far side of the obstacle.
STEP 4. REDUCE the obstacle. Use direct fire weapons (tank/combat engineer vehicle), explosives, pioneer tools, and vehicles to reduce the obstacle.
Log wall obstacles are very similar to log cribs and require the same clearing technique.
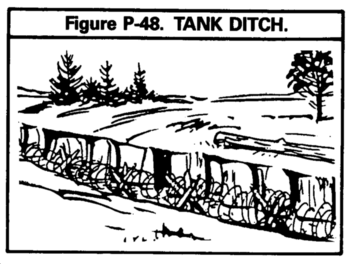
P-10. TANK DITCHES
Tank ditches are usually in open terrain. They are at least 4 meters (13 feet) wide and 1.8 meters (5 feet) deep. The enemy may put barbed wire in them to keep tank crews or infantry from dismounting and using the ditch for shelter. He may prepare the approaches, sides, and bottom of the ditch with antitank and antipersonnel mines or chemicals to make breaching difficult.
These steps are followed to clear a tank ditch:
STEP 1. SUPPRESS the enemy covering the obstacle.
STEP 2. Request smoke to OBSCURE the obstacle area and conceal friendly troops.
STEP 3. SECURE the far side of the obstacle.
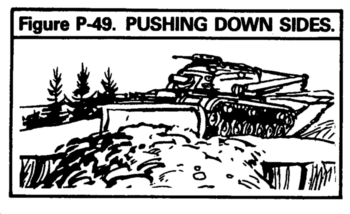
STEP 4. REDUCE the obstacle. Use an armored combat earth mover, tank with blade, or combat engineer vehicle to push down the side of the ditch. Explosives may also be used to blow down and slope the sides of the ditch.
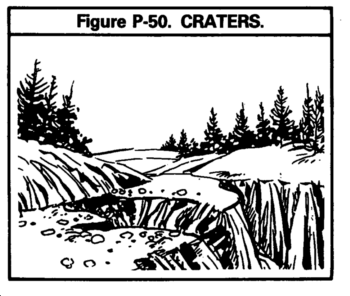
P-11. CRATERS
The enemy uses explosives to create road craters. He will leave the loose spoil around the sides of the crater to make it difficult for a tank to back out.
A crater is cleared using the same steps as with a tank ditch.
P-12. WIRE
The enemy uses wire obstacles to separate infantry from armor. He also uses them as roadblocks against wheeled vehicles.
These steps are used to breach a wire obstacle:
STEP 1. SUPPRESS the enemy covering the obstacle.
STEP 2. Request smoke to OBSCURE the obstacle area and conceal friendly troops.
STEP 3. Secure the near side of the obstacle and clear a lane through the wire. Use wire cutters, bangalore torpedoes, or explosives to remove the wire. Watch out for antipersonnel mines and booby traps. Mark any mines and booby traps with engineer tape, cloth, or anything recognizable. One squad breaches while the platoon (-) overmatches. Tank fire, combat engineer vehicle fire, and massed indirect and direct fire can help breach the wire.
STEP 4. SECURE the far side. As soon as the clearing squad has cleared a lane, the squad moves through the lane and secures the far side.
STEP 5. Destroy the marked mines with explosives or grappling hooks (REDUCE).
STEP 6. Mark cleared lane.
STEP 7. Move unit through the obstacle.
|
NEWSLETTER
|
| Join the GlobalSecurity.org mailing list |
|
|
|