CHAPTER 6
LOAD PREPARATION, LOADING, AND
TIE-DOWN INSTRUCTIONS
6-1. INTRODUCTION. This chapter deals with preparing loads. It describes how to determine tie-down requirements and shoring needs. It also shows how to compute the CB of loads and correctly use pallets and rollers.
6-2. RESTRAINT CRITERIA. Tie-down devices secure cargo against forward, rearward, lateral, and vertical movement during takeoff, flight, and landing. To determine the number of devices needed to safely secure a given item of cargo, you must know the--
- Weight of the cargo.
- Restraint criteria for the aircraft.
- Strength of the tie-down devices and fittings.
- Angles of tie to be used.
a. Restraint Factors. Compute restraint criteria for each aircraft to counter the maximum amount of force or thrust that cargo can be expected to exert against tie-downs under operating conditions. Restraint factors are influenced by--
- Acceleration during takeoff.
- Stability during flight.
- Deceleration during landing.
- Type of landing field (improved or unimproved) for which the aircraft is designated.
b. Tie-Downs. The effective holding strength of a device (or fitting) is determined by the rated strength of the item and how it is employed. All tie-downs must be anchored to a tie-down fitting. The strongest tie-down is no stronger than the fitting to which it is attached. If a tie-down is stressed to its breaking point, the fitting is stressed an equal amount up to the full rated strength of the tie-down. Figure 6-1 shows a typical tie-down correct pull-off.
c. Restraint Nomenclature. Restraints are named for the direction in which they are meant to keep the cargo from moving. Forward restraints keep the cargo from moving forward, aft restraints keep it from moving aft, and lateral restraints keep it from moving side to side. Vertical (downward) restraint is supplied by the cargo floor.
d. Calculation of Tie-Down Devices Required. Use the following method to calculate the number of tie-down devices required to restrain a load from moving in any direction, using the restraint criteria provided:
PROBLEM:
How many tie-down devices rated at 5,000 pounds will be required to restrain a load weighing 4,000 pounds with tie-down devices at a 30-degree vertical and a 30-degree side angle?
CALCULATION:
1. Forward restraint (formula):


NOTE: Since the equation yields a fractional number, this number is increased to the next whole number. Therefore, five tie-down devices will be required to provide forward restraint; six tie-down devices are desirable.
2. Aft restraint (formula):
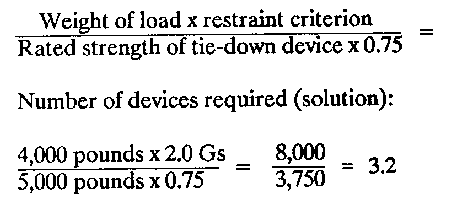
NOTE: Since the equation yields a fractional number, this number is increased to the next whole number. Therefore, three tie-down devices will be required; four tie-down devices are desirable.
3. Vertical restraint (up) (formula):
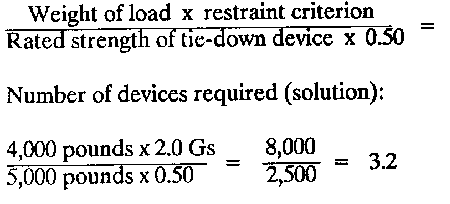
NOTE: If the forward and aft restraint is provided by tie-down devices applied over the cargo or attached to the cargo, no additional vertical restraint is required. Otherwise, four tie-down devices will be needed to provide vertical restraint.
4. Vertical restraint (down): The floor provides the downward restraint.
5. Lateral restraint (formula):


NOTE: If the forward and aft restraint is provided by tie-down devices applied over or attached to the cargo, no additional lateral restraint is required. Otherwise, three tie-down devices will be needed to provide lateral restraint; four tie-down devices are desirable.
6-3. EFFECT OF TIE-DOWN DEVICES AT ANGLES. A tie-down will withstand a force equal to its rated strength only when the force is exerted parallel to the length of the tie-down device. It is seldom possible to fasten a tie-down device in this manner. Instead, it is usually necessary to fasten the tie-down device to the cargo at some point above the floor, resulting in a loss of restraint strength. The strength of restraint is reduced in ratio to the angle formed by the tie-down device with the floor and the axis of the helicopter. Based on calculations, a 30-degree angle of attachment in the intended restraint direction causes a restraint loss of only 25 percent in that direction. This is the most desirable angle. While causing a loss of restraint in one direction, imposing these angles on the tie-down device furnishes restraint in two other directions, so that one tie-down device provides restraint in three directions simultaneously. Thus, a tie-down device applied to provide forward restraint at an angle of 30 degrees also furnishes about 50 percent of its rated strength in lateral and vertical restraint.
6-4. METHODS OF RESTRAINING CARGO. There are two basic methods of applying tie-downs to restrain cargo. The method used depends upon whether or not the cargo has tie-down provisions. Cargo with no tie-down provisions is restrained by passing the tie-down (straps) over or around the cargo and attaching both ends of the tie-down device to the tie-down fittings in the cargo floor. Cargo with tie-down provisions is restrained by attaching one end of the tie-down device to the tie-down fittings in the cargo floor. Attach the other end of the tie-down device to the tie-down point on the cargo (Figure 6-2).
6-5. RESTRAINT OF CARGO WITHOUT TIE-DOWN PROVISIONS. Many cargo loads carried in the aircraft will consist of a variety of boxes, crates, and so forth. This type of cargo must be secured by passing tie-down devices over and around the cargo. When cargo is restrained in this manner, the following factors must always be kept in mind.
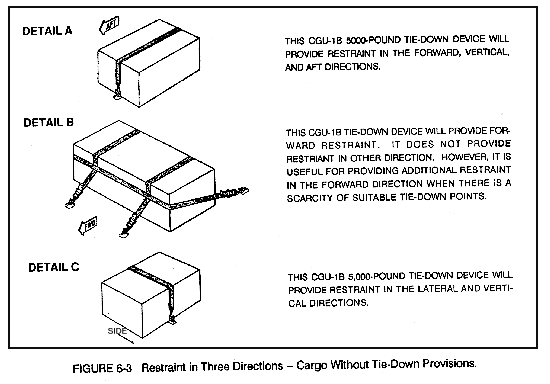
a. Amount of Restraint. A tie-down device placed around an item of cargo will provide restraint equal to the effective strength of the device in the direction it prevents the cargo from moving. This means that a CGU-1B tie-down device applied over cargo (Figure 6-3 Detail A) will provide restraint in the forward, vertical, and aft directions since it will prevent the cargo from moving in these directions. The device applied across the front of the cargo will only provide restraint in the forward direction since it is the only direction in which it really prevents the cargo from moving (Figure 6-3 Detail B). There would be no lateral or vertical restraint from this device since the cargo can readily move in these directions. Extreme care must be taken in applying devices in this manner.
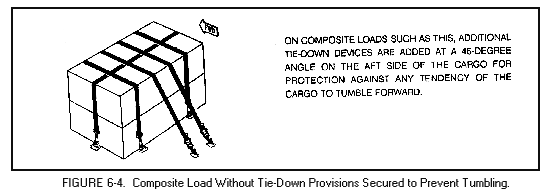
b. Length and Tie-Down Angle of the Tie-Down Devices. A tie-down device should generally be as short as possible and follow as closely as possible the contour of the cargo it is securing to minimize slippage. When tie-down devices are passed over cargo from side to side (Figure 6-3 Detail C), the tie-down device should be as close to 90 degrees as the floor fittings will permit. This is also true of the first two tie-down devices (if there are two) which pass over the cargo in the fore and aft direction. If there are more than two devices in the fore and aft direction, the tie-down angle of the additional devices on the aft side of the cargo should be changed to 45 degrees to obtain additional protection against any tendency the cargo may have to tumble forward. This procedure is particularly important when tying down tall items and composite cargo loads consisting of several stacked boxes. In arranging composite loads, cargo should not be stacked so that it is top heavy. The height of a composite load should not be greater than its length in the longitudinal direction, if it can be avoided.
|
CAUTION Tie-down angle should be 45 degrees with this technique. A 30-degree angle will allow cargo to shift. |
c. Shifting of Cargo. Since the tie-down devices are not actually attached to the cargo, make sure that the load cannot slip from under the tie-down device. This is especially important when several items are tied together. After the proper number of tie-down devices have been applied to comply with the restraint criteria, always check the load to see if any part of it can slip free(Figure 6-3 and 6-4). In many cases where several items are tied down together, it may be necessary to add more tie-down devices to completely secure the load.
6-6.
RULES FOR APPLYING TIE-DOWN DEVICES TO CARGO WITHOUT TIE-DOWN PROVISIONSa. Use the following rules when applying tie-down devices to cargo without tie-down provisions:
(1) Rule 1. If the cargo to be tied down as one load is less than 2,000 pounds, determine the minimum number of tie-down devices required.
(2) Rule 2. If the load is over 2,000 pounds and consists of a single item, follow the procedures out-lined in the sample problem in paragraph 6-7.
(3) Rule 3. If the load is over 2,000 pounds and if it is a composite load consisting of several items, separate the load into two smaller loads. If this is not possible, follow the procedures outlined in the sample problem in paragraph 6-7.
(4) Rule 4. If enough tie-down devices are applied over the top of the cargo to provide forward and lateral restraint, then vertical and aft restraint will automatically be provided. If tie-down devices are applied across the cargo, the restraint in each direction should be checked if there is any question.
(5) Rule 5. After applying the tie-down devices required for minimum restraint, check the load to determine if additional tie-down devices are required to prevent the load from shifting. Composite loads will almost always require additional tie-down devices in the lateral direction.
b. Figure 6-5 provides a simple method for determining the minimum number of tie-down devices required to meet the restraint criteria for different cargo weights. The tie-down patterns shown apply to single as well as composite loads. However, for composite loads, additional tie-down devices will almost always be required to prevent the load from slipping.
6-7. SAMPLE PROBLEM FOR SECURING CARGO WITHOUT TIE-DOWN PROVISIONS. Determine the amount of tie-down devices required to properly secure a composite load of 1,800 pounds.
a. Determine the amount of forward and lateral restraint. Refer to Rule 4, paragraph 6-6.
1,800 x 4.0 Gs = 7,200 pounds of forward restraint.
1,800 x 1.5 Gs = 2,700 pounds of lateral restraint.
b. Determine the minimum number of tie-down devices necessary for the required restraint.
c. Apply tie-down devices to the load.
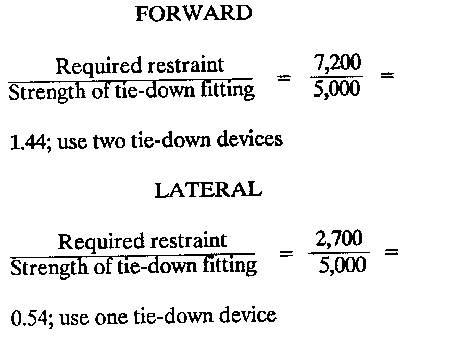
d. In accordance with Rule 5, paragraph 6-6, check the load to see if any additional tie-down devices are required to prevent the load from shifting. In this case, more than two tie-down devices are required to prevent the cargo from shifting sideways and at least four tie-down devices will be required.
6-8. RESTRAINT OF CARGO WITH TIE-DOWN PROVISIONS. Vehicles, special shipping containers, and some items of equipment are provided with rings or other suitable points to which cargo tie-down devices can be attached. When cargo is secured by attaching tie-down devices directly to the cargo, the amount of restraint and the tie-down angle must be kept in mind.
a. Amount of Restraint. A tie-down device, attached between a tie-down ring or point on an item of cargo and a tie-down fitting in the cargo floor, will provide restraint equal to the strength of the tie-down device in the direction of the tie-down device (Figure 6-6). In practice, however, it is not feasible to attach tie-down devices purely in the direction in which restraint is required because of the location of the tie-down provisions on the cargo. Most tie-down devices, out of necessity, must be attached at an angle to the desired direction of restraint. As a result, only a part of the effective strength of the tie-down device will be available to provide restraint in the desired direction.
b. Tie-Down Angle. The tie-down angle is very important because it determines the amount of restraint that can be obtained in any direction. To lessen the number of tie-down devices and to simplify the calculation of the number of tie-down devices required to restrain a load, apply all tie-down devices as closely as possible to the two 30-degree tie-down angles. In tying down cargo, apply at least four tie-down devices at an angle of 30 degrees to the cargo floor and 30 degrees to the longitudinal axis of the aircraft to provide restraint in all directions. If additional restraint is needed in the forward direction, apply additional devices at the same tie-down angles or at an angle 30 degrees to the cargo floor and 0 degree to the longitudinal axis of the aircraft. These devices do not provide any lateral restraint. They do, however, concentrate more restraint in the forward direction than a tie-down device applied at a 30-degree vertical and 30-degree side tie-down angle. It is for this reason that this tie-down angle is used.
c. Percentage Restraint Chart. See Table 6-1.
(1) Angles across the top are those formed between the tie-down device and the cabin floor.
(2) Angles down the side are those formed between the tie-down device and the longitudinal axis of the aircraft.
(3) Vertical restraint is related only to the angle between the tie-down device and the cabin floor. The lateral angle has no bearing on it.
(4) The unshaded area indicates the "best compromise" position.
6-9. RULES FOR APPLYING TIE-DOWN DEVICES ON CARGO WITH TIE-DOWN PROVISIONS. The rules used when applying tie-down devices to cargo with tie-down provisions are as follows:
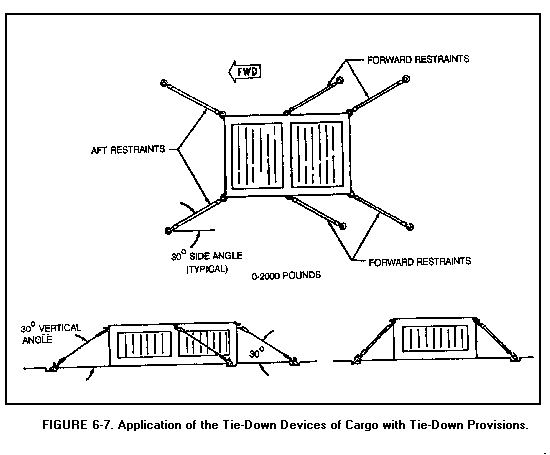
a. Rule 1. Always apply an even number of tie-down devices, attached in pairs, for forward and aft restraint (Figure 6-7).
b. Rule 2. Apply the tie-down devices as close as possible to the rule-of-thumb tie-down angles. Apply the first four tie-down devices so that the tie-down angle is 30 degrees with the cargo floor and 30 degrees with the longitudinal axis of the helicopter.
c. Rule 3. If the tie-down devices can be applied at the rule-of-thumb tie-down angles, determine the number of tie-downs required to provide restraint.
d. Rule 4. If the tie-down devices cannot be applied at the rule-of-thumb angles, follow the procedure outlined in the sample problem in paragraph 6-10.
6-10. SPECIAL LOADS. This paragraph covers a possible vehicle load that is air transportable in the aircraft. Each load has been positioned and the tie-down restraint calculated, using the method set forth in this chapter. Additional information will be included when the using activities determine the special loads required. The load contained in this paragraph includes only those considered to be special due to critical dimensions, weights, or CG of the item to be loaded. Loadings of the special cargo can be applied to the aircraft only if they conform to the following conditions:
a. Actual weights of vehicles are the same as assumed in the load illustrations.
b. The weight and balance of the helicopter must be checked by the procedures given in this chapter.
c. Restraint should be at the rule-of-thumb tie-down angles given in Figure 6-8.
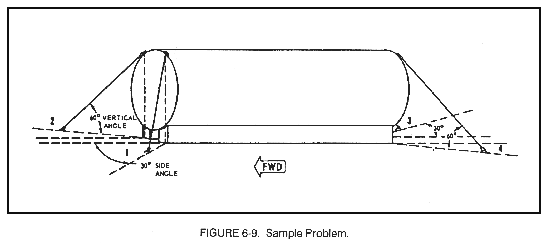
SAMPLE PROBLEM. Cargo with Tie-Down Provisions.
KNOWN:
The shipping container shown weighs 1,000 pounds (Figure 6-9). Because of its shape, size, and the tie-down locations, the tie-down devices cannot be applied at an angle of 30 degrees to the cargo floor.
PROBLEM:
How many tie-down devices are required to properly secure the container?
STEP 1. Determine the amount of restraint required in each direction.
1,000 x 4 Gs = 4,000 pounds of forward restraint.
1,000 x 1.5 Gs = 1,500 pounds of lateral restraint.
1,000 x 2 Gs = 2,000 pounds of aft restraint.
1,000 x 2 Gs = 2,000 pounds of vertical restraint.
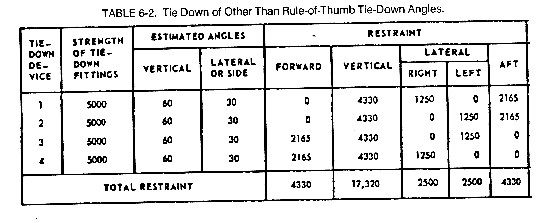
STEP 2. Check Table 6-2 and determine how many tie-down devices would be required if the container could be secured at the rule-of-thumb tie-down angles. The table shows that at least four tie-down devices attached to 5,000-pound tie-down fittings are required.
STEP 3. Tie down the container with the number of tie-down devices determined in Step 2. Apply the tie-down devices as close as possible to the rule-of-thumb tie-down angles.
STEP 4. Construct a table similar to the one shown and estimate the tie-down angle for each tie-down device.
STEP 5. Obtain the amount of restraint provided by each tie-down device, and add the results to determine how much restraint is actually provided in each direction.
STEP 6. Compare the actual restraint found in Step 5 with the restraint required found in Step 1. If the actual restraint is less, add more tie-down devices and continue the procedure until sufficient restraint is obtained. In this case, no additional tie-down devices are required since the actual restraint is greater than the required restraint.
6-11. SHORING. Shoring is a method of using lumber, planking, or similar material to spread highly concentrated loads over a greater floor area than that occupied by the cargo alone. It also protects the cargo floor from damage caused by tracked vehicle cleats, steel wheel rims, and packing case bands or studs. Shoring size is determined by the cargo to be carried and the floor strength of the helicopter carrying it. In general, 2 inches by 8, 10, or 12 inches of shoring can best be used. Lengths of shoring may vary depending on the intended use. For ease of handling, length should not exceed 12 feet. Plywood sheets of various thicknesses and sizes may be used when practical. Since shoring is used both to load and unload, it will be transported with the cargo and tied down as directed by the aircrew. Include shoring weight with the cargo weight to accurately determine cargo CG. Since all aircraft have relatively fragile flooring, place particular emphasis on proper distribution of cargo weight. A cargo item that has a small bearing area on the cargo floor in comparison with its weight may exceed the aircraft floor strength and require shoring.
NOTE:The structure limits of the flooring for a particular aircraft are found in the aircraft operator's -10 manual.
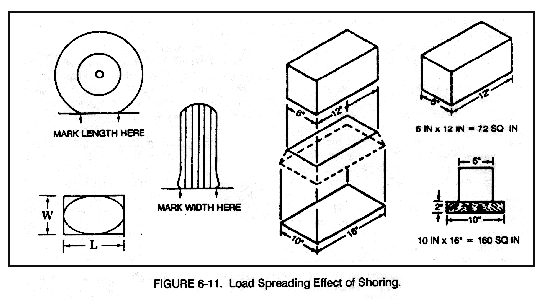
a. Load Spreaders. Load spreaders (shoring) are support placed beneath an object to increase floor bearing area to prevent excessive concentration of weight. As Figure 6-9 shows, the weight of a load resting on shoring is not spread over the entire shoring area. It is increased over an area extending from the point of contact at a 45-degree angle until it contacts the surface on which the shoring rests. Inspect shoring before it is used to make sure that it is clean, sound, and fit for its intended purpose. Defects in shoring reduce its effectiveness. If the shoring has a split in it, the weight of the cargo will not be transferred past the split, as shown in Figure 6-10. If the shoring is not wide enough, the cargo area is not spread past the edge of the shoring.
b. Shoring Requirements
(1) To determine the need for shoring or load spreaders for a given load, consider only the area of contact with the floor. In calculating the contact area for rectangular-shaped loads, multiply the width of the item by the length. As an example of load spreading, assume that the plank is 2 inches thick and the box is 12 inches long by 6 inches wide. The area of contact between the box and the plank will be 6 by 12 inches, or 72 square inches. Now extend imaginary planes downward and outward from the edges of the bottom of the box at a 45-degree angle. Where these imaginary planes intersect the cargo floor, the area of contact will be 10 by 16 inches, or 160 square inches. In this case, the area of contact has been more than doubled--an increase of 122 percent. The proportioned increase, however, will not always be so great. When 2-inch-thick shoring is used, that area over which the load is distributed is enlarged by a border 2 inches wide all around the area of load and shoring contact. This border is as wide as the shoring is thick. Thus, if the shoring is 1 inch thick, the load-bearing border added is 1 inch wide. If the shoring is 3 inches thick, the load-bearing border added is 3 inches wide, and so forth. But as a general rule, the use of shoring more than 4 inches thick is not practical. The relationship between border width and shoring thickness applies to all shoring. Since the increase in area occurs only around the perimeter of the load/shoring contact area, the larger the contact area, the smaller the proportional increase in contact area. For example, shoring 2 inches thick under a box 12 inches square will increase the area of contact 77 percent by adding 112 square inches to the original 144 square inches. Shoring 2 inches thick under a box 60 inches square will increase the contact area by only about 14 percent by adding 494 square inches to the original 3,600 square inches. The spreading effect of simple shoring is the same regardless of the shape of the area of contact.
(2) Since the vehicle weight is transmitted through the wheels, it is necessary to know the tire pad or "footprint" area made by pneumatic and hard rubber tires contact with the cargo floor. When vehicles with hard rubber tires roll onto the cargo floor, stresses are created that are far more critical than those created by vehicles with pneumatic tires. The pressures here are concentrated along a thin ribbon of contact at each wheel. The length of this ribbon (the width of the tire) then becomes important in calculating load distribution.
(3) Figure 6-11 shows the procedure for determining the pressure exerted over a given area by vehicles with rubber tires. The majority of vehicles transported, for example, those with pneumatic tires, do not exceed unit floor and ramp load maximums and thus do not require shoring. Again assuming that the shoring is 2 inches thick, the area of weight distribution of the footprint is enlarged proportionally by the shoring thickness, which will add a 2-inch border. If the original tire footprint is 12 by 6 inches with a formula area of 56.6 square inches, the addition made by the 2-inch border increases the area over which the load is spread to 16 by 10 inches with a formula area of 125 square inches.
6-12. ITEM WEIGHT. There are several ways of finding the weight of an item. One is to look it up in TB 55-46-1. This publication gives the dimensions and weight of almost every item the military has. If you do not have the technical bulletin but do have access to a scale, you can weigh the item. If the item is too big to manhandle onto a scale, load it on a vehicle and then weigh it on a vehicle scale.
6-13. CENTER OF BALANCE
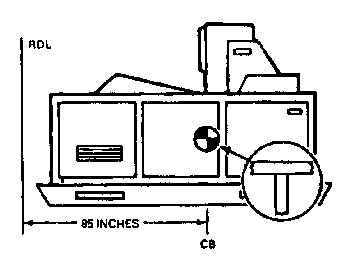
a. The CB of items offered as cargo must be determined to accurately compute the weight and balance condition of a loaded aircraft. The agency offering cargo for air shipment marks each item of cargo with the correct gross weight and a CB point as follows: any item measuring 10 feet or longer and any item having a balance point other than its center. In addition, vehicle-type cargo having a load-carrying capability will be marked indicating an empty or loaded CB, as appropriate. Items not marked as outlined above will not be accepted for airlift as unknown weight/CB presents an unsafe condition relative to aircraft weight and balance.
b. To correctly plan an airlift and segregate loads for individual aircraft, weights and CB of cargo units must be determined. There are two main divisions: vehicles and general cargo.
(1) The weight and CB of a vehicle must be determined after all secondary cargo is secured as it is to be airlifted. Secondary loads are items of baggage or cargo transported in truck beds and trailers. They must be included in the total weight of the vehicle. Nothing can be added to or removed from a vehicle that has been weighed and marked unless it is reweighed.
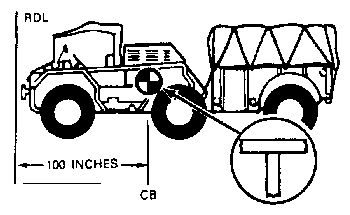
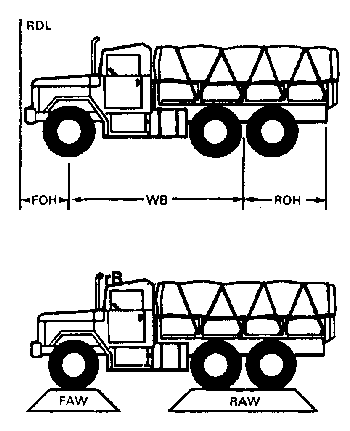
(2) The following terms are used to calculate CB of a vehicle:
- Reference datum line (RDL)--predetermined point from which all measurements are taken.
- Front overhang (FOH)--distance in inches from front bumper to center of front axle.
- Wheel base (WB)--distance in inches from center of front axle to center of rear axle or center of tandem axles.
- Rear overhang (ROH)--distance from rear or center of tandem axles to rear bumper.
- Front axle weight (FAW)--pounds.
- Rear axle weight (RAW)--pounds.
- Moment--the product obtained in multiplying the weight by the distance (in inches) from the RDL.
c. The computation formula is illustrated below showing examples of different types of vehicles and possible loads. Before beginning the process, the unit movement officer must make sure that scales used for weighing are calibrated.
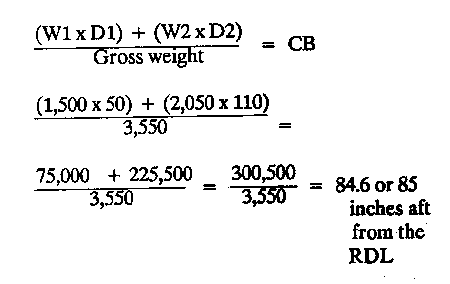
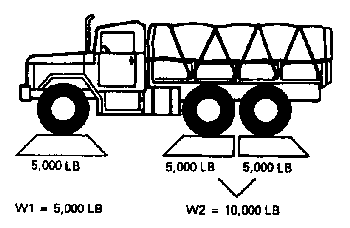
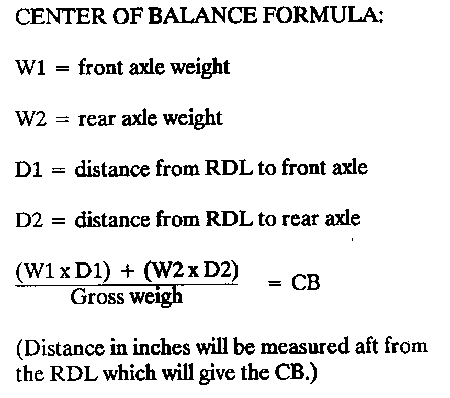
(1) Compute the CB location of vehicles using this formula: Multiply weight by distance (in inches) of each axle from the reference line, then divide the total results by the vehicle gross weight. The resulting figure is the number of inches to be measured aft from the reference line to the CB of the vehicle.
(2) The vehicle CB is computed to the nearest whole inch. Any answer that has a fraction of .5 or higher is increased to the next higher number. If .4 or less, the fraction is dropped.
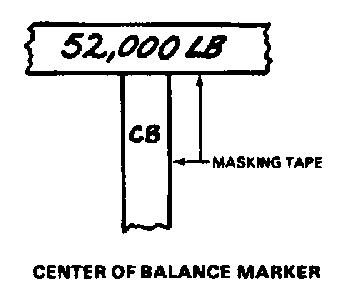
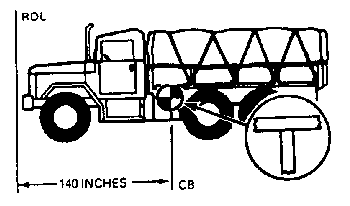
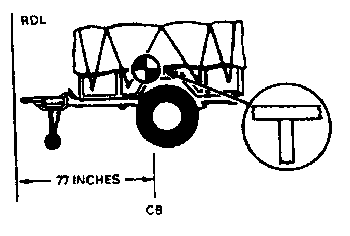
(3) After computing the CB of a vehicle, mark its location and gross weight on both sides using masking tape and grease pencil/magic marker, forming the letter "T." The horizontal portion of the "T" will contain the letters "CB" to indicate the exact position of the vehicle CB. In addition, axle weights must be marked above each axle.
(4) The following illustrations show examples of methods used to determine the weight and CB location of typical cargo units. These cargo units include general cargo, large or skid-mounted cargo, track-type vehicles, and single- and multiple-axle vehicles. EXAMPLE 1--Vehicles
STEP 1. Determine front and rear axle weights.
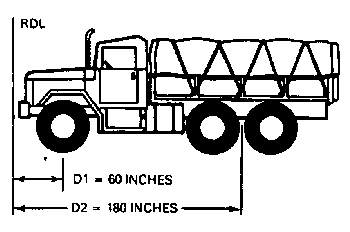
STEP 2. Determine distance from the front and rear axles to the RDL.
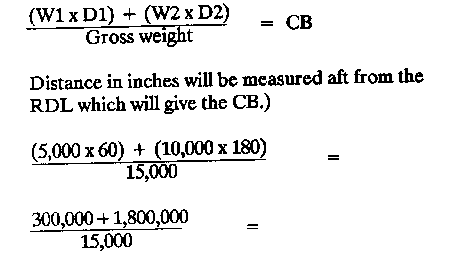
STEP 3. Enter the information obtained in Steps 1 and 2 into the formula.
STEP 4. Divide the total moment by the gross weight. This final result (140 inches) is the CB of the vehicle measured from the front end (reference datum line).
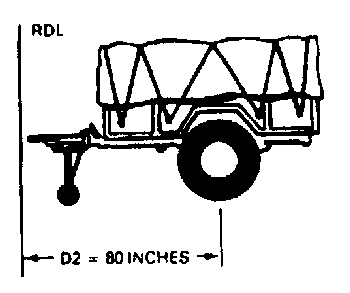
EXAMPLE 2--Trailers
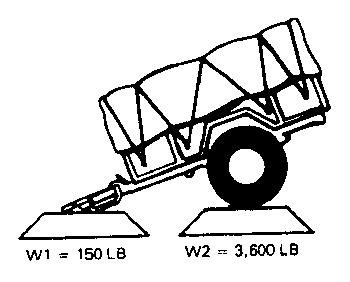
The same idea is used in determining the CB for a trailer as was used for the truck in Example 1. The main difference is that the tongue is weighed as the front axle and the actual axle is weighed as the rear axle.
STEP 1. Weigh tongue and axle.
STEP 2. Measure the distance from the end of the tongue to the center of the axle.
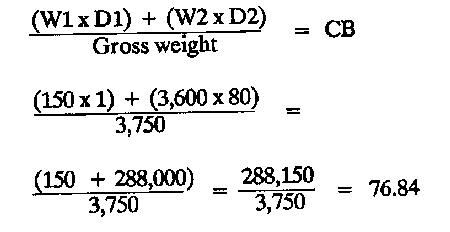
STEP 3. Enter the weights.
STEP 4. Now measure 77 inches from the tongue aft to obtain the CB on the trailer.
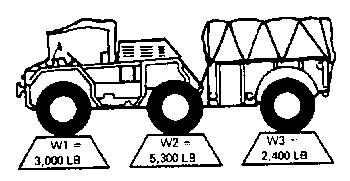
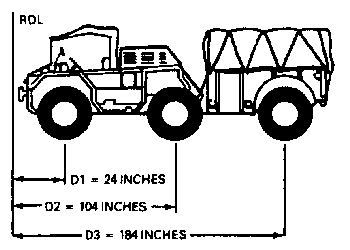
EXAMPLE 3--Multiaxle vehicles
STEP 1. To determine the CB for a multiaxle vehicle such as the one shown here, first weigh each axle as in Step 1 in Example 1.
STEP 2. Then measure the distance from the RDL to each axle as was done in Step 2.
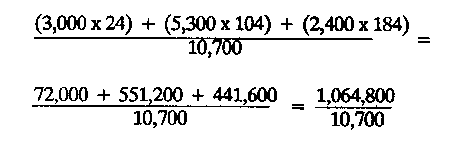
STEP 3. Now as before, enter the information obtained in Steps 1 and 2 into the formula.
STEP 4. Divide the total moment by the total weight.
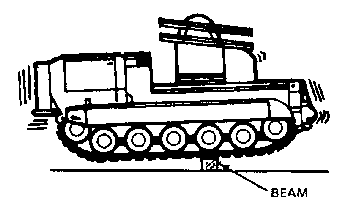
EXAMPLE 4--Tracked vehicles
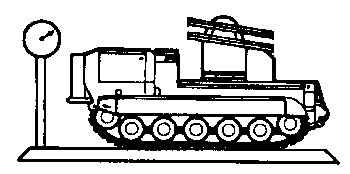
STEP 1. To determine weight, drive the vehicle onto a platform scale (truck scale, coal yard scale, and so forth) large enough to accommodate the entire vehicle. Record weight.
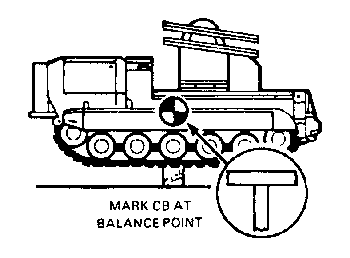
STEP 2. To determine CB, drive the vehicle onto a wooden beam or pole until it tilts forward. Mark the side of the vehicle at the point of tilt.
STEP 3. With appropriate materials, mark the CB and gross weight of the vehicle.
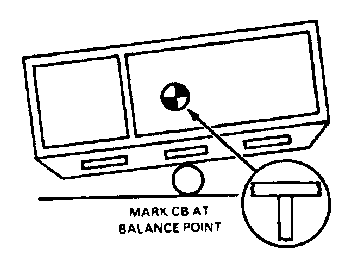
EXAMPLE 5--Skid-mounted cargo
STEP 1. If the skid-mounted cargo will fit on the scale, weigh the whole load to use as your weight figure.
STEP 2. Determine the CB by placing that load onto a pipe and centering the cargo until it balances, then mark your CB.
EXAMPLE 6--Skid-mounted cargo
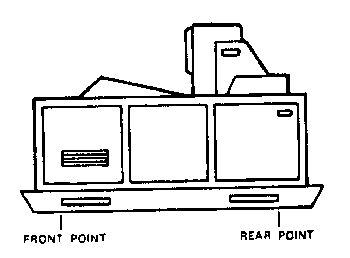
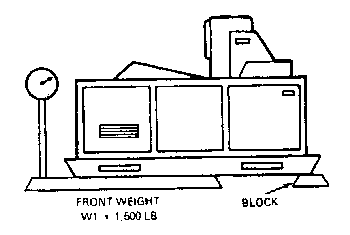
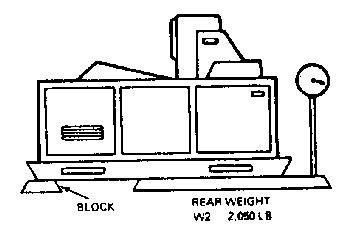
If the skid-mounted cargo is too large to fit on the scale at one time, it will have to be weighed and measured as in Examples 1 and 2, using the same formula.
Now go through Steps 1 through 3 as before in Examples 1 and 2.
STEP 1. Support the overhang at the same height as the scale with a block of wood.
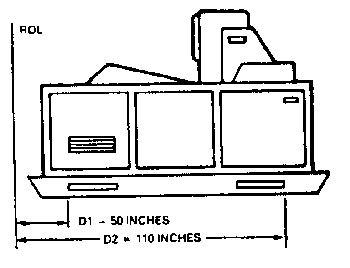
STEP 2. Measure the distance from the RDL to the front and rear points of support (same as axles).
STEP 3. Again enter the information obtained in Steps 1 and 2 into the formula.




NOTE: The points to use as the axles should be support braces between the skids, as shown here.
