

APPENDIX E
SOIL-TRAFFICABILITY TEST SET
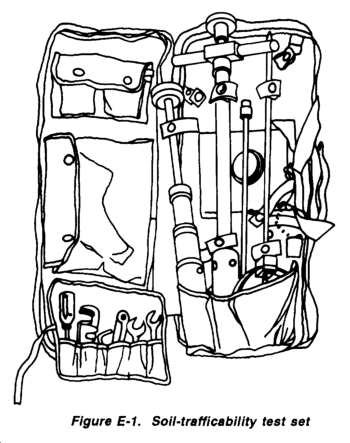
Trafficability measurements are made with the soil-trafficability test set. This set consists of one canvas carrying case, one cone penetrometer with 3/8-inch steel and 5/8-inch aluminum shafts and a 0.5-square-inch cone, one soil sampler, remolding equipment (which includes a 3/8-inch steel shaft and a 0.2-square-inch cone, a 5/8-inch steel shaft with foot and handle, a 2 ½-pound hammer, and a cylinder and base with pin), and a bag of hand tools (which includes one combination spanner wrench and ¼-inch screwdriver; two open-end wrenches, ½ by 9/16; one 6-inch Stillson wrench; one 3/16-inch Allen wrench; and one 2-inch screwdriver with a &frac18-inch bit). The items are shown in their proper places in the carrying case in Figure E-1, SC-6635-98-CL-E02-HR gives component listings and stock numbers.
CONE PENETROMETER
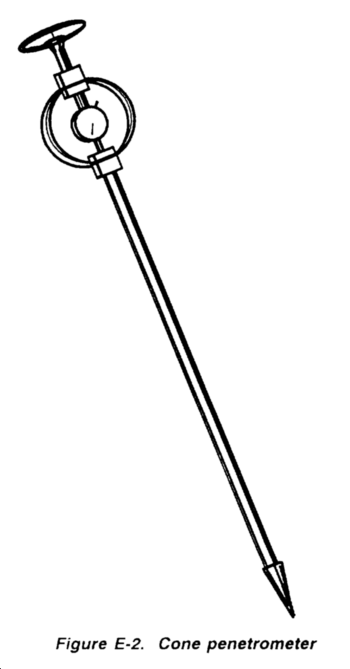
The cone penetrometer is shown in Figure E-2. It consists of a 30-degree cone with a ½-inch-square base area, a steel shaft 19 inches long and 3/8 inch in diameter, a proving ring, a micrometer dial, and a handle.
Use of the Cone Penetrometer
Inspect and adjust the cone penetrometer prior to use. Using an operator's assistant which measurements can be made and recorded and usually diminishes the likelihood of errors.
Inspection. Inspect the penetrometer before using it to make sure that all nuts, bolts, and joints are tight and that the dial-gage stem contacts the proving-ring bearing block.
Zeroing. Allow the penetrometer to hang vertically from its handle, and rotate the dial face until 0 is under the needle. When the instrutment is kept vertical between the fingertips and allowed to rest on its cone, the dial will register about 2 to 4 pounds--the total weight of the instrument--or 4 to 8 on the dial.
Operation. Operate the penetrometer as follows:
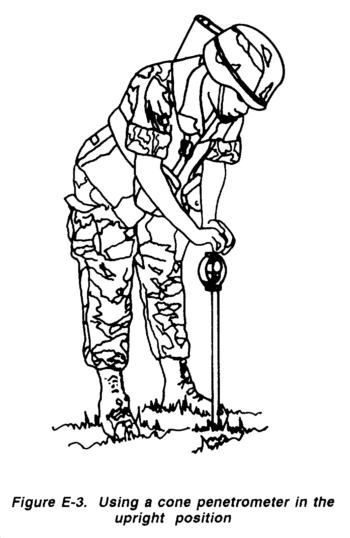
1. Place one hand over the other on the handle, palms down, and approximately at right angles as shown in Figure E-3. This minimizes eccentric loading of the proving ring and helps keep the shaft vertical.
2. Apply force until slow, steady downward movement occurs.
3. Take a dial reading just as the base of the cone becomes flush with the ground surface. To do this, watch the cone descend until an instant before the cone base is expected to be flush with the ground surface, then immediately shift the vision to the dial face. Continue the slow, steady, downward movement and take successive dial readings at appropriate 6-inch intervals to a depth of 18 inches. If it is necessary to stop the downward progression of the cone penetrometer for any reason, progress may be resumed with no adverse effects on the cone penetrometer readings. Progression should be stopped between depths so that the next reading is taken only after downward progression has resumed. For example, when only one person is on the trafficability reconnaissance, it may be convenient to make two cone penetrometer readings, stop the penetration to record the readings, resume the penetration to obtain two additional readings, then stop to record.
Precautions. Observe the following precautions when operating a penetrometer:
- Keep the instrument vertical.
- Do not attempt to take readings higher than the capacity of the dial (300). This may overstress the proving ring.
- If dial capacity is exceeded at less than 18 inches of penetration, make another penetration nearby. The cone may be striking an isolated rock fragment or other object.
- Withdraw the instrument by the shaft, never by the ring or the handle. Pulling the handle may stretch the proving ring.
- Read the CI only at the proper depth. If readings are made as little as ¼ inch from the proper depth and recorded as being at the proper depth, an average of such readings will not accurately reflect the average strength. Carelessness in making proper depth determinations is probably the greatest source of error in using the penetrometer.
Training Penetrometer Operators
Train operators in areas that have uniform soil conditions. The instructor should take approximately 50 sets of readings equally spaced over the area. The average CI for 6-inch layers should be computed and used as standards or references. The trainee should be instructed in all proper techniques of operation. He should practice penetration, observed by a qualified instructor, until he becomes familiar with the techniques of operation. The trainee should then make 50 sets of readings, using an assistant to record them. The average CIs obtained by a trainee should be compared to the standard. If the trainee's readings deviate widely, the causes for the deviations should be sought and corrected.
In a uniform area, a 5-percent deviation is wide. The most probable cause of error is carelessness in determining the proper depth. The rate of progression recommended is such that four readings (surface, 6, 12, and 18 inches) can be measured in 15 seconds during a continuous penetration in soft soil. Slower or faster penetration rates will reflect lower or higher values, respectively, but the discrepancies will not be large. The CI is also insignificantly affected by the variation in the rate of penetration for the same operator or between experienced operators. However, if deviations persist, check the possibility of cone-penetrometer mechanical imperfections, Inspect the dial face to ensure that its position has not shifted around the dial's shaft and that the needle is not sticking or has not slipped on its shaft. Any of these conditions could cause an improper zero setting. Secondly, inspect the proving ring. A damaged or overstressed ring might require recalibration. Finally, check to ensure the Instrument was properly zeroed. The micrometer dial stem may not have been in good contact with the proving-ring bearing block when the instrument was zeroed.
Care and Adjustment of the Penetrometer
Keep the penetrometer free from dirt and rust and keep all parts tight. Frequently check the instrument and rezero, if necessary. Ensure no grit is caught between the stem of the dial and the lower mounting block.
Dial Care. The micrometer dial is a sensitive instrument that should be protected against water and rough use. Never immerse it in water, and wipe it dry as soon as possible after use in rainy weather. When the dial is transported by truck, wrap it in paper or cloth.
Bearing-Block Adjustment. If either or both bearing blocks become loosened and moved, adjust them so that they lie on the same diameter of the ring. Retighten them and recalibrate the proving ring. Do not calibrate while on reconnaissance. Instead, note all readings made in the field after bearing blocks have been removed and correct them according to the calibration made later.
Cone Replacement. Considerable use of the same cone may result in a rounding of its point, but it will not affect the accuracy of the instrument, However, if the base of the cone has had excessive wear or is deformed by hard use, replace the cone.
Proving-Ring Recalibration. The calibration will remain true for the life of the instrument unless the bearing blocks are moved or the ring is overstressed (deformed by a hard knock or subjected to extreme changes in temperature or other unusual strains). If the ring needs recalibration, complete the following steps:
1. Remove the handle and shaft.
2. Place the lower mounting block of the ring assembly on a smooth, horizontal surface.
3. Check the bearing-block alignment and tightness. Both blocks should be on the same diameter of the ring. Use a drafting triangle or a carpenter's square for this operation. The bolts should be snug.
4. Ensure that the stem of the dial bears firmly on the lower bearing block. Ensure that the dial arm has sufficient travel available for the full range of motion (approximately 1/10-inch deflection) of the proving ring. The dial can be moved up or down by adjusting the two nuts on the threaded stud that holds the gage in position. Both nuts should be tight when in final position.
5. Zero the dial by rotating its face so that 0 is under the needle.
6. Add the load in 10-pound increments up to 150 pounds. Mark or note the needle's position on the dial after the addition of each load increment. Any of the following loading methods may be used:
- Add deadweights to the top of the ring assembly. If a plate is used to hold the weights, its weight should be considered in the first 10-pound load.
- Use any of the load machines commonly used in laboratory work to apply the load.
- Place the ring assembly on a set of platform scales. Apply the load increments with a jack and measure them with the platform scales.
7. Remove the load in 10-pound increments, noting the position of the needle after the removal of each increment.
8. Make the load run at least twice, using the average of the needle position for each increment as the final point.
9. Expect some variation in needle position; it will not be significant.
10. Establish 10-pound intervals on the dial face and mark them 20, 30, 40, so on, to 300. Each interval should be subdivided separately because the arcs for various 10-pound intervals are not necessarily the same.
NOTE: If the instrument cannot be calibrated or the proving ring is severely damaged, the instrument will need to be turned in for repair.
SOIL SAMPLER
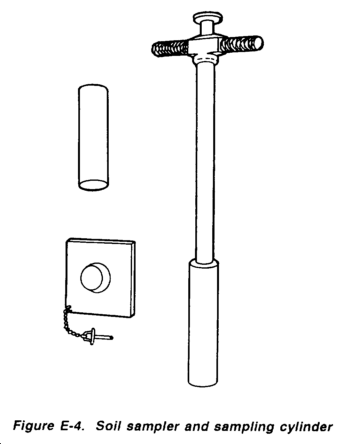
A piston-type soil sampler, as shown in Figure E-4, is used to extract soil samples for remolding tests.
Operation
The soil sampler is used in the following way:
1. Loosen the knurled handle of the soil sampler so the piston rod will move freely. Hold the sampler firmly in both hands and force it into the soil vertically (Figure E-5). Do not twist the sampler while pushing it into the soil. Sometimes two people are needed to force the sampler into firm soils.

2. After locking the piston rod by turning the knurled handle, twist the sampler slightly and withdraw.
3. Deposit the sample directly into the remolding cylinder.
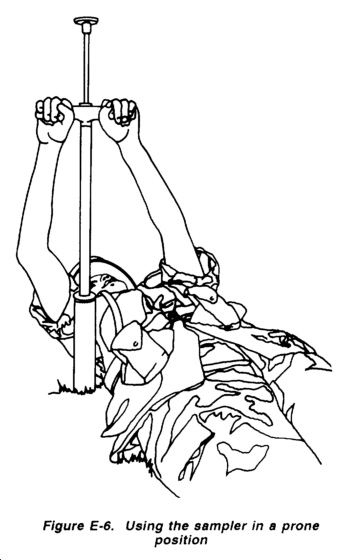
Figure E-6, shows the technique for using the sampler in a prone position.
Care
It is essential to keep the inside of the sampling tube, the piston ring, and the leather washer clean. After 5 to 25 samplings, depending upon the type of soil, complete the following cleaning procedures:
1. Immerse the tube first in water and then in fuel oil. Work the piston up and down five or six times in each liquid.
2. Wipe off the excess fuel oil, and squirt light machine oil into the tube.
3. If the sampler becomes stiff and hard to work, remove the tube, disassemble and thoroughly clean the piston, and oil the leather washer. Tube walls and cutting edges are soft and should be handled with care. The cutting edges will require sharpening from time to time.
Adjustment
Adjust the piston-rod length to keep the face of the piston flush with the cutting edge of the tube when the piston-rod handle (disk) is fully depressed. To do this, loosen the setscrew on the handle, screw the handle up or down to the correct position, and retighten the setscrew.
Remolding test
The equipment for the remolding test, shown in detail in Figure E-7 and in use in Figures E-8 through E-11, consists of the following:
- A steel cylinder approximately 2 inches in diameter and 8 inches long, mounted on an aluminum base.
- A 2 ½-pound steel drop hammer sliding on an 18-inch steel shaft with a handle.
- A cone penetrometer.
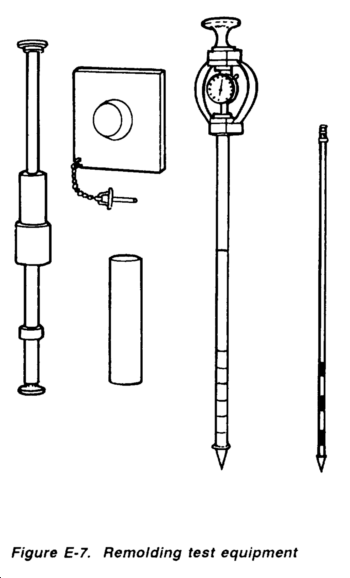
A cone penetrometer may be equipped with an aluminum shaft (5/8-inch in diameter) or a steel shaft (3/8-inch in diameter) with a 0.5-square-inch cone (for fine-grained soils) or a more slender steel shaft with a 0.2-square-inch cone (for remoldable sands). The penetrometer is used to measure soil strength in the cylinder before and after remolding. The sampler (Figure E-4) is used to obtain the soil sample from the critical layer and place it in the remolding cylinder.
Test Procedure for Fine-Grained Soils
The following remolding test is performed for fine-grained soils:
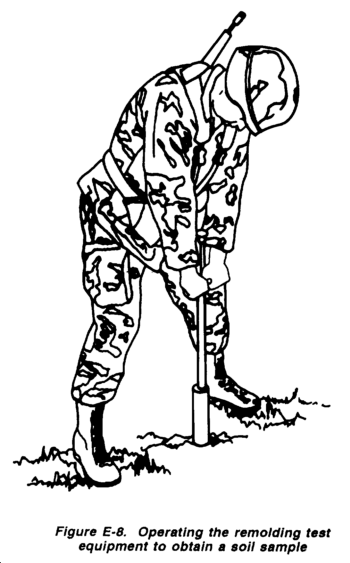
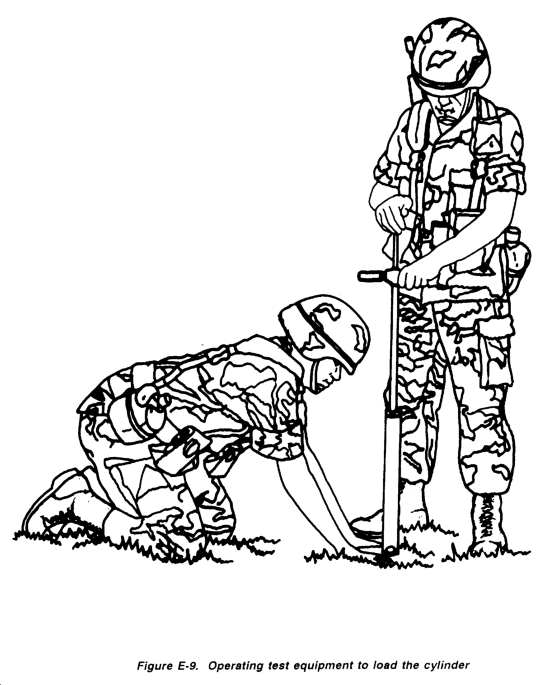
1. Take a sample from the critical layer with the sampler as shown in Figure E-8, eject it directly into the remolding cylinder as shown in Figure E-9, and push it to the bottom of the cylinder with the foot of the drop-hammer shaft.
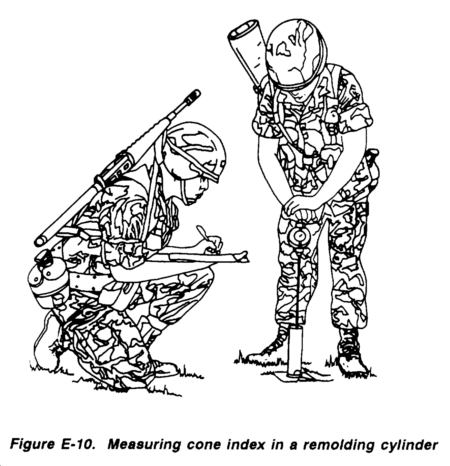
2. Measure the strength with the penetrometer (steel shaft) by taking CI readings as the base of the cone enters the surface of the soil sample and at each successive inch, to a depth of 4 inches, as shown in Figure E-10.
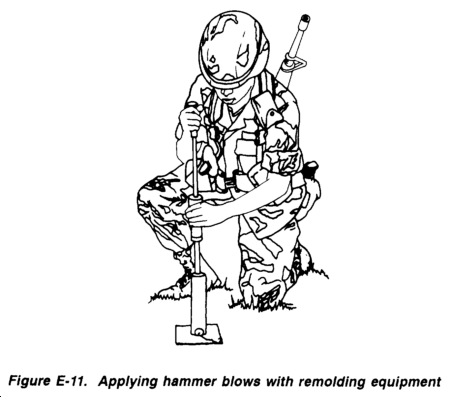
3. Apply 100 blows with the drop hammer falling 12 inches as shown in Figure E-11.
4. Measure the remolded strength from the surface to the 4-inch depth at 1-inch increments, as was done before remolding as shown in Figure E-10.
NOTE: Some samples are so hard they cannot be penetrated the full 4 inches. In such cases, the full dial capacity (300) is recorded for each inch below the last reading obtained.
To find the remolding index, take the sum of the five CI readings after remolding and divide by the sum of the five readings before remolding.
Test Procedure for Remoldable Sands
The test procedure for remoldable sands is generally the same as that for fine-grained soils. However, the CI measurements are made with the slender shaft and 0.2-squareinch cone, and the sample is remolded by placing a rubber stopper in the top of the remolding tube and dropping it (along with the cylinder and base) 25 times from a height of 6 inches onto a firm surface, such as a piece of timber. Some remoldable sands with a large amount of fines (more than 12 but less than 50 percent) react very much like fine-grained soil. When testing a remoldable sand with a large amount of fines, run both the fine grains and remoldable sands tests, and use the lower remolding index. Continue to use the more critical test throughout the area.
|
NEWSLETTER
|
| Join the GlobalSecurity.org mailing list |
|
|
|