

CHAPTER 10
Setup, Installation, and Operation Procedures
Equipment operators must be able to set up and install an electric generator set in the field and to determine locations for the fuel supply and maintenance facilities. If performed properly, this function helps ensure safe and efficient equipment performance throughout the field of operations. This chapter describes the tasks required to set up and install an electric generator set and support facilities in the field.
Section I. Setup and Installation
PRELIMINARY INSTRUCTIONS
An electric generator set may arrive in the field completely operational and ready for use. However, if the equipment was shipped from a supply or maintenance point, the fluids have been drained out of the set and it is not in an operational-ready status. Several preliminary tasks are required to set up the equipment and support facilities for a field unit.
INSPECT THE EQUIPMENT
The operator must carefully inspect all incoming equipment.
- Inspect the identification plate. Ensure that the information on the plate matches the equipment.
- Inspect the generator set for damage. Document all damage on DA Form 2404 and submit the form to the next echelon of maintenance.
- Compare the equipment with the packing list to ensure that all items shipped are present and serviceable.
- Inspect the entire unit carefully for loose and missing hardware. Tighten loose hardware and replace missing items.
- Turn the engine over by hand to ensure that all moving parts in the engine and the generator move freely.
- Ensure that all tags, tape, cloth, and barrier materials are removed.
SERVICE THE EQUIPMENT
Perform daily preventive maintenance checks and services (PMCS) after the equipment is inspected.
- Lubricate the generator set's engine according to the instructions in the current lubrication order.
- Correct as many deficiencies as you can and report uncorrectable deficiencies to organizational maintenance.
INSTALL THE FUEL SUPPLY
One of the equipment operator's most important tasks is to properly install the fuel supply and storage tanks required for the generator set. Gasoline, diesel fuel, or jet fuel (JP-4) may be used to power the generator set. Consider the following when planning installation of the fuel storage area:
- Planned duration of the field installation.
- Security requirements.
- Potential fire and safety hazards.
- Potential sources of contamination.
Planned Duration
The length of time the field unit will be in operation partly determines how the fuel storage facilities are installed. For a long-term field unit, use the proper fittings to install the fuel tanks underground. Ensure that the tanks comply with the manufacturer's instructions. Select a location that is convenient to the using equipment. Proper installation and a convenient location minimize the hazards of fuel contamination, vapor lock, and fire.
For a short-term field unit, place the auxiliary tanks or drums above the ground, as far from the using equipment as the auxiliary line allows. If you are using a metal pipeline, place the tanks about 25 feet from the generator set. Keep the auxiliary fuel line as straight as possible.
Security Requirements
Follow the unit's standing operating procedures to perform the proper security measures.
Potential Fire and Safety Hazards
Fire and safety hazards are critical elements in the design of a fuel storage area. The following safety practices will help eliminate many fire and safety hazards:
- Clearly mark the entire fuel storage area with NO SMOKING and OPEN FLAME signs to indicate that it is a hazardous area.
- Dig an open trench 4 feet wide and 6 inches deep around the area to contain any fuel leaks or spills. Pile the earth in a mound around the trench. Place crushed rock or sand inside the trench to absorb spilled fuel. Immediately cover any small spills with dry sand or earth.
- Prohibit burning of trash within 200 feet of any fuel storage area.
- Do not place any electrical wires above or near the fuel tanks.
- Direct hot exhaust from operating engines away from the fuel supply.
- Bury or cover fuel lines leading away from fuel tanks to protect them from the sun and physical damage.
- Avoid using a rubber hose for fuel delivery except as a temporary measure. To make the hose safe, attach or clamp a light, flexible copper wire to the end fittings of the hose. Twist a ground wire around the hose to prevent breakage and to provide a path for static electricity to flow to the ground. Attach one electrical grounding wire to the auxiliary tank and another to the generator set.
- Avoid using a long, nonconductive hose for fuel delivery except as a temporary measure. Static electricity builds up when fuel flows through a long pipe or hose.
- Maintain adequate fire-extinguishing equipment near the auxiliary fuel-tank area and the generator set. The fire point must include a shovel, a pickax, and a fire extinguisher. Include buckets of sand in the fire point if they are available.
Potential Sources of Contamination
The fuel supply for an electric generator set must be free of contamination. The equipment operator can help ensure a pure fuel supply by identifying potential sources of contamination and planning around them. Place the fuel storage area at least 50 feet from all work areas and equipment that does not require fuel. The storage area must be at least 50 feet from heavily traveled roads but be easily accessible by the fuel supply trucks. Place the storage area in such a manner that any fuel leaks flow away from the equipment, personnel work areas, and housing. You may need to emplace a shelter or cover to protect the fuel from contamination.
MAINTAIN THE FUEL SUPPLY
The operator must maintain a fuel supply that is adequate for all needs. To help ensure that the proper fuel is on hand--
- Ensure that the type and grade of fuel used in the generator match the specifications.
- Never mix different fuels. Label each storage tank clearly with the type and grade it contains. Ensure that only that type of fuel is put in the tank.
- Clean the tank thoroughly before changing the grade and type of fuel stored in it. Drain all the old fuel and remove the sediment and condensation. This procedure prevents improper operation or damage to the generator set.
- Ensure that fuel does not spill on any engine parts when draining an engine-mounted fuel tank. Connect a flexible hose between the petcock and the container if the fuel cannot drain directly into the container.
PERFORM BEFORE-OPERATION PMCS
Equipment operators must perform PMCS before starting an electric generator set. Refer to the manual issued with the set to ensure that all required PMCS for a specific set are performed properly. NOTE. Use the equipment manual to obtain the correct operating data.
- Check the fuel lines for leaks. Check the fuel level in the tank and refill it as needed. If winterization equipment is used, check the heater for fuel leaks. The heaters in some generator sets use diesel fuel from the main tank. Check the fuel level in the auxiliary tanks. Drain condensation from the tanks and clean the fuel filters before operating the equipment.
- Inspect the plenum drain fitting before starting a gas turbine, engine-driven generator set. Ensure that it is clear and that no fuel has accumulated in the plenum chamber. Use only clean fuel. Drain the sediment from the filter into a small container and dispose of the sediment. Check the fuel control valves for proper positioning.
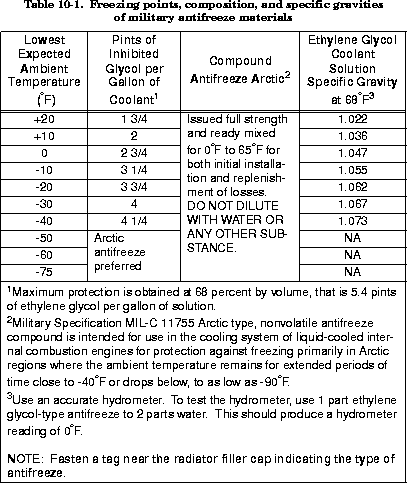
- Check the radiator coolant level and add coolant if necessary. Allow room for expansion when filling a cold radiator. If cold weather is anticipated, add antifreeze according to the instructions in Table 10-1.
- Ensure that all required tools, TMs, and basic issue items on the inventory list are on hand and serviceable. Included in the basic-issue items are an auxiliary fuel hose, grounding rods and cables, a fire extinguisher, paralleling cable, a load-terminal wrench, and grounding-wire clamps. Most generator sets have a storage compartment for the tools, TMs, and basic-issue items.
- Check the electrolyte level in the batteries, and add distilled water as necessary. Ensure that the level is about 3/8 inch above the battery plates. Never add water to the batteries from a metal container. Refer to TM 9-6140-200-14 for additional battery services.
- Check the engine's oil level and add oil if necessary. Lubricate all other parts according to the lubrication order issued with the equipment.
- Carefully check the fuel tank, the radiator, oil covers, and the oil pan for leaks. Check all lines and connections for leaks.
- Ensure that all generator and engine instruments are securely mounted, properly connected, and undamaged. Check all gauges when the generator is operating to ensure that they work properly.
- Inspect the entire generator set for cracks, breaks, and loose or missing hardware. Inspect all wires and terminals for damage and loose connections. On gas-turbine units, inspect the air-inlet screen assembly and remove obstructions. Inspect the changeover board (Figure 10-1) and the phase selector switch (see Figure 9-6) for the correct link connections or positioning for the desired voltage.

- Set the frequency selector switch for the desired frequency output on the 50/60 cycle, precise Class 1 sets. Place the circuit breaker (main switch) in the open (off) position. Connect the output service cable to the load-panel terminal connections.
- Ensure that the grounding connections on the equipment and the grounding rod are tight. Use No 6 AWG or larger wire for the ground.
CONNECTION INSTRUCTIONS
After the preliminary tasks are completed, the operator must install and connect the distribution cables.
INSTALL THE DISTRIBUTION CABLE
A distribution cable connects the generator set to the load. The cable may be installed overhead, buried underground, or laid on the ground. Two types of distribution cables are used in military distribution systems:
- Cable that is supplied in predetermined lengths and sizes and equipped with quick-disconnect connector plugs.
- Building wire that is supplied in rolls.
The operator must decide how the distribution cable is installed. The decision to install the cable overhead, underground, or on the ground depends on the type of material available and the conditions at the field unit.
Overhead
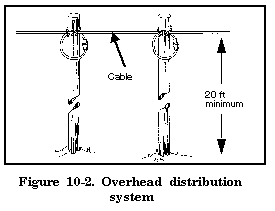
When conditions dictate the use of an overhead line, you must construct the line properly. Utility poles, the most convenient method of supporting the lines, are seldom available in the field. Pieces of wood 6 inches by 6 inches may be substituted for poles if they are long enough to set rigidly in the ground and provide safe clearance for the wires. As a last resort, you may use trees for support if the proper weatherproof cable is available. Use the following guides when installing an overhead distribution system:
- Allow a minimum height of 20 feet for vehicle clearance when crossing over roads.
- Space the poles so that the quick-disconnect joints are supported by the pole as shown in Figure 10-2.
- Tie the cable together with the quick-disconnects.
- Use the proper plug connections when installing multiphase cables equipped with quick-disconnects. This type of cable has male and female receptacles that must be properly aligned to prevent a reverse-power condition in the system. Match the cable marking or apply markings before installing the cable to ensure the proper alignment. Most cables are marked by the manufacturer. The marks are countersunk circular or triangular depressions or raised buttons in the insulation on each receptacle. Receptacles usually have one pin and one jack larger than the other pins and jacks. The large pin and large jack represent a grounding (neutral) conductor. Match the large pin and large jack to ensure that the receptacles are connected properly if there are no other markings. If you mark the cable at the field unit, paint a color code on the receptacle.
Underground
Sometimes the cable must be buried underground. Use the following guides to ensure proper cable installation:
- Dig a trench that is at least 18 inches deep to prevent the cable from being disturbed by surface digging.
- Use only moistureproof cable. Lay the cable in the trench on a cushion of sand. If sand is not available, loosen the trench base and remove all rocks and stones.
- Ensure that the joints are moistureproof if the cable is equipped with quick-disconnects.
- Separate the cables uniformly to protect the circuits. Allow at least 6 inches between the cable centers for mechanical and electrical protection.
- Cover the cable with earth that has no rocks or stones. This procedure should protect the cable if the surrounding earth is disturbed by flooding or frost heaving.
On the Ground
Most cables are laid on the ground to save time. Because many mobile generator sets can be moved almost to the point of use, it may be necessary only to lay the cable over the ground to the load. Protect the cable from mechanical damage by laying planks or logs on both sides of it. This prevents vehicles from driving directly on the cable. Lay the cable where it will have the least interference from personnel operations and install warning signs indicating the cable location. Use only moistureproof cable that can withstand inclement weather.
CONNECT THE DISTRIBUTION CABLE
Electrical power is either distributed to the load in a direct line from the generator set or processed through a load-terminal board. A direct line is used when relatively few items make up the load and when the phase requirement is fairly constant. A load-terminal board is used when many items make up the load, the loads are scattered, and the phase and voltage requirements differ. In either case, the load must be balanced between the phases as explained in Chapter 8.
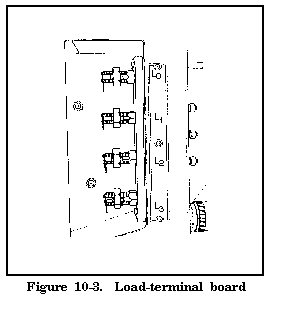
All AC generator sets are equipped with a load-terminal board (Figure 10-3). The board has four terminals that are marked L0, L1, L2, and L3. The terminals simplify the process of connecting the distribution cable at the generator.
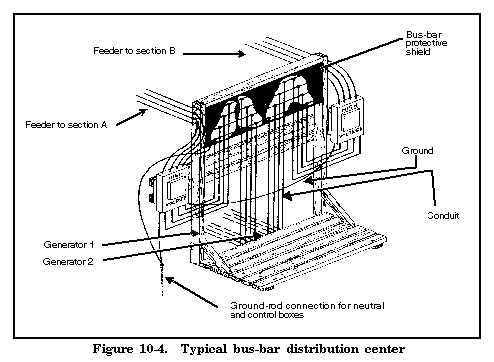
When a generator set that is large enough to supply the total electrical load is unavailable, a field unit may use a distribution center. In this situation, it is necessary to make parallel connections between two or more sets and distribute their total load through a bus-bar distribution center (Figure 10-4). A bus-bar distribution center is also used when the equipment requiring power is so widely scattered that two or more branch feeder lines are required. Power to the branch feeder lines is controlled from the bus-bar distribution center.
Perform the following PMCS before connecting a distribution system:
- Ensure that all equipment is securely mounted, securely supported, and properly insulated.
- Select the proper size of wire to connect the load. The size of wire used depends on the load current. Refer to Tables 8-7 and 8-8 to select the proper wire size.
- Ensure that the current rating of the fuses or trip elements provides adequate protection against overloads and short circuits on the branch feeder lines. Two types of switches control the output to each branch feeder line--the circuit breaker and the fused-knife switch. The operator must ensure that the components of the circuit breaker (contact points) or fused-knife switch (switchblades) can carry the rated current and voltage of the branch feeder lines.
- Protect the switch gear and bus bar from inclement weather. A weatherproof canopy provides adequate protection.
The layout of a typical distribution system is shown in Figure 10-5.
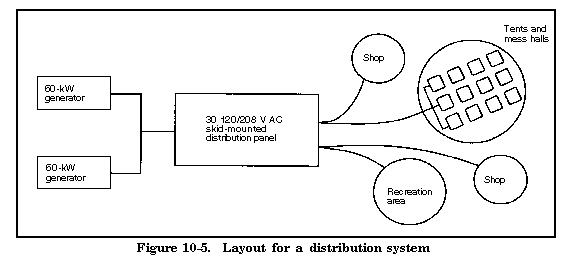
Shielded cables of various lengths connect the loads in four central areas to the power equipment. The shielding on each cable must be grounded at one end as a safety precaution. Power distribution in the central areas usually requires three-conductor, stranded copper cable. Use Tables 8-7 and 8-8 to compute the proper wire size. Operators must use three-phase voltage that ranges from 120 to 208 volts.
Section II. Operation
WEATHER CONDITIONS
EXTREME COLD
Generator sets can start and operate at temperatures as low as -25oF without a winterization kit. When the ambient temperature is lower than -25oF, most engines require preheating before they are started. The engine type determines the method used. The two basic types of cooling systems used on power-generating equipment are air-cooled and liquid-cooled. A blowtorch is used to preheat most air-cooled engines. Most liquid-cooled engines are equipped with a winterization kit that contains a preheater. Refer to the manual issued with the generator set for preheating and cold-weather starting instructions.
Checks
Some general PMCS for starting equipment in cold weather follow:
- Check the equipment manual for installation instructions before installing a generator set in extreme cold.
- Check the antifreeze solution. Ensure that it will protect the equipment at the lowest temperature expected. Use the information in Table 10-1 to mix antifreeze.
- Ensure that the coolant in the radiator is kept at the proper level.
- Inspect the cooling system frequently for leaks. Check all gaskets and hose connections.
- Check the thermometer (water-temperature gauge) during operation for abnormally high readings.
- Ensure that all shutters, shutter controls, and thermostats function properly.
- Ensure that the shutters and the baffle rods on air-cooled systems are positioned for cold-weather operation.
- Report all uncorrectable faults to organizational maintenance.
- Ensure that the batteries are fully charged to prevent freezing.
- Inspect the electrolyte level daily. The electrolyte level must be 3/8 inch above the battery plates.
- Keep the batteries clean and free of ice, moisture, and corrosion.
- Ensure that the battery connections are clean, lightly greased, and tightly secured.
- Ensure that the battery-cap vent holes are open.
- Inspect all electrical wiring insulation for cracks, frays, and breaks.
- Tighten loose connections. Report all defective wiring to organizational maintenance.
- Keep the fuel tank as full as possible to reduce condensation.
- Ensure that the proper grade of fuel is used for existing temperatures.
- Service the fuel filters more frequently than usual to remove water from the fuel system.
- Keep the fuel-tank cap and filler neck free of ice, snow, and moisture during operation and when refueling.
- Drain the fuel tank if the fuel becomes contaminated and refill it with clean fuel. Drain sediment from the fuel tank daily.
Lubrication
Lubricate the generator set for cold-weather conditions according to the current lubrication order.
Cleaning
Remove ice, snow, moisture, and other foreign material from the generator set before each period of operation.
Generator Warm-Up Period
Warm the generator set to the operating temperature before applying the load. Some generator sets are damaged when the engines operate at low rpm.
EXTREME HEAT
Operating electric generators when ambient temperatures are high requires efficient equipment cooling and adequate lubrication. The following PMCS are required when operating equipment in extreme heat:
- Provide maximum ventilation for the cooling system at all times. Keep the equipment clean, especially the engine shrouds and cooling fins and the generator blower cover. Ensure that all air passages are free of obstructions. Move all shutters and baffle rods to the proper position.
- Inspect the coolant level frequently, and add clean coolant as needed. To keep the cooling system free of rust and scale, add an approved rust inhibitor and flush the cooling system regularly. Do not use alkaline or salt water as a coolant. Ensure that the radiator core fins and screens are free of obstructions. Ensure that the fan-drive V-belt tension is adjusted properly. Ensure that the radiator shutter operates properly. If the automatic shutter control (thermostat) fails, open and close the shutter manually and report the failure to organizational maintenance. Refer to the appropriate TM to determine whether the panel doors should be opened or closed.
- Inspect the electrolyte level of the batteries daily, and add distilled water as needed. The electrolyte level must be 3/8 inch above the battery plates. Keep the batteries clean and free of corrosion. Frequently inspect the terminals for corrosion and loose connections. Corroded and loose connections generate heat during operation, and extreme heat causes the wiring insulation to swell and soften. Chafing and fraying of the wires due to vibration are more frequent during extreme heat than in other conditions. Frequently inspect the wiring for damaged insulation and report damaged insulation to organizational maintenance.
- Lubricate the generator set according to the current lubrication order.
- Provide ample air circulation around the generator set if it operates in an enclosed shelter. Allow air from the outside to circulate within the shelter. Keep the main generator's ventilation screen and louvers free of obstructions. Frequently inspect the instruments on the control panel for overloads. Overloads cause the main generator to overheat and may cause the main circuit breaker to open. Do not fill the fuel tank completely; instead, allow room for fuel expansion. Before an operating set is shut down, run it without the load to cool the engine.
GEOGRAPHICAL AREAS
DUSTY/SANDY
Perform the following PMCS when operating electric power-generating equipment in dusty/sandy areas:
- Erect a protective shield to provide wind protection for the generator set. Dust and sand cause mechanical failures and shorten the life of the equipment. Natural barriers can form a wind shield. For example, locate the generator set in the prevailing windward side of dusty areas, roadways, and construction sites.
- Frequently clean the generator set with an approved cleaning solvent. Keep the unit clean, especially the screens and grilles. When water is plentiful, wet the terrain surrounding the immediate operating area.
- Keep all equipment clean. Keep the main generator free of grease and oil. Clean obstructions from the ventilation screens. Blow dust from electrical components with low-pressure, dry, compressed air.
- Frequently inspect the cooling system for leaks. Ensure that the radiator and shutter operate properly and are free from obstructions. Keep the radiator cap tightly closed. Drain and flush the cooling system more frequently than required for normal conditions. When adding coolant, take any precautions needed to keep dust and sand from entering the cooling system.
- Maintain lubrication. Lubricate the generator set according to the current lubrication order. Keep all lubricant containers tightly sealed, and store them in an area free from dust and sand. Service the engine oil, the oil filter, and the air cleaner more frequently than required for normal conditions. Clean all lubrication points before applying lubricants. Clean around the crankcase oil-fill cap and the crankcase oil-level gauge before checking the oil level or adding oil.
- Prevent dust and sand from entering the fuel system. Inspect the fuel filter after each operating period. Clean the filters and strainers more frequently than required for normal conditions.
- Check the air cleaner frequently for restrictions.
RAINY/HUMID
Perform the following PMCS for power-generating equipment used in rainy or humid areas:
- Provide protection from rain. Keep all doors and panels on the generator closed when the set is not in use. Open the doors and panels during dry weather so the equipment can dry.
- Keep electrical equipment dry to prevent corrosion, deterioration, and short circuits. Inspect all electrical wiring for cracks, breaks, or frays. Report defective wiring to organizational maintenance.

- Keep the fuel tanks as full as possible so moisture cannot accumulate in them. When adding fuel, ensure that no water enters the fuel system. Keep the reserve fuel containers tightly closed. Drain contaminated fuel tanks and refill them with clean fuel.
SALTWATER
Salt water is corrosive to metal, but it is an excellent conductor of electricity. Perform the following PMCS on equipment operating in saltwater areas:
- Ensure that the electrical equipment is never in contact with salt water. If contact occurs, wash the equipment with freshwater and allow it to dry thoroughly before operating it.
- Cover nonoperating generator sets that are outside with canvas or other weatherproof material.
- Ensure that the coolant used in the cooling system is free of salt. Use an approved rust inhibitor to prevent rust and scale from forming in the cooling system.
- Paint exposed, unpolished surfaces. Coat exposed parts of polished steel and other ferrous metals with standard-issue rustproofing material or a light coat of grease.
HIGH-ALTITUDE
Generator sets are rated based on sea-level altitude. The rating of the set may decrease as the altitude increases. Information about operating equipment at high altitudes is usually printed on the data plate. The kilowatt rating may be reduced at high altitudes depending on the type of engine used to drive the generator. Refer to the appropriate TM for information about each model of generator set.
COMBAT AREAS
Operating generator sets in combat areas requires special precautions. Operators in combat areas must use any means available to avoid detection by the enemy. It is difficult to operate electrical generators without making the location known to the enemy. The equipment is noisy and produces large amounts of heat, which may endanger personnel and equipment nearby. The discomfort caused by the noise and heat may result in decreased performance of mission goals by personnel. The ability to hear enemy activity may be reduced. New signature-suppressed generator sets that reduce noise levels are being studied. These sets will be available to field units in the future.
NOISE
Major sources of noise associated with generator sets are the engine's exhaust system, air-intake cooling fan, and vibrating metal. Operators in combat areas can use several methods to reduce the noise from operating generators. The methods used depend on the size of the generator set.
0.5 to 10 Kilowatts
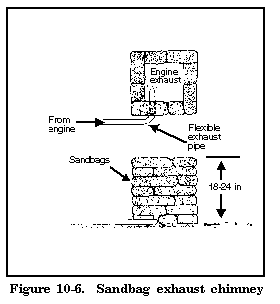
The most effective method of suppressing the noise from small-sized generator sets is to install them in a revetment. Connect an auxiliary exhaust line from the engine to the revetment chimney to remove the exhaust (Figure 10-6).
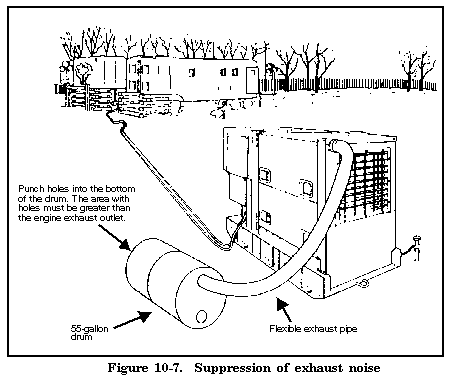
An empty 55-gallon oil or fuel drum can be substituted for a sandbag chimney. To do this, punch a number of small holes in the bottom of the drum. The area with holes must be the same size or larger than the area of the engine exhaust. Lay the drum on its side and insert the auxiliary exhaust line inside the large hole in the drum (Figure 10-7).
Use any flexible or rigid metal pipe that has a diameter larger than the exhaust outlet on the engine muffler. To reduce mechanical noises and the noise from the engine fan, place the generator behind a barrier such as a hill, dense woods, a large vehicle, or a plywood wall.
15 to 500 Kilowatts
The noise from medium- and large-sized diesel generator sets with liquid-cooled engines is very loud at the radiator end of the set. The main sources of noise are the radiator's cooling fan and the exhaust (Figure 10-8).
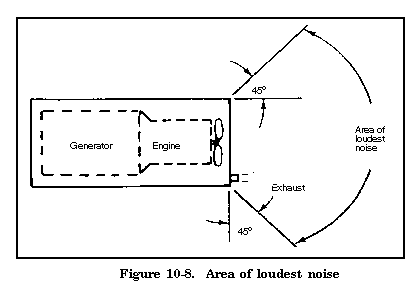
Operators in long-term field units can build underground muffler systems for these sets. Even with an underground exhaust system, the noise level will be high because of the unsuppressed fan noise. To reduce the fan noise, place a barrier such as a van, plywood sheets, or convex containers in the noise path. Another option is to place the equipment so that a natural barrier lies between the radiator and the direction where the noise reduction is desired. Do not restrict air flow out of the radiator.
VISIBILITY
It may be necessary to camouflage the equipment and revetments to avoid detection by the enemy.
INFRARED DETECTION
Generators have a thermal signature that can be detected by infrared sensors. At this time, there is no way to eliminate this problem.
ICE FOG
Ice fog caused by engine exhaust is visible in very cold climates (-25oF and below). To eliminate ice fog, place a tube on the exhaust pipes and cover the tube with a tarpaulin to diffuse the exhaust in the snow.
|
NEWSLETTER
|
| Join the GlobalSecurity.org mailing list |
|
|
|