CHAPTER 12
Pole Climbing and Rescue
Section I. Climbing
Pole climbing is necessary in constructing and maintaining overhead exterior electrical systems. The work is not difficult or hazardous if you are careful in selecting, fitting, and maintaining the climbing equipment. You must use sound judgment, use self-discipline, and follow the printed and verbal safety practices that are required in this career field.
The art of pole climbing is like any other art--it takes hard work. When you have mastered the art of climbing, you are about 10 percent efficient in your job. To become 100 percent efficient, you must learn to position yourself on the pole so that you can work at ease and with efficiency.
INSPECTION
POLE
Inspect the pole for unsafe conditions both before and during the climb. Unsafe conditions include such things as rake (leaning of the pole), shell rot, cracks, breaks, knots, woodpecker holes, and foreign attachments to the pole. Inspect the pole for rot in the center, called heart rot, by sounding the pole with a hammer (if it sounds solid when hit with a hammer, it is safe). When the pole has been in the ground for a long time, inspect it for butt rot by digging down about 6 inches at the base of the pole and drilling a hole partway into the pole base. The shavings from the hole will indicate if the pole is rotted. Plug the hole after completing this test. Remove rocks and other objects that are within 10 feet of the pole to prevent injury if you fall.
CLIMBING EQUIPMENT
Pole-climbing equipment is needed to accomplish exterior overhead electrical distribution work. Basically, there are five main parts to a lineman's equipment--a set of climbers, a body belt, a safety strap, a hard hat, and leather gloves. Inspect your climbing equipment before climbing a pole. The proper procedures for inspecting climbing equipment are covered in Chapter 13 and in TM 9-243.
CLIMBING PROCEDURES
BELTING IN
Climbing is an essential part of your job. In order to have your hands free to perform work up the pole, you must be able to belt in at the work position. Practice will help you become skilled in positioning yourself on a pole.
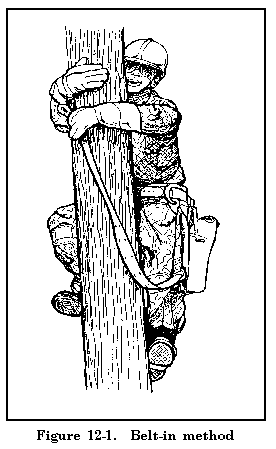
The safety strap is the first consideration. It must be carried on the body belt in the correct way. A right-handed person should carry the safety strap in the left D-ring. Snap the double (looped) end so the keeper will face outward nearest the body. The single end and the keeper will face inward farthest from the body. This will keep the strap from twisting. A left-handed person carries the safety strap the same way but on the right D-ring.
Make initial adjustments to the safety strap before climbing a pole. While belted in at the base of the pole, with your feet at equal heights, place your elbow against your stomach and raise your fist toward the pole. There should be 1 to 2 inches between your fist and the pole. With your elbow still against your stomach, extend your fingers. If your fingers do not touch the pole, your strap is too long and needs to be adjusted.
Position yourself so that both gaffs are firmly set into the pole. If you are right-handed, your left leg will be low and locked. Your right leg will be about 6 inches above your left leg in a comfortable position. Keep your knees and hips away from the pole and unsnap the single end of the safety strap with your left hand while holding onto the pole with your right hand. Pass the single end around the pole to your right hand. Grasp the pole with your left hand and snap the keeper into the right D-ring with your right hand. Both keeper snaps will face outward when you are correctly strapped around the pole. The strap should lie flat against the pole. You can then place your body weight on the safety strap. Figure 12-1 shows the proper belt-in method.

NOTE: A left-handed person should reverse the belting-in and unbelting procedures.
UNBELTING
Reverse these procedures for unbelting. If you are right-handed, your left leg should be low on the pole and locked. Your right leg should be approximately 6 inches above the left leg and in a comfortable position. Grasp the pole with your left hand and pull up on your left leg, being careful to keep the correct angle on the gaff. With your right hand, carefully unsnap the hook from the right D-ring. Pass the safety strap to your left hand. Grasp the pole with your right hand and use your left hand to snap the safety strap into the left D-ring.
ASCENDING
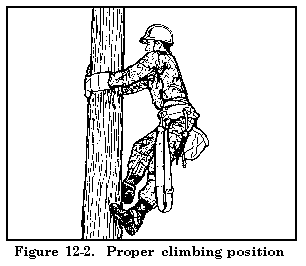
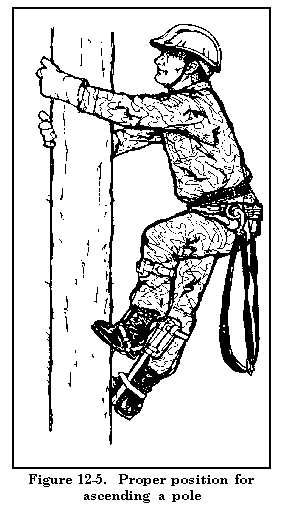
When ascending a pole, always climb the high side if possible. Keep your arms and body relaxed; and keep your hips, shoulders, and knees a comfortable distance from the pole. Climb with short steps (step length should be natural for each individual, approximately 8 to 10 inches), using your hands and arms for balance only. Extend your arms and place your hands on the pole at approximately shoulder level. If you place them at a higher level (above your head), you will have a tendency to pull yourself up with your arms. Your hands should not be overlapped on the back side of the pole because this will bring your body closer to the pole, which could be unsafe. Aim your gaffs at the heart (center) of the pole, with your toes pointed upward. The distance between your heels will change according to the diameter of the pole. See Figure 12-2 for the proper climbing position.
In order for the gaff to penetrate into the pole's heart and to ensure a safe position, your feet must be turned out and kept apart so that the gaff, not the side of your foot, will hit the pole. Imagine perpendicular lines through the center of the pole (Figure 12-3).
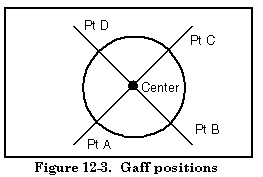
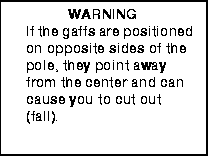
The gaffs should be positioned where the perpendicular lines intersect the surface of the pole. Proper gaff positions are at points A and B, B and C, C and D, or D and A. They should not be positioned on opposite sides of the pole such as points D and B or A and C. The horizontal position of gaffs usually ranges from 4 to 6 inches apart.
You must develop a coordination between your hands and feet. As your left foot raises, your left arm must raise; and as your right foot raises, your right arm must raise. This is just the opposite of walking.
Your steps should be short and comfortable. The weight of your body will be transferred to the lower foot with each step. Each time you step with a foot, you will transfer your body weight to that foot and lock the knee. Step length is flexible and can be adjusted to avoid hazards on the pole such as knots, nuts, and holes. Always look where you are going and inspect the pole as you are climbing.
The gaffs must come above the point to be penetrated and then be brought back down into that point at about a 30-degree angle. Always set the gaff firmly into the pole. To maintain the 30-degree angle, keep approximately 8 inches between your knee and the pole. You can accomplish this process by using the inverted-J method (Figure 12-4).
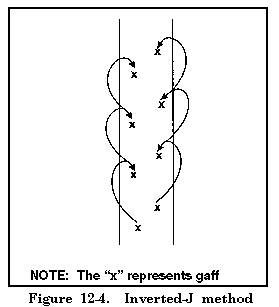
When using the inverted-J method, keep your gaffs aimed at the heart of the pole and your knees away from the pole. Never sneak (ease up a pole by lightly setting the gaffs into the pole) or slap (kick horizontally) your gaffs into the pole. Always set your gaffs in firmly. Let your legs do the work. Your weight should be shifted smoothly and easily from one foot to the other. NOTE: Do not be tempted to pull yourself up with your hands. The shorter the step, the less the temptation; the longer the step, the greater the temptation. Figure 12-5 shows the proper body position for ascending a pole.
DESCENDING
Descending a pole is just the opposite of ascending. Keep the proper climbing position and ensure that your shoulders, hips, and knees remain a comfortable distance from the pole.
When descending a pole, watch where you are going so that you do not step into a bad spot. Look down your body, between your feet, not from side to side. Your coordination will be the same; your right hand and right foot will move together, and your left hand and left foot will move together. The gaffs should naturally break out of the pole when you roll your knee to the outside during your descent, with an outward and lowering movement of your knee. Figure 12-6 shows the proper body position for descending a pole.
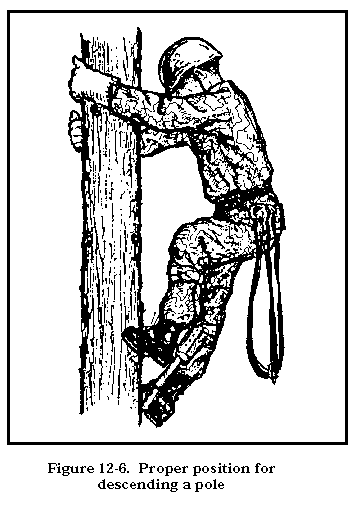
Break out the upper gaff by rolling your knee to the outside. Keep the gaff aimed at the heart of the pole at all times. Relax, straighten your leg, and lock your knee. When your straightened and relaxed leg is lined up with the heart of the pole and your body weight has been shifted above the gaff, drop the gaff into the pole. Your leg is merely lowered into position with your body weight behind it. Your steps should be approximately twice as long when descending a pole as they are when ascending a pole, but they should not be excessively long. Do not try to coast or slide like a lumberjack when descending a pole. Try to make your last step to the ground about 6 inches or less to prevent gaffing yourself.
HITCHHIKING
After you are belted in at the work position, you must move so that work can be done. You can move up and down without unbelting by hitchhiking. But, like anything, you must practice to gain confidence.
Climb to the proper height of work. If you are working around a crossarm, climb only until you are at eye level with the lag screw on the crossarm brace, belt in, and then hitchhike to a comfortable working position.
- To hitchhike up, slide the safety strap up the pole by moving your hips slightly toward the pole and moving the strap with your hands. With the strap angled up, take one or two small steps up. These steps should be smaller than normal climbing steps. Remember to lock your leg back when stepping up. Repeat this procedure until you reach the proper height.
- To hitchhike down, reverse the procedure. Slide the strap down slightly by moving your hips in. Use your hands to slide the strap. The belt will naturally fall down when you remove pressure. Take one or two small steps down. These steps should be smaller than normal steps. Use your weight to drive the gaff into the pole. Repeat this procedure until you reach the proper height. If you are close to the ground, unbelt before stepping from the pole.
CIRCLING
You cannot perform all work on a pole from one position. You must move about on the pole to be in a safe, comfortable position.
Procedures
To circle to the left, position your left foot about 6 inches lower than your right foot and lock your left knee. Position your right gaff close to your left foot, about 6 inches higher than your left foot. Shorten the safety strap on the left side by rotating your hips slightly clockwise. This action will create a slight pull to the left to help you swing to the left.
As you step up on your right foot and lock your right knee, the left gaff will come out of the pole and your body will swing to the left. Keep your left knee locked and your left gaff aimed at the heart of the pole at all times. At this time, both knees should be locked. Swing your left foot 3 to 4 inches to the left, unlock your right knee, and drop onto your left gaff. The steps around the pole should not be more than 3 to 4 inches apart (horizontally) because it could cause your right gaff to come out of the pole.
Continue the process of positioning your right foot, shortening your safety strap, stepping up onto your right foot, swinging to the left, and dropping onto your locked left leg until you have reached your desired position. If you do this procedure correctly, you will stay at the same height on the pole.
Reverse this procedure to circle to the right. Keeping your right leg low and locked, bring your left foot close to the right and about 6 inches higher. Shorten your safety strap, step up on your left foot, and swing to the right, keeping the gaff aimed at the pole and dropping down onto your locked right leg.
Work Positions
Even though you are in the location of the work, you may have to lean out to change insulators on the end of the crossarm. Ensure that you are in the correct position when you do so.
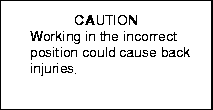
To get in a work position to the right, keep your right leg low and locked. Lengthen your safety strap slightly to the right, then twist slightly in your body belt to face your work. All your weight will be on your right foot. You are not using your left leg for this, so position it any way you feel comfortable. NOTE: Reverse this procedure to get to a work position on the left.
HOISTING TOOLS AND MATERIALS
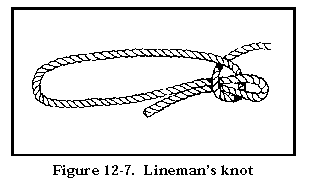
Use a lineman's knot (Figure 12-7) to tie items to a lineman's rope, and hoist the items to the work position.
SAFETY
A great portion of your time in the field will be spent working on poles. Both groundmen and linemen should pay particular attention to safety precautions during pole work. It is impossible to list all the hazards you may be exposed to, so you must be constantly alert and on the lookout for potential hazards. Each job or task has its own unique circumstances. Evaluate each situation before the work begins to determine if any hazards exist. Chapter 13 covers some common safety practices for pole work.
Section II. Rescue
Electrical shock is one of the hazards of this field that may occur on the ground, on a pole, around several people, or all alone. When it happens, your speed, rescue method, and knowledge of first aid may save a life. In fact, an individual's life could depend on your ability to perform this procedure quickly and safely. Therefore, pole-top rescue is a skill you must develop and maintain proficiency in. This section discusses the one-man concept of pole-top rescue.
PURPOSE
The purpose of pole-top rescue is to quickly and safely remove a victim from a power pole. There are many reasons why you may need to rescue a person from a pole and lower him to the ground. Some of the reasons are electrical shock, heart attack, heat stroke, physical injury, and equipment failure. No matter what the reason, when a victim is unable to remove himself from a pole, you must perform a pole-top rescue.
EQUIPMENT
The equipment necessary for pole-top rescue is important and should be available on all line trucks. The equipment should include but not be limited to--
- Personal climbing equipment such as hooks, body belts, and safety straps.
- A rescue rope that is 1/2 inch in diameter and twice the height of the highest crossarm on the base plus 10 feet.
- A knife.
- Rubber protective equipment (used if the victim or the pole is energized).
PROCEDURES
There are four basic steps in accomplishing the one-man concept of pole-top rescue--evaluate the situation, provide personal protection, climb to the rescue position, and lower the victim to the ground.
EVALUATE THE SITUATION
Call to the man on the pole and ask if he is okay or if he needs help. If there is no response or if the victim seems stunned or dazed, go to his aid. Time is extremely important. Evaluate the surroundings. Determine if the pole or crossarm is split, cracked, or on fire; if the victim is in contact with a live conductor; and if you need rubber goods or hot sticks. Look at the whole scene, not just the victim.
PROVIDE PERSONAL PROTECTION
Your safety is very important to the rescue mission because there will be no rescue without you. Your personal climbing tools and rubber goods must be in good condition. Hot-line tools must be ready in case they are needed. The physical condition of the pole must be surveyed for damaged conductors and equipment, fire, and splits. Remember, do not take chances where your safety is concerned.
CLIMB TO THE RESCUE POSITION
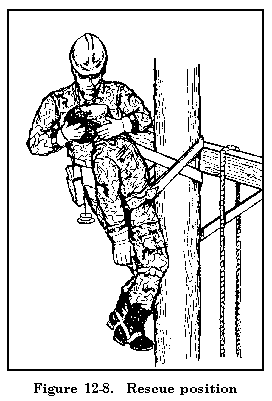
Carefully climb to the rescue position. If necessary, clear the injured of any hazards and then reposition yourself in order to determine the victim's condition. Slightly above the victim and to one side is normally the best position for checking and working with the victim (Figure 12-8). The condition of the victim may vary, but this section will discuss the conditions most commonly encountered.
Assess the Victim's Condition
- Conscious. If the victim is conscious, he will be able to tell you of his need. Administer first aid, tie the victim off, lower him to the ground, administer further first aid, and call for help.
- Unconscious, breathing. Try to revive the victim. If you cannot revive him, tie him off, lower him to the ground, administer first aid, and call for help.
- Unconscious, not breathing. Tie the victim off, lower him to the ground, administer first aid (mouth-to-mouth or cardiopulmonary resuscitation [CPR]), and call for help.
Tie the Rescue Rope to the Victim
Position the rescue line over the crossarm or other part of the structure as shown in Figure 12-9.
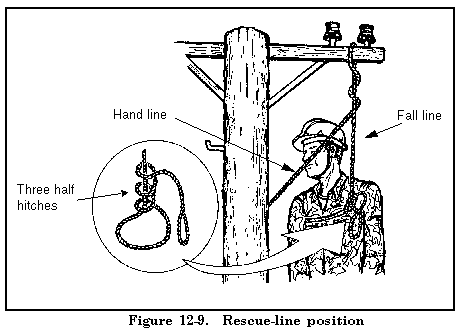
Placement is normally dictated by the position of the victim, your position in relation to the victim, and whether you are right- or left-handed.
Place the rescue line 2 to 3 feet from the pole for the best operation. Wrap the short end of the line around the fall line twice, then pass it around the victim's chest, and tie it with three half hitches. The knot should be in front of the victim, near one armpit and high on the chest.
LOWER THE VICTIM TO THE GROUND
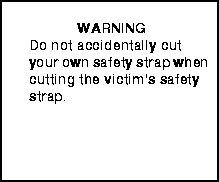
Remove the slack in the hand line by pulling on it. Then take a firm grip on the fall line with one hand, and use the other hand to cut the victim's safety strap on the side opposite the desired swing.
Lower the victim and control his descent by tightening and loosening the two twists in the rope with one hand, and use the other hand to guide the victim through any lower obstructions.
|
NEWSLETTER
|
| Join the GlobalSecurity.org mailing list |
|
|
|

