Chapter 2
MGB 4-12 BAY SS DESIGN
STEP 1. Measure the AR gap (see MGB Design, Step 1).
STEP 2. Select a bridge.
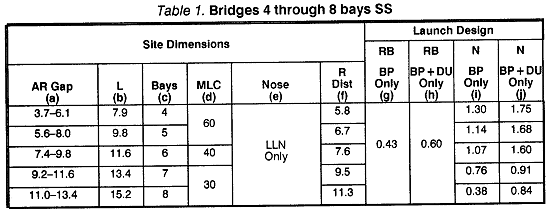
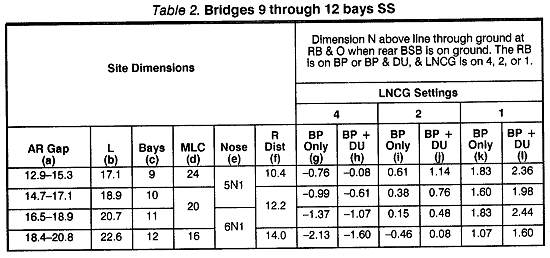
Using column (a) of Table 1 or 2, choose a bridge length whose AR gap range brackets the AR gap measured. Always select the smallest range possible to avoid wasting assets. For example, if the AR gap measured 9.5m, choose the AR gap range of 7.4m to 9.8m, even though the range of 9.2m to 11.6m also meets the criteria. Read the bay configuration column (c), and check the MLC of the bridge column (d) to ensure that it meets what is specified by the tasking authority.
STEP 3. Read the bridge length column (b).
STEP 4. Read and note the R distance column (f).
STEP 5. Read and note the nose configuration column (e).
STEP 6. Identify key construction points as follows:
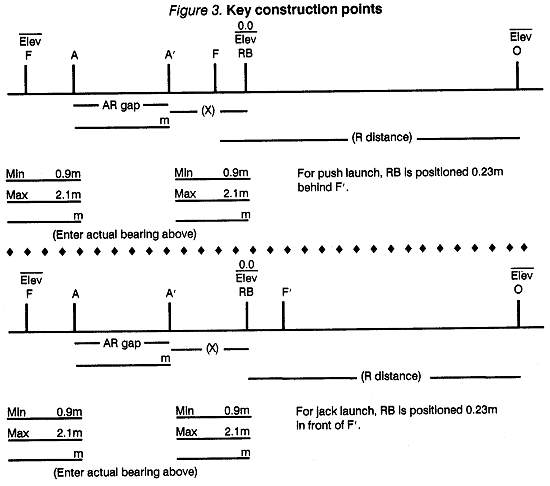
F peg -- Designates the approximate location of the far bank bankseat beam. Initially placed 0.9m from A peg on far bank.
RB peg -- Designates the position of the roller beam (RB). It may be located in one of two different positions depending upon launch method used, push launch (4 through 8 bays) or jack launch (4 through 12 bays).
NOTE: Push launches are to be performed only in an actual wartime bridge operation. Push launches are no longer performed for training or demonstration purposes.
Push launch -- The distance to the RB peg is calculated by using the position of the A' peg on the near bank, the bridge length (L), AR gap, minimum bearing requirement (0.9m), and the approximate distance the bridge falls in front of the roller beam (0.23 m). This distance is X.
X = (bridge length + 0.23m) - (AR gap + 0.9m)
NOTE: To adhere to minimum/maximum bearing rules without having to dig out or pack up under the end of bridge, you must ensure that the RB peg is placed between 1.113m and 2.33m from the A' peg.

Jack launch -- The distance to the RB peg is calculated by using the position of A' peg on the near bank, the bridge length, AR gap, minimum bearing requirement (0.9m), and the approximate distance required behind the roller beam to attach the jacks (0.23m). This distance is X.
X = (bridge length - 0.23m) - (AR gap + 0.9m)
NOTE: To adhere to minimum/maximum bearing rules without having to dig out or pack up under the end of bridge, you must ensure that the RB peg is placed between 0.67m and 1.87m from the A' peg.

O peg -- Marks the clear distance behind the roller beam required to construct the bridge. It is positioned by measuring the R distance, Table 1 or 2, column (f), behind the RB peg.
Adjust the position of the F peg, if required, and determine the final position of the bridge on the near bank (F' peg).
NOTES: (These notes apply to both Table 1 and Table 2.)
1. An extra 0.075m of clearance can be obtained by lifting on the nose to remove the pin sag. Where levels are estimated, this should not be taken into account during design but left to compensate for any errors in calculating the value of H (for SS 4 through 8 bays).
2. An extra 0.6m of clearance can be obtained by lifting on the nose to remove the pin sag (for SS 9 through 12 bays).
3. Any additional packing under the RB will increase the vertical interval N by three times the thickness of the packing. For example, if the packing is 0.075m thick, N will be increased by 0.225m.
4. The table incorporates an allowance to ensure that the nose clears the landing roller (LR) when it is positioned 0.230m in front of point F.
Bearing Check. The minimum/maximum bearings for any SS bridge up to and including 12 bays are shown in Table 3.
To calculate the actual locations of the F and F' pegs, the following procedure is used:
Near bank bearing = bridge length - (AR gap + 0.9m) where --
- Bridge length is obtained from column (b) of Table 1 or 2.
- The AR gap was measured by you in the first step of this design procedure.
- An assumption of 0.9m is made at this point in the calculation sequence because we know that this is the minimum acceptable bearing allowable on the far bank.
If the near bank bearing is within acceptable limits, you do not have to adjust the position of the F peg. Its final position will be the initial value that you assumed of 0.9m from the A peg. The F' peg will be located at a distance equal to the near bank bearing measured from the A' peg on near bank.
If the near bank bearing is greater than the maximum allowable (2.1m), you must do one of the following:
Move the F peg further away from its present assumed location to a point where the amount of bearing on the near bank is less than or equal to 2.1m, and greater than or equal to 0.9m. This will allow the F' peg to be placed at a suitable distance from the A' peg. The RB peg must be moved toward the gap the same distance the F peg is moved away from the gap. This will also move the O peg towards the gap.
Dig out the soil from the near bank until the maximum allowable bearing is not exceeded.
Crib up under the end of bridge upon completion.
Physically locate the key construction points on the ground and take elevations relative to the RB peg.
Locate O, RB, F, F', A, and A' pegs. Estimate elevations of F and O pegs relative to the RB peg. A positive value indicates a point higher than the RB peg and a negative value indicates a value lower than the RB peg. The RB peg will always be 0.0 elevation. Place the elevations on the baseline as shown in Figure 3.
Push launch:
X = (L + 0.23m) - (AR gap + 0.9m)
Jack launch:
X = (L - 0.23m) - (AR gap + 0.9m)
Check bearing to make sure you have not made a mistake.
Bearing FB + AR gap + Bearing NB = L
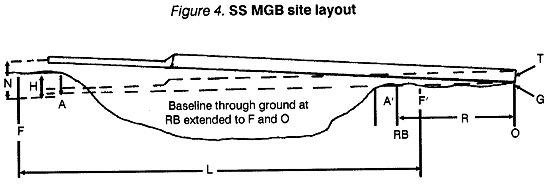
The critical points and definitions used in planning, designing, construction and launching of single-span MGB areas shown in Figure 4.
STEP 7. Slope check.
Ensure that the difference in elevation between the F' and F peg does not exceed one-tenth of the total bridge length. If it does, you will have to crib up, undertake a major construction project, or choose another centerline.
STEP 8. Calculate the far bank height (H) relative to a baseline drawn through the ground level at the RB and O pegs as follows:

STEP 9. Launch design:
4 through 8 bays:
RB packing. From Table 1, columns (i) and (j), choose a nose lift N which is greater than H. If none is available, additional packing will be required under the deck unit (DU) (Table 1 and note 3).
From column (i) and (j) or by calculation, determine the amount of packing required for the nose lift (N) required.
9 through 12 bays:
Choose an LNCG setting from Table 2, columns (g), (h), (i), (j), (k), or (l) to give a nose lift N greater than H.
If N is not greater than H, see note 3 to increase N by additional packing.
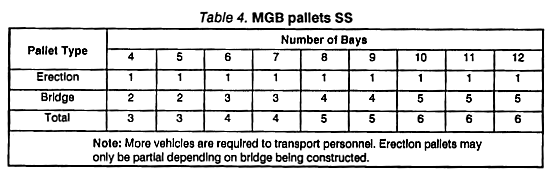
STEP 10. Loads required. From Table 4, determine the truck and trailer loads required for the bridge.
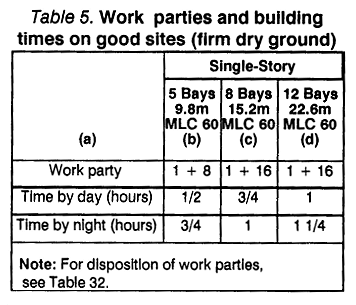
STEP 11. From Table 5, extract the following information:
Construction time______________________
Manpower requirements_________________
STEP 12. Final design:
Bays_______________________________
LNCG setting________________________
Packing required______________________
Bearing: NB__________FB_____________
Truck and trailer loads__________________
Manpower required____________________
Time to construct______________________
|
NEWSLETTER
|
| Join the GlobalSecurity.org mailing list |
|
|
|


