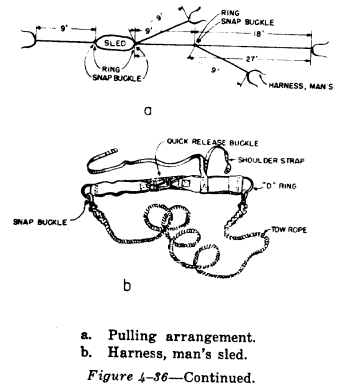
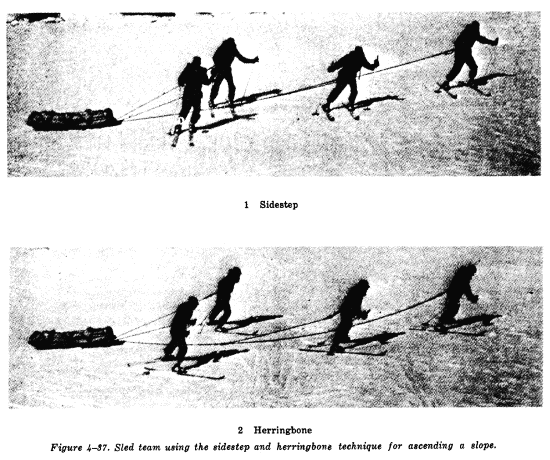
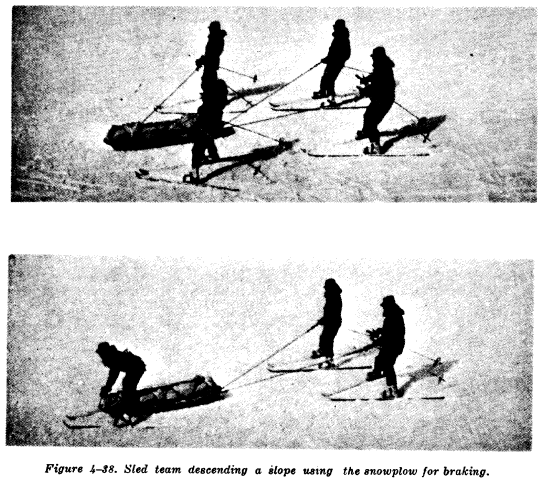
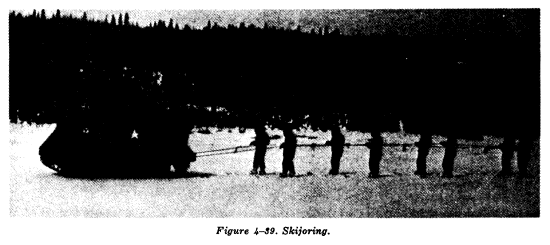
CHAPTER 4
SKIING AND SNOWSHOEING
Section I. INTRODUCTION
4-1. Purpose and Scope
a. The purpose of this chapter is to provide information concerning--
(1) Techniques used in military skiing and snowshoeing.
(2) Application of these techniques to facilitate the oversnow mobility of troops engaged in military operations.
b. This chapter also describes--
(1) Equipment available for military skiing and snowshoeing.
(2) Maintenance and care of that equipment.
4-2. General Considerations
a. The Need for Individual Mobility.
(1) Warfare in snow-covered areas requires oversnow mobility off the roads. Well-trained ski and snowshoe troops are a definite asset on the snow-covered battlefield. In deep snow (61 cm (2') or greater in depth) the individual has almost no mobility without the aid of skis or snowshoes. Troops on skis attain mobility, are not roadbound, and are able to move cross-country over all types of snow-covered terrain. They are ideally suited for reconnaissance, security missions, and deep penetration patrols conducting unconventional type operations. Aggressive action can be carried out with advantage against the enemy flanks, rear, or communication lines by lightly equipped, fast-moving troops on skis.
(2) Deep snow hinders movement on foot. By using snowshoes, individual mobility will be restored to a point approximately equal to that of foot movement on hard ground. Skis, on the other hand, provide individual mobility usually exceeding that possible on foot.
b. Need for Certain Techniques.
(1) During cross-country marches and in combat the soldier on skis or snowshoes will be required to negotiate various types of terrain conditions. He will be moving and operating in different weather and snow conditions. Carrying a rucksack-and a weapon, he will be required to move in forests, over open terrain, uphill and downhill, and often while pulling a sled.
(2) In order to execute his mission with the least wasted effort, the soldier must apply the proper techniques of skiing and snowshoeing required for the various conditions under which he will operate.
c. Use of Oversnow Equipment to Achieve Mobility.
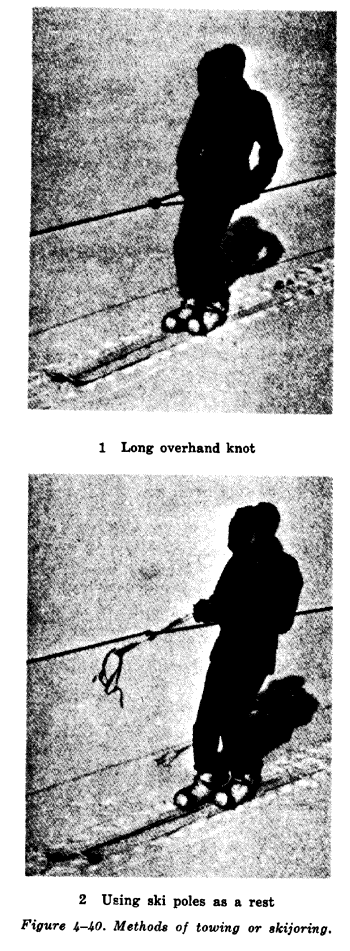
(1) The means available to the individual soldier for obtaining oversnow mobility are skis and snowshoes. When operating in snow-covered terrain the soldier must be equipped with either skis or snowshoes at all times. Using skis, he is normally able to execute long marches with less effort and in less time than when using snowshoes. Cross-country movement by soldiers on skis can be facilitated by towing the skiers with tracked vehicles or animals (skijoring). Snowshoes are more suitable than skis in confined areas, when working close to heavy weapons, or when training time is limited.
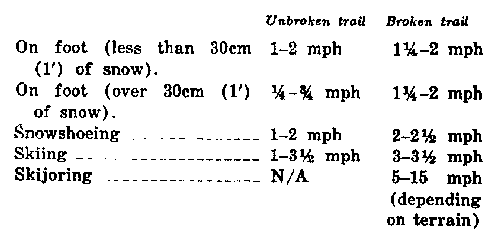
(2) Rates of movement over snow-covered terrain cannot be given in exact time requirements. They vary in each situation. However, as a guide, the following rates are listed. Rates are given for movement over flat or gently rolling terrain while individuals are carrying a rifle and loaded rucksack.
Section II. SNOW AND TERRAIN
4-3. Snow Composition
Snowflakes are formed from water vapor, at or below 32° F., without passing through the liquid water state. Newly fallen snow undergoes many alterations on the ground. As the snowmass on the ground packs and becomes denser, the snowflakes consolidate and the entrapped air is expelled. These changes are caused by effects of temperature, humidity, sunlight and wind.
a. Temperature. In general, the lower the temperature, the drier the snow and the less consolidation. As the temperature rises, the snow tends to compact more readily. Temperatures above freezing cause wet snow conditions. Lowered night temperatures may refreeze wet snow and form an icy crust on the surface.
b. Sunlight. In the springtime, sunlight may melt the surface of the snow even though the air temperature is below freezing. When this occurs, dry powder snow is generally found in shaded areas and wet snow in sunlight areas. Movement from sunlit areas into shaded areas is difficult because the wet snow will freeze to skis and snowshoes. After sunset, however, wet snow usually refreezes and the ease of movement improves.
c. Wind. Wind packs snow solidly. Wind-packed snow may become so hard that skiing or even walking on it makes no appreciable impression on its surface. Warm wind followed by freezing temperatures may create an icy, unbreakable crust on the snow. Under such conditions, skiing and snowshoeing are very difficult. Another effect of wind is that of drifting the snow. The higher the wind velocity and the lighter the snow, the greater the tendency to drift. All troop movement is greatly affected by drifting snow and wind, the effect depending on the relative direction and velocity. In addition, as the wind, increases, the effect of extreme cold (windchill effect) on the body may slow down or temporarily stop movement, possibly requiring troops to take shelter. The snowdrifts created by wind usually make the snow surface wavy, slowing down movement, especially in darkness.
4-4. Snow Characteristics
The characteristics of snow which are of greatest interest to the soldier are--
a. Carrying Capacity. Generally, when the snow is packed hard, carrying capacity is greater and movement is easier. Although the carrying capacity of ice crust may be excellent, movement generally is difficult because of its slippery surface.
b. Sliding Characteristics. All-important to the skier are the sliding characteristics of snow. They vary greatly in different types of snow and temperature variations and materially increase or decrease the movement of the skier, according to the conditions that exist.
c. Holding Capacity. The holding capacity of snow is its ability to act upon ski wax in such a way that backslapping of the skis is prevented without impairing the forward sliding capability. Holding capacity changes greatly with different types of snow, making it necessary to have a variety of ski waxes available.
4-5. Effects of Snow and Terrain on Individual Movement
a. Skis or snowshoes are usually employed in military operations when the depth of snow is 30 cm (1') or more. This equipment is needed in deep snow conditions to provide the necessary oversnow mobility of the individual and the maneuverability of troops.
b. Snow cover, together with the freezing of waterways and swampy areas, changes the terrain noticeably. Generally, the snow covers minor irregularities of the ground. Many obstacles such as rocks, ditches, and fences are eliminated or reduced. Lakes, streams, and muskeg, impassable during the summer, often afford the best routes of travel in the winter when they are frozen and snow-covered. During breakup periods this advantage is reduced, since the snow becomes slushy and the carrying capacity is poor. Even so, skiing or snowshoeing, although slow, is often the only practical way to move during this period. The drop in temperature at night will still freeze the snow surface, creating a good route for a skier or snowshoer during the night and early morning.
c. The effects of snow and terrain on individual movement vary in different areas.
(1) The arctic tundra and vast subarctic plateaus are similar. They are characterized by large plains and gently rolling terrain with scant vegetation where rocky ridges, scattered rock outcroppings, riverbanks, and scrubby brush still create obstacles to individual movement, when encountered. The shallow snow cover normally found in these areas, as a rule, is firmly packed by wind action and will usually support a man on foot. When the snow has not been wind packed and is still soft, mobility will be increased by the use of skis or snowshoes.
(2) Forested areas include vast coniferous forests, dense brush, swamps, and numerous lakes and rivers. Skiing and snowshoeing are relatively easy on frozen, snow-covered rivers, lakes, and swamps. In wooded areas concealment is best, but movement is hampered by vegetation and soft snow, therefore, greater skill is required in skiing to avoid trees and other obstacles. These disadvantages are reduced by careful selection of the best routes and following proper trailbreaking procedures. Woods retard the melting of snow in spring often allowing skiing after the open fields are clear of snow. In autumn, the situation is reversed; the deeper snow is generally found in the open fields allowing skiing earlier than in wooded areas.
(3) Mountains present special problems. Their varied and steep terrain place additional demands upon the skill of a skier and make movement on snowshoes or skis very difficult. Slopes which are easy to negotiate in summer often become difficult and dangerous to cross in winter because of deep snow cover which is prone to avalanche. Large drifts and snow cornices present other obstacles and dangers. Snow cover on glaciers obscures crevasses and makes their crossing hazardous (FM 31-72).
Section III. MILITARY SKIING
4-6. Advantages and Disadvantages
a. Advantages.
(1) In snow-covered terrain the weakest and the most vulnerable points of the enemy are usually the open flanks, rear areas, and the lines of communication. Attacking, defending, or delaying troops require a high degree of oversnow, cross-country mobility to reach these objectives. Units on skis are the most suitable troops to be used for surprise attack on distant objectives.
(2) A trained individual or a unit on skis can execute cross-country marches on roadless, variable, and snow-covered terrain more efficiently and quickly than on snowshoes or on foot.
(3) Skiing over snow-covered terrain by properly trained troops is comparatively less tiring than marching on snowshoes or on foot. Sliding characteristics obtained by the skier increase speed, mobility, and rate of march.
(4) Due to increased weight bearing surface, a skier or a unit on skis is able to cross frozen lakes and rivers when the ice will not support a man on foot.
(5) The use of oversnow vehicles and other suitable means of towing troops further increases their mobility.
b. Disadvantages.
(1) Individuals require a considerable amount of training before becoming proficient in the use of skis for military purposes.
(2) Certain terrain features, such as very dense brush and windfall areas, materially decrease the rate of march of a ski unit.
(3) Skis often require rewaxing for changing snow conditions, which consumes time. Skis also do not provide good traction regardless of wax used, for pulling loads.
4-7. Training Objectives
a. General Considerations. A soldier on skis must be capable of moving under control across diversified, snow-covered terrain while carrying the arms and equipment necessary for tactical operations. Since skis are often the most efficient means of transportation in winter warfare, the soldier should be so skilled in their use that skiing becomes a natural method of movement. Since the skiing soldier will utilize his skis for the greater portion of movement over snow-covered terrain, it is important that he acquire good skiing technique in order to be able to move anywhere required both quickly and with the least expenditure of energy. The soldier must develop these techniques so that his movement either uphill or downhill will not delay the movement of his unit. When operating in mountainous areas, the soldier must possess efficiency in both basic and advanced military ski techniques in order to move easily and safely over steep and rough terrain; the soldier must possess endurance and must be in top physical condition.
b. Training Time Required. To walk on snowshoes, one day of instruction is generally sufficient. However, several days use of snowshoes during normal training will rapidly increase proficiency. In a period of 2 weeks a soldier can be taught enough ski techniques to enable him as an individual to negotiate flat or rolling terrain with greater speed than if he were on foot or snowshoes, but he will not yet be able to operate effectively as a combat skier within a unit. At least 8 weeks of intensive training are needed in order to become a military skier capable of operating proficiently in any type of terrain. It should be noted that the level of skiing skill developed by the soldier during any period of ski instruction is improved by participating in unit training which is done on skis.
4-8. Ski Equipment
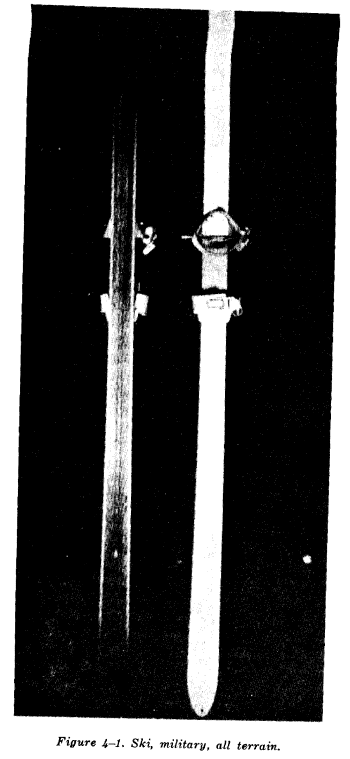
a. Skis. Military skis were formerly issued in 198 cm (6½'), 213 cm (7') and 229 cm (7½') lengths. The standard issue ski is now 213 cm long (7'); however, until stocks are depleted the other length skis may be issued in lieu of the standard ski. The standard skis are of laminated wood construction with hickory tops and running surfaces. They are all terrain cross-country skis with steel edges (fig. 4-1). The metal edges give better gripping action in turns and on icy and hard packed snow which results in better control. All skis are painted white and have a hole in the tip through which a cord can be threaded when it is necessary to pull them as ski bundles or as an improvised sled.
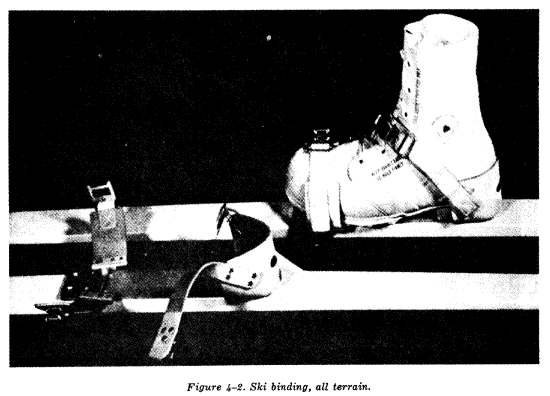
b. Ski Binding, All Terrain. The binding consists of a toeplate, toe straps, soleplate, heel cup, quick-release fasteners and mounting hardware (fig. 4-2). The toe plate is aluminum; the toe strap and heel cup are made of white rubber and three plies of dacron, the soleplate is made of fiberglas. This binding will accommodate all types of cold weather footgear and is easily put on and removed. The soleplate is flexible and allows free vertical movement of the heel which assists normal foot movement.
c. Ski Poles. Nonadjustable tubular steel poles, 130 (51"), 137 (54") and 147 cm (58") in length, are the standard item of issue, however, the adjustable ski pole is being used until stocks are depleted. Figure 4-3 illustrates the different parts of the ski pole. In an emergency, the poles can also be used for tent poles, markers, or in the construction of emergency litters.
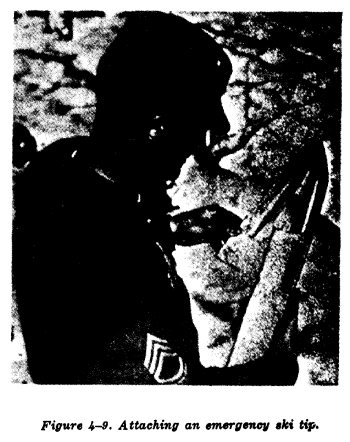
d. Ski Repair Kit and Emergency Ski Tip. This kit contains pliers, screwdriver, screws, wire, drill, strips of steel edging, and leather thongs for use in emergency repair of skis, poles or bindings while in the field. An emergency ski tip is also available. This can be used to repair or replace broken ski tips and allow the individual to continue the march until replacement skis can be obtained. Ski repair kits and emergency ski tips are usually issued to units and are not intended for individual issue. One ski repair kit per rifle platoon and one emergency ski tip per squad is usually sufficient.
e. Ski Waxes. Ski wax is used to obtain the sliding and climbing characteristics necessary for efficient military skiing. The waxing of skis is covered in paragraph 4-10.
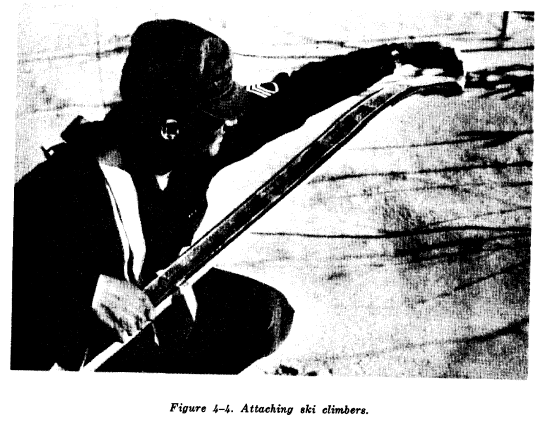
f. Ski Climbers. Climbers are strips of canvas with mohair secured to the running surface, which are attached to the bottom of the skis by means of straps (fig. 4-4). When attached, the mohair material lies with the ends pointing towards the heel of the skis. Forward movement of the ski does not disturb the material, thereby allowing the ski to slide. Backward pressure, however, causes the material to become roughened, preventing the skis from backslapping. Climbers are used by troops to make the climbing of steep slopes faster and less tiring, providing the ascent is sufficiently long to justify the time required to put them on and take them off. They may also be used to give more traction while pulling sleds, and for descents where sliding is not desired.
4-9. Preparation of Skis
a. General. Pine tar or ski lacquer is applied to the running surface of the skis to fill the pores of the wood and to furnish a base so that the skis may be properly waxed. They are also applied to the running surface of the skis to prevent moisture from being absorbed by the wood. For military skiing, pine tar is preferred as a base. If this is not available, ski lacquer is a suitable substitute. They must be used separately since they do not mix together.
b. Application of Pine Tar or Ski Lacquer.
(1) Preparation of skis. The running surface must be clean to prepare the skis for pine-tarring or lacquering. If the ski has been used, the old base and wax must be removed. The easiest way to accomplish this is to use a scraper and sandpaper. Caution should be exercised to insure that the running surface of the ski is not damaged. Old wax can also be removed by the use of steel wool or a rag moistened with a high flashpoint solvent. Solvent should only be used in an adequately ventilated working area with no smoking or open flames. If conditions are such that these materials are not available, heat can be used to remove the wax.
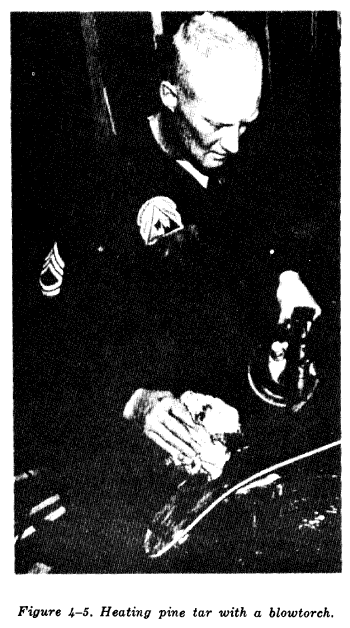
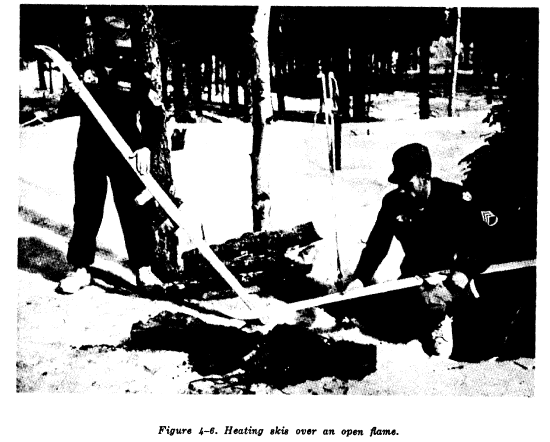
(2) Tarring procedure. After the ski has been cleaned, a light coat of pine tar is then applied with a soft brush or a rag. If the pine tar is stiff, it should be heated slightly so it can be evenly distributed. Heat is then applied to the running surface to cause penetration of the pine tar into the pores of the wood. The source of heat may be a blowtorch (fig. 4-5), one burner stove, or an open fire (fig. 4-6). To obtain the best penetration, work progressively on one section at a time rather than heating the whole surface of the ski. Care must be taken to avoid burning or scorching the wood by application of too much heat. It may be necessary to repeat this procedure several times to obtain a sufficient coating. Excess pine tar is removed during the heating process by means of a rag. When finished, the running surface of the ski should be dry and not sticky to the touch.
(3) Lacquering procedure. After the ski has been cleaned, the surface is allowed to dry thoroughly before applying the lacquer. The lacquer is applied with a clean brush, rag, or sponge, starting at the tip and working towards the heel using smooth, even strokes in a continuous motion. None of the lacquered areas should be touched until the lacquer incompletely dry. This requires several hours. The application should be made at room temperature for best results. At least two separate coats should be applied, making certain that each one is completely dry before the next one is applied. It is recommended that the surface be lightly sanded with fine sandpaper or steel wool, between coats. Care must be exercised not to inhale toxic lacquer fumes. For prolonged or repeated exposure to such fumes, unapproved respirator should be worn. No smoking or open flames should be permitted in or around the work area and adequate ventilation should be provided.
a. General. There are no standard ski waxes available in the supply system therefore commercial waxes must be procured and used. The purpose of ski wax is to provide the ski with necessary climbing and sliding qualities to prevent backslip in various snow conditions. When snow conditions and temperature change, the type and method of application of ski wax will also differ. Before wax can be properly selected and applied, the individual must learn to recognize the different types of snow conditions. It is also valuable to have some knowledge of how ski wax performs in relation to snow. After snow has fallen on the ground, its crystalline structure is continuously altered by the effects of temperature, wind, and humidity. In very cold weather these changes occur much more slowly than when temperature is near 32° F. Therefore, the most important factor of waxing is the effect that temperature has on the character of the snow and its sliding qualities.
b. Snow and its Effects on Wax.
(1) The effects of snow crystals. It is important to understand the relation of wax to the holding and sliding capabilities of the snow. For this reason there are specific waxes to use in cross-country skiing under different snow surface conditions.
(a) Proper wax. When the soldier is skiing on the level, or uphill, his body weight gives maximum pressure to the skis. The soft quality of the wax allows the crystal structure of the snow to penetrate the wax under this pressure and thus keep the ski from backslapping. When the pressure is lifted and the ski allowed to slide forward, the penetrating snow crystals will slide free from the surface of the wax reducing friction. Continuous forward motion, as in sliding, keeps the crystals from penetrating the wax.
(b) Wax too soft. When the skis slide poorly, the following condition generally exists: the snow crystals have penetrated into the wax but will not slide free. This causes clogging of the snow on the running surface and may eventually cause ice to form. Under these conditions the soldier will find that even vigorous sliding of the ski will not break the snow loose from the wax surface. Little or no forward slide can be gained.
(c) Wax too hard. When the skis slide well, but backslip on the level and when moving uphill, the following condition exists: the snow crystals are not penetrating the wax. The soldier will find he has excellent sliding when going downhill, but climbing uphill or skiing on level ground is very exhausting because of backslip. This is the primary deterrent to the use of "downhill" waxes for cross-country skiing.
(2) Classification of snow. Snow is classified here into four general types. This classification is intended to assist the soldier in snow identification, choice of wax, and its proper application under these different conditions.
(a) Wet snow. This type of snow is mostly found during the spring, but it may also occur in the fall or late winter, particularly in regions of moderate climate. This type of snow can be readily made into a heavy, solid snowball. In extreme conditions, wet snow will become slushy and contain a maximum amount of water.
(b) Moist snow. This type of snow is generally associated with early winter, but may also occur in midwinter during a sudden warmup period. This type of snow can be made into a snowball, but will not compress as readily or be as heavy as a wet snowball. It will have a tendency to fall apart.
(c) Dry snow. This type of snow is generally associated with winter at its height, but it can occur in late fall as well as in spring, when abnormally low temperatures occur. This snow is light and fluffy. It cannot be compressed into a snowball unless the snow is made moist by holding it in the hand. At extremely low temperatures, such as those found in the far northern regions, this snow is like sand, and has very poor sliding qualities.
(d) New snow. This is snow which is still falling or has recently fallen on the ground, but has not been subject to changes due to the sun or temperature variation. It can be wet, moist, or dry in nature.
c. Proper Selection and Application of Waxes. Cross-country ski waxes are formulated to provide optimum sliding and climbing characteristics for various types of snow conditions. Each type is labeled with appropriate instructions on its intended use, i.e., wet, moist or dry snow conditions. Since the types of wax vary between manufacturers, no particular type of wax can be prescribed for each classification of snow; however, the instructions on each container specifies the weather conditions and type of snow where performance of the wax is best. Proper application of all waxes is important to achieve desired results whether they be traction or sliding action. As a general rule, the wax that gives the best sliding surface for all types of snow provides an excellent base for application of other waxes. To provide traction, varying amounts, combinations, and methods of application of other waxes are used. When pulling a sled or carrying a heavy load, thicker coats of wax may be required to insure traction.
d. Waxing Procedure.
(1) Whenever possible, the waxing of skis should be done before the march when shelter and heat are available, as the running surface of the ski should be warm and dry to obtain best results. When on the march, ski wax should be carried in the pockets, if possible, so that body heat will keep the wax soft and easy to use. If the skis need waxing during the march, the running surfaces are dried as much as possible by the use of paper or dry mittens. Whenever possible, old wax should be removed before rewaxing skis particularly when a different type of wax is being used. Refer to paragraph 4-9b(1) for proper method for removing old wax.
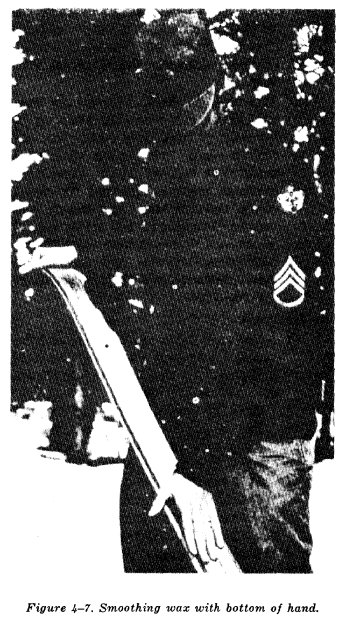
(2) To apply, cover the running surface with wax. Next, smooth the wax by rubbing it with the hand, using the heel of the palm or the fingers (fig. 4-7), a waxing cork, or a heated iron. When heat is available, this process can be made easier by warming the wax that has been applied. It is normally best to work progressively on a section at a time, from the ski tip towards the heel. If the waxing is done in a shelter, or heat is used, the skis should be allowed to cool to outside air temperature before being used. Do not place the running surfaces of skis on snow immediately after waxing if heat is used or if waxing is done in a heated room or shelter as the snow may stick and freeze to the running surface. For the same reason protect the running surfaces against wind driven snow. To insure that wax is properly chosen and applied, the skis should be tested before being used on an extended march.
4-11. Care of Ski Equipment
a. General.
(1) A broken ski or binding may put a soldier at the mercy of the enemy and the elements and prevent him from accomplishing his mission. If the soldier keeps his skis and equipment in good condition, he will find that ski marches are easier and less tiring and that he will not be the cause of any unnecessary delays and halts by his unit. Care of ski equipment is the responsibility of the individual soldier--he must check it before starting out on a mission, during breaks, and when in bivouac. At least once a week the ski equipment should be thoroughly checked by unit leaders. During combat the inspection must be done whenever the situation permits.
(2) Skis must be checked for proper base of pine tar, evidence of possible warping and splitting, loss of camber, defective edges, and broken steel edge sections or screws. At the same time bindings must be checked for worn straps, missing rivets and screws, and proper adjustment. Ski poles should be checked to insure that wrist straps, handgrips, baskets, and points are firmly fastened and that no breakage has occurred.
b. Daily Care.
(1) After each day's use, the skis and the skiing equipment should be checked and necessary repairs made by the individual as follows:
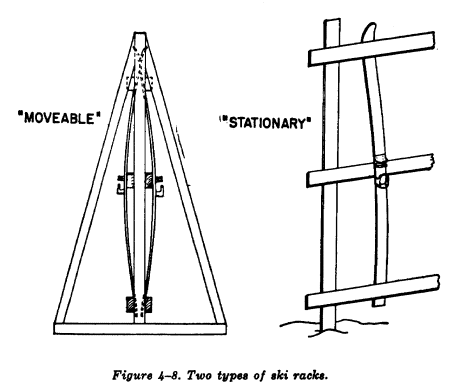
(a) Skis. Remove any snow or ice that has frozen to the ski. This may be done with heat. If heat is not available, this can be done with a mitten, wooden stick, or piece of metal. Check the heels and tips of the skis for cracks. Badly cracked skis must be replaced, as they are weakened and break easily. At the same time, check for and replace defective or missing edges and screws. The condition of ski bottoms is then checked and, if needed, additional pine tar or base wax is applied. The surface waxing for the next day's march is deferred until snow conditions are determined in the morning or shortly prior to departure. After maintenance of skis is completed, they should be placed indoors, preferably in a ski rack (fig. 4-8). Under field conditions, skis are placed in an improvised ski rack, planted upright in the snow or stacked.
(b) Bindings. Insure that all straps, buckles, screws and rivets are present and in good condition. Replace parts which are unserviceable. If necessary, readjust the fit of the bindings.
(c) Poles. Check wrist straps, handgrips, shafts, baskets, and points to insure that they are in good condition. Broken parts should be replaced at the first opportunity. Temporary repairs can be made with wire, cord, or tape.
(2) When snow cover is comparatively thin, be careful not to damage the skis while skiing in rocky or stumpy terrain. Sometimes there is water under the snow cover on frozen rivers or lakes. Try to cross them at a dry place; make an improvised hasty bridge from trees or boughs, if time permits. If the skis become wet during a crossing of water, the ice which forms on the skis must be removed after reaching the bank. A long march or sudden change in temperature may require rewaxing of skis during the march. When skis are removed, do not leave them on the snow. It may stick and freeze on the running surface. Remove the snow from the skis and stack them beside the ski tracks or lean the skis against a tree. A ski stack can be built by each squad.
c. Repair.
(1) General. Repair of unserviceable ski equipment requires qualified personnel with necessary tools and facilities, Therefore, the soldier will only be permitted to make emergency repairs such as replacing bindings, screws, and steel edges.
(2) Emergency repair. The repair of ski equipment under field conditions is emergency repair. In many cases broken skis or worn out parts of ski equipment must be replaced. To facilitate this, the following arrangements are necessary:
(a) Every unit should have replacement skis, bindings, and poles. There should also be available, ski repair kits, pine tar or lacquer, and waxes.
(b) Every squad should have one emergency ski tip (fig. 4-9) and each platoon, one ski repair kit.
(c) Every man should have the following in his possession at all times:
1. Emergency thong.
2. Pocketknife.
3. Piece of light wire (malleable) or nylon cord.
(3) Combat repair. During combat, the most suitable time for maintenance and repair of skis and ski equipment is when the unit is in reserve.
d. Storage.
(1) Proper storing of skis and skiing equipment is most important , during off seasons. Improper care in storage procedures will damage this equipment, making it unserviceable.
(2) When the skiing season is over, skis and poles are turned in by the using unit for storage. Before doing so, the skis must be cleaned and old waxes removed.
(3) Skis and poles are then checked thoroughly. Those in good condition are separated from those in need of repair or salvage. Necessary repairs are made. Ski bindings are not removed. All skis should be pine-tarred or lacquered. If needed, skis are repainted. Skilled personnel are needed for repairing skis and poles and for preparing them for storage.
(4) In further preparation, the skis are tied together by matching pairs according to their factory markings not unit markings. A piece of string or cord is used to tie the skis at their tips and heels with running surfaces facing each other. A wooden block (waxing cork may be used) is then placed-between the skis at the metal toe plates. The correct spread is about 6 to 8 cm (2" to 3"). After being Mocked, the skis are stored in a vertical position, with the tips down. If the skis must be stored horizontally, they should be supported at both ends and at the middle, with the end supports on the top side of the ski and the middle support beneath and arranged so that tension is maintained on the camber. Each ski should be supported individually when stored horizontally. The storage room should be dry with an even temperature and good ventilation (fig. 4-10).
(5) After ski poles are checked, repaired, and reconditioned, they should be placed in the same storage area as the skis.
4-12. Basic Movement
a. General. In moving on skis for the first time, most beginners find that skis are awkward to handle due to the difficulty of obtaining the necessary balance and coordination. To overcome these difficulties, the first instructional phase is devoted to step turns and walking on level ground in order to obtain the balance, correct body position, coordination, and rhythm necessary in skiing. In addition, this basic movement is a means of forming the foundation for further instruction. Ski drill techniques are covered in appendix C.
b. Skiing Without Poles. The soldier will find that in performing duties, especially in combat, he will be required to ski either with poles carried in one hand or without poles. For this reason, it is important that he practice all techniques with and without the use of ski poles. This is especially important in the beginning stages of skiing, as practice without ski poles will aid in learning proper transfer body weight, balance, timing, and control the skis.
4-13. Step Turn
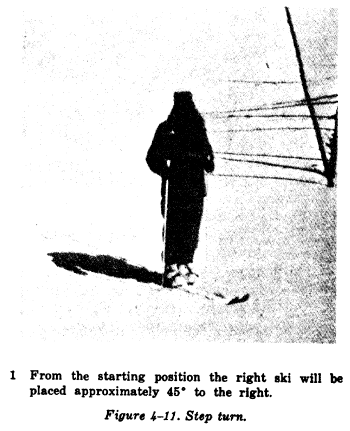
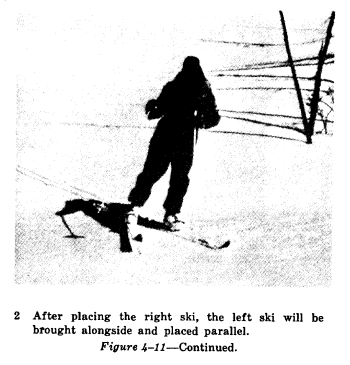
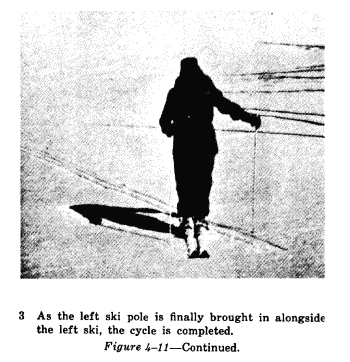
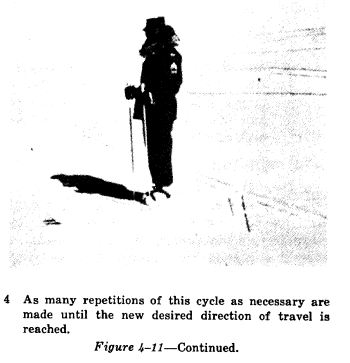
a. Use. The step is the simplest means of changing direction from a standing position. It is particularly valuable in brushy and wooded terrain (fig. 4-11).
b. Technique.
(1) From the standing position the right (left) ski tip is raised, the ski is rotated to the right (left) side, using the heel of the ski as a pivot.
(2) The ski is placed on the snow and the body weight shifted onto it.
(3) The left (right) ski is moved along side the right (left) in the same manner.
(4) Each pole is raised, moved, and placed with the corresponding ski (i.e., right ski, right pole).
(5) The same movement is repeated until the desired direction is obtained.
(6) In confined areas it may be necessary to use the tip of the ski instead of the heel as a pivot point. In turning to the right (left) the heel of the left (right) ski is raised off the snow and moved to the left of its original position. Then the right (left) ski is moved alongside the left (right) ski and this sequence repeated until the desired direction is achieved.
4-14. Kick Turn
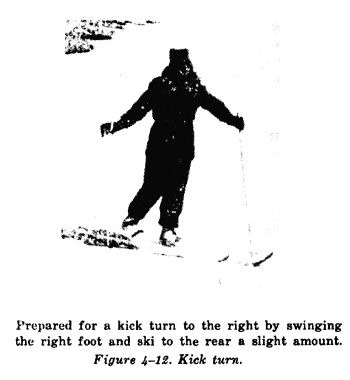
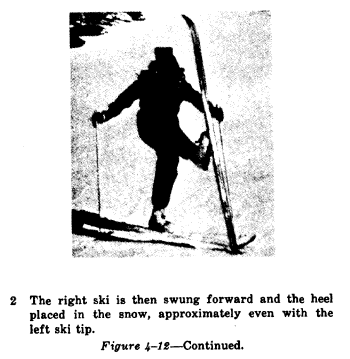
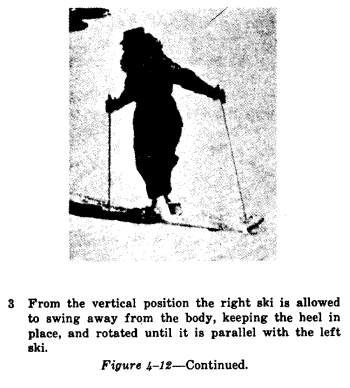
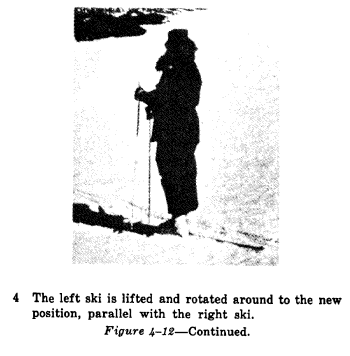
a. Use. The kick turn is a method for reversing the direction of a skier when in a standing position. It is used on both flat and steep terrain. In combat, it is also useful to conceal a change of direction in a ski track (fig. 4-12).
(1) Beginning in the standing position with skis level, the left (right ) pole is placed alongside the left (right) ski approximately 45 to 60 cm (18" to 24") in front of the toe of the foot. At the same time the right (left) pole is placed alongside the right (left) ski about 45 to 60 cm (18" to 24") behind the heel of the foot.
(2) The right (left) leg is swung forward and upward until the ski is momentarily perpendicular, its heel alongside the tip of the left (right) ski. To obtain sufficient momentum for this movement, a preliminary backward movement of the right (left) ski should first be made.
(3) The right (left) ski is then pivoted on its heel and lowered, pointing in the opposite direction and parallel to the left (right) ski.
(4) The body weight is shifted to the right (left) ski, bringing the left (right) ski and pole around and alongside the right (left) ski in the new direction, placing the ski pole in the snow.
(5) On a gentle slope the procedure is the same, except the uphill ski should be turned first.
(6) On a steep slope, the skis are placed horizontally across the slope and edged into the slope for necessary stability. The movements in executing the turn are the same as described above except that both ski poles are initially placed in the snow above the skis and the downhill ski is turned first. Then the uphill ski and pole are brought around simultaneously to complete the turn.
4-15. The Walking Step
a. Use. This is the simplest movement in skiing and is used as the basic step in forward motion. In military skiing, its application is for situations where walking or climbing is necessary. On level ground, sliding action of variable degrees can be obtained.
b. Technique.
(1) From the position of attention on skis (para C-17) left unweighted ski is slid flat over the surface of the snow and straight forward as in normal walking.
(2) At the same time, both knees are bent and the body weight is gradually shifted onto the advanced foot. The heel of the rear foot is raised.
(3) The right ski pole is moved forward and the basket is placed close to the right ski, towards the tip, with its shaft leaning to the front.
(4) A push to the rear with the pole is made, assisting in the forward body motion.
(5) The above motion is repeated with the right ski.
(6) On level ground the skis are kept flat and parallel.
(7) The skis are not lifted off the snow, and the weight of the skis is carried by the snow.
4-16. One Step
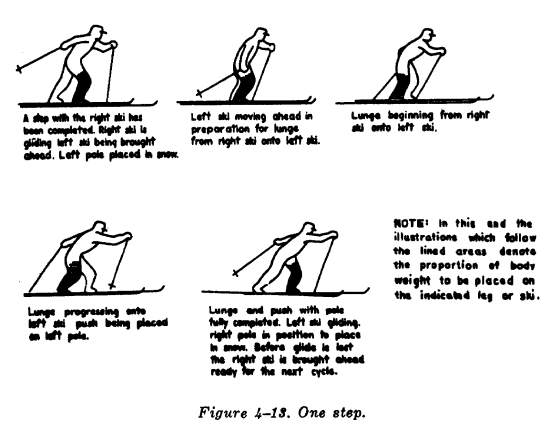
a. General. The basic movement of the one step is the walking step. Forward motion and glide are increased when the skier applies more effort to his step. This added effort is obtained by a lunge coordinated with an increased push from the poles.
b. Use. The one step is the most widely used of all skiing steps. It is applied under all types of snow conditions on level ground (fig. 4-13).
c. Technique.
(1) The one step is started by a forward lean of the body, with well bent knees and ankles. The feet are kept flat and the body weight is on the right ski, from which the initial movement (lunge) is made.
(2) The left, unweighted ski is slid flat and straight forward by a springing motion from right ankle, knee, and hip, straightening the body and transferring the weight to the left sliding ski.
(3) The springing motion (lunge) above, is completed by straightening the right knee and pushing off from the right foot, thus completing the weight transfer.
(4) The body weight is kept on the sliding (left) ski and, as the glide nears completion, the left knee and ankle are bent in preparation for the next lunge. Meanwhile, the right leg is relaxed and moves the ski forward in preparation for the next step. As this leg reaches a position approximately alongside the left leg, the next step is made with the right ski by lunging from the left leg.
(5) When using the poles, the lunge is executed as above except that as the left foot is slid forward the right ski pole is swung straight to the front and placed towards the tip of the right ski or, when the right ski is slid forward, the left ski pole is brought forward.
(6) The slide is increased by a push with the ski pole. The ski pole is leaned slightly to the front and the arms kept close to the body.
(7) The pushing action of the ski pole is increased progressively by the muscles of arms and shoulders. The push is finished off by a sharp straightening of the arm for added power. When the push has been completed the arm is relaxed and brought forward close to the body in preparation for the next poling action.
(8) During the coordinated movement of poles and lunge, correct timing and a long glide are emphasized. The main power glide is obtained from the lunge executed by each leg, the poling action provides only a secondary source of momentum. All motions are rhythmic and fluent. Poles are used in a relaxed manner and the pressure of pushing is allowed to come on the wrist strap.
4-17. Two Step and Three Step
a. Use. This step is used to attain a longer and faster glide on the level. It is also used as an aid through dips and over bumps.
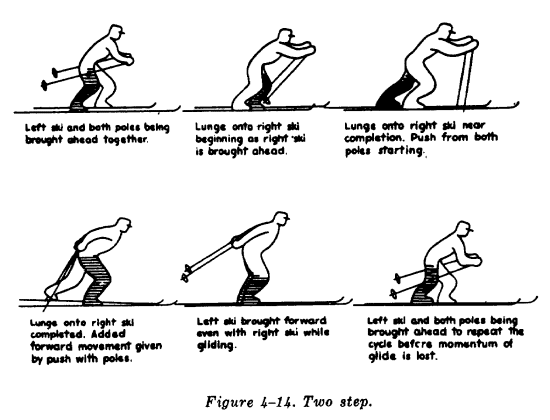
b. Technique. The technique of the two step is a combination of an accelerated walking step and a one step. In the two step the push is obtained by the use of double poling (fig. 4-14).
(1) From a standing position with the knees slightly bent, a walking step is made with the left ski to start the body in motion initially.
(2) A lunge is then made from the left leg, in a continuous rhythmic motion, to produce a long glide on the right ski.
(3) While gliding on the right ski, the left ski is brought slowly forward and even with the other ski to complete the first two step and in preparation of the next two step. This action should be started before the momentum of the glide has been lost.
(4) As the first step is made, both ski poles are brought straight to the front in a comfortable reach and set into the snow alongside the skis in coordination with the lunge of the second step.
(5) The pushing action with the poles is applied in the same manner as described above in using one pole. As the poles leave the snow, they are brought forward in a straight line in preparation for the execution of the next step. It is most important to time this motion properly to coordinate with the next lunge.
c. Three Step. In addition to the two step, the three step may be used anytime when changing ski steps and when sliding is poor. The initial steps are intended to produce more initial power. It has an advantage over the two step since it allows double poling and lunging from alternate feet. The step is made in the same manner as the two step except that two walking steps are taken before each lunge.
4-18. Variations and Applications of Ski Steps
a. In long, cross-country movement, particularly when skiing with pack and rifle, it is most important to apply techniques properly according to the terrain to insure that energy is spent wisely and conserved as much as possible. To this end, the individual must attempt to obtain as much glide as possible from his skis during each step. Although lasting only for a short moment, the glide will allow the skier to rest temporarily. In addition, all movements must be made in a relaxed manner, which necessitates continuous individual training. The constant use of the same step is monotonous and increases fatigue. To avoid this, various steps are used temporarily. The same effect is also necessary in poling. In order to relax arm and shoulder muscles, a series of steps may be made without poling. In the one step, for instance, the first two steps can be made without using the poles. Any additional combination of steps and poling may be made at one's discretion for the same reason, placing more emphasis on leg rather than arm work, or vice versa.
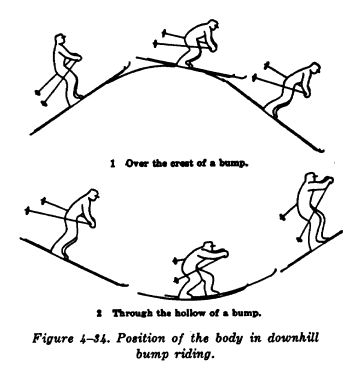
b. In bumpy terrain, ski steps and poling may be used individually or in various combinations to provide a strong pushoff to provide the skier with sufficient glide for a continuous motion through a dip and over a bump. When a series of bumps and dips is encountered, the poling action is generally applied on the crest of the first bump in order to obtain sufficient momentum to reach the top of the next bump in a continuous glide. A step supported by double poling may be applied when skiing through the dip. There are other situations where double poling may be applied to gain or increase forward motion of the ski without taking a step.
4-19. Falling
a. General. In military skiing there are two types of falls, controlled and unintentional.
(1) Controlled falls. The controlled fall has definite value. It can be used to avoid excessive speed or to avoid hitting obstacles if other means are not possible. The controlled fall can be done safely only at slow to moderate speeds. It is used to take cover quickly, assume a firing position or for a quick stop to avoid hitting an object. When properly used, it can be accomplished without injury to the individual.
(2) Unintentional falls. Unintentional falls are undesirable and may cause serious injury. Other undesirable results of an unintentional fall are increased fatigue, possible frostbite, and holes in the snow which may cause other skiers to fall. Factors which may contribute to unintentional falls are poor skiing ability, lack of control, snow conditions, fatigue, and excessive speeds.
b. Technique of Falling.
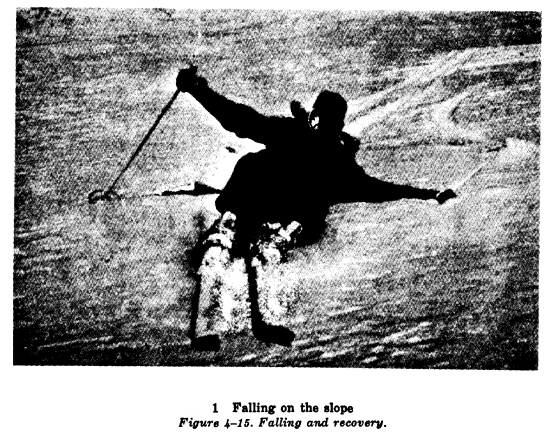
(1) If a fall is imminent, an attempt is made to relax, lower the body, and to land sideways and to the rear. While falling, an attempt should be made to stretch the body, to extend the arms and to keep the ski poles to the rear (fig. 4-15). Care should be taken to keep the knees from digging into the snow, as such action is a major cause of injury.
(3) The impact of the fall should be absorbed by the hips or buttocks.
(4) The unintentional fall is avoided as much as possible. It is often prevented by the correction of a faulty ski or body position.
(5) Landing directly on a knee or hand must be avoided since the resulting blow may cause serious injury. This is especially serious in heavy wet snow or breakable crust because the extended arm or knee may penetrate and be locked firmly in place before the body has lost momentum.
(6) Although falling or "sitting down" with the skis facing downhill is the preferred method, occasionally a fall "over the tips" cannot be avoided. The important thing to remember is RELAX.
c. Recovery.
(1) To recover from a fall, the skier must first figure out what to do before attempting to rise. A little planning will save time and energy.
(2) If necessary, the pack and other restrictive loads are removed.
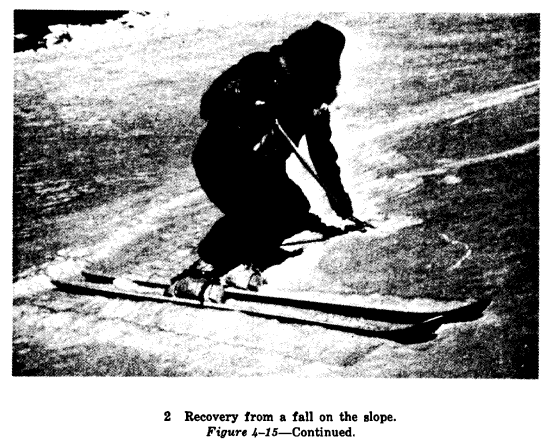
(3) Skis are untangled and brought parallel, feet together. Knees are pulled up to bring the skis close to the body. The body is then moved forward and raised, pushing with the pole if assistance is needed.
(4) To use the ski poles, both hands are first removed from the straps. The poles are then placed together with baskets in the snow slightly to the rear, grasped with one hand above the basket, palm facing downward, and with the other hand close to the top, palm facing upward.
(5) The procedure for recovery from a fall on a slope is the same except that the skis are placed below the body and perpendicular (at right angles) to the fall line. To obtain this position it may be necessary to roll onto the back, lifting the skis in the air and then in the proper position. Poles are then used as described on the uphill side (fig. 4-15).
4-20. Straight Uphill Climbing
a. Use. Straight uphill climbing is a method of ascending gentle and moderate slopes.
b. Technique.
(1) Take the first step as in walking the body leaning forward with knees well bent.
(2) On gentle slopes, slide the skis forward without lifting them from the snow. On steeper slopes, more knee bend is required which causes a transfer of body weight. It may become necessary to lift the ski as the step is made, and to place it with a stamping action upon the snow. This will give the ski wax better holding qualities because it will not break down the snow crystals by first sliding over them.
(3) Use the ski poles to assist the body in its uphill movement and to minimize backslip.
(4) The degree of slope which may be ascended using this method is limited by the holding characteristics of the wax used. With repeated backslapping of the skis, the slope should be traversed thereby decreasing the angle of climb, or a different method of climbing should be used.
4-21. Sidestep
a. Use. The sidestep is an effective method of climbing a short, steep slope, where space is confined; it may be the only practical means of ascending slopes. It is also useful for stepping sideways over logs, stumps, and other obstacles.
b. Technique.
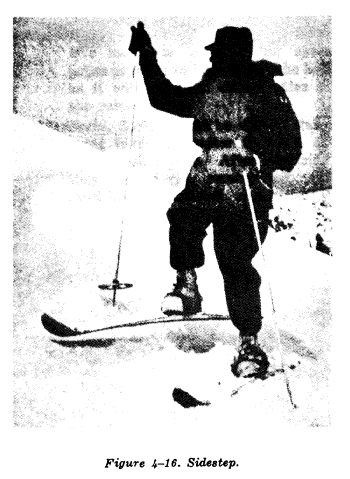
(1) The skis are placed together and perpendicular (at right angles) to the slope (fall line). To prevent slipping sideways, the uphill edges of both skis are forced into the snow by pushing both knees forward and toward the slope. Avoid leaning into the slope. Initially, the weight of the body is placed on the lower ski.
(2) The uphill is lifted in a sideways step up the slope (fig. 4-16) and the body weight placed upon it. The upper ski pole is moved at the same time and placed above and alongside this ski.
(3) The lower ski is then moved up as close as possible to the uphill ski, while the skier is supported by a push on the lower pole. This pole is then brought up and placed alongside the lower ski. This completes one cycle of the sidestep. Merely repeat until the desired elevation is reached.
4-22. Uphill Traverse
a. Use. This method of climbing is used when the slope becomes too steep for going straight uphill. Although a traverse generally involves a zigzag route, it will often be the least tiring method of ascending, thereby conserving time and energy.
b. Technique.
(1) An angle of ascent is selected which will allow climbing without backslip.
(2) The skis are edged into the slope on each step with the ski poles used as in straight uphill climbing.
(3) In changing the direction of ascent a kick turn or a herringbone turn, (para 4-24d) can be utilized. Long traverses should be used whenever possible, since elevation is gained more effectively and with less expenditure of energy in this manner.
4-23. Sidestep Traverse
a. Use. This step is a combination of a sidestep and the uphill traverse. It allows greater vertical climb in each traverse.
b. Technique.
(1) The movement is the same as in the uphill traverse, except the ski is raised slightly and placed uphill as it is brought forward with each step.
(2) The skis are kept parallel and edged, as in the sidestep.
(3) The ski poles are moved in the same sequence as in the sidestep.
4-24. Herringbone
a. Use. The herringbone is used to climb short, moderate, or steep slopes. It provides a quicker ascent than the sidestep. It is more tiring and should be used only for relatively short ascents.
b. Technique.
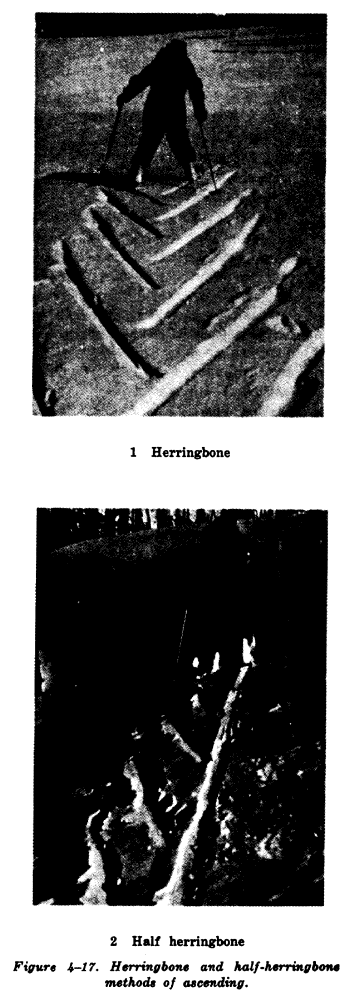
(1) The body is faced uphill with skis spread to form a wide V. This is obtained by spreading both ski tips outward. The skis are edged sharply inward, to prevent backslip, by bending the knees forward and inward (fig. 4-17).
(2) The first step is made by placing the weight on one ski, raising the other slightly above the snow and moving it forward and upward. This ski is then placed in the snow, edged inward, and the body weight transferred to it. The other ski is then moved in the same manner and placed slightly ahead.
(3) The ski poles are used in the same manner as the sidestep, except they are alternately placed to the rear of the body and to the outside of each ski to act as a brace and to aid in the climb.
c. Half-Herringbone.
(1) Use. The half-herringbone is a variation of the herringbone technique and is used to aid in preventing backslip on gentle to moderate slopes in both straight uphill climbing and traversing (fig. 4-17).
(2) Technique. The half-herringbone is executed with one ski in the herringbone position, the other pointing in the direction of movement. The poles are used for support to prevent the ski pointed uphill from backslapping while the other ski is advanced. The downward angle and edging of this ski is increased with the steepness of the slope ascended.
(1) Use. The herringbone turn is a method of changing direction while traversing a slope, while climbing, or when in confined areas where a kick turn may be difficult to use. It is also used to change direction from a herringbone position.
(2) Technique. From a traversing position the upper ski is moved first in the desired direction, using its heel as a pivot point. This ski is then placed into the snow, as in a herringbone step, with the full body weight on it. The other ski is moved up in the same way and placed into the snow. This brings the skier into a herringbone position. Both poles are held to the rear to brace the body during this movement. This cycle is repeated until the lower ski has reached the desired direction. The upper ski is brought parallel with the lower ski into a traversing position again, completing the herringbone turn.
4-25. Straight Downhill Running
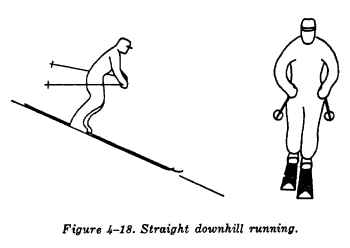
a. Use. Straight downhill running is the first technique learned in skiing downhill. It provides the individual with the balance which he must have before he can effectively descend a slope or learn more advanced techniques. Although it is the fastest means of descending, speed must be kept within the capabilities of the skier (fig. 4-18).
b. Technique.
(1) In a normal standing position with skis flat and parallel, one ski is advanced 10 to 15 cm (4" to 6").
(2) Body weight is evenly distributed on both skis. The knees are bent and pushed forward from the ankles, keeping the heels flat on the skis.
(3) The body is leaned slightly forward in a relaxed and natural upright position, head up, knees and ankles flexed without bending the body at the waist to the front.
(4) Ski poles are held pointing to the rear with baskets above the snow. The arms are bent slightly at the elbows and held close to the body with hands to the front.
(5) Body and arms are kept relaxed. Knees are kept supple to act as shock absorbers. The skier must be alert at all times.
4-26. Downhill Traverse
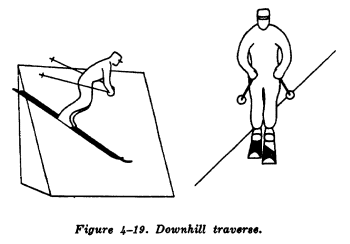
a. Use. This is the method most commonly used in descent; either used by itself or in combination with other techniques. An individual who has learned the techniques and has chosen a gradual route of descent can, in combination with a kick turn, travel over a great variety of terrain (fig. 4-19).
b. Technique.
(1) The basic position is that of straight downhill running, except that the uphill shoulder and ski is always slightly advanced and most of the weight is on the lower ski.
(2) Stand directly over the skis and avoid leaning into the slope. Both skis being edged into the slope.
(3) If more edging is needed, it is controlled by knee and ankle action, and is kept even and constant.
(4) The ski poles are held as in the straight downhill positions.
4-27. Snowplow
a. Use. The snowplow is a means for controlling and slowing down forward motion in all types of terrain. In gentle or moderate terrain it can be used for-stopping. The snowplow uses fundamental positions which are employed for furthering other skiing techniques (fig. 4-20).
b. Techniques.
(1) From straight downhill running.
(a) To move into a snowplow, both heels are pushed outward evenly, keeping the ski tips even and close together, forcing the skis to form a wide V.
(b) The body weight is kept even on both skis. The knees are bent well forward in the direction of the ski tips, causing the skis to be edged slightly inward. The heels are kept constantly on the skis while continuous outward heel pressure upon the skis is applied.
(c) The upper part of the body and the ski poles are held as in the straight downhill running position.
(d) To increase the braking action, the skis are moved into a wider V and edged more.
(2) Half snowplow.
(a) When only one ski is brought into snowplow position, this is referred to as a half snowplow. The half snowplow is used in confined areas and in traversing where a full snowplow is impractical for braking action. It is also used in conjunction with basic and advanced turns.
(b) This motion is executed by pushing only one ski outward in the snowplow position described above. Braking action is controlled by the degree of weight placed on this ski and the amount of edging applied. It is important that the ski be edged to a pronounced degree on the inside to eliminate the possibility of "catching" an outside edge.
(3) The snowplow while traversing downhill.
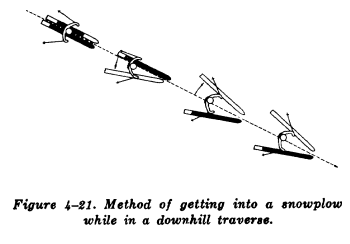
(a) To move into a snowplow from a downhill traverse, the body weight is shifted momentarily to the uphill ski. The lower ski is then moved downhill into a half snowplow position by dropping the tail and keeping the ski tips in the same relative positions and edging slightly. The body weight is then transferred back onto this lower ski. Additional braking action can be obtained by increasing the edging of this ski and placing more weight on it. To complete the snowplow, the upper ski is flattened and pushed uphill in full V (fig. 4-21).
(b) If it is desired to continue traversing in a snowplow, most of the weight is kept on the lower ski. Braking action is increased by a wider spread of the skis and increased edging of both skis.
4-28. Ski Pole Riding
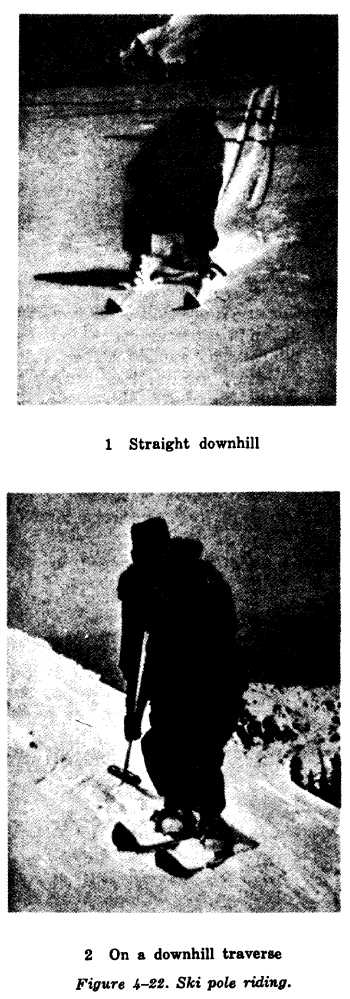
a. Use. Ski pole riding is a braking method which is sometimes necessary to use in con fined areas where ability to control descent is limited by snow conditions, terrain features, or obstacles. Two different methods are used (fig. 4-22).
b. Technique.
(1) Poles are kept together and to the rear and held between the legs for vertical descents.
(a) From a straight downhill running position the lateral spread of the skis is increased and both hands are removed from wrist straps. Both poles are held together and placed to the rear between the legs and the heels of the skis.
(b) The body is placed in a squatting position with the weight over the skis and one hand grasping the pole handles in front of the body with the palm facing upward, while the other hand is placed to the rear, grasping the shafts above the baskets, palm facing down.
(c) Control of descent is obtained by applying the required pressure on the ski poles to force the baskets into the snow.
(d) The braking action may be increased by using the half snowplow or snowplow position.
(2) Poles together and on either side of the body for traversing.
(a) From a downhill traversing position both hands are removed from wrist straps and the poles are held together on the uphill side.
(b) The hand on the uphill side grasps both pole shafts near the baskets with palm facing down and the other hand is held near the pole handles, palm facing upward.
(c) The uphill arm is braced tightly against the hips to increase the braking action.
4-29. Sideslipping
a. Use. Sideslipping is a braking method used in descending slopes at all speeds. It is especially useful in confined areas and in steep terrain where the snowplow or pole riding is impractical. It is the least tiring method of braking. In addition, it employs a sliding action which is characteristic in advanced skiing techniques.
b. Technique.
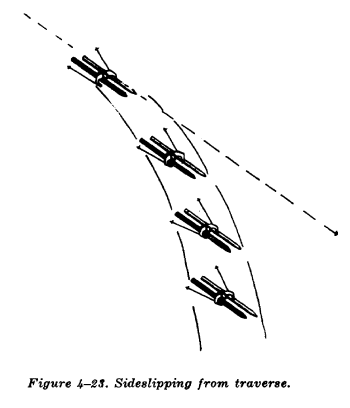
(1) A downhill traverse position is assumed. The edging of both skis is decreased by bending both knees well forward and slightly outward. This minimizes the holding power of both ski edges so that gravity will cause the skier to slide sideways down a hill (fig. 4-23).
(2) Care must be taken that the weight is kept well centered on the skis and that the lower ski pole is not placed in the snow during the sliding action. The uphill pole may be used to initiate the sideslipping action and for balance. Avoid the tendency to lean on the uphill ski pole which will hinder the skier's ability to maintain a good sideslipping body position.
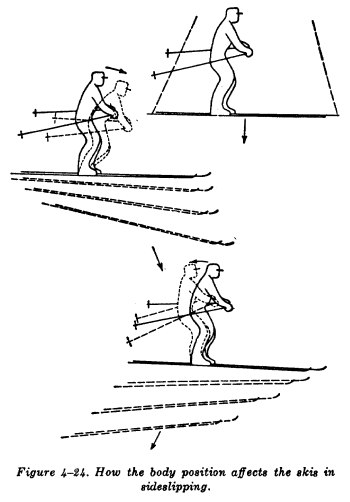
(3) By shifting the body weight in front of the center of the skis while sideslipping, the tips will drop toward the fall line; by bringing the weight to the rear, the heels of the skis will move toward the fall line. This is a means of correcting or controlling the angle of descent during the sideslip (fig. 4-24).
(4) The speed of descent is controlled by the degree of edging applied to the skis. To stop sideslipping, the edging is gradually increased by pressing the knees forward and toward the slope.
(5) In adverse terrain and snow conditions the aid of both ski poles may be used on the uphill side while sideslipping. The poles are used in the same manner as in pole riding on a traverse. This method adds a third point of suspension and braking action.
(6) At all times during sideslipping, delicate control of knee and ankle action is important to prevent the downhill edges from "catching."
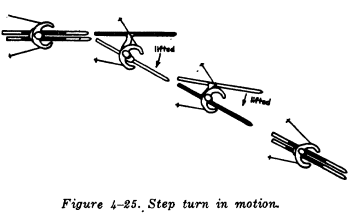
4-30. Step Turn in Motion
a. Use. This method of changing direction while in motion is useful at slow speeds in all snow and terrain conditions. It is particularly useful in adverse snow conditions and in confined areas.
b. Techniques.
(1) Before turning, lead with the ski which corresponds with the direction of the turn, i.e., right ski ahead when turning to the right.
(2) In turning to the right the weight is placed upon the left ski, which is then edged to the right. The unweighted right ski is then raised and placed on the snow in the new direction. The weight is transferred to this ski by moving the body in the new direction while pushing off from the left ski. The unweighted left ski is then lifted off the snow, and placed close to the right ski to complete the turn. Complete transfer of body weight is essential, and the movements must follow smoothly and almost simultaneously. The ski poles are held to the rear (fig. 4-25). The higher the speed, the more the center of gravity is lowered by bending the knees and ankles. This adds stability and aids in keeping up with the turn.
(3) If desired, the steps can be continued as long as the skier is in forward motion and until the desired direction is obtained.
c. Variation.
(1) Use. A variation of the step turn in motion is the skating step. It is used to accelerate forward motion on level ground or gentle slopes and is a useful aid in developing balance, weight shifting, and coordination. Basically, the movements of shifting body weight from one ski to the other are the same as in the step turn in motion except that direction is not changed and the skis are edged inward on each pushoff.
(2) Technique.
(a) From a straight downhill position body weight is placed upon either ski and knee and ankle bend is stressed:
(b) The other ski is lifted above the snow with the tip pointed slightly outward.
(c) The weighted ski is edged inward as the body is pushed off at a slight angle to the front, i.e., in the direction the lifted ski is pointed.
(d) The lifted ski is moved to the front, placed flat on the snow and weight is shifted to it.
(e) The unweighted ski is lifted from the snow and brought to the front near the weighted ski in preparation for the next step. These pushing steps are alternated left and right.
(f) A strong pushoff should be made with each step to lengthen the glide and gain acceleration. Knee and ankle bend should be stressed with each step.
(g) The step can be aided by double poling, especially to gain initial momentum.
a. Use. The snowplow turn is efficient for use at slow speeds, especially when carrying a pack and rifle. Because the snowplow position is retained, this turn enables the individual to maintain good control. In this turn, fundamental body positions and movements are used which are an important part of advanced turns.
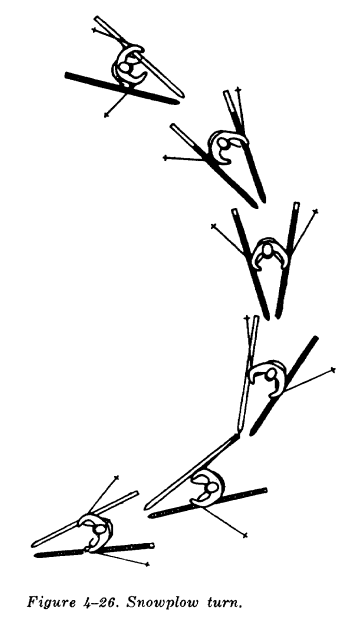
b. Technique (fig. 4-26).
(a) In executing a snowplow turn to the LEFT while snowplowing directly down a slope, the body weight is transferred smoothly onto and over the right ski (note that this ski is already pointed to the left) by a rotation of the body to the right and by a pronounced bend of the right knee to drop all body weight onto the right ski. This transfer of body weight initiates the turning action.
(b) As the turn progresses, the body is not allowed to rotate beyond the new direction of travel, i.e., face straight ahead, not uphill. The left knee is kept well bent with this ski flat and unweighted throughout the turn.
(c) Ski tips remain even and the V-angle of the skis constant. Avoid leaning into the slope. Ski poles are carried as in the snowplow position. Care must be exercised to keep them pointed to the rear as the body is rotated.
(d) As the turn is completed the body weight is either placed evenly on both skis to continue in a snowplow or gradually transferred to the left ski to start a turn to the right.
(2) From downhill traverse.
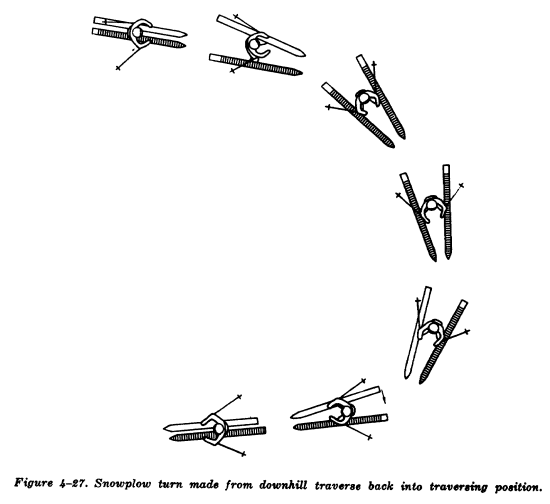
(a) In making a turn while traversing, the snowplow position is assumed as described in paragraph 4-27b(3) (a). The edging of the lower ski is decreased and the body leaned forward and both ski tips allowed to drop into the fall line in order to bring the skier into the fall line in preparation for the turn, as described above. As the tips come downhill the snowplow position must be maintained by a holding push on the tails. The turn should be continued until the skier has obtained the desired angle of descent (fig. 4-27). As the tips pass the fall line, body weight must be transferred to the downhill ski to complete the turn.
(b) After the snowplow turn has been completed and it is desired to continue with both skis together, as in the downhill traverse, the body weight is kept on the lower ski while the upper unweighted ski is brought parallel with it into a traversing position (fig. 4-27). This turn is also known as stem turn.
(3) Variation. To make a snowplow turn from a traversing downhill position in variable snow conditions, and when skiing with a pack, it is advantageous to make the half snowplow with the uphill ski. In this method the body weight remains on the lower ski. The upper, unweighted ski is moved into a half snowplow, kept flat, and the tips of both skis even. The edging of the lower ski is decreased, knees bent more, and the body leaned further forward to bring the skier into the fall line. In reaching the fall line, both skis are brought into a full snowplow and the body weight is gradually shifted over and onto the other ski in executing a snowplow turn as described above.
4-32. Advanced Turns
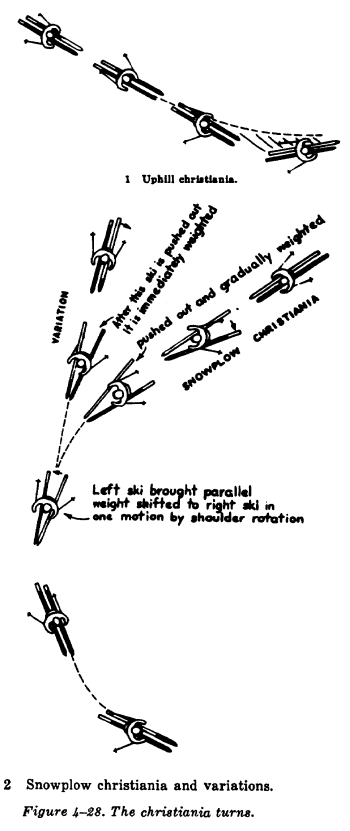
The advanced turns used in military skiing are the christiania turns. These are applied at all speeds to change directions, to reduce speed, or to stop. These are the most advanced turns taught in military skiing and are executed with the basic motions already learned, such as forward lean, edge control, and body rotation. The application of these turns may be limited by terrain and snow conditions, as well as the degree of proficiency attained and the load carried by the individual soldier. The christiania turns are started from a variety of positions, but all are completed in the same manner (fig. 4-28).
4-33. Uphill Christiania
The uphill christiania is used to turn uphill, to reduce speed and to stop. It also forms the basic movement which is used in completing other christiania turns.
a. In preparing for the uphill christiania during a downhill traverse, the upper shoulder is brought well forward in order to increase the body rotation that will, be applied during the turn.
b. The turning action of the skis is started by decreasing the amount of edging and, at the same time rotating the lower shoulder and hip forward in the direction of the turn. Forward lean of the body and knee bend are increased and the upper ski leads throughout the turn (1, fig. 4-28).
c. During the turn, both skis are controlled by gradually edging them into the slope. The weight is directly over the skis. Avoid leaning into the slope.
d. Forward lean and body rotation are increased and continued as the turn progresses. Forward speed will gradually decrease, permitting the skier the choice of continuing in a new direction or coming to a stop.
e. Care must be exercised so that the ski poles are not allowed to swing to the front during the rotation of the body.
f. This turn can be made from any angle across the slope to and including the fall line.
g. From a fall line the turn can be made in either direction. In preparation, the ski corresponding with the direction of turn is advanced (i.e., left ski leads for a left turn) and more of the body weight placed on the other ski. Emphasis is given to body rotation and knee bend to initiate the turning action of the skis.
h. To assist the turning action, a down-up motion can be used in this turn. As the turning action is stated as in b above, the body is lowered and returned to normal as the turn is completed.
4-34. Snowplow Christiania
a. Technique. The snowplow christiania, also referred to as the stem christiania, is used on turns made downhill while traversing at greater speeds than employed in the basic turns. For this reason the turn looks complicated to the student. Basically, it is a combination of the snowplow turn and the uphill christiania. The basic techniques of the snowplow turn made from a traverse position are also used here to reach the fall line. The uphill christiania is then applied to either change direction or to stop. In combining these methods the speed must be greater, the body weight shifted more rapidly, and the spread of the skis in the snowplow position at a narrower angle. Using the snowplow christiania it is possible to link a number of turns together to control speed in a continuous descent. A breakdown of the technique is as follows:
(1) In making a downhill turn to the left from a downhill traverse, the body weight is shifted momentarily to the uphill ski. The lower ski is then moved downhill into a half snowplow position, keeping the ski tips even. At the same time, the lower shoulder is brought forward. The uphill ski is then pushed uphill to form a snowplow.
(2) Body weight is then transferred back to the upper ski by body rotation, initiating the turning action.
(3) As the fall line is reached, the unweighted left ski is brought slightly forward and parallel with the right ski. The turn is then completed as in the uphill christiania (2, fig. 4-28).
(4) The upper body is kept from leaning into the slope throughout the turn, especially during the initial turning phase. Forward lean and knee bend are increased. All motions are fluent and smooth and must be well timed during the turn.
(5) When a decrease in speed is desired before starting the turn, there are two methods which can be used. In the first method the lower ski is first placed into a half snowplow position. Temporarily transferring the body weight to the ski and edging it will cause a braking action. When speed has been decreased as desired, the upper ski is pushed upward, the edging of the lower ski decreased, and the turn continued as in (2), (3), and (4) above. In the second method both skis are kept parallel and a sideslip from the moving traverse position is started. Edging of the skis in this movement will provide braking action. When speed has been decreased as desired, the turn is started as from the downhill traverse position.
b. Variations.
(1) In difficult snow and terrain conditions another method may be used to execute a snowplow christiania. In making a downhill turn to the left from a downhill traverse with this method, the upper (right) ski is brought into a half snowplow position. Leaning well forward, increasing the knee bend and decreasing the edging of the lower ski will bring the skier smoothly towards the fall line; the body weight is transferred over and onto the right ski in a smooth forward and downward motion, assisted by bringing the right shoulder forward. As the transfer of body weight is completed, the unweighted left ski is brought forward and parallel with the right ski and the turn completed from the fall line as in the uphill christiania.
(2) As more skills and balance are acquired, the snowplow christiania may be done at higher speeds with the angle of turn kept closer to the fall line. In this method only a half snowplow with the upper or lower ski is used in the preparatory position, or skis are kept parallel and the fall line is reached with a pronounced knee bend and forward lean of the body while the turn is completed with an uphill christiania.
4-35. The Lifted Christiania
a. Use. The lifted christiania turn is very useful in adverse snow conditions and in confined terrain where a short radius turn is necessary. It is also useful for skiing at night and with heavy loads, since it is a slow turn made with one ski pole being used to increase lateral stability.
b. Technique.
(1) The turn is started by applying either of the methods described for christiania turns, except that the speed is adjusted to suit the circumstances.
(2) For a turn to the left as the skier approaches the fall line, the left ski pole is placed in the snow forward and down the slope, but not directly in front of the left ski tip. The reach should not be overextended. The right pole is held in the normal manner. Weight is then applied to the left ski pole, using it for means of support and as a pivot point.
(3) Body weight is then shifted to the right ski. Since it is difficult to turn the left ski in such a short radius, this ski is lifted and placed parallel to, and slightly ahead of, the right ski, and the turn completed as in the uphill christiania.
Section IV. MILITARY SNOWSHOEING
4-36. Purpose and Scope
a. Snowshoes are individual aids for oversnow movement. Like skis, they provide flotation in snow and are useful for cross-country marches and other activities which require movement in snow-covered terrain.
b. The snowshoe is an oval or elongated frame braced with two of three crosspieces and the inclosed space filled with a web lacing. A binding or harness attached to the webbing secures the wearer's foot to the snowshoe. Flotation is provided by the webbing, which is closely laced and prevents the snowshoe from sinking too deeply into the snow when weight is placed upon it. Depth and consistency of snow will determine the amount of support obtained on the snow cover and the rate of movement.
c. Snowshoes are particularly useful for individuals working in confined areas such as bivouac sites and supply dumps, for drivers of various types of vehicles, gun crews, cooks, mechanics, and for similar occupations where aids to movement in snow are necessary. Transporting, carrying, and storing snowshoes is relatively easy due to their size and weight. Maintenance requirements are generally negligible and little skill is required to become proficient on snowshoes. However, the requirement for physical conditioning is as great, or greater, as that needed for skiing. The use of snowshoes when pulling and carrying heavy loads is particularly practical, as the hands and arms remain free. On steep slopes, however, the use of snowshoes is considerably limited because traction becomes negligible and the snowshoe will slide, causing loss of footing. Generally, the rate of movement in any type of terrain is slow because snowshoes will not glide over the snow. The gliding properties of the ski are not obtained with the snowshoes; this adversely affects the amount of time and energy spent in movement. In deep snow the trailbreaker must be changed frequently. Especially when wet, snow tends to stick to the webbing, thereby adding weight to the snowshoe.
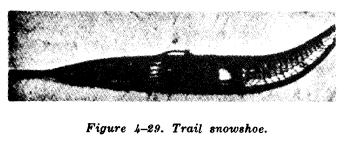
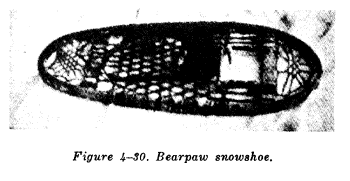
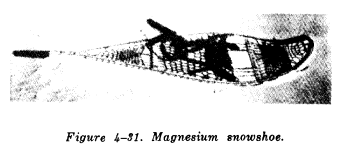
d. There are three types of standard issue snowshoes: the trail, the bearpaw, and the magnesium. They can be used with all types of winter footgear. The trail snowshoe weighs approximately 6.5 pounds, the bearpaw, 5.5 pounds and the magnesium, 4.6 pounds.
(1) Trail. The trail-type snowshoe is long, with a rather narrow body and upturned toes (fig. 4-29). The two ends of the frame connect and extend tail-like to the rear. The turned-up toe has a tendency to ride over the snow and other minor obstacles. The excellent flotation provided by its large surfaces makes the trail snowshoe best for cross-country marches, deep snow conditions, and trailbreaking.
(2) Bearpaw. This type of snowshoe is short, wide, and oval in shape, with no frame extension (fig. 4-30). The bearpaw snowshoe is preferable to the trail type for close work with weapons and vehicles, in heavy brush, and in other confined areas. Carrying or storing is also easier.
(3) Magnesium. The magnesium snowshoe is the lightest and most durable of the three types (fig. 4-31). The snowshoe has a magnesium frame with the center section made of steel, nylon-coated wire. The magnesium snowshoe is 17.70 cm (approx 7") shorter than the standard wooden trail snowshoe but is 9.50 cm (approx 4") wider giving it approximately the same flotation characteristics.
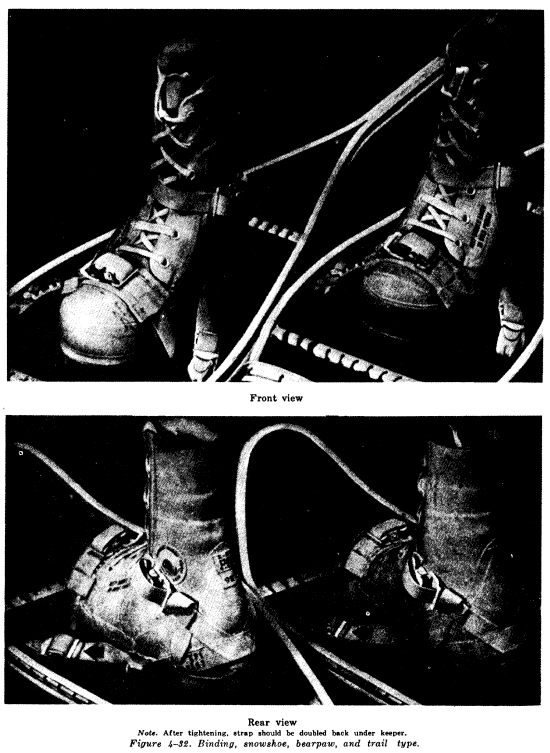
e. The trail and bearpaw snowshoes have their own individual bindings, however, the, "Binding, Snowshoe, Bearpaw and Trail Type" has been developed for use on all three types. This binding consists generally of a toe strap and a heel and instep strap. The straps are made of nylon and are secured by keepers and cam lever quick-release buckles. The method of securing the binding to the magnesium snowshoe is snown in figure 4-32.
4-37. Care and Storage of Snowshoes
a. Care. Snowshoes must always be kept in good condition. Frequent checks are necessary, particularly of webbing and binding, because individual strands may be ripped or worn out. Repairs must be made immediately, otherwise the webbing will loosen and start to unravel. If unvarnished, the rawhide webbing on wooden snowshoes will absorb moisture, stretch and turn white, particularly in wet snow. It should be dried out slowly, avoiding direct flames, and be revarnished at the first opportunity. Wooden frames may fray from hard wear and should be sanded and varnished. When needed, other minor repairs should be made as soon as practicable. When snow cover is shallow, care must be taken not to step on small tree stumps, branches, or other obstacles, since the webbing may be broken or damaged. Stepping into water is to be avoided; the water will freeze and snow will stick to it. When not in use in the field, snowshoes are placed in temporary racks, hung in trees, or placed upright in the snow. They should be kept away from open fires and out of reach of rodents.
b. Storage. In off-seasons, wooden snowshoes are stored in a dry, well-ventilated place so that the rawhide will not mildew or rot and the frames warp. Each snowshoe is closely checked for possible damage, repaired if needed, and revarnished. As in the field, snowshoes are protected against damage and from rodents. Magnesium snowshoes are cleaned and repainted if necessary. Webbing is examined and repaired or replaced if needed.
4-38. Snowshoe Technique
a. A striding technique is used for movement with snowshoes. In taking a stride, the toe of the snowshoe is lifted upward, to clear the snow, and thrusted forward. Energy is conserved by lifting it no higher than is necessary to clear the snow and slide the tail over it. If the front of the snowshoe catches, the foot is pulled back to free it and then lifted before proceeding with the stride. The best and least fatiguing method in travel is a lose-kneed rocking gait in a normal rhythmic stride. Care is taken not to step on or catch the other snowshoe.
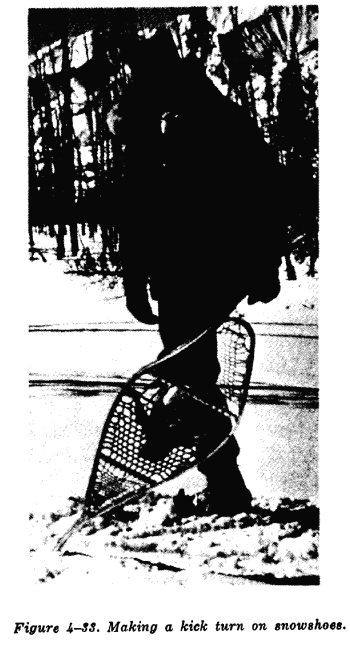
b. On gentle slopes, ascent is made by climbing straight upward. Traction is generally very poor on hard-packed or crusty snow. Steeper terrain is ascended by traversing and packing a trail similar to a shelf across it. When climbing, the snowshoe is placed as horizontally as possible in the snow. On hard snow, the snowshoe is placed flat on the surface with the toe of the upper one diagonally uphill to get more traction. In the event the snow is sufficiently hard-frozen to support the weight of a person, it is generally better to remove the snowshoes and proceed temporarily on foot. In turning around, the best method is to swing the leg up and turn in the new direction, as in making a kick turn on skis (fig. 4-33).
c. Obstacles such as logs, tree stumps, ditches and small streams should be stepped over. Care must be taken not to place too much strain on the snowshoe ends by bridging a gap, since the frame may break. In shallow snow there is danger of catching and tearing the webbing on tree stumps or snags which are only sightly covered. Wet snow will frequently ball up under the feet, interfering with comfortable walking. This snow should be knocked off with a stick or pole as soon as possible. Although ski poles are generally not used in snowshoeing, one or two poles are desirable when carrying heavy loads, especially in mountainous terrain. The bindings must not be fastened too tightly or circulation will be cut off, and frostbite may occur. During halts, bindings should be checked for fit and possible readjustment.
4-39. Training
Snowshoe training requires little technical skill. However, emphasis must be placed on the physical conditioning of the individual and the development of muscles which are seldom used in ordinary marching. The technique, as such, can be learned in a few periods of instruction. Stiffness and soreness of muscles are to be expected at first. The initial training should be gradual with regard to loads carried and distances covered. It should be progressive, with ample time allowed for the individual to acquire physical proficiency, gradually increasing the distance covered and weight carried or pulled. Overcoming obstacles such as dense brush, fallen timber, and ditches should be emphasized during training. Trailbreaking, with frequent change of lead man, should also be stressed. Snowshoe training can be accomplished concurrently with other training requiring individual cross-country movement.
Section V. APPLICATION OF SKI AND SNOWSHOE TECHNIQUE
4-40. Skiing in Variable Terrain and Snow
a. General. As a military skier the individual must be prepared to move in a great variety of terrain and snow conditions during daylight and darkness. He must be constantly alert in order to judge conditions on the route ahead and to off set the sudden changes often encountered. The techniques of skiing which he has learned will allow him to operate effectively on slopes only if he is capable of applying these methods properly and of keeping his skis under control at all times.
b. Variable Terrain. The forward lean of the body must be increased as a slope suddenly steepens, since skis will slide faster. The opposite is true as the slope is lessened. Generally, the body should be nearly perpendicular to the slope regardless of pitch, to insure proper balance. When skiing over bumpy terrain, the stability of the skier is greatly disturbed. To minimize this the knees are kept supple to act as shock absorbers, permitting the center of the body to maintain as straight a line as possible. To further increase stability on large bumps the skier increases knee bend, lowering the body when approaching the top of the bump, riding over it in this position, and then assuming a normal running position as soon as the top is passed (fig. 4-34), i.e., allowing the skis to drop away. This action will lessen the chance of the skier being thrown into the air. When moving through a hollow the normal ski and body position is maintained, with the knees absorbing the sudden change of pressure. In deep snow the leading ski should be further advanced to improve balance. The center of gravity must be kept lower by more bending of the knees. As forward lean of the body is not practical under these conditions, weight shift will need to be controlled to a greater extent by the knees and the advancement of one ski in front of the other.
c. Variable Snow. When skiing from soft snow onto hard snow the forward lean of the body must be increased, since the skis will gain speed and have a tendency to run from under the skier. The opposite is true when running from hard snow onto soft snow. In this case the body leans slightly to the rear and the leading ski is advanced farther ahead just before the soft snow is entered. Lateral stability can be increased by extending the arms sideways as is done when attempting to keep balance when walking a log or a railroad track, but the ski poles must still be kept pointing to the rear. When skiing on icy crust, stability is improved by keeping the skis farther apart or by running in a slight snowplow position. However, if the slope is rutted snowplowing may become hazardous because the tips tend to get caught. To control speed under these conditions, sideslipping and pole riding may be used. Pole riding is less effective and in extreme cases the use of sideslipping may become necessary. On icy snow the skis may chatter in a turn. To correct this, body weight is kept well forward and the edging of the skis carefully controlled as the turn is made. Crusty snow which will not support the skier's weight (breakable crust) is the most difficult to cope with. Speed is kept slower while making all turns. It may become necessary to use the step turn in motion or a kick turn to change direction.
d. Forest. Due to the limited skiing room in wooded terrain, movements for changing direction must be rapid and of shorter radius than in open terrain, especially during downhill movement. In addition, the skier must be more alert so that obstacles may be quickly overcome with a minimum of delay. The step turn in motion is a very useful technique for changing direction in this type of terrain, but speed must be reduced to use this technique. In descending narrow trails in wooded terrain or during night movements, the half snowplow or pole riding are useful for control of speed. During unit movement in wooded terrain, one man falling can block the progress of all personnel behind him. If an individual falls he should remove himself from the track in the fastest way possible, even if this results in losing his original position in the column. The baskets of ski poles have a tendency to snag branches during movement in wooded terrain, resulting in loss of balance. To avoid this as much as possible, the shafts of the ski poles should be pointed directly to the rear.
4-41. Obstacles
a. General. Snow-covered terrain will contain many small obstacles such as fences, tree windfalls, and small streams or ditches. The individual must be skilled enough to cross them easily to save time and energy. Crossing obstacles can be very time consuming for a unit. Wherever possible, the men should be dispersed so as to enable them to cross on a broad front. In some cases the overall time needed can be reduced if skis are removed while overcoming the obstacles.
b. Fences and Windfalls. Low fences and windfalls 30 to 60 cm high (1'to 2') are crossed by skiing or snowshoeing beside the obstacle so that the skis or snowshoes are parallel and alongside it, then stepping over first with one foot then the other, or a kick turn may be made over the obstacle. In the case of rail fences or large diameter windfalls it may sometimes be easier to sit on the obstacle and swing both feet simultaneously to the other side. High barbed wire fences can be crossed by removing pack and rifle and crawling underneath (fig. 4-35).
c. Ditches or Small Streams. These are crossed by stepping over them sideways, using the ski poles for support (fig. 4-35). If the ditches are deep and wide it is better to descend to the bottom either by sidestepping or sideslipping and then climb the other side by sidestepping. However, care must be taken to avoid rocks or other obstacles which might damage the skis or snowshoes.
d. Steep Slopes. When it is necessary for troops to descend or ascend slopes which are too steep for their ability, or where traversing is not practical, the sidestep should be used or the skis should be removed and the slope negotiated on foot whenever snow depth will permit.
4-42. Skiing With Pack and Weapon
a. General. When skiing with pack and weapon the same techniques apply. However, the added weight carried, changes the center of gravity and will affect the manner in which movements are made.
b. Effects on Movements.
(1) Lunges are shorter and pushes with poles less powerful.
(2) To aid in maintaining balance when skiing downhill over rough terrain, the leading ski is advanced farther and the knees kept more flexible than when skiing without a load.
(3) Speed of descent is reduced and techniques are applied more cautiously.
(4) Rotation of arms and shoulders is made with less vigor and emphasis.
(5) Slopes are climbed with a more gradual traverse.
(6) When skiing through woods or in brushy terrain, care must be exercised in order to prevent any protruding parts of the weapon from catching on branches, causing loss of balance.
(7) In the event of a fall it is sometimes more efficient to remove the pack and weapon before attempting to regain footing.
4-43. Sled Pulling
a. General. Pulling a sled is hard work, but it will be easier if proper techniques are used, The movements and techniques used should be within the ability of all members of the team, and, where possible, teams should be formed with this in mind. Generally speaking, the methods of hauling sleds apply to both skiers and snowshoes.
b. Preparation for Sled Pulling.
(1) The tow ropes must be of the proper length and also properly laid out and fastened by snap buckles in tandem system (fig. 4-36). The sled harnesses are adjusted to fit loosely on the individuals.
(2) If skis are to be used for pulling, they must be properly waxed. More emphasis must be placed on insuring good holding capacity of the wax on the snow. However, sliding capacity should not be entirely forfeited.
(3) Proper loading and lashing of sled must be checked before moving out.
c. Pulling on Varied Terrain. When pulling a sled over comparatively flat terrain, skiers normally use the one step ski technique. When crossing small ditches, the sled is stopped in the ditch while the pullers go as far as the two ropes allow. Then, by a simultaneous pull, the sled is brought up out of the ditch. To change direction in woods, the pullers continue to move straight forward until the sled comes to the desired turning point. The pullers then move in the new direction with the turn being controlled by the puller nearest the sled, assisted, if necessary, by the man behind. When the forest is dense and space does not allow the men to move far enough ahead before the turn is made, the pullers must start the turn by gradually making as gentle a curve as possible while the two men nearest the sled (in front and behind) guide, lift, and otherwise assist in turning the sled. While turning, the pullers must watch the movements of each other in order to avoid confusion.
d. Uphill Climbing. To pull a sled uphill the following methods can be applied:
(1) On short, gentle slopes the herringbone can be used.
(2) On a steep, short slope the pullers can use the sidestep (fig. 4-37). In this case the rear man moves to the front and side of the sled and, while sidestepping, assists in pulling the sled by using the rope fastened to the front end.
(3) On very gentle slopes and in snow with good traceability an uphill traverse may be employed. Ski climbers can be used if the length of the slope justifies the time required to put them on.
(4) In difficult terrain a relaying technique may be used when the necessary equipment is available. In this technique a climbing rope, 36.50 meters (120') long, or similar item, is fastened to the sled. The pullers then climb uphill as far as the rope allows. Standing in place, the sled is then pulled up to their position. This procedure is repeated as many times as is necessary to reach the top. When using this technique care must be taken to insure that the sled is well anchored each time the pullers move up since a runaway sled may not only damage itself but is a serious hazard to anyone below. Where steep slopes must be ascended for considerable distances, less energy will be expended if the sleds are left behind and the sled load backpacked to the objective.
e. Downhill Movement. In descending a slope the following methods can be used:
(1) On very gentle slopes and in poor snow conditions where the sled will not descend on its own accord, the skier can use a double poling technique or one step. However, it will be necessary to control the speed to prevent the sled from overrunning the pullers. The rear man can assist in this by braking the sled, although in most cases very little braking will be needed. If the team is on snowshoes, the pullers can descend normally while the man in the rear insures that the sled does not overrun those in front.
(2) A short, steep slope can be descended by sidestepping either on skis or snowshoes. If necessary, the rear man is assisted in the braking action by one or more members of the team. Skiers can also use sideslipping for this type of terrain. For short descents in wooded areas, the braker should position himself behind a tree for added stability in lowering the sled. If necessary, a succession of position moves are made.
(3) On long, moderate slopes skiers can use the snowplow as a braking method (fig. 4-38). If more braking is necessary than can be supplied by the rear man, the puller closest to the sled may move to one side or he may remove his rope and refasten it to the rear of the sled and assist the rear man for more effective braking. Snowshoes on this type of slope may also change pullers to brakers to aid in descent.
(4) On a long, steep slope requiring the team to go straight down, all men will be needed to brake the sled. This can be done by fastening all tow ropes to the rear of the sled with all men braking from the rear and/or one skier controlling the sled by straddling the front of the sled (fig. 4-38), and controlling the sled by himself or assisted by one or more brakers. The snowplow or sideslipping techniques are used as the braking method.
(5) Traversing by both skiers and snowshoes may be used on long, steep downhill slopes. In this case the puller nearest the sled and the rear man should remain above the sled and as far from it as the ropes will allow. From this position they can brake, preventing the sled from sideslipping.
(6) In very steep terrain a long rope, when available, may be used to lower the sled straight down the slope. This procedure is the reverse of the uphill relay method described in d(4) above, and is a very practical method for evacuating wounded.
4-44. Skijoring
a. General. Skijoring, as used in this manual, is the term applied to moving men on skis over snow by towing them with vehicles. This provides a faster and less tiring method for individual movement than is possible under their own locomotion. Oversnow vehicles, track and wheeled vehicles can be used for pulling skiers (fig. 4-39). The best routes for skijoring are snow covered roads and trails, frozen lakes, rivers, or paths made by tracked vehicles. Speeds up to 24 KmPH (15 MPH) may be maintained on level ground by trained troops, depending on weather and trail conditions. Normally, one rifle squad can be towed behind a light carrier and two squads behind a squad carrier. Towing more than two squads by one vehicle is impractical, due to the increased length of the column, difficulty in making turns, and the limitations of the vehicle and the skiers using the technique over steep or wooded terrain, and during poor or spotty snow conditions.
b. Use of Tow Rope. (For a description of knots see FM 31-72.)
(1) Two ropes 36.50 meters (120') long are used for towing a rifle squad behind a vehicle and for the purpose of securing sufficient space between the individuals. The skiers, in columns of of twos, are spaced at equal intervals behind the vehicle and outside the ropes. A gap of approximately 4 meters (12') is left between individuals.
(2) Several methods of towing can be used according to the situation, the terrain, and the distance of movement:
(a) The skier grasps a bight of rope and makes a 25 cm (10") loop by tying an overhand knot. The loop is held with one hand and poles are held in the other, or a long loop can be formed by tying an overhand knot in a 1.50 to 2 meter (5' to 7') bight of rope. The skier leans against the loop after placing it around the buttocks. He does not place the body through the loop (1, fig. 4-40).
(b) Using the ski pole method (2, fig. 4-40), the skier rests both arms and body and can arrive at the destination in better physical condition. Another advantage in this method is that a skier can easily exercise his hands to prevent frostbite during movement in extreme cold.
(c) When being towed through dense wooded areas, or when contact with the enemy is imminent, skiers may simply grasp the rope without tying a knot or using the ski poles as a rest. Thus, they can maneuver through narrow trails and are more ready for immediate combat.
(3) No matter what method of towing is being used, individuals must never be allowed to fasten themselves to the tow rope. In case of a fall they must be able to release their hold immediately to avoid serious injury to themselves or other skiers. The ski poles are usually held in one hand and available for instant use. During training and in combat situations when contact with the enemy is not probable, the ski poles may be loaded on the vehicles to avoid accidents.
c. Skijoring Technique.
(1) The track is made as simple as the terrain permits. Steep slopes, obstacles, and sharp turns are avoided. When these cannot be bypassed the speed must be reduced in order that the skiers can maneuver. A high degree of cooperation between the driver of the towing vehicle and the skiers is necessary. One man, usually the assistant driver, is responsible for stopping or slowing the vehicle in order to prevent casualties due to speed or obstacles. He constantly observes the skiers and other vehicles, gives the driver orders, and signals the skiers when the vehicle will slow down, speed up, or stop.
(2) When the vehicle begins its forward movement each man on the rope should move forward under his own power for a few steps, gradually placing tension on the towing rope to prevent being suddenly jerked into motion, causing a fall. When under way, the skier's body is leaned slightly backward, the knees are bent slightly, and the upper body is nearly straight. Skis may be farther apart than in normal skiing. One ski is kept slightly ahead. The position should be one in which the skier can relax but still be alert to sidestep quickly in order to avoid obstacles and maintain misbalance. If a skier falls, he should release the towing rope immediately.
(3) When approaching a sharp curve where the area for movement is confined, the vehicle should be slowed down or, in some instances, stopped. When negotiating a sharp turn, the vehicle should be slowed to a walking speed and skiers walk around the curve being careful not to drop or step on the tow rope. Normal speed is resumed after the last man has made the turn. Failure to do this may result in being pulled off balance by the rope as the vehicle completes the turn and proceeds in the new direction. Vehicle stops and starts must be in a gradual manner which allows for a smooth rather than a jerky ride for the skier.
(4) When descending hills the men can brake by using the snowplow or half snowplow, if space allows, to prevent overruling the vehicle or, if conditions warrant it, they may move to the side of the track where the softer snow will decrease their speed. If the terrain will not allow for controlled braking and collision with the vehicle seems imminent, the individuals should release the rope and disperse to the sides of the track. On short downhill slopes the vehicles should increase speed temporarily so that the skiers need not brake. On long, steep slopes the men can descend independently of the vehicle and reattach themselves after the slope has been negotiated.
|
NEWSLETTER
|
| Join the GlobalSecurity.org mailing list |
|
|
|


