CHAPTER 6
COMBAT TECHNIQUES
This chapter discusses employment techniques for light antiarmor weapons, all of which require at least basic gunnery skills. Techniques that require advanced skills are identified as such.
6-1. RANGE ESTIMATION
A firer who can accurately estimate the range to the target has a better chance of hitting it, regardless of the weapon used. Common methods of estimating range are listed below from the most to the least accurate. The tactical situation determines the method to be used:
a. Using range finders.
b. Measuring the distance on a map after correctly plotting your own position.
c. Pacing. Remember your individual pace count.
d. Using pair and sequence methods of target engagement. This method should be used only when in contact with the enemy.
e. Estimating range visually. This is the least accurate method of estimating range and therefore the least desirable. However, in an offensive operation or hasty defense, it may be the only method available to the light antiarmor firer. Thus, soldiers must continually train to improve their skill at visual estimation (STP 21-1-SMCT). Leaders should identify, coordinate, and record ranges to possible armored vehicle engagement locations on squad and platoon sector sketches.
6-2. SPEED ESTIMATION
Of the weapons discussed in this manual, the M136 AT4 is the best for engaging moving armored vehicles. One of its advantages over the LAW is the speed of its round, which travels faster and farther than the LAW round. However, the firer is the key in any engagement, especially a moving target engagement. Once soldiers learn to estimate speeds at known ranges, they should rehearse until they achieve a high hit-to-kill ratio. As their abilities improve, the leaders vary the ranges, speeds, and types of armored vehicles (Figure 6-1). Trainers and soldiers develop other methods through practice and are limited only by their imaginations. (Chapter 4 discusses obtaining a sight picture in detail.) Estimate how far the vehicle travels in 1 second:
a. Start when the front end of the vehicle passes the object.
b. Count, "One thousand and one" (takes about one second).
c. If more than half of the vehicle passes the object, estimate it as a fast-moving vehicle (10 mph or faster). If less than half of the vehicle passes the object, estimate it as a slow-moving vehicle (less than 10 mph).
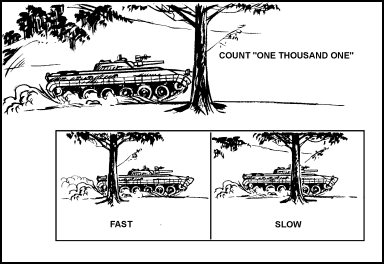
Figure 6-1. Speed estimation.
6-3. ARMORED VEHICLE WEAKNESSES
Armored vehicles usually have their heaviest armor in front, because they are designed mainly for offensive operations against other armored vehicles (Figure 6-2). All vehicles are vulnerable to repeated hits on their flanks and rear, though the flank offers the largest possible target. Firers should always aim center of mass to increase the probability of a hit. The older the vehicle model, the less protection it has against antiarmor weapons. Consequently, newer versions may use bolt-on (applique) armor to improve their survivability. Some vehicles are equipped with reactive armor, which consists of metal plates and plastic explosives. Reactive armor usually covers the forward-facing portions and sides of the vehicle and can defeat shaped-charge weapons such as the LAW and AT4. When reactive armor detonates, it disperses metal fragments to 200 meters. The M72-series LAW and the M136 AT4 cause only a small entry hole in an armored vehicle target, though some fragmentation or spall may occur.
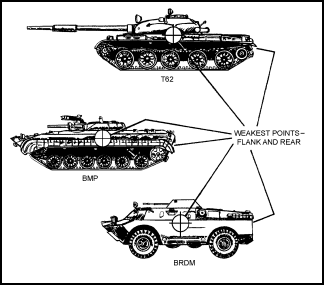
Figure 6-2. Armored vehicle weak points.
a. Natural or man-made obstacles can be used to force the armored vehicle to slow, stop, or change direction. This pause enables the firer to achieve a first-round hit. If he does not achieve a catastrophic kill on the first round, he or another firer must be ready to engage the target vehicle immediately with another round.
b. An armored vehicle without close protection (dismounted infantry) in woods, MOUT, or other restrictive terrain is vulnerable to close attack. This type of attack is most likely to originate from well-armed infantry-type teams organized into armor-killer teams. (Noninfantry units may also be required to perform this mission.) Skilled firers from these teams should engage the suspension or engine compartment of vehicles that have applique or reactive armor. When an armored vehicle is buttoned up—
all hatches are closed and personnel are inside the vehicle—the crew cannot see well enough to protect itself from close attacks or attacks from the flanks or rear. The personnel inside cannot see anything within 10 meters of the vehicle, and they cannot shoot at anything (using their main guns) within 20 meters. The white area in Figure 6-3 shows the most favorable direction of attack when the turret is facing to the front; the gray area shows the vehicle's principal direction of fire and observation when the turret is facing to the front.
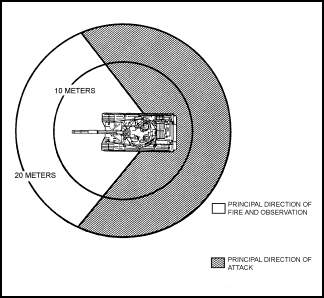
Figure 6-3. Limited visibility of armored vehicles.
c. Armored vehicle kills are classified according to the level of damage achieved (Table 6-1).
| TYPE OF KILL |
PART OF VEHICLE
DAMAGED OR DESTROYED |
CAPABILITY AFTER KILL |
| Mobility Kill |
Suspension (track, wheels, or road wheels) or power train (engine or transmission) has been damaged. |
Vehicle cannot move, but it can still return fire. |
| Firepower Kill |
Main armament has been disabled. |
Vehicle can still move, so it can get away. |
| Catastrophic Kill |
Ammunition or fuel storage section has been hit by more than one round. |
Vehicle completely destroyed. |
Table 6-1. Armored vehicle kills.
6-4. METHODS OF ENGAGEMENT
The four engagement methods include single, sequence, pair, and volley firing. The leader evaluates the situation on the ground to determine which of these methods to use. Regardless of whether they are used singly or in combination, communications are needed as well. The methods of engagement are rehearsed IAW unit SOP.
a. Single Firing. A single soldier with one light antiarmor weapon may engage an armored vehicle, but this is not the preferred method of engagement. Several light antiarmor weapons are required to kill an armored vehicle. A single firer firing one round must hit a vital part of the target to damage it at all (Figure 6-4).
Figure 6-4. Single firing.
(1) Range Not Known. A single firer should engage only targets within 200 meters when he does not know the actual range. The probability that he hits a target beyond 200 meters with a single round is small.
(2) Range Known. A single firer can engage targets out to 225 meters with the LAW or 300 meters with the AT4 when he knows the actual range. The firer should do this only when he has a flank or rear shot, or when he has no other engagement option.
b. Sequence Firing. A single firer, equipped with two or more light antiarmor weapons prepared for firing, engages the target. After engaging with the first round and observing the impact, the firer adjusts his point of aim, engages with another round, and so on until he destroys the target or runs out of rounds (Figure 6-5).
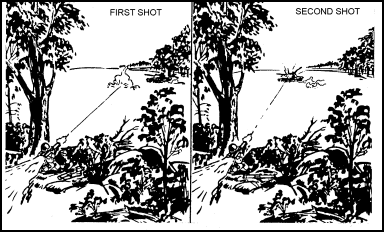
Figure 6-5. Sequence firing.
c. Pair Firing. Two or more firers, equipped with two or more light antiarmor weapons prepared for firing, engage a single target. Before firing, the first firer informs the others of the estimated speed and distance to the target. If the impact of his round proves his estimate to be correct, the other firers engage the target until it is destroyed. If the impact of the round proves his estimate to be incorrect, the second firer informs the others of his own estimate, then he engages the target. This continues until the target is destroyed or all rounds are expended (Figure 6-6).
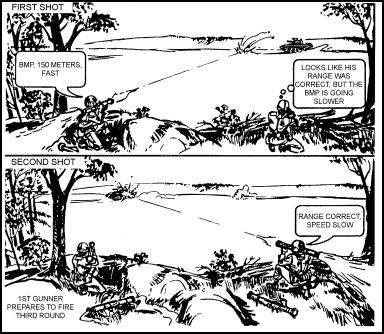
Figure 6-6. Pair firing.
d. Volley Firing. Two or more firers can engage a single target when the range is known. These firers engage the target at one time on a prearranged signal such as a command, whistle, booby trap, mine, or TRP. For the best method of engagement, use the light antiarmor weapon, because it places the most possible rounds on one target at one time, increasing the possibility of a kill (Figure 6-7).
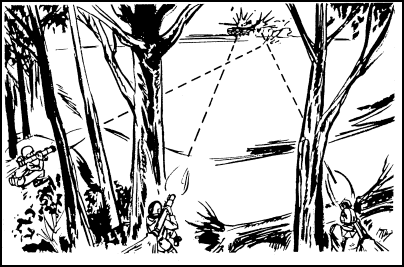
Figure 6-7. Volley firing.
e. Communications. Leaders control all unit fire and communicate this information to the entire unit IAW unit SOP. Light antiarmor weapons firers must know—
Designated firers.
Target priority.
Method of engagement.
Range and lead to target (if known).
Command or signal to fire.
Command or signal to cease fire.
6-5. ENGAGEMENT OF FIELD FORTIFICATIONS AND BUILDINGS
Light antiarmor weapons have little effect against field fortifications and buildings. Soldiers should not expect to severely damage targets with these weapons. However, if the alternatives shown in Table 6-2, are used, soldiers may be able to gain a temporary advantage.
| AIM POINT |
EFFECT WHEN WEAPON
IS FIRED AT AIM POINT |
RECOMMENDED
FIRING TECHNIQUE |
| BUNKER OR FIGHTING POSITION |
| Firing Port or Aperture |
Rounds fired into firing ports or apertures are wasted: rounds detonate inside rear of position, causing little structural damage to the position or to the equipment or personnel within, unless they are hit directly. The AT4 produces less effect than the LAW. |
Coordinate fire: Fire light antiarmor weapons at a point 6 to 12 inches from the front edge of the firing ports in the berm. Fire small arms at the bunker or position to prevent personnel within from returning light antiarmor fire. |
| Berm |
Firing at the berm causes the round to detonate outside the fighting position or inside the berm, creating only a small hole in the berm, dust, or minor structural damage to the position, but no damage to personnel or equipment unless they are hit directly. The AT4 produces less effect than the LAW. |
| Window |
The round may travel completely through the structure before detonating; if not, it creates dust and causes minor structural damage to the rear wall, but little damage to personnel or equipment, unless they are hit directly. The AT4 produces less effect than the LAW. |
Fire 6 to 12 inches from the sides or bottom of a window. Light antiarmor rounds explode on contact with brick or concrete, creating an opening whose size is determined by the type of round used. |
| Wall |
The round detonates on contact, creating dust and causing a small hole and minor structural damage, but little damage to personnel or equipment, unless they are hit directly. The LAW may be used to create a loophole, which is a hole large enough to throw hand grenades through. The AT4 produces less effect than the LAW. |
| Corner |
Corners are reinforced and thus harder to penetrate than other parts of a wall. Any light antiarmor round will detonate sooner on a corner than on a less dense surface. Detonation should occur in the targeted room, creating dust and causing overpressure, which can temporarily incapacitate personnel inside the structure near the point of detonation. The AT4 causes more overpressure than the LAW. |
Table 6-2. Effects of light antiarmor weapons on field fortifications or bunkers.
6-6. ENGAGEMENT OF OTHER VEHICLES
The M72-series LAW proves more effective against light vehicles; the M136 AT4 proves more effective against armored vehicles. Nonarmored vehicles, such as trucks, cars, and boats, are considered soft targets. Firing along their length offers the greatest chance of a kill, because this type of shot is most likely to hit their engine block or fuel tank.
6-7. LIMITED VISIBILITY ENGAGEMENTS
Limited visibility engagements can be conducted using various night vision devices or with artificial illumination. However, when NVDs or artificial illumination is used, limited visibility can reduce the maximum effective range for light antiarmor weapons by at least one-third. To avoid fratricide, leaders must ensure all designated light antiarmor weapon firers are trained to use their weapons in limited visibility.
a. Night Vision Device. Before a NVD can be used with the M136/AT4, it must be removed from its designated weapon (M249 machine gun or automatic weapon, or M60 machine gun) and the M136/AT4 mounting bracket must be attached. Appendix F describes the various NVDs that can be used, it also gives information for mounting, boresighting, and zeroing procedures for each NVD.
b. Artificial Illumination. If artificial illumination is used during a limited visibility engagement, it should be placed above and slightly beyond the target. However, the ability to identify and engage targets is even less with artificial illumination than with NVDs.
6-8. ENGAGEMENT IN NBC CONDITIONS
Wearing a protective mask limits the firer's ability to sight the weapon. Wearing NBC gloves limits his ability to manipulate the firing mechanism.
a. Sighting the Weapon. Sighting while wearing the protective mask may require rotating the weapon slightly counterclockwise. The mask also makes determining the location, identity, and engageability of targets more difficult.
b. Firing the Weapon. Practice manipulating the firing mechanism while wearing NBC gloves.
NOTE: When live firing either a light antiarmor weapon or its subcaliber trainer, aim within range firing limits.
DANGER
THE M136 AT4 IS NOT RATED SAFE. IN TRAINING, NEVER FIRE IT FROM AN ENCLOSURE; IN COMBAT, DO SO ONLY WHEN NO OTHER POSITION IS AVAILABLE. THE OVERPRESSURE AND BLAST COMBINED CREATE CONDITIONS THAT CAN KILL YOU. IF THEY DON'T KILL YOU, THEY CAN INJURE YOU SERIOUSLY OR DEAFEN YOU TEMPORARILY OR PERMANENTLY.
|
6-9. ENGAGEMENT FROM AN ENCLOSURE
Firing from an enclosure creates unique hazards. As such, before positioning soldiers in enclosures (in combat only), leaders must consider several factors that affect safety. Only in combat, when no other tactical option exists, should the M136 AT4 be fired from an enclosure. If it must be employed this way, the enclosure must meet the following minimum requirements. The M72-series LAW has been rated as safe for use from an enclosure but, again, only when the enclosure meets the following minimum requirements:
a. Construction. The building must be sturdily constructed to reduce the structural damage that would occur in a weakly constructed enclosure such as one made of wood or stucco.
b. Size of Enclosure. Minimum measurements for the enclosure are as follows:
AT4—minimum room size 17 x 24 feet.
LAW—minimum room size 12 x 15 feet.
Both—minimum ceiling height 8 feet.
c. Ventilation to the Rear and Sides. To allow for the backblast, at least 20 square feet of ventilation—
such as a standard 3-foot by 7-foot doorway—must be provided directly behind the firer. More doors and windows are removed beside and behind the position to increase ventilation and reduce overpressure, noise, and blast effects. Without sufficient ventilation, the blast would weaken or collapse the walls. On the front wall, windows and doors are reinforced rather than removed, because removing would draw attention to the position. Reinforcing the windows also helps protect the firer from enemy direct-fire weapons.
d. Objects and Debris. All objects and debris are removed from the rear of the weapon, because the backblast causes them to fly around the room injuring personnel.
e. Muzzle Clearance. Muzzle Clearance must be at least 6 inches.
f. Weapon Clearance. Properly positioning the weapons within the enclosure is vital to the safety and survival of all personnel in the enclosure. The weapons should be positioned so that no walls are within 5 meters to the rear or side of the weapon.
g. Personnel Positions. If any other soldiers must be present, then they must remain forward of the rear of the launcher and avoid standing in corners or near walls. If possible, they should construct reinforced positions that fit the previous criteria and that can protect them in case the building collapses.
WARNING
To avoid injuring the eardrums, soldiers must wear the approved brand of ear protection.
|
6-10. ENGAGEMENT BEYOND MAXIMUM EFFECTIVE RANGE (M136 AT4 ONLY)
A skilled M136 AT4 firer can engage targets beyond the weapon's maximum effective range of 300 meters, up to 550 meters. Beyond 550 meters, the firer must aim higher than center of mass and apply additional lead for moving targets. Commanders must realize that accuracy is reduced at these ranges. Also, firing at these ranges identifies the firing position to the enemy.
6-11. OFFENSIVE OPERATIONS
All elements, even those with other organic antiarmor weapons, use light antiarmor weapons. Light antiarmor weapons can influence the action in an attack, so units should routinely stock them beforehand. They are most useful against lightly armored vehicles. They can also be used against soft targets, such as bunkers, field fortifications, automobiles, and trucks, but their shaped-charge warheads have less effect on these than on armored targets. Unless personnel, ordnance, or flammable material on or inside them are hit, soft targets can normally continue to fight after being attacked by light antiarmor weapons. Due to their relatively short range, light antiarmor weapons should be placed throughout the attacking force. They support the maneuver by providing a base of fire, and they enable the assaulting force to engage in close antiarmor combat.
6-12. DEFENSIVE OPERATIONS
Whether or not other organic antiarmor weapons are available, light antiarmor weapons are an asset in the squad and platoon defensive plan.
a. Light antiarmor weapons are employed with interlocking fires to provide mutual support. Dispersion allows leaders the flexibility to place flank, rear, and oblique fires on targets. This procedure increases the survivability of the firers as well as the probability of achieving kills. Leaders must select positions that avoid fratricide from antiarmor backblast and short rounds (Appendix A).
b. The squad and platoon leader's sector sketch identifies TRPs and primary areas of possible engagement. The sector sketch also identifies possible avenues of approach for enemy armored vehicles. Each light antiarmor weapon shares a sector of fire with the primary small-arms weapon assigned to its position. However, because it is neither a primary nor crew-served weapon, the light antiarmor weapon does not require a separate range card. When assigning sectors of fire, squad and platoon leaders inform firers of all possible target areas, TRPs, and prearranged signals (Figure 6-8). (FMs 7-7, 7-7J, and 7-8 provide more information about the squad and platoon sector sketch.) Leaders provide each designated position with two or more light antiarmor weapons.
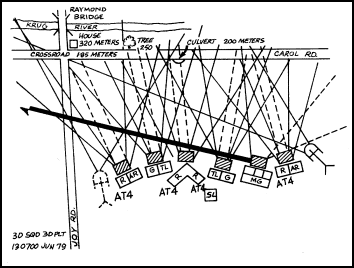
Figure 6-8. Squad sector sketch.
6-13. OTHER TACTICAL OPERATIONS
The weight of the light antiarmor weapon suits it well for combat patrols and rear area operations. (FM 7-8 provides more information about these subjects.)
a. Combat Patrols. Light antiarmor weapons are used on combat patrols to destroy enemy equipment, installations, and key points, and to harass enemy forces. The two types of combat patrols are—
(1) Ambushes (Antiarmor). The commander can employ armor-killer teams either during limited visibility or when cover, concealment, and withdrawal routes are available. The key to ambushing armored or other vehicles is to choose terrain that restricts their maneuverability and fields of fire, but that allows friendly forces to engage the vehicles from the flank and rear. Soldiers can emplace antipersonnel mines before the ambush so that dismounting enemy soldiers deploy into them. Though light antiarmor weapons can be used independently, they are normally used in support of designated organic antiarmor weapons such as the Dragon. Volley firing light antiarmor weapons increases the probability of a quick kill (Figure 6-9). Security teams stop the enemy from escaping.
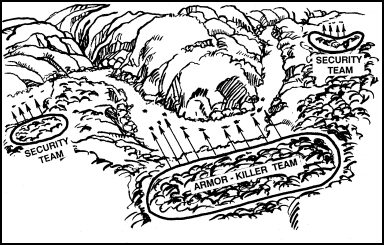
Figure 6-9. Antiarmor ambushes.
(2) Raids. Using light antiarmor weapons on raids increases target options. Light antiarmor weapons can also be used to defend against armored vehicles.
b. Rear Area Operations. Rear area operations usually consist of either: defending unit trains and tactical operation centers, or patrolling rear areas.
(1) Defense of Tactical Operations Center and Unit Trains. The mobility of modern vehicles makes the TOC and unit trains prime targets. Light antiarmor weapons are used to engage vehicles threatening the unit during the defense of the TOC. Soldiers who use light antiarmor weapons in this type of operation normally perform noninfantry-type roles. Unit leaders designate soldiers to carry light antiarmor weapons and ensure that these soldiers receive light antiarmor weapons training.
(2) Patrols of Rear Areas. Rear area patrols are security patrols conducted by designated infantry or MP units. These patrols can react to any threat they encounter in the rear area. Rear area patrols use the light antiarmor weapon in a hasty point defense at a roadblock, intersection, or strongpoint.
|
NEWSLETTER
|
|
Join the GlobalSecurity.org mailing list
|
|
|

