

ANTIARMOR RANGE CARD
This appendix outlines how to prepare a range card because he standard range card (FM 7-8) is slightly modified when employing an antiarmor weapons system. The range card is a sketch of a gunner's assigned sector of fire. It contains information that helps in planning and controlling fires, in detecting and engaging targets, and in orienting replacement personnel. Using range cards allows a gunner or a replacement gunner to find and engage targets quickly.
B-1. DESCRIPTION
A range card (DA Form 5517-R) (Figure B-1) is a record of the firing data for a weapon system on a given sector of fire. This record facilitates target engagement during good or limited visibility conditions. It is divided into three sections: marginal information, sector sketch section, and data section.

Figure B-1. Example of a three-section range card (DA Form 5517-R).
B-2. GENERAL PROCEDURES
Before a gunner can prepare a range card, he must have certain information provided to him. The leader usually briefs the gunner on that information (Figure B-2) including:
- Firing position.
- Left and right limits of fire.
- Maximum engagement line (MEL).
- Avenues of approach (AAs).
- Target Reference Points (TRPs).
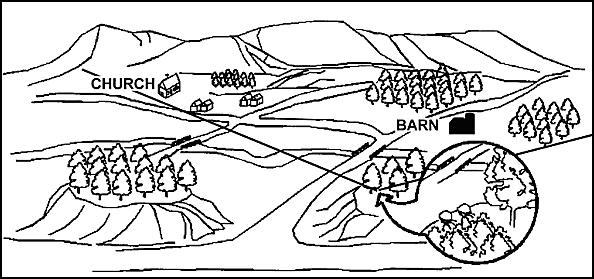
Figure B-2. Gunner's sector of fire.
"I want you to cover a sector of fire that begins here at your firing position and goes to a point about 500 meters beyond that church on the left, moves to the right along the high ground at 200 meters behind the houses, through the woodline, behind the hill, barn and orchard until it reaches a point about 300 meters beyond the right leading edge of the orchard, and returns to your firing position. The enemy is approaching from the north so they will probably use those two roads to enter your sector. Plan to engage the enemy's armor as soon as it comes within range on the road behind the barn and orchard. Engage the enemy targets as soon as they appear on the second road as they approach from the left side of that large hill. There are two target reference points within your sector so copy them down: the church is TRP AB1670 and the barn is TRP AB1677."
B-3. MARGINAL INFORMATION
Use the following procedures to complete the marginal information at the top of the range card (Figure B-3).

Figure B-3. Marginal information.
![]() a. Magnetic North. Take the range card and orient it with the assigned sector of fire. Use a lensatic compass to determine magnetic north. Keep the range card oriented to the sector of fire and draw the magnetic north symbol in the appropriate direction in the Magnetic North box.
a. Magnetic North. Take the range card and orient it with the assigned sector of fire. Use a lensatic compass to determine magnetic north. Keep the range card oriented to the sector of fire and draw the magnetic north symbol in the appropriate direction in the Magnetic North box.
![]() b. Unit Description. Use squad, platoon, and company designations. Do not list any designation for units higher than company level (Figure B-3).
b. Unit Description. Use squad, platoon, and company designations. Do not list any designation for units higher than company level (Figure B-3).
B-4. CALCULATE
Calculate EACH CIRCLE EQUALS _________ METERS.
NOTE: Remember, the Javelin's maximum effective range is 2,000 meters.
![]() a. Using a map or leader provided range data, determine the farthest point from the designated firing position to the MEL. (See paragraph B-5d for a discussion on how to determine MEL.)
a. Using a map or leader provided range data, determine the farthest point from the designated firing position to the MEL. (See paragraph B-5d for a discussion on how to determine MEL.)
![]() b. Take the distance and divide it into 9, the number of circles on a range card. Take the results and round the number to the nearest 10 meters. Enter this number in the data section. (See paragraph B-6). The following are examples:
b. Take the distance and divide it into 9, the number of circles on a range card. Take the results and round the number to the nearest 10 meters. Enter this number in the data section. (See paragraph B-6). The following are examples:
![]() (1) Example #1. If the distance to the farthest point from the designated firing position to the MEL is 2,000 meters then: 9 intervals into 2,000 meters = 222 meters. Round 222 down to 220. Therefore, each circle equals 220 meters (Figure B-4).
(1) Example #1. If the distance to the farthest point from the designated firing position to the MEL is 2,000 meters then: 9 intervals into 2,000 meters = 222 meters. Round 222 down to 220. Therefore, each circle equals 220 meters (Figure B-4).
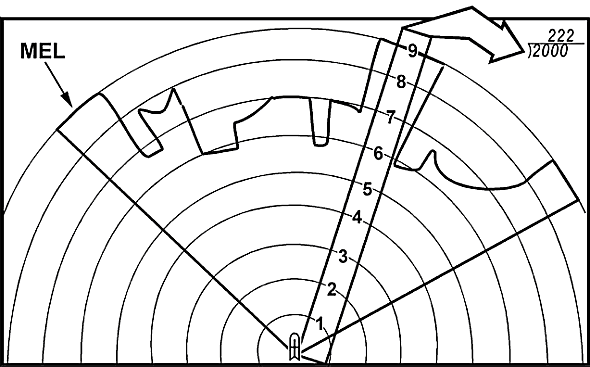
Figure B-4. Determination of distance between circles.
![]() (2) Example #2. If the distance to the farthest point from the designated firing position to the MEL is 1,500 meters then: 9 intervals into 1,500 meters = 166.667 meters, round up to 170 meters.
(2) Example #2. If the distance to the farthest point from the designated firing position to the MEL is 1,500 meters then: 9 intervals into 1,500 meters = 166.667 meters, round up to 170 meters.
B-5. SECTOR SKETCH SECTION DEVELOPMENT
The sector sketch section is a graphic representation of a gunner's sector of fire (Figure B-5). The sector sketch of the terrain should be a good representation since it becomes vital during periods of limited visibility
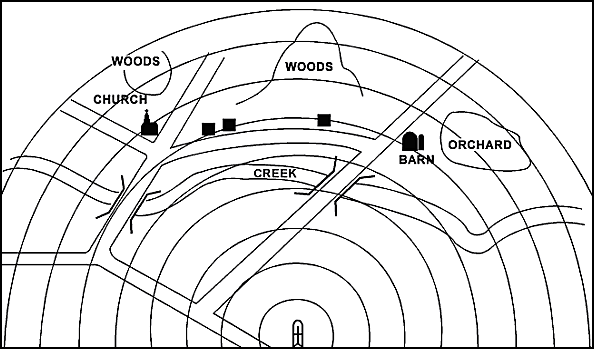
Figure B-5. Sector sketch.
NOTE: A gunner may be assigned more than one sector of fire. A separate range card is prepared for each sector.
![]() a. Sketches. The sketch should cover the entire assigned sector if possible. Make the sketch as large as possible, but do not exceed the limits of the largest circle. When depicting large natural objects (forests, hills, and so forth) or man-made objects (buildings, bridges, and so forth), draw the outline of the object and label it appropriately (Figure B-5). When sketching objects in the sector, locate them on or near the corresponding circle to denote range to the object.
a. Sketches. The sketch should cover the entire assigned sector if possible. Make the sketch as large as possible, but do not exceed the limits of the largest circle. When depicting large natural objects (forests, hills, and so forth) or man-made objects (buildings, bridges, and so forth), draw the outline of the object and label it appropriately (Figure B-5). When sketching objects in the sector, locate them on or near the corresponding circle to denote range to the object.
NOTE: Do not attempt to depict contour lines on the sector sketch section.
![]() b. Gunner's Firing Position. The gunner's firing position is designated by the black dot in the center of the smallest circle of the range card. Draw a symbol of the Javelin over the black dot to designate that this range card is for a Javelin.
b. Gunner's Firing Position. The gunner's firing position is designated by the black dot in the center of the smallest circle of the range card. Draw a symbol of the Javelin over the black dot to designate that this range card is for a Javelin.
![]() c. Left Limit and Right Limit. Left and right limits are imaginary lines from the gunner's firing position to a designated point on the ground (Figure B-6). Use terrain features when possible to designate left and right limits. Other recognizable objects such as a building or other man-made structures can be used. The area between the left and right limits depicts the gunner's sector of fire or area of responsibility. Lines are drawn from the designated firing position to the MEL in the area of the designated limits. Number the left limit as No. 1, number the right limit No. 2, and place a circle around each number. Record the azimuth and distance of each limit in the data section.
c. Left Limit and Right Limit. Left and right limits are imaginary lines from the gunner's firing position to a designated point on the ground (Figure B-6). Use terrain features when possible to designate left and right limits. Other recognizable objects such as a building or other man-made structures can be used. The area between the left and right limits depicts the gunner's sector of fire or area of responsibility. Lines are drawn from the designated firing position to the MEL in the area of the designated limits. Number the left limit as No. 1, number the right limit No. 2, and place a circle around each number. Record the azimuth and distance of each limit in the data section.
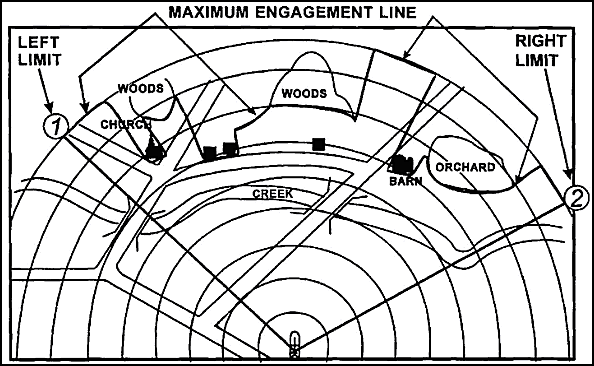
Figure B-6. Sector of fire and maximum engagement line.
![]() d. Maximum Engagement Line. The MEL designates the maximum effective range of a weapon (Javelin) and the gunner's line-of-sight limitations due to the terrain in his given sector of fire (Figure B-6).
d. Maximum Engagement Line. The MEL designates the maximum effective range of a weapon (Javelin) and the gunner's line-of-sight limitations due to the terrain in his given sector of fire (Figure B-6).
![]() (1) If there are no limitations, draw the MEL along the last circle in the sector sketch section. The line should connect with the left and right limit labels.
(1) If there are no limitations, draw the MEL along the last circle in the sector sketch section. The line should connect with the left and right limit labels.
![]() (2) If there are limitations, starting at the left limit, draw the MEL in front of the limiting terrain features. The MEL should extend in front of and follow the limitations until it reaches the right limit.
(2) If there are limitations, starting at the left limit, draw the MEL in front of the limiting terrain features. The MEL should extend in front of and follow the limitations until it reaches the right limit.
![]() e. Avenues of Approach. Avenues of approach are areas where a target is most likely to appear or most likely to travel. This area can be a natural line of drift or a road. Tracked and wheeled vehicles may or may not use the same AA. Starting from the left and working to the right, number the areas where targets are likely to appear. Start with the number three since the numbers one and two have already been used to mark the left and right limits. Place a circle around each number. Continue until all identified AAs have an assigned number (Figure B-7). Record the azimuth and distance to each AA in the data section.
e. Avenues of Approach. Avenues of approach are areas where a target is most likely to appear or most likely to travel. This area can be a natural line of drift or a road. Tracked and wheeled vehicles may or may not use the same AA. Starting from the left and working to the right, number the areas where targets are likely to appear. Start with the number three since the numbers one and two have already been used to mark the left and right limits. Place a circle around each number. Continue until all identified AAs have an assigned number (Figure B-7). Record the azimuth and distance to each AA in the data section.
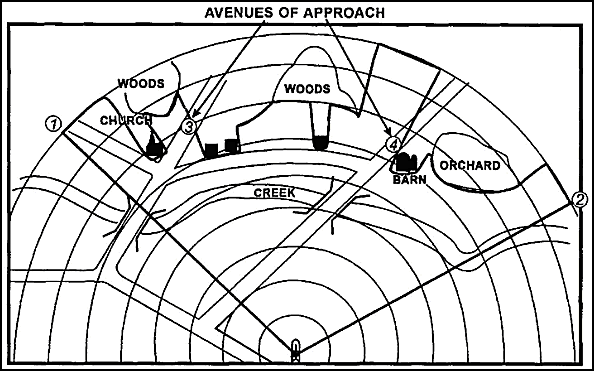
Figure B-7. Avenues of approach.
![]() f. Target Reference Points. Prominent terrain features and or easily recognizable man-made objects (for example, road intersections, buildings, bridges, and so forth) are used as TRPs (Figure B-8). TRPs are used to locate targets and adjust direct or indirect fires. Normally, the sector has at least one TRP in a sector, but no more than three. Number each TRP and place a circle around each number starting with the next available number after AA numbers. In the Figure B-8 below, there are two AA and two TRPs, numbers 5 and 6 are assigned to the TRPs for this example. Record the azimuth and distance to each TRP in the data section.
f. Target Reference Points. Prominent terrain features and or easily recognizable man-made objects (for example, road intersections, buildings, bridges, and so forth) are used as TRPs (Figure B-8). TRPs are used to locate targets and adjust direct or indirect fires. Normally, the sector has at least one TRP in a sector, but no more than three. Number each TRP and place a circle around each number starting with the next available number after AA numbers. In the Figure B-8 below, there are two AA and two TRPs, numbers 5 and 6 are assigned to the TRPs for this example. Record the azimuth and distance to each TRP in the data section.
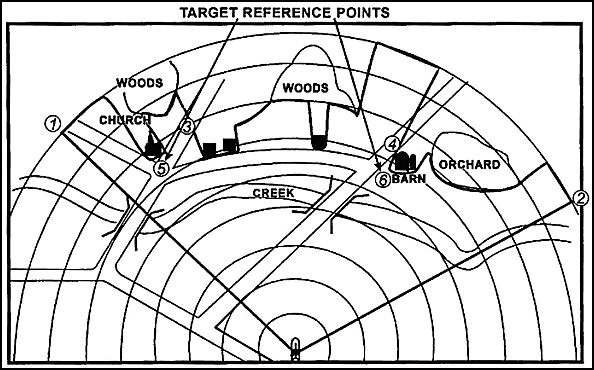
Figure B-8. Target reference points.
![]() g. Dead Space. Dead space is an area inside a gunner's sector of fire and inside the range of his weapons system where he can neither observe nor place direct fire. Any area in which a gunner does not have line of sight is considered dead space (Figure B-9). Buildings, trees, hills, or other terrain features can cause dead space. Shade these areas using diagonal lines to indicate significant dead space in the sector. These areas can then be identified as areas for indirect fire weapons.
g. Dead Space. Dead space is an area inside a gunner's sector of fire and inside the range of his weapons system where he can neither observe nor place direct fire. Any area in which a gunner does not have line of sight is considered dead space (Figure B-9). Buildings, trees, hills, or other terrain features can cause dead space. Shade these areas using diagonal lines to indicate significant dead space in the sector. These areas can then be identified as areas for indirect fire weapons.
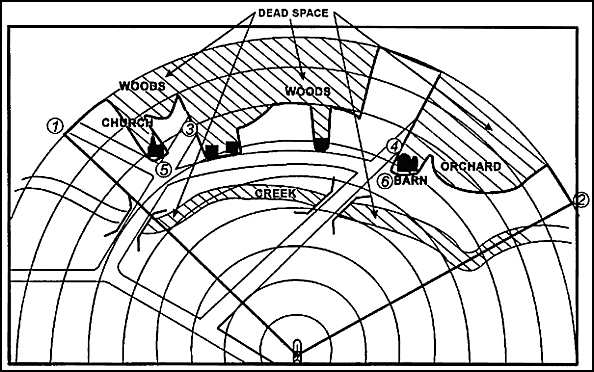
Figure B-9. Dead space.
![]() h. Gunner's Reference Point. The gunner's reference point (GRP) serves as a point of reference when one unit is being replaced by another (Figure B-10). The gunner locates a nearby recognizable terrain feature (such as hilltop, road junction, and so forth) to the right, left, or rear of his firing position to use as his GRP. Label the GRP and draw an arrow between it and the firing position to the terrain feature. The direction of the arrow determines which azimuth to use. Record the azimuth and distance in the data section.
h. Gunner's Reference Point. The gunner's reference point (GRP) serves as a point of reference when one unit is being replaced by another (Figure B-10). The gunner locates a nearby recognizable terrain feature (such as hilltop, road junction, and so forth) to the right, left, or rear of his firing position to use as his GRP. Label the GRP and draw an arrow between it and the firing position to the terrain feature. The direction of the arrow determines which azimuth to use. Record the azimuth and distance in the data section.

Figure B-10. Gunner's reference point and firing.
Fill in the DATA SECTION (Figure B-11) as follows. Figure B-12 shows a sample completed range card for a Javelin position:

Figure B-11. Javelin range card-data section.

Figure B-12. Example completed Javelin range card (DA Form 5517-R).
![]() a. POSITION IDENTIFICATION. Designate as either primary, alternate, or supplementary.
a. POSITION IDENTIFICATION. Designate as either primary, alternate, or supplementary.
![]() b. DATE. Indicate only the day and month.
b. DATE. Indicate only the day and month.
![]() c. WEAPON. Enter Javelin.
c. WEAPON. Enter Javelin.
![]() d. NO. (number). Use the numbers 1 and 2 to represent the left and right limits. Starting with the subsequent numbers designate AAs and then TRPs as designated in the sector sketch section.
d. NO. (number). Use the numbers 1 and 2 to represent the left and right limits. Starting with the subsequent numbers designate AAs and then TRPs as designated in the sector sketch section.
![]() e. DIRECTION/DEFLECTION. List only the DIRECTION, in degrees for the appropriate item in the number (NO.) column. Line through the word DEFLECTION since it is not applicable.
e. DIRECTION/DEFLECTION. List only the DIRECTION, in degrees for the appropriate item in the number (NO.) column. Line through the word DEFLECTION since it is not applicable.
![]() f. ELEVATION. Line through the word ELEVATION since it is not applicable. Draw a diagonal line through the boxes pertaining to ELEVATION.
f. ELEVATION. Line through the word ELEVATION since it is not applicable. Draw a diagonal line through the boxes pertaining to ELEVATION.
![]() g. RANGE. Distance is measured in meters from the designated firing position to the target or target engagement area. The most accurate way to measure distance is the laser range finder.
g. RANGE. Distance is measured in meters from the designated firing position to the target or target engagement area. The most accurate way to measure distance is the laser range finder.
![]() h. AMMO. Line through the word AMMO since it is not applicable. Draw a diagonal line through the columns pertaining to AMMO.
h. AMMO. Line through the word AMMO since it is not applicable. Draw a diagonal line through the columns pertaining to AMMO.
![]() i. DESCRIPTION. List the name of the item listed in the corresponding NO. column (for example, road intersection, barn, church, and so forth). If the object is a TRP, list the TRP number, if left limit or right limit enter LL or RL.
i. DESCRIPTION. List the name of the item listed in the corresponding NO. column (for example, road intersection, barn, church, and so forth). If the object is a TRP, list the TRP number, if left limit or right limit enter LL or RL.
![]() j. REMARKS:
j. REMARKS:
![]() (1) Enter any information that is considered useful in helping understand the range card.
(1) Enter any information that is considered useful in helping understand the range card.
![]() (2) Enter the GRP data here if there is not sufficient room in the data section. (Record the data.)
(2) Enter the GRP data here if there is not sufficient room in the data section. (Record the data.)
B-8. FIELD-EXPEDIENT RANGE CARD
A field-expedient range card is used when DA Form 5517-R is not available. Preparation of a field-expedient range card follows basically the same guidelines as a standard range card. The gunner can use just about anything to draw on as long as the data is recorded. As one example, a discarded MRE box works well (Figures B-13 and B-14).
Figure B-13. Terrain presentation.
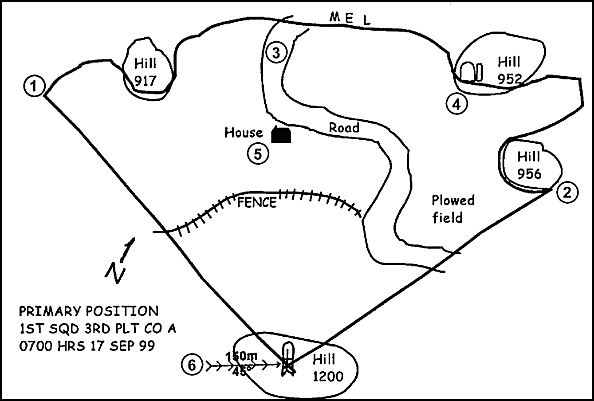
Figure B-14. Field-expedient range card showing the terrain.
(Record the data.)
|
NEWSLETTER
|
| Join the GlobalSecurity.org mailing list |
|
|
|