

Chapter 4
Combat Operations
This chapter provides the MP leader with the information needed to successfully complete a combat mission. When MP platoons conduct the tasks addressed in this chapter, they will mirror the actions of the company.
PREPARE FOR COMBAT
4-1. Units that are not directly engaged in combat often find it necessary to travel in order to position themselves for combat operations. During these movements, the battalion supports the company and the company supports and monitors the platoons with the movement plan. The move's success depends on the unit's discipline and ability to execute the plan. (Refer to Appendix E for precombat inspection checklists.)
MAINTAIN AND MOVE A COMBAT LOAD
4-2. Combat load is the quantity of supplies, in all classes, that the company must have on hand to sustain operations for a prescribed number of days. The company must be capable of moving the combat load, using organic transportation assets, into combat in a single delivery. To save time, the company combat loads vehicles while the quartering party readies the new site. The combat load ensures that a unit is ready for combat even when it is on the move.
4-3. The principles of combat loading are standard. All equipment, ammunition, and gear are loaded on the vehicles in a logical order and put in predesignated places. Knowing the location of each item allows for quick retrieval during the move. Combat loading also lends to a fast set up at the new site. Like the basic load, the company's combat load is mission-dependent. No single load plan can satisfy all the situations. MP leaders must consider the following:
Weight limits of the unit's vehicles and trailers, being careful not to overload them.
Whether or not the equipment will fit (cube out). For equipment data, see the applicable technical manual (TM).
4-4. Unit SOPs has load plans tailored for various mission activities. Having a choice of load plans for various deployments reduces the load time. Load plans and diagrams are modified to suit METT-TC and vehicle and trailer capacities. The modifications are shown on the load diagram in the vehicle. HMMWVs may be loaded in many configurations, which include—
Loading the basic equipment in the mounted standard brackets on the vehicle.
Modifying and moving the brackets to meet mission or unit requirements.
PLAN A TACTICAL ROAD MARCH
4-5. The basic considerations in planning any road march are the METT-TC factors (especially the enemy situation and the mission); the march order; and the type, number, and characteristics of vehicles available for the movement. A company conducts a tactical road march for relocating and facilitating rapid movement of the vehicles with a prescribed speed and interval between the vehicles. When preparing for a tactical road march, the company uses the following planning sequence when time permits:
Prepare and issue the WO as early as possible to allow maximum time for preparation.
Prepare an estimate of the situation, specifying the organization of the march column.
Organize and dispatch reconnaissance and quartering parties.
Prepare detailed movement plans based on the organization of the march column and a review of the available reconnaissance information.
Avoid choosing highly populated areas, curves in the road, or other hard-to-secure areas.
Plan the timing so that the unit arrives at the SP just before it is scheduled to cross it. The time a unit must cross the SP is provided to the unit. As other units may be planning to use the route, each unit must cross the SP on time.
Prepare the overlays and issue them to the vehicle commanders and subordinate leaders. The road march overlay includes, at a minimum, the location of the SP, RP, scheduled halts, and checkpoints at critical points along the route.
COORDINATE AND DIRECT THE MARCH
4-6. The chain of command controls the column. The march leader—
Coordinates the road march through the chain of command with the local movement control unit.
Determines if the convoy needs a movement credit or a clearance to use the given route. If so, the march leader submits a Department of Defense (DD) Form 1265 through the appropriate movement control center.
Informs higher HQ and the supported units of the dates and times that the operations will stop at the old site and begin at the new site.
Tasks subordinate leaders to attend a briefing to discuss unit readiness and load plans and forecast support requirements.
Submits requests for support based on the forecast developed during the briefing. Requests may include fire support, refueling, vehicle recovery operations, and other support needed to complete the march.
Requests HQ personnel to prepare a movement table. Refer to Appendix E of FM 55-10 for detailed information on the movement tables.
Requires unit personnel to analyze the route reconnaissance information looking for likely enemy ambush sites.
Ensures that a strip map, which may be included as an annex to the OPORD, is prepared. The strip map shows SPs; RPs; route numbers; place names; critical points; directional arrows; distances between the points; scheduled halt locations; and petroleum, oils, and lubricants (POL) refill points. Give copies to the unit drivers.
Ensures that radio communication is kept to a minimum during movement.
Tasks subordinates to ensure that the road march plan is followed.
CONDUCT THE MARCH
4-7. The commander sets the conditions under which military traffic moves at night. The march leader ensures that personnel are aware of and abide by the set lighting conditions when the company moves at night. Conditions that are more restrictive may be imposed contingent on the threat environment (such as air raids). Lighting conditions may include normal lighting, reduced lighting, or blackout. If the situation warrants, travel by total blackout (use of night-vision goggles [NVGs]) may be prescribed. More often, travel is under partial blackout, using only enough light to see the road and to be seen by other road users. Minimal lighting reduces visibility from the air while it permits drivers to—
Movement Techniques
4-8. During a tactical road march, the unit leaders (such as the march leader and the platoon sergeant) travel in separate vehicles. This decreases the chance of a unit's primary leaders being lost in one enemy action. The convoy moves en route by close or open column march or by infiltration. In dusty conditions, space the vehicles so that the dust from one vehicle does not blind the driver of the next.
4-9. Close Column. In a close column, the elements are close together. Use a close column for marches during limited visibility, blackout conditions, and radio silence. Under these conditions, space the vehicles so that the driver can see the two lights in the blackout marker of the vehicle ahead. Visibility determines the set distance between the vehicles. A close column—
Reduces the time it takes for the column to pass points on the route.
Requires fewer guides, escorts, and markers for control than an open column does.
Enhances movement through congested areas or over poorly marked routes.
4-10. Open Column. In an open column, elements are widely spaced as a passive defense measure. Generally, an open column is used during daylight, but may be used at night with infrared lights, blackout lights, or night-vision equipment. A distance of 50 to 100 meters or more may be designated between vehicles depending on METT-TC. Use an open column—
Over dusty roads. Reducing dust is especially important when moving through areas contaminated by radioactive fallout.
4-11. Infiltration. Infiltration is the best passive defense against enemy observation and attack, although it may be difficult to control. To move by infiltration, vehicles are dispatched one at a time or in small groups at irregular intervals to keep traffic density low and to prevent undue massing of vehicles. Use infiltration—
When maximum security, deception, and dispersion are needed.
To maintain security during the march. When the unit approaches likely danger areas (such as bridges and tunnels), have one or more teams dismount. The teams check both sides of the road before the vehicles pass. This is critical when only a map reconnaissance was conducted before the move.
Movement Considerations
4-12. Consider events and control measures that are used during the move in order for the tactical road march to be successful. These measures include the SP and RP, checkpoints, restrictions, speed control, halts, disabled vehicles, and mined areas.
4-13. Start Point. A SP gives the vehicles of a march column a common point for starting their movement. When vehicles use more than one route, each route has an SP. The SP is a recognizable place along the route of march (such as a road intersection). It should not be in a defile, on a hill, or at a sharp curve in the road that could cause movement to slow. Ensure that the SP is far enough away from the AAs to allow the vehicles to be organized and move at the prescribed speed when they reach it. Elements of the company reconnoiters the route to the SP to determine the times needed for the serial to arrive at and clear the SP before starting the march.
4-14. Release Point. A RP provides all the vehicles of the march column with a common point for reverting to the commander's control. It is a point on the march route that is easy to recognize on the map and on the ground. Guides meet the vehicles as they arrive at the RP and lead them to their new positions, usually in an AA. Multiple routes and cross-country movement from the RP to the assembly areas allow vehicles to disperse rapidly. When leaders select a RP, avoid hills, defiles, and sharp curves that may cause elements to slow or stop on the route. Ensure that vehicles are not required to countermarch or pass through another element to reach their new position.
4-15. Checkpoints. Use checkpoints on a route for reference when providing instructions and identifying places where interference with movement might occur or timing may be critical.
4-16. Restrictions. Restrictions are points along the march route where the movement may be limited or obstructed during certain time periods (such as bridges, intersections, ferries, or bypasses). The march planner—
Starts the move early enough to pass such a point before a restriction begins.
Delays the start of the move to pass a restriction after it has ended.
Plans to halt the column along the route until the restriction is lifted.
4-17. Speed Control. Vehicles in a column of any length may simultaneously encounter different types of routes and obstacles. This causes sections of the column to move at different speeds at the same time, producing an undesirable accordion or whip effect. The movement order specifies the march speed, march rate, and the maximum safe catch-up speed to reduce column whipping . The lead vehicle must not exceed the authorized maximum speed of the slowest vehicle in the column. To minimize vehicle congestion on the nearside of an obstacle, vehicle commanders and drivers must be alert and maintain the prescribed minimum following distance. Vehicles should make only gradual speed changes while maintaining their prescribed interval. Vehicle commanders must constantly be aware of the vehicle interval to their front and rear and adjust their speed accordingly.
4-18. Halts. Halts are conducted for various reasons. They—
4-19. The time and duration of the halts are usually specified in the movement order or prescribed in the unit SOP. The SOP prescribes actions to take during halts. A short rest halt of 15 minutes is usually taken after the first hour of marching. A 10-minute short halt is taken every 2 hours thereafter. The prescribed march rate includes the time required for short halts. When possible, march elements using the same route should stop at the same time. Route characteristics may make it necessary to halt at a particular point on the route rather than simultaneously at a fixed time.
4-20. Long halts are planned in advance. The length of the halt is added to the total travel time. Locations for long halts are normally selected to allow all the vehicles to clear the road and permit proper dispersion. The unit commander schedules halts for refueling in advance.
4-21. The herringbone formation is used to provide security for the march column during temporary halts. During temporary halts, the MP teams move their vehicles to alternate sides on or off the road in a herringbone pattern that lets vehicles pass down the center of the column. Movement commanders give permission for execution of unscheduled halts. The first priority at any halt is local security. OPs are established and sectors of fire are assigned to each vehicle. These actions should be automatic and part of the unit SOP.
4-22. Disabled Vehicles . Disabled vehicles must not obstruct traffic. Their crews must move them off the road and report their status immediately to the PSG. Crews must immediately signal the follow-on vehicles to bypass and continue movement. They then establish security and post guides to direct traffic. If possible, crews repair their vehicles and rejoin the rear of the column just ahead of the trail element. Vehicles that have dropped from the column return to their positions only when the column has halted. The trail party recovers vehicles that cannot be repaired by their crews.
4-23. Mined Areas . When a company encounters mined areas, it must remember that the safety of the unit is the most important factor. It bypasses mined areas whenever possible, but considers how the delay will affect the outcome of the mission. Remember to—
Be cautious. Mines may be used to force an element to take an alternate route into an ambush site.
Screen the bypass route, if possible, before diverting an element.
NOTE: Refer to Appendix H for countermine operations.
4-24. Ensure that all efforts are made to bypass mined areas; however, if the element must cross a mined area when engineer assets are not available to breach the minefield, act quickly and cautiously. Mined areas, like other obstacles, are often covered by enemy fire. Before crossing—
Detonate mine trip wires by rigging an object near the trip wire to fall on the wire.
Detonate pressure-sensitive mines by rigging an A-frame over the mine and placing a heavy object, attached to a rope, over the mine. Take cover and allow the object to fall on the mine.
Send a report to the next higher command when mines have been neutralized. Refer FM 20-32 and FM 21-75 for information on mines and countering mines.
ESTABLISH A NEW OPERATIONAL SITE
4-25. MP elements most often will collocate as part of an established base or base cluster. On occasion, MP may need to set up a base of their own. To set up at a new location, whether as part of an established base or base cluster or separately as a company or a platoon base, you must—
USE A QUARTERING PARTY
4-26. A quartering party is needed whenever a unit relocates. The quartering party's mission is to—
Reconnoiter the area for enemy presence, booby traps, NBC contamination, and other hazards.
Prepare the area for occupation and assist the units with occupation.
4-27. The platoon leader or PSG designates vehicles and personnel from the platoon that will be part of a battalion or company quartering party. The entire platoon may serve as the battalion or company quartering party.
4-28. While the unit loads for deployment, the quartering party moves to and readies the new site. The quartering party's job ends when the last vehicle in the main body arrives at the new site. The size of a quartering party is based on the tactical situation and the amount of work required to prepare the site for occupancy. A quartering party for platoon relocation would be smaller than that of a company. A company quartering party is likely to have personnel from the unit's HQ, each platoon, the maintenance and dining sections, and communications.
4-29. The quartering party leader ensures that the equipment and supplies are available to clear, secure, and set up the new site. A quartering party may need—
4-30. The quartering party leader assigns tasks to the teams based on the size of the quartering party, the work to be done, and METT-TC. He ensures that each team has the equipment needed to complete its tasks (refer to FM 7-10 ) and that they are at the proper mission-oriented protection posture (MOPP) level if they are operating in an NBC environment.
March Halts
4-31. At march halts, quartering party teams set up local security. If the vehicles can leave the road, the teams form a 360-degree perimeter around the convoy. If the vehicles cannot leave the road, they are parked at an angle so alternate vehicles face opposite sides of the road. Each team is assigned a sector to observe, with sectors overlapping between the vehicles. Each team member has a specific area of responsibility. The troops remain alert and ready to take action on contact with the enemy. All personnel watch for enemy aircraft.
Site Arrival
4-32. When the quartering party arrives at the site, it clears and then secures the site. One or more teams, after dismounting their vehicles, search the area for mines, booby traps, items of intelligence value, or other signs of enemy presence.
4-33. If nuclear weapons have been used, at least one team using radiation detection, indication, and computation (RADIAC) meters monitors the site for radioactive contaminants. Monitoring for chemical and biological agents must be continuous because it is difficult to detect their first dispersal.
4-34. In urban areas, team members clear buildings that will be used by the unit. Team members clear the structures outside the perimeter if there is a possibility of enemy presence. The priority of buildings to be cleared and the number of teams needed are based on METT-TC. Refer to FM 90-10-1.
4-35. When the area is cleared, one or more teams perform the following functions:
Set up defensive positions on likely enemy avenues of approach. These positions provide early warning and limited protection during the occupation of the new site.
Company Move
Sets up the company CP where it can best control the company, be well defended, and have LOC to the subelements.
Considers cover and concealment when choosing the CP location.
Uses camouflage screens and man-made cover and concealment where needed.
Sets up the wire communication net. Marks those areas where other unit elements will be positioned, using signs or materials that cannot be easily seen by the enemy.
Chooses alternate exits and marks them for use as emergency exits.
Designates parking areas for the heaviest, most awkward vehicles, such as 5-ton trucks.
-
- Marks the areas where latrines, garbage dumps, and tents will go.
Uses ground guides for vehicle movement in areas where troops are sleeping. (For safety, unit personnel should sleep only in the troop area).
Chooses a structure (in an urban area) that protects the troops from natural elements and has adequate latrine facilities.
-
- The food service section inside the perimeter, well away from interior roads to keep dust from contaminating the food. Locate the serving line to take advantage of cover and concealment. In urban areas, select a building for service and meal activities.
The latrines away from the bivouac area. Place latrines at least 30 meters down slope from wells or other water sources, and at least 100 meters from the dining facility, downwind and down slope, if possible. In urban areas, use existing latrines if they can serve at least 8 percent of the unit at one time.
The maintenance section where vehicles can arrive easily from the main road through the site. Ensure that vehicles are able to enter the maintenance tent at one end and exit at the other. Use existing garages for maintenance operations in urban areas.
The supply section to meet space, roadway access, and drainage needs. In urban areas, use warehouse-type buildings for supply operations.
The tactical communication section where it has space enough to support the whole operation. Usually it collocates with the maintenance section or the operations section.
4-37. When the main body arrives, the quartering party—
Ensures that the vehicles rapidly clear the approach route while maintaining vehicle intervals.
Dismounts all personnel except drivers at the dismount point.
Briefs the leader of the main body on the situation and the operational status.
4-38. The leader of the main body informs the higher HQ that the move has been completed. He reports the location coordinates for both the CP and the alternate CP by messenger or other secure means. The leader ensures that the entire party prepares fighting positions and other defensive measures.
Platoon Relocation
4-39. A quartering party, in advance of the platoon's relocation, has the same considerations scaled to size and need, as one in advance of a company. An MP platoon may collocate with a company HQ or an existing base. However, more often, a platoon's base must be set up where a platoon HQ can best—
4-40. The platoon HQ can operate from a static base or vehicles. If the platoon elements are going to operate in one location (as they would for an EPW holding area), the platoon leader sets up a static platoon HQ base. If the platoon elements must operate dispersed over a large area, the platoon leader must remain mobile. In such cases, a platoon leader could elect to set up a temporary platoon base as a rally point to report, resupply, and reorganize the platoon's resources.
4-41. The platoon bases are set up the same. The PSG selects a site that offers good cover and concealment. The site must be defendable and allow the HQ vehicle to be located near the tent. A small tent houses the platoon's HQ. Use a radio set control group to relay remote communication into the tent. An antenna increases the transmission distance and is located based on OPSEC principles. Wire communication is limited to the platoons that can hook into an existing wire net.
CONDUCT MILITARY POLICE BASE SELF-DEFENSE
4-42. When collocated with a base or a base cluster, the platoon is integrated into that base's or base cluster's self-defense planning and operations. Although bases and base clusters are more prevalent at corps and echelon above corps (EAC), the same principle applies to MP located at the division or brigade support areas. When an MP base is set up on its own, the base is responsible for its own security and protection.
Collocated
4-43. An MP platoon collocates with a base or a base cluster for logistical support and a means to conduct operations. When collocated, the platoon leader coordinates with the base defense operations center (BDOC) and the base cluster operations center (BCOC) to integrate the platoon's efforts with the base's and base cluster's efforts. The platoon's portion of the base's or base cluster's defense is to help provide early warning of the threat by area security and/or maneuver and mobility support in the area near the base or the base cluster. Because MP resources are austere, the platoon only shares sector efforts on the base's perimeter. MP are used as static posts (such as gates) only under extreme conditions. An MP platoon may be tasked to serve or augment the base cluster's response force. Before the platoon leader accepts this tasking, he consults with the company commander to—
Ensure that the company commander knows that he may have one less platoon if he is tasked for the TCF or response force for the battalion.
Allow the company commander to advise the base commander that the MP platoon could serve as a response force to the base if it is not committed.
4-44. Each base has a BDOC that plans, coordinates, and supervises base defense operations. The BDOC initiates contingency planning that enables the base to—
Increase the manning posture of the base contingent on the threat.
Hold against heavier enemy forces until response forces arrive.
Support the fire and movement of the response force operating outside the base.
4-45. Each base cluster has a BCOC to monitor base defense plans and establish the base cluster reaction force. The BCOC—
Provides C2 of the resources for planning, coordinating, and supervising the base cluster's defense.
Maintains communication with bases within the cluster as well as MP, BDOCs, and the sustainment area operations center. A great deal of intelligence is provided to a BDOC and BCOC through the rear operations net, which helps in planning the defense.
4-46. The platoon's plans for the interface of MP support into the base's self-defense plans address—
Reliable and redundant communication systems at all guard locations (such as land lines, radio links to the BDOC, and telephone hookups to the center switch).
Coordination with the BCOC or rear-area operation center (RAOC), as required.
4-47. All plans and overlays depicting MP support are forwarded to the BCOC. There they are consolidated and forwarded to the RAOC. (If a base is not part of a base cluster, the base forwards all the plans and overlays directly to the RAOC.)
Separate Setup
4-48. Set up an MP platoon separately only when there is no other alternative. This is the least desirable means for a platoon to set up. When the platoon sets up as a base separately, it must be able to defend against a wide range of enemy activity. It integrates the defense of its base (including indirect-fire systems, air defense artillery, and tactical aircraft) with the defense efforts of other bases in the sustainment area. Engineers, dismounted troops, armored vehicles, and helicopters contribute to the overall security of the bases. Bases coordinate and synchronize their defense efforts to enhance their strengths and reduce their vulnerabilities. A base's defense priorities include—
Positioning crew-served weapons and troops on assigned sectors of fire.
Improving primary fighting positions to include overhead cover.
4-49. Using the IPB process can help the platoon predict threats to base security. Platoons must be aware of the enemy's location, organization, direction of movement, and strength. In the same regard, platoons must have effective OPSEC to deny similar friendly information to the enemy. Platoons can continually improve base defenses by considering what avenues of approach and methods of attack the enemy could use, given the vulnerabilities of the platoon's base. The base defense plan must have overlays depicting weapons positions, sectors of fire, final protective fires, and reaction force contingencies. Plans are updated as often as possible.
4-50. The base's reaction force efforts are coordinated with the designated-area response force. Platoon leaders develop detailed employment plans and exchange as much information as possible with the response force and TCF commander before they are needed. Although the base's reaction force usually would not fight beyond the perimeter of the base, the reaction force must be ready to assist the response force or TCF when it arrives. The following should be considered:
Coordination of fire support before, during, and after linkup.
Recognition signals and communication procedures to be employed.
Setup in a Hide Position (Temporary Defensive Position)
4-51. If the platoon steps down from sustained continuous operations and cannot return to its base or base cluster, it may need to operate briefly from a temporary defensive position. When used properly, a temporary defensive position can enable the platoon to rest, recover, repair damaged equipment, and plan for future operations. It offers concealment with little chance of detection by the enemy. Platoons want to get the best security they can while tasking a minimum of soldiers to provide security. When the platoon leader decides to operate from a temporary defensive position, he notifies the company HQ.
4-52. Locate the position in or near the area of normal operations so that sustained operations can be resumed immediately, on order. METT-TC should be a primary concern. Easily defendable positions are preferred over those that are more difficult to defend. Ensure that the position has more than one exit route and provides communication with the next higher HQ that are enhanced or at least not interfered with by terrain. While built-up, urban areas afford suitable concealment for temporary defensive positions, it is essential that the capability to communicate be assessed before the selection of such a site. Other considerations of a temporary defensive position include—
Positioning vehicles so that key equipment can be moved or removed without displacement of the entire unit.
Concealing equipment from the sides and overhead. This prevents detection from aerial observers and some side-looking airborne radar.
Covering and concealing to reduce security and/or defense requirements.
Providing enough space between vehicles to allow a vehicle to bypass another vehicle that is inoperable.
Ensuring that the platoon follows signal security and uses noise and light discipline.
Setting up fighting positions if the situation calls for them.
SET UP LOCAL SECURITY
4-53. Self-defense planning and coordination is done as soon as the base is set up. Prior planning and mission analysis are essential elements of a base defense. MP must be able to defend the site even before occupation is complete. When an MP element is located as part of an established base, it helps defend a portion of the larger unit's perimeter. Elements that set up separately usually defend their sites by deploying in a 360-degree perimeter. The techniques and principles of defense are the same for defending a separate squad, platoon, company, or base. To plan a perimeter defense, evaluate the situation. Analyze the terrain in terms of observation and fields of fire, cover and concealment, obstacles, key terrain, and avenues of approach (OCOKA). Defenses are placed where the threat is greatest.
4-54. The platoon leader establishes the CP and the OP. He locates the CP and the OP where he can best see and control the platoon. If this is not possible, he locates it where it can cover the most likely avenue of enemy approach. An alternate CP and OP, operated by the PSG, is placed where it can control the portion of the perimeter that cannot be seen or controlled by the main CP and OP. The platoon leader then decides what other security measures and means of communication to use.
4-55. Platoon leaders must plan more than cover and concealment to counteract threat infrared, radar, thermal, and other sensors. The platoon leader uses the principles of camouflage and counters the recognition factors that make an object stand out from its background by—
Locating soldiers, equipment, or structures where they are least discernible. This alone can reduce or eliminate many recognition factors.
Using any mix of hiding, blending, disrupting, or disguising that conceals visibility.
4-56. When the number of soldiers that will defend a 360-degree perimeter is small, the platoon leader must—
4-57. The equipment to improve defensive positions includes concertina wire, sandbags and tape (for cover and concealment), trip flares, pyrotechnic devices, mines, or PEWS, and other lethal and nonlethal technologies.
4-58. Platoons must be able to defend during day or night, in reduced visibility, and in a variety of weather conditions. The platoon leader or sergeant ensures that the platoon has the equipment it needs to defend under these conditions. The platoon must know how and when to use the equipment. During reduced visibility—
Take steps to keep the enemy from observing or surprising the platoon.
Require OPs and LPs. There should be at least one OP and one LP per squad. OPs and LPs report the enemy's advance and call for illumination and supporting fire. As in a daylight defense, MP manning OPs and LPs withdraw before they become engaged in close combat.
Use patrols, illumination, PEWSs, and NVDs to help detect the enemy's advance.
Use trip flares to provide warning and give some illumination. As a rule, do not fire until the targets are visible.
Use camouflage, movement control, and light and noise discipline.
Ensure strict fire control to keep from disclosing the fighting positions.
Ensure that gunners with crew-served and antiarmor weapons use NVDs.
Provide illumination by using handheld flares or grenade launchers with illuminating rounds. Added light may be provided by fire support.
Ensure that platoon leaders plan the use of messengers, visual signals, personal contact, or whistles to communicate with the squad leaders. Squad leaders plan to communicate with their team leaders and teams using personal contact or sound and visual signals.
CONSTRUCT FIGHTING AND SURVIVABILITY POSITIONS
4-59. Fighting positions help protect soldiers and their equipment from the enemy and from the enemy's small-arms fire and fragmentation weapons, while allowing soldiers full weapon system engagement. A fighting position provides cover and concealment from which to engage or defend against the enemy. See FM 7-8 for individual fighting position construction.
4-60. Fighting positions do not protect against the destructiveness of artillery and other area weapons. Nevertheless, a dug-in fighting position may be the key to survivability. Digging in cannot remove a soldier's vulnerability by itself. It does reduce exposure to the enemy's acquisition, targeting, and engagement systems. Platoons must be able to construct their survivability positions, often without engineer assistance.
4-61. Locate fighting positions for crew-served weapons where gunners can stop dismounted attacks. The sectors of fire must cover infantry avenues of approach and provide the most grazing fire across the platoon or squad front. Overlap the sectors of fire with each other and those of adjacent squads. Prepare fighting positions so that their primary sectors of fire have the guns firing across the front of the unit. Prepare secondary sectors of fire so that the guns fire to the front.
4-62. Usually, one MP team occupies an M249 or MK19 fighting position. One member is the gunner, one is the assistant gunner, and one is the ammunition bearer or rifleman. Each gunner has a primary and a secondary sector of fire. The gunner fires in the secondary sector only on order or when there are no targets in the primary sector. Each gunner uses aiming stakes to set his weapon for a final protective line (FPL) or a principal direction of fire (PDF) within the primary sector. The FPL and PDF are control measures to help defend a position. In an attack, the gunner knows the primary areas. He engages the greatest threat and, on the order of the platoon leader or PSG, fires the FPL.
PREPARE SECTOR SKETCHES
4-63. After the crew-served weapons are in position, the squad leader positions the remaining MP to protect the gunners and to cover areas not covered by the gunner's. Using the range cards, the squad leader makes a squad sector sketch. He includes a rough sketch of the terrain around the weapon (Figure 4-1) . The squad sector sketches are used to plan defense and to control fire. Squad sector sketches show the following:
The main terrain features in each sector of fire and the ranges to the features.
The primary and secondary sectors of fire for each position.
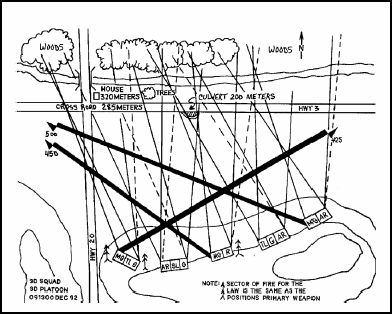
Figure 4-1. Squad Sector Sketch
4-64. The squad leader checks the range cards and the squad sector sketch for gaps or other flaws in the fire plan. He adjusts the weapons or the sectors as necessary. If the squad leader finds dead space, he takes steps to cover it with mines, grenade-launcher fire, or indirect fire. He then prepares two copies of the squad sector sketch. He keeps one copy and forwards the other copy to the platoon leader who makes a platoon sector sketch (Figure 4-2). The platoon sector sketch shows the following:
The crew-served and antiarmor weapons positions and sectors of fire, including FPL or PDF for the crew-served weapons and target reference points for the antiarmor weapons.

Figure 4-2. Platoon Sector Sketch
4-65. The platoon leader coordinates with the nearby units. He usually coordinates from left to right and from front to rear. The fires of units within the perimeter must be closely coordinated with the platoon's defensive fire plan. Squad leaders coordinate their fire plans with adjacent squads. All positions and units near the platoon are mutually supporting. The platoon leader makes sure gaps between the units are covered by fire, observation, patrols, OPs and LPs, or sensors. The units exchange information on—
The location of dead space between the elements and how to cover it.
The locations of primary, alternate, and supplementary positions and sectors of fire for automatic weapons, antiarmor weapons, and subordinate elements.
The locations and types of obstacles and how they are covered by fire.
Any patrols to be conducted, giving their size, type, times of departure and return, and routes.
PREPARE RANGE CARDS
4-66. The FPL for the M249 is the line where an enemy assault is to be checked by interlocking fire from all weapons. Use the M249 on the FPL for grazing fire no more than 1 meter above the ground, about hip high, across the front of the element. Use the MK19 or M203 to cover the dead space. To figure the dead space on the FPL, the gunner watches a person walking down the FPL and marks spaces that cannot be grazed. The gunner records all the dead space data on the range card (Figure 4-3). He prepares at least two copies of the range card, keeping one card at the position and giving one copy to the squad leader. Fire on a gunner's FPL is its final protective fire (FPF). FPF is usually used as a last resort to stop an enemy assault. All weapons fire on command, continuously, until the call to stop FPF is given.

Figure 4-3. Standard Range Card
4-67. When terrain prevents the use of an FPL, the gunner uses a PDF instead. He directs his fire toward the most threatening avenue of approach that leads to his position. His weapon is positioned to fire directly on this approach rather than across the squad's front.
4-68. Construct fighting positions for the MK19 like M249 fighting positions. However, be aware that it takes added effort to keep the M3 tripod from moving because of the recoil of the MK19. If gunners are using the M249 machine gun, they should use the tripod when firing at an angle and the bipod when firing to the front. When gunners change their fires from the oblique to the front, they must move the machine gun, but leave the tripod in place. If gunners are using the MK19, they position the tripod toward the primary sector of fire. However, because there is no bipod for the MK19, gunners must be prepared to adjust both the weapon and the tripod to the secondary sector, if required. After a crew is positioned and is assigned an FPL or a PDF, the team—
Marks the tripod's position and the limits of their sectors of fire with aiming stakes.
Digs the firing platform first. This lessens their exposure if they have to shoot before the position is completely constructed. Dig the firing platform at a level that allows the gun to traverse the sectors of fire.
Lowers the gun to reduce the gunner's profile. This also reduces the height of the frontal cover needed.
Digs the hole deep enough to protect itself and still allow the gunner to shoot in comfort (usually about armpit deep).
Uses the rest of the dirt to build the flank and rear cover when the frontal cover is high enough and thick enough. Sandbags, wire, hatchets, or saws can be useful for building overhead cover or improving the fighting positions.
4-69. The ammunition bearer digs a one-man fighting position to the flank. He positions himself where he can see and shoot to the front and the oblique. Usually the ammunition bearer is on the same side as the FPL or the PDF. From there he can see and shoot into the machine gun's secondary sector. He can also see the gunner and the assistant gunner. The ammunition bearer connects his position to the machine gun position by a crawl trench. This allows him to provide ammunition or replace one of the gunners.
SELECT FIGHTING POSITIONS IN BUILT-UP AREAS
4-70. Planning a defense of a platoon on urban terrain is similar to planning a defense in the countryside. Defensive positions must cover likely enemy avenues of approach, be mutually supporting, and provide cover and concealment. Use AT weapons on mounted avenues of approach. Machine guns cover dismounted approaches. AT4s and M203 grenade launchers work well in built-up areas. They are likely to hit enemy armored vehicles on the top or the side where armor is thin.
4-71. The method of defense (such as in-depth or linear) in the two areas is based on the same considerations. Use obstacles to canalize the enemy into kill zones or to deny key terrain. Orders must be very specific. Due to limited resources, use obstacles to channel, divert, or impede movement.
Position Locations
4-72. Select defensive positions in urban areas based on METT-TC. Often a squad occupies a building, but larger buildings may be defended by a platoon. Select buildings that—
Are well built. Concrete and steel construction is preferred.
Have strong floors to keep the structure from collapsing under the weight of debris.
Have thick walls and floors so that the enemy cannot shoot through roofs and walls to kill defenders.
Are constructed of nonflammable material. Avoid wood. Strong, fireproof construction provides protection from a nuclear attack as well as conventional firepower.
Provide good fields of fire. Buildings located next to vacant lots, alleys, and parks allow better fields of fire than buildings located next to other buildings.
Allow mutual support between the buildings. No building should be subject to attack without troops in another building being able to provide supporting fire.
4-73. Locate positions so as not to establish a pattern. Avoid obvious firing locations like church steeples (remember the elements of OCOKA) by—
Placing MK19s in the building where they can cover assigned sectors of fire and FPL.
Having the squad automatic riflemen and grenadiers cover enemy approach routes to the building.
Placing most rifle positions at or near ground level to have overhead protection and provide grazing fire on approaches.
Positioning some MK19 gunners higher to get a longer range. In addition, they can fire into areas that would be dead space for ground-level weapons.
Positioning AT4s (remember the back blast) so that they can fire down on tracked infantry fighting vehicles and wheeled scout reconnaissance vehicles.
Building Improvement
4-74. Change the outside of the building as little as possible, but inside the building—
Improve the fighting positions to provide overhead and frontal cover. Use firing ports to avoid enemy observation.
Cut or blow holes between rooms and floors so the soldiers can move quickly by a covered and concealed route to other firing positions in the building.
Barricade doors, halls, and stairs and take down fire escapes to keep the enemy out of the building.
Reinforce positions with sandbags, solid debris, beds, furniture, and so forth.
Screen or block windows and other openings. This keeps the enemy from seeing which windows are manned and throwing hand grenades into the building. When firing from the windows or holes in the walls, be sure the muzzle of your weapon does not protrude beyond the wall. This conceals the muzzle flash.
Wear armored vests, earplugs, and goggles for protection from dust and debris.
Other Considerations
4-75. Operating in urban terrain can be challenging, so consider the following:
The position locations are different, such as LAWs and AT4s go on the upper floors of the buildings (refer to FM 23-25 for the safety considerations).
The target acquisition is more difficult (such as, aiming stakes and layered fires are used extensively).
The CSS will center more on stockpiling materials in positions rather than on traditional resupply methods.
Primary communication must be by messenger, wire, or visual signs rather than radio.
The three dimensions of the enemy (aboveground, ground level, or below ground) may be in use. The enemy can easily isolate subordinate units.
ESTABLISH AND OPERATE AN OBSERVATION POST/LISTENING POST
4-76. OPs/LPs are selected locations from which to look and listen for enemy activity within an assigned area of observation. The OPs/LPs, the primary means of maintaining surveillance of an assigned avenue or a named area of interest (NAI), are positions from which MP observe the enemy and direct and adjust indirect fires against him. From the OPs/LPs, MP send SALUTE reports (Figure 4-4) to the commander when observing enemy activity. Use OPs/LPs for the following:
On key terrain when the surveillance of a specific area is required.
To prevent the enemy from a surprise attack on other friendly forces.
As an early warning security measure in a defensive perimeter.
For the monitoring of likely enemy avenues of approach, drop zones (DZ), and landing zones (LZ).

Figure 4-4. Salute Report
4-77. OPs/LPs can be performed either mounted or dismounted. A dismounted OP provides maximum stealth and has the greatest likelihood of remaining undetected by the enemy. The disadvantage of the dismounted OP is the time it takes to remount and move if necessary. If rapid movement or displacement is anticipated, the OP mounts or remains mounted.
4-78. A mounted OP/LP offers the advantages of rapid movement and protection because the enemy can easily detect them; however, it is potentially much less effective than a dismounted OP/LP.
SELECT OBSERVATION POST/LISTENING POST SITES
4-79. The platoon leader selects the general location for the platoon's OP/LP after analyzing METT-TC factors. From his analysis, he determines how many OPs and LPs to establish. He decides where they must be positioned to allow long-range observation along the avenues of approach assigned by his commander and to provide depth through the sector. Section and squad leaders select the exact positions for each OP/LP on the ground. The OP/LP must have the following characteristics:
Covered and concealed routes to and from the OP/LP. Ensure that MP can enter and leave their OP/LP without being seen by the enemy.
Unobstructed observation of the assigned area or sector. Ideally, the fields of observation of adjacent OPs/LPs overlap to ensure full coverage of the sector.
Covered and concealed positions that are effective. MP select positions with cover and concealment to reduce their vulnerability on the battlefield. MP may need to pass up a position with favorable observation capability, but with no cover and concealment, to select a position that affords better survivability.
Located where they will not attract attention. Do not locate OPs/LPs in such locations as a water tower, an isolated grove of trees, or a lone building or tree; these positions draw enemy attention and may be used as enemy artillery TRPs.
Located where they are not silhouetted. Avoid hilltops and position OPs/LPs further down the slope of the hill or on the side, provided there are covered and concealed routes into and out of the position.
MAN THE OBSERVATION POST/LISTENING POST
4-80. Ideally, an MP team should man an OP/LP to maintain team integrity. Position OPs/LPs down the slope or on a flank of a hill, if there are covered withdrawal routes. Each of the OP's/LP's fields of observation overlap those of adjacent OPs/LPs. MP may have to selectively clear fields of observation. Ensure that MP are not seen when entering and leaving an OP/LP. Equip OP/LP teams to observe the area, report information, protect themselves, and call for and adjust indirect fire. OPs/LPs on a defensive perimeter need secure communications. Use of field phones or secured radios are usually best. However, messengers can be used. OPs/LPs may use portable radios to supplement wire communication. One MP observes the area while a second MP provides local security and records and reports information. The third MP rests or provides backup security. The team members switch jobs every 20 to 30 minutes because the observer's effectiveness decreases quickly after that time. The observer needs—
Observation devices, such as binoculars, observation telescope, and NVDs.
A radio (this may be the only means of communication from a remote site like a DZ or an LZ).
POSITION OBSERVATION AND LISTENING POSTS
4-81. Place OPs/LPs either in a linear configuration or in-depth. Linear placement (Figure 4-5) allows the platoon to observe the assigned sector from several OP/LP sites, reducing the chance of the enemy entering the sector without being observed. This method works well when the platoon has been assigned a large sector with few avenues of approach or is in desert-type terrain. In-depth OP/LP placement (Figure 4-6) allows the platoon to observe the entire sector by placing OP/LP sites where the platoon can observe the most likely avenues of approach in the sector as well as along the sector flanks. This method works well when the platoon is assigned a sector with several avenues of approach or is in heavily wooded terrain. In-depth placement allows for redundancy in observation and better sector coverage.
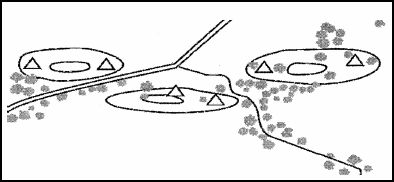
Figure 4-5. Linear OP/LP Placement
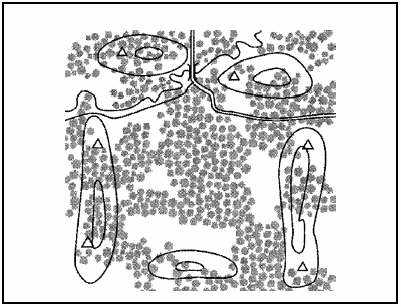
Figure 4-6. In-Depth OP/LP Placement
4-82. OP/LP team emplacement at night depends on METT-TC factors. The platoon leader places OPs/LPs close to the perimeter and within direct fire range of the defensive perimeter for protection. The team leader designates a specific location and primary direction of fire for the crew-served weapon. The OP/LP team builds a hasty-fighting position or a prepared-fighting position depending on METT-TC. The team leader designates a covered and concealed location behind OPs/LPs for the vehicle. The OP/LP team has a covered and concealed withdrawal route to the vehicle from the fighting position. The team camouflages the OP/LP and their vehicle while the gunner clears a field of fire and prepares a range card. The squad leader establishes communication with higher HQ and tells the team when and how to report. He tells them—
To be careful not to be drawn away by a small enemy element while the main element attempts to penetrate the perimeter.
When to pull back or under what conditions they can withdraw without his order.
4-83. The frequency of relief for the OP/LP team depends on the team's physical condition and morale, the weather, the number of troops available, and the next operation. The squad leader carefully plans how each soldier receives rest. When OP/LP team is part of a defensive perimeter, it—
Uses trip flares, noisemaking devices, and NVDs to detect the enemy.
Coordinates with the perimeter on the reentry procedures to the perimeter from the withdrawal route.
DEFEND A SITE
4-84. Vigilance is the watchword for local security. When the OPs/LPs detect enemy elements, they notify their superior who calls for indirect fire, if it is available. When the enemy's advance threatens the OP/LP, order the OP/LP to withdraw. As the enemy approaches platoon positions, have the platoon increase its volume of fire. The platoon leader determines if the platoon can destroy the enemy from its assigned positions. If the platoon leader determines that the platoon can destroy the enemy, the platoon continues to fight with the following actions:
The platoon leader or the FO continues to call for indirect fire as the enemy approaches. The platoon normally begins engaging the enemy at the maximum effective range. It attempts to mass fire and initiate them at the same time to achieve surprise. Long-range fire should disrupt enemy formations, channelize the enemy toward engagement areas, prevent or severely limit the enemy's ability to observe the location of friendly positions, and destroy the enemy as it attempts to breach tactical obstacles.
The leaders control fire using standard commands, pyrotechnics, and other prearranged signals. The platoon increases the intensity of fire as the enemy closes within range of additional weapons. Squad leaders work to achieve a sustained rate of fire from their positions by having buddy teams fire their weapons so that both are not reloading them at the same time.
The platoon and squad leaders consider the following when controlling and distributing fires:
The platoon leader initiates FPF as the enemy closes on the platoon's perimeter. The following actions occur at the same time:
- The automatic weapons fire along interlocking PDF or FPLs. Other weapons fire at designated PDF. The M203 grenade launchers engage enemy in dead space or against enemy attempts to breach the protective wire.
The platoon continues the fight with claymore mines and hand grenades.
The platoon leader requests indirect FPF in support of his positions, if applicable.
The platoon continues to defend until the enemy is repelled or until the platoon is ordered to disengage.
4-85. If the platoon leader determines that the platoon can not destroy the enemy, he—
NOTE: In any movement out of a defensive position, the platoon must employ all direct and indirect fire means available to suppress the enemy long enough for the platoon to move.
4-86. The platoon reorganizes after it has completed the initial battle with the enemy or relocated. The platoon positions key weapons, reestablishes security, provides first aid and prepares wounded soldiers for evacuation, and redistributes ammunition and supplies. The platoon relocates selected weapons to alternate positions if the leaders believe that the enemy may have pinpointed them during the attack and adjusts other positions to maintain mutual support. The platoon also reestablishes communication. It reoccupies and repairs positions and prepares for renewed enemy attack. The platoon repairs damaged obstacles and replaces mines and booby traps. When the platoon reorganizes, it performs the following actions:
The squad and section leaders provide ammunition, casualty, and equipment (ACE) reports to the PSG. Team leaders provide fuel status. The PSG consolidates the ACE reports, reviews the consolidated ACE report with the platoon leader, and forwards it to the company commander.
The platoon leader reestablishes the platoon's chain of command.
The PSG coordinates for resupply and supervises the execution of the casualty and EPW evacuation plan.
The platoon continues to improve positions. The platoon quickly reestablishes the OP/LP resumes patrolling as directed.
4-87. If the enemy gets through the FPF, repel it by close combat. If the perimeter is penetrated, move teams to block the penetration and cover friendly troops moving to alternate or supplementary positions. Even though the counterattack capability is limited, try to restore the perimeter. When the enemy is repelled—
Call for indirect fire on areas where the enemy is likely to regroup.
Keep the next higher commander informed throughout the conduct of the defense.
LAY HASTY PROTECTIVE MINEFIELDS
4-88. When possible, lay a hasty protective minefield as part of the unit's defensive perimeter. It can stop, delay, or restrict movement. MP often lay mines to restrict enemy movement near a defensive perimeter or at ambush sites. In the defense, platoons and squads lay hasty protective minefields to supplement weapons, prevent surprise, and give early warning of enemy advance. Hasty minefields must be covered by fire. Ensure that adjacent units are informed of the mine locations.
4-89. Platoons and squads must have permission from higher HQ to install hasty protective minefields. Higher HQ may, however, delegate approval authority to the company commander for emplacement of a hasty protective minefield. Requests for permission go through the normal chain of command.
4-90. If the company is not authorized mines in its basic loads, a special request may be needed. The enemy threat to the rear area requires commanders to issue mines as an additional protective measure. The M18A1 antipersonnel mine (claymore) and the M21 AT mine are the two mines most likely to be available to rear-area units for a hasty protective minefield. Refer to FM 20-32 and FM 21-75 .
4-91. MP generally will have claymores available to them, which is mainly a defensive weapon. However, the ways in which the claymore is used is limited only by the imagination. Plan the use of claymore mines to suit METT-TC. Emplace the mines—
To cover dead space not covered by FPF of crew-served weapons.
Outside the hand grenade range, but within the range of small-arms weapons.
Beside buildings or other sturdy structures in urban terrain.
4-92. MP record the exact location of the mines on DA Form 1355-1-R (Figure 4-7) when emplacing the minefield. This enables anyone to recover them. If possible, the unit should recover the mines before the unit relocates, and the same persons who emplaced them should recover them.
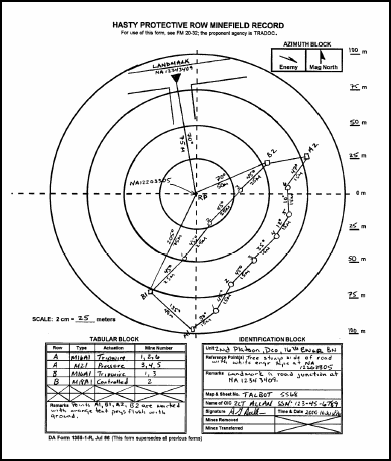
Figure 4-7. Sample DA Form 1355-1-R
PATROLS
4-93. MP are organized and equipped to conduct mounted operations. The primary offensive weapon system is the MK19. It is designed as a mounted or static position weapon. However, an MP platoon may conduct limited dismounted operations with its other organic weapons. Refer to FM 7-8 for more information about patrol operations, including organization, planning, and execution. In general, an MP platoon may be required to conduct reconnaissance and combat patrols.
RECONNAISSANCE PATROLS
4-94. Dismounted reconnaissance patrols are directed by higher HQ and conducted to gather detailed information on the enemy, terrain, specific NAIs, or avenues of approach. When executed as part of a screen or other security mission, a reconnaissance patrol can ensure the security of an OP/LP or the platoon's defensive perimeter. This is also referred to as a security patrol. Refer to Chapter 6 for area and zone reconnaissance.
COMBAT PATROLS
4-95. An MP platoon may conduct a combat patrol to establish an ambush on a dismounted enemy avenue of approach.
Ambush
4-96. MP elements, normally no smaller than a platoon, use an ambush along suspected enemy routes and elsewhere against Level II threats in the rear area. An ambush enables a small unit with light weapons to harass or destroy a larger, better-equipped unit. An ambush may be a surprise attack from a concealed position on a moving or temporarily halted target or an attack by fire only. A successful ambush requires the following:
Surprise. The platoon must seize and maintain control of the situation.
Coordinated fire. The platoon must deliver a large volume of fire into the kill zone, using individual and crew-served weapons, mines, demolitions, and indirect fire (if available), and isolate the kill zone to keep the enemy from escaping or being reinforced.
Control. Before, during, and after the ambush all elements must be able to communicate effectively with the platoon leader, primarily by using hand and arm signals.
4-97. The platoon leader organizes the platoon into assault, support, and security elements. An ambush is laid on an enemy's expected approach route. The platoon leader selects the site and members are positioned to provide—
4-98. A good ambush site restricts the enemy's movement to one flank by natural or man-made obstacles. Natural obstacles include cliffs, steep embankments, swamps, steep grades, sharp curves in the road, narrow trails, streams, and heavily wooded areas. Man-made obstacles can include mines, booby traps, and roadblocks. The ambush is configured to suit the—
4-99. To conduct an ambush, the platoon leader is positioned so he can best control the ambush elements, normally with crew-served weapons or the AT4, especially if the enemy has armor. The platoon leader—
Places a crew-served weapon to cover the left and right limits of the kill zone. These weapons must ensure that once an element is in the kill zone, it cannot leave it laterally.
4-100. The platoon leader initiates the ambush with a casualty-producing weapon, such as a claymore mine or a crew-served weapon. He ensures that there is a back-up method in case the primary means fails. The remainder of the platoon opens fire once the ambush has begun.
4-101. Most often, platoons will deploy a squad-size element for an attack on a single kill zone (a point ambush). If the company is deploying a platoon-size force to conduct a number of coordinated, related ambushes (an area ambush), the principles are the same. An area ambush works best where close terrain keeps enemy movement largely limited to trails or roads. For an area ambush—
Choose one central ambush site around which you can control and organize the outlying ambushes.
Select outlying ambush sites on the enemy's possible avenues of approach and escape from the central site.
Set up and maintain communication with all the outlying sites.
Assign the general locations of the outlying sites to the squad leaders. They will each set and conduct a point ambush.
Direct the squad leaders to let the enemy pass through the kill zones until the central ambush begins.
Provide specific instructions to the squad leaders in case the enemy detects an outlying site before the central ambush begins.
Ambush Types
4-102. There are three types of ambushes. They are the line and L-shaped ambush formations and the antiarmor ambush (refer to FM 7-8 for more information).
4-103. Line Ambush Formation . A line formation (refer to FM 7-8 for more information) is easy to control and is useful in all levels of visibility. The assault and support elements parallel the long axis of the kill zone to engage the enemy with flanking fire. The target may be so dispersed that it extends beyond the kill zone. Leaders must—
Position the assault and support elements parallel to the enemy's movement route (such as on a road or trail or at a stream).
Limit the kill zone to the size area that the ambush can cover with a great volume of fire.
Place obstacles (such as claymore mines or existing natural obstacles) between the kill zone and the ambush element to prevent counter-ambush actions.
Leave access lanes through the obstacles so the kill zone can be assaulted (if directed).
4-104. L-Shaped Ambush Formation . An L-shaped formation is useful on a straight stretch of a trail, road, or stream. It also works well at a sharp bend in a trail, road, or stream. The assault element is the long leg of an "L," paralleling the kill zone to provide flanking fire. The support element is the short leg, capping the end of the kill zone at a right angle to the assault element. The support element provides enfilade fire to interlock with fire from the other leg.
4-105. Antiarmor Ambush . The principles for an antiarmor ambush are the same as for an area or point ambush. MP are likely to encounter bypassed enemy armor in the rear area. The primary antiarmor weapon for MP is an AT4. This is a light antiarmor weapon with limited capability against medium and heavy armor vehicles. However, MP may be required to set up a hasty antiarmor ambush to destroy one or two light enemy armor vehicles. An antiarmor ambush is best performed by a platoon. The platoon leader positions the antiarmor weapons where they can engage the target from the rear, flank, or top. Multiple AT4s are used to ensure destruction. The platoon provides support and security.
CLEARING TECHNIQUES
HIGH-INTENSITY VERSUS PRECISION CLEARING TECHNIQUES
4-106. Precision clearing techniques do not replace other techniques currently being used to conduct building and room clearing during high-intensity combat. Specifically, they do not replace the clearing technique in which a fragmentation or concussion grenade is thrown into a room before US forces enter. Use precision room clearing techniques when the tactical situation calls for room-by-room clearing of a relatively intact building in which enemy combatants and noncombatants may be intermixed. They involve increased risk in order to clear a building methodically, rather than using overwhelming firepower to eliminate or neutralize all its inhabitants.
4-107. From a conceptual standpoint, standard high-intensity room-clearing drills can be thought of as a deliberate attack. The task is to seize control of the room, with neutralization of the enemy in the room the purpose. The fragmentation or concussion grenade can be thought of as the preparatory fire used before the assault. As in a deliberate attack against any objective, the assaulting element moves into position using covered and concealed routes. The preparatory fire is initiated when the assaulting element is as close to the objective as it can get without being injured by the enemy. The assault element follows the preparatory fire (fragmentation or concussion grenade) onto the objective as closely as possible. A rapid, violent assault overwhelms and destroys the enemy force and seizes the objective.
4-108. Compared to the deliberate attack represented by high-intensity room-clearing techniques, precision room-clearing techniques are more conceptually akin to a reconnaissance in force or perhaps an infiltration attack. During a reconnaissance in force, the friendly unit seeks to determine the enemy's locations, dispositions, strength, and intentions. Once the enemy is located, the friendly force is fully prepared to engage and destroy it, especially if surprise is achieved. The friendly force retains the options of not employing preparatory fire (fragmentation or concussion grenades) if it is not called for (the enemy is not in the room) or if it is inappropriate (there are noncombatants present also). The attacking unit may choose to create a diversion (use a stun-hand grenade) to momentarily distract the defender while it enters and achieves domination of the objective.
4-109. The determination of which techniques to employ is up to the leader on the scene and is based on his analysis of the existing set of METT-TC conditions. The deliberate attack (high-intensity techniques), with its devastating suppressive and preparatory fire neutralizes everyone in the room and is less dangerous to the assaulting troops. The reconnaissance in force (precision techniques) conserves ammunition, speeds up the clearing process, reduces damage, and minimizes the chance of noncombatant casualties. Unfortunately, even when well executed, it is very stressful and hazardous for friendly troops.
4-110. Certain precision room-clearing techniques, such as methods of squad and fire team movement, the various firing stances, weapon positioning, and reflexive shooting, are useful for all combat in confined areas. Other techniques, such as entering a room without first neutralizing the known enemy occupants by fire or explosives, are appropriate in only some tactical situations.
4-111. Generally, if an alerted enemy force that is determined to resist occupies a room or building, and if most or all noncombatants are clear, employ overwhelming firepower to avoid friendly casualties. In such a situation, use supporting fires, demolitions, and fragmentation grenades to neutralize a space before friendly troops enter.
4-112. In some combat situations, the use of heavy supporting fire and demolitions would cause unacceptable collateral damage or unnecessarily slow the unit's movement. In other situations, often during stability and support operations, enemy combatants are so intermixed with noncombatants that US forces can not in good conscience use all available supporting fire. At such times, room-by-room clearing may be necessary and precision room-clearing techniques are most appropriate.
PRINCIPLES OF PRECISION ROOM-CLEARING
4-113. Battles that occur at close quarters, such as within a room or hallway, must be planned and executed with care. Units must train, practice, and rehearse precision room-clearing techniques until each fire team and squad operates smoothly. Each unit member must understand the principles of precision room-clearing, such as surprise, speed, and controlled violence of action.
Surprise
4-114. This is the key to a successful assault at close quarters. The fire team or squad clearing the room must achieve surprise, if only for seconds, by deceiving, distracting, or startling the enemy. Sometimes stun grenades are used to achieve surprise. These are more effective against a nonalert, poorly trained enemy than against alert, well-trained soldiers.
Speed
4-115. This provides a measure of security to the clearing unit. Speed allows soldiers to use the first few vital seconds provided by surprise to their maximum advantage. In precision room clearing, speed does not mean incautious haste. It can best be described as a careful hurry.
Controlled Violence of Action
4-116. This eliminates or neutralizes the enemy while giving him the least chance of inflicting friendly casualties. Controlled violence of action is not limited to the application of firepower only. It involves a soldier's mind-set of complete domination. Each of the principles of precision room-clearing has a synergistic relationship to the others. Controlled violence coupled with speed increases surprise. Hence, successful surprise allows increased speed.
FUNDAMENTALS OF PRECISION ROOM-CLEARING
4-117. The ten fundamentals of precision room-clearing address actions soldiers take while moving along confined corridors to the room to be cleared, while preparing to enter the room, during room entry and target engagement, and after contact. Team members should—
Move tactically and silently while securing the corridors to the room to be cleared. Carry only the minimum amount of equipment.
NOTE: Rucksacks and loose items carried by soldiers tire them, slow their pace, and cause noise.
Arrive undetected at the entry to the room in the correct order of entrance and be prepared to enter on a single command.
Enter quickly and dominate the room. Move immediately to positions that allow complete control of the room and provide unobstructed fields of fire.
Eliminate the entire enemy in the room by fast, accurate, and discriminating fires.
Gain and maintain immediate control of the situation and all personnel in the room.
Confirm whether enemy casualties are wounded or dead. Disarm and segregate the wounded. Search all enemy casualties.
Perform a cursory search of the room. Determine if a detailed search is required.
Mark the room as cleared using a simple, clearly identifiable marking according to the unit SOP.
Maintain security and be prepared to react to more enemy contact at any moment. Do not neglect rear security.
COMPOSITION OF THE CLEARING TEAM
4-118. Execute precision room-clearing techniques by the standard four-man fire team. Because of the confined spaces typical of building- and room-clearing operations, units larger than squads quickly become unwieldy. When shortages of personnel demand it, conduct room-clearing with two- or three-man teams; four-man teams are preferred. Using fewer personnel greatly increases the combat strain and risks.
BREACHING
4-119. An integral part of precision room-clearing is the ability to gain access quickly to the rooms to be cleared. Breaching techniques vary based on the type of construction encountered and the types of munitions available to the breaching element. Techniques range from simple mechanical breaching to complex, specialized demolitions.
Shotgun Ballistic
4-120. A useful method of breaching is the shotgun ballistic breach for forced entry of standard doors. Use a 12-gauge shotgun loaded with buckshot or slugs to breach most standard doors quickly. When done properly, the shotgun breach requires only a few seconds. The two standard techniques of shotgun breaching are the doorknob breach and the hinge breach. When attempting either technique, the gunner approaches the door from an angle, avoiding standing in the area directly in front of the door. While holding the stock of the shotgun in the pocket of his shoulder, the gunner places the muzzle tightly against the door, and aims down at a 45-degree angle.
4-121. Doorknob Breach . For the doorknob breach, (Figure 4-8) the aim point is a spot halfway between the doorknob and the frame, not at the doorknob itself. The gunner fires two quick shots in the same location, ensuring that the second shot is aimed as carefully as the first. Weak locks may fly apart with the first shot, but the gunner should always fire twice. Some locks that appear to be blown apart have parts still connected that will delay entry. If the lock is not defeated by the second shot, the gunner repeats the procedure.
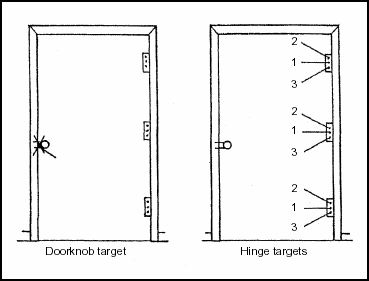
Figure 4-8. Aim Points for a Shotgun Breach of a Standard Door
4-122. Hinge Breach . The hinge breach technique is performed much the same as the doorknob breach, except the gunner aims at the hinges. He fires three shots per hinge—the first at the middle, then at the top and bottom (Figure 4-8). He fires all shots from less than an inch away from the hinge. Because the hinges are often hidden from view, the hinge breach is more difficult. Regardless of which technique the gunner uses, immediately after he fires, he kicks the door in or pulls it out. He then pulls the shotgun barrel sharply upward and quickly turns away from the doorway to signal that the breach point has been cleared. This rapid clearing of the doorway allows the following man in the fire team a clear shot at any enemy who may be blocking the immediate breach site.
WARNING Do not use small arms (5.56 or 7.62 millimeters) as a ballistic breach on doorknobs and hinges except as a last resort. It is unsafe and could result in death. |
4-123. Demolitions are often needed to defeat more elaborate barriers or to produce a desired effect to aid the initial entry.
Mechanical Breaching
4-124. Mechanical breaching is planned as a backup to a ballistic or explosive breach. Mechanical breaching is an assumed capability within all units. Taking the time to defeat weak barriers such as doors or windows by means of crowbars, saws, sledgehammers, battering rams, or axes is a decision that must be made based on the conditions of METT-TC.
Order of Movement
4-125. Clearing-team members must approach the breach point quickly, quietly, and in standard order. This approach preserves the element of surprise and allows for quick entry and domination of the room. The order of movement to the breach point is determined by the method of breach and intended actions at the breach point. The members of the fire team are assigned numbers 1 through 4, with the team leader normally designated number 3. If one member of the clearing team is armed with the squad automatic weapon (SAW) rather than an M16 rifle or carbine, he should be designated as number 4.
4-126. Ballistic (Shot Gun) Breach . The order of movement for a shotgun breach has the gunner up front, followed by the number 1 man, number 2 man, and then the number 3 man (team leader). After the door is breached, the gunner moves to the rear of the lineup and assumes the position of the number 4 man.
4-127. Explosive (Demolition) Breach . The order of movement for an explosive breach without engineer support is number 1, number 3 (team leader), number 2, and then number 4. The number 1 man provides security at the doorway. The number 3 man (team leader) carries the demolition charge and places it. The number 2 man provides security overhead, and the number 4 man provides rear security. After the demolition charge is placed, the team moves to covered positions and prepares to enter in the standard 1, 2, 3, 4 order.
4-128. Mechanical Breach . A suggested order of movement for a mechanical breach is the initial assault team in order, followed by the breach man/element. At the breach point the assault team leader will bring the breach team forward while the assault team provides local security. After the breach is conducted, the breach team moves aside and provides local security as the assault team enters the breach.
ENTRY CONSIDERATIONS
4-129. The entire team enters the room as quickly and smoothly as possible and clears the doorway immediately. If possible the team moves from a covered or concealed position already in their entry order. Ideally, the team arrives and passes through the entry point without having to stop.
4-130. The door is the focal point of anyone in the room. It is known as the fatal funnel , because it focuses attention at the precise point where the individual team members are the most vulnerable. Moving into the room quickly reduces the chance anyone will be hit by enemy fire directed at the doorway.
4-131. On the signal to go, the clearing team moves from covered or concealed positions through the door quickly and takes up positions inside the room that allow it to completely dominate the room and eliminate the threat. Team members stop movement only after they have cleared the door and reached their designated point of domination. The first man's position is deep into the far corner of the room. The depth of his movement is determined by the size of the room, any obstacles in the room such as furniture, and by the number and location of enemy and noncombatants in the room.
4-132. To make precision room-clearing techniques work, each member of the team must know his sector of fire and how his sector overlaps and links with the sectors of the other team members. Team members do not move to the point of domination and then engage their targets. They engage targets as they move to their designated point. However, engagements must not slow movement to their points of domination. Team members may shoot from as short a range as 1 to 2 inches. They engage the most immediate enemy threats first. Examples of immediate threats are enemy personnel who are—
CLEAR A SINGLE ROOM
4-133. Precision military operations on urbanized terrain (MOUT) room clearing is generally accomplished using a four-person team, consisting of three riflemen and one SAW gunner or breacher. Entry does not always require four personnel. If a specific room is to small or there are less than four clearing members due to attrition, the room may be cleared with less. However, never clear a room with less than two soldiers. If the leadership determines that the use of four-soldier teams is impractical for the situation, use the standard three-soldier team filling the numbers 1, 2, and 3 entry positions. The term point of domination refers to the two corners of the room assigned to the numbers 1 and 2 soldiers. These points allow the team to gain complete control of the objective. Each team member is assigned a different, but interlocking field of fire. This ensures mutual supporting fires. This type of entry is dynamic in nature. When completed with precision, this technique overwhelms the enemy and allows the team to move on to the next objective very quickly. When a room is cleared, the exiting procedure for leaving the room varies depending on the location of the entry point (either in the middle or at the corner of the room).
WARNING The muzzle of the clearing team's weapons should always be pointing wherever that soldier is looking. The clearing team should remain one foot away from all the walls to avoid injury due to bullets traveling down the wall (the path of least resistance). |
Stack Position
4-134. Once the approach to the room or building is completed, the team stacks (Figure 4-9) parallel to the outside wall. The number 1 soldier provides security on the entry point. This point is normally a door in a precision MOUT environment. The number 2 soldier provides security to the front of the team. The number 3 soldier (normally the team leader) is in the high-ready position. The high-ready position consists of the soldier placing the buttstock of the weapon in his shoulder pocket and raising the muzzle of the weapon from a 90-degree angle to a 45-degree angle. The number 4 soldier is in the low-ready position. The low-ready position consists of the soldier placing the buttstock of the weapon in his shoulder pocket and lowering the muzzle of the weapon to a 45-degree angle. The high- and low-ready positions aid in ensuring that the soldiers do not flag their fellow team members with their weapons during entry or clearing. A support element covers the teams from a distance, concentrating on the team's blind spots.
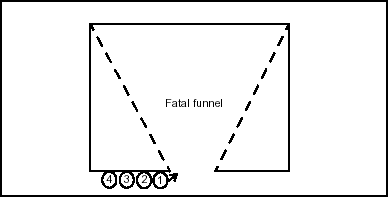
Figure 4-9. Stack
Initial Entry
4-135. When the situation allows (time, concealment, and so forth), it is important to ensure that each team member is prepared to enter the initial-entry point to the building before the assault. This is achieved while in the stack position. When ready, the number 1 soldier nods his head while maintaining security on the door. When soldier number 4 is ready, he squeezes the shoulder of soldier number 3 with the nonfiring hand. This action continues up the line. When the signal reaches soldier number 1, he silently counts to three and then enters the building with the rest of the team following. If someone inside opens the door before this sequence is completed, the team will immediately enter the structure.
Initial-Entry Breach
4-136. Figure 4-10, depicts the process of a nonexplosive breach from the standard stack. Soldier number 4 moves up to the side of the door that contains the locking mechanisms. When soldier number 3 gives the signal, soldier number 4 breaches the door (by shotgun, battering-ram, and so forth) and kicks it open. Soldier number 4 then moves back from the door to allow the rest of the team to enter. Soldier number 4 follows them into the room. Refer to FM 90-10-1 for shotgun breaching techniques.
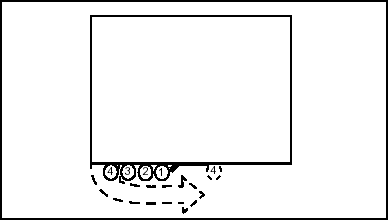
Figure 4-10. Nonexplosive Breach
Room Entry
4-137. Clear a room in the following manner when the entry point is located in the middle of the room:
Soldier number 1 (Figure 4-11) enters the room using the path of least resistance, (moves across the doorway, into the room, and does not make a turn around the doorframe) clearing the fatal funnel as fast as possible. The term fatal funnel is derived from the natural reaction of the enemy soldiers inside a room (the large end of the funnel) to focus on and fire at the doorway (the spout of the funnel). The rounds are funneled into the doorway from almost any position in the room. An attacker should never move slowly through (or stop in) the fatal funnel. Besides providing a silhouetted target to the enemy, these actions will slow the entry of the rest of the team (reducing supportive fires). The number 1 soldier's first responsibility (in this scenario) is to clear the bottom right corner. This soldier will not be concerned with the middle of the room unless a threat is located to his direct front as he enters the room. If the number 1 soldier assesses this threat as being capable of hindering his movement to the top right corner of the room (his point of domination), he may engage that threat in a manner that avoids losing momentum. If the door obstructs or partially obstructs the route, soldier number 1 pushes hard through it. This helps to dissipate any loss of momentum and knocks an enemy soldier off balance if he is hiding behind the door. Once the number 1 soldier visually clears the corner, he moves up the wall to his front, clearing it as he goes. The number 1 soldier stops at his point of domination. He then turns and begins a scan from the top left corner to 1 meter off the number 2 soldier's weapon, located in the bottom left corner in this scenario (number 1 has farther to go, soldier number 2 should be in position once number 1 arrives).

Figure 4-11. Number 1 Man, Middle-Door Entry
Soldier number 2 (Figure 4-12) enters the room immediately after the number 1 soldier enters. Soldier number 2, in this case, executes a hard left turn and moves in the opposite direction of soldier number 1. Soldier number 2's first concern is to clear the bottom left corner. Once this corner is visually cleared, he continues to clear up the left wall. Once soldier number 2 reaches this corner, he has reached the second point of domination. Soldier number 2 stops and scans from the top left corner to 1 meter off soldier number 1's weapon.
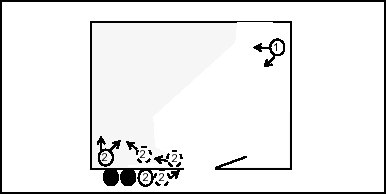
Figure 4-12. Number 2 Man, Middle-Door Entry
Soldier number 3 enters the room at the same time as the number 1 and number 2 soldiers (Figure 4-13). He moves his weapon down from the high-ready position, between soldiers number 1 and number 2 (using his height advantage, if it exists). Soldier number 3's first and primary concern is the middle of the room. If soldier number 3 enters the room quickly, effective supporting fires will be provided for the number 1 and number 2 soldiers as they clear the corners and move to their points of domination. Soldier number 3 begins with a point of aim (in this scenario) at the 11 o'clock position. He indexes his weapon down the opposite wall, while moving laterally (cross step) out of the fatal funnel, in the opposite direction of soldier number 2 (Figure 4-14). Soldier number 3 stops when out of the fatal funnel and begins to scan from 1 meter off soldier number 1's weapon to 1 meter off soldier number 2's weapon. Once one full scan is completed, soldier number 3 clears behind the door and then returns to scanning the room.
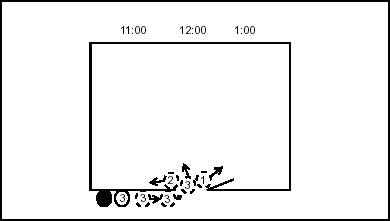
Figure 4-13. Number 3 Man, Middle-Door Entry
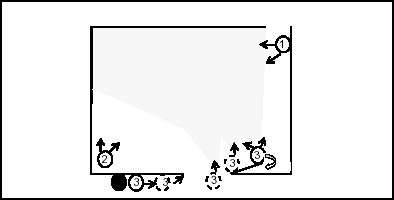
Figure 4-14. Number 3 Man, Middle-Door Entry
Soldier number 4 clears in the manner depicted in Figure 4-15 if the room is large enough for the SAW gunner or breacher to enter. He enters the room directly behind soldier number 3 and clears the fatal funnel as quickly as possible, moving in the opposite direction of soldier number 3. Soldier number 4's primary concern is the middle of the room. He begins with an overlapping point of aim at the 1 o'clock position and indexes his weapon down the far wall as he moves laterally towards the number 2 soldier. Soldier number 4 stops, once clear of the fatal funnel, and continues to scan from 1 meter off the number 2 soldier to 1 meter off the number 1 soldier.
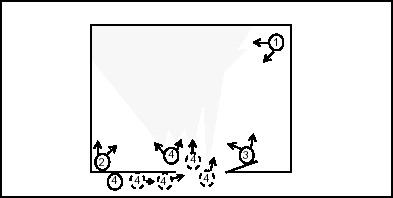
Figure 4-15. Initial Coverage
NOTE: The M249 or shotgun are not precision weapons. The number 4 soldier only engages when a clear shot at a confirmed combatant presents itself. The M249 is also very useful when the situation has degraded and heavier support is required. Leaders should train SAW gunners or breachers to be prudent in the use of their weapons in a precision MOUT environment.
Figure 4-16 shows the coverage area of each team member once they have reached their positions. The room can be visually cleared very quickly because it has been dominated in depth. This is especially important considering the fact that most rooms contain furniture (hiding positions) and many are irregular shaped. A majority of the room is covered at all times, should an undiscovered or wounded enemy soldier attempt to engage the clearing team. The bottom right corner is the only area not effectively covered by fire at this time. Both the number 1 and number 3 soldiers cleared this area during the initial entry. If the number 1 soldier or number 3 soldier determines that a threat might exist in this corner, it is soldier number 3's responsibility to provide security in this area.
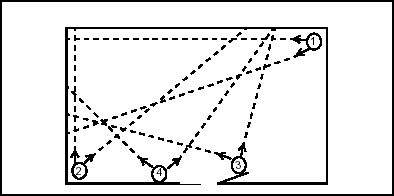
Figure 4-16. Number 1 Man, Center-Door Entry
Communication
4-138. When the room has been dominated, communication is required between the team members in order to clear the room quickly and move on to the next objective. Whether scanning the room or providing security on possible threats (open doors, unidentified persons, or dead or wounded enemy), the team members cannot shift their gaze around the room to ascertain the current situation. To solve this problem, the team leader calls for a status when he determines that no immediate threat exists. This status or situation report (SITREP) consists of each clearing team member's current condition and any possible threat in his sector. The number 1 soldier states his situation to the rest of the team. The number 2 soldier follows with his report and so on down the line. The team leader absorbs all this information and then gives directions based on the information. The conversation should be at a level that each team member may hear, but no louder. If soldier number 1 fails to sound off, soldier number 2 states his status. If soldier number 1 is down, the team will know it. If soldier number 1 fails to sound off due to a mental lapse, he may give a SITREP once the other team members have given theirs. An example of this type of communication is as follows:
4-139. This scenario is based on a one-room dwelling objective for simplicity. Once the subjects are secured, they are extracted them from the dwelling by a support team and taken to a secure area where their status can be determined and first aid may be rendered, if needed. Meanwhile, the clearing team continues its mission. This would include (dependant on the mission) searching the room for any hidden threats, contraband, or enemy information or equipment. If there are multiple rooms to clear, the TL either directs one of the clearing team members to remain in the room as security (such as "soldier number 1 security") or (if available) calls for a reserve, who is positioned outside of the room, to enter the room and secure the subjects inside it until the building is cleared. The team would then be free to move on to the next room.
Corner-Door Position
4-140. When an entry point is located in the corner of the room, slight modifications are made to the middle- door entry method. The number 1 soldier (Figure 4-17) enters through the path of least resistance and clears the path to the corner to his front and stops. This is soldier number 1's point of domination. Soldier number 1 does not continue on to the next corner, as in the middle-door method, because it would take to long for him to reach this location. The number 2 soldier makes a hard turn around the doorframe and clears the path to the corner diagonally opposite of soldier number 1. This is soldier number 2's point of domination. The number 3 and number 4 soldiers use the far corner of the room as the 12 o'clock reference point (Figure 4-18). All other actions in the room are the same as the middle-door method.
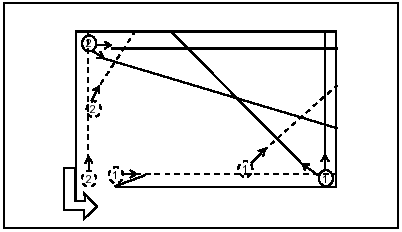
Figure 4-17. Number 1 and 2 Man, Corner-Door Entry
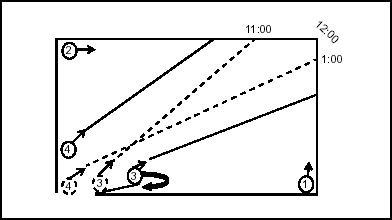
Figure 4-18. Number 3 and 4 Man, Corner-Door Entry
Rules
4-141. No matter what the room configuration, there are a few rules that should always be adhered to. These rules include the following:
Know that it does not matter if the person in front of you goes the wrong way when entering the room. Just go the opposite way as the soldier in front of you and it will work out.
Enter the room as quickly and smoothly as possible and do not waste movements. Remember smooth is fast. The faster each team member picks up its initial point of aim, the more difficult it becomes for the defender. Even a prepared defender can be caught off guard.
Clear (do not stop) the fatal funnel. The number 3 and number 4 soldiers are especially prone to stopping in the funnel.
NOTE: Ensure that the doorway is completely cleared before assuming a final position in the room.
Stay focused. Never stop scanning your sector for targets unless—
- You identify a threat in your sector. This threat could be an open door leading to an uncleared room, a person in the room other than one of the team members, an obstacle that cannot be cleared visually from your position, or anything else that you may determine as a threat. If such a threat exists, provide security for the team by covering it with your weapon.
Ensure that if you fall down while entering the room, you stay down and do not move. Do not get up until a team member places his hands on you and lifts you up. If a team member arbitrarily gets up, he may become an impediment to the rest of the team's movements. Another possibility is that he would rise into the path of a team member's bullet.
Rehearse communication. As stated above, speed and momentum will make or break this type of action. Poor communication techniques will slow your building clearing to a crawl.
Ensure that each team member knows the procedures for each position. After the first room is cleared in a multiroom objective, a team member may find that he is in a different position in the stack than when the assault started. The team leader should always attempt to avoid being the number 1 soldier when entering a room. This can normally be accomplished, but in some situations it will be unavoidable.
Ensure that you never enter a room alone. Two personnel are the minimum room-clearing team. If two soldiers are entering a room (either due to the size of the room or attrition), they should assume the number 1 and number 2 soldiers' positions.
Ensure that you never flag a fellow team member. Flagging is defined as pointing your weapon at or sweeping your weapon across another team member. Muzzle awareness, at all times, is imperative.
CLEAR A CONNECTED ROOM
4-142. Clearing multiple rooms using connecting doors is preferable to using hallways. This action reduces exposure and compliments speed and momentum.
4-143. Figure 4-19 shows a team that has just cleared a room using the corner-door technique. The door to the adjacent room is open, providing the number 2 and number 4 soldiers the opportunity to partially clear the second room. If a threat is identified in the adjoining room, it may be engaged from the cleared room. Once this firing has stopped, the SITREP will be restarted if necessary.
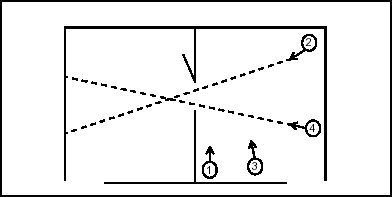
Figure 4-19. Partial Clearing of a Connected Room
4-144. Figure 4-20 shows how the team stacks in preparation for entry into the next room. When the team leader declares the first room clear, the team will automatically stack on the entrance to the next room. In this example, crossing the doorway would not only place a soldier in the fatal funnel unnecessarily, it would also mask the cover fire of the number 4 soldier. Therefore, soldiers number 1 and 3 stack to the left of the door and soldier number 2 stacks to the right. Soldier number 4 remains in a position to cover a portion of the adjacent room. In this example, soldier number 1 remains the first soldier to enter the room. He awaits a squeeze from soldier number 3. This squeeze acts as a signal to soldier number 1 that at least one other team member is behind him and is ready to enter the room. This form of communication reduces the time spent discussing the order of entry and eliminates the need for a verbal queue (an early warning for enemy soldiers inside the room) to enter the room. If the door had been positioned elsewhere in the room, it could have just as easily been the number 2 or number 3 soldier entering the adjacent room first.
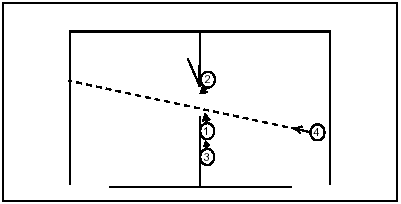
Figure 4-20. Team Stack
4-145. Figure 4-21 depicts the position of the team members while clearing the second room. The soldiers' original numbers are left in place to demonstrate the difference in the positions from the first room. As the team enters the room, soldier number 4 lowers his weapon and moves quickly to the entry point to prevent flagging any team member. He then moves up to the entrance and follows the rest of the team into the next room.
Figure 4-21. Team Members' Positions
4-146. Figure 4-22 depicts a closed door to the adjacent room. A closed door is considered locked in all cases when a breacher is present (this is assuming the breacher has the means available to defeat the lock). Once the other team members are stacked, the breacher moves to the door and breaches it on the hand signal of soldier number 3. Soldier number 4 then steps back in order to clear the path for soldier number 2 (the third soldier to enter the room). If no breaching equipment is available, a quick attempt to open the door, from the side may be made. If the door is locked, kick it open. However, this should be the last choice for defeating a locked door. Kicking generally requires more than one attempt to defeat the lock. After the first attempt, the breacher's chances of drawing fire through the door are significantly increased.
Figure 4-22. Team Positions When the Door to the Adjacent Room is Closed
NOTE: Do not attempt to open the door by hand. If the door is locked, this action will alert any enemy soldiers inside of the room of your intentions and possibly expose the breacher to fire through the doorway.
4-147. Figure 4-23 depicts the team preparing to enter the next room or a hallway. Soldier number 1 moves to a position just inside the doorway. He would have had security on the doorway from his original point of domination. The other team members stack to the left, remaining just inside the doorway. Soldier number 1 is now in the position to partially clear the next room or hallway. The team enters the room the same way as described in the initial coverage.
Figure 4-23. Stack Variation
CLEAR A FLOOR
4-148. When clearing a single-floor complex, the principles discussed in single- and connecting-room clearing are used. The only added features are the hallways and an additional squad, when available, to combat attrition. Figures 4-24 through 4-28 depict the sequence of events in a floor-clearing mission.
4-149. Figure 4-24 gives an example of a two-squad (four teams, plus HQ element) assault force, preparing to clear a floor. The first and second squads are stacked on adjacent opposite walls in the hallway. The first squad prepares to enter or clear the first room on their side. Soldier number 1 (first squad) is continually providing security on the door to his direct front. The second squad halts before exposing itself to the open door in front of the first squad. The second squad's number 1 soldier provides security on the first doorway to his direct front. If no entry point to his direct front exists, soldier number 1 provides security down the hallway. Soldier number 2 (second squad) provides security on the second doorway to the front of the first squad. Soldier number 3 (second squad) provides security on the door to the direct front of the first squad. He lifts that security when the first squad begins to enter that room. The SAW gunners in both teams provide security down the hallway. The HQ RTO (not depicted) provides rear security.

Figure 4-24. Clearing a Floor
4-150. In Figure 4-25, the first squad clears the first room and moves into the second adjoining room. As the second room is cleared, soldier number 3 calls shot and engages an enemy threat in the next room. The B team of the first squad moves into the first room after the A team begins to clear the second room. The B team awaits permission from the A team leader to enter the second room. The HQ SAW gunner picks up the hallway security. The second squad has not moved from their original position. A team should never move past an uncleared room. In this case, the second squad will not receive a room clear signal from the first squad until the first squad reaches and clears the third room. This is because entry points interconnect the rooms on this side of the hallway. These entry points should be used in lieu of the hallway, whenever possible.
Figure 4-25. Clearing Adjoining Rooms with Hallway Security
4-151. In Figure 4-26, the first squad has cleared the first three rooms. In this example, one soldier from the B team has been detached to secure the first room, a second has been left in the second room to secure the noncombatant, and a third is securing a noncombatant and a downed enemy soldier in the third room. Soldier number 1 (first squad) remains inside the doorway and provides security on the entry point of the second room to the second squad's front. Soldier number 2 provides security on the third room to second squad's front. The second squad receives the all-clear sign from the first squad (radio, thumbs-up, or hand and arm signals) and moves to their first-room entry point.
Figure 4-26. First Squad Clearing a Room with Hallway Security
NOTE: If there are not enough personnel available to leave security in cleared rooms (especially in multilevel clearing), disarm and secure all combatants and noncombatants using handcuffs or flex cuffs.
4-152. If more than one floor is involved, leave a two-person security team on each floor while the building is cleared. In this instance, each room must be systematically recleared once the building is secured. A marking system (such as chalk or chemical lights) must be implemented in order to identify the rooms that have been cleared.
4-153. In Figure 4-27, the second squad clears all three rooms on their side of the hallway. The second squad was forced to clear each room by using the hallway as an access. In this example, the second squad's B team would not follow A team into the room. When the room is cleared, the first member in the B team stacks and (when instructed) enters in order to relieve the A team of security responsibilities. Once this takes place, A team is free to exit the room and move down the hallway to the next room.
NOTE: Before the team exits the room into the hallway, the lead team member announces that the team is about to exit the room. They should wait for permission to come out into the hallway.
4-154. Once the second squad has finished clearing their side, the number 1 soldier provides security on the next uncleared room on the right (first squad) side. The first squad receives the all clear signal and then moves up to the next room. Both B team SAW gunners continue to provide security down the hallway.
Figure 4-27. Second Squad Clearing Rooms
4-155. Figure 4-28 depicts the events that take place once the building has been cleared. Two SAW gunners are dispatched to each end of the hallway for security. The rooms containing noncombatants or enemy personnel are searched first (mark them to indicate that they have been searched). Once this is completed, it is usually best to remove all of the combatants and noncombatants encountered during the clearing operation (using a small detachment) along an extraction route that is covered by a support element. The support team escorts the noncombatants to a designated holding area to determine their status, and then searches the remaining rooms.
Figure 4-28. Events After Building is Closed
CLEAR A STAIRWAY
4-156. When multilevel structures are encountered, stairs become an added obstacle that will require maneuver (Figure 4-29). One of the more dangerous stair situations that a team is likely to encounter is a stairway with a turn between floors. Besides the blind spot at the turn, these stairways often have a loft that overlooks the bottom portion of the stairway. If the team is ascending, the number 1 soldier (as always) provides security to his direct front. Soldier number 2 secures the top row of stairs. Soldier number 3 secures the loft area. If a loft area does not exist, soldier number 3 secures the top of the second row of stairs. If the team is descending, each soldier has the same area of responsibility, except that the bottom of the stairway is secured, as opposed to the top.
Figure 4-29. Clearing Stairs
CLEAR BLIND SPOTS
4-157. When a blind spot is encountered (such as stairs or a sharp corner), it can be cleared with a technique known as cutting the pie (Figure 4-30). The soldier clears the dead space by slicing it up into pieces and then clearing one piece at a time. By doing this, the soldier exposes only a very small portion of his frame to any enemy combatants, while placing himself in a position to methodically clear the dead space.
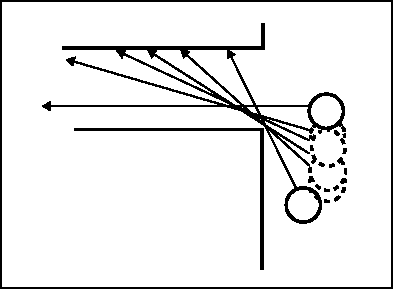
Figure 4-30. Cutting the Pie
SECURE PERSONNEL
4-158. The clearing team secures and identifies all personnel found in a room or building that is being cleared or searched. Until identified, (which will not normally occur during the clearance of the building) they approach noncombatants in the same manner as combatants. They do not assume that the frail old man in civilian clothes, cowering in the corner, presents no threat. On contact, the soldier that first indexes his weapon onto the individual orders the individual to his knees, with his hands on his head, and his fingers interlocked. This soldier stays out of arms reach at all times. Do not allow the unidentified individual near any exits. The individuals will remain in that position, with security present, until the building or room has been cleared. When it is time to secure the individual, the soldier that has been providing security does all the talking. In a slow, loud (but calm) voice, the soldier gives short, easy to understand, instructions to the individual, such as "look at me," "sit up straight," and so forth. This talk has a dual purpose. It—
Gives directions that helps in securing the individual and calms him down.
Keeps the individuals attention oriented on him and not on the second securing soldier.
4-159. As the first soldier talks to the individual, a second team member unholsters his pistol for close-in work. The second soldier approaches the individual from a blind spot, grasps the middle three interlocked fingers, and places a knee in the middle of the individual's back. Once the individual is under control, the second soldier holsters the pistol and secures the hands of the individual behind his back. If there are numerous individuals to secure and there will be several minutes before they can be exfiltrated from the building, these individuals can be placed on their knees and tilted forward so that their foreheads are against a wall. Their bodies should be at such an angle that their heads support most of the weight. If the prisoner attempts to get up, he will fall to the floor. This position enables a few soldiers to watch several prisoners. If an enemy soldier becomes engaged and the combatant does not appear to be conscious, it must be determined whether the individual is deceased or not. The body should be approached in the same manner as described above. If a kick does not gain a response, a simple eye gouge or sternal rub should identify whether the combatant is indeed dead. It is always best to secure the hands of the individual before applying an eye gouge or sternal rub. Beware of the enemy soldiers playing opossum .
TRAINING FOR MASTERY
4-160. It is obvious that the techniques described above will work best in an environment that has quick- thinking and intelligent soldiers. If the above techniques are practiced using the crawl, walk, and then run method, squads will find themselves catching on very quickly. When the one-room technique is mastered, everything else will fall into place. As teams work together, they will come up with their own systems of signaling, security, and change up in positions. The clearing of a building will be one smooth flow. The platoon leader starts training with single rooms outlined in engineer tape. This system allows for ease in critiquing, and all personnel will be able to observe and learn from the positive and negative performances of each team. The only building layout that cannot be reproduced by tape is a multilevel building (due to the presence of stairwells). Once the platoon is proficient in the one-room technique, the platoon leader moves to connecting rooms outlined in engineer tape. He continues this process until a complete floor in a real building can be cleared smoothly. Once multilevels are covered, he adds simulated breaching, furniture, and combatant or noncombatant scenarios. Once this type of training is completed, an assault team should have the base knowledge required to overcome specific situations that are not covered in this chapter. The platoon leader remembers that this is a perishable skill. As time passes, new platoon members must be integrated into this training and older members must be retrained.
|
NEWSLETTER
|
| Join the GlobalSecurity.org mailing list |
|
|
|