

CHAPTER 4
OPERATION AND FUNCTIONS

This chapter discusses normal operation and function procedures for the Dragon in the man-portable mode. (For a detailed discussion on the operation of Dragon support equipment, refer to TM 9-1425-484-10.)
4-1. INSPECTION
Inspection of the Dragon by the gunner is limited to visual inspection for physical damage. The inspections and checks are performed by the gunner before placing the Dragon into operation. During offensive operations, they are performed before leaving the assembly area. During defensive operations, they are performed as part of the gunner's fighting position preparation.
NOTE: The gunner should use TM 9-1425-484-10 to perform PMCS.
a. Inspection of the day tracker.
b. Inspection of the night tracker.
c. Inspection of the round of ammunition.
4-2. CARRYING POSITIONS
The Dragon can be carried using either the long-distance carry or the short-distance carry.
a. Long-Distance Carry. The Dragon gunner normally carries the round and tracker separately. This is especially true for long-distance moves such as road marches or cross-country travel or when contact is not likely. Carrying options 1, 2, and 3 in Figure 4-1 are used for long-distance travel.
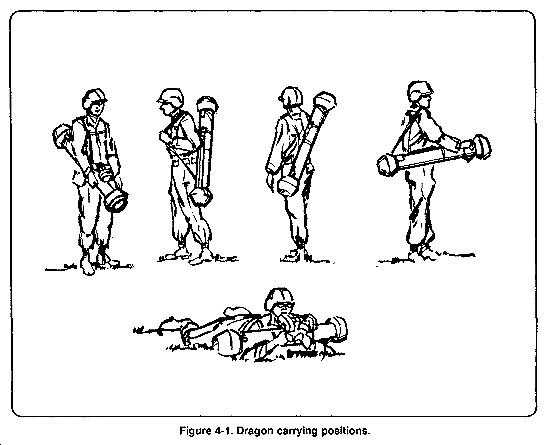
b. Short-Distance Carry. The gunner can carry the Dragon with the tracker mated to the round for short distances. When using this type of carry, the gunner must keep the forward protective shock absorber lens covers in place until the use of the weapon is anticipated. The protective lens covers prevent possible damage to the tracker lens and keep foreign objects out of the launcher. Carrying options 4 and 5 shown in Figure 4-1 can be used with the round and tracker mated. These carrying options should be used only when firing is likely, because the weapon system is in a ready-to-fire configuration.
4-3. PREPARATION OF THE ROUND FOR FIRING
Improper or careless handling of the round can damage the components and cause the missile to malfunction when launched. If there is any reason to believe the missile has been damaged, the round must be returned to the responsible ammunition personnel for inspection and disposition.
NOTE: If the night tracker is to be used, a before-operations check must be conducted IAW TM 9-1425-484-10.
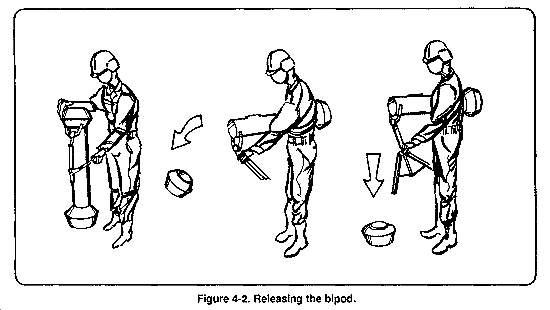
a. Releasing the Bipod. Unsnap the bipod retaining strap (A, Figure 4-2). Push the bipod forward until resistance is met. Then, snap off the forward shock absorber. Ensure that the desiccant bag, attached to the forward shock absorber, is not lodged in the launch tube (B, Figure 4-2). While still holding the round, depress the bipod friction lock. Push the bipod legs downward to number 4 or 5, then release the friction lock (C, Figure 4-2).
b. Selecting a Firing Position. A firing position is selected that best meets the situation, but for training, use the sitting position. (See paragraph 4-4.) Any one of the four positions may be used: sitting, kneeling, standing supported, or prone.
|
CAUTION: Do not lift the tracker using the shock absorbers as handles. They might tear off. |
c. Removing the Tracker (Day or Night) From the Carrying Bag or Rucksack. Open the carrying bag or rucksack. Grasp the tracker by the telescope barrel or by the trigger mechanism and remove the tracker. Remove the connector cover from the electrical connector on the tracker. Secure the cover to the hook-pile tape on the forward shock absorber. Remove the connector cover from the round.
|
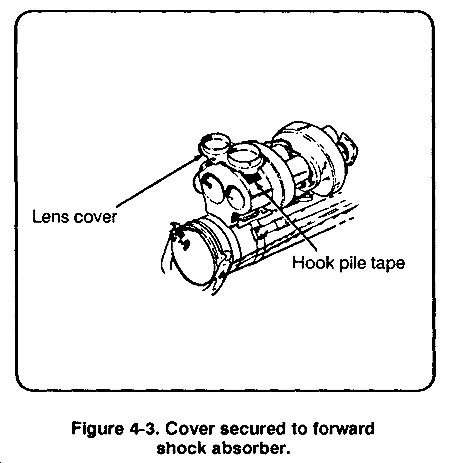
CAUTION: Do not touch the lenses. They can be damaged by touching with the fingers. |
d. Removing the Lens Cover. Secure it on top of the forward shock absorber. Make a visual inspection of the lenses for damage or obstruction (Figure 4-3).
NOTE: If using the night tracker, make sure the ACTUATOR switch is in the ON position.
|
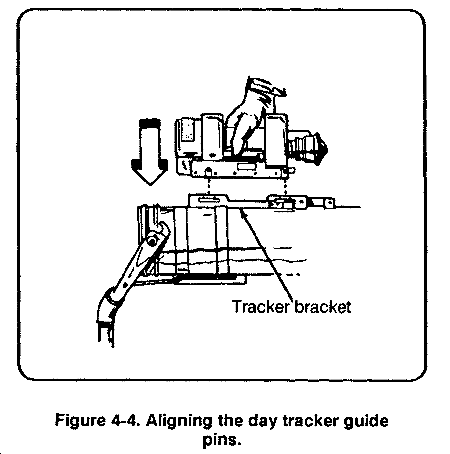
WARNING: Be careful not to press the safety and trigger while mating the tracker to the round. |
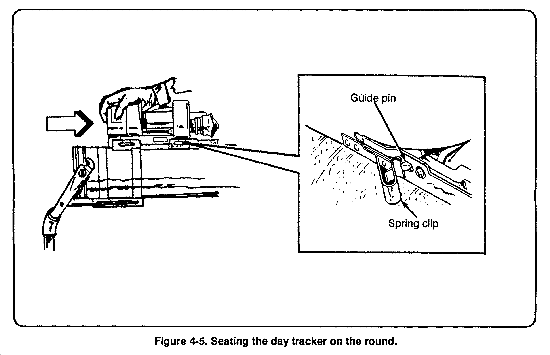
e. Mating the Tracker (Day or Night) to the Round. Assume the firing position and put the round on the shoulder. Place the tracker guide pins in the slots of the tracker bracket guide rails (Figure 4-4). (For illustration, the day tracker is used. However, the procedure is the same as for the night tracker.) Slide the tracker firmly to the rear. Use both hands, until the spring clip locks the guide pin in place (Figure 4-5). If the tracker does not mate, notify your squad or section leader.
f. Adjusting for Height and a Level Sight Picture. Look through the sight to see if the sight picture is level. Adjust the bipod friction lock and the foot adjust to obtain a level sight picture (Figure 4-6).
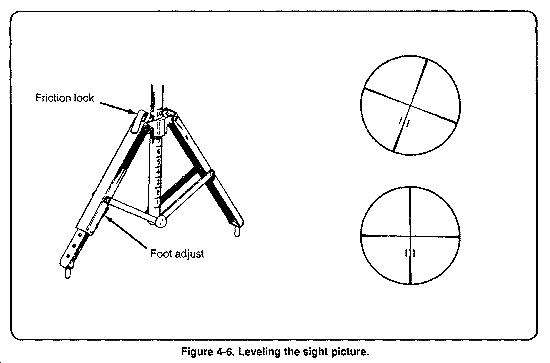
NOTE: Failure to have a level sight picture (plus or minus 6 degrees) results in the missile receiving bad commands from the tracker. The missile will be erratic and impact on the ground.
4-4. FIRING POSITIONS
The Dragon can be fired from any one of the four basic firing positions: sitting, standing supported, kneeling, or prone. A modified sitting or standing supported position can be used when the M175 mount is mounted on the machine gun tripods, M3 or M122. A detailed description of these firing positions can be found in Chapter 7.
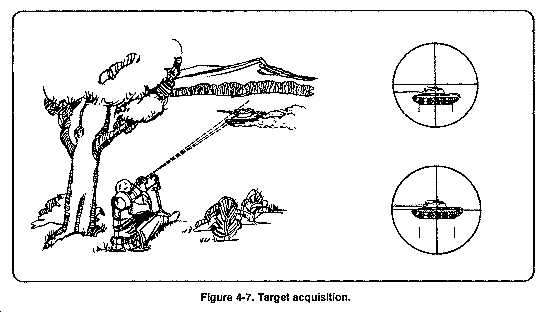
4-5. TARGET ACQUISITION AND EVALUATION
After the gunner acquires his firing position, he sights through the tracker to acquire the target (Figure 4-7). The target must be evaluated to determine whether or not it is within range and engageable. The gunner adjusts his sight picture (by moving the launcher) to place the target within the stadia lines. (See Chapter 3.)
a. Acquire and track the target IAW Chapter 3.
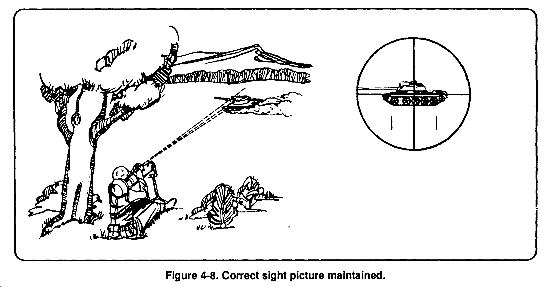
b. To fire the weapon, push the safety plunger in with the thumb of the right hand, depress and hold the trigger, and maintain the sight picture until impact (Figure 4-8). When engaging a moving target, make adjustments by moving the upper portion of the body left or right for azimuth and up or down for elevation.
NOTE: Excessive or jerky movement of the tracker while the missile is in flight may cause you to miss the target. Track the target for about two seconds before trigger squeeze to establish a smooth tracking rate during missile flight.
c. Ignore the missile when it appears in the sight picture. Do not try to fly the missile. Keep the cross hairs on the target--let the tracker guide the missile.
4-6. MISSILE FLIGHT AND CONTROL
As the missile leaves the launch tube, the infrared flares begin to operate, and the command-link wire is dispensed from the missile. The missile fins fold out and lock into place. The safety and arming device sequence is completed after the missile has traveled about 65 meters (Figure 4-9).
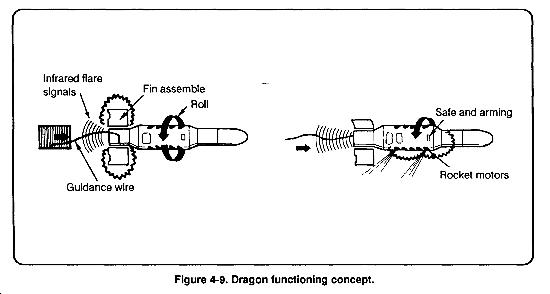
a. The tracker electronics compares the missile position with the gunner's LOS. Then, it sends the position information to the missile electronics through the command-link wire.
b. The missile electronics generates correction commands based on missile position information received from the tracker. The missile electronics either stores the commands until the missile rolls to a proper position for rocket motor firing, or fires the rocket motors, as commanded, to correct the missile's position to the gunner's LOS.
c. Acceleration and missile position corrections are accomplished by rocket motor firings. The gunner keeps the cross hairs on the selected aiming point on the target until missile impact.
d. To fire a second round, the tracker is removed from the launcher when missile flight ends. The gunner releases the spring clip at the rear left side of the tracker support assembly and slides the tracker forward and lifts it clear of the support. The expended round will now be destroyed and discarded according to unit SOP. The gunner either prepares another round or secures the tracker and any extra rounds and prepares to displace on order.
4-7. FAILURE TO FIRE
A failure to fire is when the missile does not leave the launcher when the trigger lever bar is depressed. The gunner immediately resqueezes the trigger lever bar and continues to track the target for 15 seconds. If after 15 seconds the missile has not fired, the gunner announces "Misfire," releases the trigger lever bar, and carefully feels near the tracker battery. If the tracker battery is hot, the gunner performs hangfire procedures; if it is cold, the gunner performs misfire procedures.
a. Hangfire Procedures (Combat Only).
(1) Remove the tracker from the round and place the round on the ground away from the firing site. Keep the round pointed toward the enemy advise soldiers near you of the failure to fire.
(2) Obtain a new round and mount the tracker on the new round.
(3) Acquire the previous target and continue with the mission.
NOTES: 1. If the Dragon is operated by a two-man team, the assistant gunner secures a new round.
2. The procedures in Note 1 detail actions that a gunner can take in an ideal situation. However, the tactical situation, which normally is a moving armored vehicle closing on your position within 1,000 meters, will probably dictate leaders to take other actions to preserve forces; for example, an emergency action SOP to cover the event.
b. Hangfire Procedures (Training Only).
|
WARNING: Keep the round pointed downrange. |
NOTE: When firing tactical missiles on a training range, wait five minutes before performing hangfire procedures.
(1) Notify the range officer or NCOIC that you have experienced a hangfire.
(2) Remove the round from the shoulder and place it flat on the ground. Ensure that the bipod legs are pointing to the side, with the round pointing downrange.
(3) Move away from the position.
(4) The range officer or NCOIC clears all personnel within 50 meters of the round and notifies the EOD.
c. Misfire Procedures.
(1) Loosen, then re-mate the tracker to the round.
(2) Track the target and try to fire again.
(3) If the round fails to fire again, carefully feel near the tracker battery.
(4) If the battery is still cold, remove the tracker from the round. Place the round on the ground away from the firing site. Keep the round pointed toward the enemy; advise soldiers near you of the misfire.
(5) Mount the tracker on another round and continue with the mission.
(6) If the new round also fails to fire, carefully feel near the tracker battery. If the battery is cold, the tracker is probably defective.
(7) If another tracker is available, replace the tracker and continue with the mission, using previously unfired rounds.
NOTE: See note under hangfire procedures (combat only).
4-8. DRAGON RESTORED TO CARRYING CONFIGURATION
A Dragon round that was prepared for firing but is no longer required can be moved in either one of two ways: the long-distance carry or short-distance carry. To use the long-distance carry, the gunner performs steps 1 and 2 below. To use the short-distance carry, the gunner only performs step 2 below.
STEP 1. Remove the tracker from the round.
- Replace the tracker lens cover.
- Next, remove the tracker from the round, and replace the connector cover on the tracker and round.
- Return the tracker to its carrying bag or rucksack.
STEP 2. Restore the round to the carrying configuration.
- Replace the connector cover.
- Replace the forward shock absorber.
- Set the round in an upright position with the rear shock absorber resting on the ground.
- While lightly pushing down on the bipod, press the bipod brace toward the round to lift it out of the locking slot.
- Once the bipod brace is unlocked, push down on the bipod until the upper part of the bipod that attaches to the round is parallel with the muzzle of the launcher.
- Align the cutout portion of the forward shock absorber with the bipod at the launcher muzzle.
- Push down on the shock absorber while lowering the bipod against the round.
- Ensure the upper part of the bipod engages the shock absorber.
- Retract the bipod legs and secure them to the round with the retainer strap.
- Lift up on the forward shock absorber to ensure it is secure. The round is now in a safe-to-carry configuration.
4-9. ADVERSE WEATHER CONDITIONS
The Dragon can operate in all weather conditions, providing the gunner can see the target.
NOTE: The Dragon temperature is the round's temperature. For example, if it is removed from a vehicle whose inside temperature is 45 degrees, the round will be 45 degrees, even if the outside temperature is 32 degrees.
a. Cold Weather. Check the optical surfaces and all mechanical devices for proper operation before deployment. Ensure no ice or snow has formed on the tracker components. Never operate the Dragon in temperatures lower than minus 25-degrees Fahrenheit.
b. Hot Weather. Provide as much shade or cover as possible to avoid subjecting the round and tracker to prolonged direct sunlight. Never operate the Dragon in temperatures above plus 145-degrees Fahrenheit.
|
NEWSLETTER
|
| Join the GlobalSecurity.org mailing list |
|
|
|