

CHAPTER 6
DISTRIBUTION OPERATIONS
Section I
HOSE LINE DISTRIBUTION
GS DISTRIBUTION
In areas where DS water systems are not capable of providing enough water supply, GSUs provide this capability. Purified water is introduced into the water distribution system from purification points located onshore and offshore. Water enters the system through the base terminal storage facility where it is distributed to other terminals within the COMMZ and forwarded into the corps rear area by the TWDS. Water is moved forward from the corps rear area into the division and brigade support area by the SMFT. These two 432GS distribution systems will be discussed in more detail below.
TWDS
The TWDS is intended for operation by a water supply company or tactical water distribution team. The system consists of quick-laying fabric water hose lines, pumps, and fittings and can pump up to 600,000 GPD. The system is packaged with all items of equipment needed to lay 10 miles of hose line. The mission of the tactical water distribution team is to lay, operate, and retrieve the TWDS. These teams normally augment a water supply company to supplement that unit's bulk water distribution capability in a GS role. The TWDS transports potable water across level terrain for distances up to 10 miles. Water may be stored in two 20,000-gallon collapsible fabric tanks, chlorinated and distributed to users, or used to supply PWS/DS. The following is an explanation of how each functional group contributes to the operation of the entire system.
Operate the hose line pumps in one of three modes: manual, electric manual, or electric automatic. In the manual mode, you control engine speed by manual movement of the throttle knob. Engine speed can be adjusted from a minimum of 1,000 RPM to a maximum of 2,500 RPM. In the electric manual mode, engine speed can be adjusted across the same range by manual movement of the speed control on the pressure regulator. In the electric automatic mode, engine speed is automatically adjusted by an electric speed control governor that is actuated by changes in water pressure at the pump suction port. During normal operations, the pump discharge pressure is 150 ±5 psi when pump suction pressure is above 20 psi. When pump suction pressure falls to 20 psi or less, the speed control governor reduces engine speed. At a suction pressure of l0 psi or less, engine speed is reduced to idle (1,000 RPM) to prevent possible collapse of the suction line and damage to the unit. Similarly, if pump suction pressure rises above 120 psi, engine speed reduces to idle to prevent pump discharge pressure from exceeding 155 psi. This prevents possible hose line damage due to excessively high pressure.
The TWDS is designed so that the lead pumping station can be operated in the manual or electric manual modes while the downline boost pumping stations can be operated in the manual, electric manual, or automatic modes after the initial startup. The lead pumping station must be constantly manned during TWDS operation while the boost pumping stations operating in the electric automatic mode require only periodic monitoring and refueling. At a minimum, a crew must service each of the boost pumping stations every three hours while the TWDS is operating. If one of the boost pumping stations fails while unattended, the TWDS continues to operate at a reduced capacity.
When any pumping station is operated in the manual or electric manual modes, monitor for low suction pressure or high discharge pressure. Low suction pressure can result from improper spacing of the pumping stations; an obstruction, pinch point, or break in the upline hose line; a closed upline valve; or a disabled upline pump.
Filling a storage bag/tank may also cause a temporary loss in suction pressure to a downline pumping station. High discharge pressure can result from high suction pressure, a closed downline valve, or a pinch point or obstruction in the downline hose line. If pumping station suction pressure falls below 10 psi or if discharge pressure rises above 155 psi, manually reduce engine speed to idle until you identify and correct the reason for the improper condition.
Prime the pump at the lead pumping station before starting. Start the pumps at the downline boost pumping stations after the water column arrives from the lead or upline pumping station. It takes the advancing water column approximately 20 minutes to travel two miles. If a boost pumping station pump does not start when the water column arrives, close the butterfly valve at the suction port on the pump to prevent the arriving water column from rushing through the pump and creating a turbine effect which can damage the pump impeller. If this situation develops, monitor the upline pumps for an increase in discharge pressure above 155 psi. If the discharge pressure exceeds this limit, manually reduce engine speed to idle until you start the downline boost pump, or bypass the boost pump and allow the water column to proceed to the next downline boost pump. If discharge pressure still exceeds 155 psi, the upline pumps must be shut down and restarted when the downline pump becomes operational.
The lead pumping station is equipped with lengths of rigid-walled, wire-reinforced suction hose for connecting to the water source (PWS/DS). This hose does not collapse at low suction pressure. Each pumping station is equipped with a check valve installed in the discharge line. This check valve closes and prevents water from flowing back through the pump in the event of pumping station failure. A gear-actuated butterfly valve is installed in the suction and discharge lines. Close these valves to isolate and bypass the pumping station from the hose line.
SITE AND ROUTE SELECTION
Prior to installing TWDS equipment, you must thoroughly study the terrain. Determine a general route for the hose line and general locations for the pumping stations, storage assemblies, and distribution points from examination and comparison of maps, photographs, and charts. Some elements to be considered in selecting a route and installation sites for TWDS are:
- Whether TWDS will operate independently or as part of a large system.
- The assigned mission for TWDS (issue, distribution, or storage).
- Expected length of time TWDS will be required to operate.
- Elevation differences and distances TWDS will encounter along its route.
Organize a ground reconnaissance prior to installation of TWDS to determine exact locations for pumping stations, storage assemblies, and distribution points. If possible, site locations must be near or parallel to existing roads to ease transportation, assembly, inspection, maintenance, and disassembly of the system. Avoid routes along the banks of streams, marshes, ponds, gullies, ravines, or other areas subject to flooding. Whenever possible, the hose line is laid out on firm, dry, level ground that allows easy access and is not subject to flooding. Minimum requirements for selecting the route are a sketch of the proposed hose line route, odometer distances, and enough topographic information (surveying altimeter elevations) to establish relative altitude at various points along the hose line route. Use the following guidelines to gain maximum effectiveness for installation and operation of the system:
- The route must be direct and present a minimum number of obstacles and obstructions.
- A route parallel to a secondary all-weather road is preferable to one along a heavily traveled road.
- If roadways do not exist or cannot be used, select a route that is accessible to vehicles laying the hose line.
- Plan to locate a junction of two hose line lengths at installation sites for each boost pumping station and storage assembly.
- Keep security precautions in mind. Use natural camouflage whenever possible and avoid routing hose lines through populated areas.
In selecting pumping station installation sites, determine the location of the lead or first pumping station by location of the water source. Space pumping stations at two-mile intervals, assuming that the route is reasonably direct and the terrain is level. However, a substantial rise or fall in elevation along the hose line route may require adjustment of standard spacing intervals as follows:
- If the next downline pumping station is substantially higher in elevation than the upline pumping station, shorten the distance between them.
- If the next downline pumping station is substantially lower in elevation than the upline pumping station, lengthen the distance between them.
Adjustments to spacing between pumping stations (due to elevation change) assure that water pressure is maintained within optimum operational range. Under normal conditions, TWDS delivers water to the suction port of each boost pumping station at a pressure of 20 psig. When suction pressure falls below 20 psig, boost pumping stations are designed to begin reducing speed when operated in the electric automatic mode. Therefore, if an upline pumping station is substantially lower than the next downline station and the elevation difference has not been offset by spacing adjustments, suction pressure at the downline pumping station may fall below 20 psig and cause that pump to slow down. This, in turn, will cause remaining downline boost pumping stations to slow down, seriously degrading overall performance of the TWDS.
After you plot locations of pumping stations, check the ground profile for any sharp declines in elevation along the hose line route. An excessive drop in elevation significantly increases the pressure of water as it flows downhill. If pressure builds to 225 psi, the hose line can rupture and equipment failure results. Therefore, when the ground profile indicates a sharp elevation drop along the route, install a pressure-reducing valve in the hose line. To determine the location of the pressure-reducing valve, refer to the ground profile and the outline in TM 5-4320-303-10. If elevation continues to drop excessively beyond the first pressure-reducing valve installation point, install a second pressure-reducing valve in the hose line.
In selecting a site for the storage assemblies, keep in mind you may not need the storage assemblies depending on the TWDS mission. Also, the storage assemblies must be installed near the junction of two 500-foot lengths of hose line. When selecting a site for installation of the distribution points, remember that, depending on the TWDS mission, the distribution points may not be required and the distribution points can only be installed in conjunction with a storage assembly.
TWDS INSTALLATION
Installing the 10-mile segment consists of installing a 6-inch, hard-walled suction hose to connect the lead pumping station and the water source; installing road-crossing guards and aerial suspensions as required; laying the hose line; and, if required, installing the pressure-reducing valve. Depending on the route selected for the hose line, the results of pressure loss/gain calculations, and the intended mission of the TWDS, the road-crossing guards, aerial suspensions, and pressure-reducing valve may not be required.
If one or all of these items need to be installed, transport the equipment to its respective installation site so that installation can occur in conjunction with the hose line-laying operation.
Install the hose line by first connecting the leading end of the upper length of the hose line to the butterfly valve on the discharge hose assembly at the lead pumping station using the victaulic coupling attached to the leading end of the hose line length. The hose is then flaked from the rear of a moving truck. Manually move the hose to a secure position. Connect the 500-foot lengths of hose line using victaulic couplings on the leading end of the hose line lengths. At every other connection, install a swivel joint. To install the swivel joints, use the victaulic coupling on the leading end of the hose line length and an additional victaulic coupling to connect the swivel joint to the trailing end of the next hose line length. When a predetermined the truck moves forward along route, the hose flakes out of the flaking boxes and is laid out manually behind the truck. As the hose flakes out, pick it up and move it to a secure position 5 to 10 feet from the roadway. Straighten any bends or kinks in the hose line. Restrain the hose manually until the first 50 feet of hose is in place. After 50 feet of hose is in position, the weight of the hose will hold the line in place. The assistant driver must observe the hose-laying operation at the rear of the truck. He tells the driver to speed up, slow down, or stop the truck depending on the needs of the line walkers straightening and repositioning the hose line. Also, he must observe the hose as it flakes out of the flaking box for catching or binding. The recommended hose laying speed is approximately 3 MPH. The optimum speed of any hose-laying varies depending upon the terrain, available manpower, and how far the hose must be moved between the point at which it flakes off the truck and its final secured position. Do not leave the hose exposed on any roadway or track that is traveled by other vehicles. Retain empty flaking boxes, tailgates, and breakaway for repacking and redeployment. Connect subsequent truck loads of hose line to hose line already laid. Connect hose line to each boost pumping station, storage assembly, and, if required, the pressure-reducing valve as those installation sites are reached.
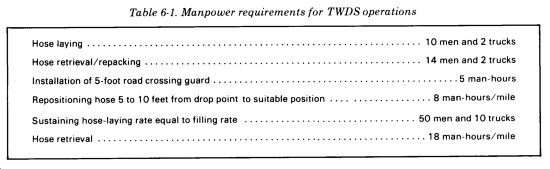
The overall manpower requirements for a hose line-laying or retrieval operation are shown in Table 6-1. A minimum of two trucks with crews of five men each, alternately laying hose and reloading the trucks, is recommended for efficient hose laying. A crew consists of one supervisor, one truck driver, one assistant driver, and two line walkers. The assistant driver observes the actual flaking of the hose from the flaking boxes and the work of the line walkers. The assistant driver tells the driver to vary the speed of the truck according to the speed and needs of the line walkers and also stops the operation if there is a problem with the hose. A minimum of two line walkers follow behind each truck, straightening kinks or bends in the hose line. The line walkers are also responsible for picking up the hose line and moving it away from the roadway.
If the hose line must be laid across a roadway or railroad, the hose is laid under an existing bridge or through an existing culvert. Pull the leading end of the hose through the culvert using a rope. If no bridge or culvert is usable, construct expedient roadway crossings using the roadway crossing guards provided. The hose line must never be buried unprotected because the weight of the fill can collapse the hose, and any sharp rocks in contact with the hose can cause a puncture. Nail a plank to the bottom of the guard for greater hose protection. If it is necessary to lay the hose under a railroad bed, dig a tunnel beneath the gravel of the railbed (if possible). Do not lay the hose directly in the trench or railbed because the shifting gravel can gradually damage the hose.
Aerial suspensions are the most effective and readily installed means of crossing streams and deep gaps. Use suitably protected and secure suspension crossings in these cases. Make adequate provision to permit free passage of the displacement ball. For wide crossings, build a suspension bridge to provide a flat deck or floor to support the entire length of the hose and eliminate bends which occur if suspension cables were used. If available, install the hose line on an actively used bridge. If the hose line is installed on an actively used bridge, secure it outside the bridge structure. Crossings must not interfere with the passage of ships and must provide clearance from flood stages. Each hose line suspension kit provides adequate material for one 300-foot wide crossing or two shorter crossings. Materials for the construction of suspension towers are not included in the kit and must be obtained locally. When constructing suspension towers for spans up to 75 feet, short towers constructed of 4- by 4-inch timber or similar material can be used as long as adequate clearance is ensured. For spans over 75 feet, construct towers of 6- by 8-inch timber or similar material to provide adequate clearance and strength. Anchor all suspension towers by guy lines to pickets provided in the suspension kit.
If required, install the pressure-reducing valve at the location determined by calculations. To install the pressure-reducing valve, disconnect hose line lengths at the site designated for installation of the pressure-reducing valve by removing the victaulic coupling. Position the pressure-reducing valve between the hose line lengths with the directional arrow on the valve pointing in the direction of the water flow. Always place a pressure-relief valve on the pressure-reducing valve, on the upline side.
TWDS DISASSEMBLY AND PACKING
Disassembly of the 10-mile hose line segment requires the same tools, equipment, and personnel used to install the hose line. The displacement and evacuation kit and the packing kit will be required to pack the hose line segments into their flaking boxes. If a forklift is not available, the lifting sling will be required to load, unload, and stack the flaking boxes.
The hose line is evacuated by passing the displacement ball through the hose by air pressure. Place the ball receiver on one end of a 500-foot segment and place the pneumatic coupler on the other end. The 250-cfm air compressor supplies pressurized air (80 to 90 psi), forcing the ball through the hose and displacing any residual water.
Once the ball arrives at the receiver, the air compressor is shut off; pressurized air is released by opening the coupler; and the ball is removed from the receiver.
Compress the hose line by replacing the ball receiver with an end cap on the 500-foot hose segment that has just been evacuated. Install the ejector assembly on the pneumatic coupler and connect it to the air compressor. After 10 minutes of operation, the hose line will be collapsed. Remove the pneumatic coupler and ejector and place another end cap on the hose segment. This hose segment is now ready for recovery.
If properly compressed, the pullboards will not be needed to reflake the hose. Reflaking the hose is accomplished in the reverse order of flaking.
Section II
SMFT DISTRIBUTION
SMFT
Transportation medium truck companies use 5,000-gallon tanks for line haul of potable water from corps GS PWS/DSs to the division and brigade support area PWS/DSs in arid operations. DSUs use 3,000-gallon tanks for unit distribution to large consumers. The following describes the installation, operation, and repair of the SMFT.
Installing Tie-Down Kit
Prior to mounting the SMFT on a semitrailer, install the tie-down kit. Procedures for doing this are as follows.
Clear the truck bed of splinters, protruding nails, and other foreign objects that could puncture or chafe the tank.
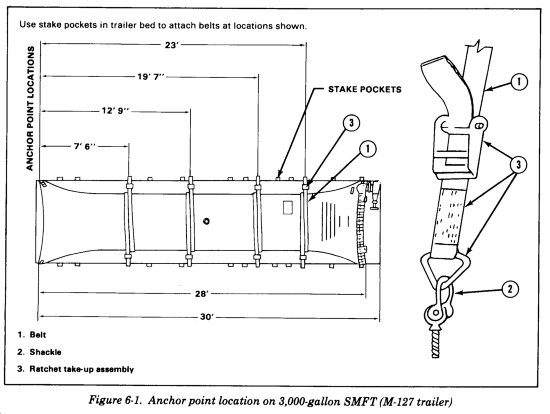
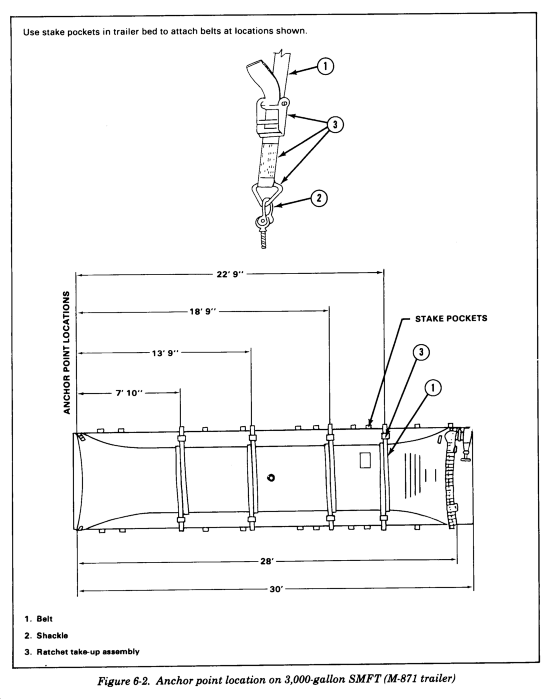
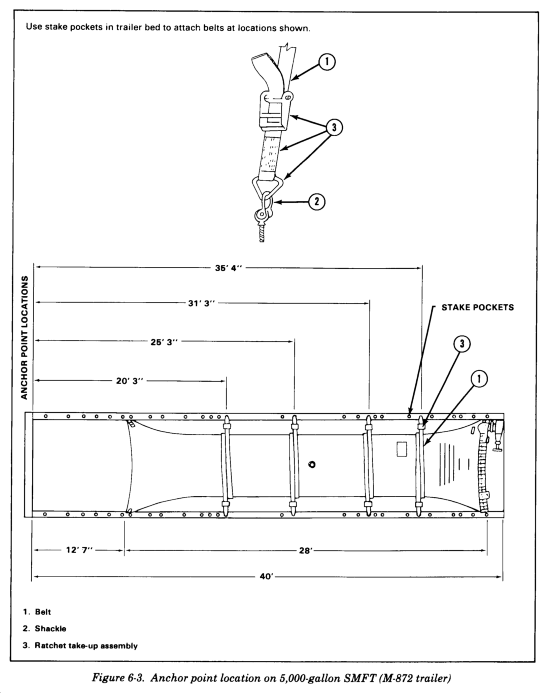
Secure the tank to the trailer with a four-belt tie-down kit. There are two anchor points per belt to provide maximum support to the tank during transport. Each anchor point consists of a 5/8-inch-diameter eyebolt, two retaining plates, one 5/8-inch hex nut, and one lock-washer assembly.
Locate the anchor points as shown in Figure 6-1, Figure 6-2, and Figure 6-3 and install as shown. Recheck the area for sharp objects. If the surface is rough and jagged, it will be necessary to place plywood or a tarpaulin for the tank to rest on.
Attach the ratchet take-up mechanism to each anchor point as shown in Figure 6-1, Figure 6-2, and Figure 6-3 by placing the clevis of the ratchet take-up mechanism over the eyebolt anchor point. Join them with the clevis pin.
Lay the tie-down straps crosswise to the length of the semitrailer bed and at a slight diagonal. Accurately center the belts between the eyebolts. Let the remaining portion of the belts lie over the side of the trailer. Ensure that each strap is not twisted and is lying flat. The area is now prepared for tank unfolding.
Installing Tank or Trailer Bed
Do not walk unnecessarily on the tank, and only do so with soft-soled shoes. Do not drop sharp objects on the tank, such as wrenches or fittings,
Using a lifting device such as a forklift or crane, take hold of the sling assembly by its lift straps and place the tank on the semitrailer in such a manner that the tank will unroll towards the rear of the trailer. The tank end should be near or touching the trailer bulkhead.
Remove the straps from the buckles on the sling assembly, and unroll and unfold the tank over the tie-down straps. Visually inspect the tank while unrolling it. Position it so that when it is full, the ends or sidewalls of the tank will not rub against the forward bulkhead or hang over the sides of the trailer. Remove the sling assembly from under the tank, and place it in the trailer stowage compartment.
Filling the Tank
Before using the tank for the first time or after prolonged storage, flush the tank with superchlorinated water. Then proceed as described here.
Inspect the tank body for any punctures or tears. Inspect the fittings and components for evidence of damage or missing bolts or gaskets. Check to see that the tank is properly installed. The trailer bed should be level to prevent the tank from rolling.
Tighten all the bolts in the fittings. Use 70 ± 5 foot pounds torque on the 1/2-inch-diameter bolts in the end clamps. The rubber in a new tank will cold-flow under the pressure and the torque will drop. Retorque tanks periodically until the rubber has set and the torque does not drop appreciably. If leakage is noted at the fittings or if the tank is subjected to hard usage, retighten the bolts.
Attach the pressure gauge to the filler/discharge valve. Open the pressure gauge valve.
Before starting to fill the tank, expel air from both the tank and the supply hose. After purging air from the tank, close the 4-inch tank inlet valve. After purging air from the supply hose, turn off the supply pump.
The free ends of the hold-down belts should now be brought over the top of the tank and down the other side through the ratchet take-up mechanism attached to the truck bed. Slide the ends of the belt through the slot in the ratchet assembly. Fold the end of the belt back, and hold manually until one turn has been taken on the roll-up spool.
Now attach the supply hose to the tank fill/discharge valve. You should have one soldier on the pump, one soldier controlling the hose, and one soldier visually inspecting the tank. Start the pump, and open the valve at the fill/discharge port on the tank.
No pressure will show on the pressure gauge until the tank is 2 feet high. From that point on, periodically check the exact tank pressure by closing the 4-inch filler/discharge valve on the tank to obtain a precise tank pressure reading. Bring the supply pump to idle while you are making this reading.
Continue filling the tank after the pressure reading has been taken until you reach 3 psi. At 3 psi, stop filling the tank.
Tighten the belts to the maximum possible with one hand on the ratchet handle. Use your hand to steady the ratchet assembly so that the belt will wind flat and true. If the tank ends are not level with the floor of the trailer, level the tank by releasing the ratchet on one side of the tank and then taking up the slack by tightening the opposite ratchet. After tightening each ratchet assembly, see that the ratchet handle has dropped securely into the locking mechanism. When all ratchet assemblies have been tightened uniformly, the pressure in the tank may increase approximately 1/2 psi.
Continue filling the tank while monitoring the pressure. The closed system of filling a tank allows the pressure to build up very rapidly as the tank reaches full capacity. Fill the tank to a final minimum pressure of 4 psi and a maximum of 6 psi.
After filling the tank to the correct pressure, shut off the filling hose valve. Next shut off the tank filler/discharge valve. Finally idle down and stop the pump. Disconnect the filling hose. You will experience some loss of water between the valves at this point. The water between the valves is under pressure: low pressure if the filling hose is shut off first as just described and high pressure if the tank valve is shut off first.
Close the pressure gauge valve and remove the gauge. The gauge is needed only to fill the tank. Keep the gauge in the cab of the tractor so it does not become damaged.
The tank is now properly filled and secured for transportation. Regularly check for tight belts. They should be tightened at least every two hours. The tank must be totally full or totally empty to be transported.
Emptying the Tank
Empty the tank by gravity or by the use of a pump. Both procedures are described below.
Empty by gravity. The end of the tank opposite the valve must be at least 8 inches higher than the valve end of the tank for complete tank emptying. The valve corner should be the lowest level of the tank. Use grade elevation or portable ramps under the trailer wheels. Connect one end of the 4-inch hose to the filler/discharge port. Connect the other end to the line or receiving container. Open the filler/discharge valve on the tank to start the flow. After the tank is empty, close the filler/discharge valve and remove the hose. Unstrap the tank and roll it up to allow the transporter to backhaul if necessary.
Empty by pump. You will need at least two soldiers for this operation: one to operate the tank valve and one to operate the pump. Connect one end of the 4-inch hose to the tank filler/discharge port. Connect the other end of the hose to the suction side of the pump. Open the tank filler/discharge port. Start the pump and idle up. Determine the emptying rate by the capacity of the pump. After the tank is empty, idle and shut down the pump. Close the filler/discharge valve, and disconnect the 4-inch hose. The tank must be rolled up and secured to the bulkhead when not in use, even if the trailer is not being used to backhaul. If left flat and empty, the tank and valve will be damaged during movement.
Repairing the Tank
Repair the tank with sealing clamps or wooden plugs. Both repair procedures are described below.
Repairs with sealing clamps. Repair small slits, tears, or cuts (not to exceed 6 1/2 inches in length) with sealing clamps. The size of the damaged tank area (opening) needing repair governs the size of the clamp used to affect a tank repair. The following criteria are furnished as guidance in selection of appropriate size clamps:
It may be necessary to increase the size of the tears slightly in order to be able to insert the bottom plate of the sealing clamp.
Slip the bottom plate of the sealing clamp through the hole or tear and rotate it until it is centered and parallel to the tear.
Center the top plate of the sealing clamp on the threaded shank and directly over the bottom plate.
Tighten the wing the wing nut to securely clamp the tank wall between the two plates. Tighten enough to stop the leak. If pliers are used, do not exert extreme tightening that might strip the threads of the clamp stud or that might damage the tank fabric.
Repairs with wooden plugs. As an immediate, temporary measure in emergencies, use the furnished wooden plugs for expedient sealing of small holes or punctures. Select the plug size needed to fit (seal) the tank puncture, insert in the hole, and twist clockwise until the fit becomes quite snug and the tank leak is either stopped or slowed to the greatest possible degree. Follow-up regular inspection should be made of the inserted plugs, as possible tightening of the plugs may be necessary if the leak resumes. Later, if the leak is not totally stopped, the use of a small sealing clamp may become necessary. The size of hole or tear will determine the size of wooden plug to be used as follows:
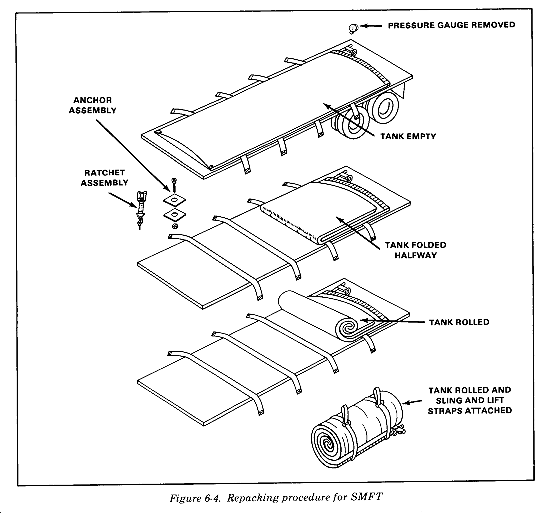
Figure 6-4 illustrates repacking procedures. Use the following procedures to pack the tank.
Begin by removing the pressure gauge. Disconnect and remove the hold-down kit ratchets. Hang the loose ends of the belts over the sides of the trailer.
Fold the tank almost in half lengthwise. Lay the top fold of the tank down approximately 1 foot shorter than the bottom fold. The ends will then be equal when the tank is rolled.
Begin to roll the tank. It is necessary that the first roll be circular and tight, otherwise the tank will be hard to roll and make a large package. After the first few uses, the tank will become more flexible and easier to roll and unroll.
Slip the sling around and under the tank if the tank is to be transported to a new trailer or placed back into its shipping box. The sling is located in the semitrailer stowage compartment.
Roll and store the belts, pressure gauge, ratchets, bolts, and plates in a prepared area, preferably in a box in the nose of the trailer. Pad the pressure gauge to avoid damage.
FAWPSS components are lightweight and air transportable. They can be delivered by LAPES, parachute airdrop, or sling load delivered by Army utility helicopter. The FAWPSS is also transportable by ocean cargo ship, rail car, standard military 5-ton cargo truck, or a semitrailer. The drums weigh approximately 4,500 pounds full and 300 pounds empty and are shaped like the 250-gallon drum. The remaining paragraphs of this section describe procedures for inventory, assembly, operation, and disassembly of the FAWPSS.
Before performing the procedures described in this section, ensure that all components for one entire FAWPSS are on hand.
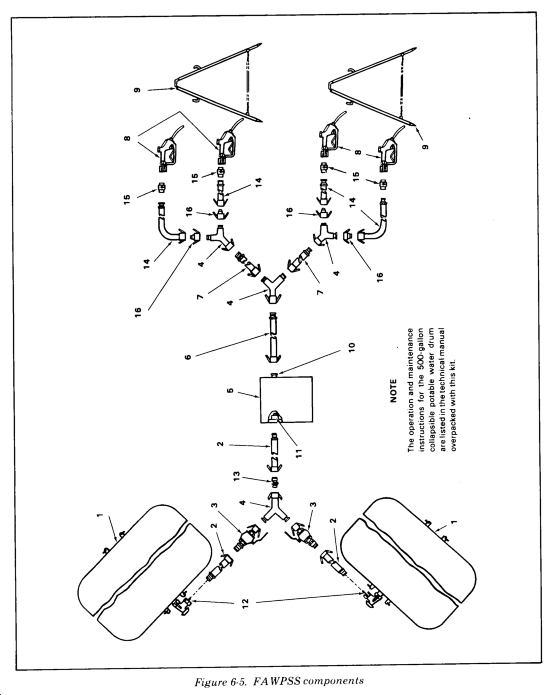
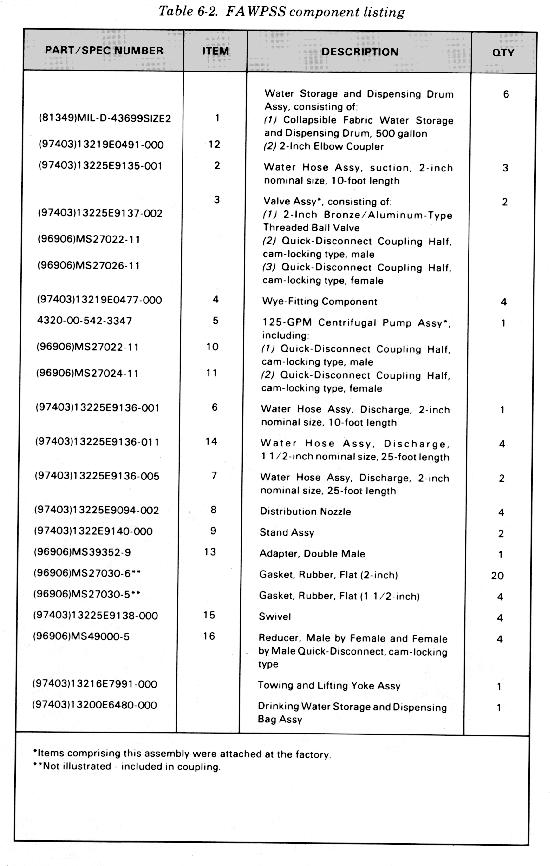
Each component of the FAWPSS has been labeled with a part number, identification number, or specification number. FAWPSS components are illustrated in Figure 6-5 and identified in the component list (Table 6-2). The quantity of each is also given. The only activities required for assembly of the FAWPSS are unpacking and positioning the equipment and attachment of quick-disconnect assemblies. It is not necessary to use wrenches, screwdrivers, or other tools. In several instances, components are attached to one another at the factory.
Select a flat, solid, debris-free area with adequate terrain drainage. This area should measure approximately 30 feet by 120 feet and be free of overhead obstacles to permit delivery and removal of water storage drums by helicopter.
Note that some system components, while having similar names and a like appearance, are actually different. For instance, discharge water hose assemblies (items 6, 7, and 14 in Figure 6-5 and Table 6-2) differ from each other. Be careful during assembly to avoid interchanging these and other similar items.
When unpacking the FAWPSS containers, take care to avoid nails which can puncture drums and hoses.
In assembling the FAWPSS, first open the packing container. Remove and assemble or position the items in the order specified. Retain the packaging and packing containers for use during future recovery and system storage. Remove dust caps and plugs from each hose just prior to use of that assembly.
Place the 125-GPM centrifugal pump assembly in the center of the assembly area. Position the side of the pump that contains the male quick-disconnect coupling so that it faces toward the area where the four distribution nozzles are to be located. The side of the pump that contains the female quick-disconnect coupling then faces the area where the water storage and dispensing drums are to be located. Place the suction water hose assembly at the side of the centrifugal pump that contains the female quick-disconnect coupling. Attach the male end of the suction water hose assembly to the female quick-disconnect coupling on the centrifugal pump. Refer to TM 5-4320-208-12&P.
Use the towing and lifting yoke assembly as necessary to position two full water storage and dispensing drum assemblies. Make sure that the side of each tank which has the 2-inch elbow coupler is close enough to its respective suction water hose assembly to permit attachment.
The FAWPSS is used to issue water to supported units. Follow these procedures to operate the FAWPSS.
The FAWPSS is operated by a 125-GPM centrifugal pump. Six 500-gallon water storage and dispensing drums are attached and replaced, two at a time. Quick-disconnect couplings connect the drums to the balance of the system. These drums provide water by the suction of the pump through hoses, valves, and connecting assemblies to four distribution nozzles where the water is manually discharged. The rationale for authorizing six drums is based on two drums being filled while two are being transported and two are being used with the system.
To issue water, setup the FAWPSS assembly as shown in TM 5-4320-301-13&P. Prime the pump and start the centrifugal pump engine. Refer to TM 5-4320-208-12&P for operating instructions.
Check the entire system for leaks, beginning with the 2-inch elbow couplers on the water storage and dispensing drums. If you discover a leak, shut off the centrifugal pump engine. If the leak is at a quick-disconnect coupling assembly, open and remove the assembly. Inspect the hose assembly for abnormal twisting or ballooning which indicates that the hose is weak. Also check the couplings to be certain that sealing gaskets are in place and whether there is damage or the presence of foreign matter. If gaskets are damaged or missing, obtain these items from the overpack kit and replace. If couplings are damaged, replace the entire assembly with a spare assembly from the overpack kit. If foreign matter is present, thoroughly flush the hose. Refasten the assembly. Start the engine of the centrifugal pump, and repeat the above procedure until no leaks are seen.
Assign two workers to till the FAWPSS which contains 500-gallon drums. There are two methods of filling the 500-gallon collapsible drums. One is filling the drums directly from the PWS/DS; the other is to use the 125-GPM pump that comes with the FAWPSS. The position and the tasks of the crew vary with each of these methods. When drums are filled directly from the water supply point, assign one worker to the control valves of the filling point. Make this worker responsible for controlling the flow of water to the drums. Assign the other worker to the drum. Make this worker responsible for preparing the drum for filling, making all connections, and monitoring the filling operation. When using the 125-GPM pump, you still need two workers for the filling operation. Have one worker operate the 125-GPM pump and control the flow of the water. Assign the other to the drum with the same responsibility as in the method described before. If the drums are to be delivered by helicopter to the supported unit, you will need a vehicle to remove the filled drums to the loading point.
Test each of the four distribution nozzles. If they do not operate at full flow, stop the centrifugal pump engine. Check the strainer inside the nozzle, clean if needed, and replace. Start the centrifugal pump engine, and repeat the procedure described above until all distribution nozzles operate at full flow.
Continue issuing water until the drums are empty. Use the following procedures to disassemble the FAWPSS.
Disassemble the FAWPSS in the reverse order. of assembly. Prior to repackaging, drain, dry, and then cap and plug all hose assemblies. Drain, collapse, and fold the water storage and dispensing drum. Store component parts in the original containers in which they were received. Replace dust caps and plugs on each hose prior to repackaging. Disassemble component parts of the various hose assemblies and other fittings in the following order for repackaging:
Issuing water is perhaps the most important responsibility at the water point. The water point is in the field to provide water to the supported units. In the theater of operations, water is issued as far forward as the tactical situation permits. Usually, the supported units pick up water from the water point in their own containers. There will be a lot of vehicles coming to and going from the water point. Provisions must be made for this traffic. To solve these problems and to equally distribute the water production workload, the water supply supervisor sets up water issue schedules. Schedules eliminate confusion and loss of time that may result if units arrive unscheduled at water points. Such schedules include, but are not limited to, the following:
Work Schedules
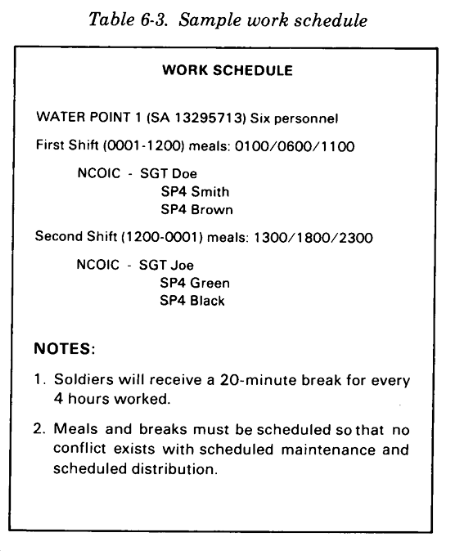
The water supply supervisor has the responsibility of preparing and maintaining several different schedules. The most valuable resource at a water point is personnel. In order to use soldiers effectively, you must complete a work schedule. Each water section has enough personnel assigned to operate assigned water points on a continuous basis. Water points must be operational 20 hours per day with 4 hours downtime for scheduled maintenance. The work schedule identifies the NCOIC of each of the two shifts at each water point, as well as all the soldiers assigned as operators on each shift. Establish meal hours (at least three per day) on the schedule, as well as guidelines for breaks. Table 6-3 is an example of a completed work schedule for one water point.
Maintenance Schedules
Maintenance schedules ensure equipment, the second most important resource, is maintained in operational condition. In order to ensure equipment is properly maintained, each piece of equipment has TMs that identify the maintenance checks and services required on an hourly, daily, weekly, or monthly basis. Using those PMCS and maintenance allocation charts contained in the TMs, schedule necessary maintenance to be accomplished after 20 hours of operation. Take into account the level of maintenance (operator-organizational-DS/GS) and the estimated time required.
If there is more than one water purification unit at a water point, ensure that both are not scheduled for maintenance at the same time. Perform maintenance when all storage tanks are full.
In addition, if possible ensure each water point is scheduled for maintenance at different times during the day so two water points are not down at the same time. Finally, do not schedule water issue during scheduled maintenance periods.
Issue Schedules
The water issue schedule is a written log. Its issuance is coordinated with supporting units to ensure timely and efficient issue of water supplies to supported units in a theater of operations.
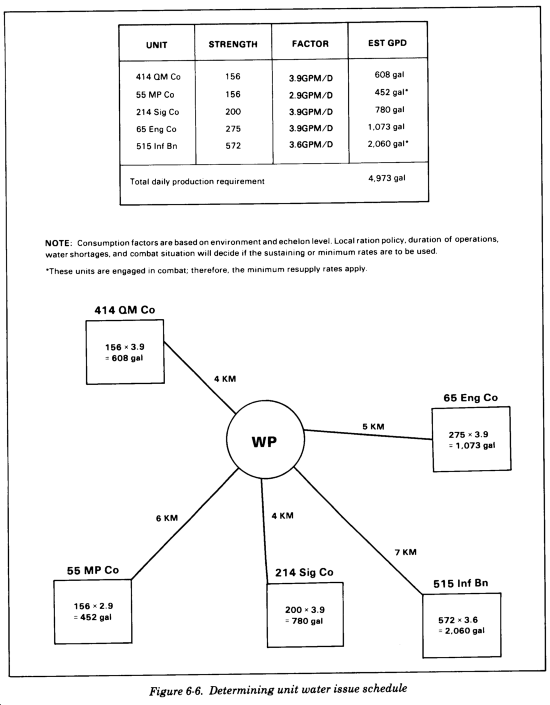
The MMC provides location and troop strength of supported units. In certain cases, the MMC may provide allocation instructions limiting issue of water during emergencies. Multiply the troop strength times the applicable consumption factors to determine the estimated consumption rate of each unit. Then compare locations of the supported units with those of the water points. Schedule the units nearest the water points to receive water first. If supported units have no organic transportation or if water is to be issued at a class 1 ration breakdown point not collocated with the water point, establish an issue schedule using the 3,000-gallon SMFT (Figure 6-6).
Draft a DA Form 1714-R which will affect equal issue of water sufficient to meet operational needs to all supported units. Submit the draft issue log to the platoon leader for approval. A sample completed DA Form 1714-R can be found at Figure 6-7. DA Form 1714-R will be locally reproduced on 8 1/2- by 11-inch paper. A copy for reproduction purposes is located at the back of this manual.
Use the issue log to draft an issue schedule on a memorandum for the commander, indicating the dates and times each supported unit will receive water and which water point they use. Include additional instructions, such as allocation limits and requests for increased supplies, on the memorandum. When signed by the commander, distribute the memorandum to the supported units in advance to ensure sufficient time for planning. Post the completed water issue logs to the water points. Log the actual gallons distributed to the consuming units on subsequent daily logs.
Distributing water is another important responsibility you have at the water point. Water provided to the supported units must first be purified or received from another source, such as GS water units. In an arid theater of operations, water is distributed from a water production or storage site to another storage site. Usually, the supporting GS water unit will deliver water from water purification or storage sites by either hose line or SMFTs. Many vehicles will be coming to and going from the water distribution point. Provisions must be made for this traffic. To solve these problems and to equally distribute the water movement work load, the water supply supervisor sets up water distribution schedules. Schedules eliminate confusion and loss of time that may result if dispatch or receipt of water occur at unscheduled times.
The daily water distribution log is important because the information from this form is used by the logistics staff to effectively manage distribution of water to all supported units. For this reason, the data entered on the distribution log should be complete and accurate. A sample DA Form 1714-1-R can be found in Figure 6-8. DA Form 1714-1-R will be locally reproduced on 8 1/2- by 11-inch paper. A copy for reproduction purposes is located at the back of this manual. Follow the guidance below for completing the distribution log.
Water Point No. Each GS water distribution point will have a different number assigned to it. In most GS operations, two or more water units will be operating in different locations throughout the area. It is essential to unit operations to keep separate information on each water distribution point.
NCO in Charge. Enter the name of the NCO in charge of the water distribution point. This information will show who is responsible for the operation of the water distribution point and who to contact for additional information concerning the distribution activities at that distribution point.
Date. At the start of each day, use a new log sheet. This log is a daily report and must be completed for each day the distribution point is in operation and water is distributed. By keeping up with the log on a daily basis, you can determine the amount of water distributed. This information will also be helpful in planning future support needs.
Time. Enter the time that the water was either received or dispatched. Receiving and dispatching water may occur at the same time.
Received. Enter the amount of water and the unit name and number from which it was received. At the end of the day, total this column. This will give the total amount of water received for the day.
Dispatched. Enter the amount of water and the unit name and number to which it was dispatched. At the end of the day, total this column. This will give the total amount of water distributed for the day.
Total Amount on Hand. At the bottom of the form, you will find Total Amount On Hand. Subtract the total of the Dispatched column from the total of the Received column to find the Total Amount On Hand figure.
Remarks. Use the Remarks block for any pertinent information that would have impact on daily operations. If the equipment must operate all day and personnel have little or no time for operator maintenance and are using backup equipment, show this equipment in the Remarks block. Also, state POL consumed, chemicals used, and any other operational information.
Use the distribution log to draft a distribution schedule memorandum for the commander, indicating the dates, times, and amount each supporting unit should dispatch water, and dates, times, and amount of water required at the distribution point. Include additional instructions, such as requests for increased water to meet mission demands (to maintain command storage levels) or transportation requirements to move water forward to other storage/distribution points. Distribute the memorandum, after signature by the commander, to the supported and supporting units in advance to ensure sufficient time for planning. the completed water distribution logs are sent to the water supervisor for planning data.
REPACKING THE TANK
Section III
FAWPSS DISTRIBUTIONFAWPSS
Section IV
ISSUE AND DISTRIBUTION SCHEDULES AND RELATED FORMSISSUE CONSIDERATIONS

DISTRIBUTION SCHEDULES

Join the GlobalSecurity.org mailing list