

|
RDL Homepage |
Table of Contents |
Document Information |
Download Instructions |
LESSON 3
CROWD CONTROL FORMATIONS
| Critical Tasks: | 191-376-4122 191-379-5400 |
OVERVIEW
LESSON DESCRIPTION:
In this lesson you will learn the various crowd control formations and how to form up troops into those formations.
TERMINAL LEARNING OBJECTIVE:
| ACTION: | Describe crowd control formations and how they are formed. |
| CONDITION: | You will have this subcourse, paper and pencil. |
| STANDARD: | To demonstrate competency of this task, you must achieve a minimum score of 70 percent on the subcourse examination. |
| REFERENCES: | The material contained in this lesson was derived from the following publication: FM 19-15. |
INTRODUCTION
We know from our studies of the histories of war that success in battle is not always determined by the number of troops or firepower. Success is more often determined by the discipline and training of the troops involved. This situation often applies to civil disturbance control operations because our troops can be expected to be greatly outnumbered. A system of crowd control formations has been devised to offset this shortage of numbers. It is vital that you have a thorough knowledge of this system of formations to help you to effectively employ your unit in a civil disturbance operation.
PART A - TYPES OF FORMATIONS AND WEAPONS
1. General.
a. Crowd control formations, when properly used and effectively carried out, represent one of the most practical methods of controlling crowds. These formations are especially effective against a large crowd because they enable the control forces to split the crowd into small groups. However, commanders must realize their limitations; formations are not the answer to all disturbance situations. Troops should not be subjected to unnecessary sniper fire and violent acts of troublemakers simply to impress the mob with a show of force. When small dispersed groups are running wild in an area of operations, crowd control formations will be of little value in stopping the disturbance.
b. Further, when a large mob has been broken up, the problem is not necessarily solved. It should not be assumed that rioters have returned to peaceful activities. It may well be that the small groups breaking away from the large group will engage in small mob tactics such as sniping, looting, and burning. If such a situation develops, commanders should apply the tactics discussed in the preceding lessons and continue active control measures until they are sure that law and order have been restored.
c. The manner of using formations and weapons, the application of a certain formation to a particular situation, and the stage of operations at which certain types of actions will be suitable, are matters which must be decided by commanders.
2. Dismounted Formations.
Dismounted crowd control formations constitute a means of blocking the advance of a mob. The various crowd control formations are tools to be employed as required. Normally, the line can be employed against any size crowd, and the echelon and wedge against a small group on a narrow front or in confined areas. When troops penetrate a crowd to capture one of its members, they may use a modified formation, such as a circular or a diamond formation, with at least two unarmed soldiers inside the formation; when the formation reaches the person to be seized, a gap is opened and the unarmed soldiers pull the person inside. These soldiers should be equipped with handcuffs and/or restraining straps for use in securing the person; however, the diamond and circular formations are open to being surrounded by the crowd.
3. Vehicle in Formations.
a. Vehicles with foot troop protection have a useful role in crowd control formations. Vehicles may be used to obtain shock action; as a platform for selected marksmen; as a base to release crowd control agents; or to enter a crowd to arrest selected persons.
b. Vehicles used in mass along with foot protection are effective in civil disturbance control operations when there is sufficient space for the vehicles to maneuver and for the crowd to move. The 3/4-ton truck containing one squad and used in groups of three is effective. Vehicles can be used in column, line, echelon, or wedge. When they are halted, troops protect them with rifles and bayonets. If a vehicle breaks down, other vehicles should be used to protect it.
4. Type of Crowd Control Formations and Their Uses.
a. Line.
(1) As an offensive formation, the line is used to push or drive crowds straight back, or across an open area, or up a city street.
(2) As a defensive formation, the line is used to hold the unruly group, or deny access to restricted streets or areas.
b. Echelon, right or left. An offensive formation used to push or drive groups away from an object. This formation can also steer a group's direction of movement.
c. Wedge. As an offensive formation, the wedge is used to penetrate and split crowds.
d. Diamond.
(1) As an offensive formation, the diamond is used to enter a crowd.
(2) As a defensive formation, the diamond is used when all-round security is required.
e. Circular. The circular formation may be used for the same purposes as the diamond. The choice for use of either depends on the confrontation of the crowd.
5. Normal Preliminary Procedure.
To use the show of force to the greatest advantage, troops should make a strong surprise appearance using the following procedures:
a. When arriving by truck, troops should dismount and gather at a point beyond the sight of the crowd just near enough to save time and energy, yet far enough to ensure security.
b. When using helicopters as a method of transporting troops to the scene of the riot or disorder, the psychological impact of their use should not be overlooked. Where possible, troops should dismount from the helicopter in sight of the crowd, but far enough away to prevent damage to the aircraft by thrown objects. Normally, the first echelon to dismount from the aircraft acts as a security element for the landing area.
c. The troops fix bayonets on order. At this time, selected leaders and marksmen only should load their weapons. Orders to lock and load weapons should be issued to the remaining troops only when a clear and evident case of necessity exists.
d. The unit marches in column formation keeping a safe distance from the mob and within plain view of it.
e. The unit halts and remains in formation. The troops hold their weapons at safe port while the commander delivers the proclamation. Following the proclamation, the commander informs the participants that they have a specific time in which to comply with the order to leave.
f. If the participants fail to leave within the given time, the commander uses measures necessary to break up the crowd.
6. Special Preliminary Procedure.
If rioters are known to be well-armed, and intelligence reports show that they intend to open fire as soon as troops appear, the commander may not make a show of force, but may launch a crowd control agent attack from covered or hidden positions.
7. Weapons Used in Formations.
a. Baton. The baton is considered the primary weapon for crowd control operations. It is an offensive weapon and unlike the rifle, the loss of baton to the crowd does not create a serious threat.
b. Rifle. The rifle with bayonet is the most practical weapon for general use by troops in crowd control formation.
c. Shotgun. One shotgun, riot type, should be issued to each squad and should be carried by the squad leader or his assigned representative. It is used to cover breaches in a formation until supporting troops can be committed, and to fire at selected targets when a short-range weapons is advisable.
d. Sniper rifle. When available, each platoon should have one sniper rifle which is carried by a selected marksman to fire at specific targets as directed by the platoon leader or company commander.
e. Hand weapons. Hand weapons may be carried by the commander, drivers, grenadiers, members of crew-served weapons, and other personnel when it is impractical to carry rifles. They are used primarily as defensive weapons.
f. Portable dispersers. Normally, each platoon may have one portable crowd control agent disperser which may be carried by a member of the platoon headquarters. The disperser can be used singly or in a battery, as directed by the platoon leader or company commander.
g. M234 64-mm grenade launcher. This projectile fired from the M234 launcher has sufficient momentum to cause pain and discomfort in order to deter individual violent rioters with minimum possibility of producing injury. For more determined or fanatical rioters, the system can also use a round that will disperse a tearing (CS) agent while it hits the person. The M234 maximum range for a point target is 40 meters and area target is 60 meters. Only an M16A1 with closed end flash suppressor can be used for the M234. The M234 is scheduled to be modified at depot level for the M16A2.
h. M203 grenade launcher. The M203 grenade launcher firing the CS cartridge is used to engage selected point or small area targets at a range of 200-400 meters. Within short ranges, the bursting or burning type grenades are normally used.
i. Machine guns. Machine guns normally are not used against rioters. Those not larger than 7.62-mm may be mounted on selected vehicles in formation for their psychological effect and for availability should the situation deteriorate to the point where their use would be authorized. Should the situation deteriorate to the point where their use would be authorized, only qualified gunners under close supervision should be used.
8. Position for Carrying Weapons.
At the discretion of the unit commander, the troops may carry their weapons in any of the positions prescribed by FM 22-5. The descriptions and illustrations given below pertain to the M16 rifle. The following positions are used as indicated:
a. Safe port.
(1) Command. SAFE PORT (one count).
(2) Position (see Figure 3-1).
(a) Right hand grasps the small of the stock with the right forefinger to the rear of the pistol grip.
(b) Left hand grasps the weapon just below and touching the upper sling swivel, and around the sling, sling facing out.
(c) Upper left arm is parallel to the ground, and forearm is as perpendicular to the ground as body conformation permits.
(d) Elbows are held as close to the body as body conformation permits.
(e) Heel of the rifle butt is held slightly to the right of the waist belt buckle.
(f) Weapon is held just diagonally enough across the body to permit the person to look straight to the front over the right side of the stock.
(3) Use.
(a) The safe-port position is extremely useful in making a show of force before rioters. In this elevated position bayonets can be seen by the participants in the rear of the group, giving an impression of a large number of troops, and of the troops' power.
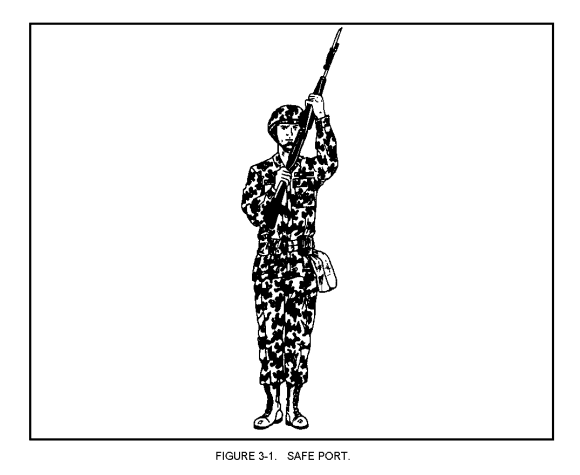
(b) Troops move into and gather from all crowd control formations with weapons in the safe-port position. The command SAFE PORT (although more easily executed from the position of the port arms, it may be executed from any other position) is given while the troops are in column prior to execution of any crowd control formation. Troops will automatically assume safe-port position before reassembly from a crowd control formation.
(c) Commanders should use the safe-port position to impress rioters. However, troops should not be required to maintain the position for extended periods of time as it is very tiring.
b. Safe Guard.
(1) Command. SAFE GUARD (one count).
(2) Position (see Figure 3-2).

(a) Right hand grasps the small of the stock, holding weapon waist high, positioned so that the small of the stock is against the right hip; butt of the stock extends to the rear of the buttocks.
(b) Left hand grasps the stock just to the rear of the upper sling swivel; hand is around the sling; sling is facing down; left arm is slightly bent.
(c) Bayonet is raised to throat level.
(d) When at the halt, the feet are together as in the position of attention.
(3) Use. The safe-guard position is one of semi-readiness. It is less tiring than the on-guard position and should be used to rest troops when circumstances permit. For example, as troops advance, they should maintain the safe-guard position until just before contact is made or resistance is expected and then should be ordered to the on-guard position. The safe-guard position can also be used when troops are pursuing a crowd which is withdrawing without resistance.
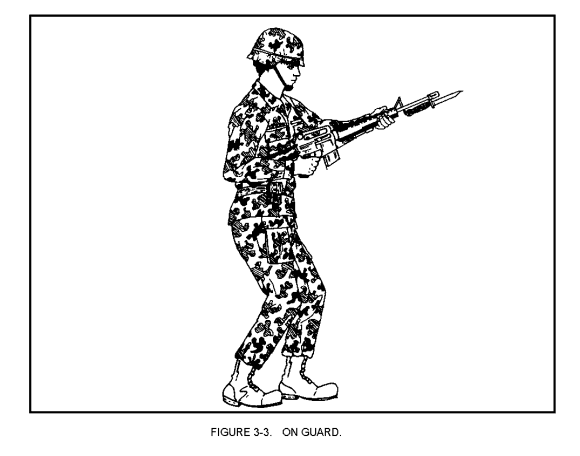
c. On Guard.
(1) Command. ON GUARD (one count).
(2) Position (see Figure 3-3).
(a) Right hand grasps the weapon on the pistol grip; the under and inner part of the forearm against the top of the stock; the base of the butt pressed snugly against the side of the right hip.
(b) Left hand grasps the hand guard at the most comfort-able point forward of the balance point; left arm is slightly bent.
(c) Bayonet is raised to throat level.
(d) When at the halt, the feet are comfortably apart, toes pointed at rioter; knees slightly bent; body leaning slightly forward; and the hip level.
(3) Use.
(a) On guard is a position of complete readiness and should be used whenever troops are in contact with a group which is showing any kind of resistance or hesitance to withdraw.
(b) Troops commanders should rest troops at every opportunity by using less tiring positions. The "on guard" position is too tiring to maintain for long periods of time.
PART B - UNIT ORGANIZATION FOR CROWD CONTROL FORMATIONS.
The formations covered in this lesson (12-man squad, 4-squad platoon, 3-squad platoon, 3-platoon company with 4-squad platoons) are for illustration only, and are not intended to require unit reorganization. For example, a 10-man squad is easily adapted to the illustration shown in Figures 3-11 through 3-32 and Figure 3-44, by deletion of appropriate squad members and by repositioning assigned leaders accordingly. Any size squad, platoon, or larger unit can be used, and crowd control formations can be adapted to fit unit organization.
1. Commands.
a. Oral commands.
(1) The commands, SAFE PORT, SAFE GUARD, and ON GUARD are given in one count.
(2) All other commands are given in two counts, with a preparatory command followed by a command of execution.
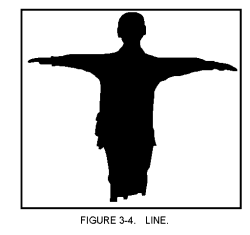
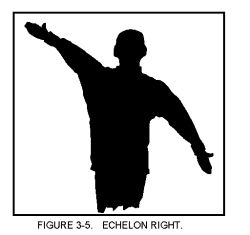
b. Hand signals. When necessary, hand signals should be used by commanders in conjunction with oral commands. Hand signals for crowd control formations may be given as follows:
(1) Line. Raise both arms to the side until horizontal, arms and hands extended, palms down. (See Figure 3-4.)
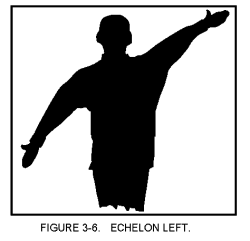
(2) Echelon right (left). Extend one arm 45-degrees above and the other 45-degrees below the horizontal, palm to the front. The upper arm shows the direction of echelon when the commander faces the formation. (See Figures 3-5 and 3-6.)
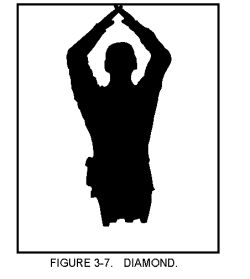
(3) Diamond. Extend both arms above the head, elbows bent slightly and fingertips touching. (See Figure 3-7.)
(4) Wedge. Extend both arms downward and to the sides of an angle approximately 45-degrees below the horizontal, palms to the front. (See Figure 3-8.)
NOTE: Hand signals indicated by the silhouettes are as if facing the formation.
|
|

2. Cadence.
a. The normal cadence for movement into and assembly from all crowd control formations is double time (180 steps per minute).
b. The normal cadence for movement of troops while in any crowd control formation is quick time (120 steps per minute). While in the on-guard position, the cadence is approximately 60 steps per minute. For psychological effect, an on-guard step may be executed by accentuating each step on the left foot with a resounding stamp.
c. Cadence may be increased or decreased at the discretion of the unit commander to meet varying situations.
d. A unit may be ordered into or assembled from crowd control formations from the halt or while marching. As each man reaches his proper position, he automatically faces in the direction of the unit's intended advance and comes to a halt. He remains at the halt in the safe-port position and awaits further orders.
3. Position of Commander and Leaders.
a. When in column, the commander at each echelon normally assumes his position at the head of the column.
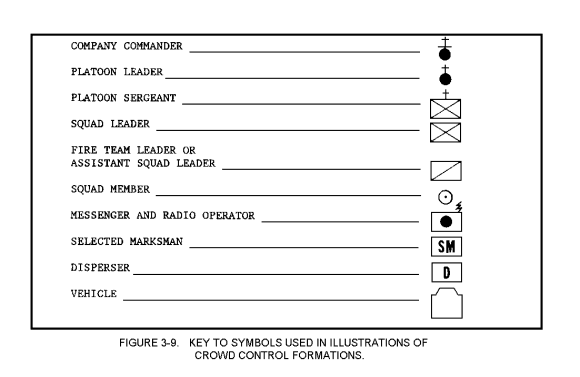
b. When in crowd control formation, squad leaders and their helpers, platoon leaders and their helpers, and company commanders take positions in the rear of the assault elements of their respective units where they can best direct and control their units. In the illustrations of crowd control formations, the platoon and squad leaders are not shown uniformly in order to illustrate the flexibility of their positions behind the formations. The symbols listed below are only applicable to this lesson (see Figure 3-9).
c. When in column, messengers (radio operators), selected marksmen, dispersers, and other members of platoon headquarters normally take positions at the front of the column.
d. When a unit is in a crowd control formation, headquarters personnel, at the discretion of the unit commander, are positioned near the commander. If the situation prevents this, they may be positioned behind the assault element.
4. Interval and Distance.
a. Interval is the lateral space between elements and distance is the space between elements in column. The normal interval and distance between men in crowd control formations is one pace (30 inches), as shown in Figure 3-10.
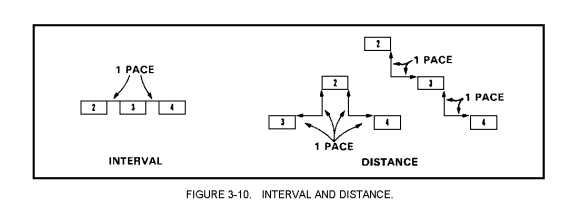
b. The interval and distance may be adjusted to meet particular situations.
c. In any echelon formation with normal interval and distance, the angle made by the formation and the route of advance will be approximately 45 degrees. The angle formed by the two wings of any wedge formation will be approximately 90 degrees when normal interval and distance are used.
5. Masking Procedures.
When it is necessary to use crowd control munitions to break up an unruly mob, or when intelligence indicators point to mob use of chemicals, protective masks will have to be worn. A key consideration in this regard is not to break formations while troops are masking. Consistent with the security of the soldier, any of the ing methods may be used.
a. Every other man drops back one or two paces, dons his mask, then resumes his place in the formation. The other half of the formation then performs the same act.
b. Remaining in formation, troops in every other squad put on their masks. Then remaining troops don their masks.
c. If there is sufficient space between troops and a crowd, all men may don their masks at the same time.
d. Reserve units put on masks and replace units in the line. This act is repeated until all troops are masked and a new reserve is constituted.
e. When chemicals have been used by rioters, or early use of crowd control agents is anticipated by the troop commander, troops may be ordered to mask prior to commitment.
PART C - SQUAD FORMATIONS
1. General.
When executing squad crowd control formations from the column, the squad leader takes one or more steps to the right and faces his squad. As he gives his preparatory command, he points to the location at which he desires the formation to be formed. If he does not point, the squad forms on the position of the number 2 man (base man) of the squad.
2. Squad Line.
a. Command. SQUAD AS SKIRMISHERS, MOVE.
b. Execution.
(1) At the command of execution, the base man advances to the position named by the squad leader. The men aline themselves in sequence on line with the base man, one pace to the right of each preceding man. (Figure 3-11.)
|
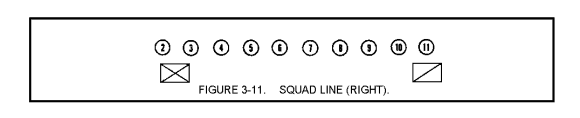
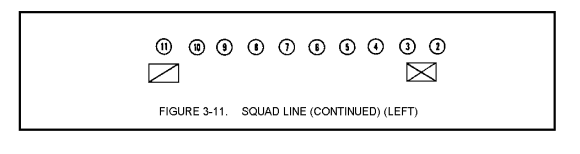
(2) If the commander desires and the situation requires, he may name a specified number of paces between men to the formation by so indicating in his preparatory command. For example, SQUAD AS SKIRMISHERS, TWO PACES, MOVE. If no interval is specified in the command, the unit will automatically assume a one-pace interval
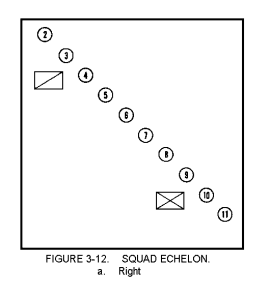
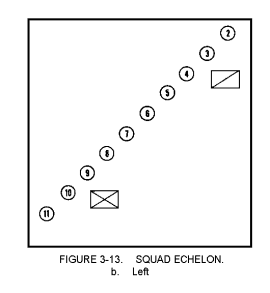
3. Squad Echelon Right (left).
a. Command. SQUAD ECHELON RIGHT (LEFT) MOVE.
b. Execution. At the command of execution, the base man advances to the position named by the squad leader. The men aline themselves in sequence on the base man, one pace to the right (left) and one pace to the rear of each preceding man (see Figures 3-12 and 3-13).
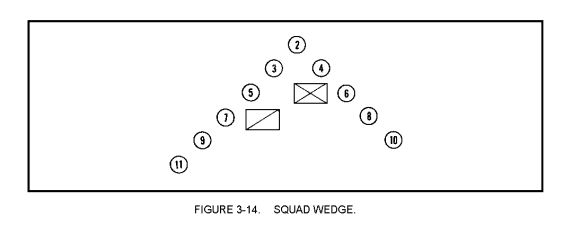
4. Squad Wedge.
a. Command. SQUAD WEDGE, MOVE.
b. Execution. At the command of execution, the base man advances to the position named by the squad leader. Even-numbered men aline themselves in sequence on the base man, one pace to the right and one pace to the rear of each preceding man. Odd-numbered men align themselves in sequence on the base man, one pace to the left and one pace to the rear of each proceeding man (see Figure 3-14).
5. Assembling a Squad.
a. Command. SQUAD ASSEMBLE, MOVE.
b. Execution. When assembling the squad, the squad leader takes a position a sufficient distance to the rear of the squad and gives the command of SQUAD ASSEMBLE, at the same time raising his right hand in the air and making a circular motion. The members of the squad hearing the command automatically come to the SAFE PORT position; the number two man does an about face, and the other members of the squad do a facing movement toward the base man. On the command of execution MOVE, the squad leaders points to the place he desires the base man to assemble (to the front or rear of the squad leader). The base man double-times to the assigned spot, and the other members of the squad follow the base man. Once back in the column formation, they are given PORT ARMS.
PART D - PLATOON FORMATIONS (4-SQUAD)
1. General.
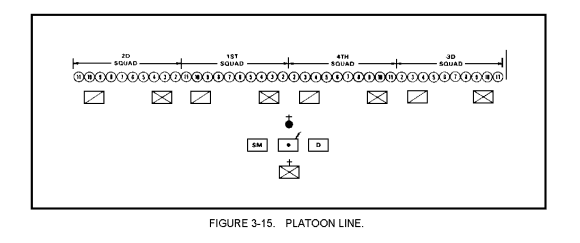
a. Platoon headquarters should consist of the following five persons (for their positions in crowd control formations, see Figure 3-15):
(1) Platoon leader.
(2) Platoon sergeant.
(3) Selected marksman.
(4) Disperser.
(5) Messenger (radio operator).
b. When directed by the platoon leader, other persons, such as operators of fire fighting equipment, may add to or become a part of the platoon headquarters.
c. In forming all crowd control formations from the column, the platoon leader moves out to the right or left front of his platoon and faces it when giving his commands. As he gives his preparatory command, he points to the approximate location at which he desires the platoon to form. If he does not point, the formation is formed immediately in front of the column. The platoon leader should pause between his preparatory command and command of execution to permit each squad leader to issue a preparatory command to his squad.
2. Platoon Line.
a. Command. PLATOON AS SKIRMISHERS, MOVE.
b. Execution. Immediately following the platoon leader's preparatory command, the squad leaders command FOLLOW ME. At the platoon leader's command of execution, the 2d and 3d squads move to the front and spread out. At the same time, the 1st and 4th squads move forward to their left and right flanks, respectively. The squad leader of the 2d squad establishes a squad line at the position indicated by the platoon leader.
The squad leaders of the 1st, 3d, and 4th squads establish squad lines individually and close and dress on the 2d or base squad (Figure 3-15).
3. Platoon Line with Two Support Squads.
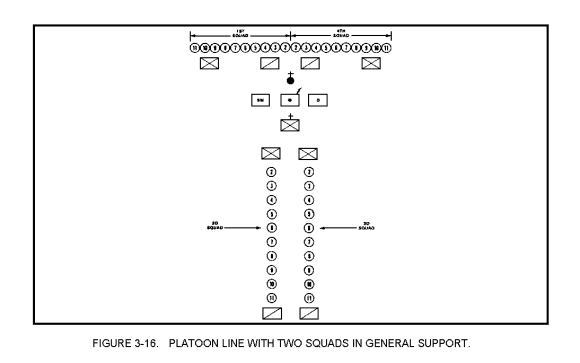
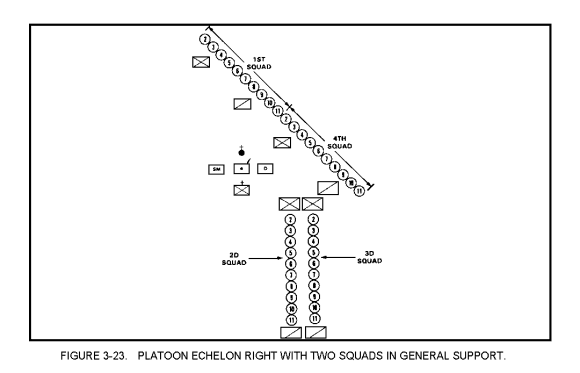
a. General Support. Whenever the command for establishing a crowd control formation contains the phrase, IN SUPPORT, without modification, it means that the support element is to remain in general support.
(1) Command. PLATOON AS SKIRMISHERS, 2D AND 3D SQUADS IN SUPPORT, MOVE.
(2) Execution. The 1st and 4th squads execute the line while the 2d and 3d squads remain in the column: number 2 man of the 4th squad is the base man of the formation (see Figure 3-16).
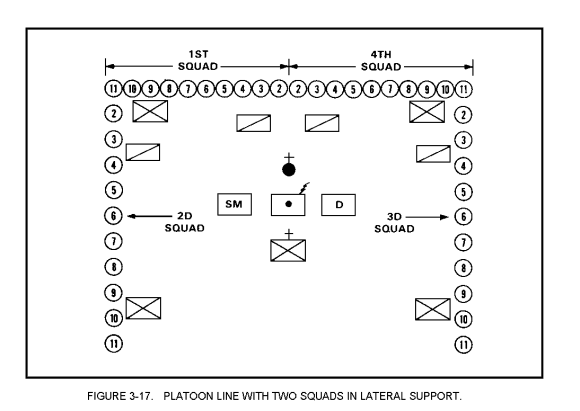
b. Lateral Support.
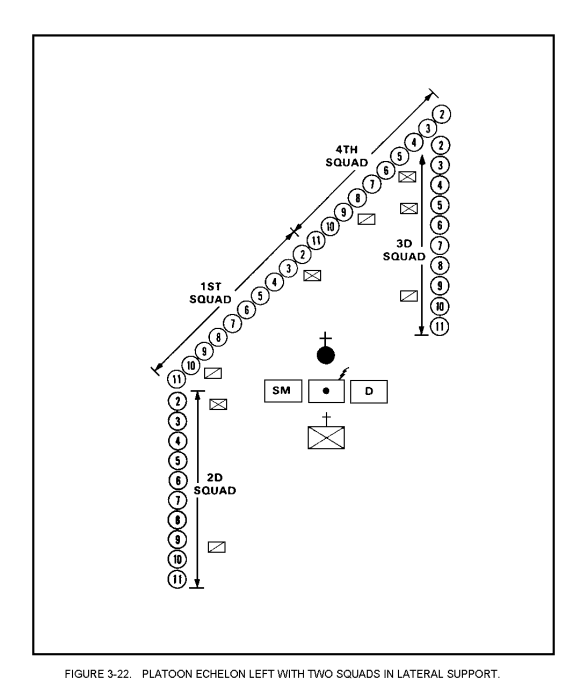
(1) Command. PLATOON AS SKIRMISHERS, 2D AND 3D SQUADS IN LATERAL SUPPORT, MOVE.
(2) Execution.
(a) The 1st and 4th squads execute the line as before, while the 2d and 3d squads stand fast. After the line has been formed by the 1st and 4th squads, the squad leaders of the 2d and 3d squads command LEFT FLANK and RIGHT FLANK, respectively. At the command of execution, MOVE, the 2d and 3d squads move out to their flanks, close in on the ends of the line already formed and face in the direction of the platoon's advance (see Figure 3-17).
(b) Similarly, the 2d and 3d squads may be committed from general to lateral support at any time by the platoon leader. He commands 2D AND 3D SQUADS, LATERAL SUPPORT, MOVE.
(c) To have the 2d and 3d squads join the line from either general or lateral support, the platoon leader commands 2D AND 3D SQUADS, EXTEND THE LINE, MOVE. The 2d and 3d squad leaders command SQUAD AS SKIRMISHERS, and point to locations for number 2 men. On command, MOVE, the squads establish individual lines, closing and dressing on the existing line.
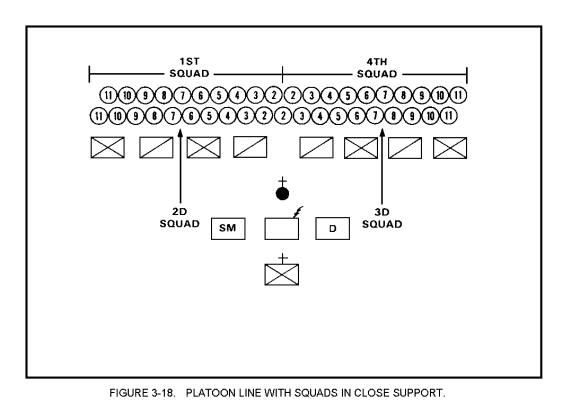
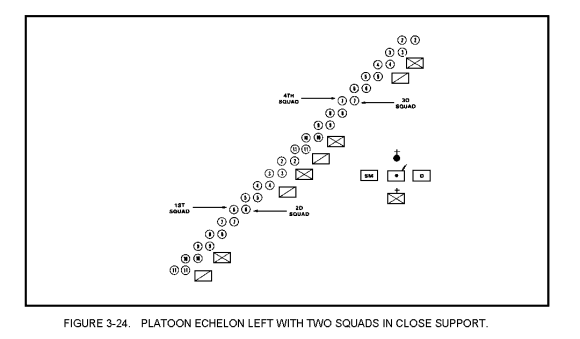
c. Close Support.
(1) Command. PLATOON AS SKIRMISHERS, 2D AND 3D SQUADS IN CLOSE SUPPORT, MOVE.
(2) Execution. The 1st and 4th squads execute a line as before. The 2d and 3d squads execute a similar line in the rear of the leading line and close in on the leading line. The men in the supporting line cover the intervals between men in the leading line (Figure 3-18). To accomplish this, the squad leaders of the 2d and 3d squads command STAND FAST. After the 1st and 4th squads are in position, the 2d and 3d squads form lines as indicated.
d. Assembling the Support Squads. To assemble the support squads from any position to general support, the platoon leader commands 2D AND 3D SQUADS, ASSEMBLE, MOVE. The 2d and 3d squads then return to the column in rear of the line formed by the other two squads.
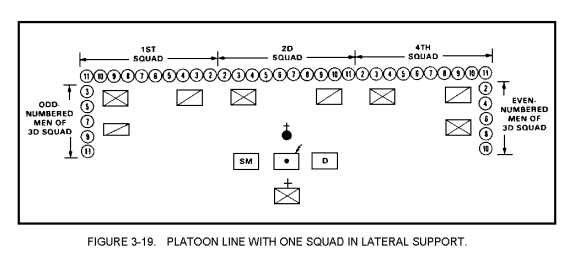
4. Platoon Line with One Support Squad.
a. Command. PLATOON AS SKIRMISHERS, 3D SQUAD IN SUPPORT, MOVE.
b. Execution. The 2d squad moves out and executes a squad line. The 1st and 4th squads form lines on the 2d squad to left and right, respective. The 3d squad remains in the column.
c. Use of Support Squad. The support squad may be used in lateral support on one or both sides of the formation, or as close support to any segment of the formation (see Figure 3-19).
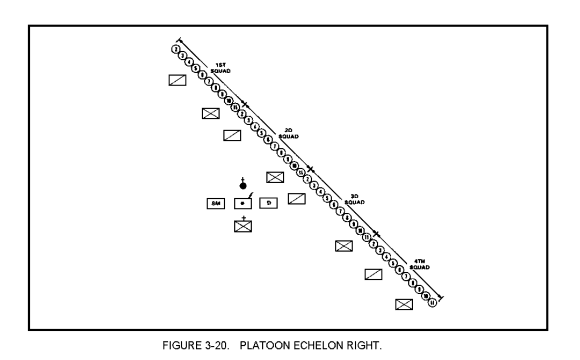
5. Platoon Echelon Right.
a. Command. PLATOON ECHELON RIGHT, MOVE.
b. Execution. Immediately following the platoon leader's preparatory command, the squad leader of the 1st squad commands FOLLOW ME. The squad leaders of the 2d, 3d, and 4th squads command STAND FAST. At the command of execution, the 1st squad moves out and executes an echelon right at the location designated by the platoon leader. As each squad clears the column, the next successive squad moves out individually and extends the echelon already formed by the preceding squad(s) (Figure 3-20).
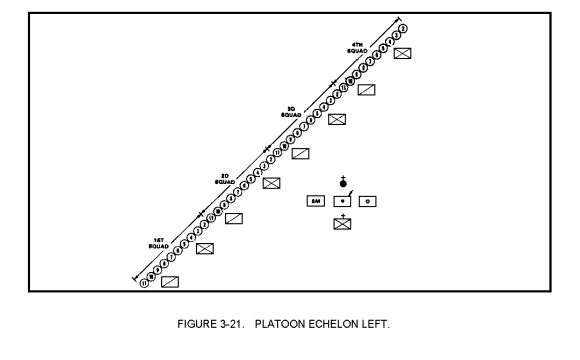
6. Platoon Echelon Left.
a. Command. PLATOON ECHELON LEFT, MOVE.
b. Execution. The platoon echelon left is formed in the same manner as the echelon right except in inverse order. The 4th squad is the base squad; the remaining squads extend the echelon in inverse sequence (see Figure 3-21).
7. Platoon Echelon with Support.
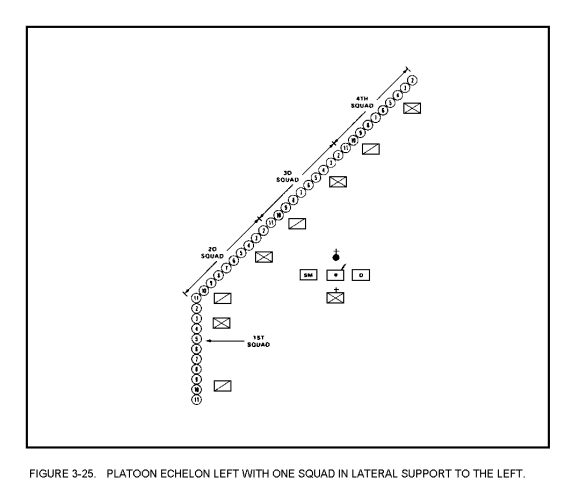
The 2d and 3d squads are used in general, lateral, and close support with the echelon right and left in the same manner as with the line (see Figures 3-22 through 3-25).
8. Platoon Wedge.
a. Command. PLATOON WEDGE, MOVE.
b. Execution. Immediately following the platoon leader's preparatory command, the squad leaders of the 1st and 4th squads command FOLLOW ME. At the same time, the squad leaders of the 2d and 3d squads command STAND FAST. On the platoon leader's command of execution, the 1st and 4th squads have cleared the front of the 2d and 3d squads, the squad leaders of the 1st and 4th squads command SQUAD ECHELON LEFT, MOVE and SQUAD ECHELON RIGHT, MOVE, respectively. The number 2 man of the 4th squad is the base man for the formation; the 4th squad executes an echelon right. The 1st squad executes an echelon left on the base man. When these movements are completed, the squad leaders of the 2d and 3d squads command SQUAD ECHELON LEFT, MOVE and SQUAD ECHELON RIGHT, MOVE, respectively, pointing to the rear elements of the wedge formed by the 1st and 4th squads. On the commands of execution, the 2d and 3d squads move out and complete the formation (see Figure 3-26).
9. Platoon Wedge with Support Squads.
a. General Support.
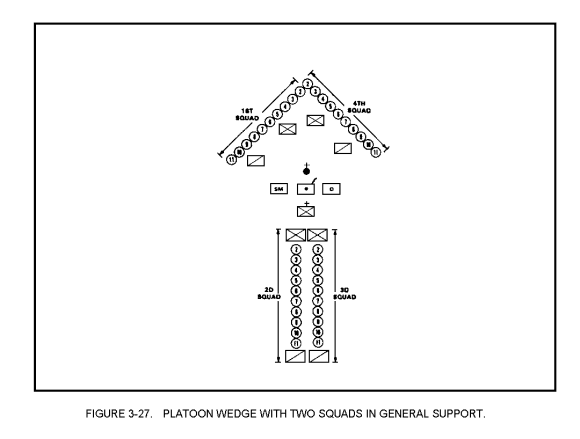
(1) Command. PLATOON WEDGE, 2D AND 3D SQUADS EXECUTE IN SUPPORT, MOVE.

(2) Execution. The 1st and 4th squads execute the wedge as explained in paragraph 28, while the 2d and 3d squads remain in the column (Figure 3-27).
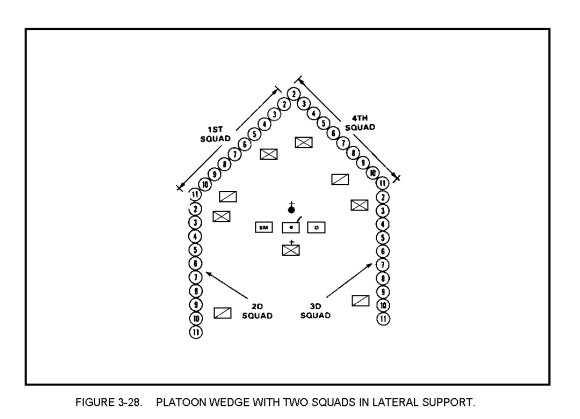
b. Lateral Support.
(1) Command PLATOON WEDGE, 2D AND 3D SQUADS IN LATERAL SUPPORT, MOVE.
(2) Execution.
(a) The 1st and 4th squads execute the wedge while the 2d and 3d squads stand fast. After the wedge has been formed by the 1st and 4th squads, the squad leaders of the 2d and 3d squads command LEFT FLANK and RIGHT FLANK, respectively. At the command of execution, MOVE, the 2d and 3d squads move out to their flanks, close in on the rear elements of the wedge, and face in the direction of the platoon's advance (Figure 3-28).
(b) To commit the 2d and 3d squads from general to lateral support, the platoon leader commands 2D AND 3D SQUADS LATERAL SUPPORT, MOVE.
(c) To have the 2d and 3d squads join the wedge from either general or lateral support, the platoon leader commands 2D AND 3D SQUADS, EXTEND THE WEDGE, MOVE. The 2d and 3d squad leaders command SQUAD ECHELON LEFT and SQUAD ECHELON RIGHT, respectively, and the platoon wedge is formed.
c. Close Support.
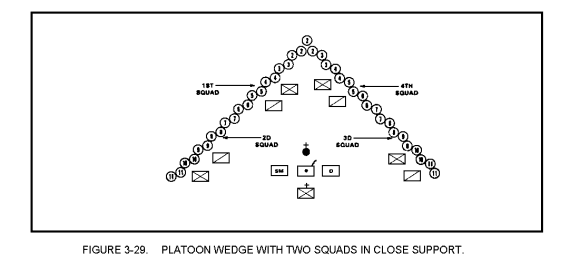
(1) Command. PLATOON WEDGE, 2D AND 3D SQUADS IN CLOSE SUPPORT, MOVE.
(2) Execution. The 1st and 4th squads execute a wedge. The 2d and 3d squads execute a similar wedge and close in on the leading wedge. The men in the supporting wedge cover the intervals between men in the leading wedge (see Figure 3-29). To accomplish this, the squad leaders of the 2d and 3d squads command STAND FAST. After the 1st and 4th squads are in position, the 2d and 3d squads form lines as indicated.
d. Assembling the Support Squads. To assemble the support squads from any position to general support, the platoon leader commands 2D AND 3D SQUADS, ASSEMBLE, MOVE. The 2d and 3d squads then return to the column in rear of the wedge formed by the other two squads (see Figure 3-26).
10. Platoon Wedge with One Support Squad.
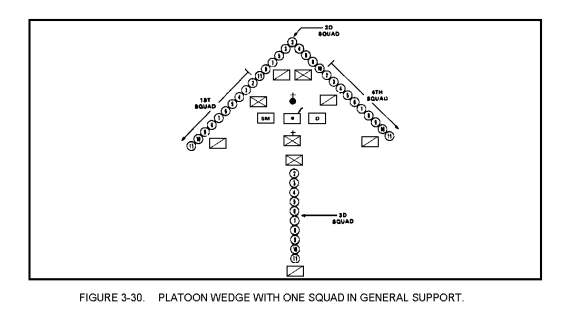
a. Command. PLATOON WEDGE, 3D SQUAD IN SUPPORT, MOVE.
b. Execution. The 2d squad moves out and executes a squad wedge. The 1st and 4th squads form echelons left and right respectively, on the 2d squad. The 3d squad remains in the column (see Figure 3-30).
11. Assembling a Platoon.
a. Command. PLATOON ASSEMBLE, MOVE.
b. Execution. The platoon leader moves out to the rear of his platoon. As he gives his preparatory command, he points to the location at which the platoon is to assemble. If he does not point, the platoon assembles directly in front of its present location. Immediately following the platoon leader's preparatory command, the squad leaders move to the head of their respective squads and command FOLLOW ME. At the command of execution, the squads follow their respective squad leaders to their appropriate positions to form a platoon column.
12. Variations in Platoon Formations.
a. During civil disturbance control operations, the platoon leader may rotate his squads in the leading elements of the formations to give any squad, or squads, a rest. He is not bound to use only those squads that are specified in the preceding paragraphs in the leading elements of his platoon formations. By merely changing his preparatory command, he may select the squads to lead his unit. For example, if the 1st and 3d squads are to lead his platoon wedge, he issues the command, PLATOON WEDGE, 2D AND 4TH SQUADS IN SUPPORT, MOVE. By naming the support squad(s) in the preparatory command, the platoon leader tells the other squad(s) that they are to lead the assault.
b. The platoon leader may also relieve any two squads in the assault element by forming a like formation with the support squads, and have the support element pass through the leading element. This procedure is frequently necessary when field protective masks are put on for a crowd control agent attack.
13. Execution of Formations. Platoon Formations (3-Squad).
The execution of crowd control formations using a 3-squad platoon is essentially the same as for a 4-squad platoon, with the following exceptions:
a. The 1st and 3d squads are normally used as the assault element in all formations in which one squad is used as general or lateral support.
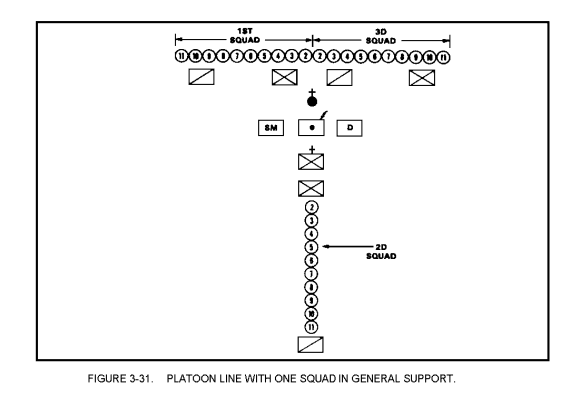
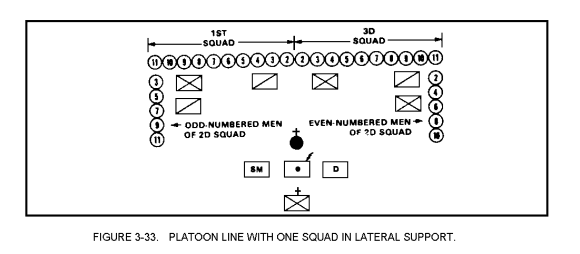
b. The 2d squad is the base squad in a platoon line formation when all three squads are committed initially to the assault element.
c. The support squad (usually the 2d squad) may be held in general support in single column or in column of two's.
(1) Single Column.
(a) Command. PLATOON AS SKIRMISHERS (ECHELON RIGHT, LEFT, OR WEDGE), 2D SQUAD IN SUPPORT, MOVE.
(b) Execution. The 1st and 3d squads execute the formation while the 2d squad remains in column.
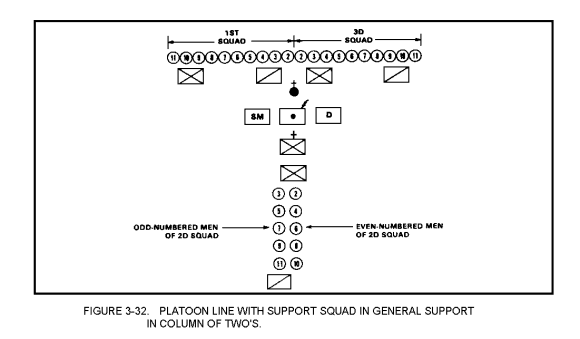
(2) Column of Two's.
(a) Command. PLATOON AS SKIRMISHERS (ECHELON RIGHT, LEFT, OR WEDGE), 2D SQUAD IN SUPPORT IN COLUMN OF TWO'S, MOVE.
(b) Execution.
1. The 1st and 3d squads establish the formation. The 2d squad, at the command of its squad leader, executes a column of two's to the right.
2. When the support squad is committed to either lateral support or to extend the existing formation, the even-numbered men move to the right and the odd-numbered men to the left. They execute these movements in the same manner as the support squads in a 4-squad platoon.
3. The squad leader normally takes control of the even-numbered men and his assistant, the odd-numbered men (see Figures 3-31, 3-32, and 3-33).
14. Assembling a Platoon.
A 3-squad platoon is assembled in the same manner as a 4-squad platoon.
PART E - COMPANY FORMATIONS
1. Company Headquarters.
a. Personnel. The company commander may use as many personnel as needed for his headquarters; however, it is advantageous to use as few as possible. Personnel not in formation and not with the company commander may be used to secure vehicles, or they may remain at the unit's administrative area. Minimum personnel to accompany the company commander should be a messenger (radio operator) and a selected marksman.
b. Equipment. The company commander should have the following equipment:
(1) Communications to maintain contact within his unit and with next higher headquarters.
(2) Sufficient transportation to keep an adequate amount of supplies available, such as crowd control agent munitions.
(3) Loudspeaker or other voice amplifying equipment.
2. Designating Locations of Formations.
When the company commander orders his company into crowd control formations from the column, he moves out to the left or right near the head of the column, where he can be seen by his platoon leaders, and faces the company. As he gives his preparatory command, he points to the approximate location for the formation. If he does not indicate a location, the company forms immediately to the front of the leading platoon.
3. Company Line In-Depth.
a. Command. COMPANY AS SKIRMISHERS IN-DEPTH, MOVE.
b. Execution. Immediately following the company commander's preparatory command, each platoon leader gives the command, PLATOON AS SKIRMISHERS. The squad leaders follow with their respective commands to their squads to form the platoon line. At the command of execution, each platoon establishes a platoon line immediately to its front (see Figure 3-34).

(1) If the company commander wants a more formidable formation, he gives the command, 2D PLATOON, CLOSE SUPPORT, MOVE. The men of the 2d platoon move forward and cover the intervals between the men of the leading platoon, and automatically assume the same weapon position as the men of the leading platoon. The platoon leader of the 3d platoon then moves his platoon forward to occupy the position formerly headed by the 2d platoon (see Figure 3-35).
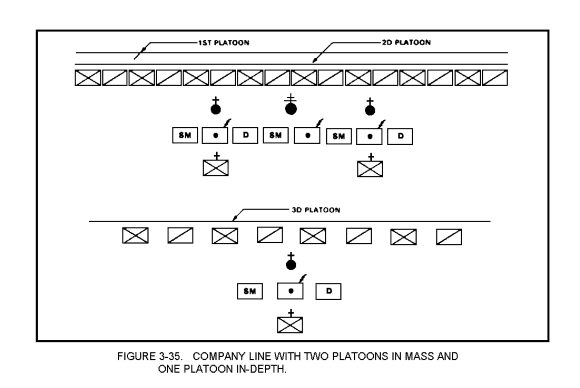
(2) If the 3d platoon is called upon to support the line, it moves forward and takes up a position directly behind the 2d platoon. The men of the 3d platoon hold their weapons at safe port. Platoon and squad leaders and their assistants mutually assist each other in controlling the company.
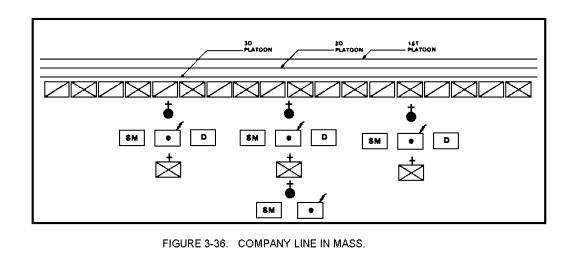
4. Company Line in Mass.
a. Command. COMPANY SKIRMISHERS IN MASS, MOVE.
b. Execution. The company line in mass is the same formation described in paragraph 3. However, in this case, the company commander indicates his desire for this formation in his initial command. The platoons each form a line individually and the 2d and 3d platoons close on the 1st platoon without further command (see Figure 3-36).
5. Company Line with Support.
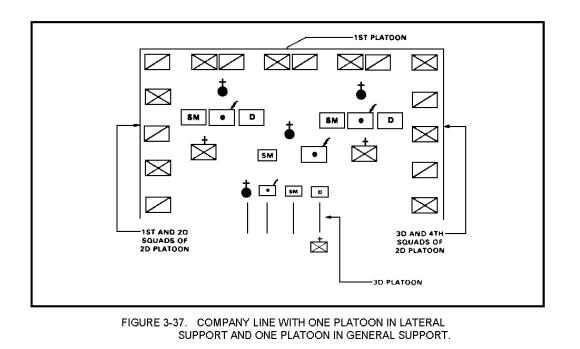
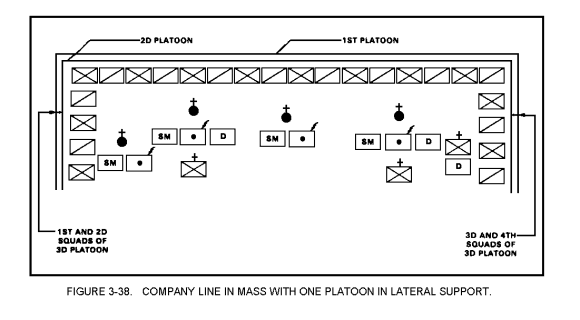
a. In company formations, the 1st platoon normally forms the assault element and the 2d and 3d platoons are used in support. The support platoons can be used in the same manner as the support squads in platoon formations. Some variations of a company with support are illustrated in Figures 3-37 and 3-38.
b. When the company commander desires to rotate his assault platoon, he merely moves another platoon up to the head of the column prior to issuing his command for the formation to be used. One platoon can be relieved from the assault element by another platoon while in crowd control formation by having a support platoon pass through the assault platoon.
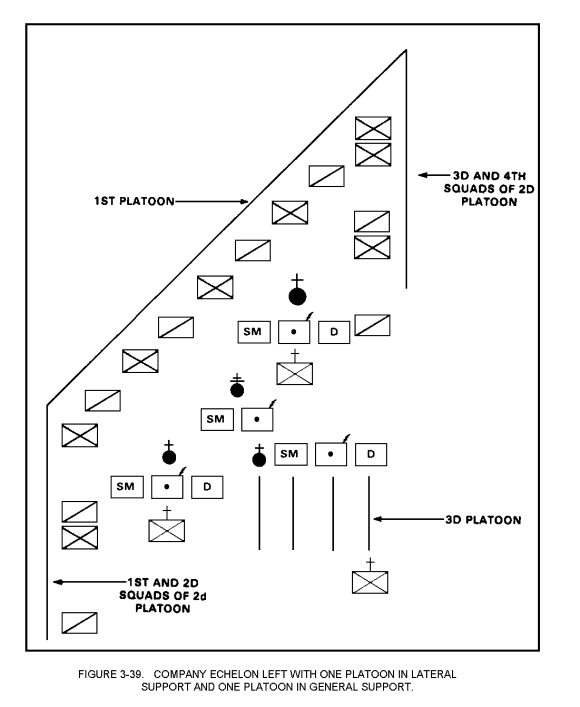
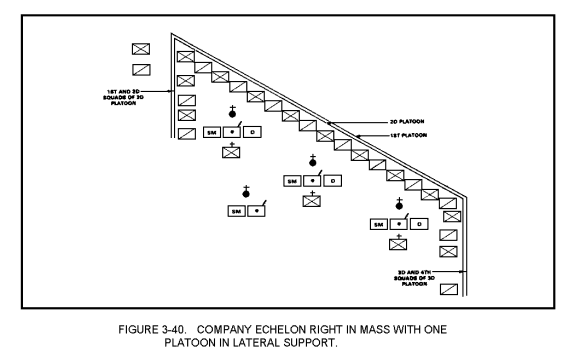
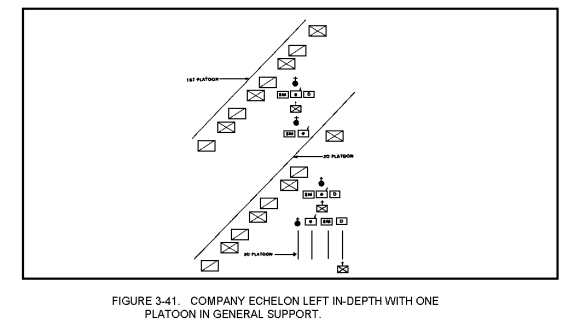
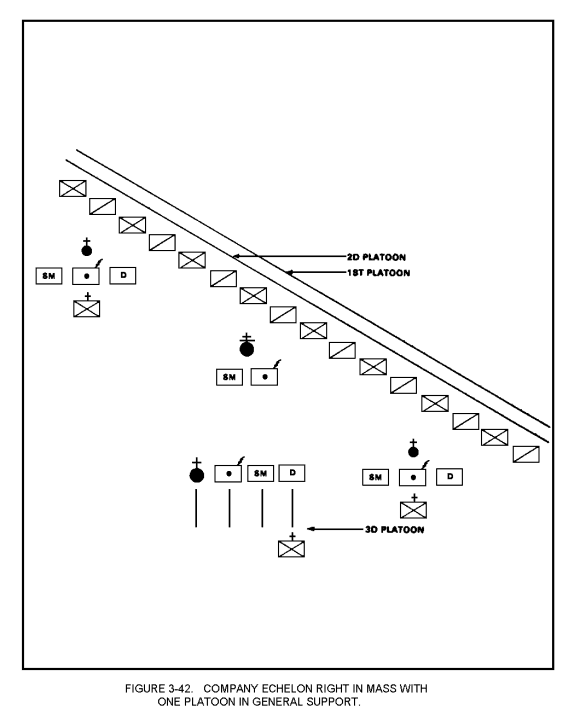
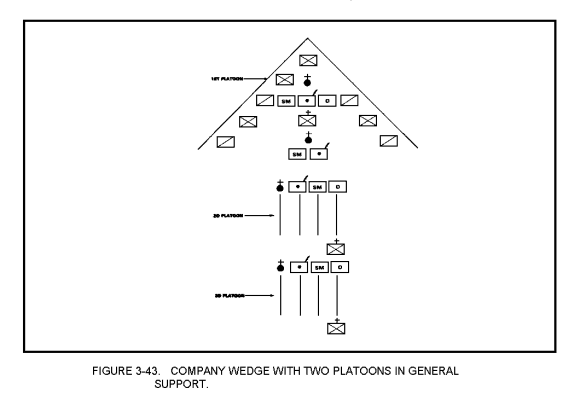
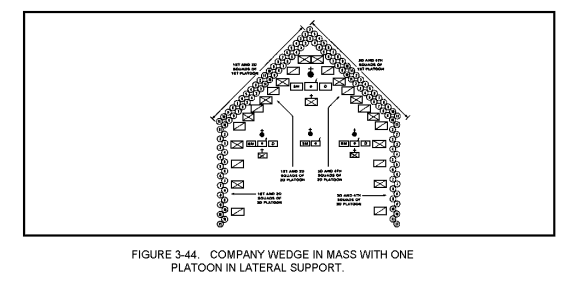
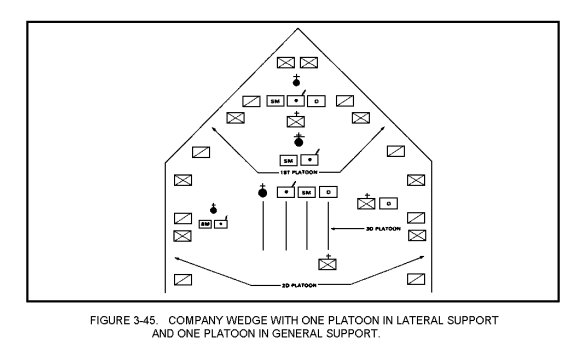
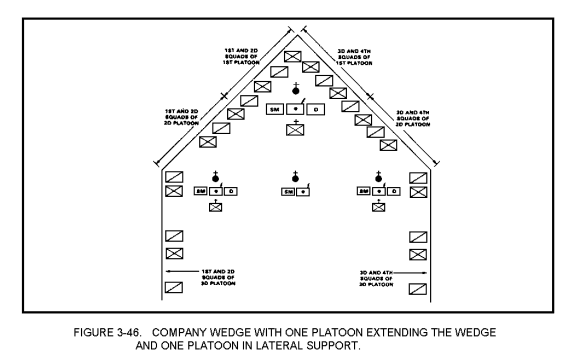
6. Company Echelon and Wedge.
The company echelon (right or left) and company wedge are formed in the same manner and with the same variations as the company line (see Figures 3-39 through 3-45).
7. Assembling a Company.
A company assembles for a crowd control formation in the same manner as a platoon or squad. Consideration must be given to the area he is operating in when assembling the company due to the size of company formations. When assembling the company, the commander takes a position to the rear of the formation and commands "COMPANY ASSEMBLE." The platoon leaders take charge of each platoon first just to the rear of the formation. Once the 3d platoon is assembled, the 2d platoon assembles around and to the front of the 3d platoon, then the 1st platoon around the 3d and 2d platoons, with all platoons facing the commander. The 2d and 3d platoons then dress on the 1st platoon. As each platoon is assembled they are commanded to Port Arms by the platoon leader and await further orders from the commander. If 4 platoons are used, assemble the 4th platoon first.
8. Considerations in the Use of Vehicles and Foot Troops.
a. When encountering large riotous groups, it may be helpful to use vehicles with foot troops in crowd control formations. While vehicles add strength to formations, certain safeguard measures should be taken.
(1) Windshields of vehicles may be in upright positions, removed, or completely depressed. If windshields are of safety glass, they offer some protection in an upright position to front seat occupants with minimum danger of injury from glass fragments.
(2) Shields or mobile barriers may be constructed by mounting a wooden or metal frame strung with barbed wire across the front of a vehicle.
(3) Foot troops in formation should walk as near the front corners of each vehicle as possible to prevent rioters from attacking the sides or rear of the vehicles.
b. Armored vehicles should be used when available and practicable because of their psychological effect and the protection they afford their occupants.
c. Vehicles should be used only in conjunction with foot troops.
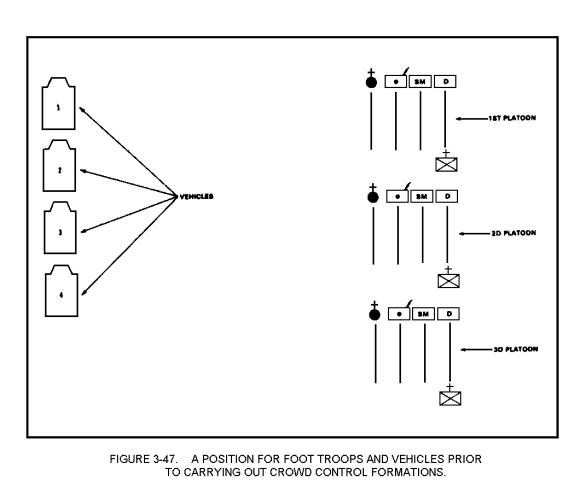
d. Whenever vehicles and foot troops are used, the commander of the foot troops commands the unit. He joins the leader of the motor section in the command (number 1) vehicle where he has a position of vantage (see Figure 3-47). In every instance, his commands are carried out through the subordinate leaders. A position that facilitates moving into a crowd control formation using foot troops and vehicles is illustrated in Figure 3-47.
e. If possible, headquarters personnel should travel with the commander.
9. Company Line with Support.
a. Command. The commands for vehicles and foot troops are the same as foot troops alone. Because of the additional noise and distances involved, the company commander gives the arm and hand signal for the line. The command and signal apply to the lead platoon only. The other platoons remain in general support until directed further.
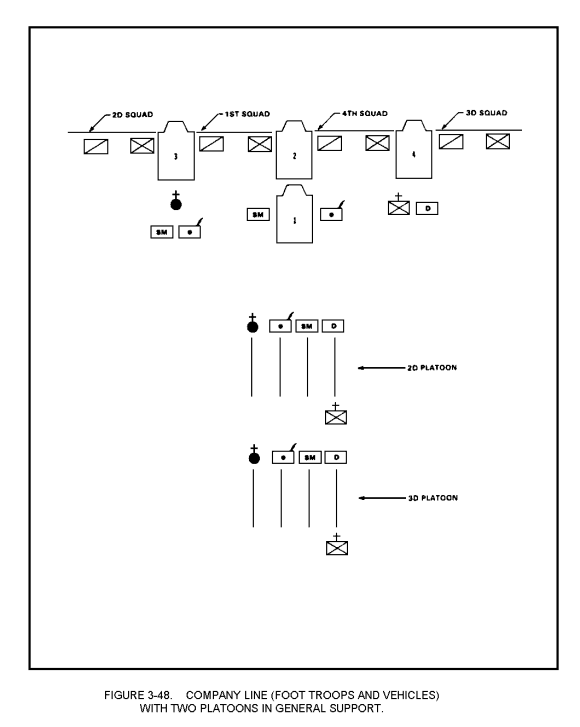
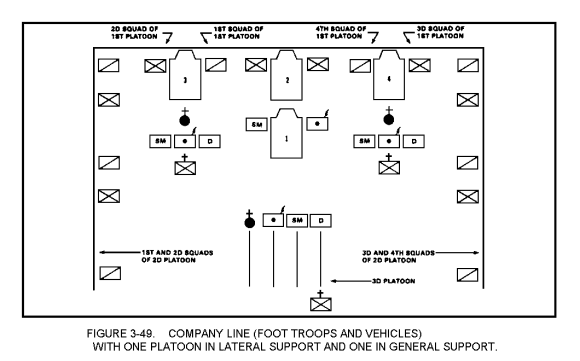
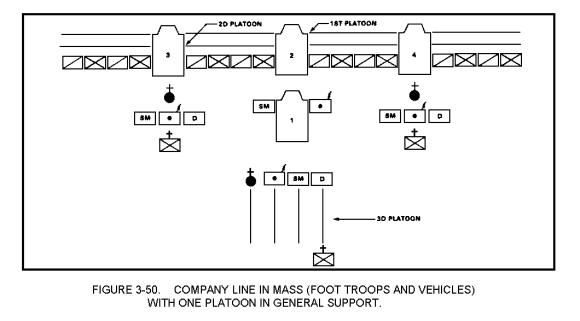
b. Execution. The motor section moves out first. The number 2 vehicle, moving to the right, passes the lead vehicle and establishes the position for the center of the line. At the same time, the 3d and 4th vehicles swing out to the left and right, respectively, and form to the left and right and slightly to the rear of the number 2 vehicle. The 2d and 3d squads of the lead platoon then move forward and form lines to the left and right, respectively, and on the front end of the number 2 vehicle. As soon as the troops are in position, the 3d and 4th vehicles close in on the left and right and tighten the formation. The 1st squad of the lead platoon then forms a line to the left of the third vehicle and the 4th squad to the right of the fourth vehicle to complete the company line. The command vehicle takes up a position behind the line where the commander can best direct and control the unit. The 2d and 3d platoons move forward and are used in general, lateral, or close support (see Figures 3-48, 3-49, and 3-50). In some instances, the foot troops may move into position first and the vehicles join the formation as needed.
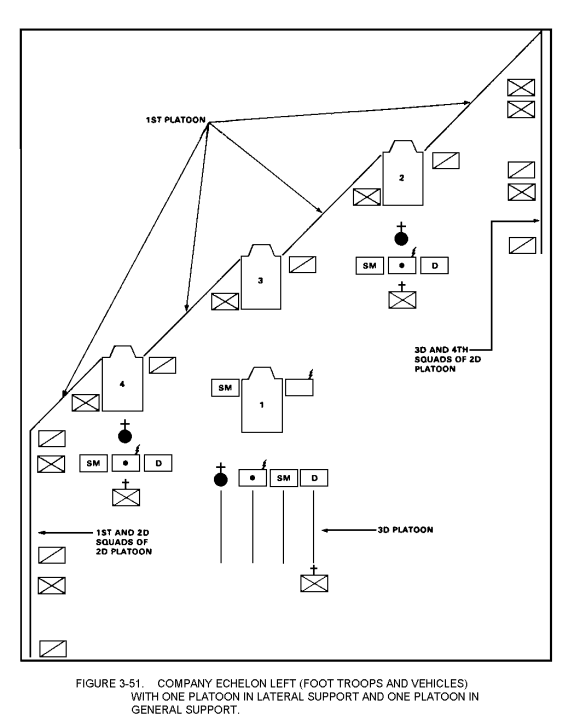
10. Echelon or Wedge.
To form an echelon right (left) or wedge, the same procedures for forming a line are followed (see Figure 3-51).
11. Assembling Foot Troops and Vehicles.
The command vehicle moves to a position to the rear of the formation; the commander, facing the formation, gives the motor section the hand signal for assembly. Immediately, the other vehicles return to their proper positions in column behind the command vehicle, while the troops stand fast. The second in command then assembles the foot troops in the usual manner.
12. Variations of Formations.
Many suitable variations to the formations described and illustrated above may be used, and appropriate commands and signals may be devised to carry them out. Because of the somewhat complicated nature and coordination required in these formations, however, new variations should be practiced extensively before they are used in actual riot situations.
Practice Exercise