

|
RDL Homepage |
Table of Contents |
Document Information |
Download Instructions |
LESSON ONE
M2 BRADLEY LEADER, TACTICAL CONTROL AND OPERATIONS
(PLATOON/SQUAD) (MOUT)
SOLDIER'S MANUAL TASKS:
| 071-326-3049 | Conduct troop leading procedures for an operation. |
| 071-326-5625 | Prepare and issue an oral platoon offensive operation order. |
| 071-326-5503 | Issue a warning order. |
| 071-326-5911 | Control mounted M2 Bradley platoon formations. |
| 071-326-5910 | Control dismounted M2 Bradley platoon formations. |
| 071-326-0573 | Control movement through urbanized terrain with an M2 Bradley platoon. |
| 071-326-0547 | Organize a platoon for the attack on a building in urban terrain. |
| 071-326-5914 | Consolidate and reorganize an M2 Bradley platoon. |
| 071-326-3060 | Consolidate and reorganize an M2 Bradley squad. |
OVERVIEW
TASK DESCRIPTION:
In this lesson you will learn to identify and understand the M2 Bradley leader, how to conduct troop leading procedures, prepare and issue oral platoon offensive operation order, issue a warning order, control mounted M2 Bradley platoon formations, control movement through urbanized terrain, and organize a platoon attack on a building in urban terrain.
LEARNING OBJECTIVE:
| TASK: | Identify and understand the M2 Bradley leader,tactical control and operations (platoon/squad) (MOUT). |
| CONDITION: | Given the subcourse material for this lesson and a combat (training) scenario, the student will complete the practice exercise at the end of this lesson. |
| STANDARD: | The student will demonstrate his comprehension and knowledge of the task by identifying and understanding the M2 Bradley leader, tactical control, and operations (platoon/squad) (MOUT). |
| REFERENCE: | The material contained in this lesson was derived from the following publication: STP 7-11M30/40 |
INTRODUCTION
In this lesson, you will study the conduct of troop leading procedures for an operation. As part of the process, you will study the preparation and issuance of the oral operation order for an offensive operation, and issuing a warning order. You will also study control of mounted and dismounted M2 Bradley platoon formations, control movement through urbanized terrain and organizing for the attack on a building in urban terrain with the M2 Bradley platoon. Later in another lesson, you will study defense and the M2 Bradley (MOUT) and the squad mission.
PART A - CONDUCTING TROOP LEADING PROCEDURES FOR AN OPERATION
1. Conducting Troop Leading Procedures for an Operation. The process which you, the leader, follow in receiving a mission, planning the mission, and then executing the mission is called the troop leading procedure (TLP). It begins when you are alerted for a mission and starts over again for each mission; it never ends. The troop leading procedure is a continuous process whose steps must all be completed to insure the success of your mission. Although each individual step is important, the exact order of their completion must remain flexible. In accomplishing the TLP, only you can determine the best order of completion. Circumstances unique to each combat situation will determine the exact order each step is completed. In accomplishing the TLP, you must remain flexible and ready to act at a moments notice. You must fully understand the tactics to be employed by your leaders and be able to adapt to a constantly changing battlefield. The TLP describes the process you must use to accomplish the mission. TLP requires time to complete. If time were unlimited, you could accomplish each step in great detail and be perfectly prepared for each mission. However, the battlefield seldom allows the luxury of unlimited time. As time is reduced, you must increasingly depend upon previous training/drills, and unit standard operating procedures (SOPs). Regardless of time, cover all the steps, even if only in abbreviated form to be sure that nothing is forgotten and that your personnel understand the mission and prepare for it.
| a. | STEP 1: RECEIVE THE MISSION. You may receive the mission as a warning order, operation order (OPORD), or fragmentary order (FRAGO). It may be verbal, written, or both. First instructions are usually in the form of a warning order. Upon receipt, analyze your mission and plan the use of available time. Often, the most critical resource you have to prepare a new mission is TIME, especially daylight hours. Make up a time schedule to effectively use available time. Take no more than one third of the available time and leave the rest for squad preparation. Starting with the time you must have your men, mission ready, work backwards, allowing your men enough time to complete each task. This procedure is called reverse planning. | |
| b. | STEP 2: ISSUE A WARNING ORDER. Initial instructions are usually given in a warning order. In a WARNING ORDER, a leader gives enough information to his unit to start preparing for the operation. Issue a WARNING ORDER to your platoon sergeant, squad leaders, and forward observer. Do so as soon as possible after you've received a warning order from your commander, analyzed the mission, and planned available time. Tell your men what the mission is, when it is to take place, what initial preparations they should make, and when you plan to issue your detailed order. | |
| c. | STEP 3: MAKE A TENTATIVE PLAN. Based on MISSION, ENEMY, TERRAIN, TROOPS, AND TIME (METT-T), make your tentative plan. If you already know the mission and terrain, you can make a quick decision about how your unit can accomplish its mission. This is a tentative plan that you may change if necessary when you go through the remaining steps. It gives you a starting point for coordination, reconnaissance, reorganization, and movement. | |
| d. | STEP 4: INITIATE THE NECESSARY MOVEMENT. This step more often applies to platoons than to squads; rarely does a squad move any distance independently from the platoon. Frequently, the company commander will get the platoon leaders together, take them to a position overlooking the area in which they will operate, and issue the order. Rather than let the company sit around waiting for its leaders to return, he may order the platoons to start moving toward the new location. When this happens, the platoon leaders need to have someone who can take the movement instructions back to their platoons and start them moving while the platoon leaders reconnoiter. As the platoon sergeant usually stays with the platoon when the platoon leader leaves, the assistant platoon sergeant can go with the platoon leader and take his instructions to the platoon. | |
| e. | STEP 5: CONDUCT RECONNAISSANCE. Reconnaissance (recon) is continuous throughout the TLP. This includes both map and ground reconnaissance. To make the best use of your men and weapons, you must see and evaluate the terrain on which they will fight. There will be times when you can only make a map reconnaissance but if you have the time and you have the first four steps in hand, get out and see the terrain. Give a recon objective to each squad leader or soldier who goes with you. You and the squad leader(s) whom you have designated as assault leader(s) should confirm enemy location, to include troop and weapons emplacement. You would also finalize your assault positions. Task one squad leader to confirm the locations that you had planned for the supporting machine guns. By accomplishing an effective reconnaissance, you can confirm your tentative plan or modify it to take advantage of your weapons and to provide for maximum protection for your troops. If you can see only part of the terrain, then make your detailed plan only for that part. | |
| f. | STEP 6: COMPLETE THE PLAN. Based on the reconnaissance, complete your plan for the operation. In an attack, you must decide how the platoon elements are to move and how to seize the objective. In a defense, you would decide where to place the weapons and how to tie the defense together. During Step 6, detailed coordination takes place with your commander, as well as units to your left, right, and rear. Whether modified from the original plan or not you will certainly add more detail. | |
| g. | STEP 7: ISSUE THE COMPLETE ORDER. A platoon or squad operation order (OPORD) is issued verbally. For an attack, you should give your order from a point where the squad leaders can see the objective. If you cannot get in a position to view the area, give the order using a terrain model or sketch. In a defense, try to give the order on the ground where the troops will defend. Use either a terrain model or sketch to help explain the order. All leaders in the platoon must make sure that all their men know the plan. | |
| h. | STEP 8: SUPERVISE AND REFINE. After the OPORD is issued, you must supervise to make sure that your men are making the necessary preparations to get the job done. Are they drawing the right equipment? Is maintenance being performed on the carriers? Are weapons ready? If you assigned special tasks, are they being accomplished? Squad leaders should issue verbal OPORD's to their troops. Once the operation has begun, you must see that the plan is followed and be prepared to refine your plan as the situation develops. You must continually supervise and refine throughout the operation. | |
PART B - THE ORAL PLATOON OFFENSIVE OPERATION ORDER
1. As a platoon leader, you must develop a clear and concise oral platoon order for the attack and issue it to your squad leaders. In issuing the order, make sure the squad leaders understand their mission and the specific coordinating instructions that apply to them. At a minimum, the order must contain the following items, properly placed in the fiveparagraph format:
| a. | Enemy and friendly situation. | |
| b. | The mission of the platoon/squad. | |
| c. | The tactical plan to accomplish the mission. | |
| d. | Consolidation instructions. | |
| e. | The location of the platoon leader during the attack. | |
| f. | The location of the carrier element (mech) during the attack or when the attack is conducted dismounted. | |
| g. | Signal instructions. |
2. Prepare and Issue an Oral Platoon Offensive Operation Order. The platoon sergeant/acting platoon leader is responsible for keeping the men informed through the squad leaders. A primary way of doing that is through the platoon order. Generally, the platoon order will be based on the operation order given by the company commander. The platoon order must be altered to delete information that does not concern the platoon and add sufficient detail to allow planning by the squad leaders. The oral platoon order should follow the same basic five-paragraph format used in the company order. That five-paragraph format is shown in the following paragraphs with a brief outline of what is included in each paragraph.
1. SITUATION: This paragraph contains all available information concerning the enemy and friendly situations.
| a. | Enemy forces: Any available information, such as strength, weaknesses, probable courses of action, weather, and terrain. | |
| b. | Friendly forces: All available information concerning the missions of the next higher and adjacent forces. | |
| c. | Attachments and detachments: Information concerning all units that have been attached to or detached from the platoon. |
2. MISSION: A clear, concise statement of the task that must be accomplished by the platoon (who, what, when, where, and why).
3. EXECUTION: Contains the mission for each rifle squad and attached element (if any). This paragraph also contains special instructions that apply to a specific squad or to the platoon as a whole, and the plan for fire support.
4. SERVICE SUPPORT: Administrative details, to include plans for ammunition, rations, resupply, and casualty evacuation.
5. COMMAND AND SIGNAL: Communications instructions, to include visual signals, radio frequencies and callsigns, and the platoon leader's and company commander's location during the operation.
3. The platoon leader must look for items in the company order that must be altered to fit the platoon's mission. For example, assume that paragraphs 2 and 3 of the company order are given as:
| "2. MISSION: Company A attacks 240600 May to seize Hill 492 and Hill 475 and continues the attack, on order, to seize Hill 510." | ||
| "3. EXECUTION: 2d Platoon makes the main attack on the right to seize Objective 1 and, on order, Objective 3." | ||
| a. | The 2d Platoon leader (acting) of an infantry platoon might alter those paragraphs as follows: | |
| "2. MISSION: 2d Platoon attacks 240600 May to seize Hill 492 and, on order, Hill 475." | ||
| "3. EXECUTION: 2d Squad leader, your squad will be fire support base for the platoon. You will establish your base-of-fire from that ridgeline at coordinates FL123456. Commence firing on my order. 1st Squad leader, your squad will attack to seize ..." | ||
| b. | The 2d Platoon leader (acting) of a mechanized (M113) platoon might alter those paragraphs as follows: | |
| "2. MISSION: The 2d Platoon attacks 240600 May to seize Hill 492 and, on order, Hill 475. The APCs will support the platoon with their .50 caliber machine guns from the ridgeline at coordinates FL123456." | ||
| c. | The 2d Platoon leader (acting) of a BIFV platoon might alter paragraphs 2 and 3 as follows: | |
| "2. MISSION: 2d Platoon attacks mounted unless forced to dismount. When forced to dismount, the fighting vehicle element will establish a base-of-fire from the ridgeline at coordinates FL123456. The close combat elements will then attack to seize ..." | ||
"3. EXECUTION . . ." |
4. Paragraph 1 of the platoon order should contain the mission of the company that was stated in paragraph 2 of the company order. Paragraph 4 and 5 will be similar to paragraphs 4 and 5 of the company order, but narrowed down to apply only to the platoon. For example, if paragraph 4 of the company order gives the location of the battalion field trains, the platoon order will probably not contain that information because it does not directly affect the squads. The responsibility of the platoon sergeant/acting platoon leader is to give the men the information that pertains to them. The five-paragraph order format should be used as a checklist to prevent omitting important information. It is not all-inclusive, however, and may be modified as necessary.
PART C - ISSUING A WARNING ORDER
1. Warning orders are used to give subordinate units advance notice of a contemplated action so that they may have time to make the necessary preparations. They are usually brief, oral or written messages. The platoon leader issues his warning order to the squad leaders, platoon sergeant, and forward observer. Each squad leader issues his warning order to his entire squad.
2. As a minimum, the warning order should include the following:
| a. | The mission should be a clear, concise statement of the task to be accomplished by the squad or platoon. | |
| b. | The time the operation or action is to take place. | |
| c. | Any specific instructions or special equipment and material required for the mission. | |
| d. | The time and place for issuance of the complete order and who is to attend. |
3. The following are examples of warning orders that would be made by the platoon leader and the squad leaders of his squad:
| a. | A platoon warning order might look something like this: |
Our mission is to attack the town of Hicks at 1830. The enemy has some good positions in the buildings. There may also be enemy tanks in the town. Draw six grenades for each man, and one LAW per man. Each squad will carry 10 blocks of C4, 10 nonelectric blasting caps, 10 fuse lighters, 100 feet of detonating cord, and 10 feet of fuse. The platoon sergeant will tell you where and when you can pick it up. Let me know by 1330 if you have any problems with radios or weapons. Meet me back here at 1405. At that time, we will move up to the ridge, overlooking the town, where I will give the complete order.
| b. | After hearing the platoon leader's warning order, each squad leader gives his squad a warning order like this: |
Our mission is to attack the town of Hicks at 1830 as part of the platoon. The enemy has well prepared positions in the buildings and probably has tanks with him. Each man will carry six grenades and one LAW in addition to the standard load for rifles and grenade launchers. Sergeant Evans, your team will handle our demolitions: Draw 10 blocks of C4, 10 nonelectric blasting caps, 10 fuse lighters, 100 feet of detonating cord, and 10 feet of fuse. Make sure you test burn the fuse. Private Smith, carry a climbing rope and a rappelling hook. The platoon sergeant will be here in 20 minutes to tell us where and when we can pick up our ammunition and equipment. I'm leaving now to get the platoon order; Sergeant Jones is in charge until I get back. We will meet here at 1515 for the OPORD.
PART D - CONTROL MOUNTED M2 BRADLEY PLATOON FORMATIONS
1. There are five basic formations for movement. They are the column, line, echelon, vee, and wedge. There formations are an aid to command and control; they are not straitjackets. The specific shape of the platoon formation is determined primarily by the mission, enemy situation, and terrain. The formation in which it is traveling prescribes its form only in a general way.
| a. | Column. You would select the column formation for road marches, for movement during limited visibility, and when passing through defiles or thick woods. An example of a mounted column formation is shown in Figure 1-1. |
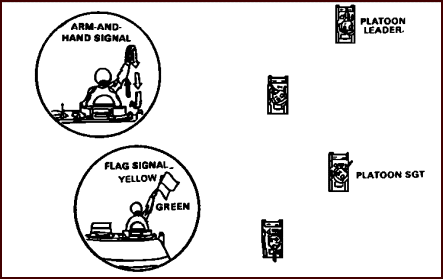
Figure 1-1. The Column Formation.
| b. | Line. You would select line formation when assaulting an objective, crossing open areas, leaving a woodline, or emerging from smoke. You would use this formation to cross an objective rapidly with maximum fire to the front. This formation lacks depth when compared to the column or wedge formations. An example of such a mounted line formation is shown in Figure 1-2. |
Figure 1-2. The Line Formation.
When desiring to protect a flank without changing the entire platoon formation, have two M2's stay on line while two M2's fall back in echelon to guard the right (left) flank. An example of such a formation is shown in Figure 1-3.
Figure 1-3. Modified Line Formation.
| c. | Echelon. You would select echelon formation when it is necessary to cover an exposed flank. An example of an echelon formation is shown in Figure 1-4. |
Figure 1-4. The Echelon Formation.
| d. | Vee. You would select the vee formation if the platoon leader requires firepower to the front and flanks. This formation can be utilized when the enemy situation is vague and the platoon leader must cover two likely locations. An example of a vee formation is shown in Figure 1-5 |
Figure 1-5. The Vee Formation.
| e. | Wedge. You would select the wedge formation when the enemy situation is vague. This formation provides excellent fire to the front end and good fire to each flank. It also allows control of the M2's and rapid deployment into other formations. Shift the wedge to make it heavy to the right or left by dropping one of the lead M2's back. Then direct the trailing M2 (right or left) to key on the adjacent M2. Such a formation is shown in Figure 1-6. |

Figure 1-6. The Wedge Formation.
NOTE: Although the visual signal depicted in Figure 1-6 conforms to doctrine, it is not suitable. The configuration of the M2 turret makes it difficult for other track commanders to see the signal. An alternative, established by SOP, is to extend the arms upward at a 45-degree angle.
2. There are three basic stationary formations: herringbone, laager, and maintenance.
| a. | Herringbone. When traveling in a column formation, select the herringbone formation to disperse the platoon. You should use this formation during an air attack or when the platoon must stop during movement. The M2's should be repositioned, as necessary, to take advantage of the best cover, concealment, and fields of fire as time permits. Direct dismount teams to establish the security during limited visibility or when the halt is more than temporary. Normally, this formation is executed without a radio command. The herringbone formation is shown in Figure 1-7. |
Figure 1-7. The Herringbone Formation.
| b. | Laager. You would select the coil or laager formation for tactical refueling and resupply. Do not use it for long periods during daylight, because it presents a lucrative target. Post security elements, to include airguards and dismount teams, and insure the M2 turrets are manned. There are two methods to form a laager. |
| (1) | When visibility is limited, form the coil by leading the platoon in a circle. When the circle is completed, all M2's stop, turn 90 degrees outward, and post security. |
| (2) | The second laager method is accomplished by quickly moving the M2 into position, and stopping. The other vehicles move directly to their assigned position according to the platoon's SOP, seek cover and concealment, and post security. This technique is used during daylight or whenever speed is required. Figure 1-8 demonstrates the laager formation. |
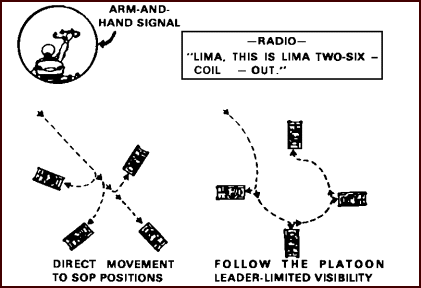
Figure 1-8. The Laager Formation.
| c. | Maintenance. The maintenance formation is not intended for use in a tactical situation. It may be used for conducting maintenance training. Have the M2's face each other, with trim vanes down (providing a workbench). Because all the M2's are facing toward the center of the formation, supervision of personnel and issuing of orders is simpler. An example of this formation is shown in Figure 1-9. |
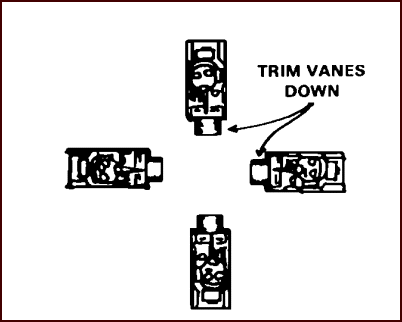
Figure 1-9. The Platoon Maintenance Formation.
PART E - CONTROL OF DISMOUNTED M2 BRADLEY PLATOON FORMATIONS
1. As the leader of a dismount element moving in a tactical situation, the selection of the correct formation is critical to mission success. Employ the correct movement technique based on the mission and the likelihood of contact. When choosing a formation, you should select one that:
| a. | Provides security (as directed by the tactical situation). | |
| b. | Allows the fighting vehicle element to support the dismount element whenever possible. | |
| c. | Disperses dismount teams. | |
| d. | Provides a position from which maximum firepower can be placed on a known enemy position without jeopardizing security. |
2. Employment of the correct movement. There are three basic formations for the dismount element: the column, the line, and the wedge.
| a. | Column. The column is the primary movement formation for the dismount element. It has good dispersion in depth and makes control easier. It provides limited fire to the front but a high volume of fire to the flanks. The lead dismount team is usually designated as the base team. The other dismount teams guide on the base team. Figure 1-10 shows a dismount element column. |
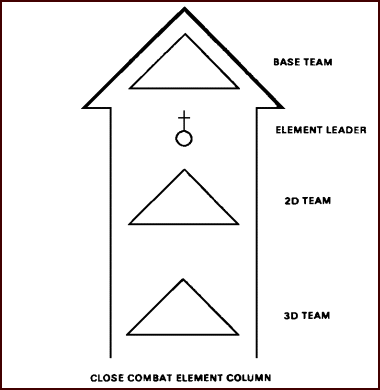
Figure 1-10. Dismount Element Column.
| b. | Line. You would select the dismount element line to assault an objective, and designate the base dismount team. In this formation, the dismount element can deliver maximum fire to the front but little to the flanks. Figure 1-11 shows a dismount element line formation |
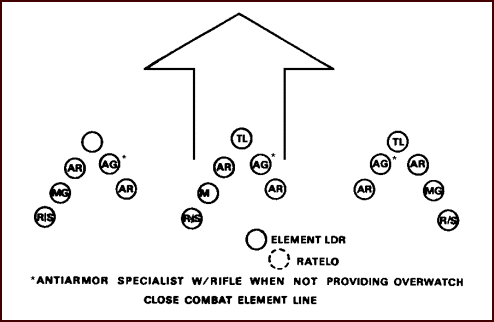
Figure 1-11. Dismount Element Line.
| c. | Wedge. Use the wedge formation when the situation is vague. This formation allows a large volume of fire to the front and to both flanks. It will usually insure that, on contact with the enemy, at least one dismount team will be free to maneuver. Figure 1-12 shows a dismount element wedge formation. |
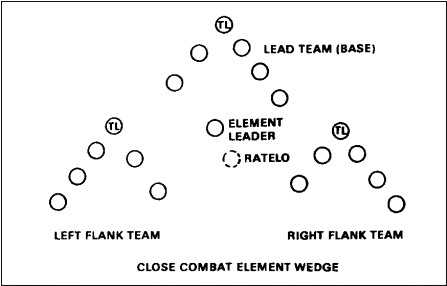
Figure 1-12. Dismount Element Wedge.
Although the formations discussed are shown as discrete formations, actual formations may consist of variations or even combinations of each. The choice will be up to you based on the situation and your professional judgment.
3. Movement Techniques. The selection of movement techniques are based on the likelihood of contact. Use of the formations is not fixed or rigid. Distances between dismount teams vary based on the terrain and visibility. As the terrain becomes more rugged, as vegetation becomes more dense, or if visibility is reduced, the distance between the dismount teams is reduced. The following are examples of contact versus movement technique:
| a. | Traveling. Use the traveling technique when speed is important and contact with the enemy is not likely. The dismount element's formation is adjusted to fit the situation. The dismount team leaders (squad leaders or assistant squad leaders) normally move at the head of their teams so they have better control and can see the platoon leader or platoon sergeant. The fighting vehicle element should be in position to support the dismount element, when possible. An example of this formation is shown in Figure 1-13. |
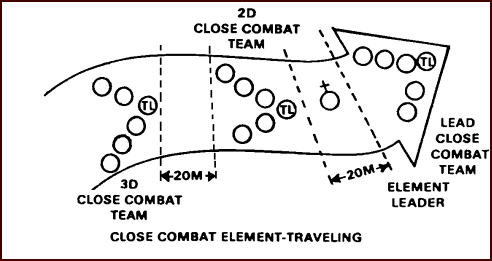
Figure 1-13. Dismount Element Traveling.
| b. | Traveling Overwatch. Use the traveling overwatch technique when enemy contact is possible, but not expected. Use caution, but move quickly. This technique provides more time and distance in which to react if the lead force runs into enemy fire. The dismount element normally uses a column or wedge formation. The lead dismount team tries to move a least 50 meters, and preferably 100 meters or more, in front of the rest of the platoon dismount element. The fighting vehicle element may be even farther to the rear or to a flank but should be in position to overwatch the dismount element, particularly the lead dismount team. |
| c. | Bounding Overwatch. Use the bounding overwatch technique when contact is expected and the terrain will not permit mounted movement, or when the dismount element is separated from the fighting vehicle element. This is the most deliberate and cautious of the movement techniques. The platoon leader directs the overwatching force to cover the progress of the bounding force from a covered, concealed position offering observation and fields of fire against likely enemy positions. The overwatching force must be able to immediately support the bounding force by providing suppression of fire and maneuver if the bounding force makes contact. The bounding force moves forward to a preselected position covered by the overwatching force. It secures the new position so that the overwatching force can then move forward. The length of each bound is tied to the observation, fields of fire, and range of weapons of the overwatching force. An example of this movement technique is shown in Figure 1-14. |
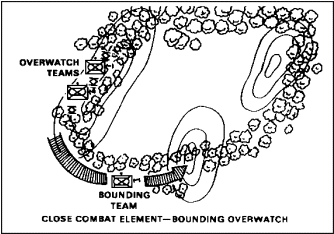
Figure 1-14. Dismount Element Bounding Overwatch.
PART F- CONTROL OF MOVEMENT THROUGH URBANIZED TERRAIN WITH AN M2 BRADLEY PLATOON
Movement Techniques on Urban Terrain. The same general platoon and squad movement techniques used on other terrain are also used on urban terrain.
| a. | Traveling Overwatch. Use traveling overwatch when moving toward an urban area and contact is possible. Upon entering the urban area, dismount teams should be deployed, and the platoon should move using bounding overwatch. Dismount teams should move alongside and through buildings, avoiding open areas whenever possible. When moving down streets, dismount teams should be staggered on alternate sides of a street. | |
| b. | Defense against ground level positions along a street. Assign two or three men to observe the upper floors of the buildings on the opposite side of the street. Fighting vehicle teams, overwatching the movement of the dismount teams, also travel staggered on alternate sides of the street. An example of this formation is shown in Figure 1-15. |
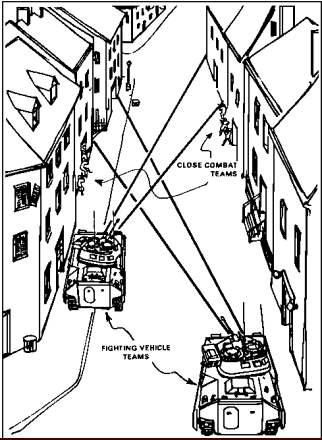
Figure 1-15. Cover for Dismount Teams.
| c. | M2 Direct Fire Support. Use the M2 to provide direct fire support for the dismount teams. Have the fighting vehicle teams move behind the dismount teams and move up to engage targets located by the dismount teams as shown in Figure 1-16. |
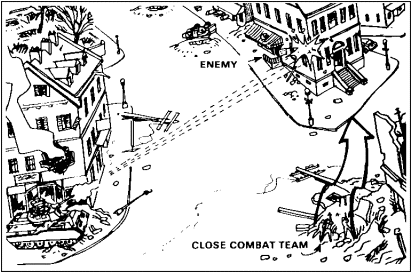
Figure 1-16. Fire Support for Dismount Teams.
| d. | Use of Fighting Vehicle Teams. Use the fighting vehicle teams to: |
| (1) | Destroy enemy positions within a building with the direct fire of the 25-mm automatic gun (using armor-piercing discarding sabot [APDS] ammunition) and the 7.62-mm coax machine gun (when the building is constructed of light material). | ||
| (2) | Suppress enemy gunners within the objective building and adjacent structures as described in Figure 1-17. |
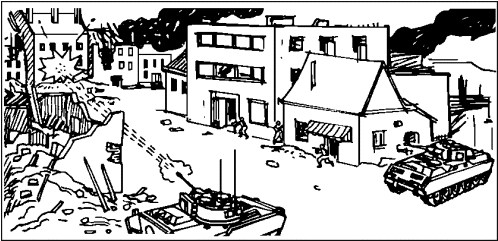
Figure 1-17. Suppression by Fire.
| (3) | Breach walls en route to and in the objective structure. This is best accomplished with the 25mm automatic gun, using a spiral firing pattern as shown in Figure 1-18. |

Figure 1-18. Spiral Firing Pattern.
| e. | Use of the 25-mm Automatic Gun. Use the 25-mm automatic gun, as it is the most effective weapon on the M2, while fighting on urban terrain. The use of the 25-mm automatic gun in support of dismount teams requires the following safety considerations: |
| (1) | High explosive 25-mm rounds arm 10 meters from the automatic gun and explode on contact. | ||
| (2) | APDS rounds discard plastic sabots to the front of the automatic gun when fired. Because of this hazard, a 175-meter safety fan is required in front of the 25-mm automatic gun. | ||
| (3) | When possible, the dismount teams should stay away from the front of the 25-mm automatic gun so that it may be fired as required. |
| f. | Use of Vehicle Smoke Screen Generators. The smoke generators on the M2 can be used effectively to cover the movement of dismount teams in the urban environment as described in Figure 1-19. When using the smoke generators on urban terrain, be aware that wind currents around and between buildings can be tricky and care must be exercised. |
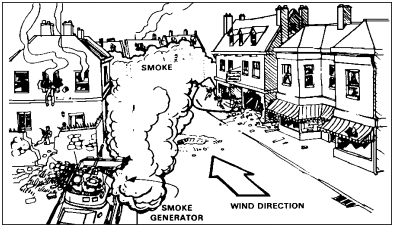
Figure 1-19. Smoke Screens Dismount Team Movement.
PART G - ORGANIZE A PLATOON FOR THE ATTACK ON A BUILDING IN URBAN TERRAIN
1. Organizing the Rifle Platoon into Two Forces. In organizing a platoon for an attack on a building, you will divide your unit into two forces; an assault force and a support force. The composition of the support force or the assault force will vary according to the situation and the platoon's mission.
| a. | The Assault Force. The assault force will normally consist of two rifle squads (+ or -) carrying only the fighting-load components of their load-carrying equipment, with a maximum load of ammunition, extra hand grenades, and LAWs. The platoon leader or acting platoon leader will move with the assault elements. Once the assault force enters its assigned building, it splits into smaller assault/support teams to search and secure the building. This action provides a support/securing team for the assault force inside the building. | |
| b. | The Support Force. The support force will consist of the platoon sergeant and the remaining squad (+ or -) carrying only the fighting-load components of their load-carrying equipment, with a maximum load of ammunition and hand grenades. In addition, the squad will have two machine guns, three Dragons or LAWs, and flame weapons |
2. Designation of Additional or Special Weapons. The following will dictate when a platoon will have additional or nonorganic weapons attached:
| a. | The platoon's mission. | |
| b. | The number of troops and types of weapons it has to cover its sector of fire. | |
| c. | Whether the platoon is expected to be attacked by enemy armor vehicles. | |
| d. | Whether the platoon's position offers good fields of fire against distant enemy targets. |
3. Assignment of Responsibilities to the Support and Assault Forces.
| a. | The support force will: |
| (1) | Occupy an overwatch position to support the assault force. |
| (2) | Isolate the objective or building to prevent the enemy from resupplying, reinforcing, or escaping. | ||
| (3) | Adjust indirect fire to suppress enemy fire. | ||
| b. | The assault force will: | ||
| (1) | Assault a building to enter and seize a foothold. | ||
| (2) | Search and clear the building room by room. | ||
| (3) | Mark all searched and cleared rooms. | ||
PART H - CONSOLIDATE AND REORGANIZE AN M2 BRADLEY PLATOON
Consolidation and Reorganization of an M2 Bradley Platoon on the Offense. The platoon leader must plan the required reorganization and consolidation of the objective and include the plan in his attack order to the squad leaders. The plan is tentative and flexible and may be changed as the situation requires, but it must be complete and in as much detail as possible.
| a. | Consolidation. Consolidation is the organizing and strengthening of a newly captured position to secure it against counterattack. The plan for consolidation includes areas of responsibility for the squads and the positions and mission for each M2 and any organic or attached crew-served weapons |
| (1) | Upon seizure of the objective, initial emphasis is on a hasty defensive posture to prevent a successful enemy counterattack. You must immediately send out two-man security elements to observe along the most likely avenues of enemy approach. Their primary purpose is to provide early warning. | ||
| (2) | The objective may be consolidated using either the terrain or clock method. |
| (a) | Terrain Method. With the terrain method, designate a certain section of the objective for each squad to occupy using specific terrain features (for example, trees, rocks, etc.). This method may also be based on avenues of approach if that is more appropriate. |
| (b) | Clock Method. With the clock method, assign each squad a portion of the objective by designating the direction of attack as 12 o'clock. Then assign each squad a portion of the clock. For example, "1st squad, your area of responsibility is from 9 to 11 o'clock; 2d squad, from 11 to 1 o'clock." |
| b. | Reorganization. Reorganization is the restoration of order in your unit and all other actions necessary to prepare your unit for further combat. |
| (1) | Reestablish the chain of command. Ensure that all key positions are filled by the remaining platoon members and that all members are made aware of the new chain of command. | |||
| (2) | Evacuate casualties and request replacements. | |||
| (3) | Execute the plan for organizing when the platoon does not have all four M2's. |
| (a) | Include crossloading of men and equipment from a disabled or missing M2 among all of the platoon's remaining vehicles. Direct the squad leader of the missing vehicle to ride on your track (platoon leader's). That way, the squad leader can follow the operation and get orders from you. Your M2 also serves as the point on which squad members assemble when the close combat element deploys. |
| (b) | Determine who, if anyone, will remain with a disabled vehicle to secure it and oversee its recovery. | |||
| (c) | Designate the ammunition and equipment needed to be crossloaded onto other vehicles. |
| (4) | Redistribute/resupply ammunition and weapons. Ensure your squad leaders pass out new ammunition, if available, and equalize that remaining. Take a quick inventory and request a resupply, if required. | ||
| (5) | Ensure all M2 vehicle teams and crew-served weapons are manned and positioned on likely enemy avenues of approach. | ||
| (6) | Ensure all PWs and enemy material and information are collected, reported, and evacuated if possible. | ||
| (7) | Give your company commander a situation report (SITREP) that includes the tactical situation, personnel strength, ammunition, weapon and vehicle status. |
PART I - CONSOLIDATE AND REORGANIZE AN M2 BRADLEY SQUAD
1. In reorganizing and consolidating an M2 Bradley squad, you must accomplish certain goals to be successful. These goals are as follows:
| a. | Reestablish local security in your sector. | |
| b. | Reestablish chain of command. | |
| c. | Redistribute or resupply ammunition and weapons. | |
| d. | Supervise evacuation of dead or seriously wounded. | |
| e. | Reorganize squad to compensate for personnel losses. | |
| f. | Consolidate position using either the terrain or clock method (offense). | |
| g. | Prepare to continue the attack (offense). | |
| h. | Replace obstacles and camouflage in your sector (defense). | |
| i. | Restore communications (defense). |
2. Consolidation and Reorganization in the Offense. The squad leader must execute the reorganization and consolidation of the objective as stated by the platoon leader in his attack order. The squad leader must be flexible to the plan as it is tentative and may change as the situation requires.
| a. | Consolidation. Consolidation is the organizing and strengthening of a newly captured position to secure it against counterattack. The plan for consolidation includes areas of responsibility for the squad members and the position and mission for the M2 and any organic or attached crew-served weapons. |
| (1) | Upon seizure of the objective, initial emphasis is on a hasty defensive posture to prevent a successful enemy counterattack. You must immediately send out two-man security elements to observe along the most likely avenues of enemy approach in your sector. Their primary purpose is to provide early warning. | ||
| (2) | The objective may be consolidated using either the terrain or clock method: |
| (a) | With the terrain method, secure a certain section of the objective designated by the platoon leader using specific terrain features, e.g., trees, rocks, etc. The terrain method may be based upon the principle avenues of approach. | |||
| (b) | With the clock method, secure an assigned portion of the objective by designating the direction of attack as 12 o'clock. Next, assign each fire team a portion of the clock, e.g., "vehicle team, your area of responsibility is from 9 to 10 o'clock; dismount team, from 10 to 11 o'clock, etc." |
| b. | Reorganization. Reorganization is the restoration of order in your unit and all actions necessary to prepare your unit for further combat. |
| (1) | Reestablish the chain of command. Insure all key positions are filled by the remaining squad members and that all members are made aware of the new chain of command. | ||
| (2) | Evacuate casualties and request replacements. | ||
| (3) | Redistribute/resupply ammunition and weapons. Reload M2 ready boxes. Insure your team leaders pass out new ammunition, if available, and equalize that remaining. Take a quick inventory and request a resupply, if required. | ||
| (4) | Insure the M2 vehicle team and all crew-served weapons are manned and positioned on likely enemy avenues of approach |
| (5) | Insure all PWs, enemy material, and information are collected, reported, and evacuated, if possible. | ||
| (6) | Give your platoon leader a situation report (SITREP) that includes the tactical situation, personnel strength, ammunition, weapon and vehicle status. |
This completes Lesson 1 on the M2 Bradley leader, tactical control, and operations (platoon/squad) (MOUT). After reviewing all the material presented in this lesson, you should complete the practice exercise for Lesson 1. Answers and feedback for the questions in the practice exercise will be provided to show you where further study is required.
GO TO:
Lesson 1 Practice Exercise:
Table of Contents