|
RDL Homepage |
Table of Contents |
Document Information |
Download Instructions |
LESSON TWO
MOVE THE TOW AND ENGAGE THE ENEMY
MOS Manual Tasks:
071-316-2556 - Determine the method of movement (TOW)
071-316-2651 - Recommend employment of TOWs
071-316-2801 - Consolidate and reorganize a TOW section following enemy contact
071-501-1010 - Recover a tracked vehicle using field expedients
OVERVIEW
TASK DESCRIPTION:
In this lesson, you will learn to determine the method of movement (TOW); to recommend employment of TOWs; to consolidate and reorganize a TOW section following enemy contact; and to recover a tracked vehicle using field expedients.
LEARNING OBJECTIVE:
| TASKS: | Identify the procedures for moving the TOW and engaging the enemy. |
| CONDITIONS: | You will be given information from FM 7-91 and STP 7-11H24-SM. |
| STANDARDS: | Moving the TOW and engaging the enemy will be in accordance with FM 7-91 and STP 7-11H24-SM. |
| REFERENCES: | The material contained in this lesson was derived from the following publications; FM 7-91 and STP 7-11H24-SM. |
INTRODUCTION
In combat, it is necessary to move the TOW launcher system from one firing position to another or from one area to another. The TOW may be used to engage the enemy in several ways. In addition, it is necessary to consolidate and reorganize TOW sections following the engagement of the enemy, and it may be necessary to recover bellied or overturned TOW vehicles using field expedients. Lesson Two of this subcourse provides instruction in each of these areas.
PART A - DETERMINE METHOD OF MOVEMENT (TOW)
1. Battlefield Movement.
The movement of units on the battlefield is an essential part of all combat operations. Tactical movements are conducted using techniques consistent with the requirement for speed, enemy situation, terrain, and visibility. Tactical road marches, a form of tactical movement, are conducted in division and corps rear areas to rapidly relocate units when the probability of enemy contact is remote and security requirements are minimal. Paragraphs 2 and 3 of this part of the lesson discuss how Anti-armor platoons move on the battlefield when enemy contact is likely and security is required. These paragraphs include a discussion of maneuver once enemy contact is made.
2. Movement Fundamentals.
Whether moving when not in contact or after enemy contact is made, the platoon must reduce exposure to observation and fires. Skillful use of terrain, avoidance of possible kill zones, and use of measures to counter enemy observation and fires are basic to effective movement.
a. Use Terrain for Protection. Terrain offers cover and concealment from observation and fires. Moving platoons must make maximum use of cover and concealment to accomplish this mission. Terrain-driving techniques can help units take advantage of the terrain over which they must move. These techniques include the following:
- Use cover and concealment.
- Avoid skylining.
- Do not move directly forward from a defilade firing position.
- Cross open areas quickly.
b. Avoid Possible Kill Zones. The platoon must avoid large, open areas; mainly those dominated by high ground or by terrain that afford cover and concealment. These are likely enemy kill zones. The enemy will try to incorporate those areas into his defensive scheme of action to capitalize on the long-range fields of fire of his antitank guided missiles and other direct-fire weapons. If likely kill zones must be crossed, then cross them rapidly. Use countermeasures to suppress likely and suspected enemy positions.
c. Use Countermeasures. Common countermeasures are suppressive fire, smoke, and camouflage.
(1) Suppressive Fire. Suppressive fire can be provided by direct-fire or indirect-fire weapons systems. It is used to degrade the enemy's ability to acquire and engage targets, which may cause enemy casualties. Direct-fire weapons systems are inherently more accurate, lethal, and responsive than indirect-fire weapons systems. However, indirect-fire weapons systems are usually more effective for suppression. This is because they can engage targets behind masking terrain (high-angle fire) and they have greater range and more effective munitions (DPICM, smoke, and high explosive).
(2) Smoke. Smoke to aid movement may be delivered by artillery or by the maneuver battalion's organic mortars, smoke pots, smoke generators, or vehicular-mounted launchers. Smoke is used to obscure and degrade the enemy's vision within and beyond his location or to screen the friendly force. With thermal sights, the platoon may still engage identified point targets through this smoke. Smoke to screen is employed on the friendly force or between it and the enemy. It is also used to degrade enemy ground and aerial observation and point fires.
(3) Camouflage. Properly selected and applied, camouflage blends vehicles and troops with the surrounding area. It complicates the enemy's target detection effort, especially from longer ranges. Because of the wide use of night vision aids, camouflage is equally important at night. It will not, however, totally guard against detection by thermal imagery devices.
3. Movement When Not in Contact.
Maneuver companies and battalions move on the battlefield using the movement techniques of traveling, traveling overwatch, and bounding overwatch. These techniques are selected based upon expected enemy contact, as shown in Figure 2-1.

Figure 2-1. Selection of Movement Techniques.
Traveling provides the greatest speed. Bounding overwatch provides the highest readiness before contact. All three movement techniques allow the moving unit to make initial contact with its smallest force. The unit commander determines the technique to use based upon his expectation of enemy contact and the requirement for speed (based upon the mission, the time available, the terrain, and visibility). In each of the three movement techniques, the anti-armor unit leader uses a combination of checkpoints, phase lines, and time limits to trigger the movement of his anti-armor elements.
a. Support Role. Because of their vulnerability while moving (limited armor protection and no capability to fire the TOW on the move), TOW platoons do not lead. In any of the three movement techniques, anti-armor platoons are best when positioned to perform as the overwatch element. This reduces the chance that an anti-armor platoon will make initial enemy contact. Because of this, an anti-armor platoon gears its movement to provide continuous coverage for the supported unit rather than covering its own movement. Whether supporting a mounted or a dismounted force, the anti-armor platoon leaders must anticipate how to best support the move, considering the terrain and the movement technique being used.
(1) Traveling. The traveling technique (shown in Figure 2-2) is used when enemy contact is not likely and speed is important. The lead and the trail elements of a unit using the traveling technique move at the same time but are dispersed for security. Terrain or other restrictions may force closing up.
However, when conditions permit, lateral dispersion is resumed. A traveling unit organizes to facilitate a rapid transition to a more secure movement technique (traveling overwatch or bounding overwatch) or maneuver, in case of unexpected enemy contact. The location of an anti-armor platoon in a battalion using the traveling technique and the command relationships established are based upon the commander's knowledge of the enemy and the terrain and his plan of action once contact is made.
(a) Anticipated Enemy Contact. If the battalion commander anticipates contact with an armor threat before he reaches his objective and terrain and visibility allow the use of the TOW, one or more anti-armor sections or one anti-armor platoon may be attached or placed under operational control (OPCON) of the lead company. This provides the lead company with a dedicated anti-armor element in overwatch.
(b) Use of Combat Column Formation for Traveling Overwatch. Companies using traveling overwatch normally move in a combat column formation. Platoons are staggered laterally with 50 to 100 meters between vehicles (mounted) or 20 to 50 meters between platoons (dismounted). Trail platoons may move on parallel routes to shorten the column and reaction time. These distances may be increased or decreased, depending upon terrain and visibility.
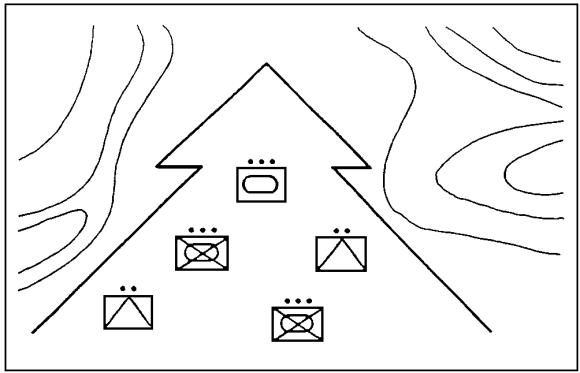
Figure 2-2. Traveling Technique.
(c) Dispersion of Remaining Anti-armor Sections or Platoons. Remaining anti-armor sections or platoons may be dispersed among the trailing elements of the battalion or they may move as a single element within the battalion column. By retaining the anti-armor company (minus) or platoon (minus) under his control, the battalion commander has an anti-armor force with which to rapidly respond to events.
(2) Traveling Overwatch. The traveling overwatch technique is used when enemy contact is possible. Thus, greater readiness is needed but speed is still important. To achieve this readiness, the distance between the lead and the following elements is increased. This distance is not fixed. The elements following stay far enough behind to avoid fire that is directed at the lead elements but close enough to provide support by maneuver if the lead element makes contact. In this movement technique, the lead element continues to move and the trail element follows with occasional stops to overwatch the movement of the lead element. Considerations for anti-armor platoons moving with companies and battalions using traveling overwatch are similar to those for traveling except that the probability of enemy contact is greater.
(a) Continuous Overwatch. An anti-armor section or platoon moving with the lead company in a battalion, using the traveling overwatch technique, regulates its movement in relation to the movement of the lead position. This provides continuous overwatch on likely enemy positions and armor avenues of approach. Speed will vary and anti-armor sections may occasionally halt in firing positions. Because of the range of the TOW, the anti-armor elements need not immediately follow the lead platoon. Another infantry or tank platoon may be closer to the lead platoon and can provide overwatch fires on any enemy that may appear at closer ranges.
(b) Traveling Overwatch Technique. If there are suitable fields of fire, an anti-armor platoon moving with an infantry company in traveling overwatch may move forward by bounds, as shown in Figure 2-3. In such cases, anti-armor sections bound forward alternately to provide overwatch, taking care not to move so far forward that they can be suppressed by enemy fires directed at the lead platoon. This technique for continuous overwatch is relatively easy to perform for anti-armor platoons that are moving with dismounted infantry over traversable terrain. At faster speeds, with mechanized infantry over-watching, anti-armor elements normally move continuously and occupy firing positions as the situation permits. If elements within the lead company are not bounding, anti-armor elements normally will not bound either.
(c) Movement with Trailing Platoons. In situations in which fields of fire are not suitable for the TOW, the MK 19 on the HMMWV can be used as an antipersonnel and a close-in anti-armor weapon. Anti-armor elements not equipped with the MK 19 or .50-caliber machine gun would move with trailing platoons. Anti-armor elements moving with trailing companies may move as in traveling. They may also be assigned to overwatch avenues of approach that lead into the flanks or the rear of the moving battalion. The battalion commander may retain control of a position of his anti-armor unit, so he can rapidly shift it to threats anticipated or encountered during the move.
(3) Bounding Overwatch. This technique is used when enemy contact is expected. It is the most secure but the slowest of the movement techniques. Part of the moving force, the overwatch element, occupies a covered and concealed position that affords good observation and good fields of fire in the direction of the expected enemy. Another part, the bounding element, covered by the overwatch element, moves forward to a selected position. It secures the position and becomes the overwatch element so that the previous overwatch element becomes the bounding element. The bounding element does not move beyond the range of the weapons in the overwatch element. It also takes care not to mask the fires of the overwatch element.
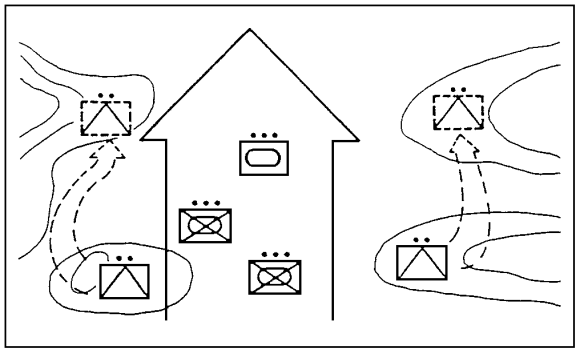
Figure 2-3. Traveling Overwatch Technique.
(a) Use By Battalion Units. This technique may be used by all battalion units. A moving battalion may bound with its lead company and move following companies using the traveling overwatch technique or it may use one or more companies to over-watch the movement of the lead company. Overwatch by trailing companies may allow the lead company to move continuously and faster using the traveling overwatch technique. The terrain and visibility, knowledge of the expected enemy, and the requirement for speed determine how this technique is employed. As with previously discussed movement techniques, anti-armor platoons may execute bounding overwatch under battalion control or attached or under OPCON of an infantry company. The anti-armor element is best employed as part of the overwatch.
(b) Orient on Enemy Locations or Avenues of Approach. The infantry company normally executes bounding overwatch by leading with a single platoon and overwatching with the remainder of the company if terrain and visibility permit. The overwatching platoon with the anti-armor element is positioned to provide immediate supporting fire if the bounding element makes contact. The anti-armor platoon orients on suspected enemy locations and avenues of approach. They do not orient on the bounding element.
Other direct-fire weapons orient on likely or suspected enemy locations at closer ranges. Indirect-fire weapons are prepared to deliver suppressive fires on planned targets or in response to requests for immediate suppression on unplanned targets. Figure 2-4 shows bounding overwatch within a moving infantry company.
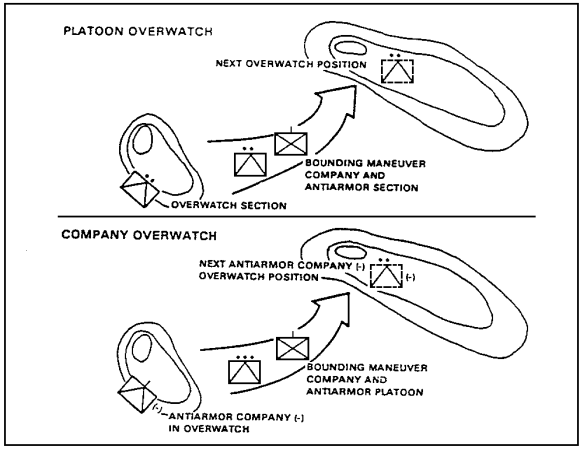
Figure 2-4. Bounding Overwatch Technique.
(c) TOW Overwatch Role. An important consideration when establishing the overwatch is that the TOW is not a suppressive or volume fire weapon. However, it does provide long-range, accurate fire on point targets and complements a mix of other direct-fire and indirect-fire weapons in the overwatch role. The MK 19 and the .50-caliber machine gun provide the necessary mix for suppressive or volume fire. The 40-mm grenade has a high trajectory when launched from the MK 19. It can be used to cover dead space that normally could not be reached. The MK 19 and the .50-caliber machine gun may be used to cover the disengagement of the TOWs. Specific tasks for the overwatch element include the following:
- Place fires on suspected enemy positions that could engage the bounding element out to and beyond the next overwatch position.
- Maneuver in support of the bounding force.
- Call for and adjust indirect fires.
- Maintain direct communication with the bounding force.
(d) Commander's Instructions. Since a company conducting bounding overwatch expects to make contact on each bound, the commander ensures that leaders of both overwatching and bounding elements understand what is to be done before each bound begins. Checkpoints, phase lines, other control measures, and SOPs are used to reduce the length of orders and use of the radio. The commander's instructions include the following;
- Location of or direction to the enemy.
- Size and type of enemy force (if known).
- Position of the overwatch element.
- Location of the next overwatch position.
- Route to be used by the bounding element.
- What the bounding element will do when it arrives at the next overwatch position.
- Actions on contact.
- How and where the next order will be given.
4. Maneuver.
Once enemy contact has been made and fires are initiated, tactical movement becomes maneuver. Maneuver is the employment of forces through movement supported by fire to achieve a position of advantage from which to destroy the enemy. It is an immediate change from and an extension of the movement techniques already discussed.
a. Support-By-Fire and Moving Elements. Maneuver involves the actions of two elements: a support-by-fire element and a moving element, as shown in Figure 2-5. The support-by-fire element covers the moving force by firing at the enemy. The moving element moves forward to close with the enemy or to reach a better position from which to fire. Depending upon the distance to the enemy and the amount of cover and concealment available, the support-by-fire element and the moving element may switch roles, as needed, to continue maneuvering. Before the moving element advances beyond the supporting range of the support-by-fire element, it takes a position from which it can fire on the enemy and allows the support-by-fire elements to move. Maneuver can be conducted mounted or dismounted and at any organizational level.
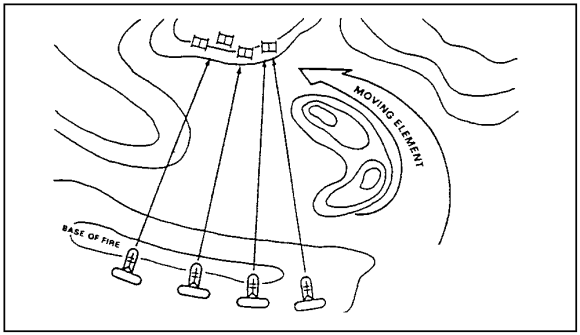
Figure 2-5. Maneuver.
b. Participation of Anti-armor Platoons. Anti-armor platoons participate in maneuver with companies and battalions. They may be part of the support-by-fire element or the moving element. When part of the moving element, the anti-armor platoon moves to gain better firing positions. It does so under the protection of leading infantry or tanks. Anti-armor sections and platoons add their fires to the assault, but they do not close with the enemy. Anti-armor elements are not assault units.
c. Engagement of Point Targets at Long Range. As part of the base of fire, anti-armor elements engage long-range point targets, such as enemy tanks, that are in prepared positions. Tanks and other infantry direct-fire weapons engage point and area targets at closer ranges. These weapons, along with supporting indirect fires, add volume to the base of fire.
5. Control TOW Section Movements.
TOW sections normally move in coordination with other forces, either within the march column or as part of a force in an overwatch position. When used in an overwatch role, the TOW section covers the movement of the bounding element of the force and moves with the overwatching force. When moving forward or rearward between overwatch positions, the section is normally covered by another TOW section or tanks. TOW squads within a section may cover the movement of each other between overwatch positions when other TOWs or tanks are not available.
| NOTE: | The distance between overwatching positions is influenced by the terrain, but the distance should not exceed 1,000 meters. Therefore, the overwatch can engage 2,000 meters beyond the bounding element. REMEMBER--STANDOFF RANGE. |
a. Forward Movement. Each section moves forward by squads within the sections.
b. Rearward Movement. Each section moves rearward by section.
c. TOW Sections Move with Tanks. Often, TOWs work with tanks. The tank is an assault weapon. The TOW is not an assault weapon. Tanks, because of their better crew protection, more rapid rate of fire, greater mobility, and larger loads of ammunition, normally engage enemy armor at closer ranges. TOWs support tank movement from overwatch positions behind them (or to the flanks) and engage targets at longer ranges.
| NOTE: | When displacing to the rear, TOWs move back first, covered by the tanks. Once the TOWs are in firing positions from which they can cover the movement of the tanks, the tanks displace to new positions. |
6. Use Terrain Properly (Terrain Driving).
Use the guidelines in this paragraph to ensure that terrain is used properly.
a. Practice Terrain Driving. No matter which technique of movement is used (traveling or bounding), terrain driving should always be practiced. It is essential when contact is possible or expected. Squad and section leaders should give the driver specific instructions as to the route that provides the best cover and concealment.
b. Follow Rules. Follow terrain driving rules to reduce exposure to effective enemy fire.
(1) Use all available cover and concealment.
(2) Never skyline.
(3) Do not move directly forward from a defilade position.
(4) Quickly cross open areas.
| NOTE: | The TOW launch tube and tracker can be kept in the ready-to-fire position for short moves. However, for extended moves over rough terrain or during formation movement, the TOW should be kept inside the vehicle to prevent damage or recognition by enemy observation posts (OPs). |
c. Use Terrain for Cover and Concealment. When moving between overwatch positions, protect the TOW section by using the terrain to cover and conceal its movement.
d. Use Smoke and Suppressive Fire. When terrain between overwatch positions does not conceal movement, smoke and suppressive fire by artillery and automatic weapons is placed on known or likely enemy positions while TOW sections quickly move between positions.
PART B - RECOMMEND EMPLOYMENT OF TOWs
1. General.
Following the basic rules of anti-armor unit employment increases the probability of destroying targets and enhances the survivability of the anti-armor elements. These basic rules are discussed in this Part B.
2. Mutual Support.
Anti-armor units support each other due to their assigned tasks, their relative positions (with respect to each other and to the enemy), and their inherent capabilities. Mutual support is established when tows are employed by section, and sectors of fire are overlapped between sections.
a. Employing by Section. The employment of TOWs by section establishes mutual support between two squads, as shown in Figure 2-6. If one squad is attacked or forced to displace, the other can continue to cover the assigned sector. To achieve this, the squads are positioned so that the fires directed at one squad suppress only that squad.
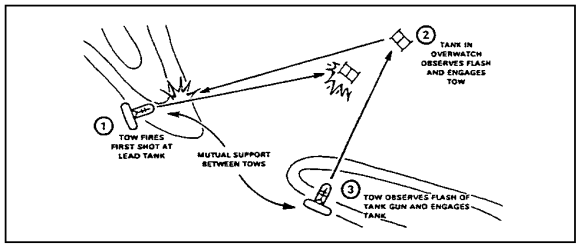
Figure 2-6. Employment by Section.
b. Overlapping Sectors of Fire. Overlapping sectors of fire (shown in Figure 2-7) are vital to mutual support. Primary, alternate, or secondary sectors of fire are used.
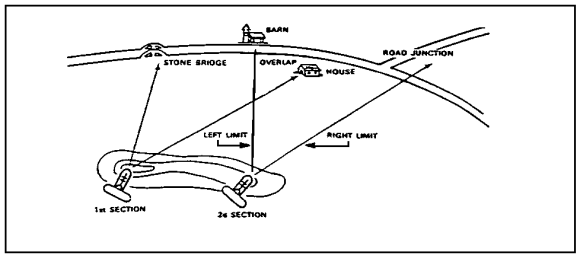
Figure 2-7. Overlapping Sectors of Fire.
3. Security.
Anti-armor units can be attacked by dismounted enemy infantry. Anti-armor units should be positioned near friendly infantry units for protection. Anti-armor squads need not be in the same place as the infantry, but the infantry should be able to cover dismounted avenues of approach to the anti-armor positions. When moving with infantry, anti-armor units provide their own local security.
4. Flank Shot Engagements.
Anti-armor squads and sections must be positioned to engage tanks from the flank. Flank shots at enemy tanks are more desirable than frontal shots for the following reasons:
a. Armor Protection. A tank has its greatest armor protection in the front.
b. Front Orientation. A tank is set up to orient to the front. Its laser range finder, firepower, vision ports, and crew are all directed to the front.
c. Likelihood of Detection. A tank engaged from the front is less likely to be killed and more likely to detect and suppress the attacking anti-armor units.
d. Vulnerability. A tank is more vulnerable and creates a larger target from the flank.
5. Massed Fires.
Mass is achieved by concentrating the effects of combat power at the decisive place and time to gain favorable results against the enemy. The anti-armor unit achieves mass through mutual fire support, detailed fire control, and fire distribution measures synchronized with the combat elements of the supported unit.
6. Standoff.
The perception of standoff to mean "engage armor vehicles beyond 2,000 meters to the maximum range (3,750 meters)" is not always tactically feasible for the following reasons:
a. Extra Tracking Time. The extra tracking time beyond 2,000 meters increases the likelihood of gunner error and gives the enemy more reaction time to maneuver against the friendly position if he is engaged by frontal shots.
b. Reduced Hit Probability. The probability of a hit at an extended range is reduced, especially through thermal sights or any form of obscuration.
c. Reduced Flank-Shot Hit Probability. Ranges beyond 2,000 meters decrease the probability of flank-shot hits due to extended tracking time, speed of enemy vehicles, and terrain restrictions.
| NOTES: | The T-64B and the T-80 Soviet main battle tanks can fire antitank guided missiles (ATGM) through their main gun tubes. These missiles have ranges up to 4,000 meters, which negate the standoff. Threat armored vehicles can fire high explosives (HE) to suppress TOW gunners at ranges greater than 2,000 meters. |
7. Cover and Concealment.
Cover and concealment is critical to the survival of anti-armor weapon systems. Except in the Improved TOW Vehicle (ITV), the TOW system has several inherent weaknesses during tracking.
- Long flight time.
- Slow rate of fire.
- Distinctive signature.
- Exposure of the gunner, except ITVs.
The effects of these weaknesses can be reduced through cover and concealment. Leaders should look for terrain that affords good cover and concealment. Conspicuous terrain features, such as lone buildings or trees, hilltops, and other obvious positions, should be avoided. To further reduce the vulnerability to enemy fire, anti-armor weapons should be dispersed laterally and in depth so that no two weapons can be suppressed at the same time by a single weapon. If possible, anti-armor squads should be at least 300 meters apart, as shown in Figure 2-8.
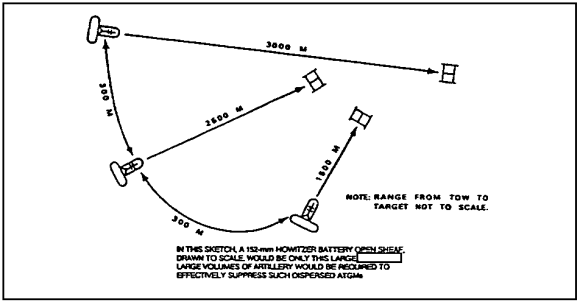
Figure 2-8. Dispersion Between Squads.
This minimizes the casualties and equipment damage that could result from an artillery barrage. These aspects of cover and concealment also apply to movement and to the selection of routes.
a. Cover (Natural and Man-Made. Cover is protection from the fire of enemy weapons and from enemy observation, as shown in Figures 2-9 and 2-10. It may be natural or man-made.
(1) Natural Cover. Natural cover includes reverse slopes, ravines, and hollows.
(2) Man-Made Cover. Man-made cover includes fighting positions, walls, rubble, and craters.
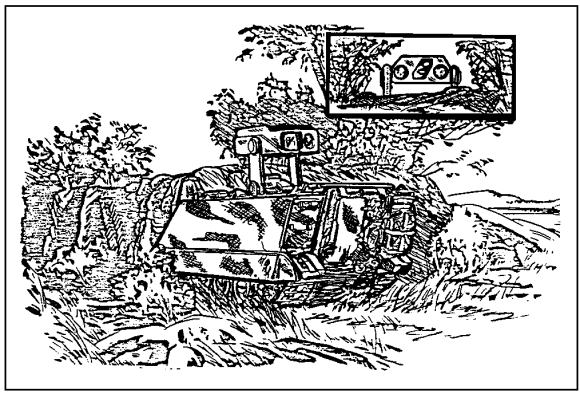
Figure 2-9. Cover.

Figure 2-10. Reverse Slope.
b. Concealment. Concealment (as shown in Figure 2-11) is protection from observation. It is anything that hides a soldier, a unit, or a position from ground and aerial observers and gunners. It includes not only camouflage, light, noise, movement, and odor discipline. Night vision devices and other detection devices penetrate darkness and prevent it from providing sufficient concealment. Leaders must choose inconspicuous positions that do not skyline TOW launchers.
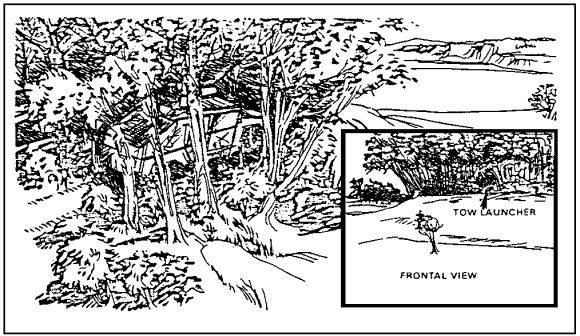
Figure 2-11. Concealment.
8. Employment in Depth
Anti-armor fire should be employed in depth.
a. Offense. In the offense, routes and firing positions should be selected to support the forward movement of attacking units.
b. Defense. In the defense, anti-armor squads may be either forward initially and moved to in-depth positions as the enemy closes or they may be positioned initially in depth.
9. Employment as Part of a Combined Arms Team.
The skillful integration of infantry, engineer, and indirect-fire assets greatly improves the survivability and lethality of anti-armor units.
a. Infantry Assets. Infantry is needed to provide local security, to emplace obstacles (wire and mines), and to engage dismounted infantry and armor.
b. Engineer Assets. Engineer assets help shape the engagement area by emplacing obstacles that slow, canalize, restrict, or divert the enemy's movement. Obstacles increase the enemy's time in the kill zone and force him to present his flank as he maneuvers around an obstacle.
c. Indirect Fire Assets. Indirect fires (artillery and mortars) are used for several purposes. They slow the enemy rate of advance, break up formations, cause vehicles to button up, and suppress accompanying artillery and antitank guided missiles. Also, they are used to help conceal the movement of TOW squads between positions. Anti-armor platoon leaders can request indirect fires by contacting either the battalion mortar platoon or the DS artillery battalion. Frequencies, call signs, and priorities of fire must be coordinated.
10. Employment Guidelines.
When employing TOWs, use the following guidelines.
a. Provide Mutual Support. Mutual support is the help that weapons/units give to each other to fully use their capabilities and to offset their limitations.
(1) Use TOWs in Pairs (By Section). To be sure that a sector of fire has continuous anti-armor coverage, use TOWs in pairs with overlapping sectors of fire. Used that way, they can support each other. One system can fire while the other is reloading or moving to an alternate position. Use TOWs separately only when that is the only way to cover the armor approaches or to overwatch the attacking company's zone, as shown in Figure 2-12.
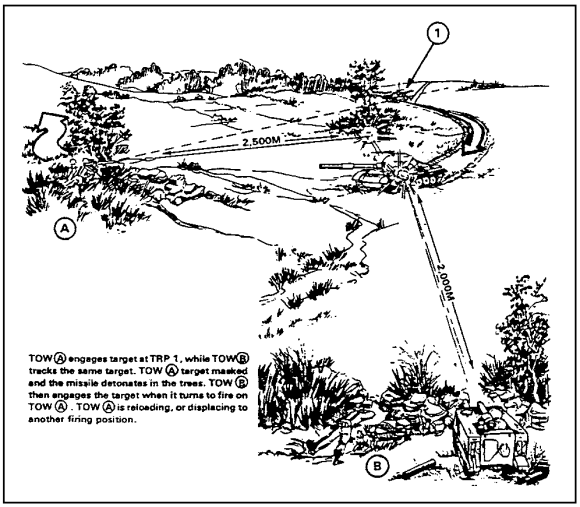
Figure 2-12. TOWs in Pairs.
(2) Combine TOW Fires with Fires of Other Anti-armor Weapons. Position TOWs and other weapons so that they can support each other. Position TOWs and tanks so as to provide long-range coverage along high-speed armor approaches to ensure continuous anti-armor fires. Position Dragons and Light Antitank Weapons (LAWs) along the anti-armor approaches with more restrictive fields of fire. Use TOWs to engage the long-range targets and to add depth to the defense.
(3) Inteqrate TOWs with Nearby Infantry for Security. TOW crews by themselves are vulnerable to attacks by mounted and dismounted infantry. To provide security against such attacks, TOWs should be positioned so as to take advantage of infantry blocking dismounted and concealed mounted approaches leading to TOW positions, as shown in Figure 2-13.
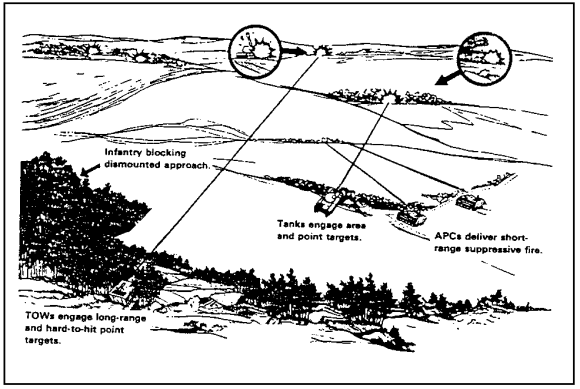
Figure 2-13. Integrate TOWs with Nearby Infantry.
b. Exploit TOW Range (Figure 2-14). The greatest advantage of the TOW is its accuracy over most tanks at ranges beyond 1,500 meters. The major limitation is that the TOW crew (M113 or M151) is exposed to enemy suppressive fires while firing. Therefore, the principal factors to consider when positioning the TOW for employment are twofold.
(1) Exploit the capabilities of the weapon.
(2) Protect the crew from countermeasures such as artillery and tank fire.
c. Avoid Conspicuous Terrain Features. Use terrain to your best advantage. Every piece of terrain has features that can enhance or degrade mission accomplishment with the TOW. Conspicuous terrain features, such as road junctions, hilltops, and lone buildings or trees, attract the enemy's attention, and he may have registered on them. As a leader, you must recognize terrain features that will serve the chances of success with the TOW and lessen its vulnerability to detection. Figure 2-15 shows examples of how to avoid conspicuous terrain features such as hill crests. For example, the TOW can be hidden on reverse slopes of hills to fire on the enemy's rear or flanks. The TOW can be hidden in fence and tree lines, in haystacks, in the edges of woods, in shell holes, or beside buildings.
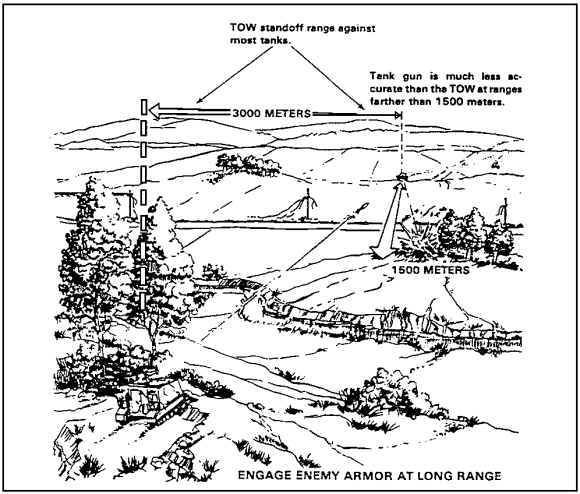
Figure 2-14. Exploit TOW Range.
d. Provide for Flank Engagements. TOW frontal fire against tanks must be avoided, as a rule. The crew of a launcher so sited is extremely vulnerable, particularly at shorter ranges. When enemy tanks are advancing, their firepower and observation are oriented toward the front. It is difficult for them to detect and trace a missile launched from a flank, as indicated in Figure 2-16.
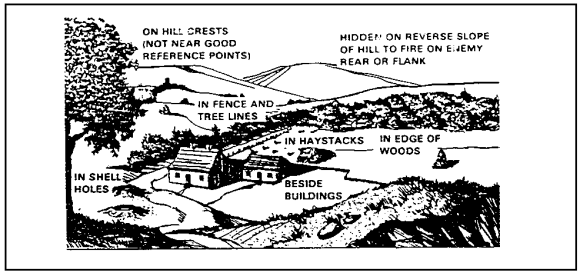
Figure 2-15. Avoid Conspicuous Terrain Features.
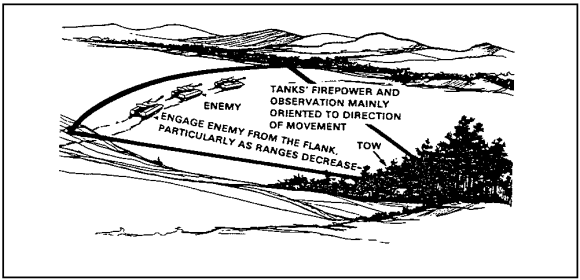
Figure 2-16. Provide for Flank Management.
However, a trailing enemy tank may see the launch signature or crew movement and destroy the weapon or stalk it from the rear. In addition to firing from the flank, site the weapon so that it is in defilade from the direction of the enemy. (This means that there must be something between the weapon and the tanks that are not being fired at--a parapet, a wall or natural cover. Flank concealment is necessary but flank defilade, giving cover from fire, is preferred. The concealment of flash is also essential, not only from the following tanks but from the enemy's observation post as well. A weapon seen is a weapon lost.
e. Provide Dispersion. If the section leader can control the fires of both squads, TOW squads should be separated a minimum of 300 meters (either laterally or in depth), as shown in Figure 2-17, so that no two squads can be suppressed at the same time by the fires of a single volley of artillery from one battery. This separation depends upon terrain and the section leader's capability to control the fire and the movement of the squads.
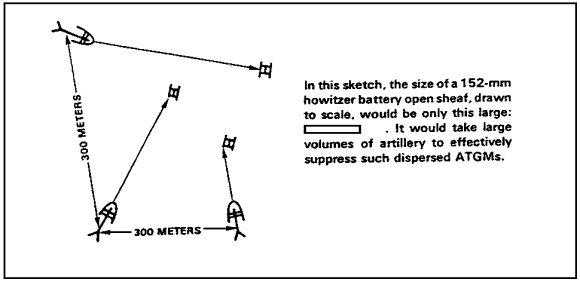
Figure 2-17. Provide Dispersion.
PART C - CONSOLIDATE AND REORGANIZE A TOW SECTION FOLLOWING ENEMY CONTACT
1. Consolidate and Reorganize (Offense).
Include your plan to consolidate and reorganize the objective in your attack order to your squad leaders. The plan may be changed as the situation requires, but it must be complete and detailed.
a. Consolidation. Consolidation is the organizing and strengthening of a newly captured position. The aim is to secure the position against a counterattack. The plan for consolidation includes a sector of fire for the TOW section.
(1) Hasty Defense. Upon the seizure of the objective, set up a hasty defense to meet a counterattack. You must observe along enemy approaches.
(2) Request General Location and Sector of Fire. Request from the commander the general location and the sector of fire of your section.
(3) Correct Fire Planning and Coordination. Correct your fire planning and coordination.
b. Reorganization. Reorganization is the restoration of order in your section and the actions needed to prepare your section for further combat.
(1) Reestablish the Chain of Command. Ensure that all key positions are filled and that all members know the new chain of command.
(2) Evacuate Casualties. Evacuate casualties and request replacements.
(3) Redistribute Ammunition. Redistribute ammunition within the section.
(4) Resupply Ammunition. Pick up ammunition at a predesignated point, if coordinated, or take a quick inventory and request resupply through channels.
(5) Man and Position TOWs. Ensure that TOWs are manned and positioned to cover their assigned sectors of fire.
(6) Give Situation Report. Give your commander a situation report that includes the tactical situation, personnel strength, and ammunition-vehicle-weapon status.
(7) Plan Maintenance. Plan for maintenance on TOWs and vehicles, where applicable, if the tactical situation allows it.
2. Reorganize (Defense).
When an enemy assault is repelled, you must immediately prepare your section to meet a renewed assault. To accomplish this task, you must follow many of the same procedures used for the reorganization after an offensive action:
a. Reestablish the chain of command.
b. Redistribute and resupply ammunition.
c. Request instructions for the location and the sector of fire of the TOW section.
d. Reestablish communication. Check wire to ensure that it was not cut during the attack.
e. Evacuate and request replacements for casualties.
f. Restore camouflage and improve positions. Do not overcamouflage a position. If it was not found during the first assault, it may not be found during the next try.
g. Resupply after inventory is taken and submit requests for all needed supplies.
PART D - RECOVER A TRACKED VEHICLE USING FIELD EXPEDIENTS
1. Methods of Recovery.
There are four methods of vehicle recovery using organizational personnel and equipment.
a. Winching. Winching uses winches on special-purpose or cargo vehicles.
b. Towing. Towing uses the towing capabilities of similar special-purpose vehicles. This is the quickest recovery method.
c. Lifting. Lifting uses special-purpose vehicles.
d. Expedients. Expedients are used when other methods are not adaptable to the situation or when recovery vehicles and equipment are not readily available.
2. Recovery Procedures.
During any recovery operation, a proven procedure should be used to ensure quick and safe recovery. A haphazard or trial-and-error approach to a recovery problem can only result in the prolonged immobility of the disabled vehicle, the loss of valuable time, damage to the equipment, and possible injury to personnel. The following eight-step recovery procedure should be used in every recovery involving winching.
RECONNOITER AREA
ESTIMATE SITUATION
CALCULATE RATIO
OBTAIN RESISTANCE
VERIFY SOLUTION
ERECT RIGGING
RECHECK RIGGING
YOU ARE READY
3. Equipment and Support for Recovery.
The unit drivers and crews should attempt recovery before calling on support from a higher level. Recovery support should be called upon only when similar vehicles are not adaptable to the situation or when the tactical situation does not permit their use. ENGAGED COMBAT VEHICLES SHOULD NEVER BE DIVERTED FOR RECOVERY.
4. Use of Similar Vehicles for Recovery.
The use of similar vehicles for recovery is usually the quickest method because similar vehicles are most likely to be readily available. The number of tracked vehicles required for a specific recovery depends on the resistance to be overcome, the type of disablement, and the condition of the terrain on which the towing vehicles must be operated. The rigging is accomplished by using the vehicle tow cables attached to the tow hooks of the vehicles.
a. Use of Tow Cables. When the tow cables are used between two vehicles, the cables should be crossed. This prevents them from entangling in the tracks on the turns and maintains the alignment of the vehicles, as shown in Figure 2-18. If a greater working distance between the pulling vehicle and a mired vehicle is required, two cables can be joined together by using tow hooks.
b. Recoverinq a Mired Vehicle. To recover a mired vehicle, use the following procedure.
- Position the towing vehicle and shut off its engine.
- Attach the tow cables to the tow hooks at the rear of the towing vehicle.
- Attach the tow cables to the tow hooks of the mired vehicle.
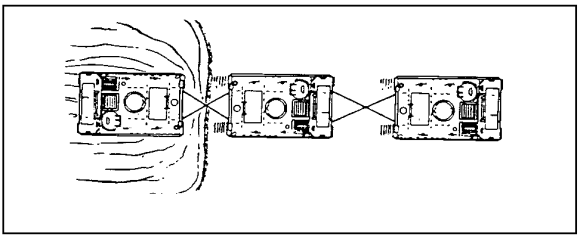
Figure 2-18. Towing a Mired Armored Personnel Carrier (APC) Using Two Similar Vehicles.
| CAUTION: | ENSURE THAT ALL SAEETY KEYS ARE INSTALLED IN THE TOW HOOK PINS. |
- Start the engine of the towing vehicle.
- Shift the towing vehicle's transmission into 1 range and slowly take up the slack in the cables.
- Stop the towing vehicle.
- Shift the transmission into neutral.
- Lock the brakes.
- Shut off the engine.
- Recheck the rigging.
- Start the engine of the towing vehicle.
- Shift the transmission to 1 range.
- Release the brakes.
- Instruct the driver of the mired vehicle to prepare his vehicle for movement.
- Start the engine.
- Shift the transmission to 1-2 range.
- Release the brake.
- Slowly apply power and move forward.
| NOTE: | The driver of the mired vehicle must apply power to assist in the recovery. |
- Tow the mired vehicle until both vehicles are on a hard surface.
- Instruct the driver of the towed vehicle to slowly move forward to provide slack in the towing cable.
- Stop the recovered vehicle.
- Place the transmission of both vehicles in neutral, lock the brakes, and shut off the engines.
- Disassemble and stow the rigging.
| NOTE: | If two towing vehicles are required for an operation, only one tow cable is needed between the towing vehicles because the strength of one tow vehicle is slightly greater than the pulling effort of the second towing vehicle. However, when two tow cables are available, they should be used to maintain alignment and to equalize the pulling effort. |
c. Recovering a Nosed Tracked Vehicle. The recovery of a nosed tracked vehicle (shown in Figure 2-19) may require as many as three similar vehicles, depending on the degree to which it is nosed and the condition of the terrain on which the pulling vehicle must operate. In extreme situations, it may be necessary to lift the front of the nosed vehicle. To use a lifting vehicle, two or more cables are connected together to obtain a greater working distance between the nosed vehicle and the lifting vehicle. The lifting vehicle is positioned facing the nosed vehicle. The cables of the pulling vehicle are connected as for the recovery of a mired vehicle. Power is applied to all the assisting vehicles at the same time until the front end of the nosed vehicle is raised and starts moving rearward. Then the lifting vehicle moves forward slowly, supporting the vehicle until it is recovered. If there has been any spillage of oil or fuel in the nosed vehicle, its engine should not be operated until the spillage has been cleaned up.
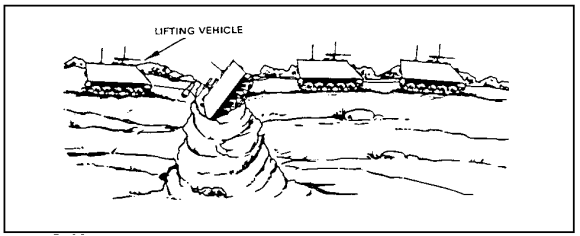
Figure 2-19. Recovering a Nosed Armored Personnel Carrier (APC) with Similar Vehicles.
d. Recovering an Overturned Tracked Vehicle. An overturned tracked vehicle can be uprighted by using three similar vehicles, as shown in Figure 2-20.
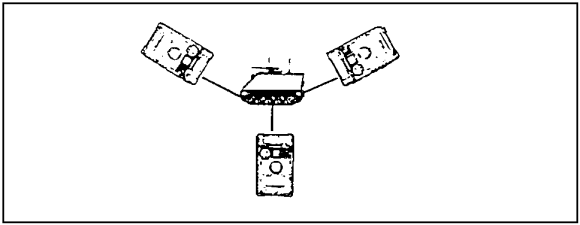
Figure 2-20. Recovering an Overturned Armored Personnel Carrier with Similar Vehicles.
(1) Pulling Vehicle. One vehicle is used to pull the overturned vehicle upright.
(2) Holding Vehicles. The other two vehicles are used to hold the overturned vehicle and to retard its fall to prevent its crashing down on the suspension system.
(3) Connecting the Cables. Two cables are connected in pairs to allow a safe working distance. The cable used to upright the overturned vehicle is connected to the nearest center roadwheel arm support housing on the high side of the overturned vehicle. Never connect it to any other part of the suspension system, turret, or tiedown eyes.
(4) Positioning the Holding Vehicles. The two vehicles used for holding are positioned at a 30- to 45-degree angle from the overturned tank with their cables connected to the two hooks on the high side of the overturned vehicle. The holding vehicles are positioned so as to prevent damage to the cables or the fenders and the lights of the overturned vehicle as it is
uprighted.
(5) Uprighting the Overturned Vehicle. The drivers of the holding vehicles shift to low range. The pulling vehicle applies power gradually in reverse, while the holding vehicles move forward only enough to keep their cables taut until the overturned vehicle passes through the point of balance. As the overturned vehicle passes through the balance point, the holding vehicles move forward slowly, supporting the overturned vehicle and lowering it onto its suspension system.
| WARNING: Because of spilled oil and fuel that will normally be present, smoking or open flames near the overturned vehicle must be prohibited. |
5. Recovery Expedients.
Military operations require vehicles to operate in remote areas where, should disablement occur, assistance is not readily available. Under these conditions, the driver or the crew must attempt self-recovery by the use of expedients. An expedient is an improvised method using materials on hand.
a. Anchoring Tracks. Vehicles often become bellied (high-centered) on stumps, rocks, and dry ridges or in mire. In such cases, vehicles are immobilized because of a lack or traction.
(1) Recovering a Vehicle Bellied in Mire. To recover a vehicle bellied in mire (as shown in Figure 2-21), obtain a log that is long enough to span the width of the vehicle and thick enough to support the vehicle's weight. The log is placed against both tracks, and a tow cable is placed so that one end of the cable goes over the log and through the tracks from inside. The other end of the tow cable is placed underneath the log, and the ends of the cable are connected with a tow hook on the outside of the track to facilitate disconnecting. The same procedure is followed to attach the log to the track on the opposite side of the vehicle. By gradually applying power to the tracks, the slack in the tow cables will be taken up, pulling the log underneath the tracks until it comes into contact with the obstacle, anchoring the tracks and causing the vehicle to move.

Figure 2-21. Recovering a Vehicle Bellied in Mire.
(2) Self-Recovering a Vehicle Bellied in Mire. To self-recover a vehicle bellied in mire, first erect the rigging. Do so by placing a log against both tracks, positioning the tow cables (both tracks) and connecting the ends of the cables using tow hooks (both tracks). Then, recover the tracked vehicle by starting the engine, releasing the brakes, shifting the transmission selector lever to the desired position, and gradually applying power to the tracks. To stop the vehicle, shift the transmission selector lever to the neutral or the park position, lock the brakes, and shut off the engine. Then, disassemble and stow the rigging.
| CAUTION: | CARE MUST BE TAKEN TO STOP THE VEHICLE BEFORE THE LOG REACHES THE FENDERS TO PREVENT DAMAGE TO THE FENDERS AND TOW CABLES. |
(3) Recovering a Vehicle Bellied in Other than Mire. For a bellied disablement other than mire, the tracks can be anchored using two tow cables. Connect the tow cables together with a tow hook and attach the cables to both tracks by passing the ends of the cables through the tracks from the outside and attaching them to the standing parts of the cables with two hooks. When power is applied to the tracks, the cables will contact the obstacle and anchor the tracks.
b. APCAT Device. Armored personnel carriers (APCs) may fail to exit the water after swimming due to steep banks or adverse terrain conditions. As an aid to water exit, the APCAT expedient can be used. The APCAT expedient kit consists of one pair of track anchor blocks (fabricated locally) and 200 feet of one-inch fiber rope (shown in Figure 2-22). The track anchor blocks are placed in the vehicle track sprocket holes in each track, and the rope is then attached from the blocks to suitable anchorage. As power is gradually applied, the tracks will anchor themselves to the blocks and cause the vehicle to move. This expedient may also be used in mired or bellied situations.

Figure 2-22. APCAT Expedient Kit.
c. Capstan Kit. When leaving water after swimming operations, an APC may become disabled because of the steep angle of the bank, the muddy or slippery surface of the bank, or a combination of both, and be unable to exit. A capstan expedient can be used for a self-recovery. The capstan kit (shown in Figure 2-23) consists of one pair of capstan adapters that bolt onto the drive sprocket hub, one pair of capstan drums with mounting tee bolts, nylon rope, and one pair of ground anchors. Normally, the capstan adapters are permanently mounted to the drive sprocket hubs with the metal shroud plates cut away. The capstan drums can be very quickly installed to the adapters with the drum tee bolts. The rope is secured to each mounted capstan drum and wrapped two or three turns around the drums on both sides of the vehicle. Care must be taken to ensure that the anchors are positioned in line with the capstan drums. The ropes must extend from the underside of the capstan drum before they are tied to their respective anchors. By applying power to the tracks, the ground anchors will embed in the ground, and the winching action of the capstan drums will cause the vehicle to move. To recover a tracked vehicle using the capstan kit, follow these steps:
- Lock the brakes and the steering levers.
- Stop the engine.
- Remove the capstan kit from the stowed position.
- Remove mud and debris from around the sprocket wheels.
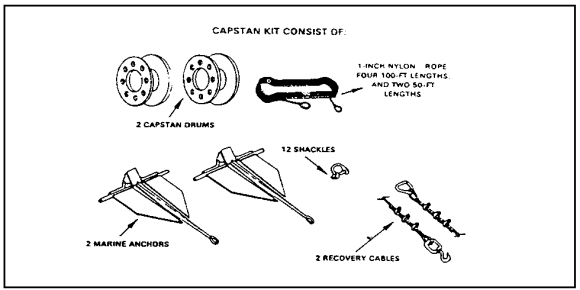
Figure 2-23. Capstan Kit.
- Attach the drum assemblies to the sprocket wheels.
- Position the anchors at the desired location.
- Connect ropes to the anchors.
- Attach anchor recovery cables to the anchors.
- Attach ropes to the drums and take up the slack.
| NOTE: | The ropes must be pulled tight and kept away from the drum to prevent them from winding into the drum or catching in the track. |
- Start the engine.
- Release the brakes and the steering levers.
- Position the range selector in 1 range.
- Apply power slowly until the anchors are embedded and the carrier starts a forward motion.
- Continue the forward motion until the carrier is free of obstacles.
- Stop the carrier.
- Lock the brakes and the steering levers.
- Position the range selector in neutral.
- Stop the engine.
- Disassemble the capstan kit.
- Recover the anchors.
- Stow the capstan kit in the travel position.
| NOTE: | The capstan kit may be ordered through your maintenance shop. |
Practice Exercise

