

|
RDL Homepage |
Table of Contents |
Document Information |
Download Instructions |
Lesson 2
SELECT A TERRAIN ROUTE, DIRECT A DRIVER OVER THE ROUTE, RESPOND TO DIRECT AND INDIRECT FIRE WHILE MOUNTED, AND USE VISUAL SIGNALING TECHNIQUES
OVERVIEW
Lesson Description:
In this lesson, you will learn to select a terrain route and direct a driver over the route, react to direct and indirect fire while mounted, and use visual signaling techniques while mounted.
Terminal Learning Objective:
| Action: | Select a terrain route and direct a driver over the route, react to direct and indirect fire while mounted, and use visual signaling techniques while mounted. | ||
| Condition: | You will be given information contained in this lesson. | ||
| Standard: | Identify the procedures for selecting a terrain route and directing a driver over the route, reacting to direct and indirect fire while mounted, and using visual signaling techniques while mounted. | ||
| References: | The material contained in this lesson was derived from the following publications:
|
INTRODUCTION
To select a terrain route, you must consider the cover and concealment that terrain features provide. To direct a driver over the route, you must use terrain-driving rules, know how to react to direct and indirect fire while mounted, and know how to control vehicles with arm-and-hand signals. This lesson provides instruction in each of these areas.
SELECT A TERRAIN ROUTE AND DIRECT A DRIVER OVER THE ROUTE
1. . In selecting a terrain route, the vehicle commander should give the driver clear, specific instructions as to the route that affords the best use of available cover and concealment. Figure 2-1 shows a route that takes advantage of the natural cover provided by terrain features (ridges) to conceal a vehicle from suspected enemy positions as the vehicle moves along its route.
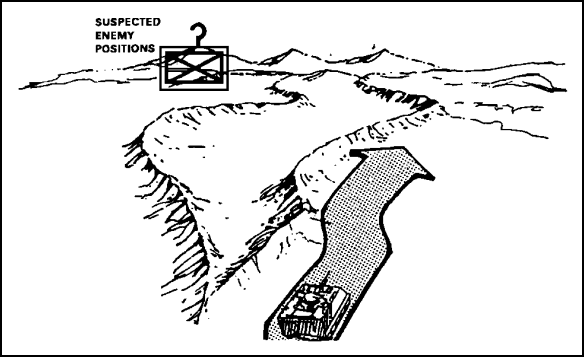
Figure 2-1. Route Cover and Concealment.
2. . Follow these terrain-driving rules to reduce exposure to effective enemy fire and detection—
a. Never skyline or move directly forward from a defilade position, as shown in Figure 2-2.
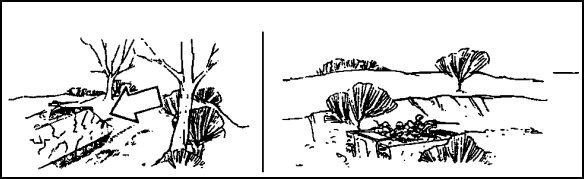
Figure 2-2. Movement from Defilade Position.
b. Avoid dusty terrain when possible, as shown in Figure 2-3, since it betrays the movement of armored vehicles.
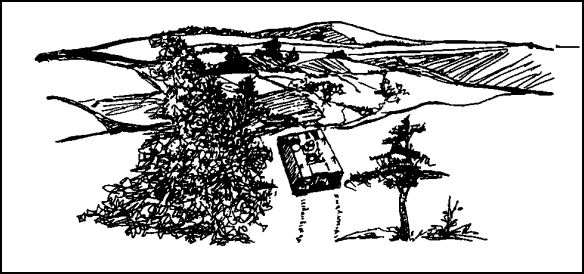
Figure 2-3. Selecting Terrain to Avoid Dust Signatures.
c. Use all available cover and concealment.
d. Leave the terrain looking as natural as possible to hinder tracking by the enemy, as shown in Figure 2-4.
Figure 2-4. Using Terrain to Hide Tracks.
e. If you must cross an open area (as in emerging from a woodline, crossing a ridge, and so on.), check it first for possible enemy positions and then cross it quickly, as shown in Figure 2-5. If enemy locations are identified or suspected, suppress or smoke them before crossing the open area. Cross the open area rapidly from covered position to covered position.
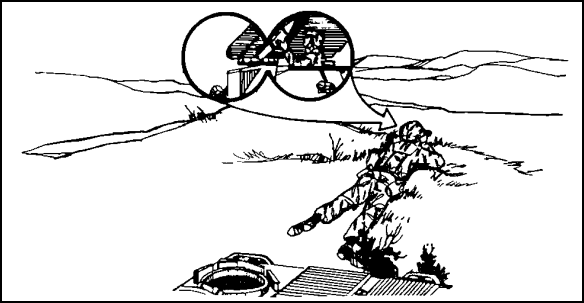
Figure 2-5. Planning to Cross Open Areas.
f. Where covered or concealed routes are not available or when their use would be time-consuming, plan routes that have "escape valves" available. For example, Figure 2-6 shows dense tree lines providing protection from Saggers.
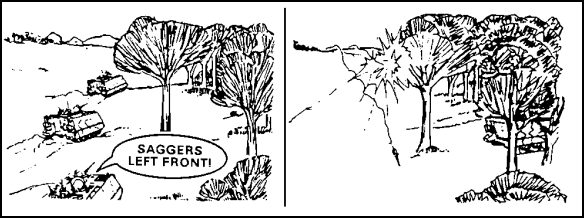
Figure 2-6. Escape Valves.
3. . Use the following guidelines to react to direct or indirect fire while mounted:
a. Immediately return fire with all weapons, as shown in Figure 2-7. This is critical when you are hit by direct fire. The machine gun mounted on the vehicle is the best weapon to suppress the enemy's fire, but the added firepower of other weapons must be considered. If there is no machine gun, all available squad members should return fire. Massive response is crucial before you can take action.
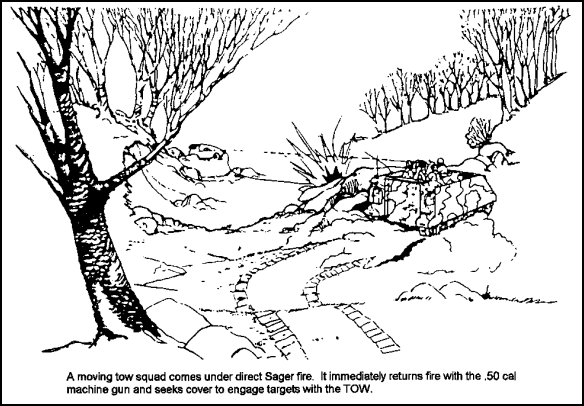
Figure 2-7. Mounted TOW Squad Reacting to Enemy Fire.
b. Move to cover as you begin suppressive fire. Take advantage of the terrain during the movement. If you do, this task will not be so difficult.
c. Upon receiving fire, call the section leader and tell him of the situation. He can develop the situation or provide you with the needed support if you are pinned down or in contact with a force that you cannot handle.
d. As squad leader, always maintain control of your vehicle by moving into the cupola and observing through vision blocks. Ensure that all track hatches are closed, and move rapidly through the impact area.
e. Establish an SOP and practice it while training.
USE VISUAL SIGNALING TECHNIQUES WHILE MOUNTED
1. .
a. Visual communication is a means available to all units. Visual signals are transmitted by the following—
(1) .
(2) .
(3) .
(4) .
(5) .
(6) .
b. Visual signals are suitable for transmitting prearranged messages rapidly over short distances as well as for the recognition and identification of friendly forces.
c. Visual signals also make it easier to control the action or movement of the follower. Conversely, visual signals can influence the actions or the movement of the leader.
d. You must know all the visual signals that can assist you in performing your specific job effectively if no other means of communication are available.
2. . Signals for combat formations and battle drill may be used, as appropriate, by either mounted or dismounted troops. They give the soldier a means of communication between himself and other persons or units. They must be practiced until their use becomes second nature. Signals must be given correctly and clearly.
a. . When movement or action is to be executed by less than the total unit, the signaler will point, if necessary, toward the person(s) or element(s) of a unit as a warning that a signal will follow.
b. . When a unit or an action is to be executed by the entire unit, the proper signal should be preceded by the signal ATTENTION. Most signals may be given from the ground or from a vehicle.
| NOTE |
| Figures 2-8 through 2-32 illustrate the various signals discussed in the following paragraphs. Unless otherwise indicated in the figures, the signaler faces the person(s) or element(s) for which the signal is intended. |
3. . Arm-and-hand signals, tactical signals, and platoon movement formation signals are discussed in the following subparagraphs.
a. . Listed below are selected standard arm-and-hand signals that you should know to control vehicles.
| NOTE |
| A total of 22 arm-and-hand signals are illustrated in Figures 2-8 through 2-29. The signals are identified (in the subparagraphs in which they are discussed) by successive letters of the alphabet. For example, the first signal discussed (the START ENGINES or PREPARE TO MOVE signal) is identified by the letter "A" in Figure 2-8. The next signal (the STOP ENGINES signal) is identified by the letter "B," in Figure 2-9, and so forth, with the twenty-second signal (the I DO NOT UNDERSTAND signal) being identified by the twenty-second letter of the alphabet, "V." |
(1) . To signal START ENGINES or PREPARE TO MOVE, simulate the cranking of engines by moving the arm in a circular motion at waist level.

Figure 2-8. START ENGINES or PREPARE TO MOVE signal.
(2) . To signal STOP ENGINES, draw your right hand, palm down, across your neck in a "throat cutting" motion, from left to right.

Figure 2-9. STOP ENGINES signal.
(3) . To signal MOUNT, with the hand extended downward at your side and the palm 45-degrees out, raise your arm sideward and upward to an angle of 45-degrees above the horizontal. You may use both arms when giving this signal. Repeat the signal until it is understood.

Figure 2-10. MOUNT signal.
(4) . To signal DISMOUNT or TAKE A PRONE POSITION, extend your arm sideward at an angle 45 degrees above the horizontal, with your palm down, and lower it to your side. You may use both arms in giving this signal. Repeat the signal until it is understood.

Figure 2-11. DISMOUNT or TAKE A PRONE POSITION signal.
(5) . To signal MOVE the vehicles FORWARD or COME FORWARD, move your hand(s) backward and forward with your palm(s) toward your chest, as if you were pulling the vehicle.

Figure 2-12. FORWARD or COME FORWARD signal.
(6) . To signal NEUTRAL STEER (tracked vehicles), cross your wrists at your throat. Point your index finger in the direction to steer, and clench the fist of your other hand.

Figure 2-13. NEUTRAL STEER signal.
(7) . To signal MOVE IN REVERSE (backup), face the unit (vehicle) that you are signaling. Raise your hands to your shoulder, level palms to the front. Move your hands forward and backward as if you were pushing the vehicle away.

Figure 2-14. MOVE IN REVERSE signal.
(8) . To signal CHANGE DIRECTION, raise your hands to shoulder level in front of your body. On the arm in which the direction of the turn is to be made, form a clenched fist. Make a beckoning motion with your other arm to bring the vehicle forward. To reverse, make a pushing motion.

Figure 2-15. CHANGE DIRECTION signal.
(9) . To signal BUTTON UP, place both hands, one on top of the other, palms down, on top of your helmet, with both arms back and in the same plane as the body. To signal UNBUTTON, give the BUTTON UP signal. Then separate the hands, moving them slightly to each side in a slicing motion. Repeat the signal until it is understood.

Figure 2-16. BUTTON UP or UNBUTTON signal.
(10) . To signal CLOSE UP DISTANCE BETWEEN VEHICLES AND STOP, face the vehicle being signaled, and extend your forearms to the front with your palms inward and separated by at least the width of the shoulders. Bring your palms together as the distance shortens. The vehicle must stop when your palms come together.

Figure 2-17. CLOSE UP DISTANCE BETWEEN VEHICLES and STOP signal.
(11) . This is an alternate signal used to stop tracked vehicles. To signal STOP, clasp your hands together, palm to palm, at chin level.

Figure 2-18. STOP signal.
(12) . This signal is used for vehicles with ramps. To signal RAISE RAMP, make a circular motion with either hand at head level while your other arm is extended across your body.

Figure 2-19. RAISE RAMP signal.
(13) . To signal LIGHTS OFF, point the index finger of your right hand toward your right eye and give a "thumbs down" signal with your left hand.

Figure 2-20. LIGHTS OFF signal.
(14) . To signal LIGHTS ON, point toward your eyes with the index fingers of both hands.

Figure 2-21. LIGHTS ON signal.
(15) . This signal is used for vehicles with ramps. To signal LOWER RAMP, make a circular motion with either hand pointing to the ground.

Figure 2-22. LOWER RAMP signal.
(16) . To signal LEFT TURN or COLUMN LEFT, extend your left arm horizontally to your side with your palm to the front.

Figure 2-23. LEFT TURN or COLUMN LEFT signal.
(17) . To signal PASS AND KEEP GOING, extend your left arm horizontally to the side, with your palm to the front, and describe large circles to the front by rotating your arm clockwise from the elbow.

Figure 2-24. PASS and KEEP GOING signal.
(18) . To signal RIGHT TURN or COLUMN RIGHT, extend your right arm horizontally to the side with your palm to the front.

Figure 2-25. RIGHT TURN or COLUMN RIGHT signal.
(19) . To signal ATTENTION, extend your arm, sideways and slightly above the horizontal, with your palm to the front. Wave your arm toward and away from your head several times.

Figure 2-26. ATTENTION signal
(20) . To signal I AM READY or ARE YOU READY?, extend your arm toward the person being signaled. Then raise your hand slightly above horizontal with your palm facing outward.

Figure 2-27. I AM READY or ARE YOU READY signal.
(21) . To signal DISREGARD PREVIOUS COMMAND or AS YOU WERE, raise both arms and cross them over your head, palms to the front.

Figure 2-28. DISREGARD PREVIOUS COMMAND or AS YOU WERE signal.
(22) . To signal I DO NOT UNDERSTAND, raise both arms sideward to the front. Bend both arms at the elbows and place both hands across your face, palms to the front.

Figure 2-29. I DO NOT UNDERSTAND signal.
| NOTE |
| The five arm-and-hand signals (labeled "A" through "E" in Figures 2-30 through 2-34) are made using a flashlight to control vehicles. |
(23) . To signal START ENGINES, move the light to describe a horizontal figure 8 in a vertical plane in front of the body.

Figure 2-30. START ENGINES signal.
(24) . To signal STOP or STOP ENGINES, move the light horizontally back and forth several times across the path of approaching traffic to stop vehicles.

Figure 2-31. STOP or STOP ENGINES signal.
(25) . To signal GO, FORWARD, MOVE OUT, INCREASE SPEED, or DOUBLE TIME, move the light vertically several times in front of your body.

Figure 2-32. GO; FORWARD; MOVE OUT; INCREASE SPEED; or DOUBLE TIME signal.
(26) . To signal MOVE IN REVERSE (for vehicles which are not moving), hold the light at shoulder level and blink it several times toward the vehicles. Use this same signal to signal SLOW DOWN (for vehicles which are moving).

Figure 2-33. MOVE IN REVERSE signal for Vehicles Not Moving or SLOW DOWN signal For Moving Vehicles.
(27) . To signal TURN LEFT or TURN RIGHT, rotate the light to describe a circle 12 inches in diameter in the desired direction of the turn.
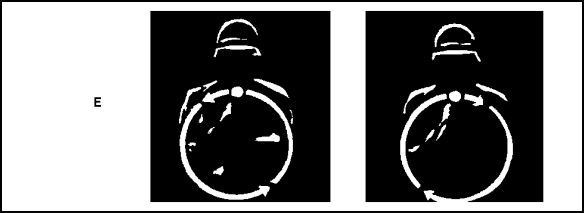
Figure 2-34. TURN LEFT or RIGHT signal.
b. . Listed below are selected standard arm-and-hand signals and flag signals that you should know.
(1) . To signal TRAVELING, hold a green flag in your right hand or fully extend your index finger upward, as shown in Figure 2-35. Rotate your arm in a circle clockwise.
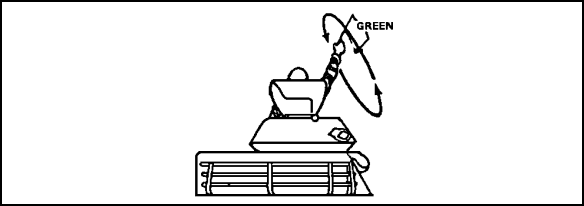
Figure 2-35. TRAVELING signal.
(2) . With the green flag in your right hand and the yellow flag in the left hand or the index fingers of both hands extended, give the signal by waving your arms in a modified version of the backstroke, as shown in Figure 2-36.
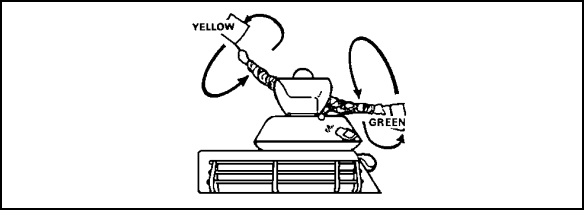
Figure 2-36. TRAVELING OVERWATCH signal.
(3) . To signal CEASE FIRING, raise your hand in front of your forehead, palm to the front, and swing your hand and forearm up and down several times in front of your face, as shown in Figure 2-37.
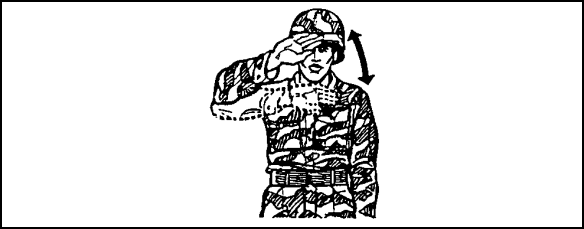
Figure 2-37. CEASE FIRING signal.
(4) . To signal DISMOUNT, extend your arm sideways 45-degrees above horizontal, with your palm down, and lower it to your side, as shown in Figure 2-38. You may use both arms in giving this signal. Repeat it until it is understood.
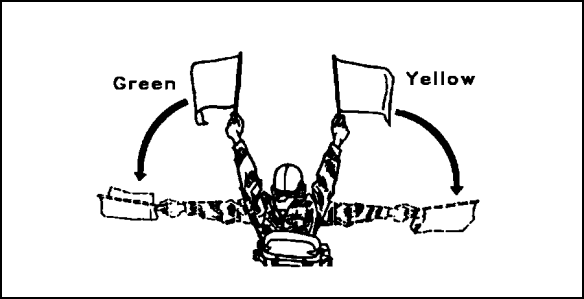
Figure 2-38. DISMOUNT signal.
(5) . To signal MOVE UP ON MY LEFT, hold a red flag in your left hand, as shown in Figure 2-39. Move the flag from a fully extended upward to a 90-degree position at your side and then raise it upward again.
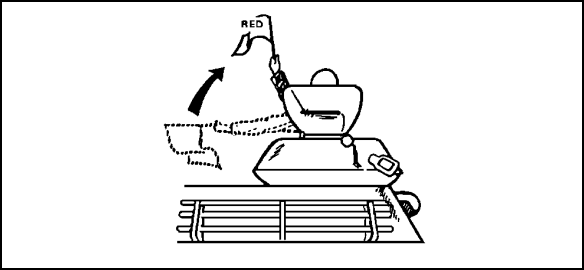
Figure 2-39. MOVE UP ON MY LEFT signal.
(6) . To signal MOVE UP ON MY RIGHT, hold a red flag in your right hand, as shown in Figure 2-40. Move the flag from a fully extended to a 90-degree position at your side. Then raise it upward again.
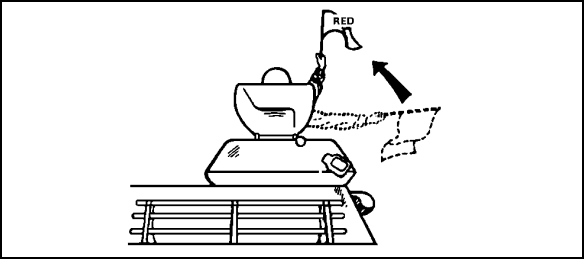
Figure 2-40. MOVE UP ON MY RIGHT signal.
(7) . To signal COVER OUR MOVE, fully extend your arm, bend your arm at the elbow, and touch the top of your helmet with the flat of your hand, as shown in Figure 2-41.
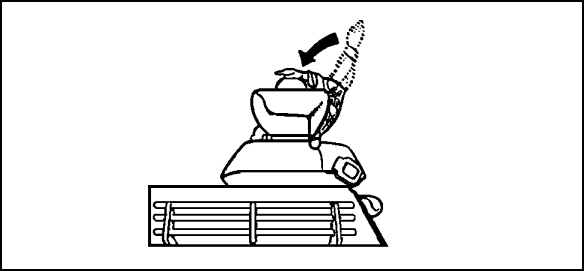
Figure 2-41. COVER OUR MOVE signal.
(8) . To signal ENEMY IN SIGHT, hold your rifle in the ready position at shoulder level. Point the rifle in the direction of the enemy as shown in Figure 2-42.
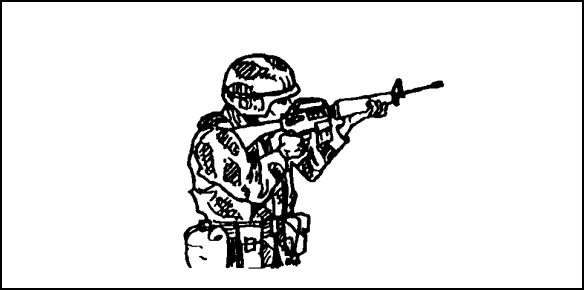
Figure 2-42. ENEMY IN SIGHT signal.
(9) . To signal COMMENCE FIRING, extend your arm in front of your body, palm down, and move it through a wide horizontal area several times, as shown in Figure 2-43.
Figure 2-43. COMMENCE FIRING signal.
(10) . To signal DANGER or ENEMY IN SIGHT, hold a red flag and raise your arm in a vertical position, as shown in Figure 2-44.
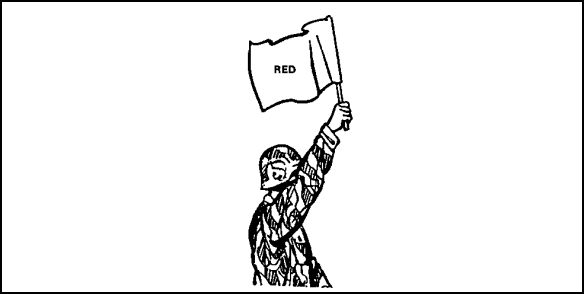
Figure 2-44. DANGER or ENEMY IN SIGHT signal.
(11) . To signal MOVE OUT, hold a green flag with your right arm fully extended to the right, as shown in Figure 2-45. Raise your arm in a sweeping motion back and forth above your head.
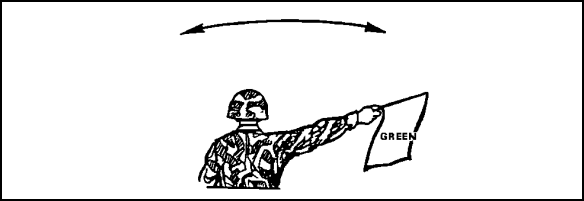
Figure 2-45. MOVE OUT signal.
(12) . After masking, hold red and yellow flags above your head in your right hand and hold a green flag overhead in your left hand, as shown in Figure 2-46, to signal NBC HAZARD PRESENT.
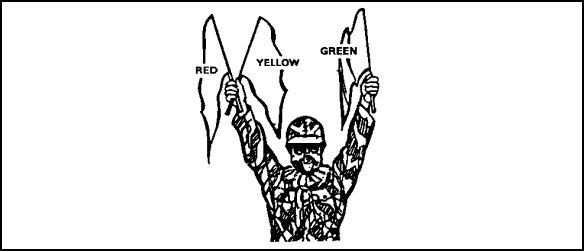
Figure 2-46. NBC HAZARD PRESENT signal.
(13) . With your right arm fully extended at a 90-degree angle (flag optional), raise it to a full extended upward position, as shown in Figure 2-47, to signal MOUNT.
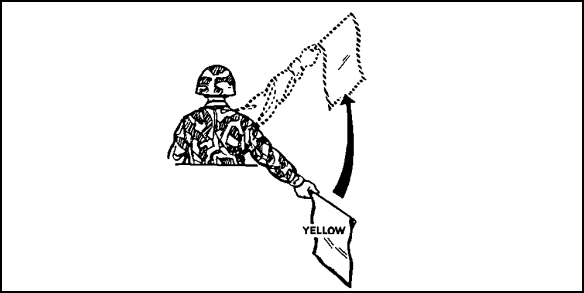
Figure 2-47. MOUNT signal.
(14) . To signal DISMOUNT, hold a green flag in your left hand, a yellow flag in your right hand and move your arms from vertical to horizontal, as shown in Figure 2-48.
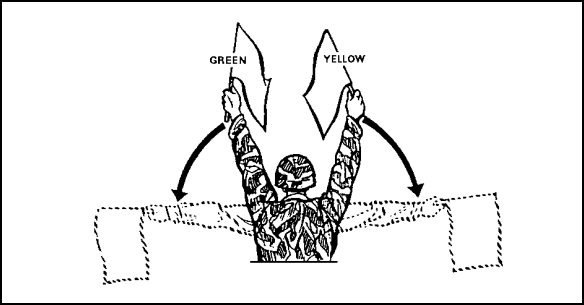
Figure 2-48. DISMOUNT signal.
(15) . To signal DISMOUNT AND ASSAULT, hold a red flag in your left hand and a green flag in your right hand. Move the flags from vertical to horizontal, as shown in Figure 2-49.
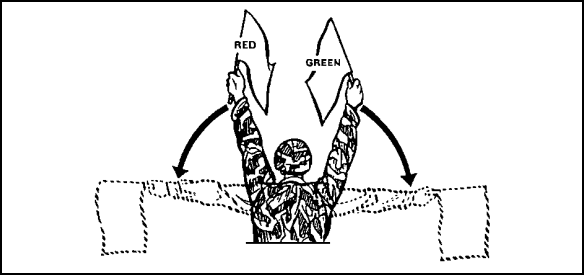
Figure 2-49. DISMOUNT AND ASSAULT signal.
(16) . To signal ASSEMBLE or CLOSE, hold yellow and green flags in your right hand, overhead in a vertical position, as shown in Figure 2-50.
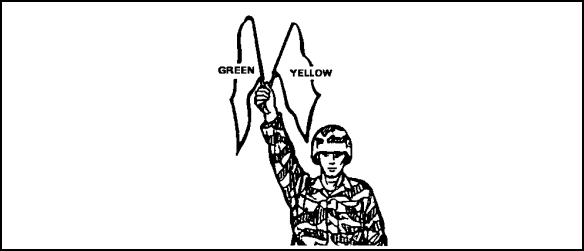
Figure 2-50. ASSEMBLE or CLOSE signal.
c. . Platoon movement formations and signals to direct these formations are shown in Figures 2-51 through 2-56.
(1) . Figure 2-51 shows the arm-and-hand signal, with and without the use of flags, used to indicate a left (or right) turn.
| NOTE |
| If flags are used, use a green flag to indicate a left turn. For a right turn, reverse the signal and use a yellow flag. |
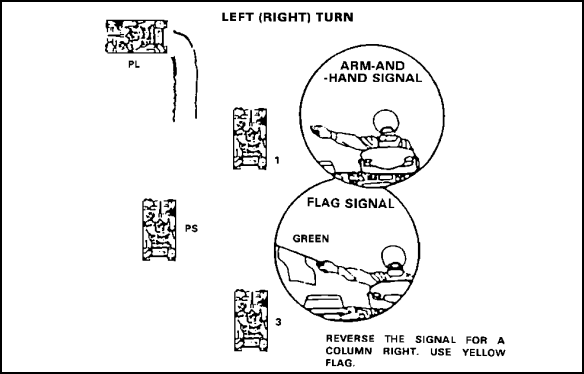
Figure 2-51. LEFT (RIGHT) TURN signal.
(2) . Figure 2-52 shows the arm-and-hand signal used to indicate an echelon formation. The use of flags is optional. The arms are extended outward and diagonally, the left arm above and the right arm below the shoulder, to indicate a left echelon formation. A green flag is held in the left hand and a yellow flag in the right. Maintain a distance of 50 to 100 meters between vehicles. Reverse the signal to indicate a right echelon formation.
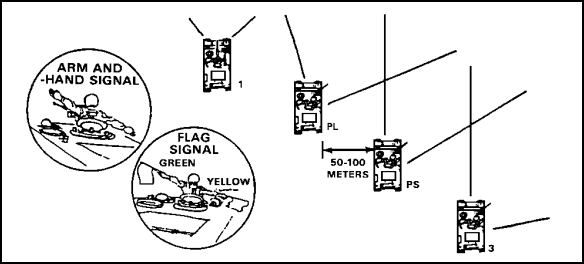
Figure 2-52. ECHELON FORMATION signal.
(3) . Figure 2-53 shows the arm-and-hand signal used to indicate the herringbone formation. Extend both arms outward from your body at shoulder level. Bend your arms up at the elbow so that your arms form a 90-degree angle. Straighten your arms again so that they are extended at shoulder level. Repeat the signal until it is understood.
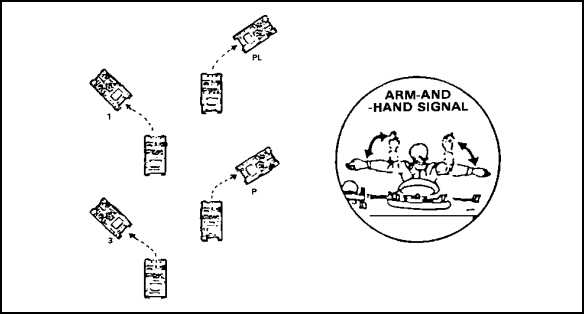
Figure 2-53. HERRINGBONE FORMATION signal.
(4) . Figure 2-54 shows the arm-and-hand signal used to indicate a line formation. The use of flags is optional. To give this signal, extend your arms straight out from the sides at shoulder level. If flags are used, hold a green flag in your left hand and a yellow flag in your right hand.
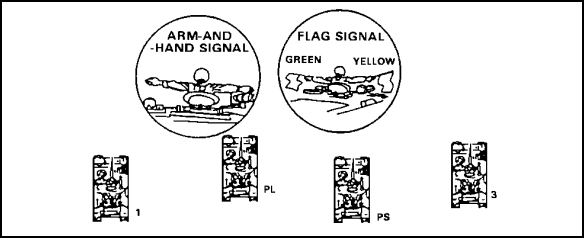
Figure 2-54. LINE FORMATION signal.
(5) . The arm-and-hand signal used to indicate a Vee formation is shown in Figure 2-55. The use of flags is optional. Extend your arms above your head, in a "Vee." If flags are used, hold a green flag in your left hand and a yellow flag in your right hand.

Figure 2-55. VEE FORMATION signal.
(6) . You may use any of three signals to indicate a wedge formation. These signals (old arm-and-hand, flag signal, and new (alternate) arm-and-hand) are shown in Figure 2-56.
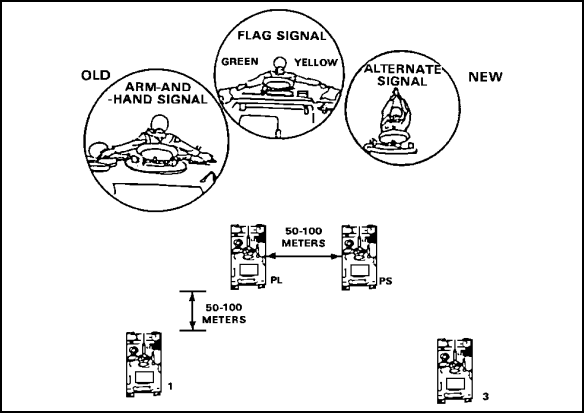
Figure 2-56. WEDGE FORMATION signal.
(7) . Figure 2-57 shows the arm-and-hand signal used to indicate a line variation formation. The use of flags is optional. Extend your arms straight out to your sides at shoulder level. Move your right arm up and down. If flags are used, hold a green flag in your left hand and a yellow flag in your right hand.
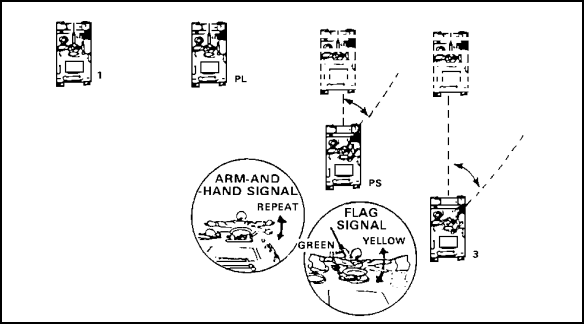
Figure 2-57. LINE VARIATION signal.