

|
RDL Homepage |
Table of Contents |
Document Information |
Download Instructions |
Lesson 1
PLANNING DEFENSE OPERATIONS
OVERVIEW
Lesson Description:
In this lesson, you will learn to identify the planning of a mechanized platoon defense, and the differences between employing infantry and mechanized infantry in defensive positions as well as how fighting vehicles defend. You will also be able to identify the control measures used in the defense once the battle has been joined by mechanized infantry.
Terminal Learning Objective:
Action: |
Identify the planning considerations of a mechanized platoon defense, the differences between employing infantry and mechanized infantry in defensive positions, how fighting vehicles defend, and the control measures used in the defense once the battle has been joined by mechanized infantry. | ||||||||
Condition: |
You will be given information contained in this lesson dealing with planning considerations of a mechanized platoon defense. | ||||||||
Standard: |
At the completion of this lesson, you will understand the planning of a mechanized platoon defense, by identifying the differences between employing infantry and mechanized infantry in defensive positions, how fighting vehicles defend, and the control measures used in the defense once the battle has been joined by mechanized infantry. | ||||||||
References: |
The material contained in this lesson was derive from the following publications:
|
INTRODUCTION
Defensive planning is different for mechanized and light infantry platoons. This lesson discusses the differences of the planning and control measures used by the defense platoon. The various weapons used by the light infantry and mechanized platoons are discussed in relation to planning and conducting the defense.
Part A
MECHANIZED DEFENSIVE PLANNING
1. Defense. The purpose of defensive operations is to repel an enemy attack and destroy the attacker. Defensive operations may also be undertaken to defeat an enemy attack, gain time, concentrate forces elsewhere, control key or decisive terrain, wear down enemy forces as a prelude to offensive operations, and retain strategic, operational, or tactical objectives.
a. The immediate purpose of any defense is to defeat the attack. Other purposes, while important, are ancillary from an operational perspective (they may, however, be overriding from a strategic perspective).
b. Defense is used to gain time for reinforcement to arrive or to economize forces in one sector while concentrating forces for attack in another. In either case, a defense or a delay may achieve these objectives.
c. In some instances, a force may defend because it is unable to attack. The defender then uses his advantages of position and superior knowledge of the terrain to cause the enemy to overextend himself. Once the enemy has committed himself against the defense and has been weakened by losses, the defender maneuvers to destroy him with fires or counterattacks.
d. In other cases, portions of a force may be required to retain key or decisive terrain or essential strategic, operational, or tactical objectives. Even in offensive operations, air assault, airborne, or amphibious forces may need to defend deep objectives until a larger force can link up with them. Whatever its larger purpose, the immediate challenge of any defensive operation is to recapture the initiative and thus create the opportunity to shift to the offensive. All activities of the defense must contribute to that aim. The platoon defends as part of a company or company team and completes tasks assigned to it by the company or company team commander.
2. Mechanized Platoon Defense (M113). The mechanized platoon defense for units using the armored personnel carrier (APC), M113, have specific functions and characteristics. The following paragraphs discuss defense operations that involve the M113.
a. Characteristics and Functions.
(1) Defense Tasks. The platoon's defensive tasks include--
(a) Destroying enemy tanks, BMPs, and BTRs with dismounted or mounted Dragons and light antiarmor weapons (AT-4s).
(b) Suppressing enemy antitank guided missile (ATGM) fires with the caliber .50 machine gun, dismounted machine guns, squad automatic weapons (SAWs), grenade launchers, and rifles.
(c) Repelling dismounted enemy attacks.
(d) Providing close-in security for tanks and improved TOW vehicles (ITVs) during limited visibility and in restrictive terrain.
(e) Locating the enemy and providing security by manning observation posts and conducting patrols and ambushes.
(f) Building obstacles to slow, stop, or canalize the enemy, and providing security for obstacles.
(g) Conducting platoon-size counterattacks or counterattacking as part of a larger force.
(2) Company Support. In the defense, the company or company team is usually supported by additional ITVs, artillery, mortars, and engineers. Each supporting element is deployed to increase the company's or company team's combat power, and to reduce its vulnerabilities.
(3) Tanks. Tanks, if present, are placed to exploit their mobility, firepower, and armor protection.
(4) Improved TOW Vehicles (ITVs). ITVs are positioned to exploit their long-range antiarmor fire and pinpoint accuracy.
(5) Engineers. To make terrain more favorable for the defense, engineers emplace obstacles, dig defilade positions, and clear routes.
(6) Movement in the Defense. The defense often involves fast, frequent movement between battle positions and in counterattacks. Platoons and squads must respond to short-notice changes in mission. They must also fight from new battle positions immediately. Therefore, platoons must develop and practice standing operating procedures (SOPs) and, with these, learn to exploit the mobility and firepower of the APC. The order to occupy a position should trigger a series of automatic actions by the entire platoon.
b. Planning the Defense.
(1) The company or company team commander explains the platoon's mission by issuing an operation order. From the operation order, the platoon leader learns--
(a) The platoon's mission.
(b) The commander's concept of how the defense will be fought.
(c) The position of the platoon in the company or company team defense.
(d) The platoon's sector of fire or engagement area.
(e) The fire support that is available.
(f) The evacuation procedures for friendly casualties.
(g) Where enemy prisoners of war are to be taken.
(h) The special signals that are to be used.
(i) The on--order missions for the platoon.
(j) The position and mission of units on the flanks and in the rear.
(2) The platoon leader begins his troop-leading procedures after receiving a company operation order. His first step is to plan available time. Once this is done, he can issue a warning order to his key personnel, which include a platoon sergeant, squad leaders, and a forward observer. A warning order alerts the platoon personnel to the mission, tells them what preparation they are to complete, and where and when to receive the platoon leader's complete order.
(3) This procedure gives the platoon leader time to reconnoiter and prepare his operation order. He begins this process with an analysis of the mission, enemy, terrain, troops, and time available (METT-T). The rest of the platoon gets ready for the mission.
(4) Often, the platoon leader must issue simple fragmentary orders (FRAGOs) because the tactical situation requires immediate response. When this happens, he must rely heavily on the SOP. Regardless of the time available, the platoon leader should perform as many of the troop-leading procedures as possible.
c. Operation Order.
(1) The platoon leader completes his order when he has completed his analysis, made his reconnaissance, and developed his plan.
(2) The operation order should follow the standard five-paragraph operation order format and be issued orally. SOPs should be referred to when possible to help shorten the order. The platoon leader should give his order from a point overlooking (or on) the platoon's defensive position if possible. The order must explain what is to be done, where, how, when, and by whom. The squad leaders then give orders to their squads.
d. Priority of Tasks.
(1) To help the platoon use available time efficiently, the platoon leader should establish task priorities. Normally, these are in SOPs, but they can be modified by the platoon leader or company commander. In most situations, the first five tasks are--
(a) Establishing security.
(b) Positioning APCs and dismounting teams.
(c) Emplacing crew-served weapons and designating sectors of fire and final protective lines (FPLs).
(d) Clearing fields of fire.
(e) Preparing fighting positions.
(2) Some of these tasks may be done at the same time. Additional tasks can include preparing range cards, emplacing obstacles, preparing alternate and supplementary positions, or laying wire for communications. The platoon leader should specify the order in which these tasks are to be accomplished. Coordination with adjacent squads and platoons must be continual throughout the planning and execution phases.
(3) Camouflage netting (radar scattering) should be used whenever possible when the APC is placed in position. The nets enhance concealment by breaking up the regular shape of the vehicle and denying ground and aerial observation.
3. Mechanized Platoon Defense with the Bradley Fighting Vehicle (BFV). The mechanized platoon defense for units using the Bradley fighting vehicle requires specific planning procedures and tasks. The BFV defense tasks vary from the M113 platoon tasks that were discussed previously.
a. Defense Tasks. The platoons defend to hold terrain and destroy the enemy. The BFV platoon defense tasks include--
(1) Destroying enemy BMPs, BTRs, and other lightly armored vehicles with the 25-mm gun and with Dragons, AT-4s, and grenade launchers.
(2) Destroying enemy tanks with the BFV-mounted TOW and with Dragons and AT-4s.
(3) Suppressing enemy antitank fires with the 25-mm gun, grenade launchers, 7.62-mm coaxial machine gun, M249s, and rifles.
(4) Repelling dismounted enemy attacks with the BFV and dismounted infantry.
(5) Locating the enemy and providing security by manning observation posts and conducting patrols and ambushes.
(6) Constructing obstacles to slow, stop, or canalize the enemy and providing security for obstacles.
(7) Conducting platoon-size counterattacks, or as part of a larger force, to regain portions of their position that have been overrun.
b. Planning the Defense.
(1) The information the platoon leader learns from the operation order for the BFV platoon defense is similar to the M113 platoon. However, for the BFV platoon, the platoon leader also learn the--
(a) The most likely and most dangerous enemy avenue of approach and expected enemy course of action.
(b) The evacuation or destruction procedures for damaged vehicles.
(c) The availability of ammunition, mines, barrier materials, and other supplies.
(2) The defense may involve fast, frequent movement between battle positions and during counterattacks. Platoons and squads must respond to short-notice changes in mission and fight immediately from a new battle position. Thus, platoons must develop and practice SOPs, master applicable drills, and learn to exploit the mobility and firepower of the fighting vehicle.
c. Operation Order.
(1) On receipt of a company operation order, the BFV platoon leader begins his troop-leading procedures. He begins with an analysis of the METT-T.
(2) Often, the BFV platoon leader must issue simple FRAGOs because the tactical situation requires immediate action. When this happens, he must rely heavily on SOPs. During occupation of a battle position, the platoon and squads should use the applicable drills to reduce time and possible confusion. Regardless of the time available, the platoon leader should perform as many of the troop-leading procedures as possible.
(3) The BFV platoon uses the same operation order format as the M113 platoon that was discussed in paragraph 2c, of Part A of this subcourse.
d. Priority of Tasks.
(1) The priority of tasks for the BFV platoon are similar to the M113. In most situations, the
(a) Security. Specifically--
- establishing OPs.
- conducting local patrols to search for enemy stay-behind forces, sensors, mines, or booby traps.
- positioning M8 alarms.
- maintaining one-third of troops on security at all times.
(b) Positioning key weapons (location, sectors of fire, principal direction of fire [PDF], FPF) for the BFVs, Dragons, and SAWs.
(c) Clearing fields of fire and preparing range cards and sector sketches.
(d) Preparing primary fighting positions.
(e) Emplacing hasty minefields/obstacle systems.
(f) Establishing local communications systems (wire, trenches) for the BFVs, fighting positions, and OPs.
(g) Emplacing platoon early warning systems (PEWs), night vision equipment, and other warning devices (higher priority during limited visibility).
(h) Improving fighting positions by--
- constructing overhead cover.
- setting out aiming stakes.
- adding camouflage.
- burying land lines.
- hiding or disposing of fresh earth.
(i) Preparing alternate and supplementary positions.
(j) Stockpiling ammunition, water, and food, and conducting maintenance.
(2) As with the M113, some of these tasks should be done at the same time. The platoon leader and squad leaders must closely supervise the activities to ensure that valuable time is not lost on tasks of minor priority.
(3) The first 30 minutes of the occupation of a defensive position are critical because during this period security is established, positions are designated, and work is begun.
(4) The platoon leader must conduct a hasty reconnaissance to ensure that the location of his position is correct and that the squad sectors and key weapons positions will not have to be moved once they are in place.
(a) Coordination. The platoon leader should coordinate with both flank units and with his company team commander early enough to preclude having to move his squads or make major adjustments in fighting positions after construction is well under way. Squad leaders coordinate on their flanks as well.
(b) Supervision. Constant supervision for the defensive positions preparation is necessary, especially for verifying squad sectors and key weapons positions as well as fields of fire. If it becomes obvious to a platoon or squad that a sector must be adjusted or that positions must be shifted, the decision is made quickly and the soldiers moved where they are needed most.
(5) To ensure personnel are not exhausted when the enemy attacks, rest, sleep, and eating plans are made so that security and work can continue.
e. Indirect Fire Planning. Most indirect fire planning is done by the company commander and the fire support team chief with input from the platoon leader.
(1) Reviewing Target List. A copy of the target list is given to the platoon leader. The platoon leader and forward observer (FO) check the target list, ensuring that fire is planned on all enemy avenues of approach as well as on known or likely enemy positions in the platoons sector of fire. If more targets are needed, the FO requests them through the fire support officer (FSO). Normally, the FO stays with the dismounted element because he has virtually no capability to call and adjust indirect fires when mounted.
(2) Planning at the Platoon Level. At platoon level, fires should be planned to the front, on top, and to the rear of platoon positions. Fires are planned on likely enemy avenues of approach and on prominent terrain features from which fires may be adjusted. In addition, fires are planned on dead space that cannot be adequately covered by other platoon weapons.
(3) Coordinating Planning. Fire planning is a team effort between the platoon leader and FO. Usually, fire planning occurs after the rifle team sector sketches and BFV's range card have been compiled and the platoon leader has determined where the defensive plan requires strengthening. The platoon leader and other key leaders select a few critical targets that can be easily identified during the battle.
(4) Compiling Platoon Fire Plans. The coordinates (eight-digit, if possible) are determined when the platoon leader, with the aid of the FO, decides which targets are to be covered by indirect fire. The information is then passed to the company team FSO who compiles all of the platoon fire plans for the company commander. The confirmed target list is returned to the platoon where the FO quickly confirms the targets by plotting them on the map. The targets are then matched to the terrain and disseminated among key personnel including platoon sergeants (PSGs) and radio/telephone operators (RATELOs).
(5) Determining Number of Targets. The platoon leader's ability to call for targets during the battle serves as a guide for how many he should request. He should try to memorize the target numbers for all of the indirect targets in his platoon sector. Memorizing the target numbers allows the platoon leader to quickly call for those fires during the battle without having to refer to a map or reference card. Also he does not have to rely on light if the battle takes place during limited visibility. Normally, a few targets are sufficient in a platoon sector, especially if they are on prominent terrain features from which they can be adjusted.
(6) Assigning Final Protective Fire (FPF). An FPF is a prearranged barrier of fire. The company commander may assign a mortar or artillery FPF to a platoon. The platoon leader must plan the FPF location with the platoon FO and the company FSO. The FPF should cover the most threatening dismounted approach. It is planned close to the platoon position but not close enough to endanger friendly troops. The FO advises the platoon leader on how close to the rifle teams an FPF can be fired without endangering the troops. This varies with the type of weapon and ammunition fired. When assigned an FPF, the platoon leader has authority to call for it unless the company commander retains authority. The FPF is fired as a last resort to stop an enemy assault. When ordered, the FPF is fired continuously until the order to stop is given. All other platoon weapons fire while the FPF is being fired.
f. Obstacle Planning.
(1) Enhancement of Sector. The platoon has little organic capability to emplace significant obstacles but can enhance its sector and individual positions in many of ways.
(a) Mines can be carried on the BFVs, and a hasty protective minefield can be emplaced.
(b) Tactical wire can be carried on the BFVs and used either for protection or as a deception to confuse the enemy as to exact location of positions.
(c) Trip flares, Claymores, and field-expedient tangle-foot obstacles can be emplaced.
(d) Trees can be cut using pioneer tools, and field-expedient abatis and roadblocks can be constructed.
(2) Engineer Support. If a platoon leader receives, or is told he will receive, engineer support in his area, he should still put in the obstacles he can emplace with his own assets. He then prioritizes those projects that require outside assistance.
(a) Specific engineer missions. In many cases, engineer assets execute specific engineer missions in the platoon area that have been directed by higher headquarters. In these cases, the platoon leader should verify that the obstacles fit into his platoon defensive plan. If they do not, he should coordinate with the engineer element or the company team commander.
(b) After emplacing obstacles. Once engineer obstacles have been emplaced, the platoon leader should review his platoon obstacle plan to determine if any adjustments of his own hasty protective obstacles are required.
(3) Covering Obstacles. Once emplaced, obstacles must be covered by observation and fire. If not observed and covered by fire, the obstacles can be easily breached or bypassed, especially during limited visibility.
g. Defensive Sector Sketch. The leaders of the fighting vehicle crews prepare BFV range cards (DA Form 5517-R, Feb 86), and squad leaders prepare sector sketches. Each antiarmor specialist and automatic rifleman prepares a range card. The sketches and range cards serve as memory aids to the platoon and help the platoon leader prepare his platoon fire plan.
(1) Rifle Team Sector Sketch. The sketch is prepared based on direct observation of the sector and by using each weapon's range card. Two copies of the sketch are made; one copy goes to the platoon leader and the other copy remains at the position. See Figure 1-1 for an illustration of a squad sector sketch. A rifle team sector sketch is a rough drawing, as close to scale as possible, showing--
(a) Main terrain features in the sector and the range to each.
(b) Each primary position.
(c) Engagement areas or primary and secondary sectors of fire for each position.
(d) M249 FPLs or PDFs.
(e) Type of weapon in each position.
(f) OP and leader positions.
(g) Target reference points (TRPs) in the sector.
(h) Dead space.
(i) Obstacles.
NOTE |
The parts of the squad sector sketch described are the minimum items for a meaningful sketch. The platoon SOP may require more detail. FPLs or PDFs apply to the M249s only when employed with tripods and traversing and elevating mechanisms. |

Figure 1-1. Squad Sector Sketch.
(2) Team Sector Sketch. The squad leader or assistant squad leader prepares the team sector sketches and submits them to the platoon leader. Bradley commanders prepare range cards for their individual vehicles and submit them to the mounted element leader. The platoon leader combines sketches and range cards to make a platoon sector sketch.
(3) Platoon Defensive Sector Sketch. A platoon defensive sector sketch is a sketch drawn as closely to scale as possible and includes a target list for direct and indirect fires. The sketch should show--
(a) Platoon, element, or engagement area.
(b) BFV and team positions.
(c) BFV positions with primary sectors of fire or engagement areas.
(d) BFV remount point.
(e) Dragon and M249 positions with primary sectors of fire for each.
(f) M249 FPLs or PDFs.
(g) Maximum engagement ranges of TOWs, 25-mm gun, and coaxial machine guns.
(h) OPs.
(i) TRPs and target numbers.
(j) Mines and other obstacles.
(k) Indirect fire target locations.
(l) Indirect fire FPF location, if allocated.
Because the platoon leader is involved in numerous activities in the early part of the defense, he uses the FO to consolidate team sector sketches and BFV range cards into a tentative platoon sector sketch. This not only saves the platoon leader valuable time but allows the FO to immediately begin fire planning and to determine which targets to recommend to the platoon leader. At least two copies of the platoon sector sketch should be prepared; one for the platoon leader and one for the company commander. If time permits, additional copies can be given to each subordinate team or squad. To facilitate company fire planning, the platoon sector sketch must be forwarded to the company commander as soon as possible.
NOTE |
The parts of the platoon defensive sector sketch shown in Figure 1-2 are the minimum necessary. The company SOP may require more detail. |
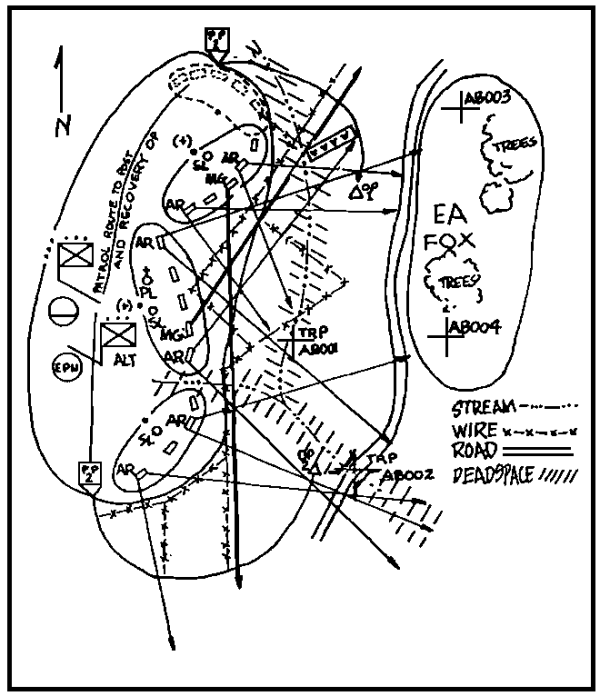
Figure 1-2. Platoon Sector Sketch.
h. Range Cards. A range card is a rough sketch of the terrain a weapon is assigned to cover. It shows the possible target areas and terrain features plotted in relation to a firing position. The information is used to plan and control fire, detect and engage targets, and orient replacement personnel or units.
(1) Preparation of a Range Card. Normally, each BFV gunner prepares the range cards for his BFV. He prepares one for each primary, alternate, and supplementary position designated in the defense, and for any static position when enemy contact is possible such as a position in an assembly area.
(2) Contents of a Range Card. Each range card contains at least the following information--
(a) The symbol for the weapon covering the sector.
(b) The azimuth (degrees) and distance (meters) of the firing position from an easily recognizable terrain feature. (This serves as an easy reference to locate the firing position.) If no recognizable terrain feature is available use an eight-digit grid.
(c) The boundaries of the area assigned to be covered by observation and fire.
(d) Areas where targets are likely to appear (engagement areas) and the range, azimuth, and elevation to them from the firing position.
(e) Dead space.
(f) Direction.
(g) Identification data including unit designation (no higher than company), firing position (primary, alternate, or supplementary), are magnetic north arrow.
(3) When to Prepare the Range Card. The gunner prepares a range card as soon as possible after moving into a firing position. Depending on the priority of work established, and once the Bradley commander tells the gunner the sector of fire and other required information, the gunner prepares the range card.
(4) Uses for the Range Card. The platoon leader uses the range cards and squad sector sketches to prepare a platoon sector sketch. A standard preprinted sheet of paper is best for drawing the range card. However, anything the gunner can write on, such as a piece of notebook paper or a cardboard box, can be used. Figure 1-3 shows a sample range card.
(5) Development of the Range Card. The gunner first, draws the BFV map symbol in the lower center of the range card. Then he shows the sector of fire by drawing arrows from the vehicle symbol to the left and right limits. To identify the sector, he sketches any easily recognizable terrain features. In the data section, the gunner indicates the magnetic azimuth, deflection (from the azimuth indicator), and range to the far limits of the sectors of fire.
NOTE |
The left and right limits are labeled one and two, respectively, in the sector sketch and a circle is drawn around each number. The left and right limits should be the first items drawn and labeled in the sector sketch and the data section of the range card. (The azimuth, deflection, and range are not placed on left/right limit lines.) |

Figure 1-3. Standard Range Card.
(6) Target Reference Points. The gunner places target reference points (TRPs) at the location designated by the Bradley commander, and at any other location where a target is likely to appear. He then number each TRP and likely target locations in the range card sketch section.
NOTE |
| Arrows are not drawn from TRPs and likely target engagements to the vehicle position. |
(7) Engagement Line. The gunner draws a maximum engagement line across the sector of fire for the 25-mm automatic gun, TOW, and 7.62-mm coax machine gun. These lines depict the maximum ranges at which a target can be engaged effectively.
NOTE |
The 25-mm (high explosive incendiary tracer/armor-piercing discarding sabot tracer [HEI-T/APDS-T]) and the TOW may have more than one maximum engagement. |
(8) Dead Space. The gunner draws diagonal lines across the area and write the words "dead space" to show dead space or areas where targets cannot be engaged.
(9) Heading and Data Section. First, the gunner draws a magnetic north arrow on the range card to orient it with the terrain. Then he reads identification data including the unit designation (no higher than company), time and date of preparation, and type of position (primary, alternate, or supplementary).
(10) Remarks Block. He enters the information for the weapon reference point in the remarks block on the range card.
(11) Marking the Positions. After completing the firing position range card, he marks the position with ground stakes. This enables the same BFV or a BFV from a relief unit to reoccupy the firing position and to use the data from the prepared range card for the position.
(a) Staking the Position. The position should be staked before the vehicle is moved to any hide position. This is done once the position range card is completed. Three stakes are needed to mark the position (Figure 1-4). One stake, centered on the driver's station and touching the hull, is placed in front of the vehicle. This stake needs to be long enough so that the driver can see it as he moves into position. The other two stakes are placed parallel to the left track, one lined up with the front wheel hub and one with the rear wheels. These stakes are placed close to the vehicle with only enough clearance to let a driver move into position without knocking them down. The stakes should be driven deep enough into the ground so that a strong wind cannot knock them down. To make them easier to see during limited visibility, engineer tape or luminous tape can be placed on the friendly side of the stakes.
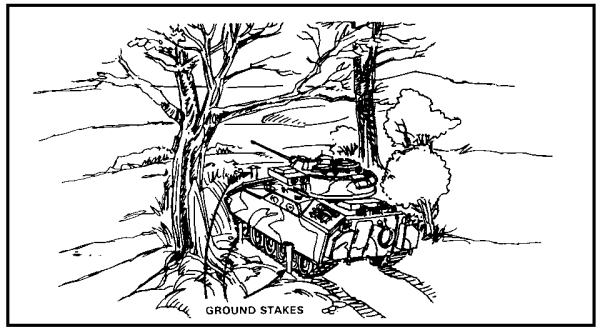
Figure 1-4. Staking the Position.
(b) Moving into Position. If the situation permits, a ground guide can be used to help the driver move the vehicle into position. If a ground guide cannot be used, the driver moves in parallel to the two side stakes with the front stake centered in the driver's station. Once in position, the BFV gunners should index the range and azimuth for one of the targets on the range card. If the sight is aligned on the target, the vehicle is correctly positioned, and the data from the range card can be used. If the sight is not aligned on the target, the gunner should tell the driver which way to move the vehicle to align the sight on the target. Only minor adjustments should be necessary.
i. Coordination Between Adjacent Platoons/Squads/Teams.
(1) Platoon leaders coordinate with adjacent platoons. Squad leaders coordinate with adjacent teams so that all positions and all units are mutually supporting. The platoon leader ensures that this coordination takes place. Normally, coordination is initiated from left to right. As a minimum, gaps between positions are covered by fire. Coordinating points are established to ensure that units meet at some specific point on the ground to tie in their flanks. Information exchanged includes--
(a) Locations of primary, alternate, and supplementary positions.
(b) Sectors of fire for BFVs, M249s, and Dragons.
(c) Location of dead space between units and how it is to be covered.
(d) Location of OPs.
(e) Location and types of obstacles and how to cover them.
(f) Patrols to include size, type, time of departure and return, and routes.
(2) Exchanging of Information. A sector sketch that contains most of the above information may be exchanged. However, in some cases BFVs can be positioned not only to support the dismount element but also to support flank platoons. At times, this might even be a compromise position that must be occupied to tie in a vulnerable flank. Platoon leaders must be especially careful of tying in their flanks, since platoons defend as part of a company team.
j. Planning for Remount. The remount must be planned in detail, because Bradley platoons dismount their infantry in the defense. This is especially true when subsequent movement is an integral part of the defensive plan. It is also important when the dismount and vehicle elements are separated for the fight. The inability to plan and execute a speedy remount negates the advantage of the BFVs speed as the vehicles are forced to wait for the dismounted infantry to link up and remount. Planning for the remount at platoon level should include--
(1) Remount rehearsal.
(2) Reconnaissance of the route to the remount point by both the vehicle and dismount elements.
(3) Marking of the route to the remount point.
(4) Signals to initiate the remount.
(5) Contingencies for limited visibility, loss of communication, loss of leaders.
Part B
MAJOR DIFFERENCES BETWEEN EMPLOYING INFANTRY AND MECHANIZED INFANTRY IN DEFENSIVE POSITIONS
1. Infantry Defensive Considerations.
a. Considerations. A platoon leader's defense plan includes the following considerations:
(1) Deployment of squads.
(2) Deployment of machine guns and antitank weapons.
(3) Use of indirect fire.
(4) Use of mines and obstacles.
(5) Security measures.
(6) Selection and operation of a command post (CP) and observation post (OP).
b. Deployment of Squads. Squads are deployed abreast so they can all fire toward the expected direction of attack. A squad can defend a front of about 100-meters on ideal terrain. The distance between two-man positions should be about 20-meters, and the distance between one-man positions should be about 10-meters. The platoon gives each squad a position to defend and a sector of fire. The center squad's sector of fire covers their sector and overlaps the sectors of adjacent squads. (Figure 1-5 illustrates overlapping sectors of fire.)
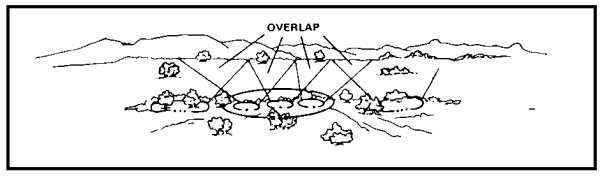
Figure 1-5. Overlapping Sectors of Fire.
c. Deployment of Machine Guns and Antitank Weapons. The platoon leader selects machine gun and antitank weapon positions.
(1) Machine Guns. Machine guns are the platoon's primary weapons for stopping infantry attacks. Positions and sectors of fire should cover infantry avenues of approach and provide grazing fire across the platoon's front. Each gun is given a primary and secondary sector of fire. The sectors should overlap each other and those of adjacent platoons. A gunner fires in his secondary sector only if no targets are in his primary sector, or if ordered to fire. Each gun's primary sector includes a final protective line (FPL) or a principal direction of fire (PDF).
(a) Final Protective Line. The FPL is a line on which the gun fires grazing fire across the platoon's front. The platoon leader assigns a machine gun an FPL where terrain allows. Grazing fire is no more than 1 meter above the ground (about hip high). Fire on a gun's FPL is its final protective fire (FPF). The FPL is fired on command of the platoon leader and in conjunction with the FPF of indirect fire weapons.
(b) Dead Space. To find dead space, a soldier walks the FPL while the gunner watches and marks spaces that cannot be grazed with fire. (Refer to Figure 1-6 for an illustration of finding dead space along an FPL.) Dead space is recorded on the range card, and is covered with obstacles, grenade launcher fire, or mines.
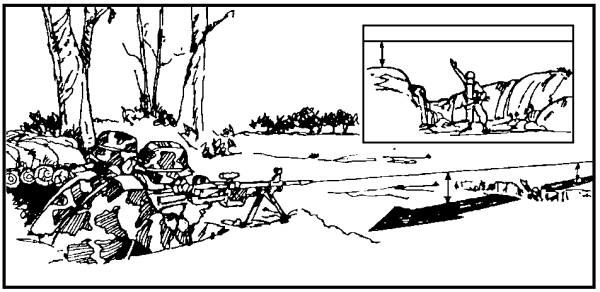
Figure 1-6. Finding Dead Space Along an FPL.
(c) Principal Direction of Fire (PDF). When the terrain does not lend itself to an FPL, the platoon leader assigns the machine gun a PDF. The PDF should be toward a gully or down a ditch that leads into the position. The gun is positioned to fire directly down this approach rather than across the platoon's front. Gunners lay the machine guns on the FPL or PDF when not firing. After the machine guns are sighted, the squad leader positions riflemen to protect the machine guns and to cover areas not covered by fire (Figure 1-7).
Figure 1-7. Principal Direction of Fire.
(2) Antitank Weapons. The platoon leader positions antitank weapons to cover armor avenues of approach. He selects a primary position and a sector of fire for each weapon. He may also select alternate and supplementary positions. Each position should allow flank fire and provide cover and concealment. Figure 1-8, provides an example of antitank weapons positions.
Figure 1-8. Antitank Weapon Positions.
(3) Range Cards. When preparing an infantry defensive position, range card is prepared for each tripod-mounted machine gun and antitank weapon. Procedures for preparing range cards were discussed in Part A of this lesson.
d. Use of Indirect Fire. The company commander and the FSO plan most of the indirect fire. They give the platoon leader a copy of the planned target list. The platoon leader and his FO check the target list to ensure that fire is planned on all enemy avenues of approach and on known or likely enemy positions in the platoons sector of fire. If additional targets are needed, the FO requests them through the FSO.
(1) Target Reference Points (TRPs). Targets that are planned to control and direct the antitank weapons and any other direct-fire weapons are called TRPs.
(2) Final Protective Fire (FPF). The FPF is a prearranged barrier of fire.
(a) A platoon leader plans the FPF location with his FO and the FSO. It normally covers the most threatening approach. They plan the FPF close to the platoon position, but not so close as to endanger troops.
(b) The company commander may assign the FPF to a platoon. When the company commander assigns the FPF assigned the FPF, he may either give the platoon the authority to call for it or retain this authority for himself.
(3) Firing of the FPF. The FPF should only be fired to stop an enemy assault. On signal, the FPF is fired continuously until the order is given to stop. All platoon weapons fire while the FPF is being fired.
e. Use of Mines and Obstacles. The platoon leader improves the defense using mines, barbed wire, and trip-flares. He emplaces antipersonnel (AP) mines on infantry avenues of approach. He also emplaces both AT and AP mines on armor avenues of approach.
f. Security Measures. To keep the enemy from observing or surprising the platoon, a platoon leader establishes a security system for his platoon. He bases this system on orders received from his company commander, the enemy situation, and the terrain and visibility conditions. The system must provide for both active and passive measures.
(1) Active Security Measures. A company commander may require a platoon to have a set number of observation posts (Ops) and a set number of men on security. If he does not, the platoon leader decides what is needed. Each platoon should have at least one OP and, in close terrain, each squad may have one.
(a) Security Within Platoon's Position. A platoon leader also establishes security within his platoon's position. The platoon leader requires a set number of men to be on security at all times. The number varies with the enemy situation, terrain, and visibility. As a guide, at least one third of the platoon's soldiers should be on security at all times.
(b) Expectation of an Attack. When an attack is expected, the entire platoon should be on security. However, this degree of security should not be maintained for too long. A platoon leader must keep in mind that his men need rest in order to function in future operations, security cannot be sacrificed for rest.
(c) Man on Security. A soldier on security should be awake, fully dressed, manning his weapon, observing his primary sector of fire, and listening for enemy activity. The soldier on security in antitank and machine gun positions mans the weapon even if it is not an assigned weapon. A leader must explain to a soldier on security what to do if he hears or observes enemy activity.
(d) Stand-to Morning and Evening. To ensure that every soldier adjusts to the changing light and noise conditions as well as being dressed, equipped, and ready for action, platoons hold a stand-to morning and evening. The stand-to morning starts before first light in the morning and continues until full daylight. The stand-to evening begins before dark in the evening and lasts until full darkness falls. To prevent establishing a pattern, platoons must vary the starting and ending times. The stand-to must last long enough to accomplish its purpose.
(2) Passive Security Measures. Passive security measures include camouflaging positions, controlling movement, light and noise discipline, and limited radio traffic.
g. Command Post-Observation Post (CP-OP). A platoon leader locates his CP-OP in a place from which he can best see and control his platoon (Figure 1-9). If he cannot see and control all of it from one place, he locates the CP-OP so that he can see and control that part of his platoon covering the most likely enemy approach. The platoon leader will then locate an alternate CP-OP in a place from which to see and control that part of the platoon that he cannot see or control from the primary CP-OP. The platoon sergeant operates the alternate CP-OP.

Figure 1-9. Command Post-Observation Post.
(1) Platoon CP-OP. The platoon CP-OP ties into the company wire net with a TA-312 field phone and into the company radio net with a PRC-77 radio. The platoon has its own platoon radio and wire nets.
(2) Platoon to Squads. Wire is the primary means of communication between the platoon leader and his squad leaders. When another means of communication other than phones and radio is more appropriate, or when phones and radios do not work, the platoon leader uses messengers, visual signals, personal contact, or whistles. Additional phones may be issued to the platoon for use in OPs.
(3) Squads to Fire Teams. The squad leader communicates with his fire team leaders and his men by personal contact, and oral orders, or by sound and visual signals.
2. Mechanized Infantry Defensive Considerations.
a. Designation of BFVs. When the enemy attacks, BFVs, designated to engage at long range, fire at priority targets. They then move to alternate positions. Some of these BFVs are designated to engage enemy armor with TOWs, while others engage enemy command and control vehicles, infantry carriers, and air defense artillery (ADA) weapons with the 25-mm gun.
(1) As the enemy advances, friendly tanks begin to engage enemy tanks. Friendly obstacles, covered by direct and indirect fire, break up enemy formations denying enemy elements mutual support. Enemy vehicles are engaged on the flanks and rear by BFVs, as they move into primary engagement areas.
(2) Designated infantry, preferably located on reverse slopes for protection or on hindering terrain, engages enemy elements at relatively close ranges using Dragons, AT-4s, M249s, and small arms. To complete the destruction of the enemy, BFVs and dismounted infantry move by covered and concealed routes to remount points and then to subsequent positions, if the defensive plan calls for movement to subsequent positions. Once the enemy has been destroyed, units reorganize, resupply, and prepare for subsequent missions.
b. How Fighting Vehicle Elements Defend. The BFV-equipped platoon defends better against a greater variety of threats than previous mechanized platoons.
(1) Equipment Used in the BFV-equipped Platoon. Infantry can now defeat mounted attacks at longer ranges and win the close-in fight with the BFV and its 25-mm gun, TOW, and 7.62-mm coaxial machine gun.
(a) TOW. Enemy tanks are primary targets for the TOW. Because of the small number of TOW rounds on the BFV, missiles should not be wasted on targets that can be killed by other weapons.
- Use of a TOW. The basic rule for using a TOW is to engage enemy tanks as soon as they are in range and on the flanks. Accurate preparation of a range card aids the gunners and Bradley commanders in determining that enough exposure time is available for a hit.
- Firing a TOW. The BFV must move to an alternate firing position to avoid enemy return fire when a TOW is fired. The launcher must be reloaded after two TOWs have been fired. The BFV should move to a hide position, reload, and then move to an alternate firing position. The platoon leader must be kept informed of missiles on hand for firing. During any lull in the battle, the platoon leader or platoon sergeant should request resupply, even if only a few missiles are needed.
(b) 25-mm Gun. Firing APDS-T ammunition, the 25-mm gun can defeat the BMP and other light armored vehicles, such as the BTR and BRDM, out to 2,000 meters.
- Using the 25-mm Gun. The defender can separate the enemy infantry from his tanks by forcing him to dismount and engaging BTRs and BMPs as they come into range within the platoon position. The enemy infantry is vulnerable to small arms and indirect fires once dismounted. The 25-mm gun can continue to engage BTRs or BMPs, then switch to HEI-T to destroy or suppress dismounted infantry or thin-skinned vehicles.
- Reloading. Time to reload the weapon system must be planned, as with the TOW. APDS-T should be reserved for targets that cannot be killed with HEI-T.
- Using HEI-T. HEI-T should be held for targets that cannot be killed or suppressed with the 7.62-mm coaxial machine gun. HEI-T and APDS-T are reloaded at every chance to avoid running out of ammunition during an enemy attack. Adding ammunition to existing links is quicker than loading empty weapons. When changing from one type of 25-mm ammunition to another, the first round is of the type previously selected because that round is already chambered.
(c) 7.62-mm Coaxial Machine Gun. The coaxial machine gun is effective in suppressing ATGMs and enemy machine gun positions, defeating thin-skinned vehicles, forcing armored vehicles to button up, and engaging troops on foot or riding on the outside of tanks. To conserve the larger caliber ammunition, the 7.62-mm coaxial machine gun should be used whenever possible. Keeping the coaxial machine gun at maximum ammunition load is just as critical as for the 25-mm gun. It should be reloaded to capacity at every chance.
(2) Movement to Alternate Firing Positions. The BFV leader moves to an alternate firing position to avoid effective enemy fire or to gain a better firing position in the desired sector of fire or engagement area.
(a) Directing the Movement. This movement is either directed by the fighting vehicle element leader, or done automatically by the squad leader if his position has been discovered and targeted by the enemy. When the enemy is returning effective fire, the fighting vehicle crew must avoid multiple engagements from the same firing position.
(b) Coordinating the Movement. Individual vehicle movement must be coordinated so all vehicles will not be out of firing positions at the same time. Normally, the platoon leader directs movement to supplementary positions. This movement normally involves all parts of the fighting vehicle element moving at the same time, but it may be done by single BFVs or by pairs.
(c) Screening the Movement. If effective enemy fire forces a BFV to leave its position, the on-board smoke grenade launchers or smoke-screen generator can be used to conceal the vehicle's movement.
(3) Continuation the Fight. The fighting vehicle element continues the fight while the rifle teams remount the vehicles if the platoon is ordered to move to another battle position. Both the fighting vehicle and the dismount elements are located together.
(a) Separated Elements. The dismount element should notify the fighting vehicle element leader before moving to the remount point when the elements are separated. The BFV then moves to the remount point to pick them up.
(b) Engaged Elements. The platoon must move quickly if either element becomes decisively engaged. An enemy force traveling at 20 kilometers per hour moves one kilometer in only three minutes.
(c) Slowing the Enemy. To slow the enemy, the fighting vehicle element increases its rate of fire, and the FO adjusts for indirect fire and smoke on the enemy. Emplaced barriers and mines will also slow the enemy attack. If needed, the BFV's smoke-screen generators can be used to supplement the smoke provided by indirect fire.
c. Defense by Dismounted Elements. Dismounted elements defend either while still mounted or after dismounting as an infantry unit.
(1) Defending Against Dismounted Attack. During an attack the enemy infantry advances as far as possible mounted in BTRs and BMPs. When forced to dismount, usually 300 to 400 meters from your position, the infantry continues the attack on foot supported by indirect fire, tanks, BTRs, and BMPs. Indirect fires are placed as quickly as possible on the enemy's dismounted forces.
(a) Engaging the Enemy Force. The dismounted elements engage the attacking enemy force as soon as it comes within the element's sector of fire. Targets in the primary sector of fire have priority. However, targets in the secondary sectors are engaged when no targets show in the primary sector.
(b) Enemy Begins the Assault. The platoon leader and his FO should call for all FPFs as the enemy begins the assault. Until the enemy assault is halted, a heavy stream of fire is maintained. The rate of fire is then reduced to save ammunition.
(c) After the Enemy Assault is Repelled. When the enemy assault is repelled the platoon leader reorganizes his platoon by getting a status report from each squad, ensuring that key weapons are manned, designating replacements for key leaders, if needed, and reporting his status to the company team commander. Retreating enemy forces are often disorganized and exposed to fire. If ordered to do so, the platoon leader should keep calling for indirect fire and be prepared to quickly remount the BFV's and counterattack.
(2) Dismounted Infantry Defending Against a Mounted Attack. Riflemen and M249 gunners direct their fires at exposed crew members, forcing them to close their hatches. Fire is also directed toward the dismounted infantry moving along with the tanks. If the enemy infantry can be separated from the tanks, once the tanks have closed up, they become vulnerable to infantry antiarmor weapons.
(a) Dragons. Dragons are used to engage enemy tanks as soon as the tanks enter their sectors of fire. When no tanks are seen in primary sectors of fire, Dragons may be fired at enemy tanks in secondary sectors of fire. When engaging targets, antiarmor specialists should make maximum use of the frontal protection of their positions and try for flank shots at target tanks. Because of the scarcity of ammunition, Dragon engagements should be controlled by squad leaders.
(b) Light Antitank Weapons (AT-4s). AT-4s are fired at enemy armored vehicles that close on the rifle team's position. Squad leaders should hold AT-4 fire until enemy vehicles come into the protective minefield, or close enough so that AT-4 hits can be made on the sides of the target vehicles. Normally, a squad leader has better results if his entire team hits one enemy tank with surprise volley or pair fire.
(c) M203 Ammunition. Squad leaders fire dual-purpose M203 ammunition at BTRs and BMPs, preferably from the sides. As with the LAW, they should wait until the targets are close enough to ensure a hit.
d. Preparation for the Next Attack. When an enemy assault is repelled, leaders must prepare to counterattack, continue the defense in place, or displace. The platoon must quickly prepare for more enemy attacks if the platoon leader is directed to hold his present positions.
(1) Reestablish Security. If OPs withdrew to the battle position, they are sent back out to reestablish security. If any of the OP personnel did not return or are wounded, they must be accounted for or replaced.
(2) Replace Key Personnel. If there are casualties among leaders or critical weapon operators, they are replaced.
(3) Redistribute/Resupply Ammunition. Squad leaders take inventory and redistribute any remaining ammunition including ammunition from casualties. The rifle team gets additional ammunition from the squad vehicle if it is nearby.
(a) Ammunition status is reported to the dismount element or platoon leader. Fighting vehicle crew leaders reload the 25-mm gun and 7.62-mm coaxial machine gun and quickly count remaining ammunition and missiles.
(b) Ammunition and missile status is reported to the vehicle element or platoon leader. The fighting vehicle element leader also redistributes ammunition and missiles among the BFVs.
(c) The platoon leader or platoon sergeant consolidates the platoon's ammunition status reports. He then requests resupply and, if necessary, sends a vehicle to pick up more ammunition and missiles.
(4) Evacuate the Dead, Seriously Wounded, and Enemy Prisoner of Wars (EPWS.). The wounded are treated and returned to duty, when possible. The seriously wounded are evacuated to the rear. All sectors of fire must be checked to ensure they are still covered, after casualties are evacuated. As needed, leaders must ensure positions are readjusted to cover any gaps left by casualties or disabled BFVs. After a quick interrogation and search for information that might be of immediate value to the platoon, enemy prisoners are evacuated to the rear.
(5) Replace Camouflage. Wilted material is removed and replaced with fresh camouflage, when the situation allows. A position should not have too much camouflage.
(6) Replace Obstacles. Obstacles, mines, and early warning devices should be replaced if enemy forces have withdrawn. Troops must be careful since this is a risky task, especially if there are enemy snipers around. Smoke can be used to cover movement, although obstacles may have to be replaced after dark.
e. Counterattack. Leaders at all levels must seek the opportunities to attack during the conduct of defensive operations. The counterattack is an excellent way to seize the initiative, destroy or disrupt the enemy, and gain key terrain.
(1) Regaining the Platoon Position. Normally, platoons counterattack to regain all or a portion of the platoon position. Often these counterattacks are done by massing direct fires and calling for indirect fires to eject the enemy from the position before he can establish himself. Counterattack by maneuver is often done with only a few men, especially if other portions of the platoon position are still defending. The BFVs can be used to fire or maneuver to aid in restoring the platoon position if they are nearby.
(2) Counterattacking as Part of a Larger Force. The platoon sometimes counterattacks as part of a company/team or a battalion task force. Some counterattacks are planned in great detail. Others are not planned but are executed rapidly when the right conditions exist, like hasty attacks. Before overwatching or following enemy echelons can interfere, counterattacking forces must complete their tasks and regain covered positions.
(3) Resembling a Hasty Attack. Counterattacks may resemble a hasty attack at the platoon level. To catch the enemy at a weak point, platoon leaders make an estimate of the situation and react immediately.
(a) Preferred Method (Counterattack by Fire). The preferred method of counterattacking involves repositioning a unit so that effective fire can be placed on the enemy. In this case, the unit only moves to the extent necessary to assault the enemy and drive him off a piece of terrain. Normally, this situation is associated with the enemy seizing a part or all of the platoon's defensive positions.
(b) Restoring Continuity. The enemy must be expelled to restore the continuity of the defense. This requires decisive action to hit the enemy before he has an opportunity to react.
(4) Deciding to Counterattack. The platoon leader's decision to counterattack must not be reckless. The decision must involve an understanding of the higher (company) commander's intent and the use of good judgement before taking a calculated risk. Where feasible, the platoon leader should take action based on the commander's direction. However, the platoon leader should have the latitude to take the initiative in the absence of specific orders.
Example |
| The company commander may describe the necessity of retaining a specific piece of terrain that is critical to the battalion's defensive plan. If this terrain is lost, but can be regained through the immediate action of a platoon, the platoon leader should seize the initiative and retake the terrain. |
Part C
CONTROL MEASURES IN THE DEFENSE WITH MECHANIZED INFANTRY PLATOONS AND OPPOSING FORCES
1. Defensive Tactics and Techniques.
a. The mechanized platoon's defense must capitalize on the
(1) BFVs firepower and mobility.
(2) Dragon's thermal vision equipment.
(3) Dismounted infantryman's fighting capability.
b. Carrier teams with Dragons are used best to defend against mounted attacks along open avenues of approach. Along avenues that restrict movement, dismount teams are used best to defend against dismounted attacks.
c. Leaders cannot always position the carrier teams where they will not be subject to dismounted attack. They are seldom able to position the dismount teams where the enemy cannot use his armored vehicles.
d. Therefore, to make the most of the platoon's total combat power, leaders and commanders must carefully position and control carrier teams and dismount teams. This is not a simple matter, since the APC firing the caliber .50 machine gun or Dragon is chiefly a medium-range weapon system; however, the dismounted infantryman is most effective at short ranges. If the two are properly used, they complement and mutually support each other.
2. Control Techniques. Control is relatively simple when the entire platoon is mounted. However, control becomes difficult when dismount teams are deployed. The two ways to control the carrier teams and dismount teams are by squad or platoon.
a. Squad Control. The carrier team and dismount team remain under squad leader control only when the two teams are collocated. Because the two teams are together, this method improves control, concentrates fire-power, and increases security. The squad leader either remains in the vehicle or dismounts, whichever allows him to best control the entire squad and influence the fight.
b. Platoon Control. The carrier teams are formed into a carrier element and a dismount element, each under platoon control when the teams are positioned away from the dismount teams. In this situation, the platoon leader decides which element has the most important mission as well as from which position he can best control the entire platoon and influence the action. Whichever element the platoon leader decides to be with, he controls the other element through the platoon sergeant.
3. Command and Control.
a. Control and synchronization of the vehicle and dismount elements are the basic command and control considerations at platoon level. Since the platoon leader normally locates with the maneuver element, if one is used it will most likely be the mounted element. The platoon sergeant then locates with the dismount element.
b. In the defense, command and control are vital. They are the most difficult to achieve and maintain under limited visibility conditions. Good command and control begins in the fighting positions. Each fighting position must have the following aids for controlling fires:
(1) Aiming Stakes. Aiming stakes assist the soldier in firing his weapon on dangerous avenues of approach.
(2) Sector Stakes. Sector stakes define the sector of fire on the right and left. Sector stakes also prevent accidental firing into adjacent positions. Figure 1-10 illustrates the locations of aiming and sector stakes.

Figure 1-10. Aiming Stakes and Sector Stakes.
(3) Range Cards and Squad and Platoon Sector Sketches. The use of range cards and squad and platoon sector sketches for control is essential. A coordinated defense is possible through the integration of such control measures.
c. Due to the difficulty of estimating distance at long range, target reference points (TRPs) are necessary for the 25-mm and TOW systems. TRPs should be selected out to the maximum ranges of the systems either through--
(1) Careful map study.
(2) Pacing.
(3) Driving the distance.
(4) If tanks are available, using their laser range finders to mark or verify TRPs.
d. The platoon may use additional control measures such as tracers and pyrotechnics.
(1) Tracers. Tracers identify point or area targets.
(2) Pyrotechnics. Pyrotechnics indicate the lifting, shifting, or concentration of fires.
4. Coordination.
a. Proper coordination must be made with adjacent platoons that are on the flanks of the platoon's battle positions. This coordination includes the sectors of fire for--
(1) Night firing of crew-served and vehicular weapon systems.
(2) Repositioning of forces during limited visibility.
(3) Security measures necessary to secure the front and flanks.
b. The platoon leader positions his surveillance, target acquisition, night observation (STANO) equipment and night vision devices to ensure that overlapping fields of observation and fire are established within the platoon's sector of fire.
c. The capabilities of the integrated sight unit (ISU) must be realized. It is important that this system be manned and that a surveillance plan is implemented ensuring that sectors of observation overlap. Operation of the ISU requires starting the engine of the Bradley about every two hours to maintain a charge. To prevent the enemy from knowing how many vehicles are on the position, all BFVs should be started at the same time.
5. Occupation a Defensive Position. The techniques used to occupy a defensive position during good visibility also apply during limited visibility. Because of problems of command and control, the dismount element and BFVs should be placed on the same battle position whenever possible.
a. Reconnaissance During Good Visibility. A defensive position to be occupied should first be reconnoitered during good visibility. Both the reconnaissance and the occupation must be done with stealth and under enforced light and noise discipline. During the reconnaissance, the platoon leader--
(1) Ensures no enemy forces occupy the proposed battle position.
(2) Identifies enemy avenues of approach (mounted and dismounted) and potential enemy overwatch positions.
(3) Chooses engagement areas if they are not assigned by the company commander.
(4) Chooses primary, alternate, and supplementary positions for the rifle teams and fighting vehicles.
(5) Identifies dead space in front of positions and formulates a plan on how to cover it.
(6) Chooses locations for observation posts and the command post.
(7) Confirms locations of adjacent platoons and companies.
(8) Chooses target reference points, sectors of fire, and other control measures.
(9) Chooses routes in and out of positions.
b. Reconnaissance During Limited Visibility. A reconnaissance conducted during limited visibility must accomplish the same objectives as stated above.
(1) Because of the limited range of observation, the platoon leader's task must be accomplished with great care. He must ensure that his reconnaissance is done with a STANO device of similar capabilities as that of his weapon systems. If time permits, the platoon leader should--
(a) Go forward.
(b) Conduct the reconnaissance.
(c) Return to the platoon position.
(d) Bring the squad leaders forward.
(2) The platoon leader should also assign--
(a) Rifle team and fighting vehicle positions.
(b) Sectors of fire.
(c) Target Reference Points.
(d) Engagement areas.
(3) The squad leaders should then return to the platoon position and issue orders for the occupation and preparation of forward positions. The platoon then moves forward.
c. Limited Time. If there is not enough time for the tasks listed above, the platoon leader can take his squad leaders forward during the initial reconnaissance, or bring the entire platoon forward to an assembly area near the defensive position. He can then conduct his reconnaissance with his squad leaders. The platoon members accomplish the work priorities as they occupy the defensive positions.
d. Employment of the Dismount Element and BFVs. The platoon leader must carefully consider the method of employing the dismount element and the BFVs. The platoon leader must closely examine whether to fight both elements from different battle positions or the same battle position. The occupation of battle positions and the controlling of fires is simplified if both elements are on the same position during limited visibility.
e. Activities Associated with Defensive Positions. All activities normally associated with occupying defensive positions during good visibility are also done during limited visibility.
(1) To compensate for the limited visibility condition, techniques may change such as having to use night vision devices to establish sectors of fire, and actually walking the FPL and PDF.
(2) Noise and light discipline must be strictly enforced. Also, face-to-face coordination with adjacent platoons must be conducted and sectors of fire coordinated. This coordination should effectively tie in overlapping sectors of fire and observation with weapon systems and night vision devices. Defensive positions are adjusted as necessary when good visibility returns.
6. Disengagement. Based on orders from the task force commander, the commander decides how long to retain defensive positions. The company or company team may be required to remain and fight as long as possible, or it may be required to disengage and displace to subsequent positions. A platoon, as part of a company or company team, may disengage to defend from another battle position, prepare for a counterattack, delay, withdraw, or prepare for some other mission.
a. Fire and Movement. The basic tactic for disengaging involves fire and movement to the rear. All available fires are used to stop the enemy, allowing platoons to move away from the enemy.
(1) Mass Fire. Before beginning the movement away from the enemy, the company or company team commander may move his platoon and mass fire to stop or slow the enemy advance.
(a) A heavy volume of antiarmor fire forces the enemy to dismount his infantry, which slows his mounted advance. Artillery and mortar HE fire and smoke also add to the enemy's confusion, slow the momentum of his mounted attack, and help conceal the movement of friendly units.
(b) Small arms and indirect fire can be used against an attack by dismounted troops. A base of fire is formed to cover other units moving away from the enemy. One unit acts as the base of fire, holding off the enemy by fire or holding terrain that blocks his advance, while other units move to break contact. See Figure 1-11 for an illustration of the units breaking contact.
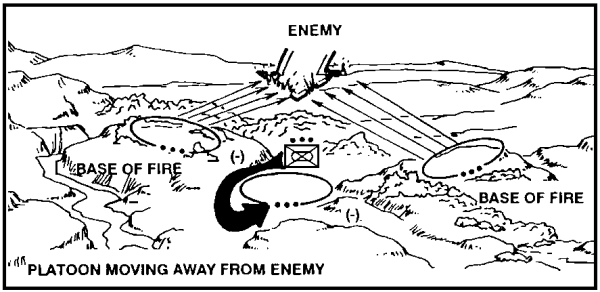
Figure 1-11. Breaking Contact.
(c) When the moving units arrives at the next position, they provide a base of fire to cover the rearward movement of the forward unit. Figure 1-12 provides an example of the rearward movement.
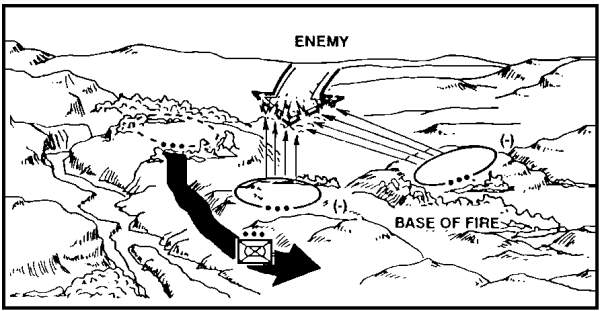
Figure 1-12. Rearward Movement.
(d) Fire and movement is repeated until contact with the enemy is broken, or units pass through a higher level base-of-fire force, or the units are in the next position to resume their defense.
(2) Antiarmor Weapons. When facing a mounted enemy attack platoons employ antiarmor weapons since they are the most effective weapons for the base of fire. For that reason, movement of those antiarmor weapons must be closely controlled. Normally, ITVs move back first, followed by BFVs, then tanks.
(3) Restrictive Terrain. When facing a dismounted enemy attack in restrictive terrain, or with limited visibility, the ITVs and tanks may have to move first, covered by the infantry and their BFVs.
(4) Tactics Used to Disengage. The tactics used to disengage from the enemy differ according to how the platoon is deployed, the company or company team plan for disengagement, and other factors. However, some actions apply in all cases. The following list provides examples of the tactics used.
(a) Platoons maximize use of the fighting vehicle's firepower to cover rearward movement.
(b) BFVs should back out of position and move, keeping a terrain feature between the vehicle and the enemy.
(c) The turret weapons should remain pointed in the direction of the enemy.
(d) Firing port weapons should be manned and ready to fire, especially from the rear firing ports. (This procedure is critical when the squad is operating at reduced strength).
(e) Rapid movement and an effective base of fire are the keys to a successful disengagement.
b. Plans for a Disengagement. Plans for a disengagement may be a part of any defensive plan. A plan for rapid remounting must be made if rifle teams are deployed. Keeping the platoon mounted or placing the rifle teams with the fighting vehicles simplifies this process.
(1) Platoon remount points and routes to the remount points must be chosen when the platoon employs the fighting vehicle and dismount elements on separate positions. In addition, the platoon must rehearse the use of routes. The platoon remount point can be
(a) Near the dismount element position.
(b) Near the BFV position.
(c) Between the two.
(2) Within the remount point, platoons should choose covered positions for vehicles and dismounted infantry that allow for easy remounting even during limited visibility. Figure 1-13 illustrates the platoon remount points.
(3) Squad leaders must be sure their men know the location of the remount point, where the squad vehicle is at that point, and routes to the point. Routes to the remount point should be covered and allow speedy movement for both elements. The following list discusses considerations for planning, specifically--
(a) BFVs can move faster and have more protection from enemy small-arms fire and artillery fragments than dismounted troops.
(b) The BFVs will often shift from one firing position to another, so routes must be planned from each position to the remount point.
(c) Following routes and finding remount points will be difficult in the heat of battle and even more difficult during limited visibility.
(4) As a minimum, routes should be marked and reconnoitered by the vehicle drivers and Bradley commanders, and by the squad leaders/assistant squad leaders.

Figure 1-13. Platoon Remount Points.
c. Disengagement by the Dismount Element. When the dismount and fighting vehicle elements are separated, there are three ways the dismount element can disengage. Simultaneous disengagement, moving all teams at the same time, can be used when the element is covered by another force. When the dismount element must cover its own movement, it disengages by rifle teams or by thinning the lines.
(1) Simultaneous Disengagement. When the rifle teams simultaneously disengage, using movement techniques, they assemble and move as one element to the remount points as fast as possible. Simultaneous disengagement is favored when--
(a) Rapid movement is critical.
(b) The disengaging element is adequately covered by overwatching fires.
(c) The enemy has not closed on the dismount element or cannot fire effectively at it.
(d) There are significant obstacles to delay the enemy.
(2) Disengagement by Rifle Teams. One or two teams stay in position as a base of fire when the dismount element must cover its own movement. The rest of the dismount element moves to the rear. To cover the movement of the rifle teams, teams left in position must fire into the entire element's sector. Sectors of fire are adjusted for better coverage of the element's sector.
(a) When the rest of the element is in position to cover their disengagement, then the teams left in position disengage.
(b) Movement to the rear by alternating teams is continued until contact is broken. The disengagement is complete and the dismount element moves to the remount point using proper movement techniques, once contact with the enemy is broken.
(c) Disengagement by rifle teams has the advantage of being simple since the rifle teams stay together. Disengagement by rifle teams is used when one or two teams can effectively cover the entire dismount element's sector. See Figure 1-14.
(3) Disengagement by Thinning the Lines. When disengaging by thinning the lines, the platoon leader selects men from each rifle team, often one man from each fighting position, will disengage and move to the rear. The men still in position then become the base of fire to cover the movement.
(a) The rest of the element moves to the rear when the rearward moving men are in position to provide a base of fire.
(b) The Dragon has a 65-meter minimum arming range, so it is best to move the Dragon first. Normally, the platoon and squad leaders move last. As one group disengages, men remaining in position increase their rate of fire to avoid being overrun by the enemy. This process is continued until contact is broken, as with other methods of disengagement.
(c) Disengagement by thinning the lines allows an even distribution of fire across the dismount element's sector during the disengagement. It is used when no one rifle team can cover the dismount element's sector because of close terrain or limited visibility. Because the teams are separated, control is more difficult than when disengaging by teams. Figure 1-15, portrays the disengagement by thinning the lines.
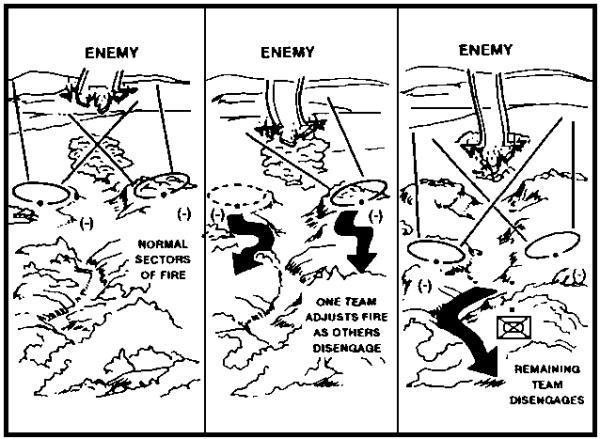
Figure 1-14. Disengagement by Rifle Teams.
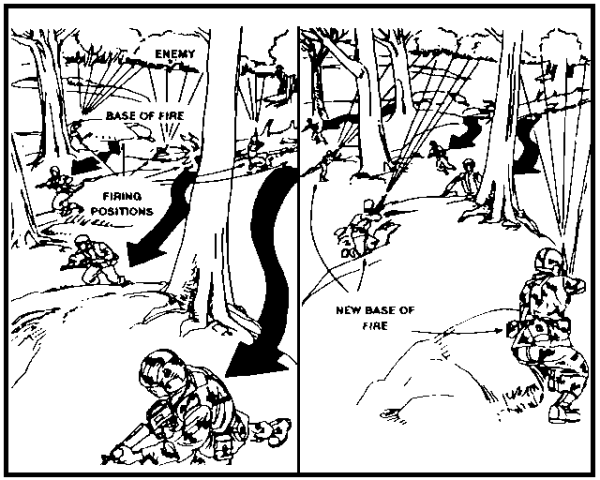
Figure 1-15. Disengagement by Thinning the Lines.
(4) Disengagement of Rifle Teams When Employed with BFVs. When BFVs and rifle teams are employed on the same position, rifle teams normally move to the rear while BFVs provide a base of fire. BFVs then quickly move to the rear, link up with the infantry, load them, and move out. Rifle teams can use any of the disengaging techniques discussed earlier. Usually, the method selected will be dictated by the--
(a) Enemy situation.
(b) Terrain.
(c) Fighting vehicle crews' ability to serve as a base of fire.
(d) Type and amount of overwatching fires.
d. How the Fighting Vehicle Element Disengages. The dismount element, when deployed, should disengage first while covered by the BFVs because of the BFV's speed, firepower, and protection against small-arms fire and artillery shell fragments. However, the fighting vehicle element may have to disengage first and move to a position to assist the dismount element in disengagement if the BFVs are not in a position to support the dismount element by fire, or dismount element is heavily engaged.
(1) Two Ways Vehicles Elements Can Disengage. Whichever method is used, there are two basic ways the vehicle element can disengage. If the BFVs are covered by another force, simultaneous disengagement may be used. If the BFVs must cover their own movement, they disengage by section. These methods are similar in concept to those used by the dismount element.
(2) Simultaneous Disengagement. When the BFVs disengage simultaneously, they move as one unit as quickly as possible. Normally, this method is used when the BFVs are covered by another force and speed is the most critical factor. See Figure 1-16, for an example of the simultaneous disengagement.
(a) Using movement techniques, the entire platoon moves to a position designated by the company or team commander, if the rifle teams are already mounted. If the rifle teams are deployed, the BFVs move to the remount point to pick up the rifle teams. The BFVs may also have to attack the enemy by fire from a new position to allow the rifle teams to disengage if the rifle teams are deployed.
(b) Once the rifle teams have disengaged, the BFVs again disengage either simultaneously or by pairs as described below, as the situation warrants.
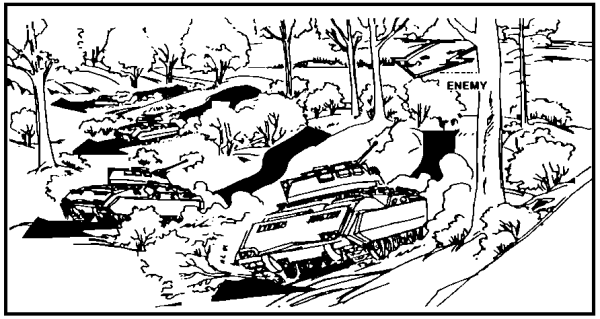
Figure 1-16. Simultaneous Disengagement.
(3) Disengagement by Vehicle or Section. When the BFVs must cover their own disengagement, one, two, or three vehicles can be left in position as a base of fire while the remainder moves to the rear. The BFVs left in position must cover the entire sector until the moving vehicles reach positions they can use to provide a base of fire. See Figure 1-17.
(a) Number of Vehicles. The number of vehicles left as the base of fire depends on the enemy situation and how quickly the fighting vehicle element must disengage. Normally, one pair of vehicles forms a base-of-fire element while the other pair moves back. Normally, the BFVs receiving the heaviest tank and ATGM fire are disengaged first. It is critical that other BFVs, ITVs, or tanks can cover the sectors of the disengaging BFVs. This cover prevents the enemy from quickly moving into the friendly positions through the gap left by the rearward moving BFVs.
(b) Fire and Movement. Regardless of the method used, the BFVs keep up fire and movement to the rear until they disengage or are in position to serve as a base of fire for the rifle teams or for other platoons. Execution must be well controlled and aggressive. BFVs covering the rest of the element's disengagement must step up their rates of fire while dismounted infantry move to the rear, taking advantage of covered and concealed routes. Turret weapons should remain oriented in the direction of the enemy during movement. As soon as rifle teams remount, firing ports should be manned.

Figure 1-17. Disengagement by Section.
(c) Indirect Fire and Smoke. The platoon leader should request, through his FO or the company team commander, indirect fire and smoke to cover the platoon's move. High explosive (HE) is used against enemy troops. Smoke is used to screen exposed routes the platoon must cross. The BFVs smoke-screen generator can also be used to conceal the platoon's movement. Smoke-grenade launchers should be used if the vehicles are having difficulty breaking contact.
(d) Direct Fire Support. The platoon leader should ask the company or company team commander for assistance if direct fire support is needed to let the platoon disengage. The platoon may have to use a combination of mounted and dismounted fire and movement if the covering fire of other elements is not enough to allow it to move.
(e) Covering Other Platoon's Movement. During a disengagement, the company team commander may direct a platoon to cover the movement of other platoons by occupying battle positions to fire into assigned areas or to hold terrain.
Practice Exercise