

|
RDL Homepage |
Table of Contents |
Document Information |
Download Instructions |
LESSON 1
IDENTIFY THE FIRE PLANNING MEASURES, PRIORITIES OF TASKS, AND METHODS OF EMPLOYMENT OF A BRADLEY PLATOON IN THE DEFENSE, MOUNTED OR DISMOUNTED.
TASK:
Identify the fire planning measures, priorities of task, and methods of employment of a Bradley platoon in the defense, mounted or dismounted.
CONDITIONS:
Given the subcourse material for this lesson, a combat (training) scenario and extracts, as applicable, the student will complete the practical exercise at the end of this lesson.
STANDARDS:
The student will demonstrate his comprehension and knowledge by identifying the procedures to conduct defensive operations.
REFERENCES: FM 7-7J
In this lesson, the tactics and techniques used by the Bradley platoon in the defense will be discussed. You will look at task priorities and fire planning. This will include fire distribution and control procedures.
The defense may involve fast and frequent movements. These are made between battle positions and during countermeasures.
The platoon and squad must be able to respond to changes in mission on short notice. They must be able to fight immediately from a new battle position. To do this, they must learn to exploit the mobility and firepower of the BFV. They must develop and practice SOPs. All battle drills needed must be mastered.
Learning Event 1: IDENTIFY TASK PRIORITIES USED IN PREPARING THE BRADLEY PLATOON FOR DEFENSIVE OPERATIONS
This learning event will teach the task priorities used to prepare the Bradley platoon for the defense. First, identify the tasks and look at an operation order.
DEFENSIVE TASKS
The platoons defend to hold terrain and to destroy the enemy. Their tasks include--
- Destroying enemy BMPs, BTRs, and other lightly armored vehicles. They use the 25-mm gun, Dragons, light antitank weapons (LAWs), and grenade launchers to do this.
- Destroying enemy tanks with the BFVs' TOW, and with Dragons and LAWs.
- Suppressing enemy antitank fires. This is done with the 25-mm gun, grenade launchers, 7.62-mm coax machine guns, squad automatic weapons (SAWs), and rifles.
- Repelling dismounted attacks. This is done with the BFV and dismounted infantry.
- Locating the threat and providing security. To do this, the dismounted element mans observation posts and conducts patrols and ambushes.
- Building obstacles to slow, stop, or canalize the threat. The platoons also provide security for obstacles; that is, mines and log craters.
- Conducting counterattacks. These may be platoon size or as part of a larger force. They are conducted to regain a part of a position that has been overrun.
PLATOON LEADER'S ORDER
The platoon leader gets the company operation order. He then begins his troop-leading procedures. These start with an analysis. He must consider the mission, enemy, terrain, troops, and time.
Immediate Action
At time, the tactical situation demands that the platoon leader acts immediately. He must then issue simple, fragmentary orders. These will relay heavily on SOPs. Drills are used when occupying a battle position. They reduce time and confusion. No matter what time is available, the platoon leader should complete as many of the troop-leading procedures as he can.
Completing the Order
The platoon leader completes his analysis. He makes his reconnaissance and develops his plan. He then completes his order. The order should be issued orally. The standard five-paragraph format should be used. When possible, he refers to SOPs in the order. This helps to shorten the order. When he can, the platoon leader gives his order from a point which overlooks (or is on) the platoon's defensive position. The order explains what is to be done, how, when, and by whom. The platoon leader asks the squad leaders to recite back their mission. This is to ensure his orders are simple, clear, and understood.
PRIORITY OF TASKS
The platoon must use all the time it has to the fullest. The leader sets up task priorities to help do this. As a rule, these are found in the SOP. They can be modified as needed. In most situations, the tasks are--
Establish Security. Observation posts are set up. Patrols are used to search for stay-behind forces, sensors, mines, or booby traps. The M8 alarm is set up. One-third of troops are on security at all times.
Position Key Weapons. Set up location, sectors of fire, PDF, and FPF. This is done for BFVs, Dragons, and M60's or SAWs.
Clear Fields of Fire. Range cards and sector sketches are made at this time.
Prepare Fighting Positions. The primary positions are made ready for the defense.
Emplace Mines and Obstacles. A hasty minefield/obstacle system is set up.
Set Up Communications. The local system for communications is set up (wire, trenches), and any observation posts (OPs).
Emplace Warning Devices. These include the Platoon Early Warning System (PEWS), night vision equipment, and other devices. This task will have a higher priority in limited visibility.
Improve Fighting Positions. Overhead cover is used, and aiming stakes are driven. Camouflage is used as fully as possible. Land lines will be buried. Any fresh earth will be hidden or disposed of.
Other Positions. Positions to supplement and be alternates to the primary are set up.
Supplies. A stockpile of supplies should be set up. These should include ammunition, water, and food. Maintenance should be conducted.
Task Timing
Some of these tasks should be done at the same time. The platoon and squad leaders must supervise these functions closely. This ensures that time is not lost on tasks of minor priority. The first 30 minutes of occupying the position are crucial. Security is set up, positions are manned, and work is begun. The platoon leader must conduct a hasty reconnaissance. He must ensure that the location of his position is correct in order that squad sectors and key weapons will not have to be relocated.
Coordination
The platoon leader should coordinate with both flank units and the commander of the larger force. Squad leaders coordinate on their flanks as well. This must be done early. Again, the purpose is to ensure that changes will not have to be made. Changes that must be made after the work is well under way will waste time.
Supervision
Supervision of the work must be constant. It is vital to verify squad sectors, key weapons positions, and fields of fire. It may become obvious to a platoon or squad leader that a change must be made. A sector may need to be adjusted, or a position may have to be shifted. The decision should be made quickly. Soldiers are then moved to where they are needed most.
Other Plans
Rest, sleep, and eating plans should be made. These ensure that security and work can go on. They help to avoid having all men exhausted when the attack comes.
CONCLUSION
The priorities used by the Bradley platoon to prepare for the defense have been identified. They are planned to make the best use of all the time available. Their success depends on the leaders. They are the only means to ensure that the platoon is prepared.
Learning Event 2: IDENTIFY FIRE PLANNING CONSIDERATIONS USED IN PREPARING THE BRADLEY PLATOON FOR DEFENSIVE OPERATIONS
Your task priorities have been set up. You are now ready to do fire planning. In this learning event, look at fire planning considerations for the defense. Plan for indirect fire and FPF. Sector sketches and range cards will be used to aid in the planning. Obstacle and remount plans will be looked at.
INDIRECT FIRE PLANNING
Most indirect fires are planned by the company commander. The FSO aids him in this. They use input from the platoons in their plans. A copy of the target list is given to the platoon leader. The platoon leader and his forward observer (FO) check the target list. They ensure that fire is planned on all threat avenues of approach. They also see that fire is planned for known or likely threat positions in the platoon sector of fire. If more targets are needed, the FO requests them through the FSO. The FO will stay with the dismount force. If he is mounted, he is not able to call or adjust fires.
Selecting Targets
At platoon level, fires are planned to the front, on top, and to the rear of platoon positions. In each of these areas, fires are planned on likely avenues of approach. They are also planned on prominent terrain features. Fires may be adjusted from these. Fires are also planned on dead space that the platoon weapons cannot cover.
The platoon leader and his FO work as a team to plan fires. As a rule, this is done after the platoon leader decides where his plan needs to be strengthened. Rifle team sketches and BFV range cards are compiled to do this. The platoon leader selects a few critical targets. These are targets that will be easy to identify in the battle.
Naming and Confirming Targets
After the targets have been chosen, the coordinates are named. These will be eight digit, when possible. This data is passed to the company team FSO. He compiles all the platoon fire plans for the company commander. In time, the confirmed target list is returned to the platoon. The FO quickly confirms by plotting on the map. The company commander may have added or deleted some targets. Once the confirmed targets have been plotted on the map, they are matches to the terrain. They are then passed among key personnel (PSG, RATELO).
Number of Targets
There is a guide for how many targets the platoon leader should request. It is based on his ability to call for them during the battle. He should try to memorize all target numbers in his sector. This allows him to call for them quickly. He does not have to depend on a map or reference card. These aids may not be of much use in limited visibility. As a rule, a few targets will be enough in a platoon sector. This is even more true if they have to adjust fire from certain terrain features.
Final Protective Fire
The company commander may assign the FPF. It may be mortar or artillery fire. The FPF is a barrier of fire, arranged in advance. The platoon leader must plan for its location with his FO and FSO. It should cover the most threatening dismounted approach.
The FPF is planned close to the platoon position, but not close enough to put friendly troops in danger. The FO will advise the platoon leader on how close to the troops it can be fired with no danger. This varies with the type of weapon and ammunition fired. The impact area of some typical FPFs are shown below.
| Weapon | Unit | Width of Impact |
| 107-mm mortar | Platoon (6 mortars) | 200 meters |
| 105-mm howitzer | Battery (6 howitzers) | 300 meters |
| 155-mm howitzer | Battery (8 howitzers) | 400 meters |
When assigned an FPF, the platoon leader will have the authority to call for it. This is unless the company commander has retained that authority. The FPF is fired as a last resort to stop an enemy assault. It is fired on order, continuously, until ordered stopped. All other platoon weapons fire while the FPF is being fired.
OBSTACLE PLANNING
The platoon has little resource to emplace obstacles. But there are a number of ways it can enhance its sector. Mines can be carried on the BFV and used to emplace a hasty minefield. Tactical wire can also be carried. It is used for protection. It may also be used to deceive or confuse the enemy about exact positions. Trip flares and Claymores can be set up. Field-expedient tangle-foot obstacles can be put in place. Trees may be cut, using pioneer tools. These are used to build abatis and road blocks.
Engineer Support
The platoon leader will have engineer support at times. He should still put in any obstacles that he can with his own assets. Priority can then be given to those projects that need outside help. In many cases, the engineer assets in the platoon sector are there to carry out missions from the larger force. In these cases, the platoon leader should verify the obstacles. They should fit into his platoon defense plan. If they do not, he must coordinate with the engineers, or with the company team commander.
Once obstacles have been emplaced, the platoon obstacle plan should be reviewed. Adjustments to platoon-made obstacles may need to be made. The obstacles must also be covered by observation and fire. If not, they are easy to breach or bypass. This is even more true in limited visibility.
DEFENSIVE SECTOR SKETCH
The leaders of the fighting vehicle crews make up BFV range cards (DA Form 5517-R). Squad leaders draw up sector sketches. Each antiarmor specialist and automatic rifleman makes up a range card. The range card is covered in the next learning event. The sketches and range cards serve as memory aids for the platoon. They also help the platoon leader prepare his platoon fire plan.
Rifle Team Sector Sketch
The rifle team sector sketch is a rough drawing. It is shown in Figure 1.

FIGURE 1. RIFLE TEAM SECTOR SKETCH.
The squad sector sketch is made as close to scale as possible. The sketch shows--
- Main terrain features in the sector and range to each.
- Each primary position.
- Engagement areas or primary and secondary sectors of fire for each position.
- SAW or M60 FPLs and PDFs.
- Type of weapon in each position.
- OP and leader positions.
- Target reference points in the sector.
- Dead space.
- Obstacles.
The sketch should be based on direct observation of the sector. Each weapon's range card is used in making it. Two copies of the sketch should be made. One copy goes to the platoon leader; the other copy stays at the position.
| NOTE: | The parts of the squad sector sketch described are the minimum. At least this many items are needed if the sketch is to have meaning. The platoon SOP may require more detail. The M60 will be kept in each squad until the M249 SAW is issued. FPLs or PDFs do apply to M60's or SAWs, but only when the weapon is used with tripod and traversing and elevating mechanisms. |
Platoon Sector Sketch
The squad leader or assistant squad leader prepares the team sector sketches and submits them to the platoon leader. Bradley commanders prepare range cards for their individual vehicles and submit them to the platoon leader. The platoon leader combines the sketches and range card to make a platoon sector sketch. A platoon defensive sector sketch is a line drawing as closely to scale as possible and includes a target list for direct and indirect fires. (See Figure 2). The sketch includes--
- Platoon or element sector or engagement area.
- BFV and team positions.
- BFV positions with primary sectors of fire or engagement areas.
- BFV remount point.
- Dragon and SAW positions with primary sectors of fire for each.
- SAW or M60 FPLs or PDFs.
- Maximum engagement ranges of tube-launched, optically tracked, wire-guided (TOWs), 25-mm gun, and coax machine guns.
- OPs.
- TRPs and target numbers.
- Mines and other obstacles.
- Indirect fire target locations.
- The indirect fire FPF location, if allocated.
FIGURE 2. PLATOON SECTOR SKETCH.
There are many demands on the platoon leader's time in the early part of the defense. For this reason, he may use his FO to make the platoon sector sketch. The FO will then use the range cards and squad sketches to make a tentative platoon sector sketch. This saves the platoon leader time. It also lets the FO start his fire planning right away. He can then decide which targets to recommend to the platoon leader.
At least two copies of the platoon sector sketch are made. One stays with the platoon leader. The other goes to the commander of the larger force. This must be passed on as quickly as possible. It is needed for use in the company fire planning. If there is time, more copies are made. These are given to each subordinate team or squad.
| NOTE: | The parts of the platoon sector sketch given are the minimum needed. The company SOP may require more detail. |
COORDINATION BETWEEN ADJACENT PLATOONS, SQUADS, AND TEAMS
Platoon leaders must coordinate with adjacent platoons. Squad leaders coordinate with adjacent teams. This gives mutual support between all elements. The platoon leader checks to see that this has taken place. As a rule, coordination is initiated from left to right. Gaps between positions are covered by fire, as a minimum. Coordinating points are set up. These ensure that groups will meet at a named point on the ground to tie in their flanks.
Information Exchanged
Coordinating units exchange information. In many cases, a sector sketch can be exchanged. This will include most of the information needed. That information is--
- Locations of primary, alternate, and supplementary positions.
- Sectors of fire for BFVs, SAWs, and Dragons.
- Location of dead space between units and how it is to be covered.
- Location of OPs.
- Location and types of obstacles and how to cover them.
- Patrols, to include size, type, time of departure and return, and routes.
In some cases, the BFVs are placed to support both the dismount force and the flank platoon. At times, this may even be a compromise position. It must be occupied to tie in the flank. The platoon leader must keep in mind that he defends a part of a company team. He must use care in tying in flanks.
PLANNING FOR REMOUNT
The platoon will dismount the rifle teams in the defense. The remount must be planned in detail. This is even more true when further mounted movement is part of the defense plan. It is also crucial when the BFV and dismount forces will be separated for the fight. The platoon leader must be able to plan and execute a speedy remount. The BFV has the advantage of speed. This is lost when it must wait for linkup and remount. Planning for the platoon remount should include--
- Remount location.
- Reconnaissance of route to the remount point by both the BFV and dismount forces.
- Marking of the route to the remount point.
- Signals to start the remount.
- Contingencies for limited visibility and loss of communications or leaders.
CONCLUSION
You have seen the fire planning considerations used by the Bradley platoon in the defense. The platoon leader must know and be able to use these. The fire planning must be done well if the defense is to succeed.
Learning Event 3: IDENTIFY FIRE DISTRIBUTION AND CONTROL PROCEDURES USED BY THE BRADLEY PLATOON FOR CONDUCTING DEFENSIVE OPERATIONS
The Bradley platoon lives by its firepower. This asset must be used to the fullest extent. Fast and effective fire means survival in battle. Even when the platoon fights outnumbered, it must distribute its fires over the threat force. Every shot must count. To do this, fires must be controlled. Platoons must develop and use standard procedures to distribute and control fire. Response in the first few seconds of battle must be instant. The first shots fired will be crucial ones. It must be your platoon that fires them, and not the threat. With the upper hand of having fired the first shots, you are ahead. Fire can then be redistributed if need be.
At times, the platoon leader will be able to direct the fires of the entire platoon. This will happen mainly while in the defense.
Visual control measures can be used to control fire. They can start and stop engagements and shift fire. They can also signal actions arranged in advance. Often, though, the radio must be used. The speed of mechanized warfare demands it. Alerts and commands must be clear, accurate, and brief.
PRINCIPLES OF FIRE CONTROL AND DISTRIBUTION
There are general principles. They apply to all fires of the Bradley platoon. The platoon leader must recall and use them when setting up SOPs.
Avoid Target Overkill
At times, the platoon will fight outnumbered. As a rule, they cannot then afford to engage a single target with more than one weapon. Bradley commanders must strive for one-on-one engagements. TOW should make one-shot kills. The 25-mm gun should be used for single-round ranging shots and short-burst kills. Avoid engaging disabled vehicles. These targets should be left for tanks. Tanks and other weapon systems have a larger ammunition load and more destructive power. When other, more dangerous, targets are destroyed, disabled vehicles may be engaged.
Use Each Weapon in Its Best Role
Each BFV weapon has a role to which it is best suited. In this role, it best compliments the other weapons. The platoon should use the weapons in their best roles.
The 25-mm Gun. The 25-mm gun is best used to kill lightly armored or thin-skinned vehicles. It is also used to suppress antitank guided missiles (ATGMs) at medium to long range. Each BFV carries 900 rounds of 25-mm ammunition. As a rule, this include 300 rounds of armor-piercing discarding sabot (APDS) and 600 rounds of high-explosive incendiary-tracer (HEI-T).
The TOW. The TOW is best used against armored targets, mainly tanks. These cannot be killed with the 25-mm gun. Each BFV can carry up to seven TOW missiles. Two are in the launcher. The other five are stowed inside the BFV. Note that TOW and Dragon missiles use the same storage space. If two Dragons are stowed, there is room for only three TOWs inside the BFV.
The 7.62-mm Coax Machine Gun. This is best used to destroy light vehicles and kill dismounted troops. It can also suppress threat gunners out to 1,100 meters. Each BFV has a large on board load of 7.62-mm ammunition. It should be used against suitable targets. As a complement to the 25-mm gun at shorter ranges, it helps save 25-mm ammunition.
Concentrate on Long-Range Threats
The rifle team weapons are also used to complement the BFVs. These include the M60, automatic weapons, grenade launcher, and Dragon. They are best used along approaches where the fields of fire are limited. The BFV is then free to concentrate on long-range targets.
Engage Only Targets That Offer a High Probability of Hit
BFV gunners must avoid firing at targets that are out of range. Fire only at targets that will probably be hit by the first round. Random firing at targets wastes ammunition and missiles. It also risks exposing firing positions to the threat.
Take the Best Shots and Expose Only Those BFVs Actually Needed to Fire
Often, it is not necessary to fire all of the BFVs in position. At these times, only those in the best positions to hit should fire. The others should stay hidden. One case would be when one BFV has a frontal shot, and another a flank shot, on the same target. The BFV with the flank shot should engage. The flank shot is best for two reasons. It gives a better chance to kill the target, and there is less chance that the target will see and fire on the BFV.
The danger that a threat vehicle or weapon system poses for the BFVs changes. Range, terrain, and the weapons it mounts are the factors. As a rule, tanks are the greatest threat to BFVs at ranges to 2,000 meters. At ranges no longer than this, a BRDM or BMP firing an ATGM is more of a threat. A moving BMP is not a real threat until it moves within 1,000 meters. Always engage the greatest threat first. If two targets are equal threats, engage the closest one first.
Ammunition resupply will be a major problem in battle. The platoon must use fire discipline. If this is not used, all ammunition can be spent in one or two engagements. The platoon is then no longer effective BFV crews must keep checking the ammunition supply. Ammunition report procedures should be part of the SOP. The platoon leader should set the point where resupply should be requested. A BFV should not be allowed to drop below this level. An exception is a combat emergency. Ammunition in the reload racks should be replaced at every chance. This cuts reload time. If there is no ammunition in the ready racks, reload will take much longer.
STANDARD OPERATING PROCEDURE
The platoon should rehearse battle drills and SOPs thoroughly. This will ensure fast reaction times. The SOP should cover a number of things. Besides battle drills, these include--
- Area coverage responsibilities.
- Turret orientation.
- Weapons-ready procedures.
These should cover different situations, such as road marches or halts.
Battalion or company SOPs should set the combat ammunition load by type and amount. The platoon SOP should set the weapons-ready posture. One example is against a multiple threat. Two BFVs may be prepared to fire AP. A third is ready with high explosive. The fourth has TOW ready. The platoon is then ready to engage varied targets with the weapons best suited. BMPs would be engaged with the APDS. The HE would suppress ATGMs at long range. Tanks would be engaged with the TOW. The platoon leader may have to adjust the weapons-ready posture after an engagement. Ammunition may need to be redistributed. This is to make sure BFVs are not too low on the ammunition or missiles needed.
FIRE PLANNING MEASURES
Fire planning and distribution measures must be simple and clear. Their use must be routine. They can then be used without long, detailed instructions. Some simple measures are described in this section.
Sector of Fire
Each squad or platoon is assigned an area to cover. It is specific and clearly identified. This is called the sector of fire. It is set out by easily seen terrain features that outline it. These include roads, streams, hills, and ridgelines. A sector of fire can run from the firing position to the maximum engagement range of the weapons, or it can be an enclosed area at a distance from the firing position. In this case, the terrain between the enclosed sector and the firing position is open. It must be covered by other weapons; these may be those of a tank or a rifle team.
Two things dictate how sectors are assigned. One is the terrain. The other is the number and type of weapons available to cover with. An area should be completely covered with the proper type of fire. This gives mutual support between each vehicle.
Each vehicle is assigned a primary and secondary sector of fire. They are then better able to cover areas and gain mutual support. The secondary sector of one squad is the primary of another.
Fire is shifted to the secondary sector, on order. This is done when there are no targets in the primary sector. It is also done when needed to cover another squad. This happens when that squad is forced to move to an alternate position, or the squad may be out of action to reload its weapons. The primary and secondary sectors of fire are shown in Figure 3. Note the arrows used in the figure. Each ends at a terrain feature that is easy to pick out. Any feature of the land may be used to outline a sector.
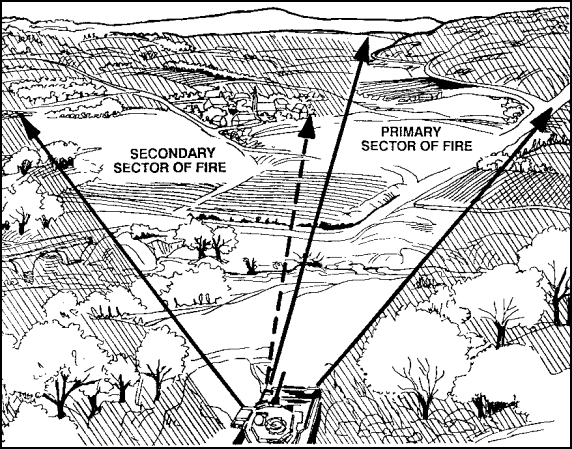
FIGURE 3. PRIMARY AND SECONDARY SECTORS OF FIRE.
Overlapping sectors of fire may also be assigned. This is done when the avenue of mounted approach is narrow. It is also used to concentrate the fires of the whole platoon. The fires focus on some crucial point, such as a chokepoint. This increases the problem of control. Target overkill is also more likely. So, added control measures are needed. These can include--
- Engagement priorities.
- Fire patterns.
- Target reference points.
The leader must choose positions for control. These should let them observe and coordinate the fire.
TARGET REFERENCE POINT (TRP)
Some typical TRPs are shown in Figure 4.

FIGURE 4. TARGET REFERENCE POINTS.
The TRP is used to name targets of opportunity. It is also used to shift fire, or assign sectors of fire. In the defense, they are chosen for BFVs along avenues of mounted approach. Only as many TRPs as are needed to control and distribute fire are named. Having too many can confuse gunners.
Each TRP is given a number to identify it. This is done by the platoon FO. The number is made up of two letters and four numbers. An example is AB5010. These numbers are placed in the remarks section of the platoon fire plan.
This gives easy reference and coordination. At times, TRPs may be referred to by the last three digits. This simplifies fire commands. As an example, TRP AB5010 may called TRP 010.
PHASE LINES
Phase lines are shown in Figure 5. A phase line is a linear control measure. As a rule, it is used to control movement. It can also be used with widely separated BFVs. It controls and distributes their fires. A phase line can be any lineal terrain feature. It may be natural or man-made. Rivers and streams make good phase lines. So do roads and railroad tracks.
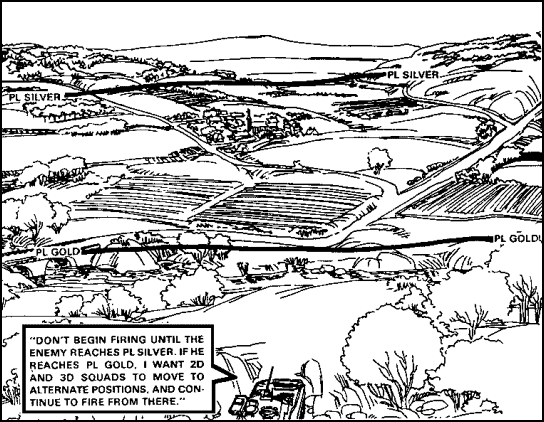
FIGURE 5. PHASE LINES.
Phase lines are used to get simultaneous actions. They may start, shift, or stop fire, or they may mark the point where BFVs are to move to alternate or supplementary positions. In Figure 5, the platoon leader uses the phase lines to tell the squads when to fire and when to displace to alternate positions. Note the lines in the figure. Phase line GOLD is a stream; phase line SILVER is a ridgeline.
Phase lines can also be used to point out when target priorities are to change. For example, "I WANT ALL SQUADS TO ENGAGE ONLY TANKS WITH TOWs UNTIL THE ENEMY REACHES PHASE LINE SILVER. WHEN THE TANKS CROSS SILVER, THEY WILL BE IN RANGE OF THE TEAM'S ATTACHED TANKS. I WANT YOU THEN TO BEGIN ENGAGING BMPs WITH YOUR 25-MM GUN."
Phase lines are a simple, routine control measure. They are effective. At times, they are used as an emergency control measure. This is done when radio communications are jammed.
ENGAGEMENT PRIORITIES
In battle, many types of targets may appear at once. A formation may be made up of tank, BMPs, BRDMs, and so forth. Fire must still be distributed rapidly. The platoon leader must have effective control. He assigns each squad a distinct type of target. It is this vehicle the squad will engage first.
This method is particularly effective during retrograde operations when targets may appear suddenly and there is little time for detailed instructions. But, if a particular target presents a threat to a squad, that target must be engaged immediately, regardless of engagement priorities. Engagement priorities are useful when sectors of fire have not been assigned or when overlapping sectors of fire have been designated. Like TRPs, they can be used as an emergency measure if communications are lost.
| NOTE: | Engagement priorities should be assigned with care. Two types of targets should be destroyed first. One type is those which are the greatest threat. The other is targets that carry the momentum of the attack. Killing these will break the momentum. Such targets include command vehicles, mine clearers, and bridging vehicles. |
FIRE PATTERNS
There are three basic fire patterns that can be used to distribute the platoon's fire. They are used when multiple targets appear, and no other measures have been assigned. The three patterns are: frontal fire, crossfire, and depth fire.
Frontal Fire.
Frontal fire is used when targets are dispersed laterally to the platoon's direction of fire. Each BFV shoots targets to its front. The flank BFVs engage flank targets first. When these are destroyed, fire is shifted. It moves toward the target center of the threat formation.
Frontal fire is most effective when the threat is dispersed laterally. The threat should also be moving laterally across the sector of fire. At times, targets will approach head on. This puts their observation and firepower toward the BFVs. It also forces shots at the thickest (front) armor of the target. (See Figure 6.)
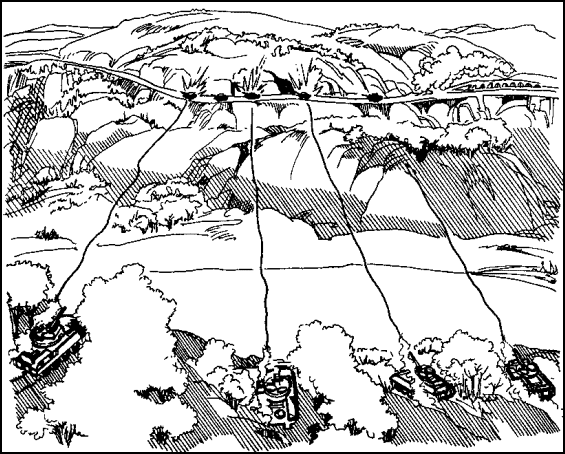
FIGURE 6. FRONTAL FIRE.
Crossfire
Crossfire is also used when targets are dispersed laterally. But, in this case, obstructions prevent all BFVs from firing to the front. Crossfire is also used to get flank shots. These increase the chance to kill. They also help avoid detection when the threat is moving straight at the BFVs. Each BFV engages a target diagonal to itself. Flank BFVs engage their opposing flanks. As targets are destroyed, fire shifts to the center of the enemy formation. Crossfire is shown in Figure 7.
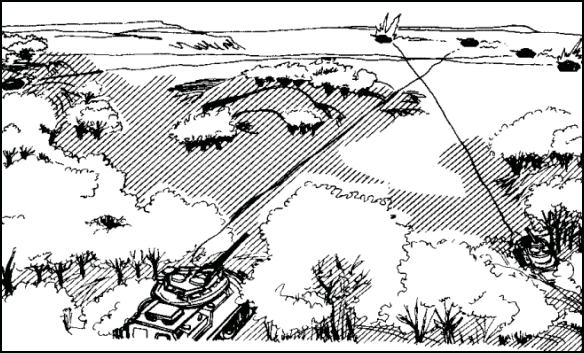
FIGURE 7. CROSSFIRE.
Depth Fire
Depth fire is used when targets are exposed in depth. BFVs on one side engage the nearest targets. Those on the other side engage the farthest targets. Fire is then shifted toward the center of the formation. This may be done by the SOP, or it may be called out by the platoon leader in his order.
Fire patterns may be changed. They can also be combined with other fire patterns. This is done to give the maximum coverage of the threat. The threat may adjust his information after he has been engaged. Fire patterns may then need to be changed. Targets in depth are shown in Figure 8. A change in fire pattern is shown in Figure 9.
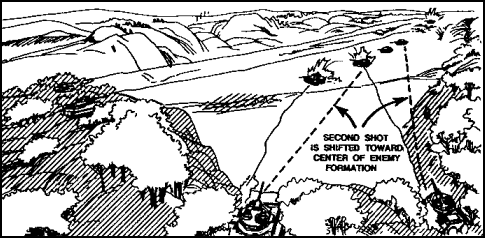
FIGURE 8. TARGETS IN DEPTH.
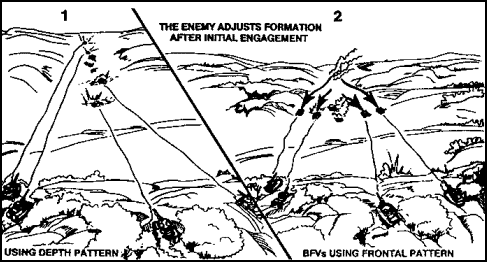
FIGURE 9. CHANGE IN FIRE PATTERN.
FIRE COMMANDS
Speed and accuracy are vital when threat targets are engaged. Commands must be clear and concise. In the stress of battle, the leader must be able to quickly analyze the situation. He must then issue concise and complete fire commands. There can be no delay.
A standard format for platoon fire commands is used. It gives all the needed information in the least time. This format is used even under the worst of conditions. The format for platoon fire commands is given in Figure 10. The elements are issued in the proper sequence.
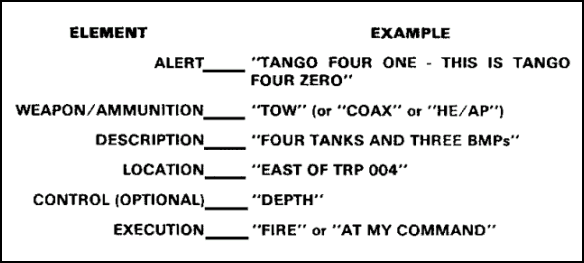
FIGURE 10. FIRE COMMAND FORMAT.
Examples of typical fire commands are given in Figure 11.

FIGURE 11. EXAMPLE FIRE COMMANDS.
On this type of ammunition is given to designate the 25-mm gun. This shortens the fire command. TOW commands can also be shortened in the SOP. When a command includes TOW, it may mean that the target is a tank, unless another target is named. Then, when tanks and BMPs appear at the same time, both can be engaged.
Practice of the fire commands must be constant. They must be issued quickly and clearly. Bradley commands and gunners must react at once when an alert is given. Practice alone can achieve this.
PLATOON FIRE PLANNING
Platoon fire planning is part of the leader's troop-leading procedures. It starts as soon as the platoon leader gets a mission. It goes on until the mission is accomplished. The platoon fire planning tells how fire is to be distributed and controlled.
Section Fire Control
While mounted, fire control is achieved by one of three methods of section fire control. These will be discussed next.
Alternating Fires. These may be used in several ways. When in the defense, continuous fire from the same place soon gives the threat a fix on the position. Alternating fires lets one BFV shift firing positions while another fires. BFVs in the defense can give away their position with continued fire. By alternating, they avoid this. Constant fire is delivered, but from different positions. At long ranges (2,500 meters or more), the pair can alternate firing and observing. When both know their fire is effective, simultaneous fires can be used.
Simultaneous Fire. This is when both vehicles of a section are firing into their assigned sectors at the same time. It is used when moving unprotected. It is also used when surprised by many threat vehicles.
Observed Fire. In this method, the firing vehicle engages targets. His wingman observes the effects of the fire. He then helps to spot and correct fire. The wingman also gives local security. This lets the firing vehicle concentrate on the firing. If there is a weapons malfunction, or low ammunition, the wingman takes over firing. This method is also used when only one target is in the sector. It is the normal method of fire from protected positions at or near maximum range.
Defensive Fire Planning
Defensive fire planning is more deliberate and detailed. This is because there is more time to consider these factors:
- Individual BFV targets.
- Platoon targets.
- Indirect fire targets.
- Fire distribution and control measures.
To develop the defensive fire plan, the platoon leader makes assignments. Each squad BFV is given a primary and at least one alternate firing position. They are also given a sector of fire. The platoon leader also names the platoon point or area targets. Other control measures are used. These include TRPs, engagement areas, or target priorities. They coordinate the fire if two or more vehicles are firing in the same area or sector.
The platoon leader gets target information from squad leaders. Most of the time, it is given on sector sketches and range cards. With this information, he can see that fire is evenly distributed and that control measures will work.
When the platoon leader completes the fire plan, he gives a copy of the sector sketch to the commander of the larger force. If there is time, he has each squad leader copy the sketch. If not, the squad leaders may get only a quick briefing.
BFV RANGE CARD
A range card is a rough sketch of the terrain a weapon is to cover. It shows possible target areas and terrain features. These are plotted in relation to a firing position. The range card data is used to--
- Plan and control fire.
- Detect and engage targets.
- Orient replacement personnel or units.
A BFV gunner makes a range card for his BFV. He makes one for each primary, alternate, and supplementary position. One is also drawn for any static position when enemy contact is possible. An example is for an assembly area.
Each range card must have at least the following information:
- The symbol for the weapon covering the sector.
- The azimuth (degrees) and distance (meters) of the firing position from an easily recognizable terrain feature. (This serves as an easy reference to locate the firing position.) If there is no recognizable terrain feature, an eight-digit grid may be used.
- The boundaries of the area assigned to be covered by observation and fire.
- Areas where targets are likely to appear (engagement areas) and the range, azimuth, and elevation to them from the firing position.
- Dead space, that is, areas that cannot be observed or covered by fire.
- The direction.
- Identification data:
1. Unit designation (no higher than company/troop).
2. Time and date of preparation.
3. Firing position (primary, alternate, or supplementary).
4. Magnetic north arrow.
The gunner prepares a range card as soon as he can after moving into position. Two copies are made. One is kept on the BFV, the other goes to the platoon leader. The standard form is best for drawing the range card. If need be, the gunner may use anything he can write on. The range card should be drawn as shown in Figure 12.

FIGURE 12. BFV RANGE CARD.
The BFV map symbol is drawn in the lower center of the range card. The sector of fire is shown by drawing arrows from the BFV symbol to the left and right limits. Terrain features that are easy to identify are sketched in. These identify the sector. The data section is then filled in. The magnetic azimuth and deflection are entered. These are taken from the azimuth indicator in the turret. The range is given to the far limits of the sectors of fire.
In the sector sketch, left and right limits are labeled one and two. A circle is drawn around each number. These should be the first items drawn and labeled in the sector sketch. They should also be the first entered on the range card data section. The azimuth, deflection, and range are not placed on the left and right limit lines.
Target reference points are then entered. The Bradley commander indicates where they are placed. They are also put in at any point where a target is likely to appear. The TRPs are then numbered in the sketch section.
NOTE: |
Arrows are not drawn from TRPs and likely target engagements to the vehicle position. |
The maximum engagement line is then drawn in. This is placed across the sector of fire for the 25-mm gun. One is also drawn for the TOW and the 7.62-mm machine gun. These lines show the maximum ranges at which a target can be effectively engaged.
NOTE: |
There may be more than one maximum engagement line for the 25-mm gun (HEI-T/APDS-T) and the TOW. |
Dead spaces are shown by diagonal lines across the area, and writing "dead space." These are spaces where targets cannot be engaged with direct fire.
A magnetic north line is drawn. This orients the range card to the terrain. Then, identification data is added. The unit is designated. This should be done no higher than company/troop level. The time and date prepared is given. The type of position is also given. The data for the weapon reference point is put in the remarks block.
MARKING A FIRING POSITION
After the range card is drawn, the position should be marked with ground stakes. The position can then be reoccupied, using the same data. Three stakes are used.
One stake is placed in front of the BFV. It is centered on the driver's station, touching the hull. This stake should be long enough for the driver to see it. The other two stakes are placed along the left track. One is lined up with the front wheel hub. The other lines up on the rear road wheels. The stakes are placed close to the BFV. Only enough clearance is left for the driver to move in without knocking them down.
The stakes should be driven deeply so that a strong wind will not knock them down. Engineer tape or luminous tape can be placed on the friendly side of the stakes. This makes them easier to see in limited visibility.
Moving Into Position
A ground guide can be used (when possible) to help move the BFV in. Once in position, the gunner should check one of the targets on the range card. To do this, he can index the range and azimuth of the target. If the sight is on the target, the position is correct. The data from the range card may be used. If the sight is not on the target, the vehicle must be adjusted. The gunner tells the driver which way to move the BFV. Only slight adjustments should be needed.
CONCLUSION
Fire control and distribution are key aspects of the platoon defense. The effectiveness of the platoon depends on them. Range cards and sector sketches must be prepared with care. Fire commands must be practiced until reaction to alerts is instant. SOPs will aid in this. They must be developed and practiced. Control measures must be well thought out and checked. Fire power is one of the Bradley's greatest assets. Use it to the fullest extent to accomplish missions.
Learning Event 4: IDENTIFY DEFENSIVE TACTICS AND TECHNIQUES USED BY THE BRADLEY PLATOON FOR CONDUCTING DEFENSIVE OPERATIONS
The Bradley platoon should make full use of its assets in the defense. These assets give it options never before open to an infantry force. In this learning event, you will see how to apply these assets with defensive tactics and techniques.
DEFENSIVE TACTICS AND TECHNIQUES
The platoon defense should make full use of all that the Bradley offers. The BFV gives firepower and armor protection. It is swift and agile. Thermal vision allows it to see in nearly any conditions. In dismount, the foot soldier adds his fighting ability. All of this adds up to a tremendous defensive power.
Positions
The platoon must position elements for the greatest effect in the defense. BFVs defend against attack along mounted avenues of approach. Rifle teams cover avenues that restrict mounted movement. They also cover the reverse slopes of mounted avenues. They can deliver surprise fires on the threat vehicles with LAWs and Dragons. On reverse slopes, they are not subject to long-range suppression by the threat.
BASIC TACTICS
The BFV offers defensive options that a combined arms team has not had before. The turret weapons let the BFV fight in its own right. Bradleys can fix or limit the threat. This allows tanks to be consolidated and to deliver a powerful counterattack.
Fixing the Threat
Fixing the threat denies him the chance to withdraw part of his force for use elsewhere. It is done by the Bradley by use of firepower and maneuverability. The dismounted infantry support this. They dig in on restrictive terrain or on the reverse slope. This fully exploits the advantage of the defender. That is the ability to prepare the battlefield.
Control of Elements
As in the offense, dismount brings a change in leadership. The command and control structure changes to meet the needs of two forces. Overall control of the platoon stays with the platoon leader, but he keeps direct control of only the maneuver force. Control of the other force is given to the platoon sergeant. One leader concentrates on fighting the dismount force. He uses dismount tactics to exploit restrictive terrain. The other concentrates on the BFV fight. At times, the two forces will separate from each other, but they must still fight in relation to each other.
Two major assets of the BFV are firepower and survivability. The leaders must optimize these assets. This is done through the use of--
- Movement.
- Cover and concealment.
- Dispersion.
- Mutual support.
- Flank shots.
- Stand-off range.
- Employment in depth.
METHODS OF EMPLOYMENT
There are three basic methods of employment for the Bradley platoon. These are as follows:
- Same battle position, same avenue of approach.
- Same battle position, different avenues of approach.
- Different battle positions, same avenue of approach.
BFVs and Dismount Infantry on the Same Battle Position, Covering the Same Avenue of Approach.
With this method, the platoon can defend against mounted and dismounted attacks. It can also move rapidly to another position. (See Figure 13.)
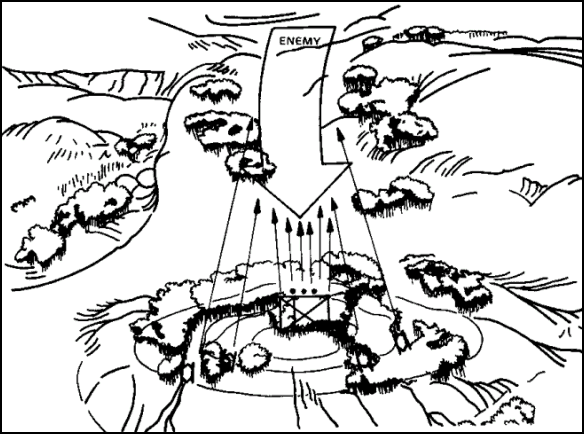
FIGURE 13. SAME BATTLE POSITION, SAME AVENUE OF APPROACH.
Within the battle position, the BFV may be positioned with the rifle teams forward or around the vehicles for security. Normally, if the dismounted avenue of approach is the most dangerous to the platoon and the terrain is restrictive, the BFVs will be positioned based on their ability to employ the 7.62-mm coax in support of the dismounted positions. Otherwise, the BFVs are positioned to take advantage of their long-range fires and the infantry either provides them security or takes up positions on a reverse slope.
The BFVs remain on the same battle position as the rifle team when the terrain provides good observation, fields of fire, and cover and concealment to both dismounted infantry and BFVs. In addition, the battle position must provide fields of fire that take advantage of the restrictive terrain that dismounted infantry prefers and or provide protection for the dismounted infantry from the long-range fires of the enemy.
The platoon leader makes assignments. Each vehicle and rifle team is given a primary position and sector of fire. Alternate positions are also given. The platoon leader also calls out who will man OPs and where the OPs are to be set up. In time, the OPs are adjusted. This is done to better fit into the company team reconnaissance and surveillance (R&S) plan.
The platoon leader supervises the placement of each BFV. He ensures that it ties in with the others by his concept of the defense. Often, this means that the BFVs are offset to the flanks. This gives better long-range shots.
This method is a conservative use of the Bradley platoon. Its main advantages are--
- Command and control are eased. Both forces are in the same place, focused on the same approach.
- BFVs are easy to remount.
- BFVs have more security. This is because the rifle teams are close.
Same Battle Positions, Different Avenues of Approach. (This method is shown in Figure 14.)
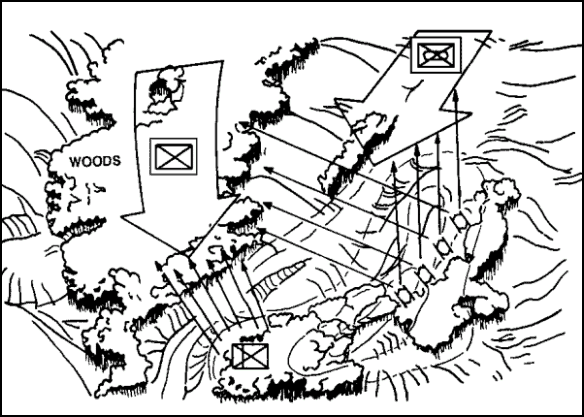
FIGURE 14. SAME BATTLE POSITION, DIFFERENT AVENUES OF APPROACH.
This is used when the position has two avenues of approach of equal danger. One has short-range field of fire. The other has long-range fields of fire. The BFV covers the long-range avenue with its fires. The rifle team is placed to cover the short-range avenue. Each force is then on terrain best suited to it. During limited visibility, security should be increased. To achieve this, the platoon leader will often reposition some of the dismount force.
Plans must be made to shift the BFVs. The dismount approach can become the most dangerous if the mounted approach is ignored by the threat. In this case, the BFVs would use their speed to reposition. When nearer to the dismount force, they add their 7.62 coax fire in support of the rifle teams.
Different Battle Positions, Same Avenue of Approach (This method is shown in Figure 15.)
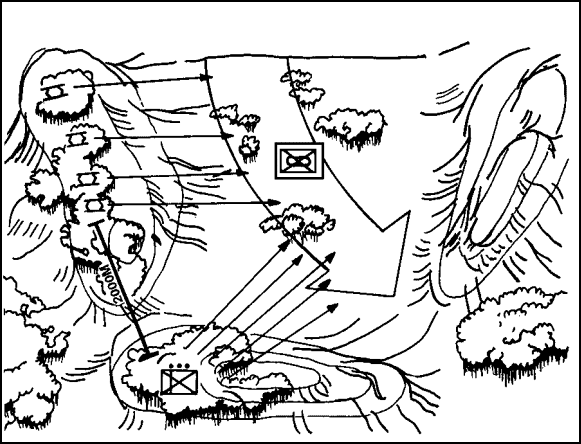
FIGURE 15. DIFFERENT BATTLE POSITIONS, SAME AVENUE OF APPROACH.
If positioned on separate battle positions, BFVs and dismounted infantry must fight in relation to each other and cover the same avenue of approach. Fighting in relation to one another means that the BFVs are able to provide the dismounted infantry with supporting fires from their primary, alternate, or supplementary positions. Both elements are positioned to engage enemy forces on the same avenue of approach, but at different ranges. This will normally equate to a maximum of three-fourths of the effective range (approximately 2,000 meters) of the BFVs primary armament--the 25-mm gun. This ensures that the BFV fires can reach and overlap the dismount positions. As long as they are fighting in relation to each other, the platoon leader will normally continue to control both elements.
Bradleys Displacing to Support Dismount Element
At times, there is a need to gain better observation and fields of fire. This makes better use of the BFVs weapons.
The BFVs are then used forward of the dismount force, on the same avenue of approach. The Bradleys displacing process is shown in Figure 16.
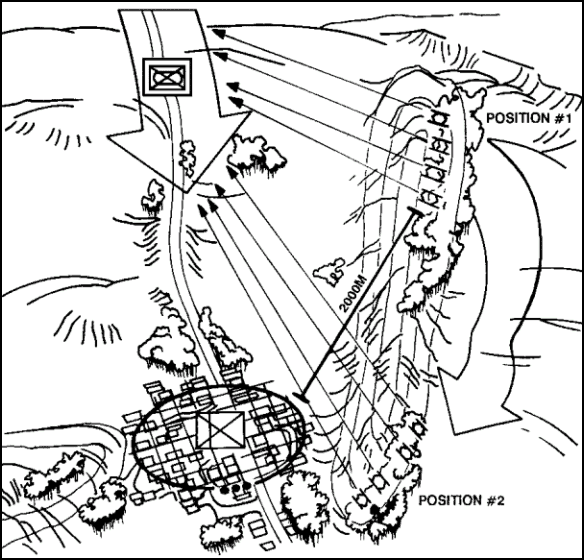
FIGURE 16. BRADLEYS DISPLACING.
The dismount element must use all the time it has to prepare the positions. This includes setting up obstacles. When the threat attacks, the BFVs will engage their formations. They then move to the flank or rear of the dismount force. This is done by a signal or event arranged ahead of time. The timing of this move is crucial. The best use of the BFVs is made by fighting them forward. But this also leaves them more open to fire as the threat closes.
Platoon Leaders' Position
The BFV force will be the first to see and engage the enemy. The timing of moves to alternate or subsequent positions is crucial. As you have seen, the platoon leader controls the BFV force. The platoon sergeant controls the dismount force. At times, though, other methods are needed. One example is when the main fight is expected to be dismounted. The platoon leader would then stay forward with the dismount force. As the situation develops, he may choose to move. He might move to the BFV force, or he may choose a position which lets him better control both forces. In this way, the platoon leader stays abreast of the situation. He also has the most control where the main fight is expected. Control is hardest with the forces separated. The commander of the larger force may tell the platoon leader which force to locate with.
Dismount Force Planning
The leader of the dismount force must plan for operations without the support of his BFVs. He must plan for the supplies to be with the dismount force. He must also consider how long the team will be apart, and how quickly his force can remount.
BFVs Forward
The BFVs may be used well forward for a certain mission. When that mission is complete, they displace. Their position is then in support of the dismount force. One such mission is long-range antiarmor engagements. In such fights, the BFVs must avoid decisive engagements. They must be free to displace to their next positions. Rifle teams are placed to the rear. They improve positions and emplace obstacles.
Company Control
There are times when the Bradley platoon's mounted and dismounted forces are not fighting in relation to each other. Control of these forces is then consolidated at the company team level. The company team 21C is used to do this.
A company or company team commander may consolidate the company's dismount forces in one location. The BFVs are deployed separately in the situations which follow:
- A large number of dismounted troops are required to hold a position, such as a strongpoint.
- Primary position for the dismount force does not have adequate fields of fire for the BFVs weapons.
- The dismount force must occupy heavily wooded or rugged terrain that the BFV cannot traverse.
- Both mounted and dismounted avenues of approach must be defended. Terrain is such that both cannot be defended from the same position.
In these situations, the dismount force and the BFVs may not be able to support each other at first. Plans should be made to use the BFV's speed for repositioning. The BFVs then support the dismount force from supplementary or subsequent positions.
Plans may be modified in limited visibility. Added security may be given to the BFVs. This may be done by moving a rifle team to the BFV's position. It can also be done by rejoining the platoon on a single battle position.
REVERSE SLOPE DEFENSE
The estimate of the situation will often require the company team commander to employ his elements, especially his dismounted infantry, on the reverse slope. If the factors of METT-T require the employment of dismounted infantry on what is essentially a mounted avenue of approach, the dismounted infantry must be concealed from the enemy at ranges beyond which their own weapons are effective.
This means that the dismount force should be protected from threat tank gun and observed artillery fire. This is true even when friendly forces are fighting with their tanks and ATGMs. Ideally, the dismount force is deployed to protect it. They are not open to fire from threat direct fire systems that cannot engage.
Most of the weapons in the dismount force are not effective beyond 600 meters. The reverse slope defense may be used to protect them from fires beyond that range.
To some extent, this conflicts with the need for maximum observation forward to adjust indirect fire on the enemy as well as the need for long-range fields of fire. In some cases, the tanks, BFVs and ATGMs must be deployed forward. The dismount force stays on the reverse slope. As the battle closes, the vehicles withdraw from their forward positions. As the battle closes, the vehicles withdraw from their forward positions. Their new positions should make full use of the BFVs long-range fires. This can deliver enfilade shots from the depth and the flanks of the reverse slope.
At night, the nature of the threat may change. The dismount force may then occupy the forward slope or crest to deny it to the threat. In these cases, the dismount forces may have an alternate night position forward.
The area forward of the crest must be controlled by friendly forces. This is done with aggressive controls, and active as well as passive reconnaissance means. The threat must not be allowed to take advantage of reduced observation. He would use this to move to a position of advantage without being taken under fire.
Advantages of Reverse Slope Defense (See Figure 17.)
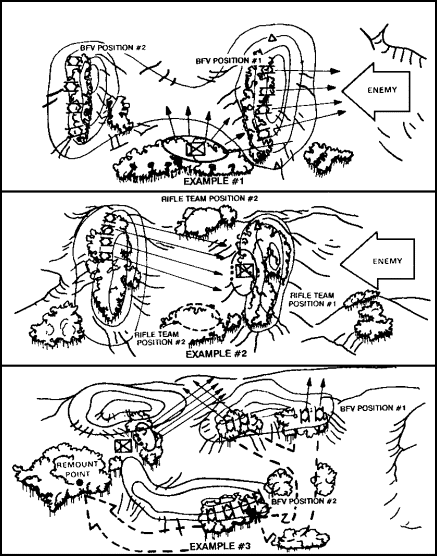
FIGURE 17. REVERSE SLOPE DEFENSE OPTIONS.
There are a number of advantages in the use of the reverse slope defense. These are as follows:
- Threat ground surveillance of the position is masked.
This includes surveillance devices and radar. - The threat must come within range of the defender's weapons to engage with direct fire.
- The threat's indirect fire will be less effective. This is due to reduced observation.
- The threat may be deceived about the strength and location of the positions.
- The defenders will have more freedom of movement out of sight of the threat.
Disadvantages of Reverse Slope Defense
The disadvantages of the reverse slope defense are listed here:
- Observation to the front is limited.
- Field of fire to the front are reduced.
- Threat is able to launch his attack from a closer range.
When the Reverse Slope Defense is Used
The decision to use the reverse slope defense is made by the company team commander. As a rule, he will choose this defense when--
- A unit wants to surprise or deceive the threat about the location of its defensive position.
- A forward slope may be made untenable by direct threat fire.
- The forward slope does not need to be occupied to achieve depth and mutual support.
- The fields of fire on the reverse slope are better; or, they are at least good enough to accomplish the mission.
- The forward slope is likely to be the target of intense artillery fires.
The BFV in the Reverse Slope Defense
The BFV offers options in positioning that were not possible before. BFVs can initially be positioned forward. This makes full use of their protection from artillery. It also uses their ability to engage at long range. After the initial engagement, the BFVs may move over or around the crest line. They move through the dismount force on the reverse slope. Their new position is either on the flanks, or farther in depth to the rear.
Obstacles
Obstacles are also needed in the reverse slope defense. The threat will be engaged at close range by the units on the reverse slope. Obstacles should be emplaced that--
- Keep the threat from closing too quickly and overrunning the positions.
- Ease disengagement if decisive engagement is not desired.
VEHICLE POSITIONS
The platoon leader chooses positions for his BFVs. He does this with guidance from the company team commander and based on the factors of METT-T. Each vehicle's position should provide--
- Cover, especially to the front.
- Concealment from ground and air observation.
- Good fields of fire into the most likely avenues of approach.
- Covered and concealed routes to and between positions and to the platoon remount point.
- Mutual support between positions.
Weapons Systems
Each vehicle should have a primary position and as many alternate positions as needed to cover the entire sector of fire. Supplementary positions should be designated to cover secondary sectors of fire. These may also cover the next most dangerous avenue of approach. If the BFVs are fighting apart from the dismount force, they must be able to support these positions. All three weapon systems should be considered when positions are selected and prepared. The platoon leader should name the primary weapon system to be used at each position. The 25-mm gun and the 7.62-mm coax can fire between trees and through light vegetation. Care must be taken when firing 25-mm armor-piercing discarding sabot. It must not be fired over friendly troops within an arc of 10 degrees on either side of the gun and within 175 meters. The plastic sabot falls away from the projectile when this round is fired. It can cause serious injury to personnel. The same is true of the tank's main gun sabot. In this case, the danger zone is 1,000 meters forward and 70 meters on either side.
Use of the TOW
The TOW can kill tanks at a range of 3,750 meters. This is more than the range of threat tank main guns. Their range, as a rule, is 1,500 to 2,000 meters. This gives the BFV a standoff advantage with the TOW. TOW positions must have unobstructed fields of fire. They should also have a clear backblast area, and must fire from a level area of terrain.
The TOW has a high-kill probability on any tank it hits. This probability rises if the TOW hits the tank's weaker side armor. Flank engagements are best. This is because a tank crew's observation, and its main gun, are oriented to the front. The flank shot reduces the chances for detection. It also improves the chances for a kill.
Avoiding Threat Fires
The BFV cannot survive against antiarmor missiles, or direct fire weapons larger than 14.5-mm. It is vulnerable in this way. There are two ways to overcome this. One is to stay concealed and give surprise fire. The other is to fire at maximum ranges and displace to alternate positions. This keeps the threat from placing effective fire on the BFV. When one BFV displaces, others should give cover fire. This keeps the enemy under a constant stream of fire. He is not able to acquire and engage targets.
BFV Separation
The threat will try to suppress with fires and smoke. The BFV force should be positioned for separation. The BFVs should be as far apart as possible while still giving mutual support. Chances of the same fire being used to suppress two or more BFVs are then reduced. About 100 meters is a good planning figure between BFVs.
Hide Positions
Hide positions are shown in Figure 18. These should be out of the direct fire line of the threat. They both protect the BFVs and conceal their true positions. This lets them give surprise fire on the threat. Hide positions should be prepared when there is time. They should be hull down if possible. Movement from hide to firing positions should be rehearsed.

FIGURE 18. HIDE POSITIONS.
When the dismount force is the BFVs, the infantrymen can observe the sector. They then call the BFVs into position when targets appear. The hide-position method can be used by single BFVs or the whole platoon. When the BFV and dismount forces are separate, the BFV leader may have to dismount. He then moves forward to observe the sector.
The use of hide positions helps avoid early detection. Routes from hide to firing positions should be concealed. The observers and BFV force must communicate. This may be done by visual signals, wire, or radio. Each BFV should have several firing positions for a single hide position. This lets it engage at long ranges, and move before the threat can return fire.
Artillery Barrages
In some situations, the platoon may not have time to prepare their fighting positions. The threat may deliver an artillery barrage at these times. The platoon can still protect itself; the BFVs move to covered and concealed positions. These can be to the flank or rear of the intended position. They wait through the barrage, then occupy the position. The platoon leader positions himself to observe avenues of approach. This lets him decide the proper time to move.
Hull-Down Position
In the hull-down position, only the turret is exposed. The hull is protected by cover. This is shown in Figure 19. The turret can also be camouflaged; it is then hidden, but can still fire the turret weapons. The 25-mm gun should be fully depressed when the position is first entered. Then, close-in targets can be engaged without moving the vehicle.
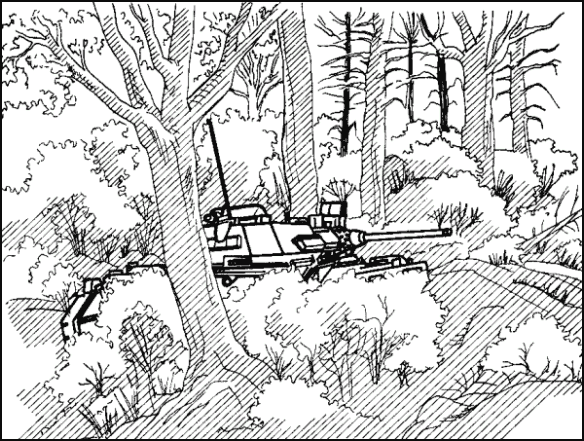
FIGURE 19. BFV HULL DOWN.
Added protection is given by the turret-down position. The BFV has cover to the front, but the Bradley commander can still see what is to his front. The driver moves into the fighting position hull down; the gunner then directs him in reverse until he can no longer see through his sights. The turret will then be covered from the front. To engage, the driver moves the BFV forward until the gunner has fields of fire. (See Figure 19.)
RIFLE TEAM POSITIONS
Rifle teams are best used against the most dangerous dismounted avenues of approach. These include small towns, rugged terrain, and thick woods.
The rifle team may face either a mounted or dismounted threat. The platoon leader must plan for this. He should choose restrictive mounted approaches to position rifle teams. These include secondary roads, trails, and roads bordered by obstacles.
The rifle team at full strength has six infantrymen. They are, as a rule, placed in three two-man positions. These positions may be reduced when the approach is narrow. If the approach is wide, some positions may have to be occupied with only one man.
Distance Between Rifle Teams
The distance between rifle teams is determined by a number of factors. These include--
- The mission of the platoon.
- Threat capabilities.
- The terrain.
- Visibility conditions.
- Strength of the rifle teams.
- Location of the rifle teams with respect to the BFVs.
Squad Leader Assignments
The platoon leader assigns sectors to the dismount element squad leaders. He explains to them how each fits into the defensive concept. He tells the squad leader where to place his SAWs (or M60's) and Dragon. He assigns sectors of fire for each weapon. Leaders must be cautious about organizing a defense that relies too much on the Dragon; it has a slow time of flight and is easy to suppress. Also, only a few rounds are carried. The dismount leader makes sure that the key weapons have mutual support. He also ensures that there are no gaps in the element's sector.
Mutual support is gained by overlapping sectors of observation and fire. This fire must be enough to stop the threat from penetrating the position. It also keeps him from isolating any part of the dismount force. A rifle team position and overlapping fires are shown in Figure 20.
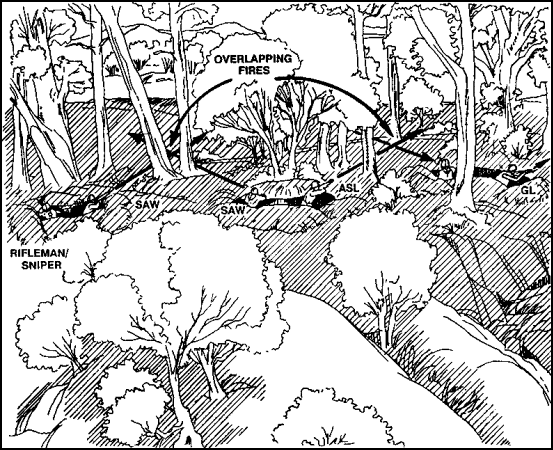
FIGURE 20. RIFLE TEAM POSITIONS AND OVERLAPPING FIRES.
Obstacles are planned and emplaced to aid in the fire support plan. The commander may provide engineer assets. These should be used to the fullest extent. They can emplace obstacles and or prepare positions.
As a rule, dismounted infantry is used in dug-in positions. These should have overhead cover. This will reduce the risk from indirect fire.
Dragons
As was noted, rifle teams are most often used where mounted movement is restricted. This means that Dragon positions with good engagement ranges may not be available. In this case, the Dragons should be placed forward or on the flanks of the dismount element. This will give better fields of fire. Dragons should be placed to get flank shots, where possible.
Limited rounds for the Dragon are carried. Give thought to this situation when deploying it. Often, it should be considered for use with an armor-killer team. Other uses are forward with an OP, or to the flank. If there are no Dragon targets, or if all rounds have been used, the antiarmor specialists fire their M16A2 rifles. A good Dragon position should have--
- Observation to the maximum Dragon range.
- Cover and concealment.
- Clear fields of fire (to the flanks, if possible).
- Security.
- A backblast area.
- Concealed routes to subsequent positions.
Following the initial position, the Dragon can move to a subsequent one. A covered route for this movement is shown in Figure 21. The figure shows the Dragon in its initial position. This is forward of the rifle teams. The subsequent move is to their flank.
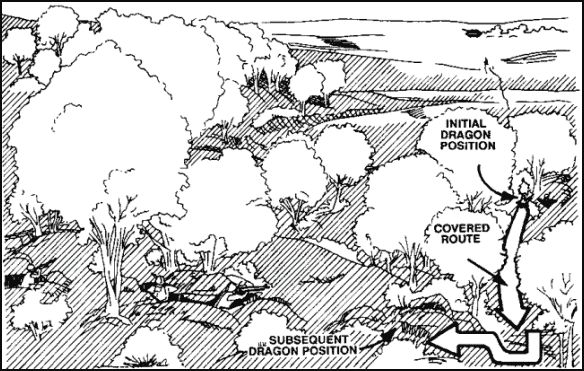
FIGURE 21. DRAGON POSITIONING.
Machine Guns
Machine guns are the main weapon used by the dismount force to stop infantry attacks. As a rule, all of the platoon's machine guns are manned with the dismount element. They should be on tripods with traversing and elevating mechanisms. Machine guns are positioned to give sectors of fire across the dismount elements front. If possible, they should interlock with the BFV force and adjacent platoons. The positions should have frontal cover. Machine guns are best used to give enfilade fire down the line of the threat assault formation. Machine gun positioning is shown in Figure 22.

FIGURE 22. MACHINE GUN POSITIONING.
Machine guns are assigned a final protective line. As a rule, this is across the front of the battle position. It is the point where the platoon leader expects to stop the threat dismount force. This will be done with interlocking fire and obstacles. A machine gun FPL should give as much grazing fire as possible. Grazing fire is to be no more than one meter above the ground along the FPL.
Dead space is any space that grazing fire does not cover. It is found by having a man walk the FPL. The machine gunner eyes this man as he walks. He records any space his grazing fire will not cover. This dead space must be covered by fires from the grenadier's M203. Indirect fire, such as mortars, is also planned on the dead space. The FPLs should overlap. Then, the loss of a machine gun does not leave a gap.
At times, a gully or ditch will lead into the position. If so, the machine gun can be positioned to fire straight down the approach. Rather than an FPL, this machine gun is assigned a principal direction of fire. This is shown in Figure 23.
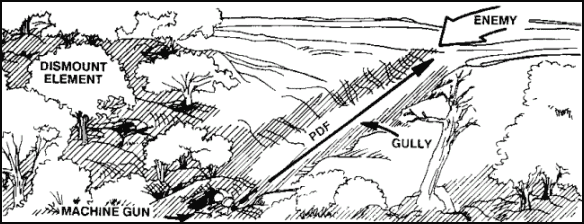
FIGURE 23. PRINCIPAL DIRECTION OF FIRE.
A machine gun is always laid on its FPL or PDF, unless engaging other targets. The FPL machine guns should be fired all at the same time and on signal.
M60. The M60 requires an assistant machine gunner. He should be assigned a sector that will do one or more of the following:
- Help secure the machine gun position.
- Cover gaps in machine gun fire.
- Overlap the machine gun sector.
If the threat mounted attack closes within 400 to 500 meters, the assistant acts. He directs his weapon fire at any exposed enemy track commanders. This would force them to close their hatches. Their control problems would then be greater.
SAW. The M249 SAW is to be issued to mechanized units. It will be used like the M60 in the defense. SAW employment options are shown in Figure 24. The two automatic riflemen should cover the team's front, or tie in with a flank. They should be assigned sectors that overlap with other team's fires. This will give fire all through the platoon's sector. Dead space is covered with grenade fire from the M203.
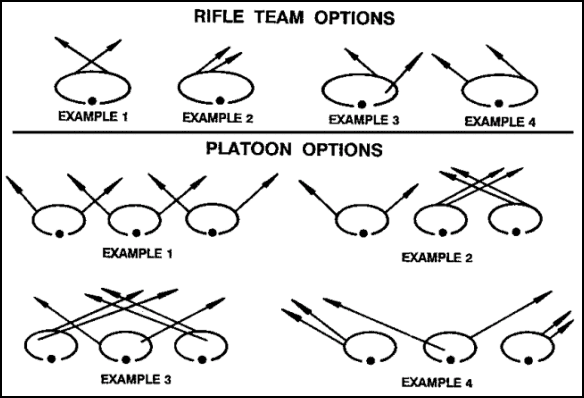
FIGURE 24. SAW EMPLOYMENT OPTIONS.
The SAWs can be used on each flank. They may also be used in pairs on one flank or the other. When used singly on each flank, there are options. They can both shoot across the front of the rifle teams, or they can be used to tie in with one or both of the flanks. The platoon leader decides on the PDF.
LAW. This is the main close-in antiarmor weapon of the rifle team. Each rifle team should have several LAWs in its position. A soldier's sector of fire for the LAW is the same as for his main weapon.
Claymores. Threat approaches to the position should be covered with hasty mines. There may be dead space that cannot be hit with grenade launchers. Claymores and other antipersonnel mines can be used here. A Claymore must be fired by a soldier who can see its sector of fire. Claymores should be double-wired. This is so they can be fired either from the position they protect, or the adjacent position. If more than one Claymore covers the same sector, the squad leader should name a firing sequence. The Claymore has only 100 feet of wire. Care must be taken in setting it up. This ensures that soldiers in the adjacent position are not in its backblast. Hasty protective minefields must be reported to higher headquarters.
Antitank Mines. These are best used for close-in protection against mounted assaults. They should be placed on likely tank routes where they can be covered by LAW fire. At least one mine should be emplaced per two-man position. More may be used if the threat of armored attack is great. When mines are used, reports must be made and locations recorded. All antitank mines should be removed when leaving the position. At times, such as when a withdrawal is ordered, this cannot be done. A report that mines were left in place must then be made.
Each weapon is set up and prepared to fire in its assigned sector. The squad and platoon leaders check the observation and sector of fire for each position. They complete coordination between the rifle teams. The FPL or PDF for each M60 is checked by the M60 gunner. The squad leader then allocates the initial ammunition. He supervises the preparation of all positions for each weapon.
The squad leader must concentrate on control of the team's fires. He fires his own weapon only to name targets or where added firepower is needed.
The platoon leader and squad leaders must be in positions from which they can control their men. As a rule, the squad leader will be in his team's center two-man position. He should be able to see his whole team and their sector. He should also be able to see the dismount force leader. The platoon leader must look for a position where he can see the whole platoon sector. He must be able to see at least the most critical part of it. He should have visual contact with the BFVs whenever possible.
CONCLUSION
This lesson covered the task priorities of the Bradley platoon in the defense. It also went over the fire planning considerations, together with fire distribution and control procedures. The lesson ended with a discussion of the tactics and techniques for conducting the defense. You will go to lesson two after taking the practice exercise which follows next.