|
RDL Homepage |
Table of Contents |
Document Information |
Download Instructions |
Part E
DEFENSE
1. Conduct of the Defense. This paragraph provides a pattern of preparation, decision, and execution for platoons and squads. It links the leader's critical decision points to a standard sequence of actions that a platoon takes in planning, preparing for, and executing defensive operations. The standard sequence of actions are-
b. Move to Defensive Positions.
c. Establish Defensive Positions.
d. Locate the Enemy.
e. Initiate Contact/Actions on Enemy Contact.
f. Fight the Defense.
g. Reorganize.
(1) Prepare for Combat. The platoon leader receives the company warning or operation order.
(a) The platoon leader quickly issues a warning order.
(b) The platoon leader begins making a tentative plan based on his estimate of the situation and an analysis of METT-T.
(c) When possible, the platoon leader (and squad leaders) reconnoiters the defensive position and the route(s) to it. The leader's reconnaissance party should always include a security team (minimum of two soldiers). The leader's reconnaissance-
- Maintains security.
- Checks for enemy positions, or signs of past enemy activities, obstacles, booby traps, and NBC contamination.
- Confirms/adjusts squad positions and sectors of fire from those in the tentative plan. (Normally the platoon leader assigns and adjusts machine guns and antiarmor positions.) The platoon leader revises his plan as necessary based on a further assessment of METT-T.
- Leaves a security element on the position to observe/report changes in the situation.
- As the reconnaissance party returns to the platoon, the platoon leader posts guides along the route to maintain security and help the platoon move into the position.
(d) Based on his reconnaissance and any additional information, the platoon leader completes and issues his plan.
(e) All squad leaders check (the platoon sergeant spot checks) weapons, communications equipment, and accessories for missing items (squad and individual) and serviceability.
(f) The platoon sergeant makes sure that the platoon has ammunition, food, water, and medical supplies on hand, in quantities prescribed by the platoon leader. (Squads and platoons should plan to prestock an additional basic load of ammunition on the defensive position.)
(g) All soldiers camouflage themselves and their equipment to blend with the terrain.
(h) The platoon rehearses critical tasks first.
- The platoon leader makes final inspection of weapons (test fires weapons, if possible), equipment (include communications checks), and personnel (include camouflage). The platoon sergeant closely monitors the soldiers' load to ensure that standard items are packed in accordance with the platoon SOP and that it is not excessive.
- If an advance party is used, the platoon leader, platoon sergeant, and advance party leader (normally a squad leader) review advance party activities and redistribute equipment to the advance party (for example, tripods, stakes).
- If not already moving, the platoon leader initiates the movement of his platoon.
(2) Move to Defensive Positions. The platoon applies the fundamentals of movement-
(a) Move on covered and concealed routes.
(b) Avoid likely ambush sites.
(c) Enforce camouflage, noise, and light discipline.
(d) Maintain all-round security, to include air guards.
(e) Use formations and movement techniques based on METT-T.
(3) Establish Defensive Positions. The platoon halts short of the defensive position in a covered and concealed position and establishes local security.
(a) The platoon leader and squad leaders and a security team (minimum of two soldiers) move forward to link up with the security team on the position.
- The squad leaders return to the platoon and move their squads forward.
- The platoon occupies the designated position. Guides control the movement of the platoon into position.
(b) As the platoon occupies its position, the platoon leader ensures that all tasks are performed in the stated priority of work. Additionally, the platoon leader-
- Walks forward of positions, if possible to check camouflage and confirm dead space. The most important aspect of infantry fighting positions is that they cannot be observed by the enemy until it is too late.
- Checks on wire and mine teams. The platoon leader ensures that protective wire is outside of hand-grenade range from the fighting positions and tactical wire lies along the friendly side of the final protective line (FPL).
- Briefs the platoon sergeant on the logistics plan(include resupply and casualty evacuation routes).
- Issues finalized platoon order and checks soldier knowledge and understanding. (All soldiers must be aware of friendly units forward of the position [for example, patrols, scouts] and their return routes. They must also know the signals or conditions to initiate, shift, fire final protective, and cease fires, and to reposition to alternate and supplementary positions.)
(c) The platoon improves the position continuously.
(4) Locate the Enemy. The platoon establishes and maintains OPs and conducts security patrols as directed by the company commander. Patrols, OPs, and individual soldiers look and listen. They use night surveillance devices, binoculars, and PEWS to detect the enemy approach.
(5) Initiate Contact/Action on Enemy Contact. Once the enemy is detected, the platoon leader-
(a) Alerts the squad leaders, platoon sergeant, and his forward observer.
(b) Reports the situation to the company commander.
(c) Calls in OPs. (The squad leader or platoon leader may decide to leave the OPs in place if the soldiers manning them can provide effective flanking fires, their positions afford them adequate protection, and or their return will compromise the platoon's position.)
(d) Calls for and adjusts indirect fire when the enemy is at maximum range.
(e) Initiates the long-range direct fires of his platoon on command from the company commander. Leaders and individual soldiers return to their positions and prepare to fire on command from the platoon leader.
(6) Fight the Defense. The platoon leader determines if the platoon can destroy the enemy from its assigned positions.
(a) If the answer is YES, the platoon continues to fight the defense.
- The platoon leader or FO continues to call for indirect fires as the enemy approaches. The platoon normally begins engaging the enemy at maximum effective range. It attempts to mass fires and initiate them simultaneously to achieve surprise. Long-range fires tied-in with obstacles should disrupt his formations; channelize him toward engagement areas; prevent, or severely limit his ability to observe the location of friendly positions; and destroy him as he attempts to breach tactical obstacles.
- Leaders control fires using standard commands, pyrotechnics, and other prearranged signals. The platoon increases the intensity of fires as the enemy closes within range of additional weapons. Squad leaders work to achieve a sustained rate of fire from their positions by having buddy teams fire their weapons so that both are not reloading them at the same time.
- In controlling and distributing fires, the platoon and squad leaders consider-
- As the enemy closes on the platoon's protective wire, the platoon leader initiates final protective fires (FPF)(the following actions occur simultaneously)-
- The platoon continues to defend until the enemy is repelled, or the platoon is ordered to disengage.
oo
The range to the enemy.oo
Priority targets(what to fire at, when to fire, and why).oo
Nearest or most dangerous targets.oo
Shifting to concentrate fires on their own or as directed by higher headquarters.oo
Ability of the platoon to engage dismounted enemy with enfilading, grazing fires.oo
Ability of the platoon's antiarmor weapon to achieve flank shots against enemy vehicles.oo
Machine guns and automatic weapons fire along interlocking principle direction of fire (PDF), or final protective lines (FPL) as previously designated and planned. Other weapons fire at designated principle direction of fires. M203 grenade launchers engage enemy in dead space or against enemy attempts to breach protective wire.oo
The platoon continues to fight with Claymores mines and hand grenades.oo
If applicable, the platoon leader requests indirect final protective fires (FPF) if they have been assigned in support of his positions.(b) If the answer is NO, the platoon leader-
- Reports the situation to the company commander.
- Continues to engage the enemy or repositions the platoon (or squads of the platoon) only when directed by the company commander to-
oo
Continue fires into the platoon sector (engagement area).oo
Occupy supplementary positions.oo
Reinforce other parts of the company.oo
Counterattack locally to retake lost fighting positions.oo
Withdraw from an untenable position using fire and movement to break contact. (The platoon leader does not move his platoon out of position if it will destroy the integrity of the company defense. All movements and actions to reposition squads and platoons must be thoroughly rehearsed.)In any movement out of a defensive position, the platoon MUST employ all direct and indirect fire means available to suppress the enemy long enough for the unit to move. |
(7) Reorganize.
(a) The platoon-
- Reestablishes security.
- Mans key weapons.
- Provides first aid and prepares wounded soldiers for MEDEVAC.
- Repairs damaged obstacles and replaces mines (Claymore) and booby traps.
- Redistributes ammunition and supplies.
- Relocates selected weapons to alternate positions if leaders believe that the enemy may have pinpointed them during the attack. Adjusts other positions to maintain mutual support.
- Reestablishes communications.
- Reoccupies and repairs positions, and prepares for renewed enemy attack.
(b) Squad and team leaders provide ammunition, casualty, and equipment (ACE) reports to the platoon leader.
(c) The platoon leader-
- Reestablishes the platoon chain of command.
- Consolidates squad ACE and provides ACE report to the company commander.
(d) The platoon sergeant coordinates for resupply and supervises the execution of the casualty and EPW evacuation plan.
(e) The platoon continues to improve positions. The platoon quickly reestablishes OPs and resumes patrolling as directed.
2. Security. In the defense, infantry platoons attempt to surprise the enemy and initiate contact in such a way that his plan is disrupted. To capitalize on the element of surprise, infantry in defensive positions must remain undetected. A compromised position will either be bypassed or assaulted with overwhelming odds. Infantry platoons must conceal the location and preparation of their positions. They do this through the use of camouflage techniques and a strict adherence to noise and light discipline. Platoons must also provide their own security from the arrival of the leader's reconnaissance party through the execution of the defense. Platoons provide their own security through patrolling; the use of observation posts; and by detailing a percentage of the platoon to man hasty positions, while the remainder of the platoon prepares the defense. (Lesson 3 provides detailed information on patrolling techniques. Part L discusses techniques for establishing observation posts. Securing the position during preparation can be an SOP item.)
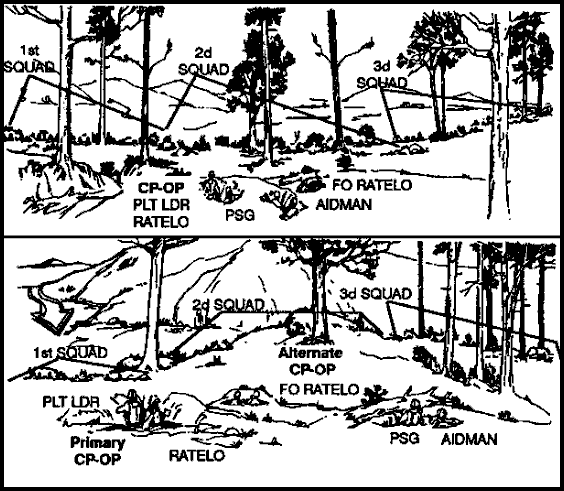
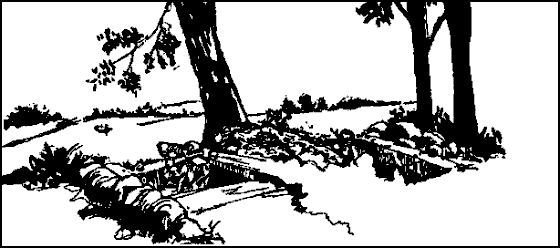
3. Command Post and Communications. A platoon leader sets up his CP where he can best see and control his platoon. The FO and the platoon RATELO occupy the platoon CP with the platoon leader. If the leader cannot see and control all of the platoon from one place, he sets up the CP where he can see and control the main effort. He then sets up an alternate CP where the platoon sergeant can control the rest of the platoon. The aidman normally locates with the PSG. The alternate CP bunker, with overhead cover, may be large enough to hold additional ammunition and casualties. The EPW collection point is normally near the alternate CP. Excess supplies, barrier material, equipment; and KIAs are camouflaged near the alternate CP (Figure 2-36). The platoon CP ties into the company wire net with a field telephone (if in the TOE) and into the company radio net with a radio. The alternate CP ties into the platoon CP with wire. The platoon has its own platoon radio and wire nets.
Figure 2-36. Command Post-Observation Post.
4. Weapons Emplacement. The success of the defense depends on the positioning of soldiers and weapons. To position their weapons effectively, all leaders must know the characteristics, capabilities, and limitations of their weapons, the effects of terrain, and the tactics used by the enemy. Leaders should position weapons where they have protection; avoid detection; and surprise the enemy with accurate, lethal fires. In order to position the weapon, the leader must know where he wants to destroy the enemy and what effect he wants the weapon to achieve. Additionally, the platoon leader must consider whether his primary threat will be armored vehicles or dismounted infantry. When the platoon must fight armored vehicles, the platoon leader positions antiarmor weapons along the most likely armored avenue of approach first. When the primary threat is from dismounted infantry, the platoon leader should position his machine guns on the most likely dismounted avenue of approach first. The platoon leader must consider both mounted and dismounted avenues of approach. His plan should address both; one as a contingency of the other. Squad leaders position all other weapons to support these key weapons, cover dead space, and provide security.
a. Machine Guns. M60 (7.62-mm) and M249(5.56-mm) machine guns are the platoon's primary weapons against a dismounted enemy. They provide a high volume of lethal, accurate fires to break up enemy assaults. They also provide limited effects against lightly armored vehicles and cause vehicle crews to button-up and operate with reduced effectiveness. Leaders position machine guns to-
(1) Concentrate fires where they want to kill the enemy.
(2) Fire across the platoon front.
(3) Cover obstacles by fire.
(4) Tie-in with adjacent units.
(a) The following definitions apply to the employment of machine guns.
- Grazing fire. Grazing fire occurs when the center of the cone of fire does not rise more than 1 meter (about waist high) above the ground. When firing over level or uniformly sloping terrain, a maximum of 600 meters of grazing fire can be obtained.
- Dead Space. Dead space is an area within the maximum effective range of a weapon, surveillance device, or observer that cannot be covered by fire and observation from a given position because of intervening obstacles, the nature of the ground, the characteristics of the trajectory, or the limitations of the pointing capabilities of the systems. The platoon covers dead space with another direct fire weapon, M203 fire, indirect fires, or mines (command-detonated Claymores). Additionally, the platoon leader should attempt to tie-in obstacles (wire and mines) and fires to cover dead space. He may also position OPs to observe dead space for another position.
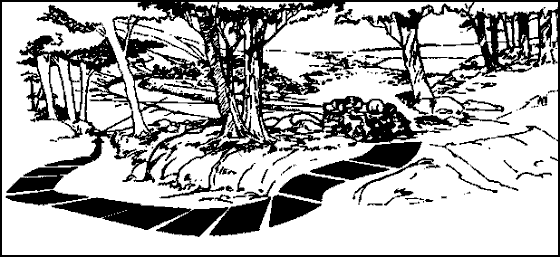
- Final Protective Line. A final protective line(FPL) is a predetermined line along which grazing fire is placed to stop an enemy assault. Where terrain allows, the platoon leader assigns a machine gun an FPL. Once in position, one soldier from the machine gun team walks the FPL to identify both dead space and grazing fire along its length. (Figure 2-37.)
- Principle Direction of Fire. A principle direction of fire (PDF) is a priority direction of fire assigned to cover an area which provides good fields of fire or has a likely avenue of approach. It is also used to provide mutual support to an adjacent unit. Guns are laid on the PDF if an FPL cannot be assigned due to terrain. If a PDF is assigned and other targets are not being engaged, guns are laid on the PDF.
Figure 2-37. Finding Dead Space Along an FPL.
(5) Each gun is given a primary and secondary sector of fire. Their sectors of fire should overlap each other and those of adjacent platoons. A gunner fires in his secondary sector only if there are no targets in his primary sector, or when ordered to do so. Each gun's primary sector includes an FPL or a PDF. The gun is laid on the FPL or PDF unless engaging other targets. When FPFs are called for, the gunner shifts to and engages on the FPL or PDF.
b. Antiarmor Weapons. The MAW is normally the antiarmor weapon that supports a rifle squad or platoon. In some units these weapons are organic to the platoon. At times, the platoon may be supported by HAWs. During planning, the leader considers the enemy vehicle threat, then positions antiarmor weapons accordingly to cover armor avenues of approach (Figure 2-38). He also considers the fields of fire, the tracking time, and the minimum arming ranges of each weapon. The platoon leader selects a primary position and a sector of fire for each antiarmor weapon. He also picks supplementary positions for them. The antiarmor leader selects alternate positions. Each position should allow flank fire and have cover and concealment. The leader can integrate the MAW thermal sight into his limited visibility security and observation plan.
Figure 2-38. Antiarmor Weapon Positions.
c. Grenade Launchers. The M203 is the squad leader's indirect fire weapon. He positions it to cover dead space in the squad's sector, especially the dead space for the machine guns. The M203 gunner is also assigned a sector to cover with rifle fire. The high-explosive, dual-purpose (HEDP) round is very effective against lightly armored vehicles such as the BMP-1 and the BTR.
d. Rifles. The leader assigns positions and sectors of fire to each rifleman in the squad. Normally, he positions the riflemen to support the machine guns and antiarmor weapons. They are also positioned to cover obstacles, provide security, cover gaps between units, or provide observation.
5. Range Cards. A range card is a record of the firing data required to engage predetermined targets within a sector of fire during good and limited visibility. Every direct-fire weapon gunner must prepare a range card (DA Form 5517-R, Standard Range Card). Two copies of the range card are prepared. One copy stays at the position and the other is sent to platoon headquarters. Range cards are prepared for primary, alternate, and supplementary positions. Range cards are prepared immediately upon arrival in a position, regardless of the length of stay, and updated as necessary. The range card is prepared in accordance with the FM for the specific weapon. The range card has a sector sketch section and a data section.
a. The marginal information at the top of the card is listed as follows-
(1) SQD, PLT, CO. The squad, platoon, and company designations are listed. Units higher than company are not listed.
(2) MAGNETIC NORTH. The range card is oriented with the terrain and the direction of magnetic north arrow is drawn.
b. The gunner's sector of fire (including FPL or PDF) is drawn in the sector sketch section. It is not drawn to scale but the data referring to the targets must be accurate.
(1) The weapon symbol is drawn in the center of the small circle.
(2) Left and right limits are drawn from the position. A circled "L" and "R" are placed at the end of the appropriate limit lines.
(3) The value of each circle is determined by using a terrain feature farthest from the position that is within the weapon's capability. The distance to the terrain is determined and rounded off to the next even hundredth, if necessary. The maximum number of circles that will divide evenly into the distance is determined and divided. The result is the value for each circle. The terrain feature is then drawn on the appropriate circle.
(4) All TRPs and reference points are drawn in the sector. They are numbered consecutively and circled.
(5) Dead space is drawn in the sector.
(6) A maximum engagement line is drawn on range cards for antiarmor weapons.
(7) The weapon reference point is numbered last. The location is given a six-digit grid coordinate. When there is no terrain feature to be designated, the location is shown as an eight-digit grid coordinate.
c. The data section is filled in as follows-
(1) Position Identification. The position is identified as primary, alternate, or supplementary.
(2) Date. The date and time the range card was completed is entered.
(3) Weapon. The weapon block indicates the weapons used.
(4) Each Circle Equals Meters. Write in the distance in meters between circles.
(5) Number. Starting with FPL or PDF, left and right limits, and TRPs and reference points are listed in numerical order.
(6) Direction/Deflection. The direction is listed in degrees. The deflection is listed in mils.
(7) Elevation. The elevation is listed in mils.
(8) Range. The distance in meters from the position to the left and right limits and TRPs and reference points.
(9) Ammunition. The type of ammunition used is listed.
(10) Description. The name of the object is listed; for example, farmhouse, wood line, hilltop.
(11) REMARKS. The weapon reference point data and any additional information is listed. See Figures 2-39, and 40 for examples of completed DA Form 5517-R for an M60 machine gun and Dragon.
Figure 2-39. Examples of Completed DA Form 5517-R(M60MG).
Figure 2-40. Example of Completed DA Form 5517-R (Dragon).
6. Types of Positions. Defensive positions may be classified as primary, alternate, or supplementary. All positions should provide observation and fields of fire within the weapon's or platoon's assigned sector. They should take advantage of natural cover and concealment even before soldiers begin to camouflage them. Soldiers improve their ability to reposition by using covered routes, communications trenches; by employing smoke; or by planning and rehearsing the repositioning by fire and maneuver.
a. Primary. A primary position provides a soldier, weapon crew, or unit the best means to accomplish the assigned mission.
b. Alternate. Alternate positions allow soldiers, weapon crews, or units to cover the same sector of fire covered from the primary position. Soldiers occupy alternate positions when the primary position becomes untenable or unsuitable for carrying out their tasks. Soldiers may occupy alternate positions before an attack to rest and/or perform maintenance, or to add the element of surprise to their defense.
c. Supplementary. Supplementary positions provide the best means to accomplish a task that cannot be accomplished from the primary or alternate positions. Platoon leaders normally locate supplementary positions to cover additional enemy avenues of approach and to protect the flanks and rear of the platoon position.
7. Squad Positions. As a guideline, a squad can physically occupy a front of about 100 meters. From this position, it can defend 200 to 250 meters of frontage. The frontage distance between two-man fighting positions should be about 20 meters (allowing for a "lazy W" configuration on the ground; this would put fighting positions about 25 meters apart physically). Every position should be observed and supported by the fires of at least two other positions. One-man fighting positions may be located closer together to occupy the same platoon frontage. The distance between fighting positions depends on the leader's analysis of the factors of METT-T. In determining the best distance between fighting positions, the squad leader must consider-
a. The requirement to cover the squad's assigned sector by fire.
b. The need for security; that is, prevent infiltrations of the squad position.
c. The requirement to prevent the enemy from using hand grenades effectively to assault adjacent positions, should he gain a fighting position.
8. Platoon Positions. The platoon leader assigns primary positions and sectors of fire to his machine guns and antiarmor weapons. He must personally check the lay of each weapon. He assigns primary positions and sectors of fire to his squads. The squad leader normally assigns the alternate positions for the squad and has them approved by the platoon leader. Each squad's sector must cover its own sector of fire and overlap into that of the adjacent squad. Flank squad sectors should overlap those of adjacent platoons. The platoon leader also assigns supplementary positions if required. The platoon leader may choose to position his squads in depth to gain or enhance mutual support.
9. Sector Sketches. Leaders prepare sector sketches based on their defensive plan. They use the range card for each crew-served weapon (prepared by the gunners).
a. Squad Sector Sketch. Each squad leader prepares a sector sketch to help him plan his defense and to help him control fire (Figure 2-41) The squad leader prepares two copies of the sector sketch. He gives one copy to the platoon leader and keeps the second copy at his position. The SOP should state how soon after occupying the position the leader must forward the sketch. The sketch shows the following-
(1) Squad and platoon identification.
(2) Date/time group.
(3) Magnetic north.
(4) Azimuth and distance from a known point.
(5) The main terrain features in his sector of fire and the ranges to them.
(6) Each primary fighting position.
(7) Alternate and supplementary positions.
(8) The primary and secondary sectors of fire of each position.
(9) Maximum engagement line.
(10) Machine gun FPLs or PDF.
(11) Dragon positions with sectors of fire.
(12) The type of weapon in each position.
(13) Observation posts and the squad leader's position.
(14) Dead space to include coverage by grenade launchers.
(15) Location of NVDs.
(16) Obstacles, mines, and booby traps.
Figure 2-41. Squad Sector Sketch.
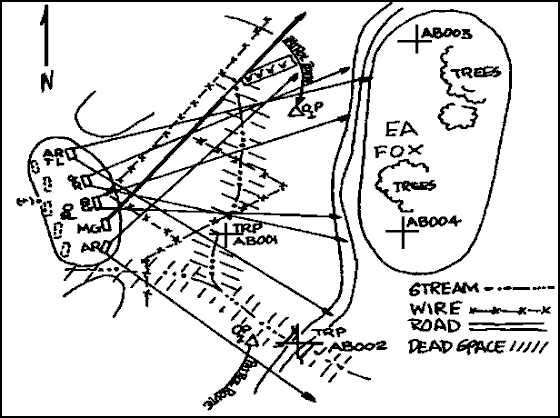
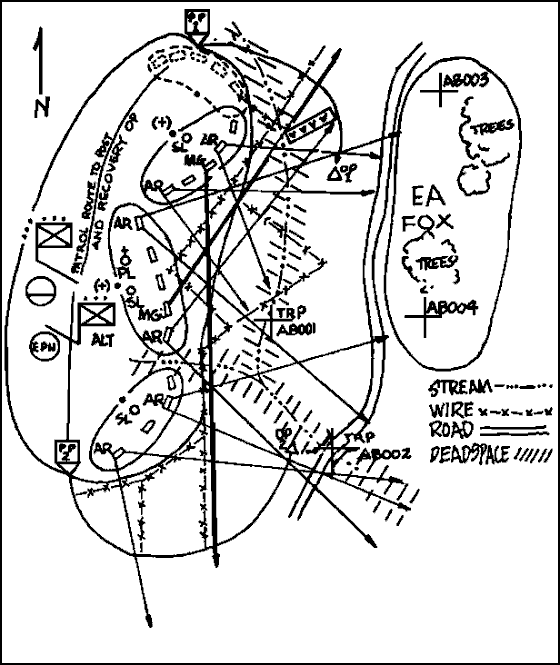
b. Platoon Sector Sketch. The platoon leader checks range cards and squad sector sketches. If he finds gaps or other flaws in his fire plan, he adjusts the weapons or sectors as needed. If he finds any dead space, he takes steps to cover it with mines, grenade launcher fire, or indirect fire. He then makes two copies of his platoon sector sketch (one for his use; the other for the company commander) (Figure 2-42). His sketch shows the following-
(1) Squad sectors of fire.
(2) Machine gun and antiarmor weapon positions and their sectors of fires, to include FPLs and PDFs of the automatic rifles/machine guns and TRPs for the antiarmor weapons.
(3) Maximum engagement lines for antiarmor weapons.
(4) Mines (Claymores) and obstacles.
(5) Indirect fire planned in the platoon's sector of fire(targets and FPF).
(6) OPs and patrol routes, if any.
(7) Platoon CP.
(8) Platoon/company identification.
(9) Date/time group.
(10) Magnetic north.
(11) Azimuth and distance from a known point.
(12) Location of casualty collection point.
(13) Location of NVDs/thermal sights that are part of the limited visibility security plan.
(14) Adjustments during limited visibility to maintain coverage of assigned TRPs.
Figure 2-42. Platoon Sector Sketch.
10. Fire Control Measures. Normally, antiarmor fires (except LAWs) are part of the battalion or company fire plan. One leader controls all antiarmor weapons firing from a single position or into a single engagement area. Platoon leaders normally control the fires of machine guns. Squad leaders and team leaders control automatic rifles, grenade launchers, and rifle fire. Platoon and squad leaders use the following fire control measures to ensure the proper concentration and distribution of fires.
a. Sectors. Leaders use sectors of fire to assign responsibility and ensure distribution of fires across the platoon and squad front. Sectors should always overlap with adjacent sectors.
b. Engagement Areas. Leaders use engagement areas to concentrate all available fires into an area where they intend to kill the enemy. When conducting ambushes, units refer to the engagement areas as a KILL ZONE.
c. Fire Patterns. These include front, cross, and depth fires. These patterns describe the relationship between the weapons and the targets. The intent is to ensure that weapons do not waste ammunition firing on the same target, while other targets remain unengaged.
d. Engagement Priorities. These designate the priority for engaging key targets to include leaders, RATELOs, crew-served weapons, and engineers. The following is an example of a engagement priority.
(1) MAW gunners fire-
(a) At the most threatening armored vehicle.
(b) At armor in the kill zone or primary sector.
(c) At armor in the secondary sector.
(d) At armored vehicles beyond 200 meters.
(2) Machine gun gunners fire-
(a) The FPL or PDF, if signaled to do so.
(b) At groups of five or more in the primary sector(from farthest to closest).
(c) At crew-served automatic weapons.
(d) At groups of five or more in the secondary sector.
(e) At unarmored vehicles.
(3) Automatic riflemen fire-
(a) Along the FPL, if signaled to do so.
(b) At groups of five or more in the primary sector(closest to farthest).
(c) At soldiers in the primary sector.
(4) Grenadiers fire-
(a) At light armored vehicles in sector.
(b) At groups of three or more in sector.
(c) At groups of three or more in secondary sector.
(d) At individual soldiers in sector, using M16 rifles.
(e) At dead space in sector (if occupied by the enemy).
(f) At other targets as directed by squad or team leader (illumination or smoke on order).
(5) Riflemen fire-
(a) In their primary and secondary sectors.
(b) Nearest to farthest, starting on flank and working toward the center:
(c) At leaders.
(d) At RATELOs.
(e) At individual soldiers.
(6) LAW (AT4) gunners fire-
(a) In two-soldier volleys on direction of the team or squad leaders.
(b) At nearby threatening vehicle.
e. Rate of Fire. Some weapon system FMs specify rates of fire by name others do not. The doctrinal terms should be used when possible; others are addressed by SOP.
11. Priority of Work. The platoon's priority of work is a list of tasks that the leader uses to control what gets done by whom and in what order in the preparation of the defense. These tasks are normally prescribed in the SOP. The leader adjusts the priority of work based on his consideration of the factors of METT-T and on his and the higher commander's intent. The platoon's normal priority of work is-
a. Establish local security.
b. Position antiarmor weapons, machine guns, and squads and assign sectors of fire.
c. Position other assets attached to the platoon.
d. Establish the CP and wire communications.
e. Designate FPLs and FPFs.
f. Clear fields of fire and prepare range cards and sector sketches.
g. Coordinate with adjacent units, left, right, forward, and to the rear.
h. Prepare primary fighting positions.
i. Emplace obstacles and mines.
j. Mark or improve marking for TRPs and other fire control measures.
k. Improve primary fighting positions such as overhead cover.
l. Prepare alternate positions, then supplementary positions.
m. Establish a sleep and rest plan.
n. Reconnoiter routes.
o. Rehearse engagements, disengagements, and any counterattack plans.
p. Adjust positions or control measures as required.
q. Stockpile ammunition, food, and water.
r. Dig trenches to connect positions.
s. Continue to improve positions.
12. Coordination. Coordination between adjacent platoons/squads is normally from left to right and from front to rear. Information exchanged includes the following-
a. Location(s) of leaders.
b. Location of primary, alternate, and supplementary positions and sectors of fire of machine guns, antiarmor weapons, and subunits.
c. Route to alternate and supplementary positions.
d. Location of dead space between platoons and squads and how to cover it.
e. Location of OPs and withdrawal routes back to the platoon's or squad's position.
f. Location and types of obstacles and how to cover them.
g. Patrols to be conducted to include their size, type, times of departure and return, and routes.
h. Location, activities, and passage plan for scouts and other units forward of the platoon's position.
i. Signals for fire and cease fire and any other signals that may be observed.
j. Engagement and disengagement criteria.
13. Fighting Positions. This paragraph discusses techniques for the construction of infantry fighting positions. Infantrymen use hasty; one-, two-, and three-soldier; machine gun; medium and light antitank; and 90-mm recoilless rifle positions. Soldiers must construct fighting positions that protect them and allow them to fire into their assigned sectors.
a. Protection. Fighting positions protect soldiers by providing cover through sturdy construction, and by providing concealment through positioning and proper camouflage. The enemy must not be able to identify the position until it is too late and he has been effectively engaged. When possible, soldiers should site positions in nonobvious places, behind natural cover, and in an easy to camouflage location. The most important step in preparing a fighting position is to make sure that it cannot be seen. In constructing fighting positions, soldiers should always-
(1) Dig the positions armpit deep.
(2) Fill sandbags about 75 percent full.
(3) Revet excavations in sandy soil.
(4) Check stabilization of wall bases.
(5) Inspect and test the position daily, after heavy rain, and after receiving direct or indirect fires.
(6) Maintain, repair, and improve positions as required.
(7) Use proper materiel. Use it correctly.
b. Siting to Engage the Enemy. Soldiers must be able to engage the enemy within their assigned sectors of fire. They should be able to fire out to the maximum effective range of their weapons with maximum grazing fire and minimal dead space. Soldiers and leaders must be able to identify the best location for their positions that meet this criteria. Leaders must also ensure that fighting positions provide interlocking fires.
c. Prepare by Stages. Leaders must ensure that their soldiers understand when and how to prepare fighting positions based on the situation. Soldiers normally prepare hasty fighting positions every time the platoon halts (except for short security halts), and only half of the platoon digs in while the other half maintains security. The following stages are-
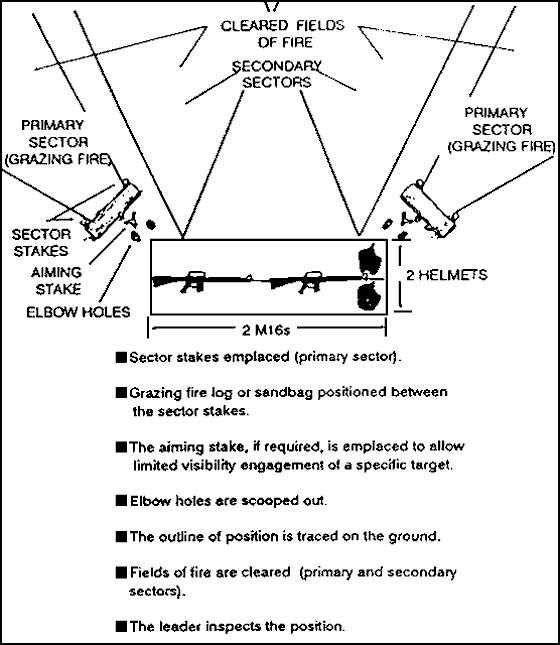
(1) STAGE 1. The leader checks the fields of fire from the prone position and has the soldier emplace sector stakes (Figure 2-43).
Figure 2-43. Stage 1, Preparations of a Fighting Position.
NOTE
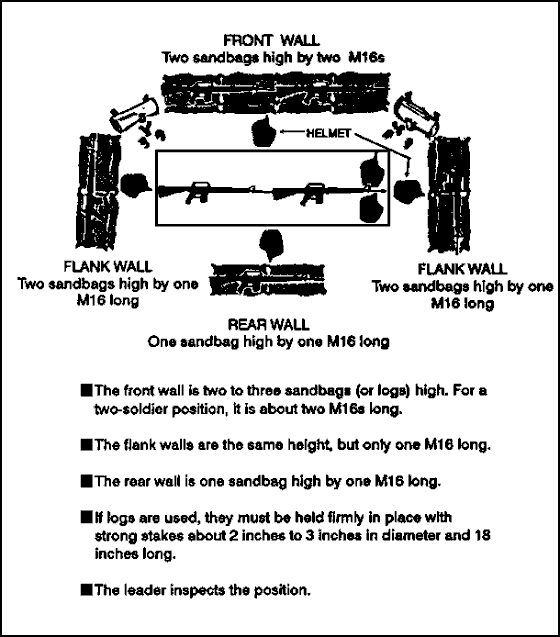
(2) STAGE 2. The retaining walls for the parapets are prepared at this stage. These ensure that there is at least one helmet distance from the edge of the hole to the beginning of the front, flank, and rear cover (Figure 2-44).
Figure 2-44. Stage2, Preparations of a Fighting Position.
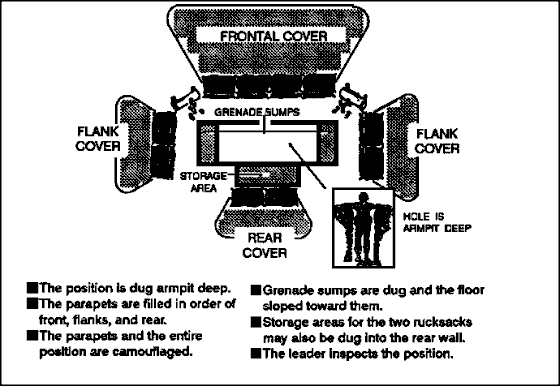
(3) STAGE 3. During stage 3, the position is dug and the dirt is thrown forward of the parapet retaining walls and then packed down hard (Figure 2-45).
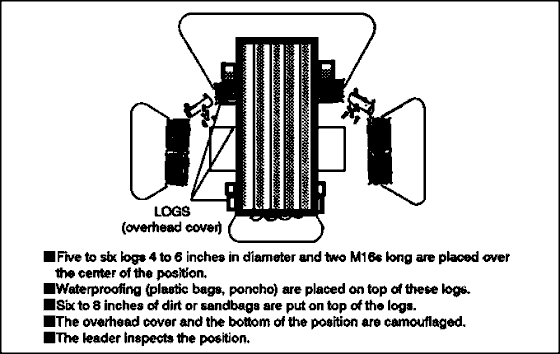
(4) STAGE 4. The overhead cover is prepared (Figure 2-46). Camouflage should blend in with surrounding terrain. At a distance of 35 meters, the position should not be detectable.
Figure 2-45. Stage 3, Preparations of a Fighting Position.
Figure 2-46. Stage 4, Preparations of a Fighting Position.
d. Types of Fighting Positions. There are many different types of fighting positions. The number of personnel, types of weapons, the time available, and the terrain are the main factors that dictate the type of position.
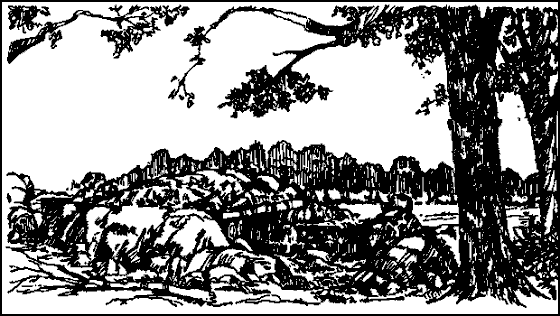
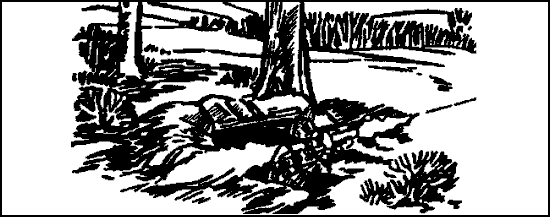
(1) Hasty Fighting Position. Soldiers prepare this type of position when there is little or no time to prepare fighting positions (Figure 2-47). They locate it behind whatever is available. It should give frontal protection from direct fire while allowing fire to the front and oblique. A hasty position may consist simply of a rucksack placed beside a tree or large rock. For protection from indirect fire, a hasty fighting position should be in a small depression or hole at least 18 inches deep. The term "hasty position" does not mean there is no digging. Even if there are only a few minutes, a prone shelter can be scraped out or dug to provide some protection. This type of position is well suited for ambushes or for protection of overwatching element during raids and attacks. Hasty positions can also be the first step in construction of more elaborate positions.
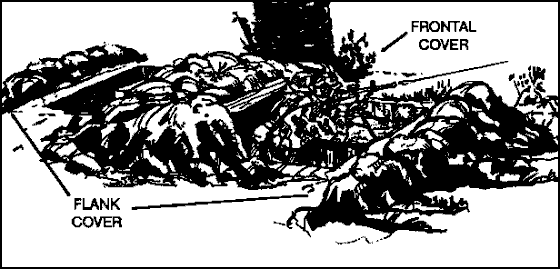
(2) One-Soldier Fighting Position. This type of position allows choices in the use of cover; the hole only needs to be large enough for one soldier and his gear. It does not have the security of a two-soldier position. The one-soldier fighting position must allow a soldier to fire to the front or to the oblique from behind frontal cover. (Figure 2-48.)
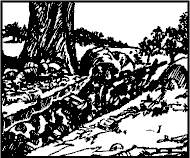
Figure 2-47. Hasty Fighting Position. |
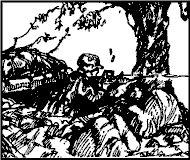
Figure 2-48. One-Soldier Fighting Position. |
(3) Two-Soldier Fighting Position. A two-soldier fighting position can be prepared in close terrain. It can be used where grazing fire and mutual support extend no farther than to an adjacent position. It can be used to cover dead space just in front of the position. One or both ends of the hole are extended around the sides of the frontal cover. Changing a hole this way lets both soldiers see better and have greater sectors of fire to the front. Also, during rest or eating periods, one soldier can watch the entire sector while the other sleeps or eats. If they receive fire from their front, they can move back to gain the protection of the frontal cover. By moving about one meter, the soldiers can continue to find and hit targets to the front during lulls in enemy fire. This type of position requires more digging and is harder to camouflage. It is also a better target for enemy hand grenades (Figure 2-49.)
Figure 2-49. Two-Soldier Fighting Position.
(4) Three-Soldier Fighting Position. A three-soldier position has several advantages over the other types of positions. There is a leader in each position, which makes command and control easier. It supports continuous, secure operations better than other positions. One soldier can provide security; one can do priority work; and one can rest, eat, or perform maintenance. This allows the priority of work to be completed more quickly than in a one-soldier or two-soldier position. It allows the platoon to maintain combat power and security without either shifting personnel or leaving positions unmanned. It provides 360-degree observation and fire. It is more difficult for the enemy to destroy this type position. To do so, the enemy must kill or suppress three soldiers.
(a) When using three-soldier positions the leader must consider the distance between positions and the size of the squad's sector . The choice depends mainly on visibility and fields of fire.
(b) The squad leader will be in a fighting position that will most likely be engaged during the battle, and not be able to exert personal control over the other two positions. The squad leader keeps control over the battle by clearly communicating plans and intent to the squad to include control measures and fire plans; using prearranged signals like flares, whistles, or tracers; positioning key weapons in his fighting position; placing the fighting position so that it covers key or decisive terrain and the team might be able to act as a reserve.
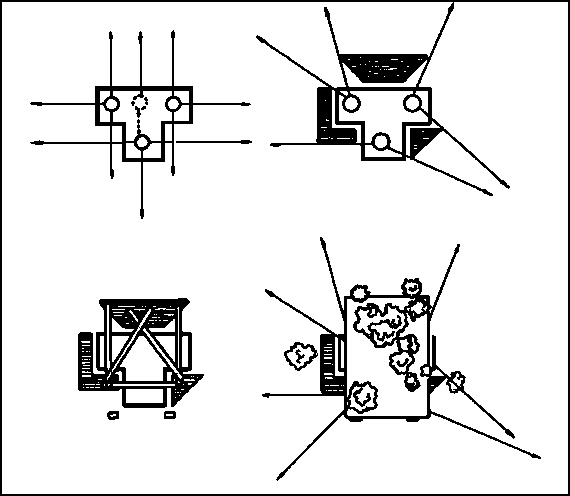
(c) The three-soldier fighting position is the T-position. This basic design can be changed by adding or deleting berms, changing the orientation of the T, or shifting the position of the third soldier to form an L instead of a T. (Figure 2-50.) The first layout of the position is oriented to fire on expected enemy avenues of approach from any direction. Berms are added based on METT-T factors. They cannot block observation or fire into assigned primary or alternate sectors. Berms should be designed to support overhead constructions. Logs of sufficient diameter (4 to 6 inches) or long pickets are used to support overhead cover for the position. They are placed a minimum of 1 foot back from the edge of the hole, or one-fourth the depth of the hole, whichever is greater. The position is completed when natural camouflage materials are added to hide the position.
Figure 2-50. Three-Soldier T-Position.
(5) Machine Gun Position. The primary sector of fire is usually to the oblique so that the gun can fire across the platoon's front. The tripod is used on the side that covers the primary sector of fire. The bipod legs are used on the side that covers the secondary sector of fire. When changing from primary to secondary sectors, the gunner moves only the machine gun. Occasionally, a sector of fire that allows firing directly to the front is assigned, but this can reduce the frontal cover for the crew when firing to the oblique. (Figure 2-51.)
(a) After the platoon leader positions the machine gun, he marks the position of the tripod legs and the limits of the sectors of fire. The crew then traces the outline of the hole and the frontal cover (if it must be improved).
Figure 2-51. Machine Gun Position.
(b) The crew digs the firing platforms first to lessen their exposure in case they have to fire before they complete the position. The platforms must not be so low that the gun cannot be traversed across its entire sector of fire. This reduces the profile of the gunner when he is firing and reduces the height of the frontal cover.
(c) After digging the firing platforms, the crew digs the hole. They first place the dirt where frontal cover is needed. They dig the hole deep enough to protect them and still let the gunner fire the gun with comfort, usually about armpit deep. When the frontal cover is high and thick enough, the crew uses the rest of the dirt to build flank and rear cover.
(d) Trench-shaped grenade sumps are dug at various points so that either soldier can kick a grenade into one if needed.
(e) In some positions, a machine gun might not have a secondary sector of fire; so, only half of the position is dug.
(f) Overhead cover for a machine gun position is built the same as for a two-soldier position.
(g) When there is a three-soldier crew for a machine gun, the ammunition bearer digs a one-soldier fighting position to the flank. From his position, the ammunition bearer can see and fire to the front and to the oblique. Usually, the ammunition bearer is on the same side as the FPL or PDF. This allows him to see and fire his rifle into the machine gun's secondary sector, and to see the gunner and assistant gunner. The ammunition bearer's position is connected to the gun position by a crawl trench.
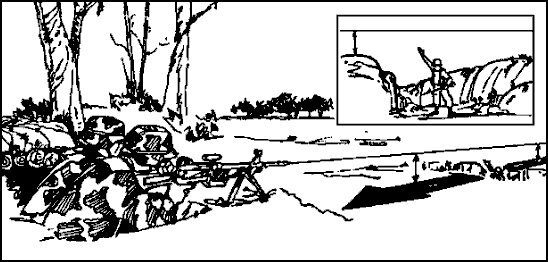
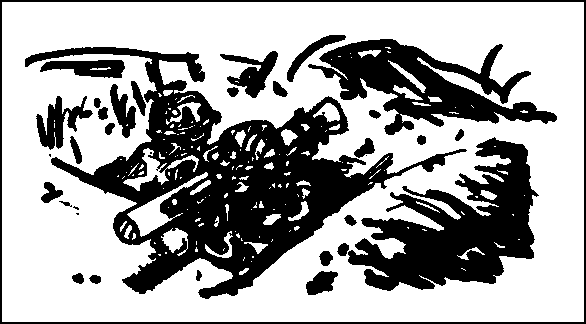
(6) Dragon Position. The Dragon can be employed from hasty or completed positions. However, some changes are required. (Figure 2-52.)
Figure 2-52. Dragon Position.
DRAGON BACKBLAST AND MUZZLE BLAST MUST BE CONSIDERED TO AVOID INJURING PERSONNEL. WHEN A DRAGON IS FIRED FROM A COMPLETED POSITION, THE MUZZLE END OF THE LAUNCHER MUST EXTEND 6 INCHES BEYOND THE FRONT OF THE HOLE. THE REAR OF THE LAUNCHER MUST EXTEND OUT OVER THE REAR OF THE HOLE. |
(a) As the missile leaves the launcher, the stabilizing fins unfold. During firing, the gunner must keep the the weapon at least 6 inches above the ground to allow room for the fins. The hole is only waist deep to allow the gunner to move while tracking a target. Because of the height of the Dragon gunner above ground level, the frontal cover should be high enough to hide his head and, if possible, the backblast of the Dragon. A hole is dug in front of the position for the bipod legs.
(b) There will be times when the Dragon can be fired only in one direction. The position is adjusted to have cover and concealment from all other directions.
(c) When the Dragon is fired in only one direction, it should be to the oblique. This protects the position from frontal fire and allows engagement of the target from the flank. Both ends of the launcher must extend out over the edges of the hole.
(d) Overhead cover must be built on the flanks. Cover must be large enough for the gunner, the tracker, and the missiles. Overhead cover that allows fire from underneath it can be built if the backblast area is clear. However, overhead cover must be well camouflaged.
(e) Selecting and preparing alternate positions for a Dragon have a high priority since the Dragon is an important weapon and is easy to detect. When preparing an alternate position, a covered route to it should be selected and improved so the gunner can move to it under fire.
(7) 90-mm Recoilless Antiarmor Weapon System Position (Rifle and Ranger). Positions for the 90-mm RCLR and the 84-mm RAAWS are built like Dragon positions, except they are larger. Since two soldiers are needed to operate the weapons, the hole must be slightly longer if the gunner must fire to the right side of the frontal cover. The assistant gunner can then work from the right side of the weapon(Figure 2-53). (Alternate positions, similar to the Dragon may be prepared.)
WHEN THE LAW, AT4, 90-mm RCLR, OR FLASH IS USED FROM AN INFANTRY FIGHTING POSITION, CARE MUST BE TAKEN TO ENSURE THAT NO INJURIES RESULT. SOLDIERS MUST BE CLEAR OF THE BACKBLAST AREA. NO OTHER FIGHTING POSITIONS ARE LOCATED IN THE BACKBLAST AREA. THE GUNNER MUST ENSURE THERE IS NOTHING(WALLS, TREES, OR OTHER OBJECTS) TO THE REAR OF THE WEAPON TO DEFLECT THE BACKBLAST. |
Figure 2-53. RAAWS Position.
(8) Light Antitank Weapon AT4 and Flash Positions. The AT4, and the Flash can be fired from infantry fighting positions. If the AT4, or Flash is to be fired from a two-soldier position, the gunner must ensure that the other soldier is not in the backblast area. The front edge of a fighting position is a good elbow rest to help the gunner steady the weapon and to gain accuracy. The AT4 or Flash gunner leans against the front or side wall of the hole for greater stability when firing(Figure 2-54). When firing the AT4, the gunner leans against the rear wall--his elbows are not supported.
Figure 2-54. Light Antitank Weapon AT4 Position.
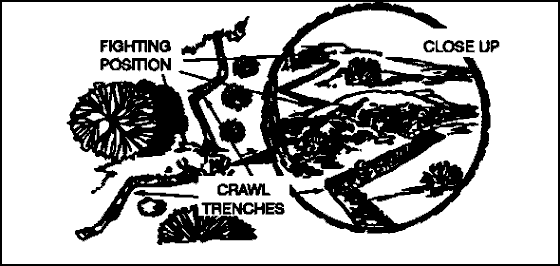
(9) Trenches. When there is time and help, trenches should be dug to connect fighting positions so soldiers can move by covered routes. The depth of a trench depends on the type of help and equipment available. Without engineer help, crawl trenches (about 3 feet deep by 2 feet wide) are usually dug. The trench should zigzag so the enemy will not be able to fire down a long section of it (Figure 2-55).
Figure 2-55. Trenches.
GO TO:
Table of Contents


